

Hello, thank you for visiting Theresa’s Treasures. I am Theresa, an Independent Stampin’ Up! Demonstrator in Arizona, USA. I am extremely excited to be participating in Kylie Bertucci’s International Blog Highlight Gallery with my Wildlife Wonder Thank You card. Today I am hopping along with Stampin’ Up! demonstrators from around the world! Please be sure to see all of the creative inspiration by visiting everyone’s blog.
The theme for this Gallery is “Thank You”.
We often forget those simple words “Thank you”. However, it is so very important to show appreciation to the people in your life who have helped you, supported you or inspired you. One way to express gratitude is to send a handmade thank you card. Discover the joy in making and sending a handmade card!

This Wildlife Wonder Thank You Card also showcases the Earthen Elegance and Fresh as a Daisy Designer Series Paper, and the Grassy Grove stamp set.
Current Host Code: DRT4WHEV
Measurements
- Boho Blue cardstock card base: 5 1/2″ x 8 1/2″ scored at 4 1/4″
- Fresh as a Daisy Designer Series Paper, blue “cloudy sky” design: 4 1/8″ x 5 3/8″
- Earthen Elegance Designer Series Paper: 2 1/2″ x 4 1/8″
- Pebbled Path cardstock: 1 1/4″ x 3″
- Basic White cardstock: 1 1/4″ x 3″ and 4″ x 5 1/4″ (inside)

Supplies
- Wildlife Wonder stamp
- Grassy Grove stamp
- Deckled Rectangle Dies
- Ink: Pebbled Path, Copper Clay and Boho Blue
- Watercolor Pencils Assortment 1
- Blending Brush
- Clear Emboss Powder
- Heat Tool
- 2023-2025 In Color Dots

Instructions
- Fold the Boho Blue card base and use the Bone Folder to make a crisp fold. Set aside.
- Take out the two pieces of Basic White cardstock. Start with the smaller piece. Use Pebbled Path Ink to stamp the wolf onto the paper.
- Color the rock under the wolf with the Pecan Pie Watercolor Pencil using a very light pressure. Then color the wolf with the Basic Gray Watercolor Pencil. Add some Blue Watercolor Pencil to the background. Finish up with a light layer of Early Espresso Watercolor Pencil under the rock.


- Use a Deckled Rectangle to diecut the edges. Set aside.
- For the inside card piece, use the Blending Brush and Boho Blue Ink to create a light blue background.
- Use the images from the Grassy Grove stamp and the Pebbled Path Ink to stamp a scene onto the inside card piece.


- Use a second Blending Brush and the Copper Clay Ink to add some color to the hill.
- Stamp the sentiment ” For All The Great Things You Do” just over the hill in Pebbled Path Ink.
- Adhere the inside card piece to the inside of the Boho Blue card base.
- Now stamp the sentiment “A Note Of Thanks” onto the Fresh as a Daisy Designer Series Paper. Immediately cover the ink with the Clear Emboss Powder. Tap off excess. Heat set.
- Adhere to the front of the Boho Blue card base.
- Use the Deckled Rectangle to cut the longest edges of the Earthen Elegance card piece. Adhere to the Fresh as a Daisy card piece.
- Adhere the wolf card piece to the Pebble Path cardstock. Then use Stampin’ Dimensionals to adhere it to the card front.
- Embellish with the 2023-2025 In Color Dots.

Voila!
I hope you enjoyed my card today using the Wildlife Wonder and Grassy Grove stamp set along with some awesome Designer Series Paper!
Visit my Online Store to order what you need to make this card for yourself. Photographic supply list is at the end of this blog.
Current Host Code: DRT4WHEV

You are currently at Theresa McEntee-Theresa’s Treasures-USA. When you click on the Vote For Me button above you will see the gallery of creative inspiration from Demonstrators around the world! Remember to visit everyone’s blog by clicking on the photo of their card in the Gallery.
To vote for your favorite cards, click on the small heart in the upper right-hand corner of each photo. You have 5 votes! Enjoy and come visit Theresa’s Treasures again soon!
Thanks again for stopping by! Have a most wonderful and crafty day!
Theresa
Clickable Supply List
Product List  |  | |||
 |  |  |  | |
 | ") | |||
 |
")
")


 Designer Series Paper")
 Designer Series Paper")
Promotions
New Kit added to the Kit Collection!!


This kit includes:
- Supplies to create 8 cards—4 each of 2 designs
- 8 coordinating envelopes
- Boho Beach photopolymer stamp set
- One Pecan Pie Ink Spot
- Printed card bases, printed die cuts, adhesive, embellishments, and a clear block
- Finished card size: 5-1/2″ x 4-1/4″ (14 x 10.8 cm)
- Coordinating colors: Crumb Cake, Lost Lagoon, Pecan Pie, Pool Party, Wild Wheat
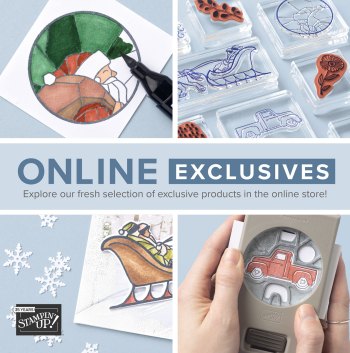
New Online Exclusives!
Being a Stampin’ Up! demonstrator means enjoying fun perks like preordering products before they’re available to customers! For Online Exclusives, a demonstrator can preorder any product listed on the Online Exclusives flyer! A larger selection of new, exclusive products will be available to demonstrators and customers during the customer sales period.
Demonstrator Preorder: 1 June–5 July 2023
Customer Sales Period Begins: 6 July 2023
Paper Pumpkin Monthly Kit

Bonus Days!!

BONUS DAYS ARE BACK!
Because do you know what’s a great deal? Getting rewarded for all the crafting supplies you’re already going to buy!
When you shop between July 6-31 and spend $50 USD | $60 CAD you will earn a $5 USD | $6 CAD coupon! Make sure you save all your coupons because you can redeem them (and we mean ALL of them) between August 1–31 .
There’s no limit to how many coupons you can earn!


")


 Designer Series Paper")


")


")
")

")


 Designer Series Paper")


 Crinkled Seam Binding Ribbon")


")


 Specialty Designer Series Paper")


")


 Specialty Designer Series Paper")


 Seam Binding Ribbon")


")


")


 Designer Series Paper")
 Crinkled Seam Binding Ribbon")


")


 Designer Series Paper")

