Posted in 2023-2024 Stampin' Up! Annual Catalog, Love/Affection

Cheerful Daisies Friendship Card for the Inspirations in Ink June 2023 Blog Hop

Today I have an awesome Cheerful Daisies Friendship Card!

Welcome and thanks for visiting Theresa’s Treasures Paper Crafts! I am Theresa and I am a Stampin’ Up! Demonstrator in Arizona, USA. Today is the monthly Inspirations in Ink Blog Hop! I am excited to be hopping with talented demonstrators from around the world. Be sure to check out everyone’s projects using the Cheerful Daisies Bundle. The Cheerful Daisies Bundle is in the Stampin’ Up! 2023-24 Annual Catalog. You may order from my Online Store HERE.

Measurements

  • Thick Basic White cardstock card base: 4 1/4″ x 11″ scored at 5 1/2″ (10.5cm x 29.7cm scored at 14.85cm)
  • Petal Pink cardstock: 4 1/4″ x 5 1/2″ (11cm x 14.5cm) for diecutting the largest Scalloped Contours Die
  • Basic White cardstock: 3 1/2″ x 4 3/4″ (9cm x 12cm) for diecutting the next smaller Scalloped Contours Die
  • Basic White cardstock: 4″ x 5 1/4″ (9.8cm x 14.2cm) Inside
  • Petal Pink cardstock: 3 1/4″ x 4″ (8.2cm x 12cm) for diecutting the 3rd layer of the daisies
  • Crushed Curry cardstock: 3 1/4″ x 4″ (8.2cm x 12cm) for diecutting the 2nd layer of the daisies
  • Lemon Lolly cardstock: 3 1/4″ x 4″ (8.2cm x 12cm) for diecutting the base layer of the daisies
  • Early Espresso cardstock: 1″ x 1 1/2″ (2.5cm x 3.8cm) for diecutting the center of the daisies
  • Garden Green cardstock: 3″ x 5″ (7.5cm x 12.5cm) for diecutting the leaves

Supplies

  • Cheerful Daisies stamp set and die Bundle
  • Scalloped Contours Dies
  • Ink: Early Espresso, Garden Green, Crushed Curry, Lemon Lolly and Petal Pink
  • Iridescent Rhinestone Basic Jewels
  • Adhesives: Multipurpose Liquid Glue and Stampin’ Dimensionals

Instructions

  1. Die cut all of the pieces as outlined above.
  2. Fold the Thick Basic White card base and set aside.
  3. Stamp with the small daisy outline stamp 3 times in the lower right hand corner of the 4″ x 5 1/4″ Basic White cardstock for the inside. Use the Early Espresso Ink. Then stamp the small daisy solid stamp to fill in the outline. Stamp one with Crushed Curry Ink, one with Petal Pink Ink and one with Lemon Lolly Ink. lastly, Stamp Off once using the small leaf stamp and Garden Green Ink to add the leaves.
  1. Adhere the completed inside card piece to the inside of the Thick Basic White card base. Set aside.
  2. Use Early Espresso Ink and the sentiment stamp “Your Friendship Means Everything” to stamp in the upper left-hand corner of the Basic White cardstock Scalloped Contours diecut.
  3. Use the Multipurpose Liquid Glue to adhere the layers of each of the daisies together. Adhere the Early Espresso cardstock flower centers.
  4. Arrange the Garden Green cardstock leaves and stem on the Basic White Scalloped Contours diecut. Position the flowers and see how you like the arrangement. Use Multipurpose Liquid Glue to adhere the stem and leaves. Then use Stampin’ Dimensionals to adhere the daisies.
  5. Adhere the completed Basic White Scalloped Contour diecut onto the Petal Pink Scalloped Contours diecut using Stampin’ Dimensionals.
  6. Use the Multipurpose Liquid Glue to adhere the Petal Pink Scalloped Contours diecut to the front of the Thick Basic White card base.
  7. Add as many of the Iridescent Rhinestone Basic Jewels as you wish!

Voila!

Thank you so much for visiting today! Please visit all the blogs in the Inspirations In Ink Blog Hop. You will be amazed and inspired by all the fun and creative projects made by the Inspirations In Ink demonstrators. 

You are currently visiting Theresa McEntee-USA creator of Theresa’s Treasures Paper Crafts.

Blog Line Up

Deirdre Croal – USA

Julie Golding-Page – Canada

Karen Beck – Canada 

Theresa McEntee – USA

Rebecca Nutley – Australia

Robbie Rubala – USA 

Christy Gridley – USA  

Have a most wonderful and creative day!

Theresa

Would you like the start getting a discount on quality Stampin’ Up! supplies? Join my Stamping Gems Team today! And if you have a long wish list, you can join to get $155 UDS in product for $99 USD! This is the best deal in the whole catalog! Click HERE to order your starter kit!

This special ends June 30, 2023! Join and order now to be able to get what you want!

Thinking of adding creativity to your life? Try a monthly paper crafting kit! The Paper Pumpkin Monthly Subscription delivers a kit with everything you need to make a project-right to your door! Sign up for a Pre-paid Paper Pumpkin Subscription HERE.

Ciao!

Posted in 2023-2024 Stampin' Up! Annual Catalog, 3D Embossing Folder, Gratitude/ Thanks, Online Exclusives

Kylie & Bruno Bertucci’s Demonstrator Training Program Blog Hop-June 2023- Biggest Wish Thank You Card

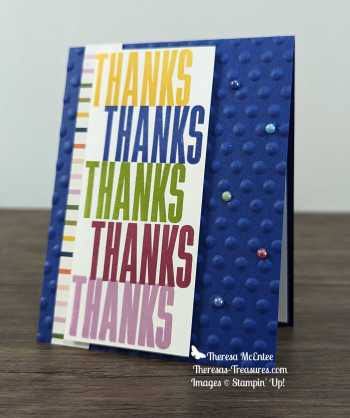
This Biggest Wish Thank You card is quick and simple to make!

Hello! Welcome to Kylie & Bruno Bertucci’s Demonstrator Training Blog Hop for June 2023. I’m Theresa with Theresa’s Treasures Paper Crafts. I have a quick and simple Biggest Wish Thank You card for you today! I am so glad you are joining me!

We are a group of Stampin’ Up! Demonstrators from around the world. We are taking part in this awesome training program to help us build a successful Stampin’ Up! business. My goal is to participate in the monthly Blog Hop to be more consistent with posting a blog.

Also, this blog hop is full of ideas and creative inspiration! Be sure to visit everyone’s blog by clicking on the links at the end of my blog.

Measurements

  • Starry Sky cardstock card base: 4 1/4″ x 11″ scored at 5 1/2″
  • Basic White card stock: 4″ x 5 1/4″ and 2 1/4″ x 5 1/8″
  • Delightfully Eclectic Designer Series Paper (DSP): 3/4″ x 5 1/2″ and 1/2″ x 5 1/4″- On Sale Now! See below

Supplies

Instructions

  1. Start by stamping the “THANKS” sentiment onto the top left of the 2 1/4″ x 5 1/8″ Basic White cardstock with Daffodil Delight Ink.
  2. Next stamp in Fresh Freesia Ink on the bottom left.
  3. Shift to the right and stamp in Starry Sky Ink just under the Daffodil Delight “THANKS”.
  4. Stamp on the center left in Granny Apple Green Ink.
  5. Finish up the stamping with the Berry Burst Ink shifted to the right.
  6. Run the Starry Sky card base through the Stampin’ Cut & Emboss Machine using the dot pattern of the Basics 3D Embossing Folders so that the front panel is embossed.
  7. Adhere the 1/2″ x 5 1/4″ strip of the Delightfully Eclectic DSP (rainbow stripe pattern on the back of the pretzel pattern) on the left side of the 4″ x 5 1/4″ Basic White cardstock. Leave a 1/4″ space from the left edge.
  8. Now adhere this card piece to the inside of the Starry Sky card base.
  1. Next adhere the 3/4″ x 5 1/2″ DSP strip to the left side of the front panel. Leave 1/4″ space from the left edge.
  2. Use Stampin’ Dimensionals to attach the sentiment panel to the card front.
  3. Add Bling! with the In Color Pearls.

Voila!

Remember to visit everyone’s blog. You will see creative inspiration from Demonstrators around the world! You are currently at Theresa McEntee-Theresa’s Treasures-USA. Enjoy!

I appreciate your visit to my blog today. Remember to sign up for my Theresa’s Treasures Paper Crafts Newsletter. You can click on the “Subscribe to my Newsletter” tab. Please subscribe to my blog as well. If you need any assistance with placing an order, let me know in the comments., or email me at theresastreasures.az@gmail.com. Thanks!

Have a most wonderful day! Happy crafting!

Theresa

Promotions

Designer Series Paper Sale!

Stock up on this gorgeous Designer Series Paper now! Order HERE!

Paper Pumpkin Monthly Craft Kit


Say hello to summer and get crafting under the sun with this month’s kit! With beach designs, fun accordion-fold cards, along with sentiments to support, encourage, say hello, and more, wave at those you love through uplifting cards and send family and friends oceans of kind words all summer long!

Paper Pumpkin Kits contain all you need to make the project. The Fun in the Sun kit will contain supplies for 9 accordion fun fold cards! Try it out for one month! Subscribe HERE now!

Joining Special to Join my Stamping Gems Team!!

It’s a fabulous time to join Stampin’ Up! New team members will get even more FREE products in their customizable Starter Kit. Between 1–30 June, those who sign up can get $125 USD | $165 CAD $155 USD | $206 CAD worth of products for only $99 USD | $135 CAD + free business supplies + free shipping + all the fun being a part of Stampin’ Up! Use the resources provided below to spread the word before time runs out!   Join HERE today!

New Online Exclusives!

Demonstrator Preorder: 1 June–5 July 2023

Customer Sales Period Begins: 6 July 2023

Some of the Current Online Exclusives Include:

Check out the current Online Exclusives HERE!

Supply List

Product List
Posted in 2023-2024 Stampin' Up! Annual Catalog, 3D Embossing Folder, Gratitude/ Thanks, Nature, Outdoors, Stampin" Blends Alcohol Markers

Kylie’s International Blog Highlights Gallery-June 2023: Night of Flight Thank You Card

Hello, thank you for visiting Theresa’s Treasures! I am Theresa, an Independent Stampin’ Up! Demonstrator in Arizona, USA. I am extremely excited to be participating in Kylie Bertucci’s International Blog Highlight Gallery with my Night of Flight Thank You card! Today I am hopping along with Stampin’ Up! demonstrators from around the world! Please be sure to see all of the creative inspiration by visiting everyone’s blog. You can view the Gallery by clicking on the Vote Button below.

The theme for this Gallery is “Thank You“.

We often forget those simple words “Thank you”. However, it is so very important to show appreciation to the people in your life who have helped you, supported you or inspired you. One way to express gratitude is to send a handmade thank you card. Discover the joy in making and sending a handmade card!

This Night of Flight Thank You Card showcases the Host Set, Night of Flight, available for purchase at a discount when you have a qualifying order in my Online Store HERE.

Current Host Code: S7F7S9EK

Measurements

  • Mossy Meadow cardstock card base: 5 1/2″ x 8 1/2″
  • Mossy Meadow cardstock: 3″ x 4″ for diecutting the leaves
  • Copper Clay cardstock: 4″ x 5 1/4″
  • Very Vanilla cardstock: 4″x 5 1/4″
  • Basic White cardstock: 2 1/2″ x 5″ for stamping the moth
  • Crumb Cake cardstock: 1 3/4″ x 2″ for the sign

Supplies

  • Night of Flight stamp set
  • Timeless Arrangements stamp set (for the sentiment)
  • Exposed Brick 3D Embossing Folder
  • Timber 3D Embossing Folder
  • Cheerful Daisies Dies
  • Ink: Memento, Azure Afternoon and Copper Clay
  • Basic Black Stampin’ Write Marker
  • Stampin’ Blends Alcohol Markers: Copper Clay, Azure Afternoon, Basic Black and the lighter of the Medium Deep Natural Tones (SU800)
  • Paper Snips
  • Wink of Stella
  • Stampin’ Dimensionals
  • Stampin’ Cut & Emboss Machine

I was interested in a blue moth and found several awesome photos on Google. I combined elements of the 2 moths above to create the moth on the Night of Flight Thank You card.

Instructions

  • Stamp the large moth in Memento Ink onto the Basic White cardstock.
  • Stamp the inside of the wings in Azure Afternoon ink.
  • Use the Basic Black Stampin’ Write Marker to draw the “eyes” on the wings.
  • Use the Stampin’ Blends to color the wings.
  • Fussy cut the moth with the Paper Snips. Use the bone folder to slightly curve the wings and set aside.
  • Use the Exposed Brick 3D Embossing Folder to emboss the Copper Clay cardstock.
  • Lightly drag the Copper Clay Ink Pad over the embossed Copper Clay cardstock with the raised side up. This adds dimension to the brick wall.
  • Cut the Crumb Cake cardstock into 3/4″ x 2″ and 1″ x 2″ strips.
  • Use the Copper Clay Ink to stamp the sentiment “thanks” onto the 3/4″ x 2″ strip.
  • Place the 3 Crumb Cake cardstock strips in the Timber 3D Embossing Folder and run through the Stampin’ Cut & Emboss Machine.
  • Cut the 1″ x 2″ embossed Crumb Cake cardstock strip into a
    1″ x 1 1/2″ piece. Then cut in half so you get two 1/2″ x 1 1/2″ pieces to use for the posts of the sign.
  • Die cut 3 leaves with the Cheerful Daisies Dies from the 3″ x 4″ Mossy Meadow cardstock.
  • Adhere the Very Vanilla cardstock to the inside of the Mossy Meadow card base.
  • Now adhere the embossed Copper Clay cardstock to the front of the card base.
  • Use Stampin’ Dimensionals to adhere the moth.
  • Glue the sign posts to the Thanks sign and adhere to the card front.
  • Add the Mossy Meadow cardstock diecut leaves.

  • For some extra sparkle, brush on the Wink of Stella to the moth’s wings.

Voila!

I hope you enjoyed my card today using the Night of Flight Host Set.

Visit my Online Store to order what you need to make this card for yourself. Photographic supply list is at the end of this blog.

Current Host Code: S7F7S9EK

You are currently at Theresa McEntee-Theresa’s Treasures-USA. When you click on the Vote For Me button above you will see the gallery of creative inspiration from Demonstrators around the world! Remember to visit everyone’s blog by clicking on the photo of their card in the Gallery.

To vote for your favorite cards, click on the small heart in the upper right-hand corner of each photo. You have 5 votes! Enjoy and come visit Theresa’s Treasures again soon!

Clickable Supply List

Product List
Paper Snips
[103579]
$11.00

Thanks again for stopping by! Have a most wonderful and crafty day!

Theresa

Promotions

Designer Series Paper Sale June 1 to June 30, 2023!

Shop HERE now!

Joining Special to Join my Stamping Gems Team!!

It’s a fabulous time to join Stampin’ Up! New team members will get even more FREE products in their customizable Starter Kit. Between 1–30 June, those who sign up can get $125 USD | $165 CAD $155 USD | $206 CAD worth of products for only $99 USD | $135 CAD + free business supplies + free shipping + all the fun being a part of Stampin’ Up!

Join my Stamping Gems Team HERE!

New Online Exclusives!

Being a Stampin’ Up! demonstrator means enjoying fun perks like preordering products before they’re available to customers! For Online Exclusives, a demonstrator can preorder any product listed on the Online Exclusives flyer! A larger selection of new, exclusive products will be available to demonstrators and customers during the customer sales period.

Demonstrator Preorder: 1 June–5 July 2023

Customer Sales Period Begins: 6 July 2023

Subscribe to the most wonderful monthly paper craft kit HERE! You will receive a complete kit for the project each month. Each kit includes a mini ink pad! Collect all the Stampin’ Up! ink colors! Sign up before June 10, 2023 to receive the Welcome Inn kit!