Posted in 2024 Stampin' Up! January to April Mini Catalog, Birds, Fun/Fancy fold card, Inspiration in Ink Blog Hop, Nature, Sale-a-Bration 2024

Thoughtful Expressions Watercolor Card for the Inspirations in Ink February 2024 Blog Hop

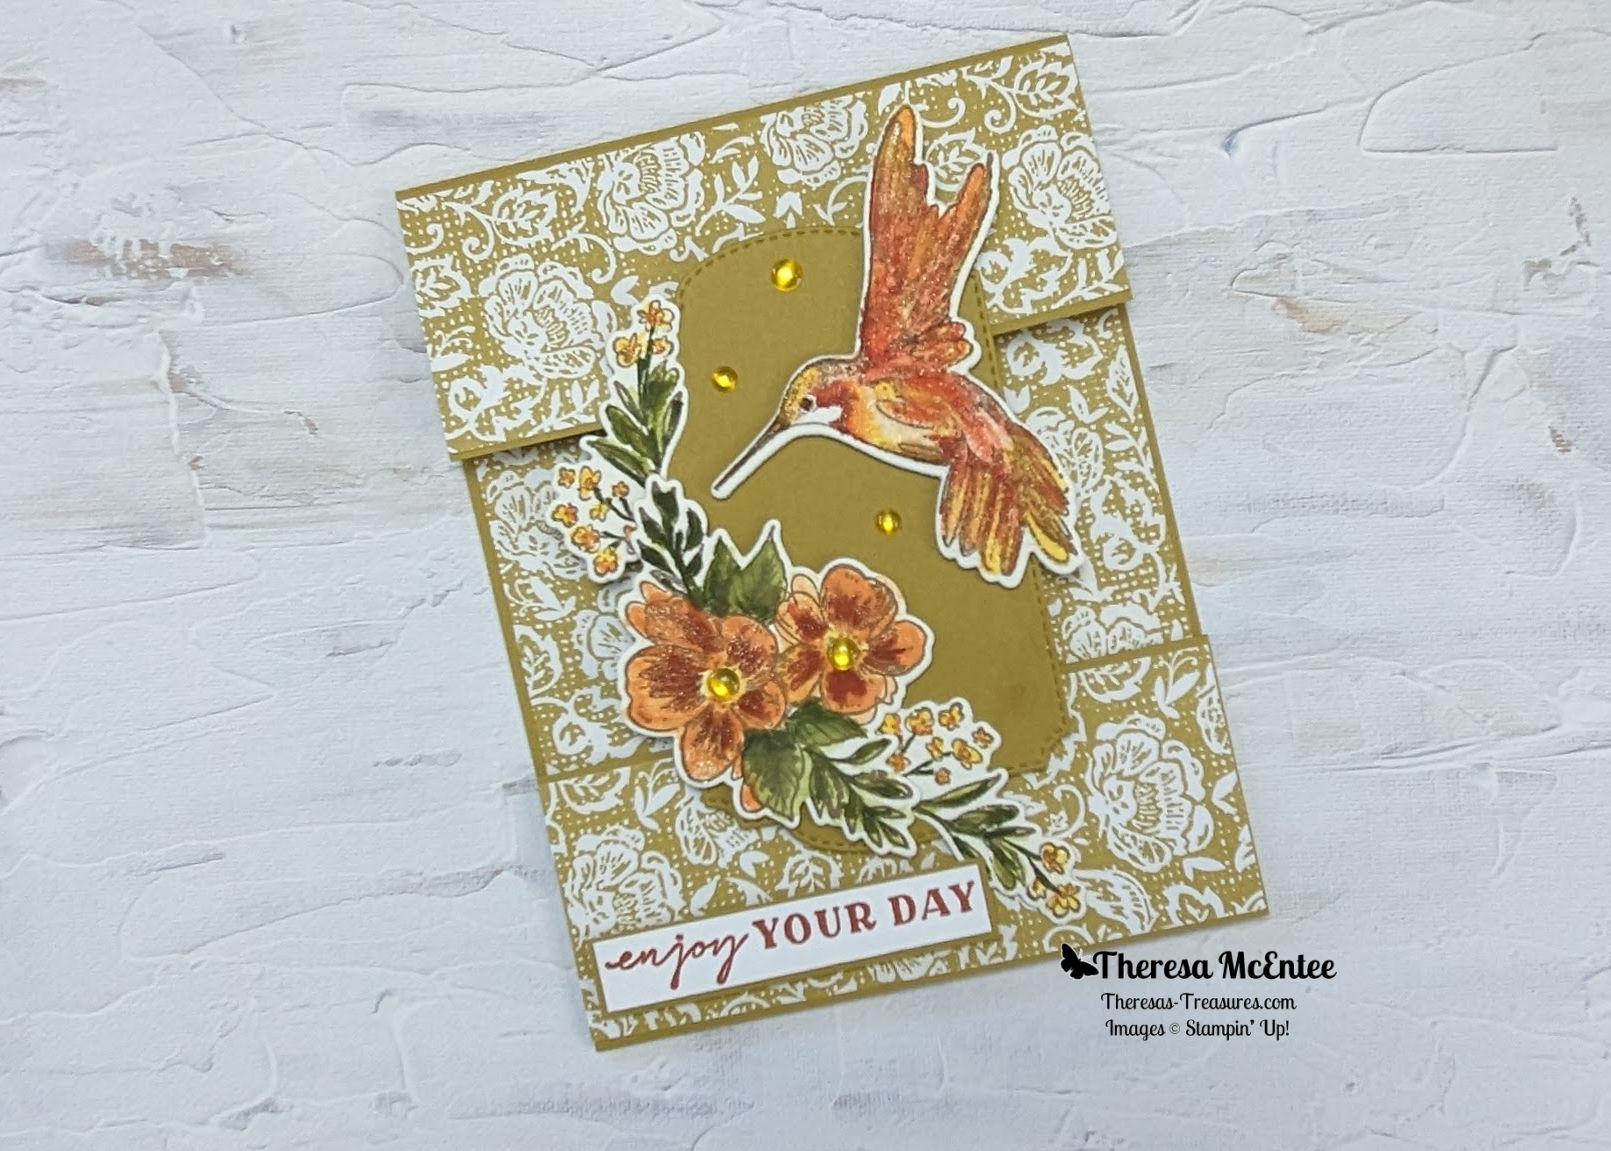
Welcome! Thank you for visiting Theresa’s Treasures Paper Crafts to see my Thoughtful Expressions Watercolor Card! I am Theresa, a Stampin’ Up! Demonstrator in Arizona, USA. Today is the monthly Inspirations in Ink Blog Hop! I am excited to be hopping with talented demonstrators from around the world. Be sure to check out everyone’s Thoughtful Expressions Bundle projects. The Thoughtful Expressions Bundle is in the 2024 January to April Mini Catalog. If you want your own, order before February 29,2024 so you can get Sale-a-bration Rewards! You may order from my Online Store HERE.

Why did I make this Thoughtful Expressions Watercolor Card? I am interested in learning to watercolor. The Stampin’ Up!® Inks are so vivid and work very well. I have been using a Nylon Round 1 paintbrush. If you would like to try watercoloring, there is a lot of trial and error. Don’t be afraid to try. There are many happy accidents that turn out well!

Measurements

  • Wild Wheat cardstock card base: 4 1/4″ x 11″ scored 5 1/2″
  • Wild Wheat cardstock: 2 3/4″ x 6″ (to die cut the center panel and inside panel), and 5/8″ x 2 5/8″ to put behind sentiment
  • Fluid 100 Watercolor Paper: one sheet
  • Basic White cardstock: 2 1/2″ x 3 3/4″ (to die cut inside) and
    1/2″ x 2 1/2″ for sentiment
  • Poetic Expressions 12″ x 12″ Designer Series Paper (DSP):
    4 1/8″ x 5 3/8″ and two 1 5/8″ x 4 1/4″

Supplies

  • Stamp Set: Thoughtful Expressions
  • Dies: Thoughtful Expressions
  • Ink refills: Lemon Lolly, Daffodil Delight, Wild Wheat, Pumpkin Pie, Cajun Craze, Old Olive and Mossy Meadow
  • Ink Pad: Stazon Saddle Brown
  • Embellishments: 2023-2025 In Color Dots and Wink of Stella

Instructions

  1. Fold the card base at the scoreline. Cut 1 3/4″ to the right of the scoreline. Then cut a 1 3/4″ x 4 1/4″off the piece that you cut off. This is the bottom of the card front.
  2. Die cut 2 labels from the Wild Wheat cardstock with the largest label die in the Thoughtful Expressions Dies. Set aside.
  3. Die cut the Basic White cardstock with the 2nd largest label die.
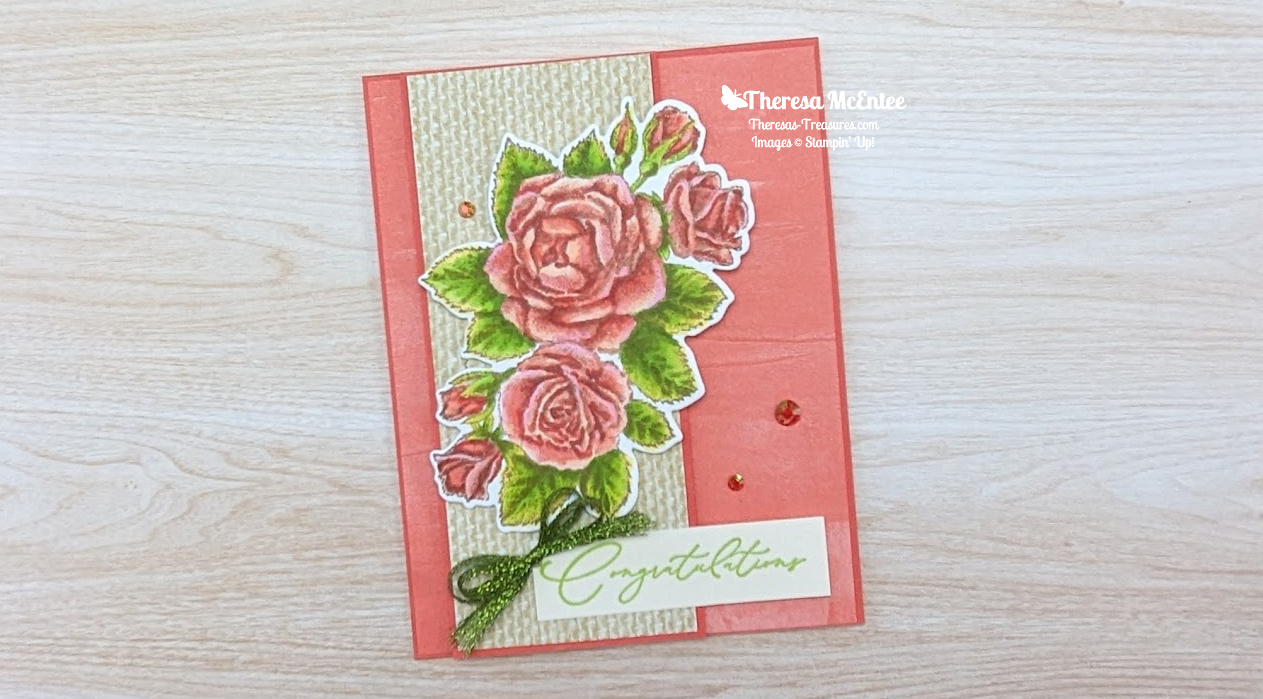
  4. Use the Stazon Saddle Brown Ink to stamp the bunch of flowers on the Basic White cardstock in the upper left and lower right corner for the inside of the card. (see photo of inside below).
  5. Adhere the stamped Basic White cardstock to one of the Wild Wheat cardstock labels.
  6. Adhere the Poetic Expressions DSP to the inside of the Wild Wheat cardstock card base. Then adhere the Basic White cardstock/Wild Wheat cardstock card piece to the center of the inside panel.
  1. Stamp the images of the hummingbird and flowers onto the Fluid 100 Watercolor Paper with the Stazon Saddle Brown Ink.
  2. Put one drop of each color onto a palette, acrylic block or the glass mat. Wet the paint brush and squeeze out the excess water.
  3. Start with the Lemon Lolly Ink and take up a small amount of ink with the paint brush and color the body of the hummingbird, the center of each of the large flowers and the small flowers in the bunch of flowers.
  4. Use the Pumpkin Pie Ink for the center of the small flowers.
  5. For the Hummingbird, use the Daffodil Delight ink, then progressively darker inks to color the wings and tail. Use a bit of Cajun Craze Ink for the base of the neck.
  6. The leaves are done in Old Olive Ink then Mossy Meadow Ink.
  7. Die cut the watercolored images.
  8. Adhere the Poetic Expressions DSP to the front flap of the Wild Wheat cardstock card base. Adhere the second piece of DSP to the 1 3/4″ x 4 1/4″ piece you cut off.
  9. Position this second piece on the bottom of the card front. Use Stampin’ Dimensionals to connect the top flap and bottom card piece together with the die cut Wild Wheat cardstock label.
  10. Glue the bunch of small flowers to the Wild Wheat cardstock label allowing space to adhere the larger flowers. Adhere the larger flowers with Stampin’ Dimensionals.
  11. Use Stampin’ Dimensionals to adhere the hummingbird.
  12. Stamp the sentiment “enjoy your day” into the strip of Basic White cs. Adhere this to the strip of Wild Wheat cardstock. Use Stampin’ Dimensionals to adhere the sentiment to the card front.
  13. Embellish with the In Color Dots in Wild Wheat and Wink of Stella.

Voila!

Thank you so much for visiting today to see my Thoughtful Expressions Watercolor Card! I hope you enjoyed my project as much as I did! Please visit all the blogs in the Inspirations In Ink Blog Hop. You will be amazed and inspired by all the fun and creative projects made by the Inspirations In Ink demonstrators. 

You are currently visiting Theresa McEntee-USA creator of Theresa’s Treasures Paper Crafts.

Blog Roll Call

Clickable Supply List

Product List
Thoughtful Expressions Bundle (English)
$55.75
Lemon Lolly Classic Stampin' Ink Refill
$5.00
Daffodil Delight Classic Stampin' Ink Refill
$5.00
Wild Wheat Classic Stampin' Ink Refill
$5.00
Pumpkin Pie Classic Stampin’ Ink Refill
$5.00
Cajun Craze Classic Stampin' Ink Refill
$5.00
Old Olive Classic Stampin' Ink Refill
$5.00
Mossy Meadow Classic Stampin' Ink Refill
$5.00
Saddle Brown Stazon Ink Pad
$10.00
Wild Wheat 8 1/2" X 11" Cardstock
$10.00
Basic White 8 1/2" X 11" Cardstock
$10.50
Fluid 100 Watercolor Paper
$9.00
2023–2025 In Color™ Dots
$8.00
Clear Wink Of Stella Glitter Brush
$8.00

Stampin’ Up Promotions

Sale-a-bration

What is Sale-a-Bration? It is a wonderful time of year for those ordering from Stampin’ Up! For every $50 USD you order, there are FREE products to choose from! Sale-a-bration starts January 4, 2024 and ends February 29, 2024. Visit my Online Store HERE

Join Now

If you’ve been thinking about becoming a Stampin’ Up! demonstrator, then there’s no better time than right now during Sale-A-Bration! Join Now by 29 February 2024 and choose between two fabulous offers:

Option 1: Get $125 worth of product PLUS our new Stampin’ Glass Mat Studio (a $60 value) for just $99!
Option 2: Get $125 worth of product PLUS an additional $30 worth of product of your choice when you join for $99. That’s a $155 value!

Join HERE today!

Monthly Paper Pumpkin Subscription

Thinking of adding creativity to your life this year? Start out by trying a monthly paper crafting kit! The Paper Pumpkin Monthly Subscription delivers a kit with everything you need to make a project-right to your door! Sign up for a Pre-paid Paper Pumpkin Subscription HERE.

Have a most wonderful and creative day!

Ciao!

Theresa

Posted in 2024 Stampin' Up! January to April Mini Catalog, Ink & Inspiration Blog Hop, Sale-a-Bration 2024, Stampin" Blends Alcohol Markers

Stippled Roses Congratulations Card for the Ink and Inspiration Blog Hop-February 2024

Hello fellow stampers! I am Theresa McEntee-author of Theresa’s Treasures Paper Crafts. I am hopping along with the Ink & Inspiration Blog Hop today with my Stippled Roses Congratulations Card for the Ink and Inspiration Blog Hop-February 2024. You can visit super awesome blogs from around the world! The list to follow the hop is at the end of my blog post. Please stop by and see everyone’s projects!

The Ink & Inspiration Challenge is both an image and a color challenge. I was inspired by the image of the roses in the center of the image. I love roses-the color, the scent, and the wonderful feeling I get when I receive them. Roses are also very nice to send to others!

Real roses can be very expensive and only live for a short time. Creating a card with roses is more managable and can last forever!

Measurements

  • Calypso Coral cardstock (cs) card base: 4 1/4″ x 11″ scored at 5 1/2″
  • Calypso Coral cs: 2 3/8″ x 5 1/2″
  • Softly Stippled Designer Series Paper (DSP):
    • Calypso Coral background: 4 1/8″ x 5 3/8″
    • Wild Wheat burlap pattern: 2 1/4″ x 5 3/8″
  • Very Vanilla cs:
    • inside: 4″ x 5 1/4″
    • sentiment: 3/4″ x 2 3/4″
    • for stamping the roses: 4″ x 5″

Supplies

  • Stamp Set: Stippled Roses
  • Dies: Stippled Roses
  • Ink: Stazon Saddle Brown and Parakeet Party Ink pads
  • Stampin’ Blends Alcohol Markers: Petal Pink, Calypso Coral, Cajun Craze, Bubble Bath, Lemon Lolly, Parakeet Party, Lemon Lime Twist & Granny Apple Green
  • Watercolor Pencils: Calypso Coral, Daffodil Delight, Pumpkin Pie & Granny Apple Green
  • Embellishments: Iridescent Pastel Gems
  • Ribbon: 1/8″ Metallic Woven Ribbon in Parakeet Party

Instructions

  1. Stamp the roses in Stazon Saddle Brown ink onto the 4″ x 5″ Very Vanilla cs.
  2. Pick out the Stampin’ Blends and Watercolor Pencils. It may take 1- 1 1/2 hours to color the roses.
  3. Start with the darkest color of alcohol ink and just color where there are already shadows.
  4. Then blend in the next lightest color. Continue to apply small amounts of ink with the markers until you have the desired look. Note: there is a Facebook Page by Alison Tilsner that you can join called Blends & Beyond. In Guide 1 there is a video she made that I followed to color the roses.

  1. After you have the Alcohol Markers down, enhance the colors with the Watercolor Pencils.
  2. Stamp the smaller rose in Stazon Saddle Brown Ink onto the inside Very Vanilla cs and color.
  3. The senntiment is stamped in Parakeet Party Ink.
  4. Assemble the card. Use Stampin’ Dimensionals for the burlap strip on the card front.

I hope you enjoyed my card. Coloring takes a lot of trial and error. If it doesn’t come out the way you like at first, try again. Enjoy the Blog Hop for more ideas with this theme!

Blog Roll Call

Have a most wonderful day!

Theresa

Order Supplies Here:

Product List
Stippled Roses Bundle (English)
$54.00
Saddle Brown Stazon Ink Pad
$10.00
Parakeet Party Classic Stampin' Pad
$9.00
Calypso Coral Stampin' Blends Combo Pack
$10.00
Petal Pink Stampin' Blends Combo Pack
$10.00
Lemon Lolly Stampin’ Blends Combo Pack
$10.00
Bubble Bath Stampin’ Blends Combo Pack
$10.00
Parakeet Party Stampin' Blends Combo Pack
$10.00
Lemon Lime Twist Stampin’ Blends Combo Pack
$10.00
Granny Apple Green Stampin' Blends Combo Pack
$10.00
Watercolor Pencils Assortment 2
$12.50
Watercolor Pencils Assortment 1
$16.00
Calypso Coral 8-1/2" X 11" Cardstock
$10.00
Softly Stippled 12" X 12" (30.5 X 30.5 Cm) Designer Series Paper
$12.50
Very Vanilla 8-1/2" X 11" Cardstock
$10.50
Iridescent Pastel Gems
$8.00
Parakeet Party 1/8" (3.2 Mm) Metallic Woven Ribbon
$9.00
Clear Wink Of Stella Glitter Brush
$8.00

Sale-a-bration

Sale-a-bration ends on Thursday February 29, 2024. The Softly Stippled 12″ x 12″ Designer Series Paper is one of the FREE products with an order of $50 USD. When you order the Stippled Roses Bundle alone you will qualify to choose the paper! Order HERE

Posted in 2024 Stampin' Up! January to April Mini Catalog, 3D Embossing Folder, Around the World on Wednesday Blog Hop, Emboss Powder, Emboss Resist Technique, Nature, Techniques

Lovely & Sweet Emboss Resist Technique for Around the World On Wednesday Blog Hop-February 2024- Technique Challenge

Hello and welcome! I am Theresa McEntee, creator of Theresa’s Treasures Paper Crafts. Today I have the pleasure of participating in the Blog Hop with Around the World on Wednesday (AWOW) organized by Angie McKenzie. I hope you like my Lovely & Sweet Emboss Resist Technique card!

On the second Wednesday of each month, the AWOW team put together a thematic hop to give you some inspiration for your own crafting. This month’s challenge is a Technique Challenge.

Happy Valentine’s Day!

“What the world needs now is love, sweet love
It’s the only thing that there’s just too little of”

My Project for today

This card was made using the Emboss Resist Technique. I love this technique because it turns out differently each time. I also love using embossing powder. It is so magical to see the emboss powder change when you heat it up!

The Lovely & Sweet stamp set is a set of sketched botanical images. I really liked the image of the almond plant so I used it for my Technique Challenge.

Instructions

Embossing

  1. Emboss the 4″ x 5 1/4″ Fluid 100 Watercolor Paper. First use the Embossing Buddy to remove the static. Stamp the image in Versamark Ink.
  2. Sprinkle the White Emboss Powder over the ink and shake off the excess.
  3. Use a small paint brush to remove any embossing powder that is not supposed to be there.
  4. Use the Heat Tool to heat the emboss powder until it magically changes. Be sure that you have heated up all the areas.
  5. Set aside to cool for 10 minutes.

The Emboss Resist Technique

  1. With a Stampin’ Spritzer spray the paper that is embossed until damp. Use a paper towel to pat off the excess water.
  2. Start with the lightest color. Using the Pool Party Ink Pad, apply ink to an E size Clear Block.
  3. Next apply Coastal Cabana Ink on the edges alsousing the ink pad.

  1. Finish by applying some Pretty Peacock Ink to parts of the edges. Use the corner of the ink pad to apply a little ink to the center.
  2. Use the Stampin’ Spritzer to spray the block until the ink begins to run together.

  1. Flip the block over and onto the embossed Fluid 100 Watercolor Paper.
  2. Apply a little pressure by placing a punch on top.
  3. Leave alone for 10 to 15 minutes.

Assembling the Card

  1. Trim the edges and mount on a 3 5/8″ x 4 5/8″ Coastal Cabana cardstock.
  2. The card base is a 4 1/4 x 11″ Pretty Peacock cardstock with the front embossed using the Fern 3D Embossing Folder.
  3. Use Stampin’ Dimensionals to adhere the stamped card piece onto the front of the card base.

  1. Here is how I did the inside. I did not use a sentiment because I wanted to keep this as an all occasion note card.
  2. Add Bling! using the Iridescent Foil Gems.

Voila!

The AWOW Team

I am so glad you have joined me today in this worldwide hug that stretches all the way from Australia to Alaska across twelve different time zones. I hope you can feel the love!

Each month this group of creative friends prepare a project for a theme. Below is an image of the whole crew and where they are from around the globe. Such a talented and wonderful group of people! You will want to visit everyone to be sure to see all the amazing projects!

We all love sharing joy with you through projects from our individual parts of the world. I hope that you will be filled with lots of inspiration!

See More Inspiring Projects

Leonie Stuart – AU

Rochelle Laird-Smith – AU

Cheryll Miller – AU

Danielle Kassing – NL

Aurélie Fabre – FR

Mikaela Titheridge – UK

Angie McKenzie – US

Kelly Taranto – US

Sharon Hashimoto Burkert – US

Chris Smith – US

Tricia Butts – US

Theresa McEntee – US

Bree Renwick – US

Cheryl Hamilton – US

Thank you so much for visiting today. I hope you enjoyed learning more about our projects. Have a most wonderful day!

Theresa

Product List
Lovely & Sweet Cling Stamp Set (English)
$26.00
Versamark Pad
$9.50
Pool Party Classic Stampin' Pad
$9.00
Coastal Cabana Classic Stampin' Pad
$9.00
Pretty Peacock Classic Stampin’ Pad
$9.00
Fluid 100 Watercolor Paper
$9.00
Coastal Cabana 8-1/2" X 11" Cardstock
$10.00
Pretty Peacock 8-1/2" X 11" Cardstock
$10.00
Iridescent Foil Gems
$8.00
Stampin' Spritzer
$4.00
Basics Embossing Powders
$18.00
Embossing Additions Tool Kit
$27.00
Heat Tool (Us And Canada)
$31.00
Clear Block E
$13.00
Clear Block H
$9.50
Fern 3 D Embossing Folder
$10.00
Stampin' Dimensionals
$4.25
Posted in 2024 Stampin' Up! January to April Mini Catalog, Birds, Gratitude/ Thanks, Nature, Sale-a-Bration 2024, Training Group Blog Hop by Kylie & Bruno Bertucci

Everyday Details Thank You Card for Bruno & Kylie Bertucci’s Demonstrator Training Group Blog Hop-February 2024

Hello! Welcome to Kylie & Bruno Bertucci’s Free Demonstrator Training Group Blog Hop for February 2024. I am Theresa with Theresa’s Treasures Paper Crafts and I have an Everyday Details Thank You card for you today. I am so glad you are joining me!

We are a group of Stampin’ Up! Demonstrators from around the world. We are members of this free training group to help us build a successful Stampin’ Up! business. My goal this year is to continue to participate in the monthly Blog Hop to show you the card I will send my customers as a thank you for ordering from me. I hope they will enjoy this Everyday Details Thank You Card!

This blog hop is full of ideas and creative inspiration! Be sure to visit everyone’s blog by clicking on the links at the end of my blog. Please leave some comments so we know how we are doing.

The beautiful images of nature in the Everyday Details stamp set inspired me to make the Everyday Details Thank You Card. Also, I love to color!

I was also excited to play with the dies in the Everyday Details Dies set because there are so many circles and rectangles to try out. The different arrangement of the circles on the Everyday Details Thank You Card made this a fun card to make.

Measurements

  • Boho Blue card stock (cs): 4 1/4″ x 11″ scored at 5 1/2″
  • Very Vanilla cs: 3 3/4″ x 3 3/4′ (to diecut large circle), 2 1/4″ x 2 1/4″ (to dicut sentiment circle) and 4″ x 5 1/4″ (inside)
  • Flight & Airy Designer Series Paper Sale-a-bration
    Freebie: 1/2″ x 4″(inside) and 2 2/3″ x 2 3/4″ (to diecut the birds)

Supplies

  • Stamp Set: Everyday Details
  • Dies: Everyday Details
  • Embossing Folder:Softly Sophistcated (another Sale-a-bration Freebie!)
  • Ink: Memento & Boho Blue stamp pads
  • Stampin’ Write Markers: Pecan Pie, Crumb Cake and Shaded Spruce
  • Stampin’ Watercolor Pencils: Balmy Blue, Pecan Pie & Garden Green
  • Stampin’ Blends Alcohol Markers: Boho Blue, Shaded Sprucee and Pecan Pie
  • Embellishments:2023-25 In Color Dots in Boho Blue
  • Ribbon: Line Thread & Bakers Twine Three Color Pack

Instructions

  1. Stamp the image of the bird’s nest onto the larger piece of Very Vanilla cs. Color as desired.
  2. Use the 3 1/4″ diameter circle die to diecut the nest.
  3. Use the 2 1/2″ diameter circle die to diecut the birds from the Flight & Airy DSP.
  4. Stamp the sentiment onto the smaller piece of Very Vanilla cs in Boho Blue Ink.
  5. Use the 2″ diameter circle die to diecut the sentiment.
  6. Run the Boho Blue card base through the Stampin’ Cut & Emboss Machine with the Softly Sophisticated Embossing Folder on the front panel.
  7. Adhere the 1/2″ x 4″ strip of the Flight & Airy DSP to the bottom of the Very Vanilla cs for the inside.
  8. Stamp the vase of flowers in Memento Ink onto the inside panel. Color as desired. (see photo of inside below)
  9. Adhere the inside panel to the inside of the Boho Blue cardstock card base.
  10. Position the 3 circles on the card front. Adhere the largest one first-flat. Also adhere the sentiment circle flat.
  11. Use Stampin’ Dimensionals to adhere the circle with the birds.
  12. Use a Mini Glue Dot to add the bow.
  13. Embellish with the 2023-25 In Color Dots.

Voila!

That is all there is to the Everyday Details Thank You Card!

Remember to visit everyone’s blog. You will see creative inspiration from Demonstrators around the world! You are currently at Theresa McEntee-Theresa’s Treasures-USA. Enjoy!

I appreciate your visit to my blog today. Please subscribe to my blog so you will continue to see these blogs. If you need any assistance with placing an order so you can make your own card, let me know in the comments. Thanks!

Have a most wonderful day! Happy crafting!

Theresa

Stampin’ Up Promotions

Sale-a-bration

What is Sale-a-Bration? It is a wonderful time of year for those ordering from Stampin’ Up! For every $50 USD you order, there are FREE products to choose from! Sale-a-bration starts January 4, 2024 and ends February 29, 2024.

Clickable Supply List

Product List
Everyday Details Bundle
$52.00
Tuxedo Black Memento Ink Pad
$6.50
Boho Blue Classic Stampin' Pad
$9.00
Stampin' Write Markers Collection
$126.00
Boho Blue Stampin’ Blends Combo Pack
$10.00
Pecan Pie Stampin’ Blends Combo Pack
$10.00
Watercolor Pencils Assortment 1
$16.00
Watercolor Pencils Assortment 2
$12.50
Boho Blue 8 1/2" X 11" Cardstock
$10.00
Very Vanilla 8-1/2" X 11" Cardstock
$10.50
Flight & Airy 12" X 12" (30.5 X 30.5 Cm) Designer Series Paper
$12.50
Softly Sophisticated Bundle (English)
$23.75
Baker's Twine Three Color Pack
$8.00
2023–2025 In Color™ Dots
$8.00
Posted in 2024 Stampin' Up! January to April Mini Catalog, Gratitude/ Thanks, Guys cards, International Project Highlights Gallery, Sale-a-Bration 2024, Tools

Trusty Tools Masculine Thank You Card for Kylie’s International Blog Highlights Gallery-February 2024

Trusty Tools Masculine Thank You Card

Hello! Welcome to Theresa’s Treasures Paper Crafts. I am Theresa, an Independent Stampin’ Up! Demonstrator in Arizona, USA. I am really excited to be participating in Kylie Bertucci’s International Blog Highlight Gallery with my Trusty Tools Masculine Thank You card. Today I am blogging along with a very creative group of Stampin’ Up! demonstrators from around the world! Please be sure to see all of the inspirational projects by visiting everyone’s blog. You will need to click on the “Vote” button below to see the Gallery.

The theme for this Gallery is “Thank You”.

We often forget those simple words “Thank you”. However, it is so important to show appreciation to those who have helped you, supported you or inspired you. One way to express gratitude is to send a handmade thank you card. Discover the joy in making and sending a handmade card for yourself!

This Trusty Tools Masculine Thank You Card showcases the Trusty Tools Bundle available in the 2024 Stampin’ Up! January to April Mini Catalog and the FREE Sale-a-bration Trusty Toolbox 12″ x 12″ DSP.

Current Host Code: HUC4WD3S

Measurements

  • Basic Black cardstock (cs) card base: 5 1/2″ x 8 1/2″ scored at 4 1/4″
  • Gold(yes gold) Foil cs: 3″ x 5 1/4″ (to diecut tools)
  • Poppy Parade cs: 2″ x 3″ (to diecut tool handles)
  • Scrap of Crushed Curry cs to diecut the tape in the tape measure
  • Basic White cs: 2 3/4″ x 4″ (inside)
  • Trusty Toolbox Designer Series Paper (DSP):
    • Poppy Parade/Gray Granite striped: 4 1/8″ x 5 3/8″
    • Pecan Pie peg board pattern: 3 1/2″ x 4 1/4″
    • Crushed Curry ruler: 1 7/8″ x 4 1/8″
    • Gray Granite background: 3 1/4″ x 4 1/4″ (inside) and
      3/4″ x 2 1/4″ (for sentiment)

Supplies

  • Trusty Tools Bundle
  • Ink: Memento, Gray Granite, Poppy Parade and Versamark
  • 91% Rubbing Alcohol and a cotton ball
  • Black Emboss Powder
  • Heat Tool
  • Stampin’ Cut & Emboss Machine
  • Black Stampin’ Dimensionals
  • Stampin’ Dimensionals and Mini Stampin’ Dimensionals

Instructions

Gold Foil to Silver Foil

  1. I recently saw this on France Martin’s Facebook page-Frenchie Stamps. She used a Stampin’ Blends Alcohol Marker to transform the Gold Foil cardstock to Silver Foil.
  2. I thought it was easier and quicker to use a cotton ball with 91% Rubbing Alcohol.
  3. Either way you have Silver Foil to cut the tools from!

Preparing all the Card Pieces

  1. There are a lot of pieces to this card! But, fear not! It is simple once you know what all the dies are for.
  2. Here is everything you can cut from the Trusty Tools Dies. The Trusty Tools Masculine Thank You card uses the pieces for the hammer, tape measure, wrench, pliers and the screws & nuts (inside of card).

  1. First, diecut all of the tools as follows.
  2. Cut the handle for the hammer & the hand grip for the pliers from Poppy Parade cs. Then cut the open-end wrench and the jaws of the pliers from the Silver Foil. Also cut one set of the screws & nuts for the inside of the card.
  3. Use Versamark Ink to stamp the hammer and the tape measure onto Silver Foil. Tip: Be sure to press straight down onto the foil so the stamp does not slide.
  4. Sprinkle with the Black Emboss Powder. Heat gently with the Heat Tool until the Emboss Powder turns.
  5. Use Memento Ink to stamp the tape of the tape measure onto the scrap of Crushed Curry cs.
  6. Also use the Memento Ink to stamp the “Thank You” onto the strip of Gray Granite DSP.
  7. Use Poppy Parade Ink to stamp the handle of the hammer onto Poppy Parade cs.
  8. Put the tools together.

Assembling the Card

  1. On the short side cut the Basic Black cs cardbase at 2″ down to the score mark. Then cut along the score mark from the top of the long side down to the 2″ cut. Save the piece you cut out for the card front.
  2. Start by adhereing the Pecan Pie peg board pattern DSP to the Basic Black cs piece you just cut from the card base.
  3. Use Mini Stampin’ Dimensionals to adhere the tools to the peg board. Set aside.
  4. Next adhere the Crushed Curry ruler DSP to the strip left as the card front.
  5. Use the Black Stampin’ Dimensionals on the very bottom of the peg board then adhere it to the card front on the ruler.
  6. Adhere the Poppy Parade/Gray Granite striped DSP to the inside of the card base.

  1. Adhere the Gray Granite background DSP to the inside.
  2. Use Gray Granite Ink to stamp some of the screws & nuts in the upper and lower corner of the Basic White cs for the inside.
  3. Use the Multipurpose Liquid Glue to adhere some screws & nuts over the stamped screws & nuts. Adhere to the Gray Granite background DSP.
  4. Finish by using Stampin’ Dimensionals along the bottom of the sentiment and glue along the top to adhere it to the card front.

Voila!

I hope you enjoyed my Trusty Tools Masculine Thank You Card today using the Trusty Tool Bundle and Trusty Toolbox DSP!

Visit my Online Store to order what you need to make this card for yourself. Photographic supply list is at the end of this blog.

Current Host Code: HUC4WD3S

You are currently at Theresa McEntee-Theresa’s Treasures-USA. When you click on the Vote For Me button above you will see the Gallery of creative inspiration from Demonstrators around the world! You can visit everyone’s blog by clicking on the photo of their card in the Gallery.

To vote for your favorite cards, click on the small heart in the upper right-hand corner of each photo. You have 5 votes! Enjoy and come visit Theresa’s Treasures again soon!

Clickable Supply List

Product List
Trusty Tools Bundle (English)
$54.75
Tuxedo Black Memento Ink Pad
$6.50
Gray Granite Classic Stampin' Pad
$9.00
Poppy Parade Classic Stampin' Pad
$9.00
Versamark Pad
$9.50
Basic Black 8-1/2" X 11" Cardstock
$10.00
Poppy Parade 8-1/2" X 11" Cardstock
$8.75
Crushed Curry 8-1/2" X 11" Cardstock
$10.00
Gold Foil Sheets
$5.00
Basic White 8 1/2" X 11" Cardstock
$10.50
Trusty Toolbox 12" X 12" (30.5 X 30.5 Cm) Designer Series Paper
$12.50
Basics Embossing Powders
$18.00
Heat Tool (Us And Canada)
$31.00
Black Stampin' Dimensionals Combo Pack
$6.00
Stampin' Dimensionals
$4.25
Mini Stampin' Dimensionals
$4.25
Multipurpose Liquid Glue
$5.50
Stampin' Cut & Emboss Machine
$128.00

Thanks again for stopping by! Have a most wonderful and crafty day!

Theresa