Hello and welcome! I am Theresa McEntee, creator of Theresa’s Treasures Paper Crafts. Today I have the pleasure of participating in the Blog Hop with Around the Worldon Wednesday (AWOW).
2025 marks a special milestone. We are celebrating 5 fabulous years of creative inspiration together! In order to honor the occasion, we are CASEing (Copy and Selectively Editing) one of our talented members each month. This month we are happy to focus on Aurélie Fabre.
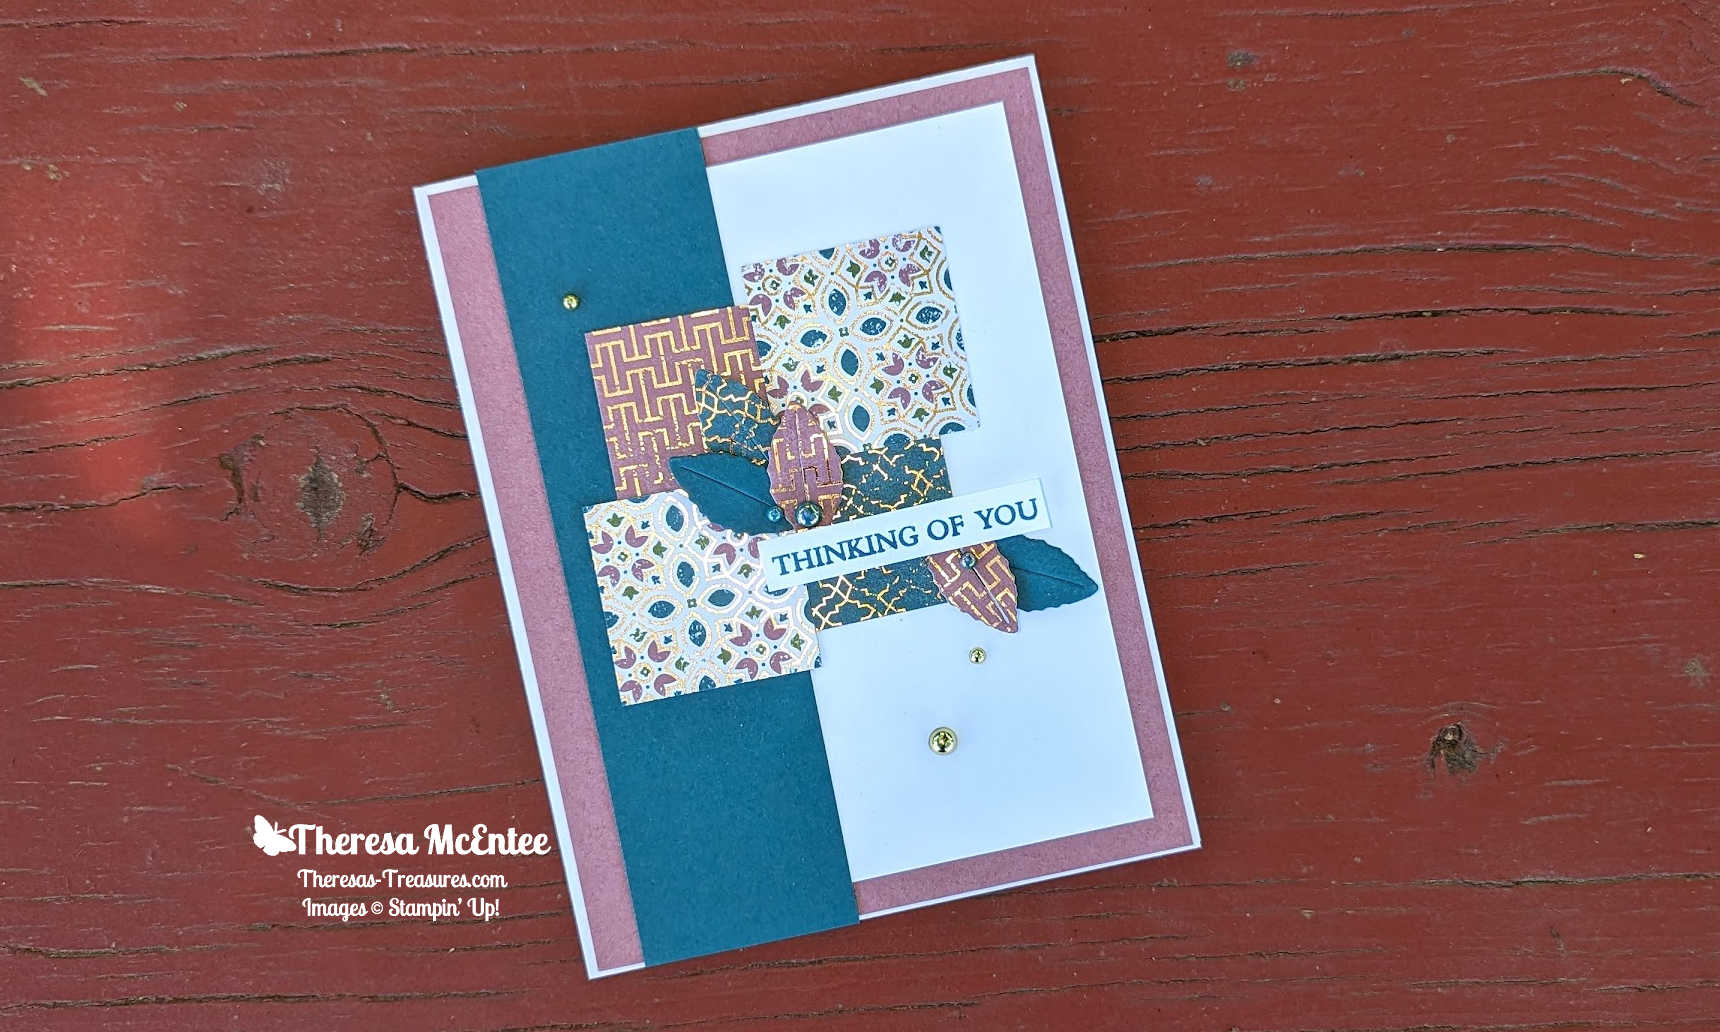
The AWOW team put together a thematic hop to give you some inspiration for your own crafting. Tic Tac Toe is this month’s theme.
I chose shadow, circle and texture from the Tic Tac Toe. Aurélie’s style is know for texture, techniques and layers. This made creating a card to CASE hers loads of fun!
Aurélie FabreTheresa McEntee
My Project for today
This card was made using the Gallery Blooms stamp set and Dies. I used the Stampin’ Blends in: Secret Sea, Cloud Cover, Mossy Meadow, Old Olive, Pecan Pie, Calypso Coral and Peach Pie.
The leaves and flowers are die cut with the Gallery Bloom Dies from the Beautiful Gallery DSP.
The Pecan Pie cardstock circle is die cut with the Spotlight on Nature Dies.
The vintage-style is created by using a Sponge Dauber to apply Pecan Pie Ink to the edges of the DSP on each panel.
Supplies
Gallery Blooms stamp set and Dies
Spotlight on Nature Dies
Simply Said stamp set for sentiment
Beautiful Gallery Designer Series Paper (DSP)
Cardstock (cs): Pecan Pie, Calypso Coral and Basic White
Sponge Dauber
Ink: Early Espresso and Pecan Pie
Blends as stated above
Multipurpose Liquid Glue
Stampin’ Dimensionals
Mini Glue Dots
Stampin’ Up! Trimmer
Gold 1 1/2″ Open Weave Trim
2025-27 In Color Flat Pearls
Measurements
Pecan Pie cs card base: 5 1/2″ x 12″ (see pattern below)
Pecan Pie cs: 2 1/2″ x 2 1/2″ (to die cut the circle)
Calypso Coral cs: three at 3 3/4″ x 4″ and six at 1 1/8″ x 1 7/8″
Basic White cs: 3 5/8″ x 3 7/8″ and scrap for stamping the flowers
Beautiful Gallery DSP Calypso Coral design: two at 3 5/8″ x 3 7/8″
Beautiful Gallery DSP Grey Granite design: six at 1″ x 1 3/4″
Beautiful Gallery DSP to die cut the leaves and flowers
Pattern for Card Base
The pattern below is for Imperial measurements in inches. Note: The card that Aurélie did may have been in Metric, but I am only showing the Imperial.
The AWOW Team
I am so glad you have joined me today in this worldwide hug that stretches all the way from Australia to Alaska across twelve different time zones. Below is an image of the whole crew and where they are from around the globe. Such a talented and wonderful group of people! You will want to visit everyone to be sure to see all the fabulous projects!
We all love sharing the joy of creating with you through projects from our individual parts of the world. I hope that you will be filled with lots of inspiration!
Hello and welcome! I am Theresa McEntee, creator of Theresa’s Treasures Paper Crafts. Today I have the pleasure of participating in the Blog Hop with Around the Worldon Wednesday (AWOW) organized by Angie McKenzie.
On the second Wednesday of each month, the AWOW team put together a thematic hop to give you some inspiration for your own crafting. This month’s theme is 1-2-3/A-B-C. The following Stadium Wave Baby Card is my interpretation of this challenge.
Have you ever wanted to make a handmade card that will “Wow!” everyone? The Stadium Wave Baby Card will do just that! The following step-by step instructions will guide you. If you have any questions or if the instructions are not clear, please leave me a comment.
My Project for today
This card was made using Stampin’ Up!® products available in my Online Store HERE. There is also a detailed, photographic, clickable supply list at the very end of the blog.
When I first started thinking about the 1-2-3/A-B-C Challenge, I was thinking about the alphabet blocks from childhood. Then I happened upon the Stadium Wave Card! I felt it was perfect for this challenge.
The Cutest Onsie stamp and die set made the Stadium Wave Baby Card a lot of fun to make.
I wanted to use bright colors and found the Full of Life 6″x 6″ Designer Series Paper was just right-using the watercolor background on the backside.
Measurements
Lemon Lime Twist cardstock card base: 4 1/4″ x 11″ scored at 5 3/8″ and 5 5/8″
Lemon Lime Twist cardstock stadium mechanism: 6″ x 10″ scored at 4″, 8″, 8 3/4″ and 9 1/2″ with paper in landscape orientation, then turned 90 degrees to portrait orientation and cut at 1″ 2″, 3″, 4″ and 5″
Full Of Life Designer Series Paper: enough to cut out 6 onsies, one at 3 3/4″ x 5″ (front) and two at 4″ x 5 1/8″ (inside)
Pretty in Pink, Lemon Lime Twist, Daffodil Delight and Balmy Blue cardstock to cut out “B-A-B-Y” with the Alphabet a la Mode Dies.
Basic White cardstock: 3″ x 3 1/2″ (for inside sentiment die cut with the Nested Essentials Dies) and 1″ x 2 3/4″ for the sentiment (die cut with the Unbounded Love Dies)
Berry Burst cardstock: 2 1/4″ x 2 3/4″(for the die cut behind the sentiment cut with the Unbounded Love Dies)
Supplies
Cutest Onsie stamp and die Bundle
Alphabet a la Mode Dies
Nested Essential Dies
Unbounded Love Dies
Ink: Berry Burst, Daffodil Delight, Lemon Lime Twist, Blueberry Bushel and Pumpkin Pie
To explain how to put the Stadium Wave Card Mechanism together, I used a craft cardstock template.
First, score on the dotted lines and cut on the solid lines. The six strips will become the Stadium Wave Mechanism.
Fold each strip so that you see a “w” as shown.
Apply Multipurpose Liquid Adhesive to the right side of the “w” and adhere. Make all six pieces.
The dotted line is for demonstration purposes and you do not need to write on your strips. With the “w” side on the bottom, apply Multipurpose Liquid Adhesive to the left one-half of the front of the folded strip. Adhere another folded strip to the first one as shown.
Continue to adhere the folded strips together until all six are adhered.
Placing the Stadium Wave Mechanism in the Card
Adhere the Daffodil Delight cardstock with the corresponding Designer Series Paper layer for the front of the card, to the Lemon Lime Twist cardstock card front.
Adhere the two 4″ x 5 1/8″ pieces of the Full of Life Designer Series Paper to the inside of the Lemon Lime Twist cardstock card base.
To add the Stadium Wave Mechanism, have all of the “w” sides on the bottom. Apply Multipurpose Liquid Adhesive to the back of the last folded strip on the bottom right. Position in the center of the Designer Series Paper panel with the top edge just below the top of the Designer Series Paper.
Apply Multipurpose Liquid Adhesive to the top of the strip on the left. Close the card, lining up the bottom edges. Wait 10 seconds. Open and “Wow!” You have the Stadium Wave!
Decorating with the Onsies
Cut six onsies from different colors of paper using the watercolor background side of the Full of Life Designer Series Paper. Cut the letters to spell B-A-B-Y from the corresponding colors of cardstock. Adhere the letters to the onsies. Stamp a heart on the first and last onsie.
Place a Stampin’ Dimensional on the portion of the mechanism above the score line as shown. Add some Multipurpose Liquid Adhesive to the upper half of the back of the onsie to adhere the first onsie to the back of the card front. Be sure the onsie is not sticking out the sides or top. (arrows)
Place a Stampin’ Dimensional above the score line on the remaining pieces of the mechanism. Adhere the onsies in order to spell B-A-B-Y. The last onsie will need to be carefully placed so it does not stick out the sides or bottom (arrows). The last onsie is only adhered by the Stampin’ Dimensional.
Use the Berry Burst Ink to stamp the inside sentiment on the Basic White cardstock. Die cut with the Nested Essentials Die. Adhere to the inside of the card.
Final Touches
Adhere 10″ of the Iridescent Striped Ribbon to the center of the Lemon Lime Twist cardstock belly band. Wrap the belly band around the card so it is snug but not too tight. The band should move up and down. Use Stampin’ Dimensionals to adhere the Berry Burst cardstock scalloped oval (Unbounded Love Dies) to hide the end of the Lemon Lime Twist band.
Use Berry Burst Ink to stamp the sentiment on a scrap of Basic White cardstock. Die cut with the die from the Unbounded Love Dies. Adhere to the Berry Burst cardstock scalloped oval with Stampin’ Dimensionals.
Add the little rattle and the bow. Add the Iridescent Faceted Gems to the rattle and the card front.
Slide the decorated belly band up from the bottom of the Stadium Wave Baby Card, and Voila!
The AWOW Team
I am so glad you have joined me today in this worldwide hug that stretches all the way from Australia to Alaska across twelve different time zones. Each month this group of creative friends prepare a project for a theme. Below is an image of the whole crew and where they are from around the globe. Such a talented and wonderful group of people! You will want to visit everyone to be sure to see all the amazing projects!
We all love sharing joy with you through projects from our individual parts of the world. I hope that you will be filled with lots of inspiration!
Hello fellow stampers! I am Theresa McEntee-author of Theresa’s Treasures Paper Crafts. I am hopping along with the Ink & Inspiration Blog Hop crew today. You can visit super awesome blogs from around the world! The list to follow the hop is at the end of my blog post. Please stop by and see everyone’s projects!
The Ink & Inspiration Challenge is a sketch challenge this month. The image inspired me and I immediately saw the possibility of a Fun Fold. I really love to figure out new ways to make a card!
I absolutely love coffee! There are so many good memories related to relaxing with a cup of delicious coffee. For this Fun Fold card I used two stamp sets- Latte Love & Coffee with Friends. You can find Coffee with Friends in the Stampin’ Up! 2025-26 Annual Catalog. The Latte Love is an Online Exclusive.
Each of these stamp sets has images that can be used for a multitude of handmade cards. I chose the women sitting on the steps with her cup of coffee because it reminded me of myself. I love to contemplate life with a hot cup of rich savory coffee!
There are several great dies to accompany the Latte Love stamp set. I only used the outline of the cup.
The “A Little Latte” Designer Series Paper is so fun with several designs!
Thinking about possibilities for Sketch 105 led to the creation of this unique Fun Fold.
Measurements
Pecan Pie cardstock card base: 5 1/2″x 8 1/2″ scored at 4 1/4″
Pecan Pie cardstock: 3″x 4″
Calypso Coral cardstock: 2 3/8″ x 3 3/8″, 2 1/4″ x 2 3/4″ (to die cut coffee cup)
Basic White cardstock: 2 1/4″ x 3 1/4″ (for the image of the women), 2 3/4″ x 3 3/4″ (front inside piece), 3 3/4″ x 5″ (back inside piece), 2″ x 2″ (to stamp and die cut coffee)
A Little Latte DSP: 5 3/8″ x 8 1/4″ scored at 4 1/8″ (see template below)
DSP Template
The image of the women with the cup of coffee was colored with the Watercolor Pencils.
Supplies
Stamp Set: Latte Love & Coffee with Friends
Dies: Latte Love
Ink: Memento, Early Espresso, Pecan Pie & Calypso Coral
Embellishments: Adhesive-Backed Swirl Dots
Ribbon: Linen Thread
Watercolor Pencils Assortment 1 & 2
Instructions
Use Pecan Pie Ink and stamp-off once to stamp the coffee for the coffee cup onto the Basic White cardstock. Die cut the coffee.
Stamp the image of the women in Memento Ink. Color as desired.
The sentiments are all stamped in Early Espresso Ink. (see below)
For the back inside card piece, use Memento Ink to stamp the image of the two coffee cups with the croissants. Color as desired.
Stamp the splatter and the cup rings with Pecan Pie Ink, some Stamped-Off once and some at full strength. (see below)
Now stamp the ariel view of the coffee cup in Calypso Coral Ink onto the Calypso Coral cardstock. Die cut the coffee cup.
Front inside and Back inside
Adhere the back inside card piece to the inside of the Pecan Pie cardstock card base. Close the card.
Next fold the “A Little Latte” DSP at the 4 1/8″ score line. Adhere the DSP to the front of the Pecan Pie cardstock card base so that it will open like a second card.
Open the DSP and adhere the front inside card piece to the inside of the DSP. Close the DSP.
Now adhere the Basic White cardstock with the image of the women on it to the Calypso Coral cardstock. Use Stampin’ Dimensionals to adhere this to the Pecan Pie cardstock.
Apply the Multipurpose Liquid Glue to the back of the bottom corner and adhere the card piece with the image of the women on it to the front of the DSP card piece.
Glue the Basic White cardstock stamped with the coffee to the inside of the Calypso Coral cardstock coffee cup. Use the glue to adhere the cup to the upper right-hand corner of the card piece with the image of the woman on it.
Add the Swirl Dots to the upper right-hand corner or as desired.
Voila!
I hope you enjoyed Sketch 105 and my Fun Fold card! Be sure to join the Blog Hop to see more interpretations of Sketch 105!
Hello and welcome! I am Theresa McEntee, creator of Theresa’s Treasures Paper Crafts. Today I have the pleasure of participating in the Blog Hop with Around the World on Wednesday (AWOW) organized by Angie McKenzie for the Adventures of Benji!
On the second Wednesday of each month, the AWOW team put together a thematic hop to give you some inspiration for your own crafting. The Adventures of Benji is this month’s theme.
Today’s hop is special because of Benji. Benji is Angie’s little Shih Tzu. He is her stamping and walking buddy. He is so full of personality! He will want Angie to carry him after a short walk, but he loves to run and play soccer! He also loves cheese, eggs, popcorn and anything with butter.
Angie promised Benji she would take him on a trip around the world- so here he goes!
First he is going to travel to the coast of California from where I am in Bisbee Arizona. He is going by submarine up to British Columbia Canada to visit Lori Wilcox. Hense, the inspiration for my card!
My Project for today
Before Benji could board the sub, the scene needed to be created. The Submarine Life Bundle is the perfect choice as there are many sea creatures so that Benji will have some friends to make along the way! This card has Craig the crab and Ollie the Octopus on the front panel.
On the inside panel are Gertrude the Guppy and her five little fishies- Gary, Geraldine, Glenda, George and Gregory. And don’t forget Sandy the Starfish!
Here is the template for this fun fold card. I hope you enjoyed the card and the story that went along with it!
To add a little Bling! I used the new 2024-26 In Color Shimmer Gems in Shaded Summer.
The AWOW Team
I am so glad you have joined me today in this worldwide hug that stretches all the way from Australia to Alaska across twelve different time zones. Each month this group of creative friends prepare a project for a theme. Below is an image of the whole crew and where they are from around the globe. Benji had quite the Adventure! And such a talented and wonderful group of people! You will want to visit everyone to be sure to see all the amazing projects!
We all love sharing joy with you through projects from our individual parts of the world. I hope that you will be filled with lots of inspiration from Benji’s Adventures. I know I sure was!
Thank you so much for visiting today. I hope you enjoyed learning more about our projects along with the Adventures of Benji! Have a most wonderful day!
Hello! Welcome to Theresa’s TreasuresPaper Crafts. I am Theresa, an Independent Stampin’ Up! Demonstrator in Arizona, USA. I am so excited to be participating in Kylie Bertucci’s International Blog Highlight Gallery with my Kiddin’ Around “You Are Amazing” card. Today I am blogging along with a very creative group of Stampin’ Up! demonstrators from around the world! Please be sure to see all of the inspirational projects by visiting everyone’s blog. You will need to click on the “Vote” button below to see the Gallery.
The theme for this Gallery is “Thank You”.
We often forget those simple words “Thank you”. However, it is also important to let those who have helped you, supported you or inspired you, know just how amazing you think they are! One way to share your feelings is to send a handmade card. Discover the joy in making and sending a handmade card for yourself!
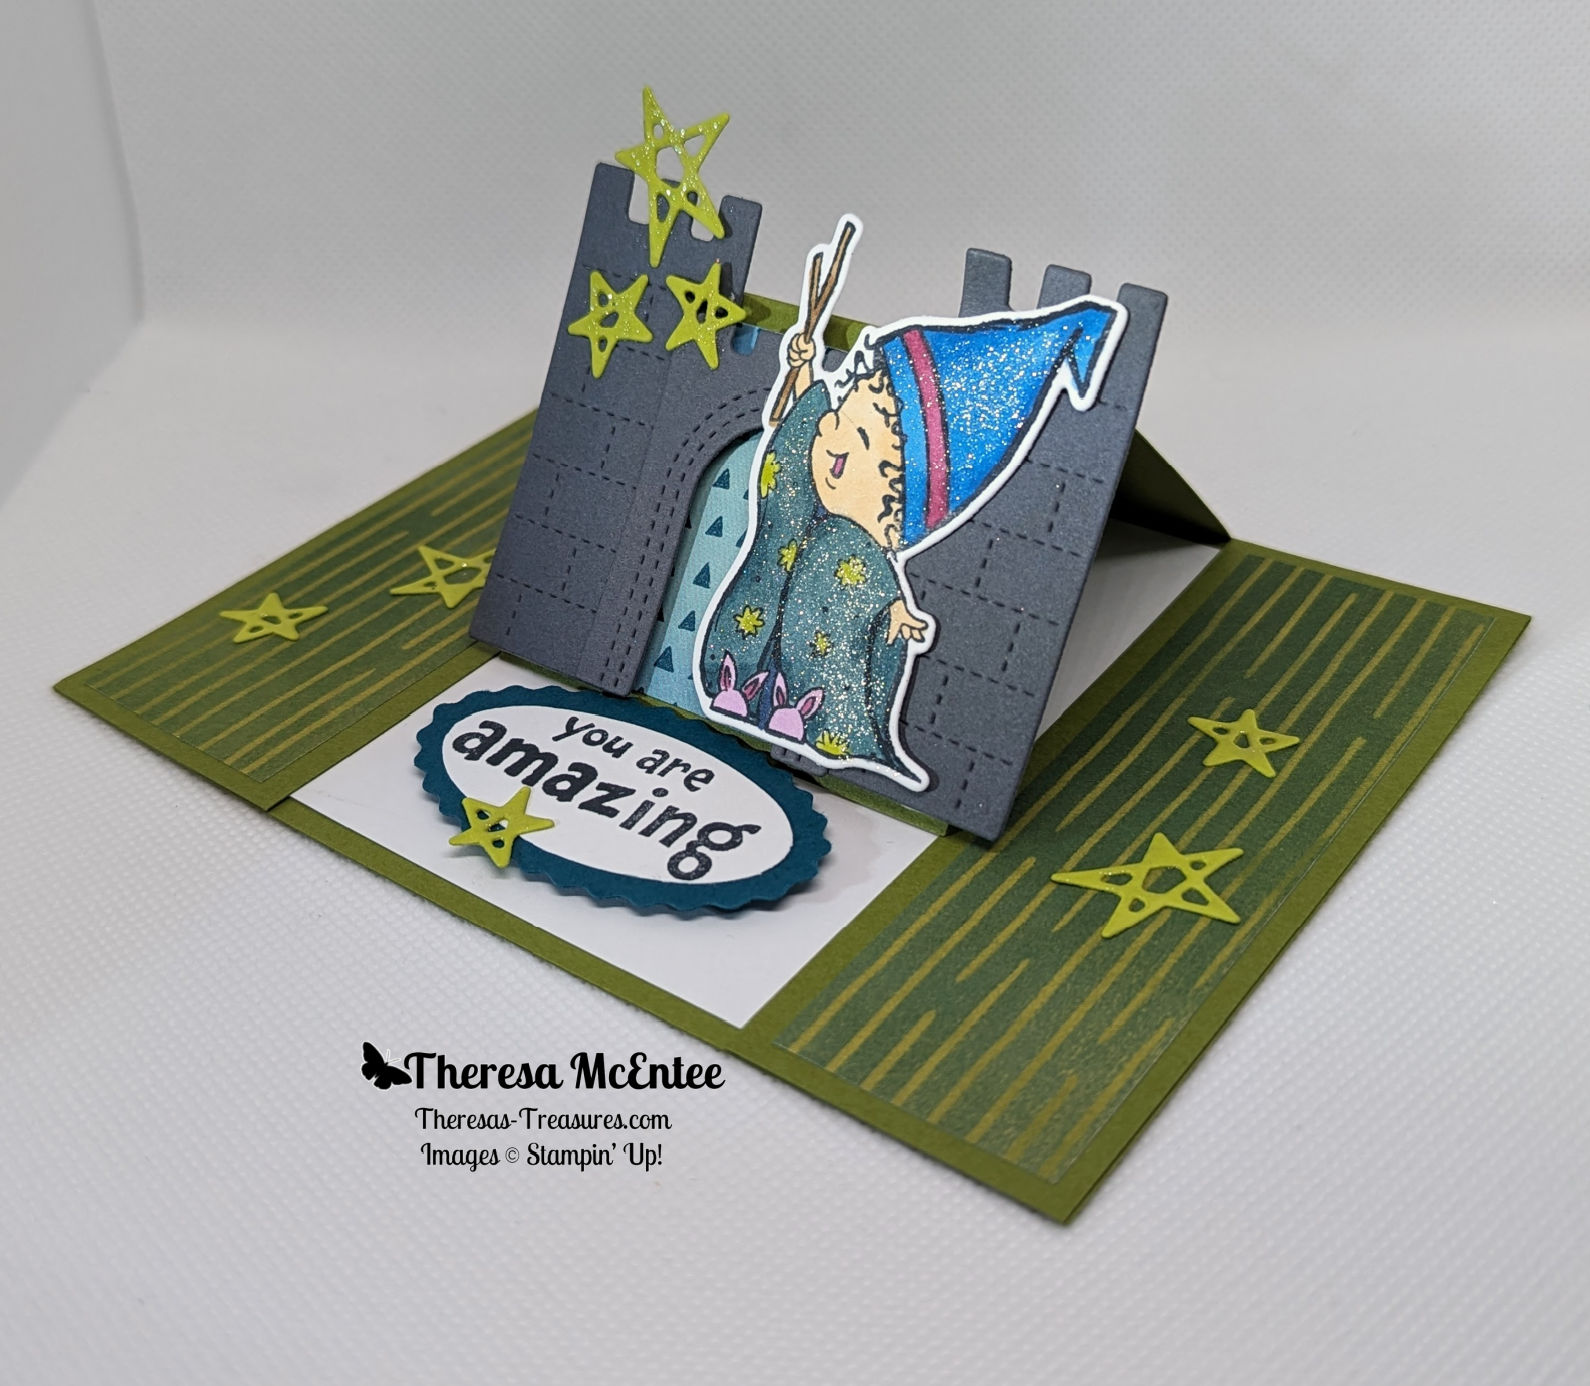
This Kiddin’ Around “You Are Amazing” Card showcases the Kiddin’ Around Bundle in the 2024 Stampin’ Up! Mini Catalog. Today I used both the stamp set and the dies, as well as the Just Kiddin’ 12″ x 12″ Designer Series Paper.
Current Host Code: K3Q7NG2M
Measurements
Old Olive cardstock card base: 5 1/2″ x 8 1/2″ scored at 4 1/4″
Basic White cardstock: 3 1/4″ x 4″, 2 1/2″ x 3″ (to stamp the child) and 1 1/2″ x 3″ (for sentiment)
Basic Gray cardstock: 3″ x 4″ (to diecut the castle pieces)
Lemon Lime Twist cardstock: 1 1/2″ x 9″ (to diecut the stars)
Pretty Peacock cardstock: 1 1/2″ x 3″
Just Kiddin’ 12″ x 12″ Designer Series Paper: two at 1 1/2″ x 4″ (Olive Green/Lemon Lime Twist “grass” pattern and 1 3/4″ x 2 1/4″ (ombre blue with mini triangles pattern for the “sky”)
Supplies
Kiddin’ Around Bundle
Double Oval Punch
Paper Trimmer
Stampin’ Cut & Emboss Machine
Ink: Memento Ink Pad
Stampin’ Blends Alcohol Markers: Azure Afternoon, Berry Burst, Fresh Freesia, Lemon-Lime Twist, Pecan Pie, Pretty Peacock and 800/light Medium Deep.
Instructions
Prepping the Card Base
Fold the 5 1/2″ x 8 1/2″ Old Olive cardstock card base at the 4 1/4″ score line.
With the 5 1/2″ side on top, cut at 1 1/2″ down to the 4 1/4″ fold. Then make another cut down to the fold at 4″.
With the 8 1/2″ side on top, score at 2″ between the 1 1/2″ and 4″ cuts.
Turn the cardbase so that the 5 1/2″ side is on top with the cut side on top.
In the center of the area below the fold, adhere the Basic White cardstock.
Adhere each of the 1 1/2″ flaps to the cardbase.
Now adhere the two 1 1/4″ x 4″ strips of Olive Green/Lemon Lime Twist Just Kiddin’ Designer Series Paper “grass” to either side of the cardbse.
Fold the center of the card base down and adhere the “sky”below the fold of the front flap.
Prepping the Rest of the Card Pieces
From the Lemon Lime Twist diecut the stars three times so that you have 9 stars.
Die cut two of the castle towers and one arch from the Basic Grey cardstock.
In Memento Ink, stamp the sentiment “you are amazing” onto the 1 1/2″ x 3″ Baisc White cardstock so that you can punch it out with the smaller smooth oval in the Dual Oval Punch.
Punch the sentiment out. Punch a scalloped oval from the Pretty Peacock cardstock.
Also with Memento Ink, stamp the image of the child onto the 2 1/2″ x 3″ Basic White cardstock. Wait until after you color to die cut the image.
Color the image with Stampin’ Blends Alcohol Markers. Colors are as follows: hat-Berry Burst & Azure Afternoon; Face– 800 of the Medium Deep Natural Tones & Berry Burst for the mouth; magic wand- Pecan Pie; gown– Pretty Peacock and Lemon Lime Twist for the stars; Bunny Slippers-Fresh Fresia and Berry Burst for the inner ear.
Die cut the child.
Assembling the Card
Use Stampin’ Dimensionals to adhere one castle tower to each side of the front flap. There is 1/4″ that hangs off the edge.
Apply a Stampin’ Dimensional behind the top of the arch. Apply a thin line of the Multipurpose Liquid Glue along the outer edge behind the left & right sides of the arch. Adhere to the front flap between the towers.
The image of the child is adhered using Stampin’ Dimensionals behind the left side and glue behind the right side.
Adhere the sentiment to the Pretty Peacock cardstock scalloped oval.
Then use Stampin’ Dimensionals to adhere the sentiment to the center of the Basic White cardstock under the front flap.
Adhere the stars as desired.
Embellish with Wink of Stella applied to the gown, hat and the stars.
Add Bling! if desired.
Voila!
I hope you enjoyed my card today using the Kiddin’ Around Bundle.
Visit my Online Store to order what you need to make this card for yourself. Photographic supply list is at the end of this blog.
Current Host Code: K3Q7NG2M
You are currently at Theresa McEntee-Theresa’s Treasures-USA. When you click on the Vote For Me button above you will see the Gallery of creative inspiration from Demonstrators around the world! Remember to visit everyone’s blog by clicking on the photo of their card in the Gallery.
To vote for your favorite cards, click on the small heart in the upper right-hand corner of each photo. You have 5 votes! Enjoy and come visit Theresa’s Treasures again soon!
Welcome! Thank you for visiting Theresa’s Treasures Paper Crafts to see my Thoughtful Expressions Watercolor Card! I am Theresa, a Stampin’ Up! Demonstrator in Arizona, USA. Today is the monthly Inspirations in Ink Blog Hop! I am excited to be hopping with talented demonstrators from around the world. Be sure to check out everyone’s Thoughtful Expressions Bundle projects. The Thoughtful Expressions Bundle is in the 2024 January to April Mini Catalog. If you want your own, order before February 29,2024 so you can get Sale-a-bration Rewards! You may order from my Online Store HERE.
Why did I make this Thoughtful Expressions Watercolor Card? I am interested in learning to watercolor. The Stampin’ Up!® Inks are so vivid and work very well. I have been using a Nylon Round 1 paintbrush. If you would like to try watercoloring, there is a lot of trial and error. Don’t be afraid to try. There are many happy accidents that turn out well!
Wild Wheat cardstock: 2 3/4″ x 6″ (to die cut the center panel and inside panel), and 5/8″ x 2 5/8″ to put behind sentiment
Fluid 100 Watercolor Paper: one sheet
Basic White cardstock: 2 1/2″ x 3 3/4″ (to die cut inside) and 1/2″ x 2 1/2″ for sentiment
Poetic Expressions 12″ x 12″ Designer Series Paper (DSP): 4 1/8″ x 5 3/8″ and two 1 5/8″ x 4 1/4″
Supplies
Stamp Set: Thoughtful Expressions
Dies: Thoughtful Expressions
Inkrefills: Lemon Lolly, Daffodil Delight, Wild Wheat, Pumpkin Pie, Cajun Craze, Old Olive and Mossy Meadow
Ink Pad: Stazon Saddle Brown
Embellishments: 2023-2025 In Color Dots and Wink of Stella
Instructions
Fold the card base at the scoreline. Cut 1 3/4″ to the right of the scoreline. Then cut a 1 3/4″x 4 1/4″off the piece that you cut off. This is the bottom of the card front.
Die cut 2 labels from the Wild Wheat cardstock with the largest label die in the Thoughtful Expressions Dies. Set aside.
Die cut the Basic White cardstock with the 2nd largest label die.
Use the Stazon Saddle Brown Ink to stamp the bunch of flowers on the Basic White cardstock in the upper left and lower right corner for the inside of the card. (see photo of inside below).
Adhere the stamped Basic White cardstock to one of the Wild Wheat cardstock labels.
Adhere the Poetic Expressions DSP to the inside of the Wild Wheat cardstock card base. Then adhere the Basic White cardstock/Wild Wheat cardstock card piece to the center of the inside panel.
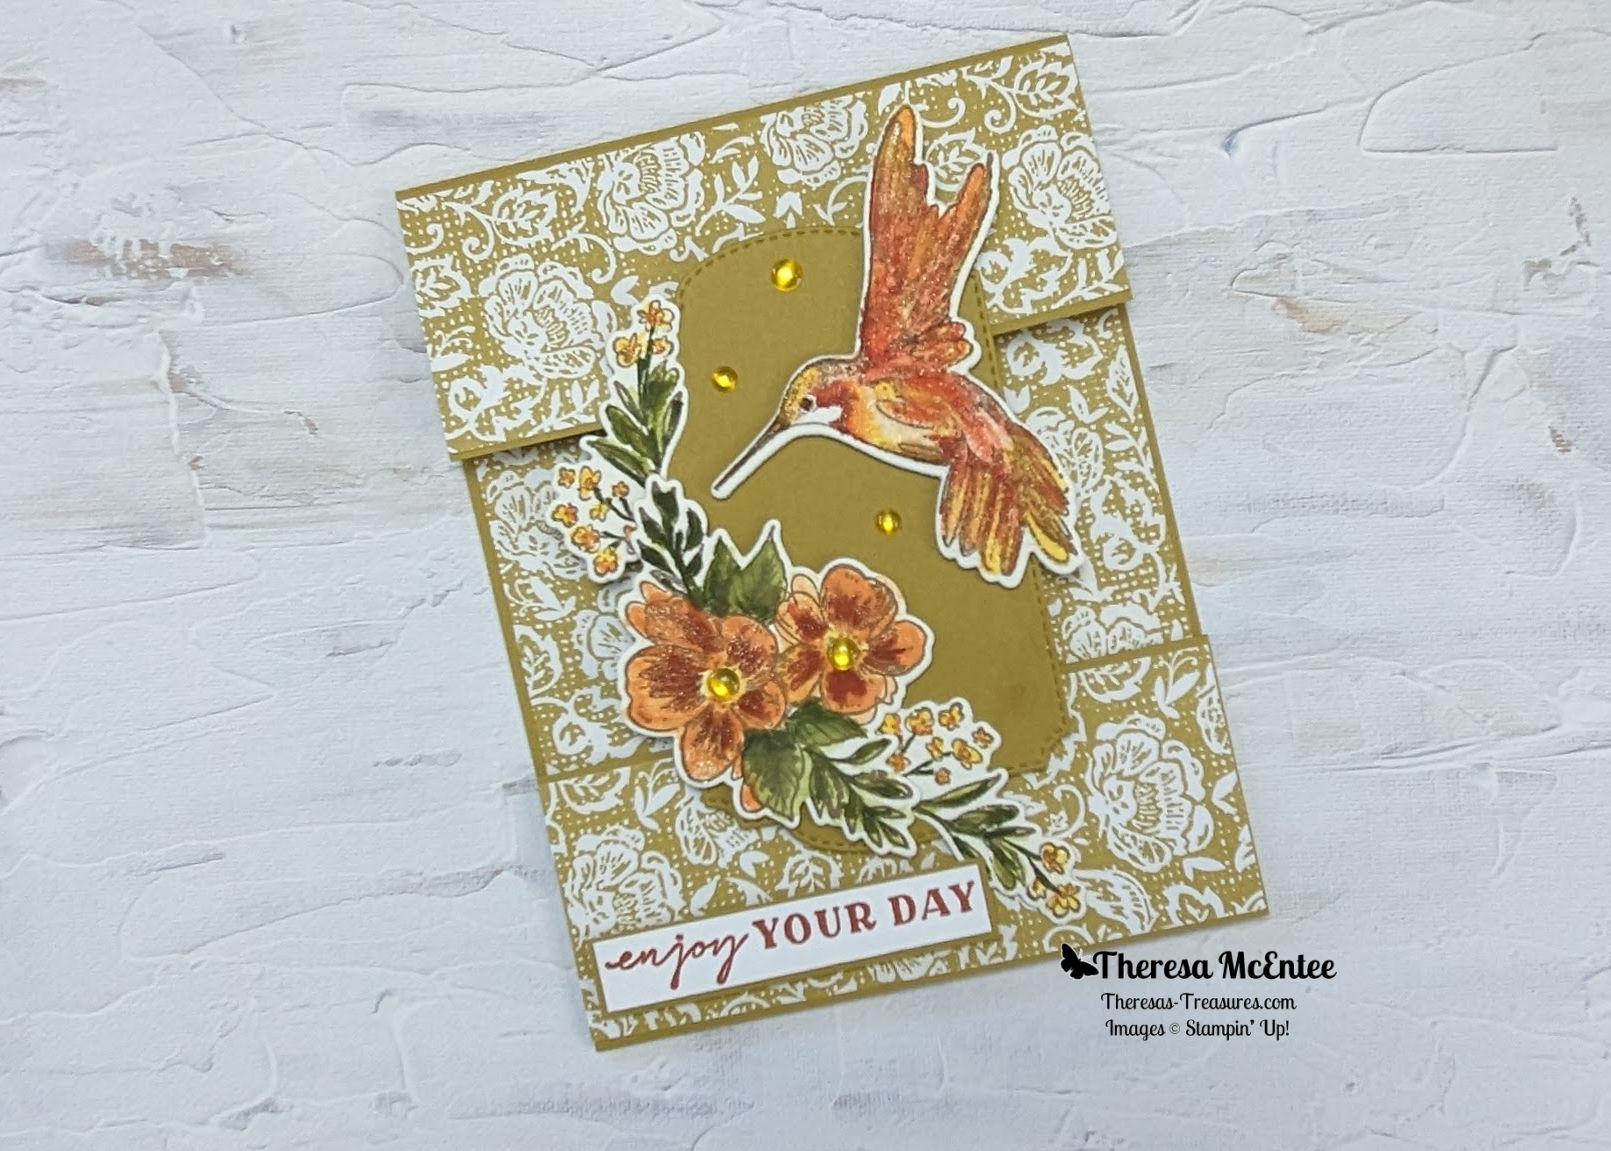
Stamp the images of the hummingbird and flowers onto the Fluid 100 Watercolor Paper with the Stazon Saddle Brown Ink.
Put one drop of each color onto a palette, acrylic block or the glass mat. Wet the paint brush and squeeze out the excess water.
Start with the Lemon Lolly Ink and take up a small amount of ink with the paint brush and color the body of the hummingbird, the center of each of the large flowers and the small flowers in the bunch of flowers.
Use the Pumpkin Pie Ink for the center of the small flowers.
For the Hummingbird, use the Daffodil Delight ink, then progressivelydarker inks to color the wings and tail. Use a bit of Cajun Craze Ink for the base of the neck.
The leaves are done in Old Olive Ink then Mossy Meadow Ink.
Die cut the watercolored images.
Adhere the Poetic Expressions DSP to the front flap of the Wild Wheat cardstock card base. Adhere the second piece of DSP to the 1 3/4″ x 4 1/4″ piece you cut off.
Position this second piece on the bottom of the card front. Use Stampin’ Dimensionals to connect the top flap and bottom card piece together with the die cut Wild Wheat cardstock label.
Glue the bunch of small flowers to the Wild Wheat cardstock label allowing space to adhere the larger flowers. Adhere the larger flowers with Stampin’ Dimensionals.
Use Stampin’ Dimensionals to adhere the hummingbird.
Stamp the sentiment “enjoy your day” into the strip of Basic White cs. Adhere this to the strip of Wild Wheat cardstock. Use Stampin’ Dimensionals to adhere the sentiment to the card front.
Embellish with the In Color Dots in Wild Wheat and Wink of Stella.
Voila!
Thank you so much for visiting today to see my Thoughtful Expressions Watercolor Card! I hope you enjoyed my project as much as I did! Please visit all the blogs in the Inspirations In Ink Blog Hop. You will be amazed and inspired by all the fun and creative projects made by the Inspirations In Ink demonstrators.
You are currently visiting Theresa McEntee-USA creator of Theresa’s Treasures Paper Crafts.
What is Sale-a-Bration? It is a wonderful time of year for those ordering from Stampin’ Up! For every $50 USD you order, there are FREE products to choose from! Sale-a-bration starts January 4, 2024 and ends February 29, 2024. Visit my Online Store HERE
Join Now
If you’ve been thinking about becoming a Stampin’ Up! demonstrator, then there’s no better time than right now during Sale-A-Bration! Join Now by 29 February 2024 and choose between two fabulous offers:
Option 1: Get $125 worth of product PLUS our new Stampin’ Glass Mat Studio (a $60 value) for just $99! Option 2: Get $125 worth of product PLUS an additional $30 worth of product of your choice when you join for $99. That’s a $155 value!
Thinking of adding creativity to your life this year? Start out by trying a monthly paper crafting kit! The Paper Pumpkin Monthly Subscription delivers a kit with everything you need to make a project-right to your door! Sign up for a Pre-paid Paper Pumpkin Subscription HERE.
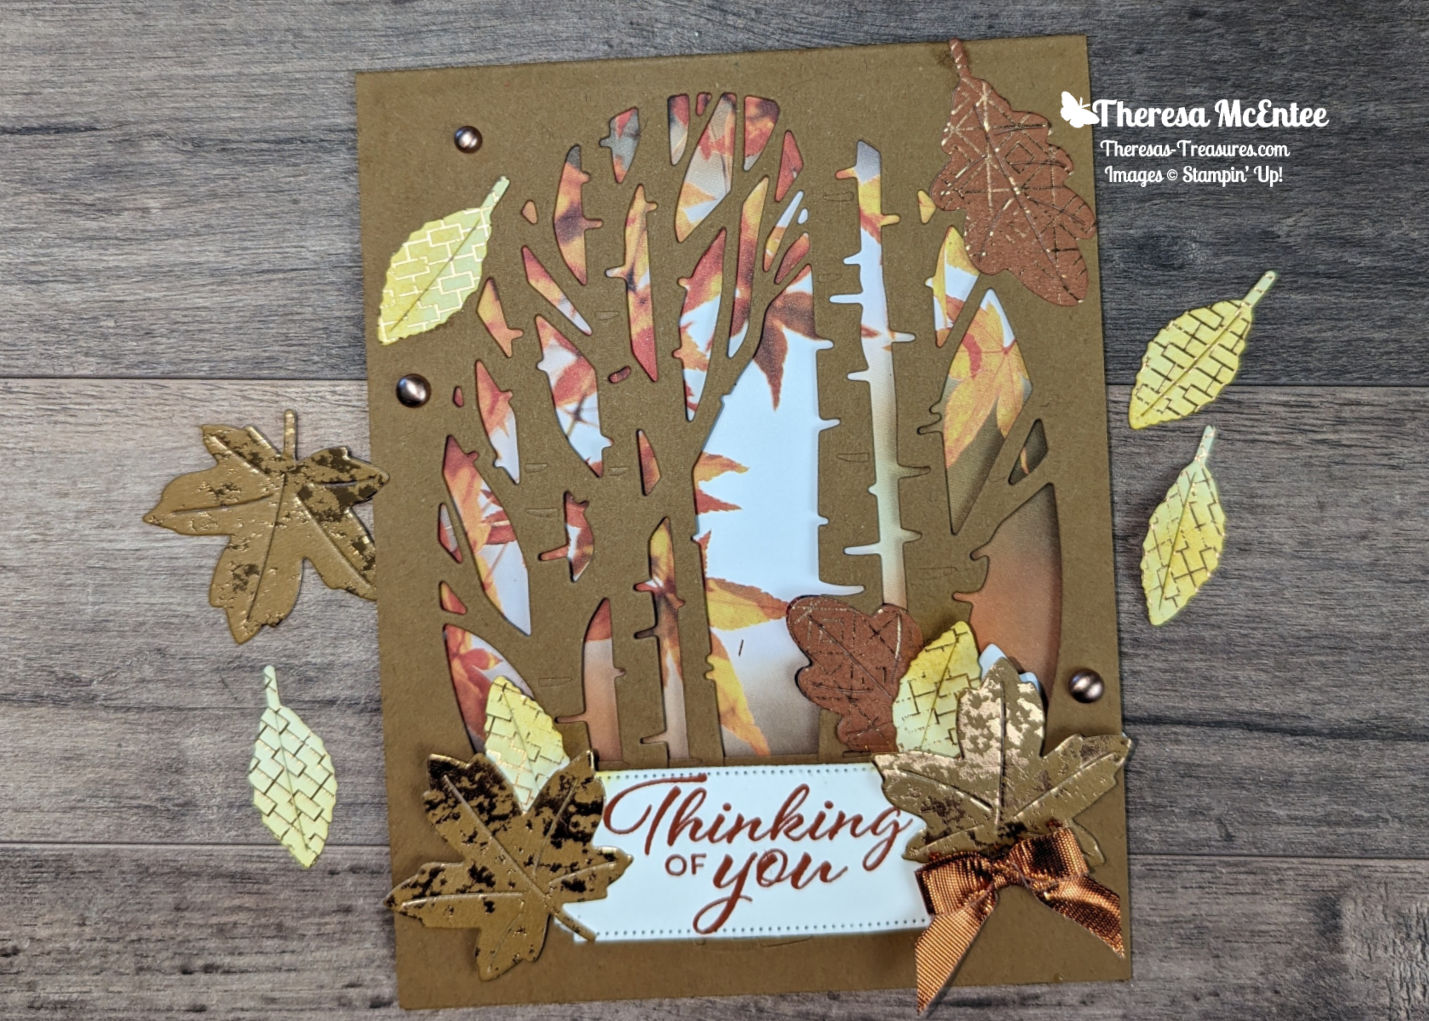
Hello and welcome! I am Theresa McEntee, creator of Theresa’s Treasures Paper Crafts. Today I have the pleasure of participating in the Blog Hop with Around the World on Wednesday (AWOW) organized by Angie McKenzie. On the second Wednesday of each month, the AWOW team put together a thematic hop to give you some inspiration for your own crafting. “Fall colors in Paris” is a Color Challenge for this month’s theme.
My Project for today
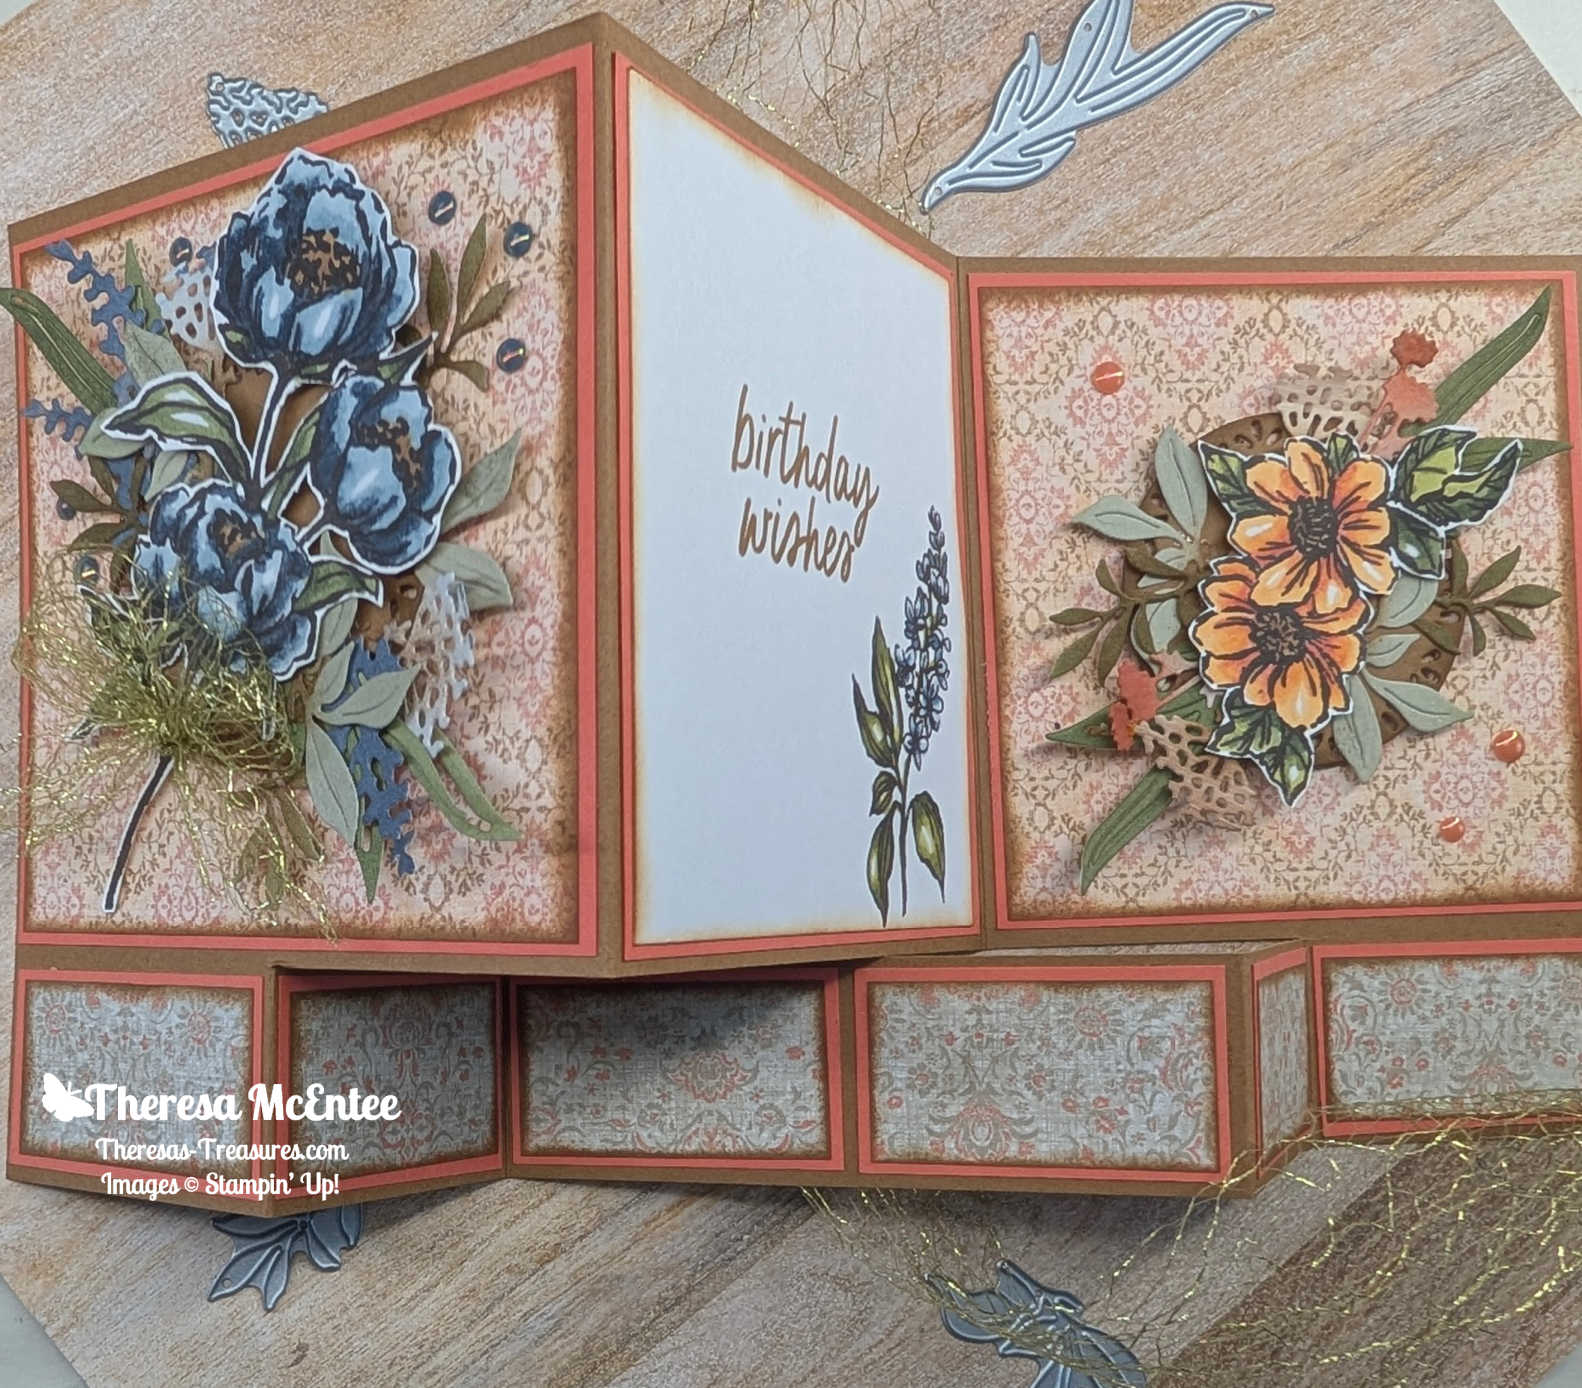
I was creating this card in my head over several days. I really love this particular design in the All About Autumn 6″ x 6″ Designer Series Paper pack. I wanted to used the Aspen Trees Dies too.
I do look at a lot of projects that other talented crafters make. Some of those projects inspire me and help me to create my own project. I hope my project will inspire you!
Project Details
This card was made using a variety of stamps and dies. The Autumn Leaves stamp and Dies come as a bundle (#162186). I have really liked the Aspen Dies that go with the Perched in a Tree stamp set. The Layering Leaves stamp set is great for sentiments.
Project Details
Measurements
Pecan Pie cardstock card base: 4 1/4″ x 11″ scored at 5 1/2″
Pecan Pie cardstock: 1 3/8″ x 4 1/4″ for inside
All About Autumn 6″ x 6″ Designer Series Paper, Autumn Leaves photo design: 4″ x 5 1/2″ scored at 1/4″
Basic White cardstock: 4″ x 5 1/4″ and 1 1/2″ x 3″(sentiment)
Dry Brushed Metallic 12″ x 12″ Specialty Designer Series Paper: 1 3/4″ x 5″ to die cut the maple leaves
All About Autumn DSP: White/Copper Foil design: 2″ x 2 1/4″ to die cut the small leaves and Cajun Craze/Copper Foil design: 1″ x 4 1/2″ to die cut the oak leaves
Supplies
Stamps & Dies: Autumn Leaves stamp set & Dies, Aspen Tree Dies, Perched in a Tree stamp set and Layering Leaves stamp set
Ink: Daffodil Delight & Cajun Craze
Blending Brush
Brushed Metallic Adhesive Backed Dots
Copper & Natural Ribbon Combo
Stampin’ Dimensionals & Mini Stampin’ Dimensionals
Mini Glue Dots
Instructions
Diecut all of the leaves and set aside.
Use the Aspen Trees Die to diecut the front of the Pecan Pie cardstock cardbase.
Adhere the Basic White cardstock to the 1/4″ edge of the All About Autumn DSP.
Stamp the sentiment from the Perched in a Tree stamp set in Cajun Craze Ink onto the Basic White cardstock. Use the the Daffodil Delight Ink to Stamp Off once then stamp the image of the leaves from the Autumn Leaves stamp set around the sentiment.
Adhere the Basic White cardstock to the inside back panel of the Pecan Pie cardstock card base.
Stamp the sentiment ” Thinking of You” from the Layering Leaves stamp set onto the smaller piece of Basic White cardstock. Diecut with the label from the Autumn Leaves Dies.
Use the Daffodil Delight Ink and a Blending Brush to color the small leaves diecut from the white/copper foil design of the All About Autumn DSP.
Place the Silicon mat between the front panel of the card base and the All About Autum DSP layer to avoid getting glue on the inside layer.
Position Mini Stampin’ Dimensionals on the tree trunks to adhere the sentiment label.
Start to adhere the diecut leaves. Remember that they will show through on the inside.
Adhere the Pecan Pie cardstock for the inside to cover where the sentiment shows through. Then position the leaves on the inside to hide the backside of the leaves from the frontside.
Add a few more leaves to the cardfront taking care that they do not show through to the inside.
Tie a bow with the Copper Ribbon and adhere with a Mini Glue Dot.
Voila! That is it!
The AWOW Team
Each month this group of creative friends prepare a project for a theme. Below is an image of the whole crew and where they are from around the globe. Such a talented and wonderful group of people! You will want to visit everyone to be sure to see all the amazing projects!
I am so glad you have joined me today in this worldwide hug that stretches all the way from Australia to Alaska across twelve different time zones. We all love sharing joy with you through projects from our individual parts of the world. I hope that you will be filled with lots of inspiration!
Hello and welcome to a Sketch Challenge with Autumn Leaves Dies! I am Theresa McEntee, creator of Theresa’s Treasures Paper Crafts. Today I have the pleasure of participating in the Blog Hop with Around the World on Wednesday (AWOW) organized by Angie McKenzie.
On the second Wednesday of each month, the AWOW team put together a thematic hop to give you some inspiration for your own crafting. This Sketch Challenge and the question on whether to add a bow or not is this month’s theme.
I found this Sketch Challenge to be, well, challenging. I had fallen in love with the All About Autumn Designer Series Paper and Autumn Leaves Dies. So I decided to play around with the different designs and colors. I love the little leaves in the dies!
My Project for today
I chose this color combination to be in line with the colors in the All About Autumn Designer Series Paper-Moody Mauve and Pretty Peacock. I did make this card using Basic White cardstock, but in retrospect, I should have used Very Vanilla cardstock. If I make another card, I will use the Very Vanilla cardstock.
Project Details
Measurements:
Very Vanilla cardstock card base: 4 1/4″ x 11″ scored at 5 1/2″
Very Vanilla cardstock: 3″ x 5″, 3/8″ x 2″ (sentiment) and 4″ x 5 1/4 (inside)
Moody Mauve cardstock: 4″ x 5 1/4″
Pretty Peacock cardstock: 1 1/2″ x 5 1/2″ and 1 1/2″ x 1 1/2″ (to diecut leaves)
Moody Mauve/Foil design of All About Autumn DSP: 1 1/8″ x 1 1/8″, 1 1/2″ x 1 1/2″ (to diecut leaves) and 3/8″ x 3 1/2″ (inside)
Pretty Peacock/Foil design: 1 1/8″ x 1 1/8″, 1″x 1 1/2″ (to diecut leaf) and 3/8″ x 5 1/4″ (inside)
Moody Mauve/Pretty Peacock/Very Vanilla/Foil design: 1 3/8″ x 1 3/8″ and 3/8″ x 4 1/2″ (inside)
Instructions
Burnish the fold of the Very Vanilla cardstock card base with your Bone Folder.
Use the Multipurpose Liquid Glue to adhere the All About Autumn DSP strips to the 4″x 5 1/4″ Very Vanilla cardstock to make the inside panel. Adhere it to the inside of the Very Vanilla card base.
Adhere the 4″ x 5 1/4″ Moody Mauve cardstock to the front of the Very Vanilla cardbase.
Position the 3″ x 5″ Very Vanilla cardstock slightly to the right and adhere in place.
Now adhere the Pretty Peacock cardstock to the card front on the left side.
Set up all of the squares of the All About Autumn Designer Series on the card front, and then adhere them.
Diecut the little leaves, place them where you like and adhere.
Stamp the sentiment in Pretty Peacock Ink. Adhere to the card front with Stampin’ Dimensionals.
Add the Blooming Pearls as desired.
The AWOW Team
Each month this group of creative friends prepare a project for a theme. Below is an image of the whole crew and where they are from around the globe. Such a talented and wonderful group of people! You will want to visit everyone to be sure to see all the amazing projects!
I am so glad you have joined me today in this worldwide hug that stretches all the way from Australia to Alaska across twelve different time zones. We all love sharing joy with you through projects from our individual parts of the world. I hope that you will be filled with lots of inspiration!
Hello and welcome! “Let’s Take A Walk” with Autumn Leaves! I am Theresa McEntee, creator of Theresa’s Treasures Paper Craft. Today I have the pleasure of participating in the Blog Hop with Around the World on Wednesday (AWOW) organized by Angie McKenzie. On the second Wednesday of each month, the AWOW team put together a thematic hop to give you some inspiration for your own crafting. “Lets Take a Walk” is this month’s theme.
My Project for today
When I was about 4 years old, I lived in the country in Pennsyvania USA. My Mom & I would go for a daily walk down the tree-lined dirt road. The image on the All About Autumn Designer Series Paper brings me back to this time period. We each had a pram. My little brother was in my Mom’s pram. I had a collection of Black Walnuts and Roly-Polies in mine! Lol!
Project Details
This card was made using Copper Clay, Daffodil Delight and Cajun Crazed colored cardstock. The sentiment is embossed in Copper Emboss Powder onto a Very Vanilla cardstock. The sentiment is diecut with a die from the He’s All That Dies. The card is embellihed around the sentiment with the Adhesive-Backed Sparkle Gems.
The inside panels are cut with the Deckled Rectangle Dies.
The AWOW Team
Each month this group of creative friends prepare a project for a theme. Below is an image of all of the crew and where they are from around the globe. Such a talented and wonderful group of people! You will want to visit everyone to be sure to see all the amazing projects!
I am so glad you have joined me today in this worldwide hug that stretches all the way from Australia to Alaska across twelve different time zones. We all love sharing joy with you through projects from our individual parts of the world. I hope that you will be filled with lots of inspiration!
Sunday September 3rd is the last day to sign up for the Make-n-Take Option!
Stamp-Along with me and my two fellow Stampin’ Up! demonstrators, Christy & Jeanne, for a two day Inked & Tiled Online Retreat on Friday, September 29th & Saturday, September 30th, 2023.
Join us for a fun weekend of card making full of ideas, tips, and inspiration! Our Stamp~Along online retreat is open to all levels – experienced crafter to beginner. We’ve created a paced format designed for you to stamp along with us during our live videos. And the videos will be available for replay afterward.
Online Retreat Details:
Exclusive Facebook Group for the Online Retreat
6 Stamp-Along Facebook lives (replays will be available)
6 PDF Tutorials plus 3 Bonus PDF Tutorials
4 different bundles featured
Option to purchase the Make-N-Take Kit for 6 cards
And prizes!
There are 2 options to join –
Purchase the Make-N-Take Kit for $47
or Get the Online Pass only for $22
The Make-n-Take Option-CLOSED
-must purchase by Sunday September 3, 2023
The Make-n-Take Kit* Includes:
Access to Stamp-Along Inked & Tiled Online Retreat Facebook Lives & Group Page.
6 PDF tutorials plus 3 additional bonus card PDF tutorials.
a Make-N-Take Kit for the 6 Retreat cards which includes cardstock card pieces, die cuts & embossed elements.
A pack of Inked Botanicals Designer Series Paper for you to pre-cut your panels & punched elements
A spool of Lost Lagoon Bordered ribbon.
A pack of Iridescent Rhinestones Basic Jewels
& Prizes!
*Does not include the Inked & Tiled Bundle, ink or basic stamping supplies i.e. glue, scissors, needed to make the Retreat cards.
Make-N-Take Kits will be mailed out by September 15th to ensure kits arrive before the Online Retreat.
Do you need to order the Inked & Tiled Bundle? Order from my Online Store HERE. You may also order the ink and any stamping supplies you need in my Online Store. The ink needed is: Crushed Curry # 147087, Calypso Coral #147101 and Lost Lagoon #161678.
Purchase Online Retreat With Make-N-Take Kit $47 USD (must sign up by Sept. 3rd) – CLOSED
The Online Pass Option: Closed
-Register by Friday September 15, 2023
The Online Pass Option* Includes:
Access to Stamp-Along Inked & Tiled Facebook Lives & Group Page.
The 6 Retreat cards plus three Bonus card PDF Tutorials.
Prizes!
*Does not include the Inked & Tiled Bundle or card Make-N-Take kit.
Don’t have the Inked & Tiled bundle? You can order from my Online Store HERE.
Purchase Online Pass Only $22 USD (Sign up by Sept. 15th) – closed
I hope to stamp along with you for the Online Retreat! It will be so much fun!


![Gallery Blooms Bundle [ 165213 ]](https://i0.wp.com/assets1.tamsnetwork.com/images/EC042017NF/165213s.jpg?w=100&ssl=1 "Gallery Blooms Bundle [ 165213 ]")
![Spotlight On Nature Dies [ 163580 ]](https://i0.wp.com/assets1.tamsnetwork.com/images/EC042017NF/163580s.jpg?w=100&ssl=1 "Spotlight On Nature Dies [ 163580 ]")
![Simply Said Mix & Match Photopolymer Stamp Set (English) [ 163756 ]](https://i0.wp.com/assets1.tamsnetwork.com/images/EC042017NF/163756s.jpg?w=100&ssl=1 "Simply Said Mix & Match Photopolymer Stamp Set (English) [ 163756 ]")
![Early Espresso Classic Stampin' Pad [ 147114 ]](https://i0.wp.com/assets1.tamsnetwork.com/images/EC042017NF/147114s.jpg?w=100&ssl=1 "Early Espresso Classic Stampin' Pad [ 147114 ]")
![Pecan Pie Classic Stampin' Pad [ 161665 ]](https://i0.wp.com/assets1.tamsnetwork.com/images/EC042017NF/161665s.jpg?w=100&ssl=1 "Pecan Pie Classic Stampin' Pad [ 161665 ]")
![Pecan Pie 12" X 12" (30.5 X 30.5 Cm) Two Tone Cardstock [ 166688 ]](https://i0.wp.com/assets1.tamsnetwork.com/images/EC042017NF/166688s.jpg?w=100&ssl=1 "Pecan Pie 12\" X 12\" (30.5 X 30.5 Cm) Two Tone Cardstock [ 166688 ]")
![Pecan Pie 8 1/2" X 11" Cardstock [ 161717 ]](https://i0.wp.com/assets1.tamsnetwork.com/images/EC042017NF/161717s.jpg?w=100&ssl=1 "Pecan Pie 8 1/2\" X 11\" Cardstock [ 161717 ]")
![Calypso Coral 8-1/2" X 11" Cardstock [ 122925 ]](https://i0.wp.com/assets1.tamsnetwork.com/images/EC042017NF/122925s.jpg?w=100&ssl=1 "Calypso Coral 8-1/2\" X 11\" Cardstock [ 122925 ]")
![Basic White 8 1/2" X 11" Cardstock [ 166780 ]](https://i0.wp.com/assets1.tamsnetwork.com/images/EC042017NF/166780s.jpg?w=100&ssl=1 "Basic White 8 1/2\" X 11\" Cardstock [ 166780 ]")
![Beautiful Gallery 6" X 6" (15.2 X 15.2 Cm) Designer Series Paper [ 165196 ]](https://i0.wp.com/assets1.tamsnetwork.com/images/EC042017NF/165196s.jpg?w=100&ssl=1 "Beautiful Gallery 6\" X 6\" (15.2 X 15.2 Cm) Designer Series Paper [ 165196 ]")
![Gold 1 1/2" (3.8 Cm) Open Weave Trim [ 165715 ]](https://i0.wp.com/assets1.tamsnetwork.com/images/EC042017NF/165715s.jpg?w=100&ssl=1 "Gold 1 1/2\" (3.8 Cm) Open Weave Trim [ 165715 ]")
![2025–2027 In Color™ Flat Pearls [ 165192 ]](https://i0.wp.com/assets1.tamsnetwork.com/images/EC042017NF/165192s.jpg?w=100&ssl=1 "2025–2027 In Color™ Flat Pearls [ 165192 ]")


")


 Designer Series Paper")

 Striped Trim")


")


 Designer Series Paper")


")


")
")
")


 Specialty Designer Series Paper")
 Specialty Designer Series Paper")