Posted in Animals, beginner stamper, cactus, desert, Mini Catalog 2020, Sale-A-Bration 2020, Simple stamping, Stampin" Blends Alcohol Markers

The Gang’s All Meer for a Birthday Greeting

Good day! I hope this post finds all of you staying healthy. If you are stuck at home, remember all those projects you wished you had time for? Well, get them out and spend the time working on them. That will help you feel more positive and productive!

Today’s card is a little silly and very cute. It is a great Birthday greeting for just about anyone except perhaps the most serious among us.

These little Meerkats are just too cute!

And there is a little surprise inside! A cute lizard with a birthday hat next to a cactus.

The Gang’s All Meer cannot be bought. You can get it free with a $50 purchase from my Stampin’ Up! Online store. Click here for the store. Do not delay because this offer is only good until March 31, 2020.

Well, let’s get started and make this card!

Measurements: Very Vanilla Card stock (CS): 8 1/2 x 5 1/2 inches with a score line at 4 1/4 inches, 3 1/4 x 2 1/2 inches, 3 1/2 x 2 1/2 inches, 3 x 1 inches, and (not pictured) 5 1/4 x 4 inches; Pool Party CS: 5 1/4 x 4 inches and 3 x 2 1/4 inches.

Use Memento ink to stamp the group of Meerkats onto the 3 1/2 x 2 1/2 inch piece of Very Vanilla CS, and the sentiment “Happy Birthday to a Stand Up Friend” onto the 3 x 1 inch piece of Very Vanilla CS.

I used the Stampin’ Blends Alcohol Markers in: Ivory, Light and Dark Crumb Cake and Light Old Olive to color the Meerkats. Check out all the Stampin’ Blends here.

There are many ways to color with the alcohol markers. I will just share what I did. I first did a Goggle search of Meerkat images to get the coloring close to natural. I started with the Ivory to color the bellies and a little on the head. I added the Light Crumb Cake for the rest of the body and head.

I used the Dark Crumb Cake for the outline of the eyes and the Light Old Olive to add some color.

Measure a length of the 5/8 inch Burlap Ribbon that is about 8 inches long. Use the Glue Dots to adhere the ribbon to the card. Tip: I put the ribbon over the the Glue Dot while it is still on the roll to adhere the dot to the ribbon. See the Burlap Ribbon here.

Adhere the ribbon to the card. Use the Take Your Pick Tool to transfer a Glue Dot under the ribbon to hold it in place. Click here to see the Take Your Pick Tool.

Tie a knot to use on the front of the card. First overlap the ribbon, then push the end through the hole.

It should turn out like this. It is a little flattened so it will lay on the card properly. Set aside.

Trim the piece with the Meerkats on it to 2 3/4 x 2 inches. Apply Stampin’ Dimensionals to the back and set aside.

Adhere the 3 x 2 1/4 inch Pool Party CS to the 3 1/4 x 2 1/2 inch Very Vanilla CS.

Apply Stampin’ Dimensionals to the back of the Very Vanilla /Pool Party piece and set aside.

Trim the sentiment to 1 3/8 inches and apply Stampin’ Dimensionals to the back. Set aside.

Now to put it all together! Adhere the Pool Party with Burlap Ribbon piece to the card front. Adhere the Meerkats to the Very Vanilla/Pool Party piece.

Adhere the Meerkat piece to the left of the card front. Now add the sentiment to the right lower corner.

Place the knotted Burlap Ribbon on the card and trim to size.

Use a Stampin’ Dimensional to adhere the knotted Burlap Ribbon to the card front.

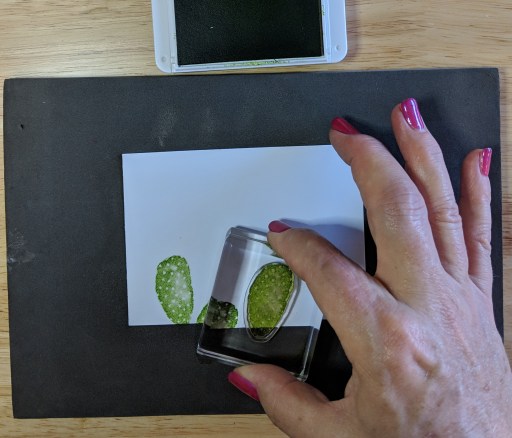
Now to make the surprise inside the card! Stamp the little cactus in Memento ink onto the 5 1/4 x 4 inch Very Vanilla CS. Now stamp the little lizard next to the cactus.

Use Call Me Clover ink (or your favorite color of ink) to stamp the mini birthday hat onto the head of the lizard. So Cute!!

To color the cactus and lizard I used the Stampin’ Blends Alcohol Markers in: light and dark Lovely Lipstick, light and dark Old Olive and light Crumb Cake. Check out all the Stampin’ Blends here.

I first used the light Old Olive Stampin’ Blend, then used the dark Old Olive Stampin’ Blend to try to create some shadow.

I used the light Old Olive Stampin’ Blend to color the little lizard. I then colored the inside of the cactus flower with light Lovely Lipstick.

Add the dark Lovely Lipstick for the outer part of the cactus flower. I used the light Crumb Cake to color the sand and make a little shadow for the lizard.

Adhere this piece to the inside of the card.

And Viola! You have a really cute and silly Birthday card! I hope you get a chance to try this card. Thank you for joining me today! Have a great day and stay safe and healthy! Please leave me a comment and let me know what you think of the cards I demonstrate. Any suggestions are welcome!

Stampin’ Up! Products used include: Stamp Set: The Gang’s All Meer #152294 (free with a $50 purchase); Paper: Very Vanilla CS #101650 and Pool Party CS #122924; Ink: Memento #132708 and Call Me Clover #147139; Stampin’ Blends Alcohol Markers: Ivory #144606, Light and Dark Crumb Cake Combo #144601, Light and Dark Old Olive Combo #144597, and Light and Dark Lovely Lipstick Combo #147281; Clear Blocks: A #118487, B #117147, C #118486 and D #118485; Take Your Pick #144107; Adhesives: TomBow Multipurpose Liquid Glue #110755, Glue Dots #103683 and Stampin’ Dimensionals #104430; and 5/8 inch Burlap Ribbon #141487.

Posted in beginner stamper, cactus, desert, Hello, Occasions Catalog 2019, Simple stamping

Beautiful Desert

Living in the desert can be very peaceful and colorful. When the cacti bloom and add color to the usually brown desert, it is breath-taking!

Today I am using the Stampin’ Up! stamp set called Flowering Desert. I have had a great deal of fun with this set! I am using the same colors I have used in previous blog posts, Shaded Spruce and Pineapple punch. I have added Granny Apple Green.

Here is today’s card. In addition to the cardstock and ink in Shaded Spruce, Granny Apple Green and Pineapple Punch you will need Whisper White cardstock and some adhesive. If you would like pink flowers on top of the cacti, you may use Melon Mambo ink.

I started with Whisper White cardstock cut at 4 1/2 x 3 1/4 inches using the larger cactus ‘leaf’ stamp in Granny Apple Green ink.

I added a couple more leaves allowing space in between for other smaller cactus leaves.

I added more to the cactus with the smaller leaf.

Keep adding more of the small leaves until you like how it looks.

Next I used the Agave leaves stamp in Shaded Spruce ink.

Top the cactus using the Pineapple Punch ink and the larger flower stamp.

To finish the design, I used Pineapple Punch ink to add the flower branch.

I used the Shaded Spruce ink for the sentiment “Hi There!”.

I am now done with the stamping.

Tip: Some of the ink will get on your Pierce Mat. This can easily be removed with a baby wipe or wet washcloth. Another option is to wrap white copy paper around the mat so the extra ink goes on the paper instead of the mat.

In order to assemble the card I cut a piece of Pineapple Punch cardstock at 5 1/4 x 4 inches and adhered it  to the Whisper White card base. The card base measures 8 1/2 x 5 1/2 and is folded in half.

I cut a piece of Shaded Spruce the same size as the stamped piece of Whisper White, 4 1/2 x 3 1/4 inches.

Place the Shaded Spruce piece at a slight angle and adhere to the card.

Adhere the stamped piece horizontally parallel to the Pineapple Punch piece.

And now you have the completed card! Be sure to send it to someone special. It’s always nice to get a handmade card in the mail from a good friend just saying “Hello”!

Here are some other variations. Have fun creating your own. To order any of the supplies listed below, click on the shop now button at the top of the blog and you will be connected to my store. If you have any questions about ordering please contact me. There is a special sale right now called Sale-a-bration which lasts until March 31, 2019. During Sale-a-bration, for every $50 ordered, you my choose a free item from the Sale-a-bration brochure. So, check out my store and get your deal on stamping supplies today!

Products used included: Stamps: Flowering Desert  #148700; Cardstock: Shaded Spruce #146981, Pineapple Punch #146971, Granny Apple Green #146990 and Whisper White #100730; Ink: Shaded Spruce #147088, Pineapple Punch #147141 and Granny Apple Green #147095; Clear Blocks: A, B, C and D; Multipurpose Liquid Glue #110755 If you wish to have pink flowers on top of the cactus’ you may use Melon Mambo ink # 147051.

Posted in beginner stamper, cactus, desert, Occasions Catalog 2019, Photopolymer, Simple stamping

Let’s Get Stamping!

Today I will show you how to use the Photopolymer stamps that Stampin’ Up! has. This set is Flowering Desert and is found in the Occasions Catalog. I just love to give a handmade card to someone to let them know I think they are awesome!

These are the supplies you will need to make this card. In addition to the stamp set, I used Shaded Spruce ink, Whisper White cardstock, Clear Block E, the Stampin’ Pierce Mat, and (not shown- Clear Block H, Gingham Gala Adhesive-Backed Sequins, Multipurpose Liquid Adhesive and Stampin’ Dimensionals)

The first step is to carefully remove the Photopolymer stamp from the sheet and place it on a Clear Block as shown.

Next is to tap the stamp onto the ink pad with a light to moderate pressure. You want to get ink on the image and not around the image. Be sure to press straight down, and lift straight up. If there is ink on your block, try using a lighter pressure.

When using the Photopolymer stamps you will need to have the Pierce Mat or a magazine under it to get the best image. Place the stamp straight down onto the paper and apply light to moderate pressure for about 5 seconds. This allows the ink to transfer onto the paper.  Lift the stamp straight up. It may take some practice to get a nice clear image. If there is ink around the image, that is called a halo, and it means you need to place the stamp on the ink with a lighter touch.

To finish the card, I stamped the sentiment onto a 3/4 inch strip of cardstock and cut a banner on one end. The cactus was cut to measure 4 x 2 1/2 inches and adhered to a 4 1/4 x 2 3/4 inch piece of Shaded Spruce. I then adhered the cactus piece onto a card base which measured 8 1/2 x 5 1/2, folded in half length-wise. The “You’re So Awesome” sentiment was adhered using Stampin’ Dimensionals to give it lift and add dimension to the card. I finished it off with some sequins.

This is a really nice, simple card that can definitely be given to someone to express how you feel about them, and pass on some positive energy!