Hello fellow stampers! You are visiting with Theresa McEntee-author of Theresa’s Treasures Paper Crafts. I am hopping with the Ink & Inspiration Blog Hop today. There are several of us- you will find the list to follow the hop at the end of my blog post. Please visit everyone!
The Ink & Inspiration Challenge is both an image and a color challenge.
Here is the photo for the challenge. A fun and relaxing scene.
I was inspired by the photo to think of a great time on the beach during summer break. Fortunately, I had a stamp that conveys a moment of that summertime fun.
The image is part of the Beside Me stamp set. (The “Happy Birthday ” sentiment is from the Inked & Tiled stamp set.)
I had been wanting to try embossing in white emboss powder on a colored background for quite a while. I was also interested in coloring with the Watercolor Pencils using the White pencil first.
A little about how I created this card:
First I embossed the image using the White Emboss Powder & a heat tool. Tip: Remove the heat as soon as the embossing powder melts. Too much heat results in the embossing chipping off the paper.
Next I colored the entire image with the White Watercolor Pencil.
Then I used the the colored Watercolor Pencils.
For the inside, I kept it simple.
This technique was a lot of fun to try. I want to make more!
I hope you enjoyed my interpretation of this challenge. Thanks so much for stopping by. Stop by the rest of the blogs today for more inspiration!
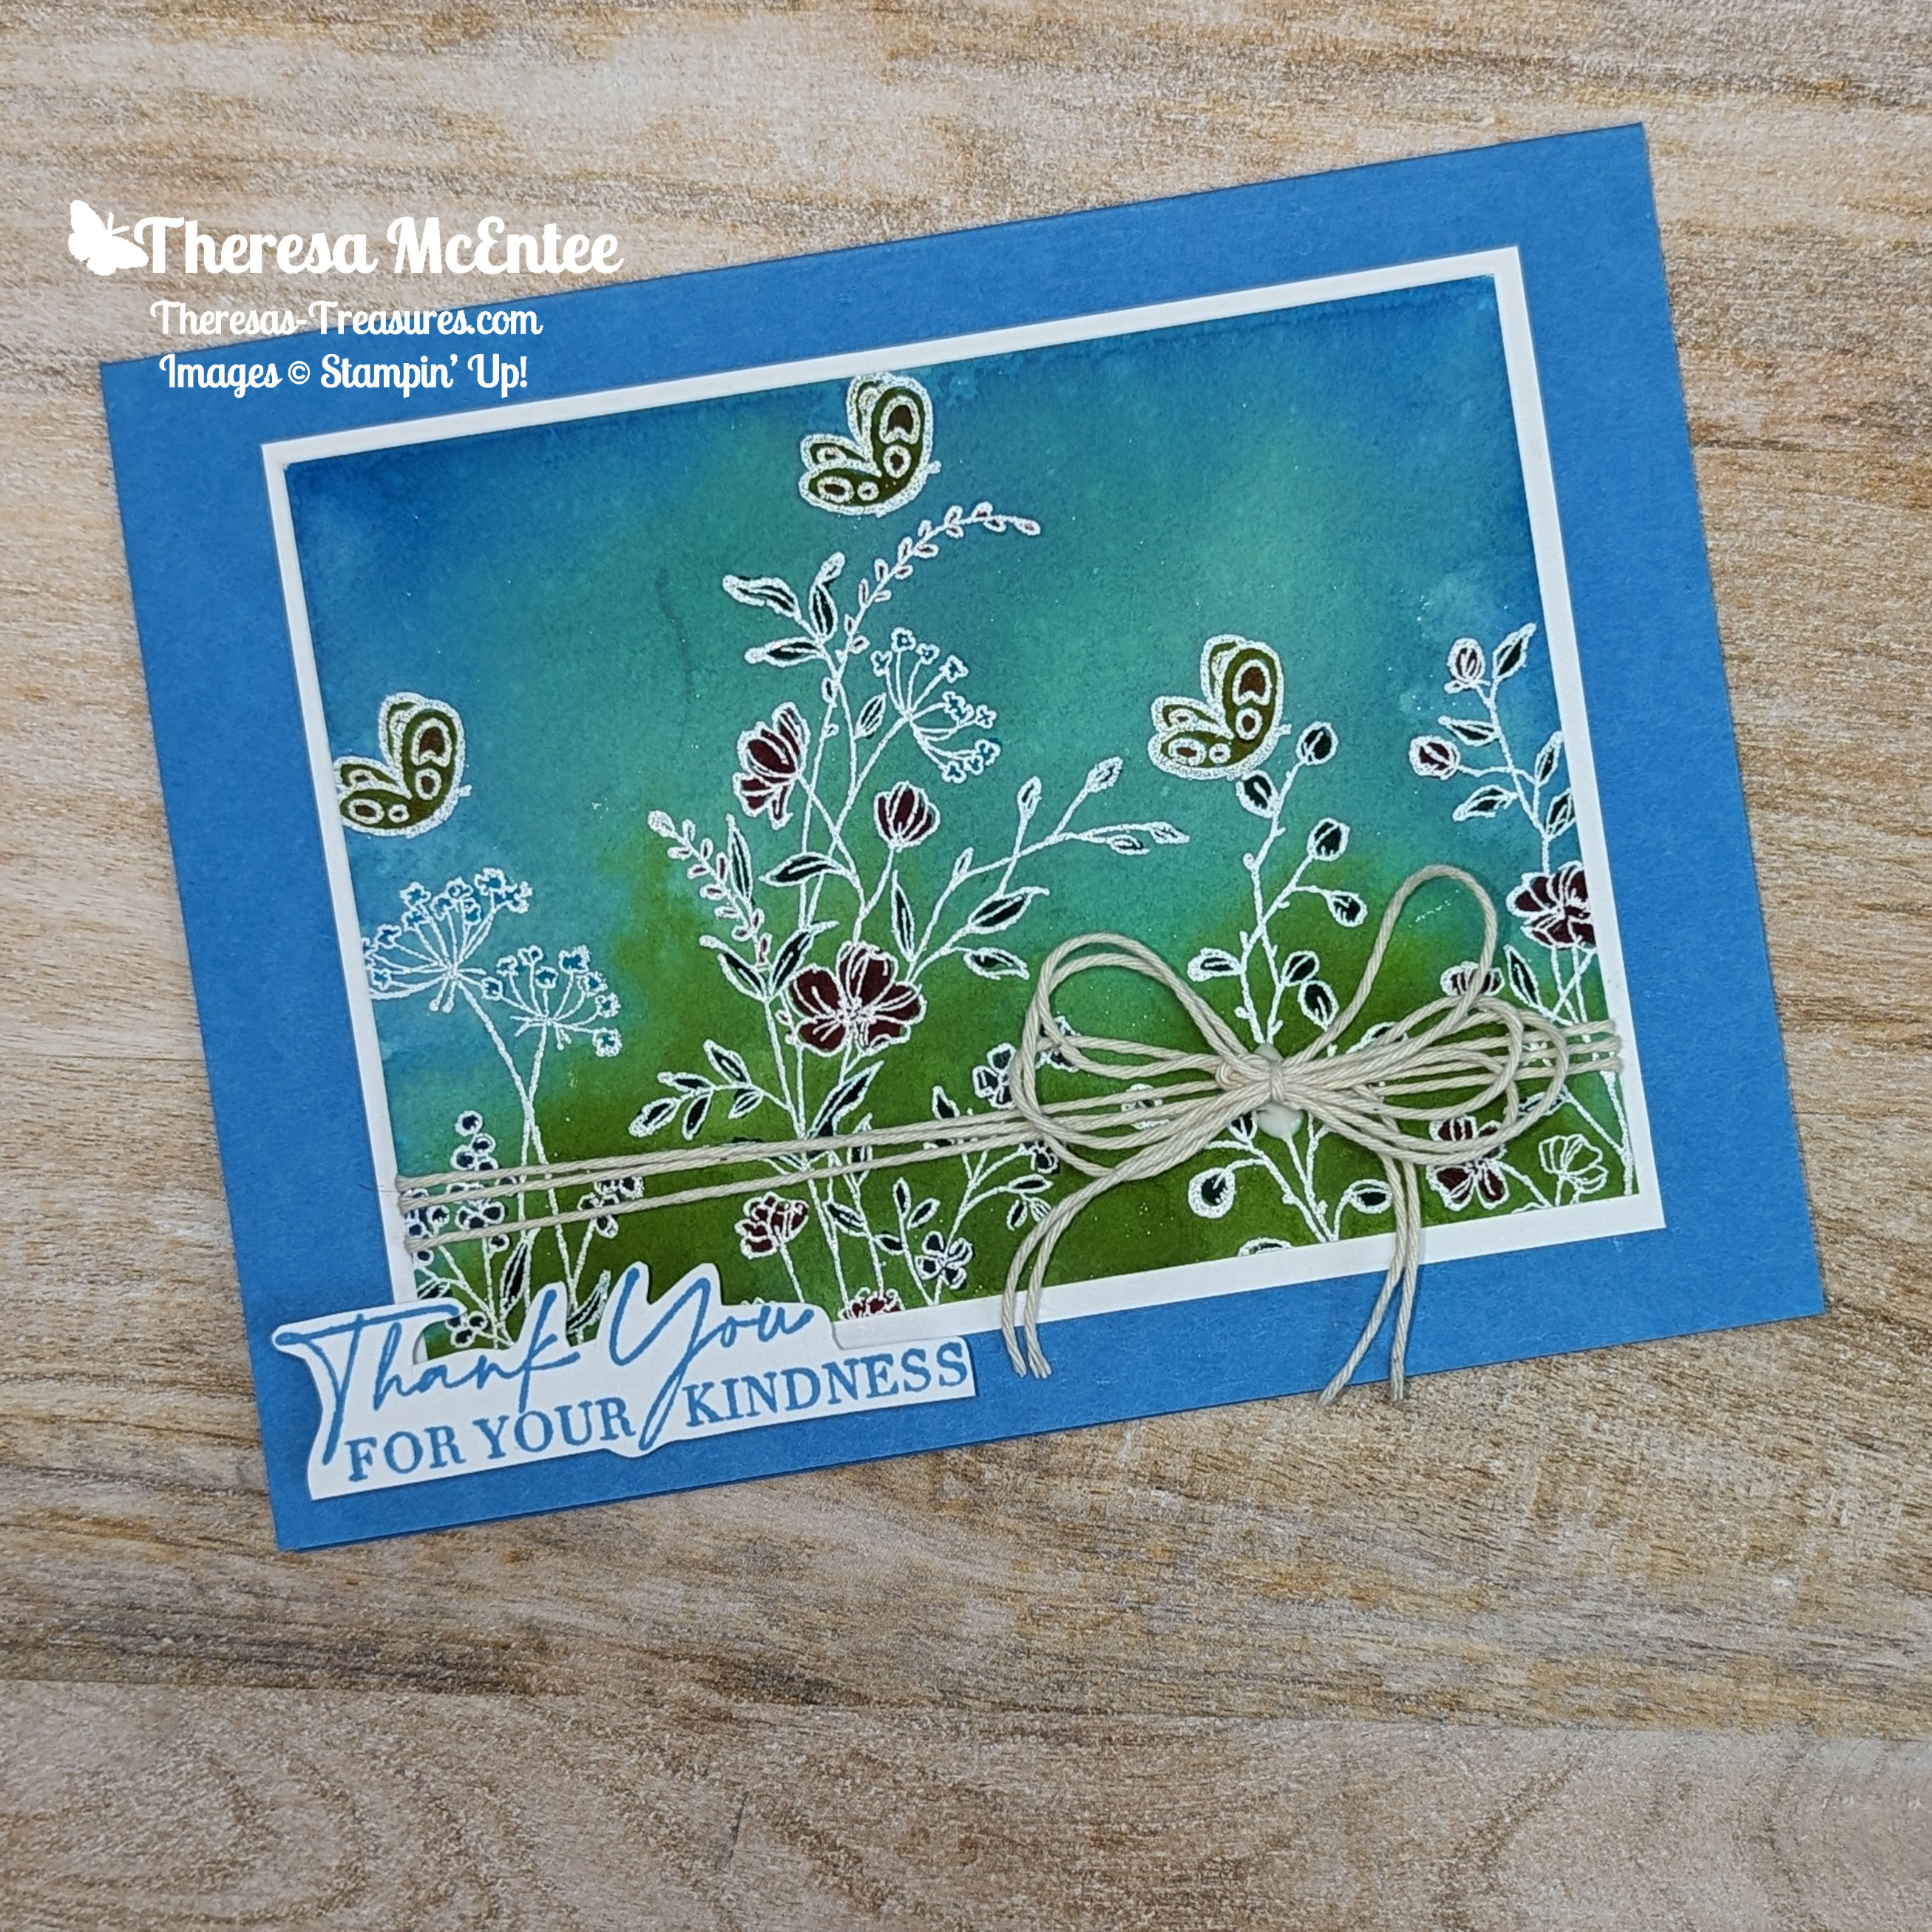
Hello! Welcome to the Kylie & Bruno Bertucci Demonstrator Training Blog Hop for July 2023. I’m Theresa, creator of Theresa’s Treasures Paper Crafts. I have a Thank You card today with the Dainty Delight stamp set using the Emboss Resist Technique. I am so glad you are joining me!
We are a group of Stampin’ Up! Demonstrators from around the world. We are taking part in training to help us build a successful Stampin’ Up! business. My goal is to participate in the monthly Blog Hop in order to create a handmade Thank You card to send to my customers! This blog hop is full of ideas and creative inspiration! Be sure to visit everyone’s blog by clicking on the links at the end of my blog.
Measurements
Azure Afternoon card stock (cs): 5 1/2″ x 8 1/2″ with a score line at 4 1/4 “
Basic White card stock (cs): 3 1/2 x 4 1/2 inches, 1″ x 2 3/4″ (sentiment) and 4″ x 5 1/4″ (inside)
Fluid 100 Watercolor Paper: 3 1/2″ x 5″ initially, then trimmed to be 3 1/4″ x 4 1/2″
Supplies
Dainty Delight stamp set
Easter Bunny stamp set (for the butterfly)
Versamark Ink
White Emboss Powder
Heat Tool
Acrylic Block E
Stampin’ Spritzer
Ink: Memento, Azure Afternoon, Coastal Cabana and Granny Apple Green
Bakers Twine Essentials Pack– Very Vanilla
Blender Brushes
Stampin’ Write Markers: Daffodil Delight, Pumpkin Pie, Shaded Spruce, Sweet Sorbet, Tahitian Tide (I don’t yet have the Azure Afternoon) and Orchid Oasis.
Instructions
Emboss Resist Technique
Stamp the floral images as desired with the Versamark Ink onto the Fluid-100 Watercolor Paper. After each image, apply the White Emboss Powder. Use the Heat Tool to set. Stamp the butterfly image from the Easter Bunny stamp set. Cover with White Emboss Powder and heat set.
Moisten the paper with the Stampin’ Spritzer.
Use the Costal Cabana Ink Pad and apply color to the E Acrylic Block.
Then use the Azure Afternoon Ink Pad and apply ink to the outer upper border.
Finally, use the Granny Apple Green Ink Pad to apply color to the lower portion of the E Acrylic Block.
Spritz the block with the Stampin’ Spritzer until the colors begin to blend together. Quickly turn upside down onto the Watercolor Paper with the embossed images. Let sit for 15 minutes.
Remove the block, and Voila! You have a beautiful watercolor Emboss Resist panel.
Adding Color
Now for the fun part! Color the flowers and butterflies as desired with the Stampin’ Write Markers.
Trim this card piece to 3 1/4″ x 4 1/4″.
Putting it All Together
Adhere to the 3 1/2″ x 4 1/2″ Basic White cs.
Wrap the Very Vanilla Bakers Twine around the card piece three times.
Make a bow with several layers. Adhere the bow to the card front with the Tom Bow Liquid Glue.
Then adhere to the Azure Afternoon cs card base.
Inside Card Piece: use the Blending Brushes with the Coastal Cabana, Azure Afternoon and Granny Apple Green Inks to create a light color on the Basic White cs inside card piece.
Stamp the floral images in Memento Ink.
Color the flowers with the Stampin’ Write Markers.
Adhere to the inside of the Azure Afternoon cs card base.
Voila!
Remember to visit everyone’s blog. You will see creative inspiration from Demonstrators around the world! You are currently at Theresa McEntee-Theresa’s Treasures-USA. Enjoy!
I appreciate your visit to my blog today. Remember to sign up for my Theresa’s Treasures Paper Crafts Newsletter. You can click on the “Subscribe to my Newsletter” tab. Please subscribe to my blog as well. If you need any assistance with placing your order, let me know in the comments. Thanks!
Have a most wonderful day! Happy crafting!
Theresa
Promotions
New Online Exclusives!
Check out the Online Exclusives! These products will not be found in any Stampin’ Up! catalog. First click on my “shop” button. You will then select the “Menu” tab. Select “Shop Products” and scroll down to “Online Exclusives”. From here you can look at the currently available Online Exclusives!
Paper Pumpkin Monthly Kit
Last day to subscribe!!
Name: Fun in the Sun
This kit includes:
All the supplies you need to create 9 cards with fun accordion folds: 3 each of 3 designs; and coordinating envelopes.
An all-occasion stamp set to send friends and family words of encouragement, support and kindness.
Iridescent Sequin Embellishments.
1 Classic Stampin’ Spot: Daffodil Delight.
Summertime Ephemera pieces, labels, and paper pieces.
Adhesive Dots and Tear & Tape Adhesive.
Completed card size: 5-1/2″ x 4-1/4″ (14 x 10.8 cm)
Coordinating Stampin’ Up! colors: Azure Afternoon, Basic Gray, Crumb Cake, Daffodil Delight, Flirty Flamingo, Granny Apple Green, Melon Mambo, Pool Party
Bonus Days!!
BONUS DAYS ARE BACK!
Why? Because you know what is a great deal? Getting rewarded for all the crafting supplies you’re already going to buy!
When you shop between July 6-31 and spend $50 USD | $60 CAD you will earn a $5 USD | $6 CAD coupon! Make sure you save all your coupons because you can redeem them (and we mean ALL of them) between August 1–31 .
There’s no limit to how many coupons you can earn!
Today I have a Super Fun Seaside Bay Emboss Resist Thank You Card!
Welcome and thanks for visiting Theresa’s Treasures Paper Crafts! I am Theresa and I am a Stampin’ Up! Demonstrator in Arizona, USA. Today is the monthly Inspirations in Ink Blog Hop! I am excited to be hopping with awesome demonstrators from around the world. Be sure to check out everyone’s projects using theSeaside Bay Bundle. The Seaside Bay Bundle is in the 2023 Jan-April Mini Catalog. You may order form my Online Store HERE.
Seaside Bay Emboss Resist Thank You Card
Measurements
Balmy Blue card stock (cs) card base: 5 1/2 x 8 1/2 inches scored and folded at 4 1/4 inches
Textured 12×12 inch Shimmer Paper, Shaded Spruce: 4 x 5 1/4 inches (algae die cuts are from the center of this piece)
Fluid 100 5×7 inch Watercolor Paper: 3 1/2 x 4 3/4 inches
Crumb Cake cs: 1 1/2 x 4 inches for the seashell die cuts
Basic White cs: 4 x 5 1/4 inches (inside of card)
Supplies
Seaside Bay Bundle (stamp & dies)
Ink: Night of Navy, Shaded Spruce, Balmy Blue & Coastal Cabana
Versamark
Stampin’ Emboss Powder, Basics, White
Heat Tool
Water Painters, large pointed tip
Stampin’ Spritzer
Flat Adhesive-Backed Pearls
Wink of Stella Glitter Brush
Stampin’ Cut & Emboss Machine
Seaside Bay Emboss Resist Thank You Card
Instructions
Step 1- Emboss the Watercolor Paper
Using the Versamark Ink stamp the images onto the Fluid 100 Watercolor Paper.
Stamp two images, then cover them with the White Emboss Powder. Shake off the excess.
Use the Heat Tool to set.
Stamp two more images and repeat.
That way you can see where you stamped to avoid stamping on top of another image.
Step 2- Emboss Resist Technique
Prepare several layers of paper towels to work on.
Squeeze each of the colored ink pads to get ink on the inside of the lid. Open & set up in a line above the paper towels.
Use the Stampin’ Spritzer to spray water on the embossed Watercolor Paper. The water beads up on the paper.
Use the Water Painter to pick up ink from the lid.
Brush the ink onto the moist Watercolor Paper one color at a time.
TIP: In between colors, squeeze water from the Water Brush onto a paper towel until it runs clear.
Dry overnight. Or use the Heat Tool to speed up the drying process.
Step 3- Assembling the Card
Use the Stampin’ Cut & Emboss Machine and the Seaside Bay Dies to cut one large & one small algae from the center of the Shaded Spruce Textured Shimmer Paper. C
Cut 2 small & one large seashell from the Crumb Cake cs.
Adhere the Basic White cs to the inside of the Balmy Blue cs card base.
Adhere the Shaded Spruce Textured Shimmer Paper to the card front.
Use Stampin’ Dimensionals to adhere the embossed & watercolored card piece to the card front.
Adhere the large algae diecut to the bottom left corner of the card front. Adhere the small algae.
Adhere the seashells
Step 4- Bling!
First add some Wink of Stella to the seashells.
Then add some of the Flat Adhesive-Backed Pearls.
Voila!
Seaside Bay Emboss Resist Thank You Card
Thank you so much for visiting today! Please visit all the blogs in this hop. You will see all the fun and inspiring projects made by the Inspirations In Ink demonstrators. You are currently visiting Theresa McEntee-USA creator of Theresa’s Treasures Paper Crafts.
Would you like your own Mini Cut & Emboss Machine? How about a Boho Blue Mini Cut & Emboss Machine! Join my Stamping Gems Team today and you can get a Mini Cut & Emboss Machine in your starter kit! Or if you already have a Cut & Emboss Machine and have a long wish list, you can join and get $175 UDS in product for $99 USD! This is the best deal! Click HERE to order your starter kit!
Sale-a-bration ends February 28, 2023! Order now to be able to get what you want! Remember to claim your Free product. New FREE products have been added!
Thinking of adding creativity to your life? Try a monthly paper crafting kit! The Paper Pumpkin Monthly Subscription delivers a kit with everything you need to make a project-right to your door! Sign up for a Pre-paid Paper Pumpkin Subscription HERE. The February kit has an Add On Die that coordinates with the images in the kit!
Thank you for joining me for our Stampin’ Up!® Demonstrator Monthly Team Blog Hop! I am so excited that you could join us today! I know you will get lots of ideas and creative inspiration! My thank you cards are made with the Free As A Bird stamp set. Be sure to visit all the blogs and see all the different thank you cards from around the world!
I belong to a group of Stampin’ Up!® Demonstrators from around the world that are taking part in training that is helping us to build a successful Stampin’ Up!® business. I am a Demonstrator in Arizona, USA. If you are not already an awesome Demonstrator, or do not have an awesome Demonstrator and live in the USA, I would love to be your most awesome Demonstrator! I really appreciate your support.
The theme for the cards today is: Thank You. I have many customers who support me and I like to send them a Thank You card every once in awhile. The following set of cards is for my fabulous customers which I will be sending to anyone who orders during the month of March.
I am looking forward to Spring with the flowers blooming and the birds singing. So much so that I was inspired to make this card. The Free As A Bird stamp set is perfect!
I colored the birds with the Stampin’ Blends Alcohol Markers in Pool Party and Bermuda Bay. The flowers are Magenta Madness. The leaves are colored in Granny Apple Green to match the background Designer Series Paper(DSP) from the Artistry Blooms DSP. The “Thanks” sentiment is from the Good Morning Magnolia stamp set. The sentiment is embossed in Clear Stampin’ Emboss Powder with Memento ink on an oval of Vellum Card Stock.
Thanks for stopping by Theresa’s Treasures. Look through the list below to see who is next in line for the Blog Hop.
I just wanted to pop on today and share this awesome masculine thank you card made with the Beautiful World stamp set.
I created this masculine thank you card with Cajun Craze Card Stock (CS) for the background on a Very Vanilla CS card base. The second layer is the Forever Gold Laser Cut paper.
I covered the Gold Hoop with leaves punched from the Brushed Metallic 12 x 12 inch CS with the Sprig Punch. The more granular gold leaf is made by applying Versamark to Crumb Cake CS and embossing with the Gold Emboss Powder. The globe and “Thank You” sentiment are also embossed with the Gold Emboss Powder. The gold twine comes from the Forever Greenery Trim Combo Pack and the sequins from the Artistry Blooms Sequins.
Viola! You have an awesome masculine thank you Card!
Thanks for stopping by. Please “like” my post and my Theresa’s Treasures Blog. Leave me a comment, I would love to hear what you think!
Hello! Hope you are all doing well and are ready to craft!
I had a customer request that I go over how to use the Stampin’ Emboss Powder to emboss on a card. I’m excited to show you the Emboss Resist technique because it is just magical! This is a very simple card meant to highlight the embossing process.
You will be surprised how simple this lovely card is to make! I used the Stampin’ Up! Forever Fern stamp set for the bunch of leaves and the sentiment.
Measurements: Shimmery White Card Stock (CS): 8 1/2 x 5 1/2 inches with a score line at 4 1/4 inches, 5 1/4 x 4 inches and a 3/4 inch strip measuring at least 3 inches. Tip: I chose the Shimmery White CS because it holds up better to watercoloring than the Whisper White CS. You could also use the Fluid 100 Watercolor Paper for the 5 1/4 x 4 inch piece.
Embossing. The first step is to use an embossing static remover powder. (Stampin’ Up! had one called the Embossing Buddy but unfortunately it retired. Information on where to get one is at the end of the blog.)
The second step is to use Versamark ink which is a high viscosity ink so that the Stampin’ Emboss Powder will adhere to it. Tip: I ink the larger stamps upside down to be sure to get the ink evenly distributed.
Carefully stamp the bunch of leaves image onto your 5 1/4 x 4 inch Shimmery White CS in Versamark ink. It will be hard to see. Take care not to touch the Versamark ink on the card because it will smear. Stamp the sentiment “HELLO” in Versamark ink onto the 3/4 inch strip of Shimmery White CS.
The third step is to apply the emboss powder to the image stamped in Versamark ink. I used White Stampin’ Emboss Powder. I use a spoon to put enough of the emboss powder to cover the image. Tip: I keep my Stampin’ Emboss Powders in a plastic container so that it is easier to use. You can just pour the powder from the jar onto the image and catch the extra powder with a piece of paper. Then pour the powder back into the jar.
I use the spoon to tap the paper and remove any excess emboss powder. You can see the image somewhat. Notice that the Stampin’ Emboss Powder is dull. When you use the Heat Tool it will become shiny.
I use a small paint brush to remove emboss powder that is on by mistake before heating it.
For this step I am using Shaded Spruce CS to better show you the process. The fourth and final step is to use the Heat Tool to melt the Stampin’ Emboss Powder. I usually let the Heat Tool run for 10 seconds before waving it in front of the paper. I keep the Heat Tool moving about 1-2 inches away from the paper. You will see a change in the emboss powder as it melts. For the White Stampin’ Emboss Powder you will see it turn from dull to shiny. The leaves on the left are before heating, on the right after heating.
Now we can watercolor! I used the Aqua Painter that is retired. There are new Water Painters in the new Stampin’ Up! 2020-2021 Annual Catalog. I just haven’t gotten them yet. They work the same. I applied a layer of water to the paper. Using Old Olive ink I started at the top of the image using wide brush strokes. Tip: To get the ink on the lid of the ink pad, squeeze the pad in the center.
I used Shaded Spruce ink for the bottom part of the bunch of leaves, blending the two ink colors in the middle. Dab the image with a paper towel to remove excess ink over the embossed image. I used the Shaded Spruce alone for the watercolor wash behind the sentiment. Tip: Squeeze the Watercolor Painter brush onto a paper towel before changing colors to remove the ink. Be sure to clean it when you are done watercoloring.
Adhere the embossed piece to the 8 1/2 x 5 1/2 inch Shimmery White CS after you have folded it at the 4 1/4 inch score line. Trim the sentiment and apply it to the card front with Stampin’ Dimensionals.
Now for some Bling! The Gold Glitter Enamel Dots are perfect for dressing up this simple card.
Apply an odd number of dots for best results. Tip: Apply the Gold Glitter Enamel Dots using the Take Your Pick tool. It makes transferring the dots from the acetate sheet to the card much easier.
And Viola! there you have a beautiful card to say “HELLO” to someone special.
I hope you enjoyed learning to emboss. If you already knew the magic of embossing, I hope you will try this card. Have a most wonderful day and find some time to craft today!
Promotion
There is a special for the month of June when you join my Stamping Gems team! For $99 you not only get to choose $125 of product for your Starter Kit, you also get to choose a free bundle of your choice. The bundle can be one stamp set with a punch, or one stamp set with dies. Email me at theresastreasures.az@gmail.com if you are interested or have any questions.


")
")


")
")


 Shimmer Paper")


")


")


")


