Posted in 2024 Stampin' Up! January to April Mini Catalog, Ink & Inspiration Blog Hop, Sale-a-Bration 2024, Stampin" Blends Alcohol Markers, Stampin' Blends

Stippled Roses Congratulations Card for the Ink and Inspiration Blog Hop-February 2024

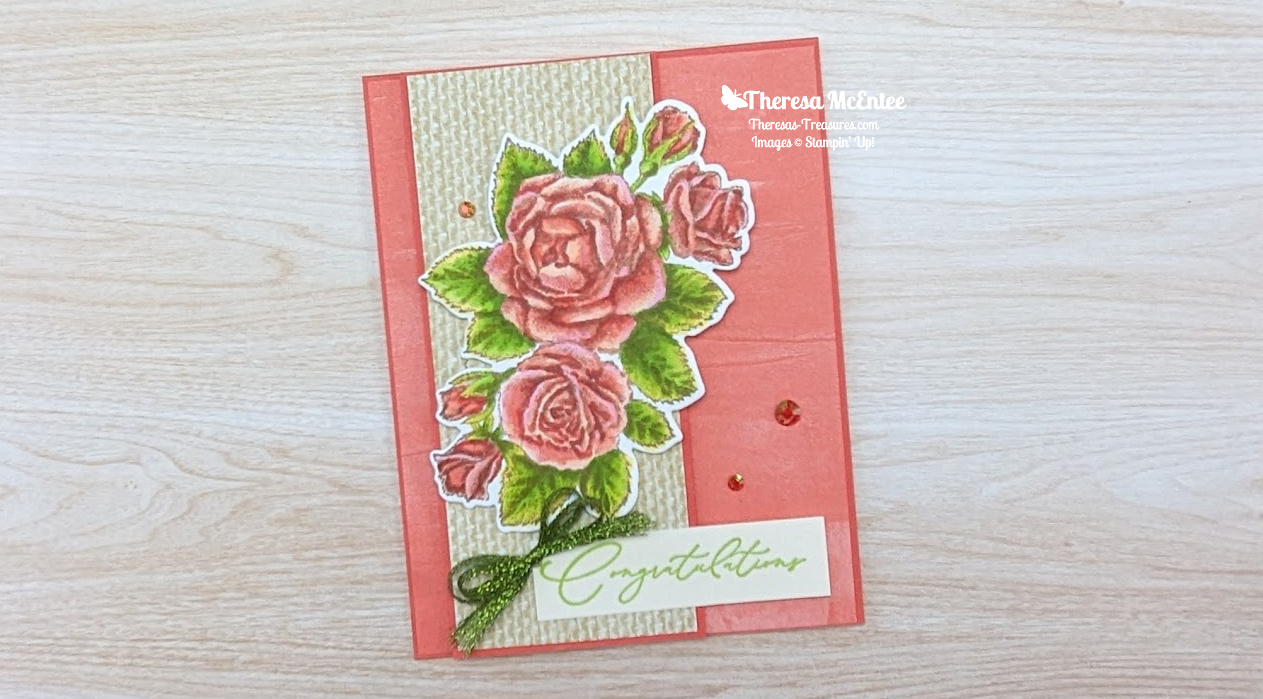
Hello fellow stampers! I am Theresa McEntee-author of Theresa’s Treasures Paper Crafts. I am hopping along with the Ink & Inspiration Blog Hop today with my Stippled Roses Congratulations Card for the Ink and Inspiration Blog Hop-February 2024. You can visit super awesome blogs from around the world! The list to follow the hop is at the end of my blog post. Please stop by and see everyone’s projects!

The Ink & Inspiration Challenge is both an image and a color challenge. I was inspired by the image of the roses in the center of the image. I love roses-the color, the scent, and the wonderful feeling I get when I receive them. Roses are also very nice to send to others!

Real roses can be very expensive and only live for a short time. Creating a card with roses is more managable and can last forever!

Measurements

  • Calypso Coral cardstock (cs) card base: 4 1/4″ x 11″ scored at 5 1/2″
  • Calypso Coral cs: 2 3/8″ x 5 1/2″
  • Softly Stippled Designer Series Paper (DSP):
    • Calypso Coral background: 4 1/8″ x 5 3/8″
    • Wild Wheat burlap pattern: 2 1/4″ x 5 3/8″
  • Very Vanilla cs:
    • inside: 4″ x 5 1/4″
    • sentiment: 3/4″ x 2 3/4″
    • for stamping the roses: 4″ x 5″

Supplies

  • Stamp Set: Stippled Roses
  • Dies: Stippled Roses
  • Ink: Stazon Saddle Brown and Parakeet Party Ink pads
  • Stampin’ Blends Alcohol Markers: Petal Pink, Calypso Coral, Cajun Craze, Bubble Bath, Lemon Lolly, Parakeet Party, Lemon Lime Twist & Granny Apple Green
  • Watercolor Pencils: Calypso Coral, Daffodil Delight, Pumpkin Pie & Granny Apple Green
  • Embellishments: Iridescent Pastel Gems
  • Ribbon: 1/8″ Metallic Woven Ribbon in Parakeet Party

Instructions

  1. Stamp the roses in Stazon Saddle Brown ink onto the 4″ x 5″ Very Vanilla cs.
  2. Pick out the Stampin’ Blends and Watercolor Pencils. It may take 1- 1 1/2 hours to color the roses.
  3. Start with the darkest color of alcohol ink and just color where there are already shadows.
  4. Then blend in the next lightest color. Continue to apply small amounts of ink with the markers until you have the desired look. Note: there is a Facebook Page by Alison Tilsner that you can join called Blends & Beyond. In Guide 1 there is a video she made that I followed to color the roses.

  1. After you have the Alcohol Markers down, enhance the colors with the Watercolor Pencils.
  2. Stamp the smaller rose in Stazon Saddle Brown Ink onto the inside Very Vanilla cs and color.
  3. The senntiment is stamped in Parakeet Party Ink.
  4. Assemble the card. Use Stampin’ Dimensionals for the burlap strip on the card front.

I hope you enjoyed my card. Coloring takes a lot of trial and error. If it doesn’t come out the way you like at first, try again. Enjoy the Blog Hop for more ideas with this theme!

Blog Roll Call

Have a most wonderful day!

Theresa

Order Supplies Here:

Product List
Stippled Roses Bundle (English)
$54.00
Saddle Brown Stazon Ink Pad
$10.00
Parakeet Party Classic Stampin' Pad
$9.00
Calypso Coral Stampin' Blends Combo Pack
$10.00
Petal Pink Stampin' Blends Combo Pack
$10.00
Lemon Lolly Stampin’ Blends Combo Pack
$10.00
Bubble Bath Stampin’ Blends Combo Pack
$10.00
Parakeet Party Stampin' Blends Combo Pack
$10.00
Lemon Lime Twist Stampin’ Blends Combo Pack
$10.00
Granny Apple Green Stampin' Blends Combo Pack
$10.00
Watercolor Pencils Assortment 2
$12.50
Watercolor Pencils Assortment 1
$16.00
Calypso Coral 8-1/2" X 11" Cardstock
$10.00
Softly Stippled 12" X 12" (30.5 X 30.5 Cm) Designer Series Paper
$12.50
Very Vanilla 8-1/2" X 11" Cardstock
$10.50
Iridescent Pastel Gems
$8.00
Parakeet Party 1/8" (3.2 Mm) Metallic Woven Ribbon
$9.00
Clear Wink Of Stella Glitter Brush
$8.00

Sale-a-bration

Sale-a-bration ends on Thursday February 29, 2024. The Softly Stippled 12″ x 12″ Designer Series Paper is one of the FREE products with an order of $50 USD. When you order the Stippled Roses Bundle alone you will qualify to choose the paper! Order HERE

Posted in 2022-23 Stampin' Up! Annual Catalog, 2023 January-April Mini Catalog, Animals, Birds, Gratitude/ Thanks, Nature, Stampin' Blends

Kylie & Bruno Bertucci’s Demonstrator Training Program Blog Hop-April 2023- Nested Friends Thank You Card

Hello! Welcome to the Kylie & Bruno Bertucci’s Demonstrator Training Blog Hop for April 2023. I’m Theresa with Theresa’s Treasures Paper Crafts & I have a Nested Friends Thank You card today. I am so glad you are joining me! We are a group of Stampin’ Up! Demonstrators from around the world. We are taking part in training to help us build a successful Stampin’ Up! business. My goal is to participate in the monthly Blog Hop. This blog hop is full of ideas and creative inspiration! Be sure to visit everyone’s blog by clicking on the links at the end of my blog.

Today is a bittersweet day because my beloved trio of Bermuda Bay, Coastal Cabana & Pool Party are no more. Sadly Bermuda Bay is being retired. Soft Suede & Sahara Sand are also retiring. I really enjoyed making this card with my favorite colors.

The Nested Friends Bundle (save 10%) is available while supplies last until May 1, 2023. After that you can purchase the stamp & the dies separately without the 10% discount in the Online Exclusives.

A list of the “Last Chance” products will be at the end of this blog. Shop now as many products have already sold out.

Measurements

  • Bermuda Bay card stock (cs) card base: 4 1/4″ x 11″ with a score line at 5 1/2″
  • Coastal Cabana cs: 4″ x 5 1/4″ and 1/2″ x 5″
  • Pool Party cs: 2 1/4″ x 3 1/2″ and 1/2″ x 2″ strip for diecutting the eggs
  • Bermuda Bay cs: 2 3/8″ x 3 5/8″, 1 5/8″ x 4 5/8″ and 1/4″ x 5 1/4″
  • Hues of Happiness Designer Series Paper (DSP): 1 1/2″ x 4 1/2″
  • Sahara Sand cs: 2″ x 3 1/2″ for diecutting the inner nest
  • Soft Suede cs: 2 1/4″ x 4″ for diecutting the outer nest
  • Basic White cs: 4″ x 5 1/4″, 3/4″ x 2 3/4″ and 2 1/2″ x 3 1/2″ for diecutting the birds

Supplies

Instructions

  1. Stamp the birds onto the 2 1/2″ x 3 1/2″ Basic White cs in Memento Black Ink. Let dry. Then color as desired with Stampin’ Blends Alcohol Markers. Die cut.
  2. In Bermuda Bay Ink stamp the “thank you” sentiment onto the 3/4″ x 2 3/4″ Basic White cs. Cut a banner on the end of the right side.
  3. Diecut the inner (Sahara Sand) & outer (Soft Suede) nests.
    Tip: Use your Silicon Craft Sheet so that when you apply Multipurpose Liquid Glue to the outer nest you will not get glue everywhere (ask me how I know!) Then use tweezers to position the outer nest to the inner nest.

3. Use the Into the Clouds Embossing Folder to emboss the 4″ x 5 1/4″ Coastal Cabana cs.

4. Emboss the 2 1/4″ x 3 1/2″ Pool Party cs with the Painted Texture Embossing Folder.

5. Adhere the Into the Clouds card piece to the front of the Bermuda Bay cs card base. Then adhere the Painted Texture card piece to the
2 3/8″ x 3 5/8″ Bermuda Bay cs. Now adhere the Painted Texture card piece to the card front.

6. Adhere the Hues of Happiness DSP to the 1 5/8″ x 4 5/8″ Bermuda Bay cs. Use Stampin’ Dimensionals to adhere this piece to the card front.

7. Adhere the 2 eggs to the inside of the nest. Then adhere the nest to the card front using a Stampin’ Dimensional on the right side and Liquid Glue on the left side.

8. Place the birds in the nest & adhere them.

9. Use a Stampin’ Dimensional on the right side of the sentiment and Liquid Glue on the left to adhere it to the card front.

10. Bling! Apply the Wink of Stella Glitter Brush to the bird in front and to the eggs. Then add the Iridescent Pastel Gems as desired.

Voila!

Remember to visit everyone’s blog. You will see creative inspiration from Demonstrators around the world! You are currently at Theresa McEntee-Theresa’s Treasures-USA. Enjoy!

I appreciate your visit to my blog today. Remember to sign up for my Theresa’s Treasures Paper Crafts Newsletter. You can click on the “Subscribe to my Newsletter” tab. Please subscribe to my blog as well. If you need any assistance with placing your order, let me know in the comments. Thanks!

Have a most wonderful day! Happy crafting!

Theresa

Product List
Posted in beginner stamper, Birds, Stampin' Blends

More Birds!

Good morning everyone! I woke up to this beautiful sunrise! I just love the colors!

Today’s card is in one of my favorite colors, Calypso Coral, and uses Stampin’ Up!’s Free as a Bird stamp set. I also used the Memorable Mosaic stamp set for the sentiment, and the Mosaic Mood Specialty Designer Series paper (DSP) for the patterns. See the last 2 blogs in which I used the Free as a Bird stamp set with other colors of the Scalloped Note Cards.

Additional supplies from Stampin’ Up!: Soft Suede Stampin’ Ink Pad, Memento ink, Stampin’ Blends – Light and Dark Calypso Coral, Light Daffodil Delight, Dark Mint Macaron and Light Crumb Cake.

The two punches needed are: 2 1/4 inch circle and Timeless Label.

Measurements: Scalloped Note Cards and Envelopes in Calypso Coral, 6 x 2 3/4 inch Very Vanilla cardstock, and 5 inch strips of the Mosaic Mood Specialty DSP

Stamp the single bird in Memento ink and the sentiment in Soft Suede as shown onto the 6 x 2 3/4 inch piece of Very Vanilla cardstock.

Gather the Stampin’ Blends together and use the Light Calypso Coral to color the birds’ belly.

Using gentle brush strokes, blend on the Dark Calypso Coral. Go over the Dark Calypso Coral with the Light Calypso Coral to blend it all together and smooth out the lines between the light and dark color.

Again using gentle brush stokes, apply the Light Crumb Cake. Use the Light Daffodil Delight for the beak and legs.

Finish with the Light Mint Macaron for the grass.

Punch out the bird and the sentiment using the respective punches.

Adhere a 5 x 1/2 inch piece of the Mosaic Mood Specialty DSP to the inside of the Scalloped Note card on the bottom so the pattern shows.

Adhere a 5 x 1 1/4 inch piece of the Mosaic Mood Specialty DSP in a different pattern onto the left side of the front of the card.

Add Stampin’ Dimensionals to the back of the bird and sentiment.

Adhere the sentiment to the bottom quarter of the card front. Adhere the bird to the top half.

And there is your simple but beautiful bird card! I just love coloring with the Stampin’ Blend alcohol markers! It is so easy to create nice looking images with little effort.

I am having a summer promotion. For every $30 ordered at my store, you can earn 3 tickets. The prize will be: the Free as a Bird stamp set, Bird Ballad DSP, a roll of 3/8 inch Scalloped Lace Trim, Memento ink and the Flower Faceted Gems–valued at over $50! The drawing with be on September 14, 2019. Good luck!

My next blog will be the last in this “Bird” series. Hope to see you then!

Stampin’ Up! supplies used for the card today are: Stamp Set: Free as a Bird #149468 and Memorable Mosaic #149226; Ink: Soft Suede #147115 and Memento #132708; Stampin’ Blends alcohol markers: Calypso Coral Combo #144045, Light Daffodil Delight #144586, Light Mint Macaron #147020 and Light Crumb Cake #144582; Paper: Mosaic Mood Specialty Designer Series Paper #149478, Very Vanilla Cardstock #101650 and the Scalloped Note Cards #149610; Punches: 2 1/4 inch circle #143720 and Timeless Label #149516; Stampin’ Dimensionals #104430 and Multipurpose Liquid Glue #110755.