

Hello and welcome! I am Theresa McEntee, creator of Theresa’s Treasures Paper Crafts. Today I have the pleasure of participating in the Blog Hop with Around the World on Wednesday (AWOW).
2025 marks a special milestone. We are celebrating 5 fabulous years of creative inspiration together! In order to honor the occasion, we are CASEing (Copy and Selectively Editing) one of our talented members each month. This month we are happy to focus on Aurélie Fabre.

The AWOW team put together a thematic hop to give you some inspiration for your own crafting. Tic Tac Toe is this month’s theme.

I chose shadow, circle and texture from the Tic Tac Toe. Aurélie’s style is know for texture, techniques and layers. This made creating a card to CASE hers loads of fun!


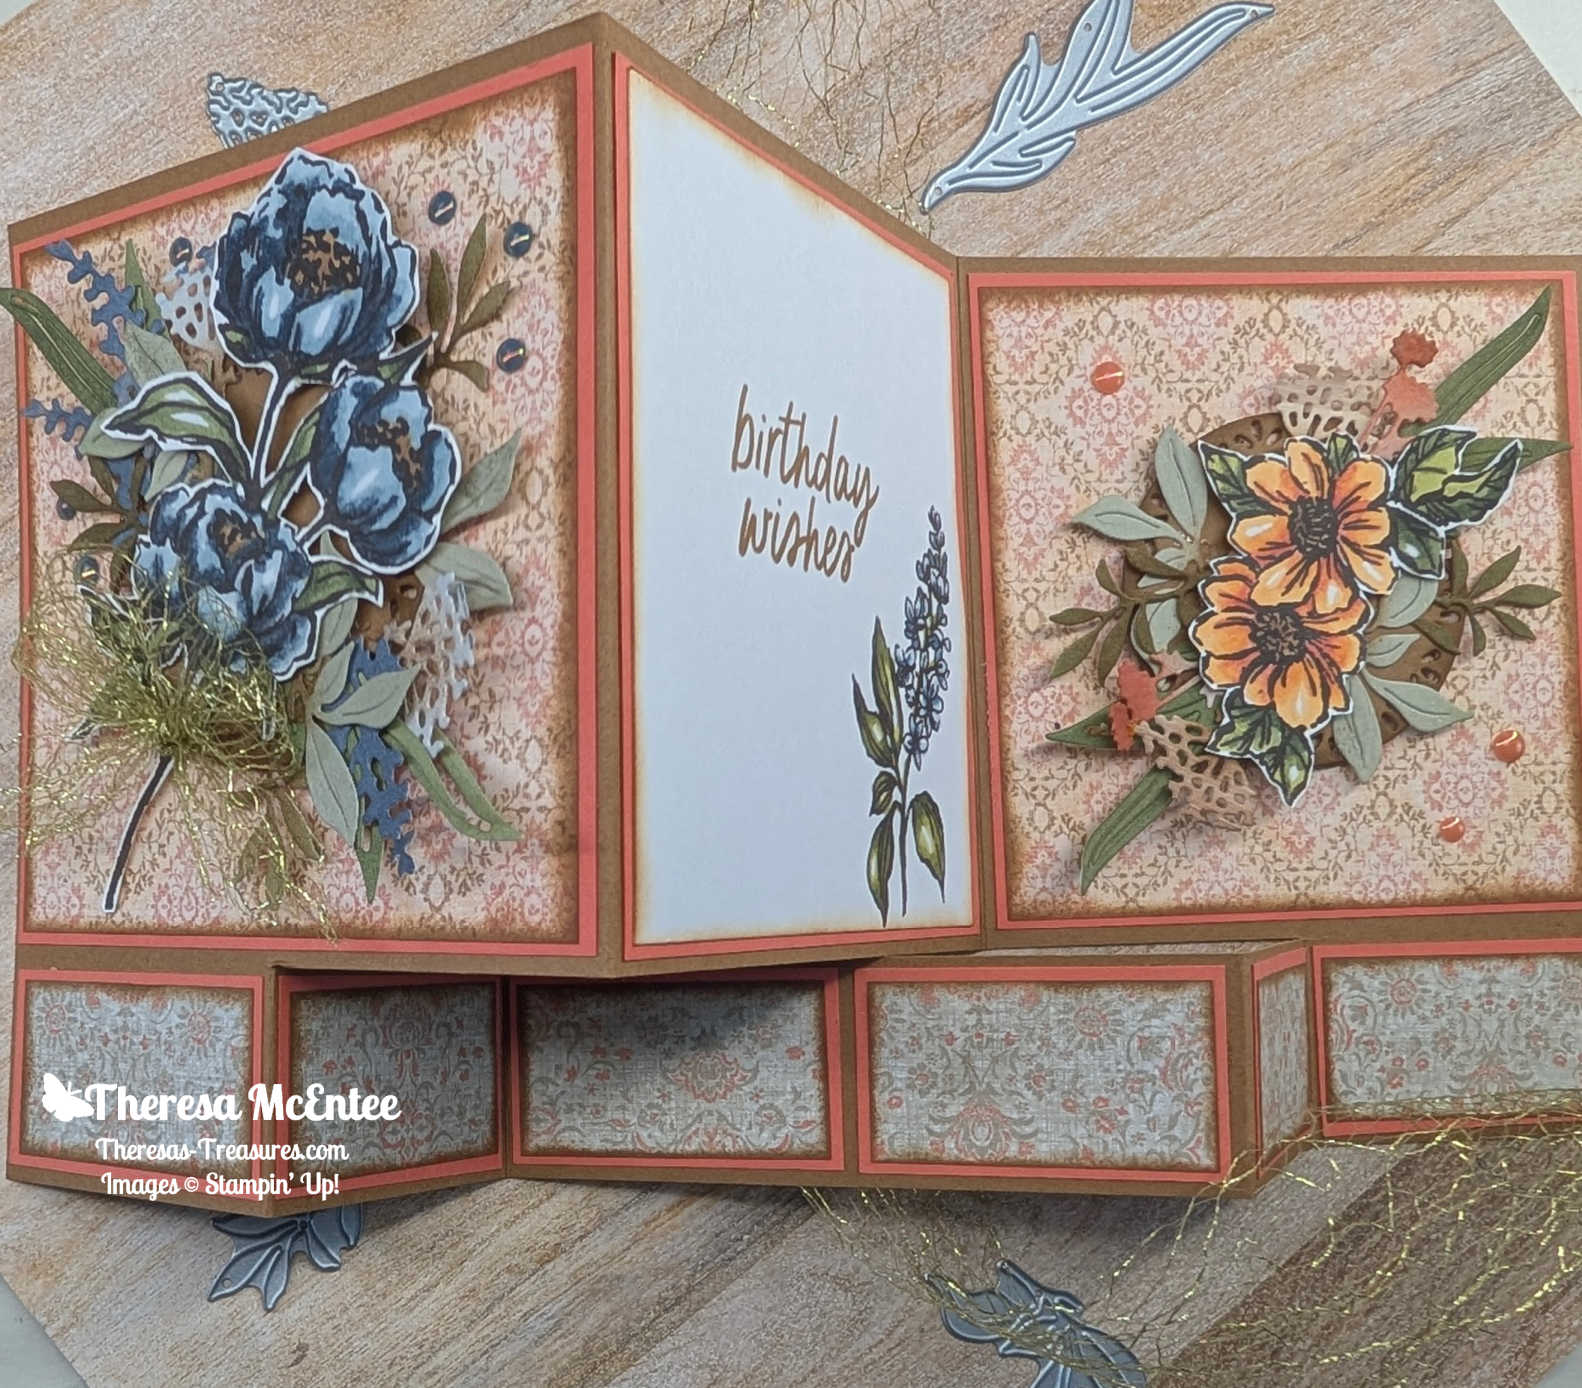
My Project for today
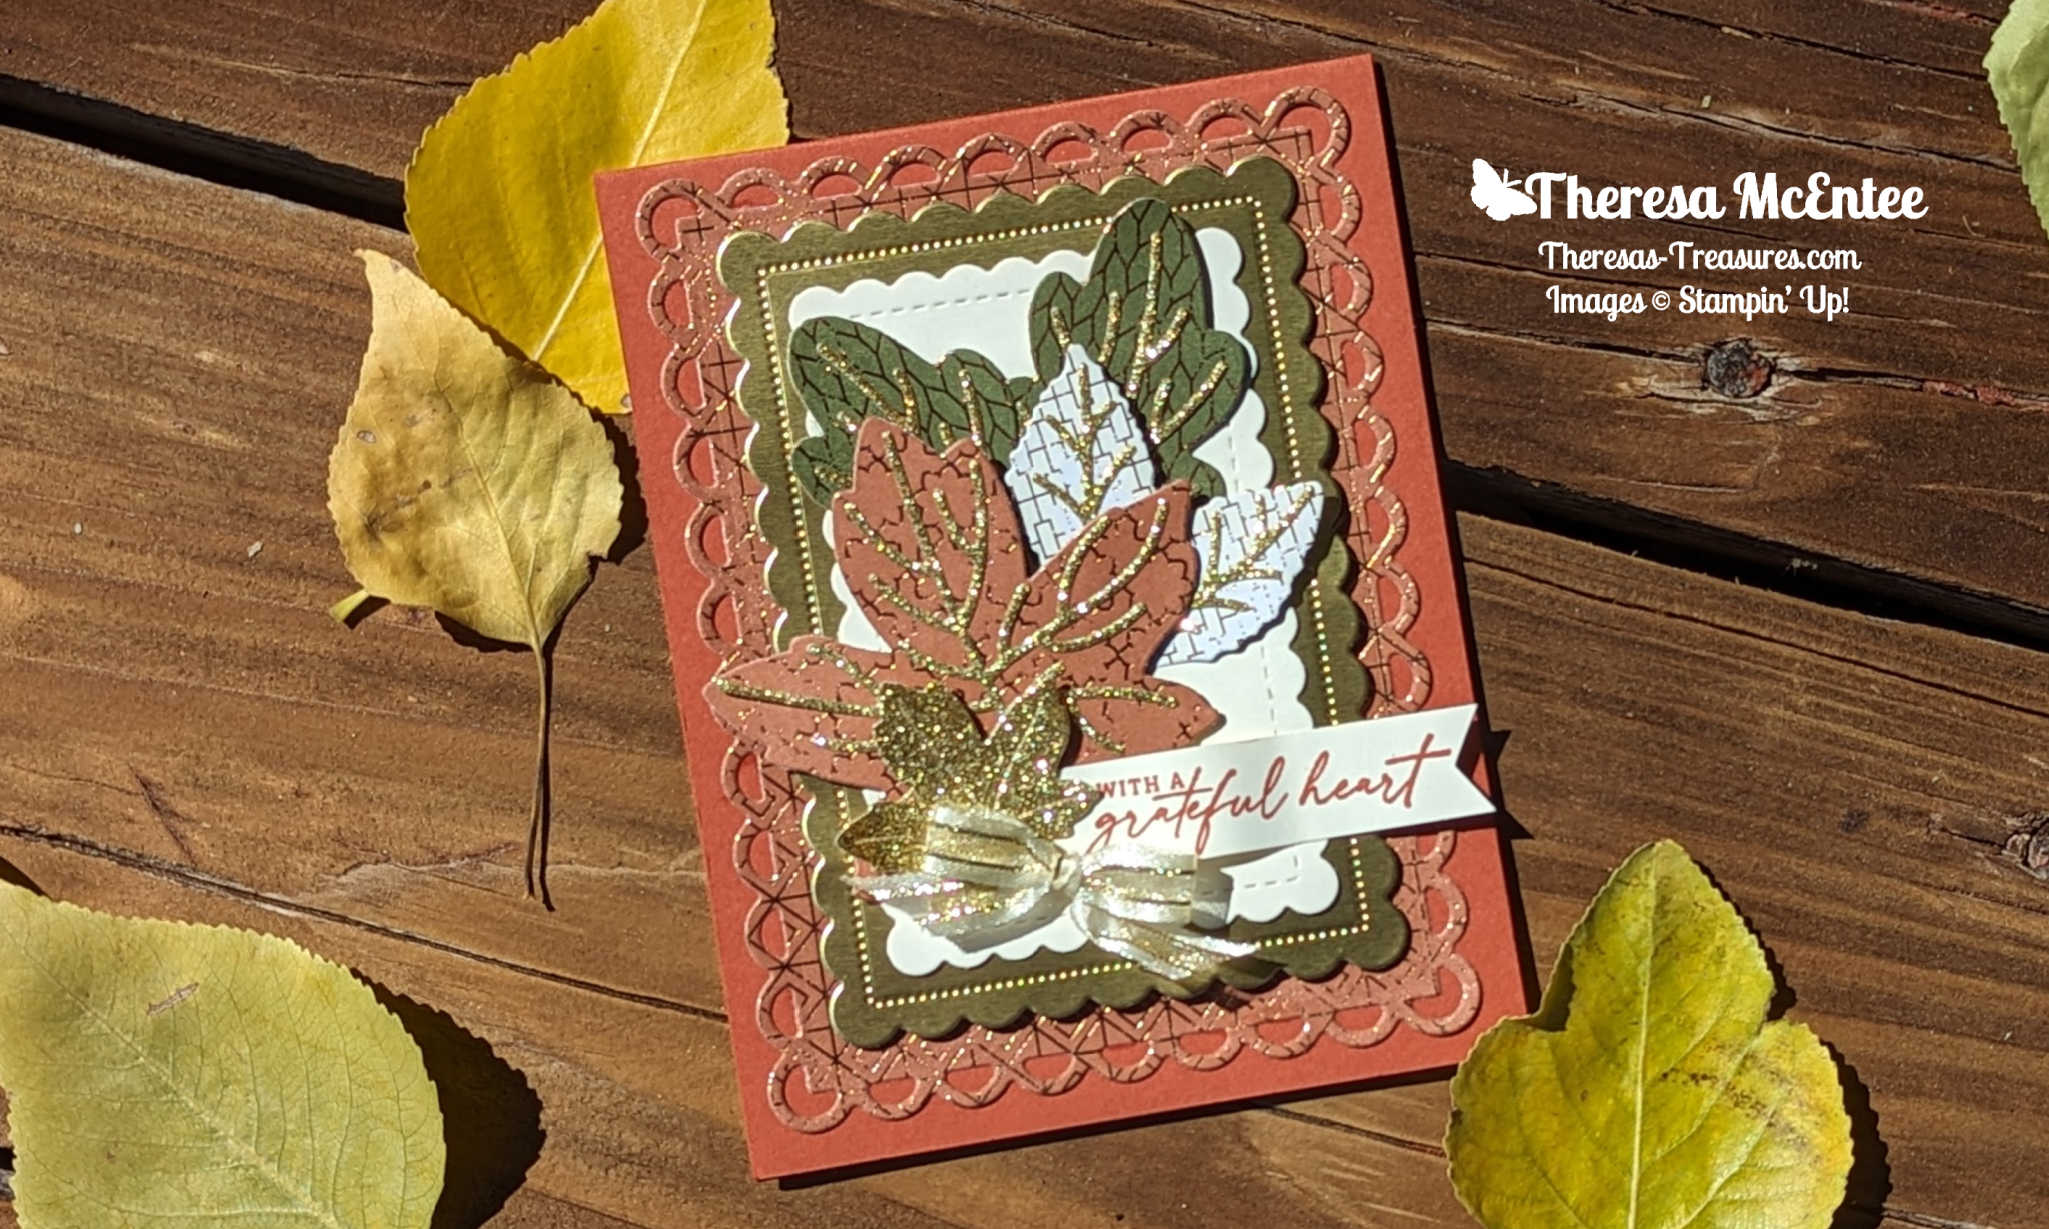
This card was made using the Gallery Blooms stamp set and Dies. I used the Stampin’ Blends in: Secret Sea, Cloud Cover, Mossy Meadow, Old Olive, Pecan Pie, Calypso Coral and Peach Pie.
The leaves and flowers are die cut with the Gallery Bloom Dies from the Beautiful Gallery DSP.
The Pecan Pie cardstock circle is die cut with the Spotlight on Nature Dies.
The vintage-style is created by using a Sponge Dauber to apply Pecan Pie Ink to the edges of the DSP on each panel.
Supplies
- Gallery Blooms stamp set and Dies
- Spotlight on Nature Dies
- Simply Said stamp set for sentiment
- Beautiful Gallery Designer Series Paper (DSP)
- Cardstock (cs): Pecan Pie, Calypso Coral and Basic White
- Sponge Dauber
- Ink: Early Espresso and Pecan Pie
- Blends as stated above
- Multipurpose Liquid Glue
- Stampin’ Dimensionals
- Mini Glue Dots
- Stampin’ Up! Trimmer
- Gold 1 1/2″ Open Weave Trim
- 2025-27 In Color Flat Pearls
Measurements
- Pecan Pie cs card base: 5 1/2″ x 12″ (see pattern below)
- Pecan Pie cs: 2 1/2″ x 2 1/2″ (to die cut the circle)
- Calypso Coral cs: three at 3 3/4″ x 4″ and six at 1 1/8″ x 1 7/8″
- Basic White cs: 3 5/8″ x 3 7/8″ and scrap for stamping the flowers
- Beautiful Gallery DSP Calypso Coral design: two at 3 5/8″ x 3 7/8″
- Beautiful Gallery DSP Grey Granite design: six at 1″ x 1 3/4″
- Beautiful Gallery DSP to die cut the leaves and flowers
Pattern for Card Base
The pattern below is for Imperial measurements in inches. Note: The card that Aurélie did may have been in Metric, but I am only showing the Imperial.

The AWOW Team
I am so glad you have joined me today in this worldwide hug that stretches all the way from Australia to Alaska across twelve different time zones. Below is an image of the whole crew and where they are from around the globe. Such a talented and wonderful group of people! You will want to visit everyone to be sure to see all the fabulous projects!

We all love sharing the joy of creating with you through projects from our individual parts of the world. I hope that you will be filled with lots of inspiration!
See More Inspiring Projects

Blog Roll
Jan Clothier – NZ
Leonie Stuart – AU
Rochelle Laird-Smith – AU
Cheryll Miller – AU
Marga Bultena – NL
Ximena Morales – DE
Aurélie Fabre – FR
Kelly Taranto – US
Chris Smith – US
Theresa McEntee – US
Bree Renwick – US
Lori Willcox – CA
Teri West – US
Cheryl Hamilton – US
Thank you so much for visiting today. I hope you enjoyed learning more about our projects. Have a most wonderful day!
Theresa
Supplies
Product List ![Gallery Blooms Bundle [ 165213 ]](https://i0.wp.com/assets1.tamsnetwork.com/images/EC042017NF/165213s.jpg?w=100&ssl=1 "Gallery Blooms Bundle [ 165213 ]") $53.00 | ![Spotlight On Nature Dies [ 163580 ]](https://i0.wp.com/assets1.tamsnetwork.com/images/EC042017NF/163580s.jpg?w=100&ssl=1 "Spotlight On Nature Dies [ 163580 ]") $35.00 | ![Simply Said Mix & Match Photopolymer Stamp Set (English) [ 163756 ]](https://i0.wp.com/assets1.tamsnetwork.com/images/EC042017NF/163756s.jpg?w=100&ssl=1 "Simply Said Mix & Match Photopolymer Stamp Set (English) [ 163756 ]") $17.00 | ![Early Espresso Classic Stampin' Pad [ 147114 ]](https://i0.wp.com/assets1.tamsnetwork.com/images/EC042017NF/147114s.jpg?w=100&ssl=1 "Early Espresso Classic Stampin' Pad [ 147114 ]") $9.00 | ![Pecan Pie Classic Stampin' Pad [ 161665 ]](https://i0.wp.com/assets1.tamsnetwork.com/images/EC042017NF/161665s.jpg?w=100&ssl=1 "Pecan Pie Classic Stampin' Pad [ 161665 ]") $9.00 |
![Pecan Pie 12" X 12" (30.5 X 30.5 Cm) Two Tone Cardstock [ 166688 ]](https://i0.wp.com/assets1.tamsnetwork.com/images/EC042017NF/166688s.jpg?w=100&ssl=1 "Pecan Pie 12\" X 12\" (30.5 X 30.5 Cm) Two Tone Cardstock [ 166688 ]") $10.00 | ![Pecan Pie 8 1/2" X 11" Cardstock [ 161717 ]](https://i0.wp.com/assets1.tamsnetwork.com/images/EC042017NF/161717s.jpg?w=100&ssl=1 "Pecan Pie 8 1/2\" X 11\" Cardstock [ 161717 ]") $14.00 | ![Calypso Coral 8-1/2" X 11" Cardstock [ 122925 ]](https://i0.wp.com/assets1.tamsnetwork.com/images/EC042017NF/122925s.jpg?w=100&ssl=1 "Calypso Coral 8-1/2\" X 11\" Cardstock [ 122925 ]") $14.00 | ![Basic White 8 1/2" X 11" Cardstock [ 166780 ]](https://i0.wp.com/assets1.tamsnetwork.com/images/EC042017NF/166780s.jpg?w=100&ssl=1 "Basic White 8 1/2\" X 11\" Cardstock [ 166780 ]") $14.00 | ![Beautiful Gallery 6" X 6" (15.2 X 15.2 Cm) Designer Series Paper [ 165196 ]](https://i0.wp.com/assets1.tamsnetwork.com/images/EC042017NF/165196s.jpg?w=100&ssl=1 "Beautiful Gallery 6\" X 6\" (15.2 X 15.2 Cm) Designer Series Paper [ 165196 ]") $12.50 |
![Gold 1 1/2" (3.8 Cm) Open Weave Trim [ 165715 ]](https://i0.wp.com/assets1.tamsnetwork.com/images/EC042017NF/165715s.jpg?w=100&ssl=1 "Gold 1 1/2\" (3.8 Cm) Open Weave Trim [ 165715 ]") $9.00 | ![2025–2027 In Color™ Flat Pearls [ 165192 ]](https://i0.wp.com/assets1.tamsnetwork.com/images/EC042017NF/165192s.jpg?w=100&ssl=1 "2025–2027 In Color™ Flat Pearls [ 165192 ]") $8.50 |


")


 Bordered Ribbon")


")
")

 Designer Series Paper")


")


 Adhesive Backed Glimmer Paper")
 Specialty Designer Series Paper")
 Satin Edged Ribbon")


")


")


")


 Designer Series Paper")