I am really enjoying stretching my creativity with the Cardz4Guyz Challenges. This challenge is to use a Sketch as inspiration for your card.
Here is the card I created from the Sketch with Stampin’ Up! products.
Here is the Sketch for the Cardz4Guyz Challenge.
This close up is to show off the Gold Hoops Embellishments which are new and available when the 2020-2021 Stampin’ Up! Catalog goes live on June 3, 2020 at noon Mountain Standard time.
The colors are Just Jade and Shaded Spruce with Gold Embossing Powder. The stamp set is Beautiful World.
Thanks so much for stopping by! Watch for my next blog on Tuesday!
There is only one more week before the new 2020-2021 Stampin’ Up! Annual Catalog is live! Since I am an Independent Stampin’ Up! Demonstrator I got to order for the catalog a month early. Here is a sneak peek at a new stamp set called Jar of Flowers!
The really fun part about this card is that there are Mason Jar Shaker domes and Flowers for Every Season Gems you can use to make a Shaker card! I will also show a Technique today using the Watercolor Pencils and the Blender Pen.
Measurements: Whisper White Card Stock (CS): 8 1/2 x 5 1/2 inches with a score line at 4 1/4 inches, 5 x 2 inches and 4 x 2 1/2 inches; Flowers For Every Season Designer Series Paper (DSP): 5 3/8 x 4 1/8 inches; and a new In Color – Magenta Madness: 5 3/8 x 2 1/4 inches.
Stamp the sentiment “Just Thinking Of You” from the Many Mates stamp set in Melon Mambo ink onto the bottom of the 4 x 2 1/2 inch Whisper White CS. Use the Timeless Label Punch to punch it out with the sentiment on one end. Put the punch as close to the words as you can.
Now insert the punched label back into the punch so the words are as close to the edge as possible.
Use the 1 1/2 inch Circle punch to punch a circle out of the 5 x 2 1/2 inch Magenta Madness CS. Be sure to leave a 1/4 inch border because you will be using this as part of your card. Adhere the sentiment punch to the circle punch. Trim the sides with your Paper Snips. Set aside.
Set up the 5 x 2 inch Whisper White CS on the Pierce Mat to be able to stamp with the Jar Of Flowers Photopolymer stamp set. I tried using Gray Granite ink but it was too light. I found if you use Smokey Slate ink and you Stamp Off on a scrap paper once before stamping on the card piece you get the right intensity of gray for using the Watercolor Pencils.
Stamp off onto the scrap paper once before stamping the stems and the bunch of flowers. The lid to the Mason jar is not Stamped Off.
I put the Flowers for Every Season DSP that I wanted for the background next to my jar of flowers so I could copy the coloring. I used colors from both sets of the Stampin’ Up! Watercolor Pencils. I started with Garden Green for the leaves and stems, Daffodil Delight for the little bunches of flowers, and Pumpkin Pie for the center of the Daffodil Delight flowers. I use a light touch first to color the entire image, then I press a little harder in spots where I would like to have the image shaded.
I used the Coastal Cabana Watercolor Pencil to create a water level in the jar. Next I used Real Red to color the poppies. Again, I used a light touch to color in the image and then press harder to shade. When I color lightly, I move the pencil in small circles and rotate the pencil every so often so that it stays sharp.
I used the Melon Mambo Watercolor Pencil to color the tulips and the Night of Navy to color the sprigs of small flowers.
Now for the fun part! I used the Blender Pen which is filled with a specialized solution for easy blending. The tulip I am pointing to has been treated with the Blender Pen and the other tulips have not. I have already used the Blender Pen on the water and stems. I use a light touch and start in the lighter colored area of the image, moving toward the shaded part. When you are done with one color, you simply write on a scrap of paper with the Blender Pen until it writes clear. Take your time with this. The Blender Pen smooths out the colored pencil.
Now I used the Jar of Flowers punch to punch the Mason Jar out. You will have the Mason jar, the bunch of flowers and need the Magenta Madness CS piece.
Do not adhere the bunch of flower piece. Just lay it on the Magenta Madness CS to help position the Mason Jar. Adhere the Mason Jar to the Magenta Madness CS.
Peel off the protective layer on the top of the Mason Jar Shaker Dome. Adhere the bunch of flowers piece to the top of the Mason Jar Shaker Dome. Take care to position the paper because the adhesive on the dome is very sticky and once the paper is on it, it will stay there!
Note to self: Leave at least a 1/4 inch under the stamped jar so that the Mason Jar Shaker Dome doesn’t stick out! Fortunately, it was easy to trim with the Paper Snips.
Adhere the 5 3/8 x 4 1/8 inch Flowers For Every Season DSP to the Whisper White CS card base. Then adhere the Magenta Madness piece to the left side of the card front. Now for some Bling! The Flowers For Every Season Gems include green faceted gems and epoxy drops.
Place a few of the gems and drops on the Mason Jar. Remove the protective layer from the back of the Mason Jar Shaker Dome. Apply some adhesive to the rest of the back of the bunch of flowers card piece. Adhere the Whisper White bunch of flowers piece to the Magenta Madness piece on the card front. Take care with placement as the Mason Jar Shaker Dome adhesive adheres quickly and doesn’t allow any “wiggle” room.
Adhere the sentiment “Just Thinking Of You” to the right side of the card front with Stampin’ Dimensionals. To make the card extra special you can add a strip of the Flowers For Every Season DSP to the inside of the card. (Measurement: 5 3/8 x 3/4 inches)
Add a bow with the 2020-2022 In Color Bumblebee 1/4 inch ribbon and adhere it to the card with a Mini Glue Dot. Viola! What a colorful and gorgeous card!
Thank you for enjoying the Sneak Peek today! I really enjoyed making the card. If you would like to purchase the products I used, you will be able to on June 3, 2020 after noon Mountain Time.
The end of the Stampin’ Up! 2019-2020 Annual Catalog is fast approaching. The last day to order from this catalog is on June 2, 2020. Ride With Me is a really cute stamp set with an adorable old fashioned pickup truck that will be retiring. There are coordinating Truck Ride Dies with which you can put together a 3D truck. Today’s card will be simple and straightforward. My mother told me she once drove a Cherry Red pickup truck when she first learned to drive. I made this pickup red in her memory.
There are 2 of the retiring colors on this card – Lovely Lipstick and Blueberry Bushel. I have really enjoyed this set of In Colors and will be sad to see them go.
Measurements: Whisper White Card Stock (CS): the card base is 11 x 4 1/4 inches with a score line at 5 1/2, and you need a 3 3/4 x 3 inch piece for stamping; Blueberry Bushel CS: 4 x 3 1/4 inches; and the 2018-2020 In Color Designer Series Paper (DSP): 4 1/4 x 2 1/2 inches in Lovely Lipstick.
I initially stamped everything in Memento Black ink. I did not like how the “I ❤ STMPN” blended in with the door.
I decided to try stamping the pickup in Lovely Lipstick ink. The balloons are stamped in Memento Black ink.
I thought the “I ❤ STMPN” stood out a little better when it was stamped in Memento ink on the Lovely Lipstick pickup truck.
I used Stampin’ Blends Alcohol markers in Dark Basic Black, Light Smokey Slate and Dark Daffodil Delight to start coloring the pickup.
The body of the pickup is colored with Dark Lovely Lipstick Stampin’ Blend alcohol marker. I went over the wheel covers twice to make them stand out. I also went along the edge of the door twice on either side of the “I ❤ STMPN”. I colored one of the balloons in Lovely Lipstick.
The Blueberry Bushel does not come in an alcohol marker so I used the Stampin’ Write marker which is water based to color two of the balloons.
I adhered the stamped pickup card piece to the 4 x 3 1/4 inch Blueberry Bushel CS. The card base was folded and burnished with the Bone Folder to create a crisp fold. The 2018-2020 In Color Lovely Lipstick DSP was adhered onto the center of the card front. The pickup card piece was then adhered with Stampin’ Dimensionals.
Now for some Bling! I used the Rhinestone Basic Jewels, the Holiday Rhinestone Basic Jewels and the Red Rhinestone Basic Jewels. Lots of color and sparkle!
Using the Take Your Pick tool to transfer the rhinestones to the card, I applied one rhinestone in the corresponding colors to each balloon.
Also added a trio of the Red Rhinestone Basic Jewels to the Lovely Lipstick DSP.
And Viola! there is your Old Fashioned pickup truck with lots of balloons and bling! If you leave off the “I ❤ STMPN” you could use this card for just about any celebration.
Make sure you take a last look at the Stampin’ Up! 2019-2020 Annual Catalog and order anything you have had on your wish list now. Time is running out! There is only 1 week left before many products retire!
Thanks for stopping by and reviewing my blog. If you have any comments, please leave them below. I would love to hear from you and hear how I am doing. I have been advised to try to use fewer photographs so that it will be easier to view my blog on the phone without using all the battery power. Let me know if there is something you like to see that I have left out. Your feedback is very important. Thanks in advance.
Today I have a great card for you! This is so simple but so beautiful! I am CASEing (copy and selectively edit) a card from Kathy Clark. We will be doing the Sponging Technique. I made this card especially full of sunshine because I wanted to tell you about the June Paper Pumpkin. Paper Pumpkin is a monthly subscription you can purchase from Stampin’ Up!. You will get an all inclusive kit every month delivered right to your door! It is a great way to start stamping at home and start building your stamping supplies. Every month you get a stamp set and an ink spot! You also get all the supplies needed to complete the project! You have to order a prepaid Paper Pumpkin for 1, 3, 6 or 12 months before June 10, 2020 to get this Box of Sunshine. Go to my store here and use item #137858 for 1 month, #137859 for 3 months, #157860 for 6 months and #137861 for 12 months. You will get a code via email and go to paperpumkin.com to submit your prepaid code. Then the fun can begin!
Now for the card!
I actually made a mistake on this card. I had intended to put a ribbon around the top two layers, but I applied the glue and had to adhere it to the third layer. I did make a second card which I will show at the end that does have the ribbon.
Measurements: Whisper White Card stock (CS): 8 1/2 x 5 1/2 inches with a score line at 4 1/4 inches, 5 x 3 3/4 inches and 4 x 2 inches; Mango Melody: 5 3/8 x 4 1/8 inches; PoppyParade: 5 1/8 x 3 7/8 inches.
Sponging Technique: You will need three inks: Daffodil Delight, Mango Melody and Poppy Parade. I have a sponge for each color that is marked with a square of the corresponding cardstock. To see more about preparing the sponges review my blog here . We will be sponging on the 5 x 3 3/4 inch Whisper White CS. Start with the Daffodil Delight ink. Use a light circular motion to sponge the color onto the scrap paper then onto your cardstock. Make a horizontal line of Daffodil Delight covering the lower third of the card piece.
Repeat using the Mango Melody ink for the middle third of the card piece. Next use the Poppy Parade ink.
Use the Aqua Painter to flick little water drops onto the sponged card piece. Watch the spots appear!
Stamp the sentiment “All days are beautiful that begin with you” onto the 4 x 2 inch Whisper White CS. Use the 1 1/2 inch Circle Punch to punch out the sentiment. Adhere the sentiment with Stampin’ Dimensionals. Adhere the sponged card piece to the 5 1/8 x 3 7/8 inch Poppy Parade CS. Next adhere the 5 3/8 x 4 1/8 inch Mango Melody CS to the Whisper White CS card base. Be sure to use the Bone Folder when you fold the card base at the 4 1/4 inch score line. Now adhere the sponged card piece to the Mango Melody taking care to center it.
Add some of the Holiday Rhinestone Basic jewels to the front. Viola! you have a very sunshiney card that will brighten anyone’s day!
Here is the second card with the ribbon across the middle. The ribbon is the Whisper White Crinkle Seam Binding Ribbon and it was dyed using the Mango Melody Stampin’ Blend alcohol marker. This card turned out a little darker.
Which card do you prefer? With the ribbon or without? Light or dark? Let me know what your thoughts are.
Thanks for visiting. I am an Independent Stampin’ Up! Demonstrator. If you have questions about starting the monthly Paper Pumpkin subscription, please let me know. Email me at theresastreasures.az@gmail.com or leave a comment here.
Below are all the Stampin’ Up! products I used. Just click on a photo and you will go directly to my Online Store.
Today’s card uses one of the sentiments in the Share Sunshine PDF Download.
MAKING A DIFFERENCE: COVID-19 PRODUCT GIVEBACK Stampin’ Up! is committed to making a difference in our global communities and caring about people first. As part of their Making a Difference program they’re offering a product giveback opportunity to support organizations that are helping COVID-19 frontline responders and communities vulnerable to the pandemic. You can purchase the Share Sunshine PDF Download and Stampin’ Up! will donate 100% of the proceeds to COVID-19 efforts. The Share Sunshine PDF Download is a digital stamp set that’s packed with both lighthearted and heartfelt sentiments and imagery relevant to the unique COVID-19 and social distancing situation we’re currently experiencing–including many ideas that came from they’re customers! You can use the download in your card making and paper crafting projects. Simply print the imagery on cardstock and cut it out using our Paper Trimmer, punches, or dies. Since we are physically distanced from each other, now is a perfect time to share sunshine with our friends and family by sending cards! Buy the PDF here: https://covid19.stampinup.com/products/giving-back-us-ca Share your projects on social media and tag them with #sharesunshine.
The sentiment for today’s card is on page 11 of the digital download. I printed it on a sheet of Shimmery White Card stock(CS) and then cut it out with my Stampin’ Up! Paper Trimmer. I printed on the Shimmery White CS because I wanted to do some water-coloring. The Shimmery White CS holds up better with water-coloring than the Whisper White CS does.
Ok, let’s get started putting together This Little Piggy!
Measurements: Whisper White Card stock (CS): 8 1/2 x 5 1/2 inches with a score line at 4 1/4 inches and a 1/2 inch strip; Shimmery White CS: 3 1/2 x 2 1/4 inches; Pear Pizzazz CS: 5 3/8 x 4 1/8 inches and 3 3/4 x 2 1/2 inches; Perennial Essence Designer Series Paper (DSP): 5 1/4 x 4 inches.
I stamped the little piggy onto Petal Pink CS in Memento ink. I added a little shadow with the Dark Petal Pink Stampin’ Blend Alcohol Marker.
I made the little mask by cutting a rectangle from the 1/2 strip of Whisper White CS. I added stitching with the Stampin’ Write Marker in Basic Black.
I used the Take Your Pick Tool on the Pierce Mat to punch a little hole at the neckline in order to thread the “elastic” for the mask through it. For the “elastic” I used the White Solid Bakers Twine (which is retiring).
I used a Dental Floss threader to thread the Solid White Baker’s Twine through the hole. I secured it on the back of the pig with a Mini Glue Dot.
I pulled the Solid White Bakers Twine up, around and down to make an “X” over the piggy’s snout. I secured the end in place with the same Mini Glue Dot. Glue the mask in place over the “X”.
Squeeze the Balmy Blue ink pad in the middle by laying it upside down on the table and applying pressure to the middle of the pad. This should put ink on the inside of the lid. If not, you could use a drop of the Balmy Blue Re-inker. Use the Aqua Painter (Water Painters) to apply a layer of water onto the Shimmery White CS. Now put some ink on the Aqua Painter, and starting at the top, spread the ink down the paper going back and forth. If the ink is not dark enough, add more ink to the brush and go over the paper again. You may clean the Aqua Painter by squeezing water from it onto a paper towel. If the ink on your paper is too dark, just go over it with the Aqua Painter using plain water. Let dry completely. When dry, adhere the Shimmery White CS to the 3 3/4 x 2 1/2 inch Pear Pizzazz CS.
Adhere the Perennial Essence DSP to the 5 1/4 x 4 inch Pear Pizzazz CS. Use the Bone Folder to make a crisp fold at the 4 1/4 inch score line on the 8 1/2 x 5 1/2 inch Whisper White CS, then adhere the piece to the front of the Whisper White card base.
Use the Stampin’ Dimensionals to adhere the watercolor card piece and the little piggy. I used 1/2 of a Stampin’ Dimensional on each end of the “i miss your face” sentiment and used glue on the center to adhere it in place.
Thanks so much for stopping by for the “This Little Piggy” card. I had so much fun with this one and I hope you will try it out. The This Little Piggy stamp set is set to retire on June 2 , 2020-so if you want it, get it now at my Online Store by clicking SHOP .
You can also order by clicking on one of the photos below:
A lot of us spend a lot of our time working in jobs that we may not like. The easy solution is to change to a job we do like. But that is not always possible. One way to “survive” your job is to “Start with Art”. Being creative is known to help improve your psychological well being. This Stampin’ Up! stamp set is retiring soon, so don’t waste any more time and let’s create a card to help you “Follow Your Art” no matter what your art may be!
This card is so fun because of all the color and the mixed designs! There are also a few Techniques thrown in there as well!
Here is the It Starts with Art stamp set. There are many exciting images to make a host of cards. I decided to use the stack of ribbon since it complimented the Follow Your Art Designer Series Paper (DSP) that I chose.
Measurements: Blueberry Bushel card stock (CS): 5 1/2 x 4 1/4 inches and 4 x 3 inches; Follow Your Art DSP: 5 1/4 x 4 inches and 4 x 3 inches; Coastal Cabana CS: 8 1/2 x 3 1/4 inches with a score line at 4 1/4 inches and Whisper White CS: two 4 x 3 inch pieces.
Let’s get stamping!
Stamp the sentiment “Follow your art” on one end of one 4 x 3 inch Whisper White CS in Memento ink. Leave space around the sentiment for the Tailored Tag Punch. Flip the Whisper White CS around and stamp the stack of spools on the opposite end.
For coloring the spools of ribbon, I did a bit of experimentation with markers and decided the Watercolor Pencils created the most appealing look. When I used the markers, I did not like the card. I actually thought it was ugly! The Watercolor Pencils made the card look so much better! I did use the Blushing Bride Stampin’ Write marker since there is not a Watercolor Pencil in Blushing Bride. The colors for the Watercolor Pencils are Pacific Point, Calypso Coral and Coastal Cabana. One of the Techniques is to use the Blender Pen.
I started coloring with the Blushing Bride Stampin’ Write marker on the middle spool. I tried to only put one layer of ink down and keep the color light.
I colored the top spool and the stripes on the bottom ribbon with the Coastal Cabana Watercolor Pencil. I did color a little darker in areas where I wanted a slight shadow.
I colored the middle ribbon with the Pacific Point Watercolor Pencil. The bottom spool and the ribbon on top are colored in Calypso Coral Watercolor Pencil.
Blending Technique The Blender Pen is a dual tipped pen filled with a specialized solution for easy blending. You just go over the Watercolor Pencil with a light touch and blend the color. To clean off the color, you just write on scrap paper until the fluid from the pen runs clear. I started Blending the Coastal Cabana Watercolor Pencil first.
Next I blended the Pacific Point Watercolor Pencil, and finally the Calypso Coral.
Now we need to fussy cut the spools of ribbon.
Tip: To fussy cut into really tight space, use the very tip of your Paper Snips and make very tiny cuts. I did try just leaving the center of the heart uncut, but I did not like the way it looked. Set this piece aside.
Punch the sentiment out with the Tailored Tag Punch. (I had to photograph this card twice because I did use the Stampin’ Write Markers initially. That is why the spools of ribbon are still there).
Prepare to use the Aqua Painter by squeezing the closed Blueberry Bushel ink pad to get a little ink on the lid. Add a few drops of water to the ink. Place the sentiment card piece on scrap paper as this technique can be a little messy. The black cardstock is just there so the sentiment card piece would show on the photograph.
Splatter Technique Flick the tip of the Aqua Painter on the lid to splatter the color onto the sentiment card piece. Clean the Aqua Painter by squeezing water out onto a paper towel until the water runs clear.
Squeeze the Calypso Coral ink pad and get some ink on the Aqua Painter. Flick the Calypso Coral ink in the same way as the Blueberry Bushel. Allow to dry, or use your Heat Tool to dry the ink more quickly.
Punch a label with the Tailored Tag Punch from the 4 x 3 inch Blueberry Bushel CS. Use the Paper Snips to cut the tag in half lengthwise.
Glue one half of the Tailored Tag Punch to the bottom half of the sentiment card piece. Now glue the other half on top.
Now to stamp the inside of the card. Use the larger button stamp to stamp onto the second 4 x 3 inch Whisper White using the Blueberry Bushel ink. Remember that an odd number of images seems more pleasing to the eye than an even number.
Use the smaller button stamp to stamp in Calypso Coral ink and Coastal Cabana ink.
Fold the 8 1/2 x 3 1/4 inch Coastal Cabana CS at the 4 1/4 inch score line. Use the Bone Folder to get a nice crisp fold.
Adhere the 4 x 3 inch Follow Your Art DSP to the front of the little card. Adhere the piece stamped with the buttons to the inside of the little card.
Adhere the 5 1/4 x 4 inch Follow Your Art DSP to the 5 1/2 x 4 1/4 inch Blueberry Bushel CS. Now adhere the little card to the center of the Blueberry Bushel card piece.
This card is a little different. Fun, fun, fun!
We will use Stampin’ Dimensionals on the back of the sentiment and the spools of ribbon.
I decided that the sentiment did not show up as much as I would like. I stamped the sentiment onto a scrap of 1/2 inch Whisper White CS. I placed it onto the sentiment piece to size it and then adhered it in place.
Adhere the spools of ribbon in place.
Viola! You have a card to keep around to help inspire you to “Follow Your Art”! Or you can send it off to someone else who may need encouragement!
Thanks so much for coming by today! I hope you are doing well, and if not, I hope you have an opportunity to try to start with art to lift up your spirits!
I am an Independent Stampin’ Up! Demonstrator and I sell the products I used for this card. If you are interested in purchasing some product to get yourself started on creating at home, please comment or send me an email at theresastreasures.az@gmail.com.
Click on the photo below to get to my Online Store and purchase that product.
Today’s card is a Father’s Day card in a Vintage style. I made this now because I know how Father’s Day sneaks up on me!
The card is made with the Stampin’ Up! A Good Man stamp set. The paper is Soft Suede, Early Espresso and Very Vanilla cardstock (CS). The printed paper is from the Stampin’ Up! Come Sail Away Designer Series Paper (DSP). The ink for the man is Soft Suede. I used a Blender Pen to slightly color the image. The sentiment is stamped in Early Espresso ink. I used Linen Thread as an embellishment.
The measurements are: Soft Suede CS: 8 1/2 x 5 1/2 inches with a score line at 4 1/4 inches for the card base; Early Espresso CS: 4 x 3 inches and 4 1/4 x 1/2 inches; Very Vanilla CS: 5 1/4 x 4 inches for the inside of the card, 4 x 3 inches and 3 x 3/4 inches; and the Come Sail Away DSP: 4 x 2 1/4 inches.
Instructions:
Fold the Soft Suede card base at the 4 1/4 inch score line.
Stamp the man in Soft Suede ink onto the 4 x 3 inch Very Vanilla CS. Use one of the Layering Ovals Dies in a cutting machine to cut out around the man.
Use the Blender Pen to blend some of the ink onto the shirt and pants. i made the pants slightly darker than the shirt.
Use the next size up on the Layering Ovals Dies to cut an oval from the 4 x 3 inch Early Espresso CS.
Adhere the two ovals together.
Stamp the sentiment “You do a great job of being a great guy” in Early Espresso ink onto the 3 x 3/4 inch Very Vanilla CS.
Tie a 22 inch piece of Linen Thread twice around the 4 1/2 x 1/2 inch strip of Early Espresso CS. Tie in place to one side.
Adhere the DSP to the front of the card base.
Adhere the Early Espresso CS wrapped with the Linen Thread onto the card with adhesive.
Use Stampin’ Dimensionals on the back of the oval piece stamped with the man, and the strip with the sentiment.
Adhere the man and sentiment.
Viola! And that is it! Now you are ready for Father’s Day too!
Thanks for visiting today. This card is made for the Cardz4Guyz Challenge #244 to make a vintage card. View other great Vintage cards at Cardz4Guyz.blogspot.com.
If you would like to purchase any Stampin’ Up! products, they are shown below. Just click on the photo and you will be connected with my Online Stampin’ Up! Store. I am an Independent Stampin’ Up! Demonstrator and would be honored to help you order what you need. Contact me by commenting on this blog, or send me an email at theresastreasures.az@gmail.com.
I really feel bad for anyone who was looking forward to a big gathering for their wedding this year in the midst of this pandemic. How awful to have made plans over the last year and then not be able to have your event the way you envisioned it. However, people will still be getting married. And who wants to run to the store right now? Having a handmade Wedding card on hand keeps you prepared.
This wonderful Wedding card is made with the Stampin’ Up!® Piece of Cake stamp set. This set is very versatile because there are 6 different cake stamps. Check it out here.
Measurements: Whisper White Card stock (CS): 8 1/2 x 5 1/2 inches with a score line at 4 1/4 inches and 4 x 2 inches for stamping the cake; Purple Posy CS: 5 1/4 x 4 inches; Perennial Essence Designer Series Paper (DSP): 5 x 3 3/4 inches; and Silver Foil: 4 x 2 inches.
Using Memento Black Ink stamp the cake on the bottom of the 4 x 2 inch Whisper White CS. Now stamp the floral cake topper on the other end. You will need room to use the Cake Builder Punch in a minute.
I used Stampin’ Write Markers in Highland Heather, Gorgeous Grape, Old Olive and Shaded Spruce to color the cake and flowers. I used the Highland Heather Stampin’ Write Marker to color the two tiny flowers located on the cake itself.
I colored the icing decorations in Gorgeous Grape. I left some of the flowers on the cake topper white because I thought they looked like daisies. The leaves are colored in Old Olive with a small amount of Shaded Spruce.
Use the Cake Builder punch to punch out the cake. You will also get a cake stand which we are not going to use. You could save the Whisper White cake stand for another card.
You will need to fussy cut the floral cake topper. It is so small!
Use the Cake Builder Punch to punch a cake stand out of the Silver Foil. Set the pieces of the cake aside for now.
Now for a trick! Hold the 5 1/4 x 4 inch Purple Posy with the 5 x 3 3/4 inch Perennial Essence DSP as shown. You may use some temporary adhesive if you wish.
Use the 2 inch Circle Punch to punch a circle in the upper left quadrant. Do not punch too close to the left edge of the card because the cake will be adhered there.
Here’s the trick! Now separate the DSP from the Purple Posy CS. Use the 2 1/4 inch Circle Punch to enlarge the circle on the DSP. This allows the Purple Posy to show through the DSP on the inside of the circle and be perfectly aligned!
Place the Purple Posy and Perennial Essence DSP pieces together and lay them on the front panel of the 8 1/2 x 5 1/2 inch Whisper White CS card base. This will show you where to stamp the sentiment.
I also placed the cake and stand on the card temporarily to help with the placement of the sentiment. The “Happy Wedding Day” sentiment is from the Beautiful Bouquet stamp set. I stamped the sentiment in Gorgeous Grape ink in the right upper portion of the circle.
I recommend using a lot of Stampin’ Dimensionals on the back of the Perennial Essence DSP.
Carefully adhere the Perennial Essence DSP to the Purple Posy CS. Next, use your Bone Folder to help get a nice crisp fold at the 4 1/4 inch score line on the 8 1/2 x 5 1/2 inch Whisper White CS card base.
Adhere the Purple Posy and DSP panel to the front of the Whisper White CS card base, keeping in mind how you want the sentiment to look.
Apply Stampin’ Dimensionals to all of the cake pieces. Adhere the cake first making sure there is space for the cake topper. Now adhere the cake topper and finally the cake stand.
Tie a bow and add it to the cake stand with a Mini Glue Dot. I used the Metallic Edged Ribbon in silver. (For help with tying a bow, refer to the video in this blog here.
Now for some Bling! I added the Rhinestone Basic Jewels sort of scattered on the Perennial Essence DSP. I placed 2 small Rhinestone Basic Jewels in the center of the flowers on the cake.
And Viola! You have a beautiful Wedding card ready to go! I think I went a little crazy with the Bling! Oh, well. It makes for a very sparkly card!
Thanks again for visiting my blog. I have so much fun creating cards and making a blog post. I hope you try some of the cards. Even if you do not have the specific paper or stamp set, perhaps my cards can be an inspiration for one of your own! Stay safe and healthy!
Below is a list of the products I used today. Just click on the photo to go to my Online Store and purchase the item.
Hi! Welcome to Theresa’s Treasures. I’m Theresa and I’m an Independent Stampin’ Up! Demonstrator from Arizona, USA. I’m so excited to be taking part in Kylie’s Demonstrator Training Blog Hop today.
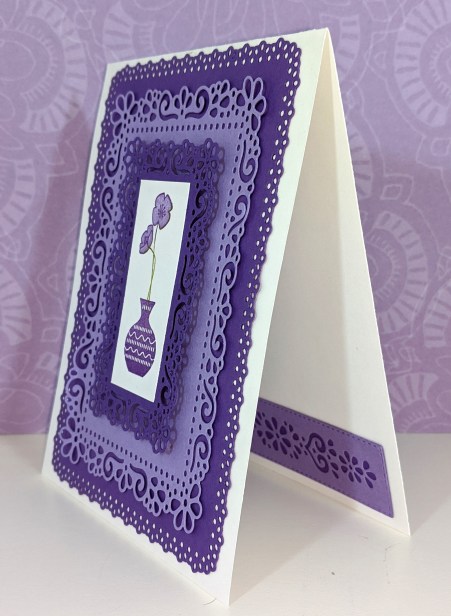
I created a card pairing my old favorite Varied Vases stamp set with the Ornate Layered Dies from the Ornate Garden Suite. I love how clean and simple the card turned out. And the card could be used for a variety of occasions, making it very versatile.
Here is a better view of the inside decoration. The colors are Gorgeous Grape and Highland Heather. I used Old Olive for the stem. The bottom layer is adhered to the card base. I used Stampin’ Dimensionals for the next 2 layers, then adhered the stamped card piece to the third layer. For the inside I used a Rectangular Layer die to cut out the design in Highland Heather, then adhered it to Gorgeous Grape. Then I fussy cut the edges of the Gorgeous Grape. The inside design is adhered to the card base.
I hope you enjoyed my card. I certainly enjoyed designing it. You can purchase the Ornate Layered Dies, Varied Vases Stamp set and view the Ornate Garden Suite at my online store HERE.
Thank you so much for stopping by. Please visit all the blogs participating in this hop to see all the fun and inspiring projects by demonstrators from around the world. You are currently visiting Theresa McEntee’s Theresa’s Treasures. Have a wonderful and creative day!
There are many Stampin’ Up! stamp sets that are retiring by June 2, 2020. I will miss several, including Let It Ride. I just love the horses! I used to go horseback riding as a kid in Albuquerque, New Mexico with my siblings. My Mom would drop us off at the stables near the base of the Sandia Mountains. After our horseback ride we would ride our bikes home. Fond memories!
This is a beautiful watercolor fun fold card. Don’t worry, it is pretty simple! It only looks complicated. I am not an artist. The stamp just lends itself to a nice watercolor.
The card opens this way and there is plenty of space to write a little note inside.
Measurements: Early Espresso Card stock (CS): 6 1/4 x 5 1/2 inches with a score at 2 inches and 6 1/2 x 4 inches with a score at 3 1/4 inches; Soft Suede CS: 5 1/4 x 4 inches; Very Vanilla CS: 3 3/4 x 3 inches and 4 x 2 inches; Crumb Cake CS: 5 1/4 x 1 3/4 inches; and Fluid 100 Watercolor Paper: 3 3/4 x 3 inches.
First I stamped the background with the Gallery Grunge stamp set using Soft Suede ink on the 5 1/4 x 4 inch Soft Suede CS. (I put a green scrap paper behind my card piece so I would not get ink on the table).
Next I used a different stamp from the Gallery Grunge stamp set to stamp in Crumb Cake ink onto the 5 1/4 x 1 3/4 inch Crumb Cake CS.
Using Memento ink, stamp the horse from the Let It Ride stamp set onto the Fliud 100 Watercolor Paper. You will need to be sure you have plenty of ink on the stamp and hold the stamp down for 10 seconds to get a dark enough image. The watercolor paper absorbs the ink differently than the cardstock does.
Stamp the sentiment “Go for it!” in Memento ink onto the 4 x 2 inch Very Vanilla CS. Leave room around the sentiment so you can use a Scalloped Circle Punch.
Now for some water-coloring fun! Turn the Balmy Blue ink pad upside down on the table. Push your thumbs down in the center, up and down, several times. Flip it over and open the ink pad. You should have an ink spot on the top of the inside cover.
I like to watercolor with the Aqua Painter. To prep the Aqua Painter you will need to squeeze the barrel that is filled with water and get a few drops of water to come out on a paper towel.
Put a few drops of water next to the ink spot (less is better). Use the Aqua Painter to mix a little ink into the drops of water. Start to apply the ink and water to the background in long strokes horizontally. Start light and gradually add color until it pleases you.
Continue to add a drop of water, then mix in the ink and apply to the background until you have the background covered. Wash off the Balmy Blue ink by squeezing the barrel of the Aqua Painter and brush it onto the paper towel until the water is clear.
Repeat the procedure with the Granny Apple Green ink. Apply to the grass. Be sure to clean the Aqua Painter before using the next color.
Using the Crumb Cake ink, apply a thin wash to the entire horse.
To get a darker ink with the Aqua Painter, do not squeeze out any water. Pick up ink from the middle of the ink spot on the very tip of the brush. Apply to areas that you want darker or shadowed. Again, I am not an artist, but I follow the artist’s lines and apply a darker layer of ink in that area. I also apply darker color to the legs that are on the opposite side of the horse. In my mind, these legs would be shadowed by the horses body.
I used the Basic Black Stampin’ Write marker on the hooves.
We are going to adhere the watercolor horse to the 6 1/2 x 4 inch scored at 3 1/4 inches Early Espresso CS. We will adhere it to the “front” of this little card with it turned backward. If you lay the card open to the table, you would adhere the horse to the left side.
The 3 3/4 x 3 inch Very Vanilla CS will go on the inside of our backward card. If you lay the card face up (the horse will be on the back of the right side), adhere the Very Vanilla CS to the left side.
The backward little card should end up looking like this.
Adhere the 5 1/4 x 4 inch stamped Soft Suede CS to the inside of the 6 1/4 x 5 /1/2 inch scored at 2 inches Early Espresso CS “card”. This is an odd looking “card” right now, but I assure you it will look great when we are done!
Adhere the 5 1/4 x 1 3/4 inch stamped Crumb Cake CS to the front of the odd Early Espresso card. Now we will put the backward and the odd cards together.
Adhere the back of the backward horse card to the center of the inside of the odd Early Espresso card. Now open the horse card and fold the front of the Early Espresso CS card under it.
Here is a “bird’s eye” view.
Use the 1 3/8 inch Scalloped Circle Punch to punch out the sentiment “Go for it!”.
To make the sentiment stand out more, I sponged some Soft Suede ink around the edge of the scalloped circle. (If you need help preparing the sponge, look at my blog about sponging here.)
Apply some Mini Stampin’ Dimensionals to the side and bottom as shown. This is because you want the card front to have a space to slide under the scalloped circle.
Place the 1 3/8 inch Scalloped Circle on the bottom left corner and be sure the front piece will slice under it before you adhere it to the card.
Viola! You have a watercolor masterpiece! Well, maybe not, but it is a very special card! Any horse-lover would appreciate receiving this card!
Thanks for joining me. I hope you try this out. Don’t worry if it doesn’t look great the first time! Just stamp several horses on a piece of watercolor and have fun! Experiment!
The 2019-2020 Stampin’ Up! Annual Catalog will be good until June 2, 2020. If you would like to look at the “Last Chance Products” just go to my online store and click the tab in the left hand column. You can get to my store here.
If you need any assistance and/or want me to mail you a new 2020-2021 Stampin’ Up! Annual Catalog, leave me a comment on this blog or email me at: theresastreasures.az@gmail.com.
To purchase any of the products I used today, click on the photo below.


")
 Designer Series Paper")
 Circle Punch")


 2020–2022 In Color Ribbon")


 Designer Series Paper")


 Crinkled Seam Binding Ribbon")


 Circle Punch")
 Circle Punch")


 Scallop Circle Punch")


