Hello fellow crafters and stampers! I am Theresa McEntee-author of Theresa’s Treasures Paper Crafts. I am hopping along with the Ink & Inspiration Blog Hop today. You can visit super awesome blogs from around the world! The list to follow the hop is at the end of my blog post. Please stop by and see everyone’s projects!
This is my Silly Safari Birthday card created using Sketch 109.
The Ink & Inspiration Challenge is a sketch challenge this month. I just returned from a week long scrapbook retreat in Scottsdale, Arizona entitled Jurassic Camp. I was feeling light and silly so the Silly Safari stamp set came to mind. I was inspired by the image because the long neck of the giraffe could easily fit on the banner in the sketch.
Supplies
Stamp Set: Silly Safari
Punches: 1 7/8″ & 2 1/4″ circle punches
Ink: Granny Apple Ink Pad & Memento Tuxedo pad
Embellishments: Strawberry Slush & Pretty In Pink Gems
Cardstock: Granny Apple Green, Pecan Pie and Darling Duckling
Hello fellow crafters and stampers! I am Theresa McEntee-author of Theresa’s Treasures Paper Crafts blog. I am hopping along with the Ink & Inspiration Blog Hop group today. You can visit super awesome blogs from around the world! The list to follow the hop is at the end of my blog post. Please stop by and see everyone’s projects!
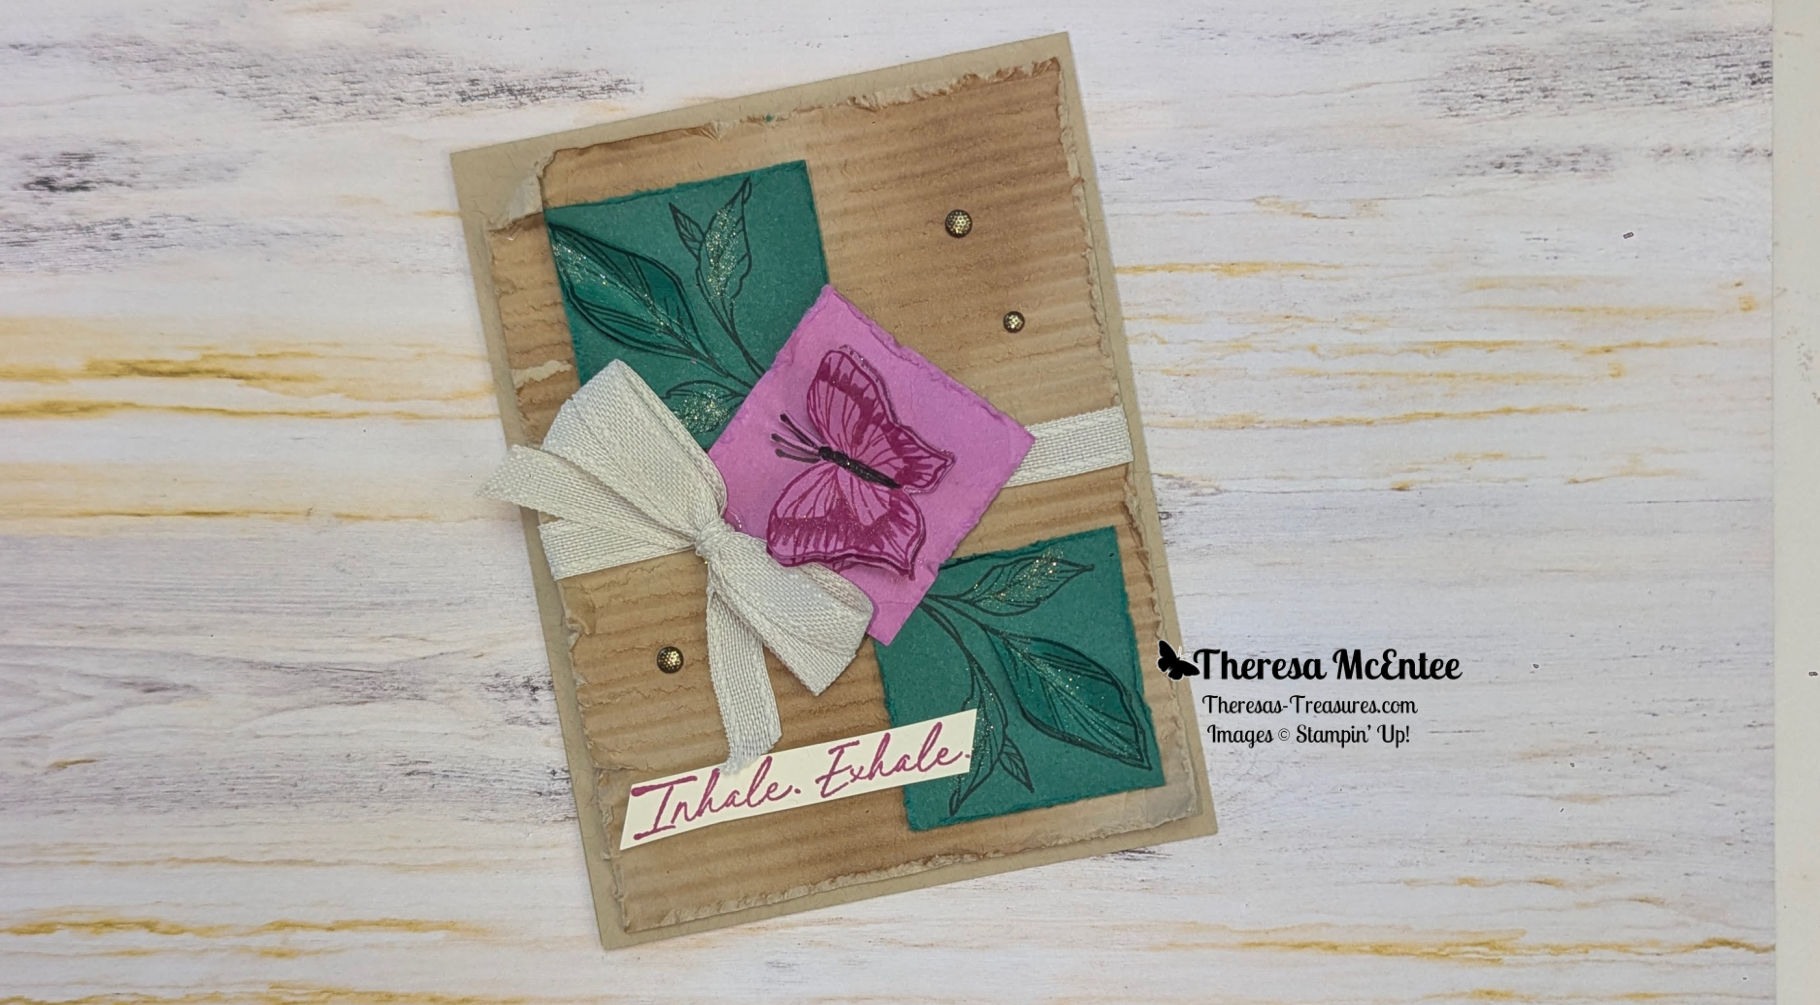
My card is made using the It’s Okay cling stamp set!
The Ink & Inspiration Challenge for March 2025 is Sketch Challenge#108. I was having a hard time with this sketch. I just wasn’t sure what I wanted to do. My card sort of happened rather that being planned. Has that ever happened to you? Ususally I sketch out my ideas first.
One type of card I like is the vintage look. I can’t say I am very good at it. I do admire other peoples vintage projects. So I tried a couple of techniques on this card.
Measurements
Crumb Cake cardstock card base: 4 1/4″ x 11″ with a score line at 5 1/2″
Crumb Cake cardstock: 4″ x 5 1/4″
Very Vanilla cardstock inside: 3 3/4″ x 5″ and 1/2″ x 2 3/4″
Shaded Spruce cardstock: 1 3/4″ x 1 3/4″ and scrap to stamp 2 more bunches of leaves
Petunia Pop: 1 3/4″ x 1 3/4″ and scrap to stamp 2 more butterflies
Stampin’ Dimensionals & Black Mini Stampin’ Dimensionals
Mini Glue Dots
Wink of Stella Glitter Brush
Instructions
Stamping the Components
Stamp the butterfly onto the 1 3/4″ x 1 3/4″ Petunia Pop cardstock. Stamp two more butterflies onto the scrap of Petunia Pop cardstock. Fussy cut the two stamped on the scrap paper. You can cut the antennae off of one of the butterflies.
On the butterfly with the antennae remaining, use a Basic Black Stampin’ Write Marker to darken the antennae and body. Then use the Dark Berry Burst Stampin’ Blends Alcohol Marker to make an outline around the inner wings. (see close up photos above)
Fold the fussy-cut butterflies in half. Apply two Mini Black Dimensionals to the center of the butterfly without the antennae. Adhere over the stamped butterfly on the square of Petunia Pop cardstock. Then apply glue to the center of the butterfly with the antennae. Adhere to the butterfly that has the Dimensionals on it. separate the wings for a 3D effect.
Use the edge of the Paper Snips to distress the edges of the Petunia Pop card stock square. Set aside.
Now stamp the leaves in Shaded Spruce Ink onto the two 1 3/4″ x 1 3/4″ Shaded Spruce cardstock squares. Then stamp another two bunches of leaves in Shaded Spruce Ink onto the scrap of Shaded Spruce. Fussy cut the two largest leaves from the scrap.
Fold the fussy-cut leaves in half. Apply glue to the center and adhere over the leaves stamped on the square of Shaded Spruce card stock. Bend the sides up for a 3D effect.
Use the edge of the Paper Snips to distress the edges. Set aside.
Use the Petunia Pop Ink to stamp the sentiment “Inhale. Exhale.” onto the strip of Very Vanilla card stock. Cut the ends at a diagonal with your Paper Snips. Set aside.
Stamping the Inside
Stamp the Very Vanilla card stock for the inside as shown below.
Adhere the inside to the inside of the Crumb Cake card stock card base.
Creating the Front Panel
Use the Mini Corrugated 3D Embossing Folder to emboss the panel of Crumb Cake card stock.
With the Stampin’ Blending Brush, apply Pecan Pie Ink to the panel as desired for a vintage effect. Then use the edge of your Paper Snips to distress the edges. It is okay if the paper tears somewhat.
Flatten the Crumb Cake card stock out. Wrap 6″ of the Beige Bordered Ribbon around the middle of the panel. Secure to the back with Mini Glue Dots.
Assembling the Card
Apply Stampin’ Dimensionals to the back of the corrugated panel. Adhere the panel to the front of the Crumb Cake card stock card base.
Adhere the Shaded Spruce card stock squares to the card front with Stampin’ Dimensionals.
Use Stampin’ Dimensionals to adhere the Petunia Pop card stock butterfly to the card front.
Use Mini Glue Dots and a little glue to adhere the bow.
Use Stampin’ Dimensionals to adhere the sentiment.
Finish with the Textured Dots Embellishment! Don’t forget to add Wink of Stella on the leaves and butterfly!
!Voila!
I hope you enjoyed my vintage card for the Sketch #108 Chalenge today. Leave me a comment to let me know what you think.
Be sure to visit all of the blogs for lots of wonderful inspiration with Sketch Challenge #108!
Calling all card makers and scrapbookers! The 2025-2026 Stampin’ Up! Annual Catalog is coming in May 2025! You can get one from your Stampin’ Up! Demonstrator. If you do not already have an awesome Stampin’ Up! Demonstrator, let me know! I would be happy to be your Stampin’ Up! Demonstrator and send a Stampin’ Up! 2025-2026 Annual Catalog to you. Start by setting up an account at Stampinup.com and choosing Theresa McEntee as your demonstrator. Let me know before March 30th so I can add you to the list!
Hello fellow stampers! I am Theresa McEntee-author of Theresa’s Treasures Paper Crafts Blog. I am hopping along with the Ink & Inspiration Blog Hop today. You can visit super awesome blogs from around the world and get inspiration for your own projects! The list to follow the hop is at the end of my blog post. Please stop by and see everyone’s projects!
The Theme for February 2025
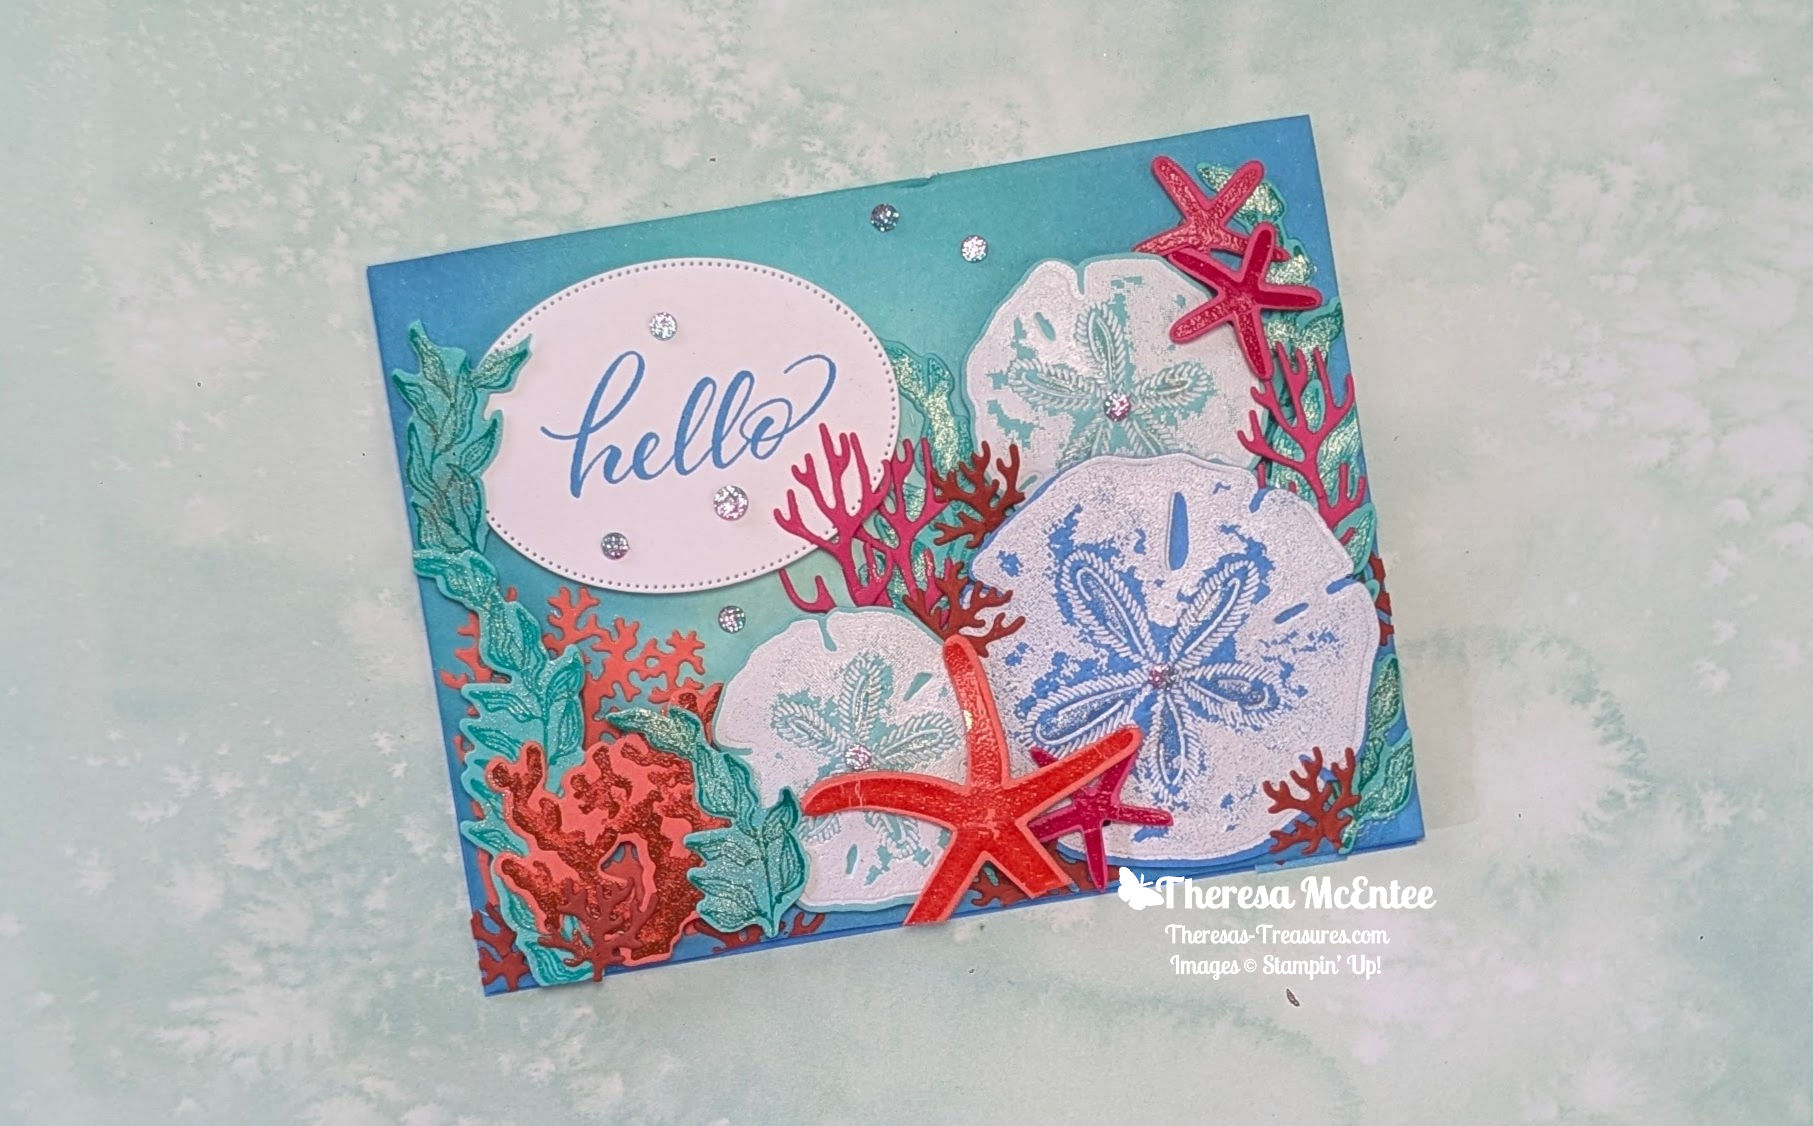
The Ink & Inspiration Challenge for February 2025 is both an image and a color challenge. I was primarily inspired by the beautiful, vibrant colors. The underwater image was intriguing.
My Card
I started to make this card by finding any sea-related stamp sets I had. I came up with Seaside Wishes and Beauty of the Deep. Seaside Wishes is still available as a bundle which includes both the dies and the hybrid embossing folder with the stamp set. The Beauty of the Deep stamp set and dies are sold separately.
Seaside Wishes stamp setSeaside Wishes DiesSeaside Wishes hybrid Embossing Folder with DiesBeauty of the Deep stamp setBeauty of the Deep Dies
Measurements
Azure Afternoon cardstock card base: 5 1/2″ x 8 1/2″ scored at 4 1/4″
Basic White cardstock: 4″ x 5 1/4″ (for the background), 2 1/4″ x 3″ (for sentiment), 3 3/4″ x 5″ (for inside of card) and 1/2″ x 4 1/4″ (for inside strip)
Calypso Coral cardstock: enough to die cut a large coral from the Beauty of the Deep dies, one large starfish and 3 small starfish from Seaside Wishes stamp and dies, and two stamped coral from Beauty of the Deep.
Azure Afternoon cardstock: 3″ x 3″ for the large sand dollar.
Coastal Cabana cardstock: 2 1/4″ x 4 1/4″ for two small sand dollars.
Summer Splash cardstock: enough to stamp 5 vines of seaweed from the Beauty of the Deep stamp set.
Melon Mambo cardstock: enough to cut 3 of the stick-like coral from Beauty of the Deep dies.
Cajun Craze cardstock: enough to die cut nine of the small bush-like coral.
Supplies
Stamp Sets: Beauty of the Deep, Seaside Wishes and Layering Leaves (sentiment)
Dies: Beauty of the Deep, Seaside Wishes and Linked Together (oval for sentiment)
I started this off by stamping with the colored ink then using Clear Emboss Powder over it for the vines of seaweed, starfish, and stamped coral. I kept making the images until I had several to create with. NOTE: the short fat coral is stamped in Cajun Craze Ink onto Calypso Coral cardstock, then covered in Clear Emboss Powder and heat set.
Next I started to die cut stuff. As stated above, I die cut several of the different types of coral.
To create the sand dollar, I stamped in Versamark and used the White Emboss Powder. I then put the sand dollar through the hybrid embossing folder/dies. With my fingers I made the sand dollars curve more to give them dimension.
The background was created using the Summer Splash, Coastal Cabana and Azure Afternoon Inks with Blending Brushes. I also made a 1/2″ x 4 1/4″ inch strip to go on the inside.
Now I had numerous images to work with so I started placing them on the card base to see how it looked. Play around with your own ideas until you like what you see.
Once I had it figured out, I started gluing it down. The center of the sand dollars have 2 Stampin’ Dimensionals piled on top of each other for more dimension. The sentiment is adhered with a single layer of Stampin’ Dimensionals.
Finish it up with the Wink of Stella and Two Tone Sparkle Gems!
¡Voila!
I hope you enjoyed my interpretation of this color and image challenge. Stop by everyone’s Blog to see more ideas using the same colors and/or image theme. You are at Theresa McEntee-USA right now.
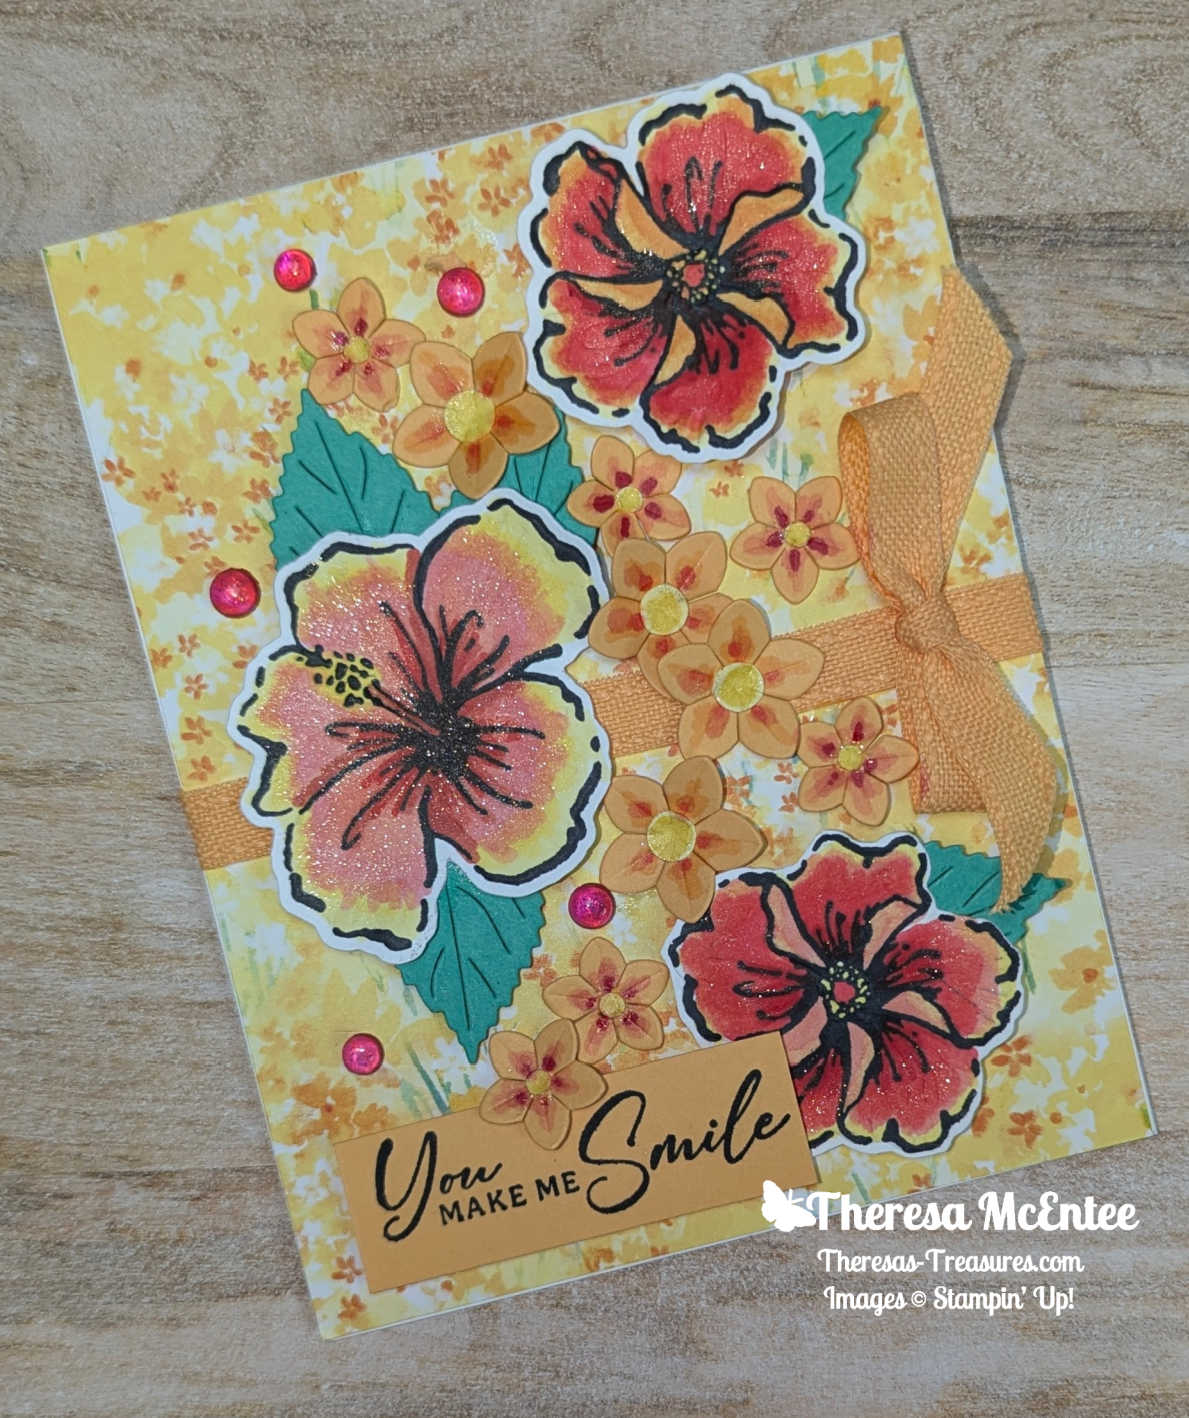
Hello fellow stampers! I am Theresa McEntee-author of Theresa’s Treasures Paper Crafts Blog. Today I am hopping along with the Ink & Inspiration Blog Hop Demonstrators with my Happy Hibiscus card. It is the last hop of 2024! You can visit super awesome blogs from around the world! The list to join the hop is at the end of my blog post. Please stop by and see everyone’s projects!
Some of the Stampin’ Up! products I used for this colorful card are a sneak peek of what is in the 2025 January to April Mini Catalog! Specifically, the Bloom Impression 12″ x 12″ Designer Series Paper and Sunny Day Iridescent Dots which will be available for purchase on January 7, 2025! If you are in need of a catalog, be sure to let me know in the comments.
This month the Ink & Inspiration Challenge is a Sketchchallenge. I was inspired by the sketch and wanted to use something other than the square and rectangle shapes. I chose the Happy Hibiscus Bundle from the Online Exclusives since the flowers were large enough to substitute for the squares and rectangle in the sketch. Also, I really enjoy coloring with the Stampin’ Blend Alcohol Markers! It is so fun to blend the colors together!
Measurements
Basic White cardstock card base: 4 1/4″ x 11″, scored at 5 1/2″
Basic White cardstock for stamping the flowers and leaves: 4 1/4″ x 5 1/2″
Peach Pie cardstock: 2″ x 4 1/2″ to die cut 6 small flowers & 4 large flowers
Peach Pie cardstock: 2 1/4″ for the sentiment
Shy Shamrock cardstock: 1 3/4″ x 5″ to die cut 5 leaves
Lemon Lolly cardstock: 1/2″ x 3″to use a hole punch to make 6 small flower centers & 4 large centers
Bloom Impressions 12″ x 12″ Designer Series Paper: yellow floral pattern: 4 1/2″ x 5 1/2″, 3/8″ x 5 1/2, 3/8″ x 4″, 1/8″ x 5 1/2″ & 1/8″ x 3 3/4″
Supplies
Stamp Set: Happy Hibiscus
Dies: Happy Hibiscus Hybid Dies
Embossing Folder: Happy Hibiscus Hybrid 3D Embossing Folder
Ink: Memento Black Ink Pad
Stampin’ Blends Alcohol Markers: Lemon Lolly Combo Pack, Calypso Coral Light, Poppy Parade Combo Pack, Melon Mambo Combo Pack, Pretty in Pink Combo Pack & a Color Lifter.
Embellishments: Sunny Day Iridescent Dots and Wink of Stella Clear Glitter Brush
Ribbon: Peach Pie 3/8″ Bordered Ribbon
Instructions
Use the Memento Black Ink to stamp the images of the flowers & leaves onto the Basic White cardstock. Also stamp the sentiment onto the Peach Pie cardstock.
Color as desired. I used the Stampin’ Blends Alcohol Markers. You could use the Blends, the Watercolor Pencils or the Stampin’ Write Markers. Have fun!
Use the Happy Hibiscus Hybid Dies and Hybrid 3D Embossing Folder to cut & add dimension to the stamped flowers. It does take a little practice to use this. I recommend practicing on images stamped in Memento Ink on scrap paper first. Watch the following video on how to use the Hybrid Dies & 3D Embossing Folder.
Die cut the Peach Pie cardstock flowers & the Shy Shamrock cardstock leaves.
Use the Stampin’ Blends Alcohol Markers to add some color to the center of each of the Peach Pie cardstock flowers.
Use two sizes of hole punches to make the Lemon Lolly cardstock flower centers. Adhere the centers to the middle of each of the Peach Pie cardstock flowers. Add some Wink of Stella to each flower.
Assembling the Card
Wrap a 6″ piece of the Peach Pie Ribbon around the Bloom Impressions panel. Secure with Mini Glue Dots. Tie a bow and adhere to the far right. I use a combination of the Mini Glue Dots and Tombow Multipurpose Liquid Glue so that the bow will stay on more securely.
Adhere the Bloom Impressions Designer Series Paper panel with the ribbon around it to the front of the Basic White cardstock card base.
Adhere the strips of Bloom Impressions Designer Series Paper to the inside of the card base as shown below.
Use Stampin’ Dimensionals to adhere the sentiment to the lower left-hand corner of the card front.
Adhere the die cut Shy Shamrock cardstock leaves to the back of the stamped & colored flowers. Use Stampin’ Dimensionals to adhere the 3 flowers to the card front. Add some Wink of Stella to each flower.
Adhere the stamped & colored leaves to the small flower for the inside. Then use the Tombow Glue to adhere the flower & leaves to the lower right-hand corner of the inside.
Use the Mini Glue Dots and a little Tombow Glue to adhere the Peach Pie Cardstock die cut flowers.
Finish the card front by adding the Sunny Day Iridescent Dots.
¡Voila!
I hope you enjoyed my interpretation of Sketch 107. You are currently at Theresa McEntee-USA author of Theresa’s Treasures Paper Crafts Blog. Be sure to visit everyone on the Blog Roll Call for lots of awesome inspiration!
Hello fellow stampers! I am Theresa McEntee-author of Theresa’s Treasures Paper Crafts. I am hopping along with the Ink & Inspiration Blog Hop today with my Seaside Wishes Encouragement Card. Here you can also visit super awesome blogs from around the world! The list to follow the hop is at the end of my blog post. Please stop by and see everyone’s wonderful projects!
The Seaside Wishes Encouragement Card is designed with the Seaside Wishes stamp set and dies available in my Online Store HERE.
The Ink & Inspiration Challenge this month is both an image and a color challenge. I was really stuck with this one. The colors were more inspiring to me than the image. Several stamp sets were tried and several cards made before I decided on this Seaside Wishes Encouragment Card.
Measurements for the Seaside Wishes Encouragment Card
Thick Basic White cardstock (cs) card base: 4 1/4″ x 11″ scored at 5 1/2″
Basic White cs: 4″ x 8″ (to die cut the sand dollars)
Basic White cs: 5/8″ x 4 1/4″ (for sentiment)
Calypso Coral cs: 3″ x 5 1/2″ (to stamp & die cut the starfish)
Coastal Cabana cs: 3 1/2″ x 5 1/2″
Garden Green cs: 1 1/2″ x 3 1/2″ (to die cut the seaweed)
Old Olive cs: 1″ x 3 1/2″ (to die cut the seaweed)
Instructions for the Seaside Wishes Encouragement Card
Use a Blending Brush and the Crumb Cake Ink to blend color onto the front panel of the Thick Basic White cs card base. Apply a darker color to the edges.
Stamp the stones and sand with the Crumb Cake Ink.
Die cut the sand dollars using the Seaside Wishes Hybrid Embossing Folder with the Seaside Wishes Dies.
Apply a light layer of Crumb Cake Ink to each sand dollar with a Blending Brush. Make some areas a little darker. Set aside.
Stamp the starfish onto the Calypso Coral cs in Calypso Coral Ink. Die cut with the Seaside Wishes Dies. Set aside.
Tear the Coastal Cabana cs along the right-hand side to make an ocean wave. Emboss with the So Swirly Embossing Folder.
Apply Wink of Stella to the torn portion of the Coastal Cabana cs. Adhere to front left of the Basic White cs card base.
Die cut some of the seaweed from the Garden Green and Old Olive cardstock.
Arrange the sand dollars, starfish & seaweed as desired.
Add the Adhesive-Backed Dappled Dots as stones.
Stamp the sentiment in Coastal Cabana Ink onto the 5/8″ strip of Basic White cs. Adhere to the card front.
In the end I really enjoyed designing the Seaside Wishes Encouragement Card because it reminded me of a vacation I took with my family to a beach in Florida. We had such a wonderful time. Good memories! I will have to design a scrapbook page now!
I hope the project you’ve seen here on my blog today has inspired you & brightened your day. You are currently visiting Theresa McEntee-US. Please see the list below & hop through all of the people on the list to see all our projects. You don’t want to miss any!
Blog Roll Call
Have a most wonderful day!
Theresa
Order Supplies to make your own Seaside Wishes Encouragement Card Here:
Hello fellow stampers! I am Theresa McEntee-author of Theresa’s Treasures Paper Crafts. I am hopping along with the Ink & Inspiration Blog Hop crew today. You can visit super awesome blogs from around the world! The list to follow the hop is at the end of my blog post. Please stop by and see everyone’s projects!
The Ink & Inspiration Challenge is a sketch challenge this month. The image inspired me and I immediately saw the possibility of a Fun Fold. I really love to figure out new ways to make a card!
I absolutely love coffee! There are so many good memories related to relaxing with a cup of delicious coffee. For this Fun Fold card I used two stamp sets- Latte Love & Coffee with Friends. You can find Coffee with Friends in the Stampin’ Up! 2025-26 Annual Catalog. The Latte Love is an Online Exclusive.
Each of these stamp sets has images that can be used for a multitude of handmade cards. I chose the women sitting on the steps with her cup of coffee because it reminded me of myself. I love to contemplate life with a hot cup of rich savory coffee!
There are several great dies to accompany the Latte Love stamp set. I only used the outline of the cup.
The “A Little Latte” Designer Series Paper is so fun with several designs!
Thinking about possibilities for Sketch 105 led to the creation of this unique Fun Fold.
Measurements
Pecan Pie cardstock card base: 5 1/2″x 8 1/2″ scored at 4 1/4″
Pecan Pie cardstock: 3″x 4″
Calypso Coral cardstock: 2 3/8″ x 3 3/8″, 2 1/4″ x 2 3/4″ (to die cut coffee cup)
Basic White cardstock: 2 1/4″ x 3 1/4″ (for the image of the women), 2 3/4″ x 3 3/4″ (front inside piece), 3 3/4″ x 5″ (back inside piece), 2″ x 2″ (to stamp and die cut coffee)
A Little Latte DSP: 5 3/8″ x 8 1/4″ scored at 4 1/8″ (see template below)
DSP Template
The image of the women with the cup of coffee was colored with the Watercolor Pencils.
Supplies
Stamp Set: Latte Love & Coffee with Friends
Dies: Latte Love
Ink: Memento, Early Espresso, Pecan Pie & Calypso Coral
Embellishments: Adhesive-Backed Swirl Dots
Ribbon: Linen Thread
Watercolor Pencils Assortment 1 & 2
Instructions
Use Pecan Pie Ink and stamp-off once to stamp the coffee for the coffee cup onto the Basic White cardstock. Die cut the coffee.
Stamp the image of the women in Memento Ink. Color as desired.
The sentiments are all stamped in Early Espresso Ink. (see below)
For the back inside card piece, use Memento Ink to stamp the image of the two coffee cups with the croissants. Color as desired.
Stamp the splatter and the cup rings with Pecan Pie Ink, some Stamped-Off once and some at full strength. (see below)
Now stamp the ariel view of the coffee cup in Calypso Coral Ink onto the Calypso Coral cardstock. Die cut the coffee cup.
Front inside and Back inside
Adhere the back inside card piece to the inside of the Pecan Pie cardstock card base. Close the card.
Next fold the “A Little Latte” DSP at the 4 1/8″ score line. Adhere the DSP to the front of the Pecan Pie cardstock card base so that it will open like a second card.
Open the DSP and adhere the front inside card piece to the inside of the DSP. Close the DSP.
Now adhere the Basic White cardstock with the image of the women on it to the Calypso Coral cardstock. Use Stampin’ Dimensionals to adhere this to the Pecan Pie cardstock.
Apply the Multipurpose Liquid Glue to the back of the bottom corner and adhere the card piece with the image of the women on it to the front of the DSP card piece.
Glue the Basic White cardstock stamped with the coffee to the inside of the Calypso Coral cardstock coffee cup. Use the glue to adhere the cup to the upper right-hand corner of the card piece with the image of the woman on it.
Add the Swirl Dots to the upper right-hand corner or as desired.
Voila!
I hope you enjoyed Sketch 105 and my Fun Fold card! Be sure to join the Blog Hop to see more interpretations of Sketch 105!
Here is my Online Exclusive Simply Zinnia card for the Sketch 104 Challenge!
Hello fellow stampers! I am Theresa McEntee-author of Theresa’s Treasures Paper Crafts. I am hopping along with the Ink & Inspiration Blog Hop today. You can visit super awesome blogs from around the world! The list to join the hop is at the end of my blog post. Please stop by and see everyone’s projects!
The Ink & Inspiration Challenge this month is a Sketch Challenge. I was already playing around with the Simply Zinnia stamp set. I had stamped a bunch of the large zinnia and colored them with the Stampin’ Blends Alcohol Markers. If you haven’t tried alcohol markers yet, don’t wait any longer. The alcohol markers make coloring so fun and rewarding!
Since I already had several zinnia colored, I arranged them to correspond to the Sketch 104 Challenge. I was thrilled to see how nice they all looked together!
I love the Flowering Zinnia Designer Series Paper and but also wanted to use the Zinnia 3D Embossing Folder. So I decided to emboss the Designer Series Paper. It is very subtle and adds texture to the card.
Measurements
Melon Mambo cardstock card base: 5 1/2″ x 8 1/2″ scored at 4 1/4″
Basic White cardstock: 4 1/4″ x 5 1/2″ (for stamping the zinnia & leaves), 4″ x 5 1/4″ (inside) and 1/2″ x 5 1/2″ (for sentiment)
Flowering Zinnia Designer Series Paper, Petal Pink polka dot design: 4 1/8 ” x 5 3/8″ (to die cut with the largest Deckled Rectangle Die & emboss with the Zinnia 3D Embossing Folder)
NOTE: save the edges when you die cut the Deckled Rectangle to use on the inside of the card
Fold the Melon Mambo cardstock card base at the 4 1/4″ scoreline and burnish with the Bone Folder. Set aside.
Die cut the Flowering Zinnia Designer Series Paper with the largerst Deckled Rectangle Die. Save the edges to use for the inside of the card.
Run the Deckled Rectangle through the Stampin’ Cut & Emboss Machine with the Zinnia Embossing Folder. Set aside.
Use Memento Ink to stamp the large zinnia three times and the leaves twice onto the 4 1/4″ x 5 1/2″ Basic White cardstock.
TIP: Use the Heat Tool to dry the Memento Ink. Then when you use the Lemon Lolly Stampin’ Blend, the black Memento will not bleed into the Lemon Lolly.
Color the images as desired. I usually start by coloring the shadows with a the dark shade. Then I blend it with a medium shade. And finally I blend everything with the lighter color.
Die cut the zinnias and leaves with the Simply Zinnia Dies. Set aside.
Use Blackberry Bliss Ink to stamp the sentiment onto the 1/2″ x 5 1/2″ Basic White cardstock. Stamp in the center as you will use the whole piece.
For the inside, use the scrap from cutting the Deckled Rectangle from the Flowering Zinnia Designer Series paper and adhere it to the 4″ x 5 1/4″ Basic White cardstock as shown below.
Assembling the Card
Adhere the inside card piece to the inside of the Melon Mambo cardstock card base.
Adhere the die cut and embossed Flowering Zinnia Designer Series Paper to the front of the card base.
Use Stampin’ Dimensionals to adhere the sentiment to the front of of the card.
Arrange the 3 zinnias on the card front. Adhere the top zinnia flat to the card front. Use 3 thicknesses of Basic White cardstock on the back of the middle zinnia. Then adhere the bottom zinnia with Stampin’ Dimensionals. Tip: place Dimensionals in the center of the back of the zinnia so you can place the leaves more easily.
Adhere the leaves.
Use Wink of Stella on the zinnia for extra sparkle.
Embellish with the Adhesive-Backed Shiny Sequins as desired.
I hope you enjoyed my interpretation of The Sketch 104 Challenge. Be sure to visit each of the blogs below to see more ideas!
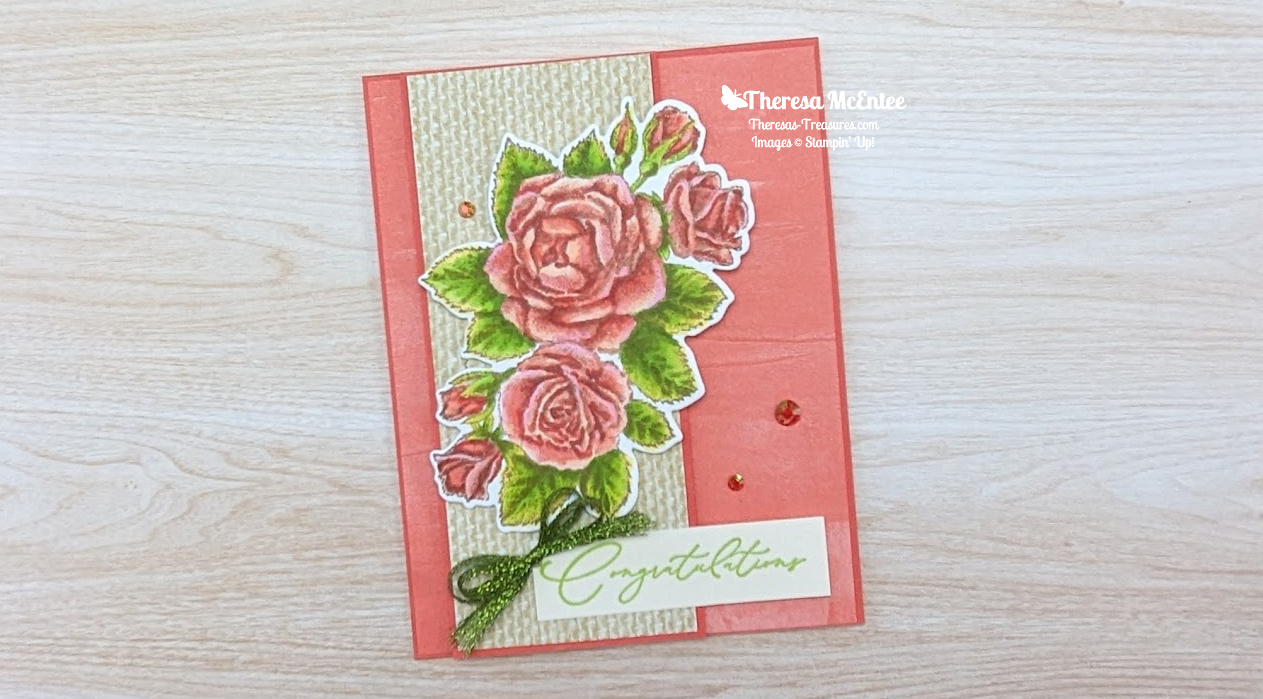
Hello fellow stampers! I am Theresa McEntee-author of Theresa’s Treasures Paper Crafts. I am hopping along with the Ink & Inspiration Blog Hop today with my Stippled Roses Congratulations Card for the Ink and Inspiration Blog Hop-February 2024. You can visit super awesome blogs from around the world! The list to follow the hop is at the end of my blog post. Please stop by and see everyone’s projects!
The Ink & Inspiration Challenge is both an image and a color challenge. I was inspired by the image of the roses in the center of the image. I love roses-the color, the scent, and the wonderful feeling I get when I receive them. Roses are also very nice to send to others!
Real roses can be very expensive and only live for a short time. Creating a card with roses is more managable and can last forever!
Measurements
Calypso Coral cardstock (cs) card base: 4 1/4″ x 11″ scored at 5 1/2″
Calypso Coral cs: 2 3/8″ x 5 1/2″
Softly Stippled Designer Series Paper (DSP):
Calypso Coral background: 4 1/8″ x 5 3/8″
Wild Wheat burlap pattern: 2 1/4″ x 5 3/8″
Very Vanilla cs:
inside: 4″ x 5 1/4″
sentiment: 3/4″ x 2 3/4″
for stamping the roses: 4″ x 5″
Supplies
Stamp Set: Stippled Roses
Dies: Stippled Roses
Ink: Stazon Saddle Brown and Parakeet Party Ink pads
Watercolor Pencils: Calypso Coral, Daffodil Delight, Pumpkin Pie & Granny Apple Green
Embellishments: Iridescent Pastel Gems
Ribbon: 1/8″ Metallic Woven Ribbon in Parakeet Party
Instructions
Stamp the roses in Stazon Saddle Brown ink onto the 4″ x 5″ Very Vanilla cs.
Pick out the Stampin’ Blends and Watercolor Pencils. It may take 1- 1 1/2 hours to color the roses.
Start with the darkest color of alcohol ink and just color where there are already shadows.
Then blend in the next lightest color. Continue to apply small amounts of ink with the markers until you have the desired look. Note: there is a Facebook Page by Alison Tilsner that you can join called Blends & Beyond. In Guide 1 there is a video she made that I followed to color the roses.
After you have the Alcohol Markers down, enhance the colors with the Watercolor Pencils.
Stamp the smaller rose in Stazon Saddle Brown Ink onto the inside Very Vanilla cs and color.
The senntiment is stamped in Parakeet Party Ink.
Assemble the card. Use Stampin’ Dimensionals for the burlap strip on the card front.
I hope you enjoyed my card. Coloring takes a lot of trial and error. If it doesn’t come out the way you like at first, try again. Enjoy the Blog Hop for more ideas with this theme!
Sale-a-bration ends on Thursday February 29, 2024. The Softly Stippled 12″ x 12″ Designer Series Paper is one of the FREE products with an order of $50 USD. When you order the Stippled Roses Bundle alone you will qualify to choose the paper! Order HERE
Hello fellow stampers! You are visiting with Theresa McEntee-author of Theresa’s Treasures Paper Crafts. I am hopping with the Ink & Inspiration Blog Hop today. There are several of us- you will find the list to follow the hop at the end of my blog post.
The Ink & Inspiration Challenge is both an image and a color challenge. I was inspired by the trees and sun because I felt a feeling of serenity while I was looking at the image. The color combination is just gorgeous! Many of my faves!
How To
Measurements are at the end of the blog.
Start out with the One Horse Open Sleigh Designer Series Paper on the left. I thought it was a little barren. After looking through all my stamp sets, I found the perfect tree in the Grassy Grove stamp set.
Tear a piece of copy paper to make an uneven edge and use as a mask so that the trees appear further away. Stamp some trees in Starry Sky Ink. The mask also provides an edge to make a snow drift for the trees to be behind. Use a Small Blending Brush with the Starry Sky Ink and a light layer to make a soft snowdrift in front of the trees.
Diecut the sun with the smallest of the Deckled Circle Dies from a piece of full stick sticky paper. Tip: Diecut through 2 or more sticky sheets so that the top one will still have a full stick.
Apply a light layer of Crushed Curry Ink with a Small Blending Brush where you want the sun to be. Stick the sun mask on. Blend on more Crushed Curry Ink, then blend on a little Pumpkin Pie just around the edge.
To make the sun’s rays, use a scrap piece of Basic White cardstock and a Small Blending Brush. Apply a small amount of Crushed Curry Ink to the brush and very gently blend the color along the edge of the scrap of cardstock. Move the scrap a little and repeat until all the rays are done.
Add more trees in Mossy Meadow Ink and Blackberry Bliss Ink.
The sentiment is from the Horse & Sleigh stamp set. Stamp the sentiment for the front of the card in Starry Sky Ink onto a strip of Basic White cardstock measuring 5/8″ x 4 1/4″.
The clouds come from the Trucking Along stamp set and are stamped in Gray Granite Ink.
Use the torn piece of copy paper again to create the inside of the card. Stamp the trees that are in the background with Starry Sky Ink. Then as you move closer, stamp the trees in Mossy Meadow Ink then Blackberry Bliss Ink. Use a Small Blending Brush and a light layer of the Starry Sky Ink to make the snowdrifts.
Stamp the sentiments for the inside of the card in Starry Sky Ink.
Adhere all of the corresponding cardpieces. Use Stampin’ Dimensionals to adhere the front panel.
Add Bling
Use the 2022-24 In Color Pearls for the Bling by applying 3 of the Starry Sky pearls.
Measurements
This is a 5″ x 7″ card.
Starry Sky cardstock card base: 7″ x 10″ scored at 5″.
Basic White cardstock: 4″ x 6″ and 5/8″ x 4 1/4″
One Horse Open Sleigh Designer Series Paper (DSP): 4″ x 6″
Blackberry Bliss cardstock: two at 4 1/4″ x 6 1/4″
If you live in the USA and would like to join Theresa’s Treasures Stampin’ Up! Stamping Gems Team, the best joining special is going on now until October 31, 2023!
Hello fellow stampers! You are visiting with Theresa McEntee-author of Theresa’s Treasures Paper Crafts. I am hopping with the Ink & Inspiration Blog Hop today. There are several of us- you will find the list to follow the hop at the end of my blog post. Please stop by and visit everyone!
The Ink & Inspiration Challenge this month is both an sketch & a color challenge. I was inspired by the sketch primarily because I was already playing with the Translucent Florals Bundle and I could envision using the images in the sketch. This bundle can be found in the Stampin’ Up! 2023 Holiday Mini Catalog.
And this bundle has a coordinating Designer Series Paper (DSP) only available in the Online Exclusives. The Delightful Floral DSP has vibrant colors and gorgeous designs. I also couldn’t wait to try out the Online Exclusive Gold Adhesive-Backed Glimmer Paper!
These colors & designs just make me smile. I love flowers and plants. My house is filled with plants and my front yard is filled with flowers!
The Gold Adhesive-Backed Glimmer Paper was so easy to use. Stamping the flowers on vellum cardstock was a little tricky. Using the Heat Tool to help set the ink helped. Also using tweezers to move the flowers helped me avoid getting ink on my fingers, too much! Later I learned a Hot Tip from my Accountability Partner, Christy Gridley, that using Clear Emboss Powder over the ink makes it so you won’t get the ink all over the place.
For the inside, I stamped the images on Basic White cardstock. Much easier!
If you would like more information on how to make this card for yourself, let me know in the comments.
Please visit everyone’s blog for awesome project ideas!


![Silly Safari Bundle (English) [ 165260 ]](https://i0.wp.com/assets1.tamsnetwork.com/images/EC042017NF/165260s.jpg?w=100&ssl=1 "Silly Safari Bundle (English) [ 165260 ]")
![2 1/4" (5.7 Cm) Circle Punch [ 143720 ]](https://i0.wp.com/assets1.tamsnetwork.com/images/EC042017NF/143720s.jpg?w=100&ssl=1 "2 1/4\" (5.7 Cm) Circle Punch [ 143720 ]")
![Granny Apple Green Stampin' Pad [ 147095 ]](https://i0.wp.com/assets1.tamsnetwork.com/images/EC042017NF/147095s.jpg?w=100&ssl=1 "Granny Apple Green Stampin' Pad [ 147095 ]")
![Tuxedo Black Memento Ink Pad [ 132708 ]](https://i0.wp.com/assets1.tamsnetwork.com/images/EC042017NF/132708s.jpg?w=100&ssl=1 "Tuxedo Black Memento Ink Pad [ 132708 ]")
![Darling Duckling 8 1/2" X 11" Cardstock [ 165622 ]](https://i0.wp.com/assets1.tamsnetwork.com/images/EC042017NF/165622s.jpg?w=100&ssl=1 "Darling Duckling 8 1/2\" X 11\" Cardstock [ 165622 ]")
![Granny Apple Green 8-1/2" X 11" Cardstock [ 146990 ]](https://i0.wp.com/assets1.tamsnetwork.com/images/EC042017NF/146990s.jpg?w=100&ssl=1 "Granny Apple Green 8-1/2\" X 11\" Cardstock [ 146990 ]")
![Pecan Pie 8 1/2" X 11" Cardstock [ 161717 ]](https://i0.wp.com/assets1.tamsnetwork.com/images/EC042017NF/161717s.jpg?w=100&ssl=1 "Pecan Pie 8 1/2\" X 11\" Cardstock [ 161717 ]")
![Basic White 8 1/2" X 11" Cardstock [ 166780 ]](https://i0.wp.com/assets1.tamsnetwork.com/images/EC042017NF/166780s.jpg?w=100&ssl=1 "Basic White 8 1/2\" X 11\" Cardstock [ 166780 ]")
![Strawberry Slush & Pretty In Pink Gems [ 165615 ]](https://i0.wp.com/assets1.tamsnetwork.com/images/EC042017NF/165615s.jpg?w=100&ssl=1 "Strawberry Slush & Pretty In Pink Gems [ 165615 ]")
![Darling Duckling Stampin’ Blends Combo Pack [ 165288 ]](https://i0.wp.com/assets1.tamsnetwork.com/images/EC042017NF/165288s.jpg?w=100&ssl=1 "Darling Duckling Stampin’ Blends Combo Pack [ 165288 ]")
![Pecan Pie Stampin’ Blends Combo Pack [ 161674 ]](https://i0.wp.com/assets1.tamsnetwork.com/images/EC042017NF/161674s.jpg?w=100&ssl=1 "Pecan Pie Stampin’ Blends Combo Pack [ 161674 ]")
![Bronze & Ivory Stampin' Blends Combo Pack [ 154922 ]](https://i0.wp.com/assets1.tamsnetwork.com/images/EC042017NF/154922s.jpg?w=100&ssl=1 "Bronze & Ivory Stampin' Blends Combo Pack [ 154922 ]")
![Timid Tiger Stampin’ Blends Combo Pack [ 165291 ]](https://i0.wp.com/assets1.tamsnetwork.com/images/EC042017NF/165291s.jpg?w=100&ssl=1 "Timid Tiger Stampin’ Blends Combo Pack [ 165291 ]")
![Gray Granite Stampin' Blends Combo Pack [ 154886 ]](https://i0.wp.com/assets1.tamsnetwork.com/images/EC042017NF/154886s.jpg?w=100&ssl=1 "Gray Granite Stampin' Blends Combo Pack [ 154886 ]")


")


 Bordered Ribbon")


")


")


")


")


")


 Designer Series Paper")


")


 Designer Series Paper")


 Metallic Woven Ribbon")


")
")
")


 Designer Series Paper")


")


 Adhesive Backed Glimmer Paper")


