

Hello! Welcome to Theresa’s Treasures Paper Crafts. I am Theresa, an Independent Stampin’ Up! Demonstrator in Arizona, USA. I am so excited to be participating in Kylie Bertucci’s International Blog Highlight Gallery with my Kiddin’ Around “You Are Amazing” card. Today I am blogging along with a very creative group of Stampin’ Up! demonstrators from around the world! Please be sure to see all of the inspirational projects by visiting everyone’s blog. You will need to click on the “Vote” button below to see the Gallery.
The theme for this Gallery is “Thank You”.
We often forget those simple words “Thank you”. However, it is also important to let those who have helped you, supported you or inspired you, know just how amazing you think they are! One way to share your feelings is to send a handmade card. Discover the joy in making and sending a handmade card for yourself!

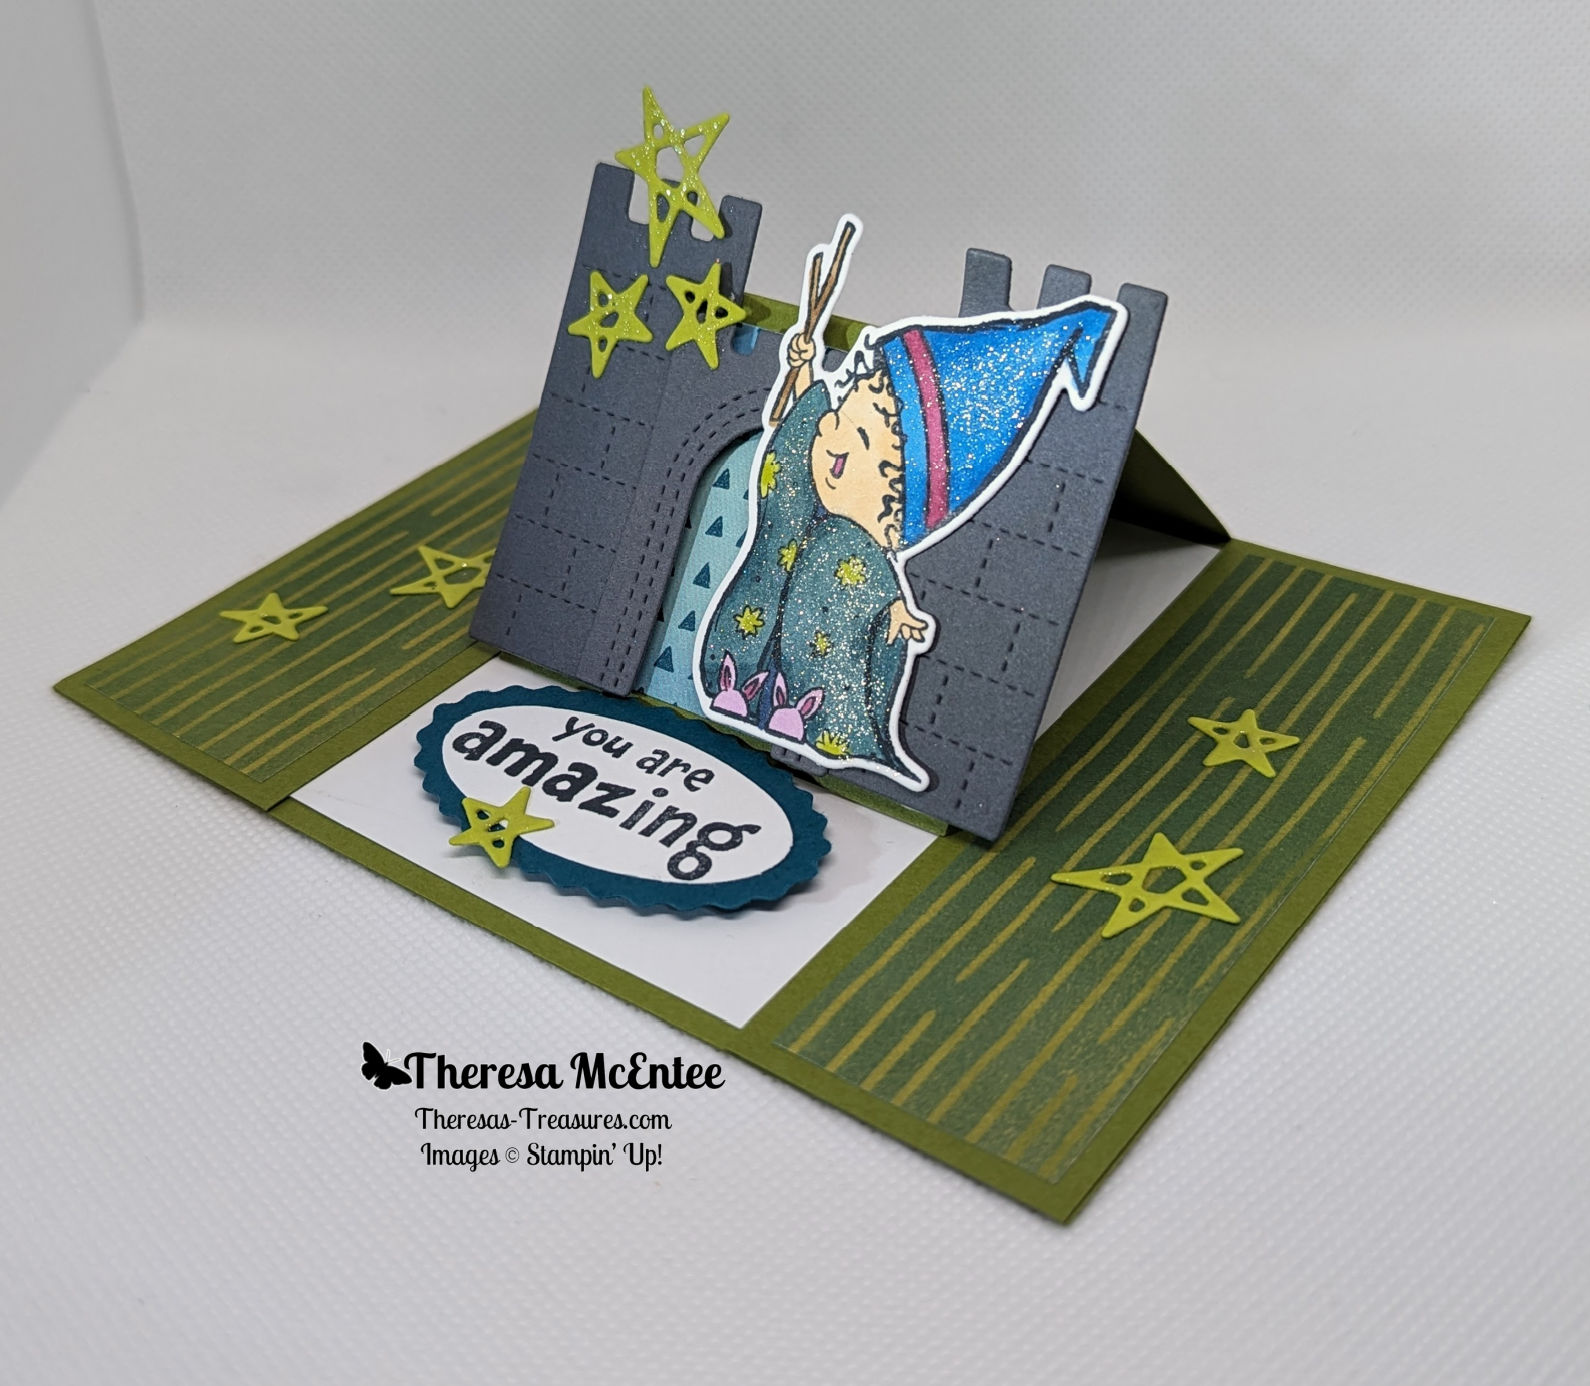
This Kiddin’ Around “You Are Amazing” Card showcases the Kiddin’ Around Bundle in the 2024 Stampin’ Up! Mini Catalog. Today I used both the stamp set and the dies, as well as the Just Kiddin’ 12″ x 12″ Designer Series Paper.
Current Host Code: K3Q7NG2M
Measurements

- Old Olive cardstock card base: 5 1/2″ x 8 1/2″ scored at 4 1/4″
- Basic White cardstock: 3 1/4″ x 4″, 2 1/2″ x 3″ (to stamp the child) and 1 1/2″ x 3″ (for sentiment)
- Basic Gray cardstock: 3″ x 4″ (to diecut the castle pieces)
- Lemon Lime Twist cardstock: 1 1/2″ x 9″ (to diecut the stars)
- Pretty Peacock cardstock: 1 1/2″ x 3″
- Just Kiddin’ 12″ x 12″ Designer Series Paper: two at 1 1/2″ x 4″ (Olive Green/Lemon Lime Twist “grass” pattern and 1 3/4″ x 2 1/4″ (ombre blue with mini triangles pattern for the “sky”)
Supplies
- Kiddin’ Around Bundle
- Double Oval Punch
- Paper Trimmer
- Stampin’ Cut & Emboss Machine
- Ink: Memento Ink Pad
- Stampin’ Blends Alcohol Markers: Azure Afternoon, Berry Burst, Fresh Freesia, Lemon-Lime Twist, Pecan Pie, Pretty Peacock and 800/light Medium Deep.

Instructions
Prepping the Card Base
- Fold the 5 1/2″ x 8 1/2″ Old Olive cardstock card base at the 4 1/4″ score line.
- With the 5 1/2″ side on top, cut at 1 1/2″ down to the 4 1/4″ fold. Then make another cut down to the fold at 4″.
- With the 8 1/2″ side on top, score at 2″ between the 1 1/2″ and 4″ cuts.
- Turn the cardbase so that the 5 1/2″ side is on top with the cut side on top.
- In the center of the area below the fold, adhere the Basic White cardstock.
- Adhere each of the 1 1/2″ flaps to the cardbase.
- Now adhere the two 1 1/4″ x 4″ strips of Olive Green/Lemon Lime Twist Just Kiddin’ Designer Series Paper “grass” to either side of the cardbse.
- Fold the center of the card base down and adhere the “sky” below the fold of the front flap.


Prepping the Rest of the Card Pieces
- From the Lemon Lime Twist diecut the stars three times so that you have 9 stars.
- Die cut two of the castle towers and one arch from the Basic Grey cardstock.
- In Memento Ink, stamp the sentiment “you are amazing” onto the 1 1/2″ x 3″ Baisc White cardstock so that you can punch it out with the smaller smooth oval in the Dual Oval Punch.
- Punch the sentiment out. Punch a scalloped oval from the Pretty Peacock cardstock.
- Also with Memento Ink, stamp the image of the child onto the 2 1/2″ x 3″ Basic White cardstock. Wait until after you color to die cut the image.
- Color the image with Stampin’ Blends Alcohol Markers. Colors are as follows: hat-Berry Burst & Azure Afternoon; Face– 800 of the Medium Deep Natural Tones & Berry Burst for the mouth; magic wand- Pecan Pie; gown– Pretty Peacock and Lemon Lime Twist for the stars; Bunny Slippers-Fresh Fresia and Berry Burst for the inner ear.
- Die cut the child.
Assembling the Card
- Use Stampin’ Dimensionals to adhere one castle tower to each side of the front flap. There is 1/4″ that hangs off the edge.
- Apply a Stampin’ Dimensional behind the top of the arch. Apply a thin line of the Multipurpose Liquid Glue along the outer edge behind the left & right sides of the arch. Adhere to the front flap between the towers.
- The image of the child is adhered using Stampin’ Dimensionals behind the left side and glue behind the right side.
- Adhere the sentiment to the Pretty Peacock cardstock scalloped oval.
- Then use Stampin’ Dimensionals to adhere the sentiment to the center of the Basic White cardstock under the front flap.
- Adhere the stars as desired.
- Embellish with Wink of Stella applied to the gown, hat and the stars.
Add Bling! if desired.
Voila!

I hope you enjoyed my card today using the Kiddin’ Around Bundle.
Visit my Online Store to order what you need to make this card for yourself. Photographic supply list is at the end of this blog.
Current Host Code: K3Q7NG2M

You are currently at Theresa McEntee-Theresa’s Treasures-USA. When you click on the Vote For Me button above you will see the Gallery of creative inspiration from Demonstrators around the world! Remember to visit everyone’s blog by clicking on the photo of their card in the Gallery.
To vote for your favorite cards, click on the small heart in the upper right-hand corner of each photo. You have 5 votes! Enjoy and come visit Theresa’s Treasures again soon!
Clickable Supply List
Product List ") $54.00 |  $22.00 |  $6.50 |  $10.00 |  $10.00 |
 $10.00 |  $10.00 |  $10.00 |  $9.00 |  $10.00 |
 $10.50 |  $10.00 |  $10.00 |  Designer Series Paper") $12.50 |  $8.00 |
 $26.00 |  $128.00 |  $4.25 |  $5.50 |
Thanks again for stopping by! Have a most wonderful and crafty day!
Theresa


")


 Designer Series Paper")

")


")


 Designer Series Paper")
