Hello fellow stampers! You are visiting with Theresa McEntee-author of Theresa’s Treasures Paper Crafts. I am hopping with the Ink & Inspiration Blog Hop today. There are several of us- you will find the list to follow the hop at the end of my blog post.
This is the challenge photo. What does it inspire you to make?
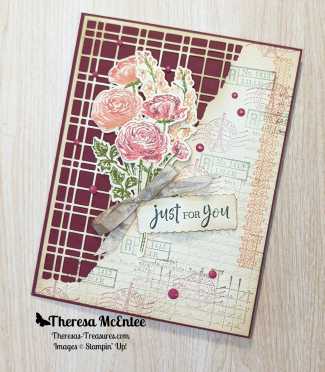
The Ink & Inspiration Challenge is both an image and a color challenge. I was inspired by the image because the flowers in the Ranunculus Romance stamp set are very similar to the photo. The colors were also very pretty and inspirational.
I had really wanted to use the Split Card Textures Dies. I got into my zone and just started stamping. Before I knew it, this card was created!
The Stampin’ Write Markers are great for applying ink to this red rubber stamp. The images of the flowers were easy to do by using the Stamparatus. That way if I missed a spot, I could reapply the ink and stamp a second time.
One of my favorite ribbons in the whole catalog is the White 1/4″ Crinkled Seam Binding Ribbon. This ribbon can be colored to coordinate with your card. Soft Suede Ink was applied with a Blending Brush until I had the off white color.
Today I have a very cute and adorable Playing in the Rain Bundle- Fun Fold Card!
Welcome and thanks for visiting Theresa’s Treasures Paper Crafts! I am Theresa and I am a Stampin’ Up! Demonstrator in Arizona, USA. Today is the monthly Inspirations in Ink Blog Hop! I am excited to be hopping with some awesome demonstrators from around the world! Be sure to check out everyone’s projects using the Playing in the Rain Bundle. The Playing in the Rain Bundle is in the 2023 Jan-April Mini Catalog. You may order form my Online Store HERE.
Measurements
Mango Melody card stock (cs) card base: 4 1/4″ x 8″ scored as shown on the template below, and 1 1/2″ x 5 1/2″.
Basic White cs: 2 3/4″ x 4″, 4″ x 5″ to stamp the 2 foxes and 3″ x 4″ to stamp & punch the sentiment.
Balmy Blue cs: two at 1 1/8″ x 4 1/8″.
Cajun Craze cs: 2″ x 4″ for the bridge.
Flirty Flamingo cs: 2″ x 2 1/2″ for the butterflies & bow on one fox’s hat.
Old Olive cs: 2″ x 3″ for the clumps of grass.
Soft Suede cs: 2″ x 2″ for the tree stump.
Rain or Shine 12″ x 12″ Designer Series Paper (DSP): flower pattern: 1″ x 5 1/4″: clouds 2 7/8″ x 4 1/8″ and 1 1/8″ x 4 1/8″; two pouring rain pattern at 1″ x 4″ and one pouring rain at 1 1/8″ x 4 1/8″.
Supplies
Playing in the Rain Bundle (stamp set & dies)
Cloud Punch
Ink: Memento Tuxedo Black & Balmy Blue
Stampin’ Blends: Ivory, Flirty Flamingo, Cajun Craze & Balmy Blue
The template for the Mango Melody cs card base is above.
Burnish the folds with the Bone Folder.
Adhere the matching 1″ x 4″ pouring rain DSP pieces to the 1 1/8″ x 4 1/8″ Balmy Blue cs. Adhere these pieces to the outermost panels on the left and the right.
Adhere the 1 1/8″ x 4 1/8″ pouring rain DSP on the 2nd panel from the left. Adhere the cloud DSP as shown below.
Adhere the flower DSP to the Mango Melody cs strip.
All the Pieces
Stamp the two foxes in Memento Ink. Color with the Stampin’ Blends & Stampin’ Write Markers. Run through the Stampin’ Cut & Emboss Machine to die cut them.
Stamp the sentiment “Rainy Days are better with you” onto the end of the 3″ x 4″ Basic White cs in Memento Ink. Punch out with the Cloud Punch.
Use a Sponge Dauber & the Balmy Blue Ink to add a little color to the edge of the cloud.
Apply Wink of Stella to the cloud if desired once the sentiment ink has dried.
Die cut all of the remaining pieces: the butterflies, bow, bridge, tree stump, and 3 of the clumps of grass.
Putting the Card Base Together
Photo 1Photo 2Photo 3Photo 4
Adhere the strip of Mango cs and flower DSP to the left & right side panels of pouring rain by following the photo series above.
Photo 1: Lay the card base flat on the table. Have the left side open & the right side folded. Apply adhesive to the bottom of the two pouring rain panels.
Photo 2: Place the flower panel on and wiggle into place.
Photo 3: Open up the card base.
Photo 4: Stand up view.
Finishing Up
Use Multipurpose Liquid Glue to adhere the left side of the bridge in place.
Position the two foxes so that their feet are on the bridge. You may need to trim a little off.
Use the Multipurpose Liquid Glue to adhere the fox on the top layer to the pouring rain panel.
Adhere the right side of the bridge.
Add the tree stump and clumps of grass.
Put a bow on one hat. Embellish with an Opaque Adhesive-Backed Gem.
Adhere the butterflies. Embellish with the gems.
Voila!
Thank you so much for visiting today! Please visit all the blogs in this hop. You will see all the fun and inspiring projects made by the Inspirations In Ink demonstrators. You are currently visiting Theresa McEntee-USA creator of Theresa’s Treasures Paper Crafts.
Special ends February 28, 2023! Would you like your own Mini Cut & Emboss Machine? How about a Boho Blue Mini Cut & Emboss Machine! Join my Stamping Gems Team today and you can get a Mini Cut & Emboss Machine in your starter kit! Or if you already have a Cut & Emboss Machine and have a long wish list, you can join and get $175 UDS in product for $99 USD! This is the best deal! Click HERE to order your starter kit!
Sale-a-bration ends February 28, 2023! Order now to be able to get what you want! Remember to claim your Free product. New FREE products have been added!
Thinking of adding creativity to your life? Try a monthly paper crafting kit! The Paper Pumpkin Monthly Subscription delivers a kit with everything you need to make a project-right to your door! Sign up for a Pre-paid Paper Pumpkin Subscription HERE.
Hello! Welcome to the Stampin’ Up! Demonstrator Training Blog Hop for February 2023. I’m Theresa with Theresa’s Treasures Paper Crafts. I am so glad you are joining me today for my Playing in the Rain Thank You card! We are a group of Stampin’ Up! Demonstrators from around the world. We are taking part in training to help us build a successful Stampin’ Up! business. The thank you notes we create are for our customers who place an order during the month of February. This blog hop is full of ideas and creative inspiration! Be sure to visit everyone’s blog by clicking on the links at the end of my blog.
This super sweet Thank You card is very simple to make. The Playing in the Rain stamp set not only has this cute turtle, but also a bunny & a fox. The Rain or Shine Specialty Designer Series Paper has many fun designs. Several have a shimmer added! All of the Stampin’ Up! products used to create this Playing in the Rain Thank You card can be purchased in my Online Store.
Measurements
Basic White card stock (cs) card base: 5 1/2″ x 8 1/2″ with a score line at 4 1/2″
Balmy Blue cs: 5 3/8″ x 4 1/8″
Basic White cs: 3 1/4″ x 3 1/4″
Rain or Shine 12″ x 12″ Specialty Designer Series Paper (DSP) flower pattern: 2 1/4″ x 3 1/4″
Supplies
Playing in the Rain stamp set
Pansy Patch stamp set
Stylish Shapes Dies
Into the Clouds Embossing Folder (FREE with $50 USD purchase during Sale-a-Bration)
Ink: Balmy Blue & Memento
Stampin’ Blends Alcohol Markers: Granny Apple Green, Crumb Cake, Pumpkin Pie and Daffodil Delight
Use the Stylish Shapes stitched square Die to cut a 2 3/4″ square from the 3 1/4″ square of Basic White cs.
Stamp the turtle in Memento ink. Stamp the group of daisies next to the turtle.
Use the Balmy Blue Ink and the “Thank You” sentiment from the Pansy Patch stamp set. Stamp “Thank You” in the upper left-hand corner.
Stamp the clouds around the turtle in Balmy Blue Ink.
Color the center of the daisies with the Daffodil Delight Stampin’ Blend. The petals are colored with the Mango Melody Stampin’ Write Marker.
Color the turtle with the Granny Apple Green and Crumb Cake Stampin’ Blends. Use the Crumb Cake Blend to add a bit of ground under the turtle.
Color the Brass Butterflies with the Pumpkin Pie Blend.
Emboss the Balmy Blue cs with the Into the Clouds Embossing Folder.
Wrap a 6 1/2″ length of the Balmy Blue & White Ribbon around the embossed Balmy Blue cs.
Tie a bow with the Balmy Blue & White Ribbon and set aside.
Adhere the Balmy Blue cs to the front panel of the Basic White cs card base.
Now adhere the flower pattern of the Rain or Shine DSP to the left side of the card front.
Use Stampin’ Dimensionals to adhere the stamped Basic White cs stitched square slight to the right of center.
Use a Mini Glue Dot to adhere the bow to the right side.
Add the Pumpkin Pie colored Brushed Brass Butterflies as desired.
Voila!
Remember to visit everyone’s blog. You will see creative inspiration from Demonstrators around the world! You are currently at Theresa McEntee-Theresa’s Treasures-USA. Enjoy the Hop!
I appreciate your visit to my blog today. Remember to sign up for my Theresa’s Treasures Paper Crafts Newsletter. You can click on the “Subscribe to my Newsletter” tab. Please subscribe to my blog as well. If you need any assistance with placing your order, let me know in the comments. Thanks!
Hello, thank you for visiting Theresa’s Treasures. I am Theresa, an Independent Stampin’ Up! Demonstrator in Arizona, USA. I am super excited to be participating in Kylie Bertucci’s International Blog Highlight Gallery with my Beside Me Thank You Card, along with Stampin’ Up! demonstrators from around the world! The theme for this Gallery is “Thank You”.
We often forget those simple words “Thank you”. However, it is super important to show appreciation to the people in your life who have helped you, supported you or inspired you. One way to express gratitude is to send a handmade thank you card. Discover the joy in making and sending a handmade card!
Tahitian Tide card stock (cs): 4 1/4 x 11 inches scored at 5 1/2 inches
Basic White cs: 4 1/8 x 5 3/8 inches, 4 x 5 1/4 inches 3 1/2 x 4 3/4 inches and 2 x 2 1/2 inches(sentiment)
Supplies
Beside Me Stamp Set
Deckled Rectangle Dies
Layering Circles Dies
Ink: Mango Melody, Pool Party, Coastal Cabana, Bermuda Bay, Tahitian Tide, Basic Grey and Memento Black.
Stampin’ Blends Alcohol Markers: Fresh Freesia, Tahitian Tide, Granny Apple Green, Night of Navy, Daffodil Delight, Medium Combo (400& 500), Medium Light (700) and Bronze.
Instructions
Top Layer
Lay the 3rd from the largest Deckled Rectangle in the center of the 4 1/8 x 5 3/8 inch Basic White cs. Use a pencil to lightly trace the inside of the bottom. Note: This will help with stamp placement.
Use the Stamparatus to position the stamp with the image of the man and children fishing. Stamp in Memento Ink. Also stamp an image onto a piece of full-stick sticky note paper.
Place the Deckled Rectangle Die back on the Basic White cs using the traced pencil line on the inside of the die as a guide.
Partially cut the Deckled Rectangle leaving the area with the pencil mark uncut. This is called a Partial Die Cut. Position the top clear plate at the border of the area to cut. Then run through the Stampin’ Cut & Emboss Machine. The die that is not under the clear plate will not cut.
Fussy cut the top of the image of the man & children on the Basic White cs and the sticky note paper. Cut off the fishing poles. These will be drawn in later. Place the sticky paper over the image.
Use a repositionable tape runner to adhere the 3 1/2 x 4 3/4 inch Basic White cs to the back of the die cut card piece. This will be the background piece.
Blending
Now for the fun part! Use the Blending Brushes and Small Blending Brushes to create the sunrise on the water.
Start by die cutting a 1 inch circle from the full-stick sticky note paper.
Use sticky note tape to create the horizon.
Use a Small Blending Brush to lightly apply some Mango Melody Ink to the area where you want the sun to rise. Then cover with the 1 inch sticky circle.
Start with the Mango Melody Ink and blend in a darker halo around the “sun”.
Then use the Small Blending Brushes to blend in Pool Party Ink followed by Coastal Cabana Ink. Use the larger Blending Brush to apply the Tahitian Tide Ink. Note: If you want the color to be as dark as my card, be patient. It takes awhile.
Remove the sticky note circle and horizon sticky note tape.
Move the “horizon” so that you can create the water. Tip: Place the sticky note tape for the horizon with a millimeter or two of the horizon showing underneath. This avoids having a white line between the sky and the water.
Apply a light layer of Mango Melody Ink under the “sun”. You may also leave a small amount of the space white.
Repeat the blending of the inks as you did for the sky. Using the small Blending Brushes, with Pool Party Ink and then Coastal Cabana Ink. Add in Bermuda Bay Ink. Use the larger Blending Brush to apply the Tahitian Tide Ink. Remove the sticky note tape.
Remove the sticky note paper from the image. Separate the background piece from the front.
Use the Blending Brushes and the inks to color in the white space on the background piece. This doesn’t have to be perfect. Color in just enough so that there is not a bright white space.
Stampin’ Blends
Use the Stampin’ Blends to color the man & children as desired. Colors used on this card are listed in the Supply List above and the Clickable Supply List below.
Use a small stamp from the FREE Thanks a Bunch stamp set to create gentle waves on the water. Waves are added to both the background and the edges of the front panel. Try the Pool Party Ink first. If you want the waves to be darker, use the Coastal Cabana Ink. Tip: less is more!
Adhere the background piece to the front of the Tahitian Tide cs card base.
Stamp the image of the flying birds in Basic Grey Ink. Note: I forgot to stamp the birds until after I had put the card together, lol!
Draw in the fishing poles using the Stampin’ Write Basic Black Marker.
Use Stampin’ Dimensionals to adhere the top layer to the card front. Take care to line up the edges and the outline of the people.
Sentiment
Create the sentiment by using the 3rd from the smallest Deckled Rectangle Die. By placing the die near the words, you can make a small deckled rectangle to fit just right.
Use Stampin’ Dimensionals to adhere the sentiment.
Voila!
I hope you enjoyed my card today using the Beside Me stamp set and the new Small Blending Brushes.
Visit my Online Store to order what you need to make this card for yourself. A photographic supply list is at the end of this blog.
Current Host Code: B223KFE9
Remember to visit everyone’s blog. When you click on the Vote For Me button you will see a gallery of creative inspiration from Demonstrators around the world! You are currently at Theresa McEntee-Theresa’s Treasures-USA. Enjoy!
To vote for your favorite cards, click on the small heart in the upper right-hand corner of each photo. You have 5 votes! Enjoy and come visit Theresa’s Treasures again soon!
Thanks again for stopping by! Have a most wonderful and crafty day!
Theresa
Promotions
Sale-a-bration!!
Order today so you can get what you want before products sell out! Be sure to claim your FREE product! If you need any assistance please email me at theresastreasures.az@gmail.com
NOTE: The item numbers below are different than the ones in the Stampin Up Annual or 2023 Jan-Apr Mini Catalogs. When claiming the FREE product use the item numbers on the flyer below.


")


 Crinkled Seam Binding Ribbon")


")
")


 Designer Series Paper")


")


 Variegated Ribbon")


")


