Posted in 2020-2021 Stampin' Up! Catalog, Nature, Rubber Band Background Technique, Stamping-off technique

Stampin’ Up!® Forever Fern Rubber Band Background Get Well Card

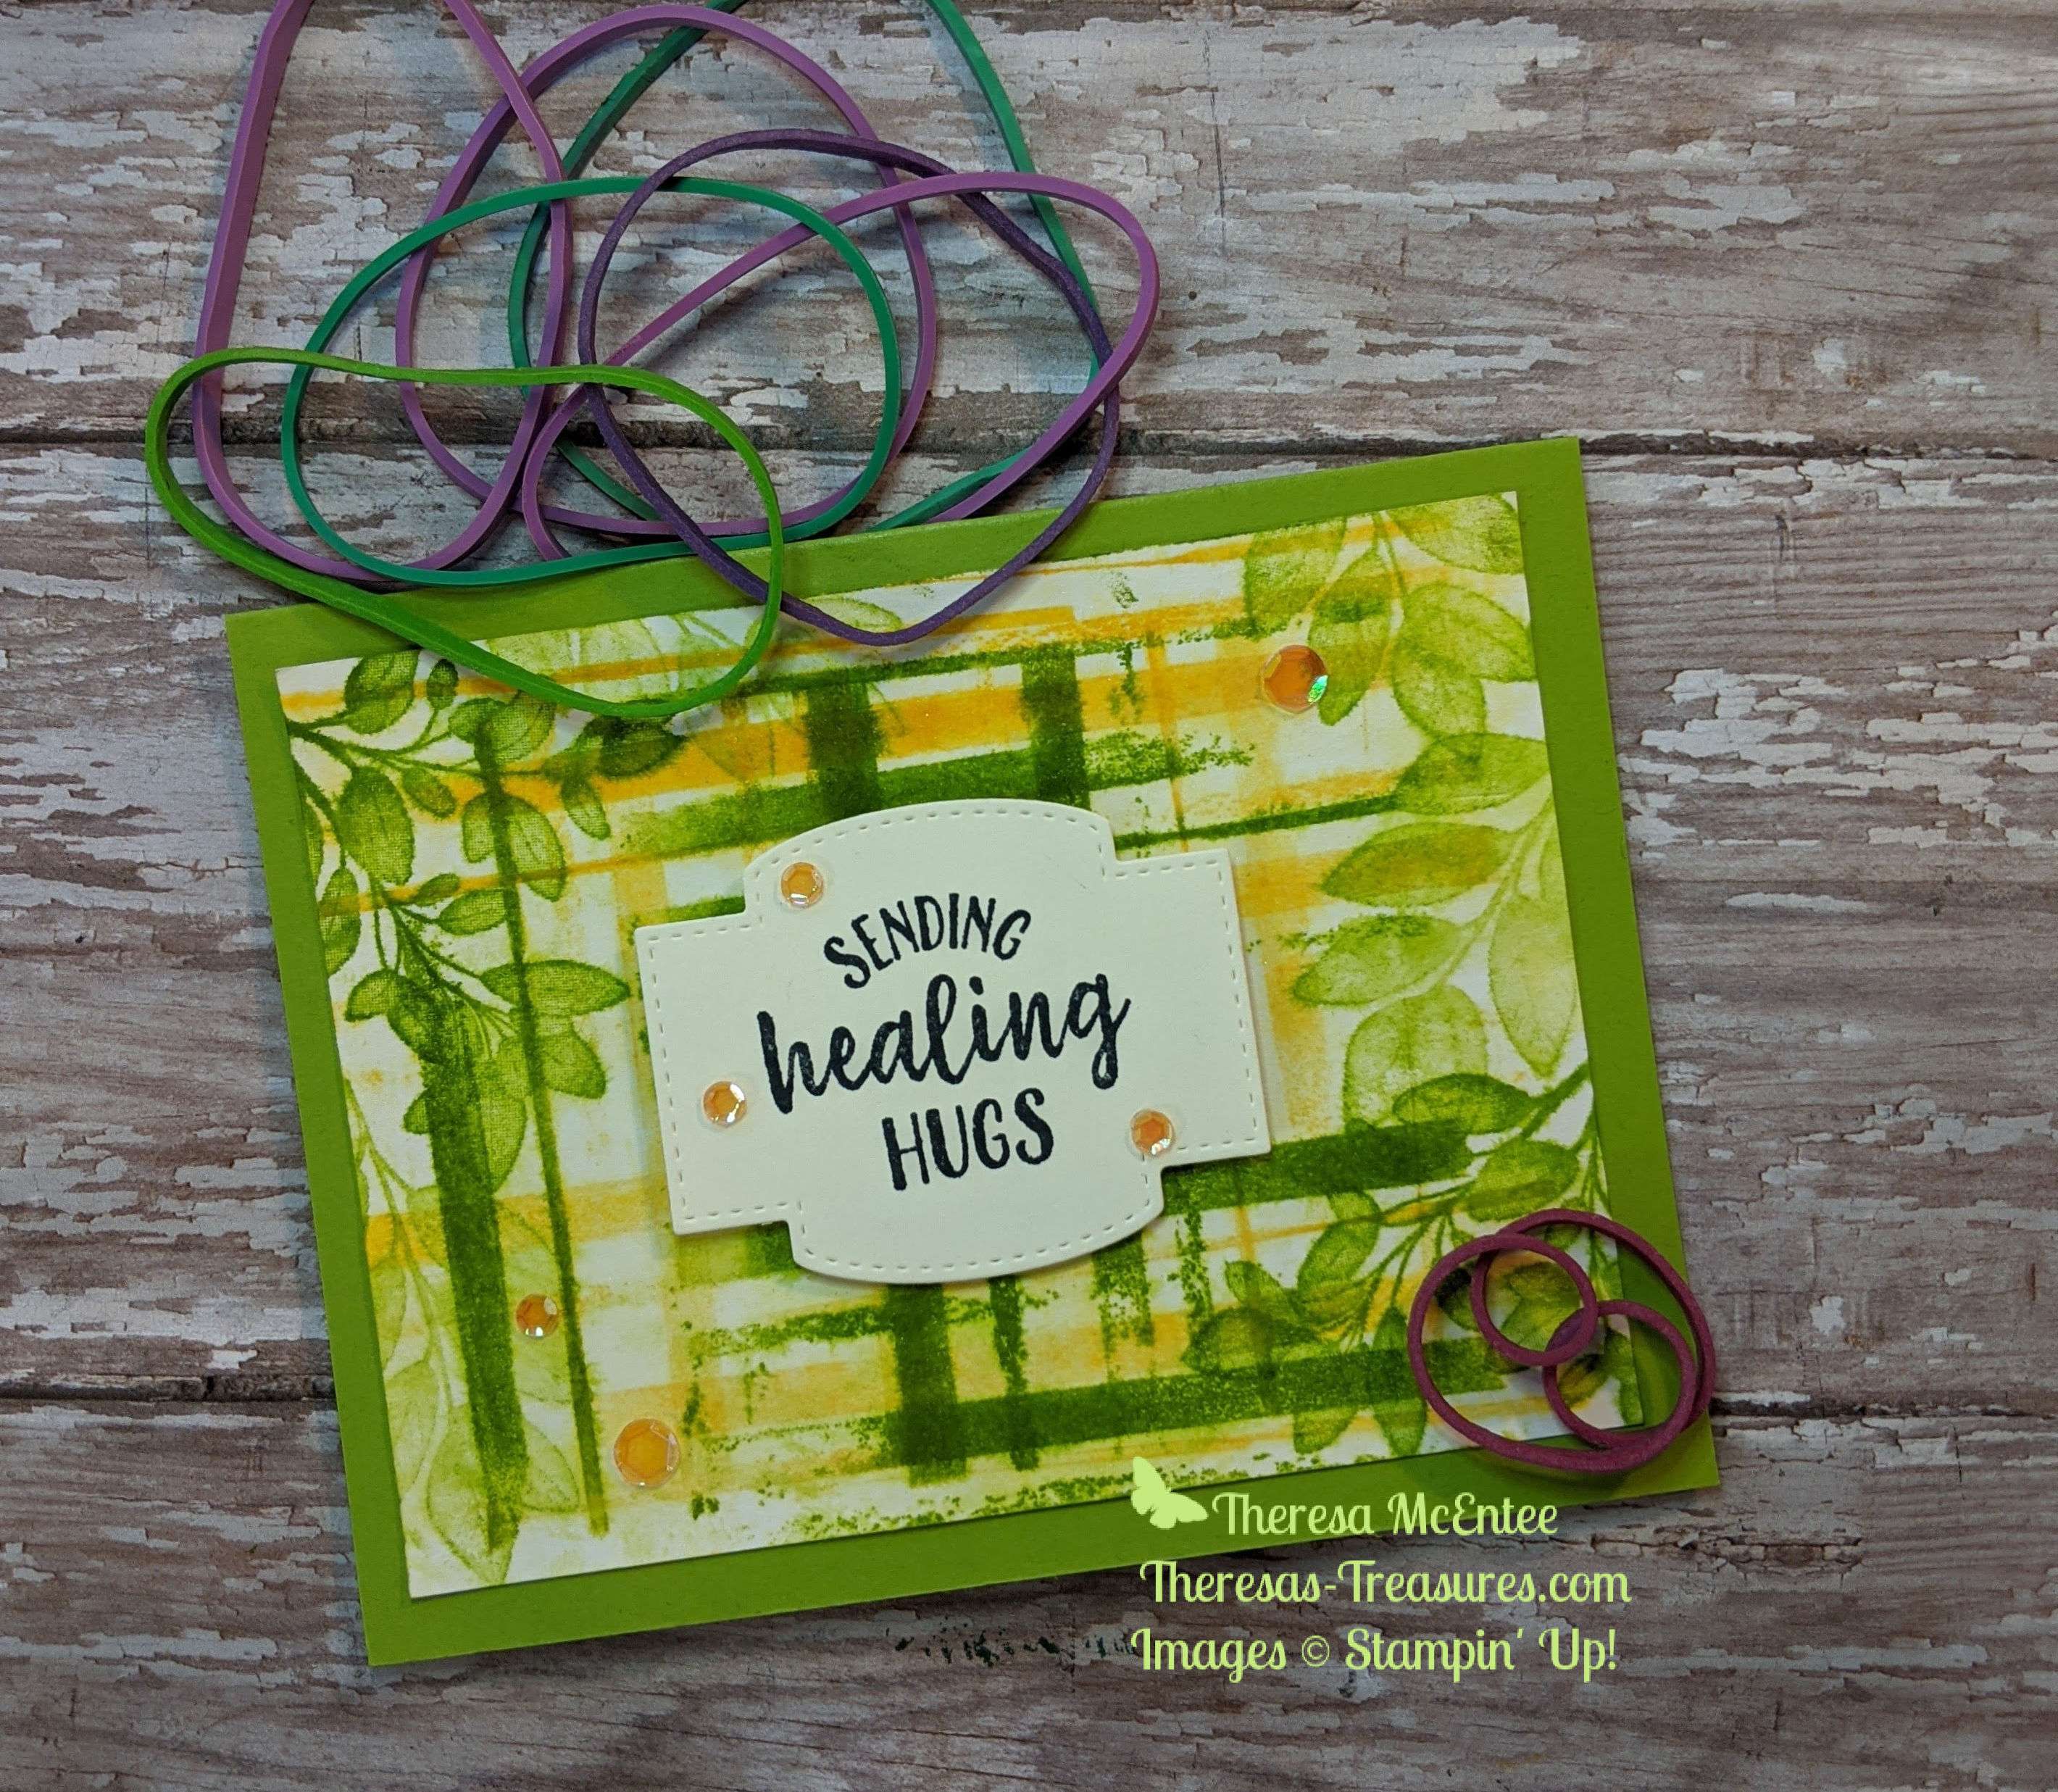
Welcome to my Wacky Wednesday Technique. This Stampin’ Up!® Forever Fern card is really wacky because it is made using rubber bands around a clear block. The things we will do to make a creative background!

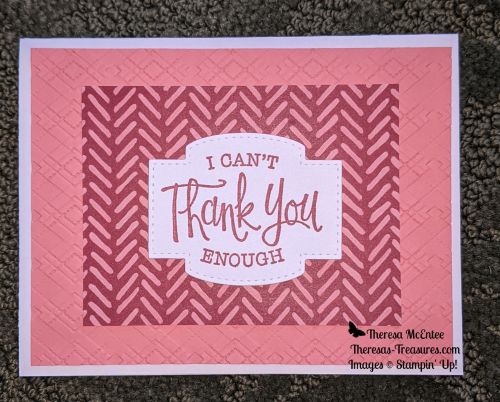
I will be using 2 stamp sets today. The Forever Fern stamp set has a lot of great leaf images. The So Sentimental is one of my all time favorites. Sadly it will be retiring. It is only available while supplies last so order yours HERE before it runs out.

Measurements

Measurements: Granny Apple Green Card Stock (CS) card base: 5 1/2 x 8 1/2 inches with a score line at 4 1/4 inches; Very Vanilla CS: 4 x 5 1/2 inches and 3 x 4 inches; and Shimmery White CS: 3 3/4 x 5 inches.

Stamping

Let’s start stamping! Stamp the sentiment “Sending Healing Hugs” onto the 3 x 4 inch Very Vanilla CS with the Memento Tuxedo Black Ink. Use you Stampin’ Cut & Emboss Machine and the Stitched So Sweetly dies to cut out the sentiment. Fortunately, the Stitched So Sweetly Dies are not on the retiring list!

Rubber band Background in Daffodil Delight

In order to try this technique you will need rubber bands of various thicknesses. Wrap the rubber band around an E size Clear Block in a random pattern.

For this step I used Daffodil Delight ink. Use the ink pad to apply ink to the rubber bands. Flip the clear block over onto the 3 3/4 x 5 inch Shimmery White CS.

Remove the clear block and see what you have. I think I would have needed to apply more ink. You can rotate the Shimmery White CS, apply more ink to the rubber bands, and stamp down on the Shimmery White again. I stamped once on the upper half and once on the bottom half.

Next I sprayed my rubber band background with a little water to make it bleed into the paper a little.

While the paper is still damp, use the Granny Apple Green ink and the large leaf image from the Forever Fern stamp set to stamp some leaves around the edges.

Stamp some more of the leaves onto edges of the 4 x 5 1/4 inch Very Vanilla CS. This will be the inside of the card. I Stamped Off once on the smaller leaf image before stamping onto the Very Vanilla CS.

Rubber band background in Granny Apple Green

I decided the background needed a little more added to it so I inked up the rubber band block with the Granny Apple Green ink and added more to the stamped background.

I also sprayed it with a little water again and then used a paper towel to dab it dry.

Open the Granny Apple Green CS card base and adhere the inside of the card to the inside of the card base.

Use the Bone Folder to fold the card base. Next adhere the Rubber Band Background card piece to the card front.

Use Stampin’ Dimensionals to adhere the sentiment to the background.

Bling!

The Artistry Blooms Self Adhesive Sequins are perfect to add some Bling! to this card! I use the Take Your Pick tool to easily move the sequins from the acetate sheet to the card front.

Viola! You have made a totally wacky Rubber Band Background for this get well card!

Thanks for coming by today. I hope you have had a chance to review the Retiring List in my Online Store. Some products are discounted. Check it all out HERE.

Supplies

Product List

Have a wonderful day!

Theresa

Posted in 2020-2021 Stampin' Up! Catalog

Happy St. Patrick’s Day Card Using Hearts

One of the most fun things about stamping is finding an alternative way to use a stamp. For example the card today is a Happy St. Patrick’s Day Card made with the Stampin’ Up! Valentine’s stamp sets, Heart to Heart and Heartfelt.

I just love how the hearts can be used to make the shamrocks.

Measurements

Measurements: Basic White Card Stock (CS) card base: 5 1/2 x 8 1/2 with a score line at 4 1/4 inches; 6 x 6 inch Designer Series Paper (DSP)-Regals: Garden Green 5 3/8 x 4 1/8 inches; Basic White CS: 5 x 3 3/4 inches and 2 1/2 x 3 1/2 inches; Garden Green CS: 2 1/2 x 3 1/2 inches.

Stamping

Start out by using Garden Green ink to stamp the sentiment “Happy St. Patrick’s Day”. The sentiment comes from the A Wish For Everything stamp set. This is an excellent stamp set for the beginner stamper as it has most of the holidays along with sentiments for the inside of a card. You can purchase the A Wish For Everything HERE.

To start creating the shamrocks, use the large outline heart in the Heartfelt stamp set. Reminder: Use a pad under the Photopolymer stamps to help get the best image. You can use the Stampin’ Pierce Mat like I have, or use the Stampin’ Up! catalog.

Next use the small solid heart in the Heart to Heart stamp set and create the smaller shamrocks.

To finish up I used the stem in the In Bloom stamp set. If you do not have this set, you could also just use the Garden Green Stampin’ Write Marker to make the stems.

Putting the Card Together

That is it for the stamping. Now adhere the stamped card piece to the Garden Green 6 x 6 Designer Series Paper. Then adhere the card piece to the front panel of the Basic White CS card base. Remember to use your Bone Folder on the Basic White CS card base to get a crisp fold.

Punching out the Sentiment

Using the Double Oval Punch, punch a scalloped oval from the 2 1/2 x 3 1/2 inch Garden Green CS. Then use the solid oval to punch out the “Happy St. Patrick’s Day” sentiment. Adhere the Basic White oval to the Garden Green scalloped oval.

Use the Stampin’ Dimensionals to adhere the sentiment to the card front. This is a great card, but you could add some Bling!

Bling!

I thought gold bling! was the most appropriate for this card. The Gold Glitter Enamel Dots fit the bill. I use the Take Your Pick tool to move the dots from the acetate sheet to the card front. The Take Your Pick tool makes this very easy.

Viola! You have made a great St. Patrick’s card complete with Bling!

Supplies

You can purchase everything you need from my Online Store to make this great card by clicking on any one of the photos below.

Product List

Thanks so much for visiting today! I really enjoy making and sharing my cards with you. Is there a particular stamp set you would like me to use? Let me know in the comments and I will try to accommodate you.

Have a wonderful week! I am receiving my first COVID vaccine tomorrow. I may or may not be able to get the Wacky Wednesday blog out. If I am feeling punk, I am going to rest. I will definitely be back next week with a fun technique.

Theresa

Posted in 2020-2021 Stampin' Up! Catalog, Birds, Emboss Powder, Gratitude/ Thanks, Nature, Stampin" Blends Alcohol Markers, Stampin' Emboss Powder

Free As A Bird Thank You Card for Kylie’s Stampin’ Up!® Demonstrator Training Program Blog Hop- March 2021

Thank you for joining me for our Stampin’ Up!® Demonstrator Monthly Team Blog Hop! I am so excited that you could join us today! I know you will get lots of ideas and creative inspiration! My thank you cards are made with the Free As A Bird stamp set. Be sure to visit all the blogs and see all the different thank you cards from around the world!

I belong to a group of Stampin’ Up!® Demonstrators from around the world that are taking part in training that is helping us to build a successful Stampin’ Up!® business. I am a Demonstrator in Arizona, USA. If you are not already an awesome Demonstrator, or do not have an awesome Demonstrator and live in the USA, I would love to be your most awesome Demonstrator! I really appreciate your support.

The theme for the cards today is: Thank You. I have many customers who support me and I like to send them a Thank You card every once in awhile. The following set of cards is for my fabulous customers which I will be sending to anyone who orders during the month of March.

I am looking forward to Spring with the flowers blooming and the birds singing. So much so that I was inspired to make this card. The Free As A Bird stamp set is perfect!

I colored the birds with the Stampin’ Blends Alcohol Markers in Pool Party and Bermuda Bay. The flowers are Magenta Madness. The leaves are colored in Granny Apple Green to match the background Designer Series Paper(DSP) from the Artistry Blooms DSP. The “Thanks” sentiment is from the Good Morning Magnolia stamp set. The sentiment is embossed in Clear Stampin’ Emboss Powder with Memento ink on an oval of Vellum Card Stock.

Thanks for stopping by Theresa’s Treasures. Look through the list below to see who is next in line for the Blog Hop.

Supplies

Product List

Have a wonderful and creative day!

Theresa

Posted in 2020-2021 Stampin' Up! Catalog, 2021 January-June Stampin' Up!®Mini Catalog, 3D Technique, Designer Series Paper, Fun/Fancy fold card, Love/Affection, Nature

Fun Fold Friday with Butterfly Brilliance by Stampin’ Up!®

Welcome to Theresa’s Treasures today for Fun Fold Friday. Today’s card is made using the Butterfly Brilliance by Stampin’ Up!® as well as the Flowers for Every Season Designer Series Paper (DSP). The Butterfly Brilliance stamp set is part of the Butterfly Bouquet Suite that will be available for purchase on March 2, 2021. Or if you want yours now, consider joining my Theresa’s Gems Team. More information on the Butterfly Bouquet Suite and how to join at the end of the instructions.

The Fun Fold is the centerpiece for this lovely card. It is super simple!

Measurements

Measurements: Basic White Card Stock (CS) card base: 4 1/4 x 11 inches with a score line at 5 1/2 inches; Bumblebee CS: 3 1/4 x 3 1/4 inches and 4 x 5 1/2 inches; Basic White CS: 3 3/4 x 5 inches; and Flowers for Every Season DSP: 4 1/4 x 4 1/4 inches.

Stamping

First we will start by stamping the sentiment “Thinking of You” from the Happy Thoughts stamp set in Memento ink onto the 3 3/4 x 5 inch Basic White CS.

You will also be stamping the Butterfly Brilliance stamp in Memento ink onto a piece of Basic White CS and then coloring the smaller butterflies with the Stampin’ Blends Alcohol Markers. The colors I used were: Daffodil Delight, So Saffron, Mango Melody and Pumpkin Pie.

Creating the Fun Fold

You will need your Stampin’ Up! Paper Trimmer for this step. First make a pencil mark at 2 1/8 inches on each side of the 4 1/4 x 4 1/4 inch Flowers for Every Season DSP.

The next step is to line up the pencil marks so that you can make a score line between them. Rotate until you have score lines on each corner.

The Flowers for Every Season card piece should look like this after you have made all the score lines. Erase the pencil marks.

Next you line up the score line at 3/4 inches and make another score line. Rotate until you have made a second score line all the way around. The end result is pictured on the right.

Now use your Bone Folder to make a crisp fold along all of the outer score lines.

In a similar fashion, fold the inner score lines outward and use the Bone Folder to make a crisp fold. Next, adhere the Fun Fold card piece to the 3 1/4 x 3 1/4 inch Bumblebee CS.

Putting It All Together

Begin to assemble the parts by adhering the Fun Fold card piece to the sentiment card piece. Then adhere that to the 4 x 5 1/4 inch Bumblebee CS.

To complete the card front, use your Bone Folder to make a crisp fold at the 5 1/2 inch score line on the 4 1/4 x 11 inch Basic White CS card base. Next adhere the completed card piece to the front of the Basic White CS card base.

Finishing Up

In order to give the butterflies a little more dimension, I used my Bone Folder to gently curve the wings of each butterfly.

Add the butterflies to the card front with a Stampin’ Dimensional in the center behind the body of the butterfly.

I wanted my Fun Fold to lie a bit more flat so I added a Mini Glue Dot under the first fold. Tip: It is very easy to move the Mini Glue Dot with the Take Your Pick tool.

Viola! You have made a lovely Fun Fold to let someone know you are thinking of them. I really enjoy making cards. And I enjoy it even more when I mail the card out to someone. Additionally, I enjoy the positive feedback I get from the recipient. Mailing cards is a really great way to spread some joy!

Thank you for coming by today for Fun Fold Friday. I hope you will spend some time making your own card and spreading some joy yourself. We could all use a little more joy!

Specials

Mark your calendar for March 2, 2021 so you can place your order for the Butterfly Brilliance stamp set and more! Or order now when you join my Theresa’s Gems Team by becoming a Stampin’ Up! Demonstrator yourself.

And when you join before February 28, 2021 you will also receive 5 packs of 6 x 6 inch Designer Series Paper! Go to theresastreasures.stampinup.net and select the “JOIN” tab or click HERE to join. If you need any assistance, shoot me an email at theresastreasures.az@gmail.com.

And don’t forget to place a qualifying order by Sunday February 28, 2021 to be able to choose a FREE Sale-a-bration item! Shop HERE

Supplies

Product List

Have a great day!

Theresa

Posted in 2020-2021 Stampin' Up! Catalog, 2021 January-June Stampin' Up!®Mini Catalog, Nature, Sale-A-Bration 2021, Techniques

Wacky Wednesday Ghost Stamping Technique with In Bloom by Stampin’ Up!®

Welcome to Wacky Wednesday where I explore different techniques for card making. Today I am showing the Ghost Technique with In Bloom by Stampin’ Up!® I recently learned this technique from Frenchie Martin. It is a bit messy, but a lot of fun!

The Flower And Field Designer Series Paper (DSP) used for this card is FREE during Sale-a-bration, but only for 6 more days! I will have more information about Sale-a-bration at the end of the instructions.

Measurements

Measurements: Basic White Card Stock (CS) card base: 4 1/4 x 11 inches with a score line at 5 1/2 inches; Flirty Flamingo CS: 5 3/8 x 4 1/8 inches and 1 x 4 inches (not shown); Flower & Field DSP: 4 x 5 1/4 inches; Basic White CS: 1 x 4 inches (the Basic White CS piece pictured here is larger than what you need as I changed the card while I was photographing it).

Stamping

The only stamping outside of the Ghost Stamping Technique is the sentiment. Use Memento Black ink to stamp the “Happy Day” from the Itty Bitty Greetings onto the 1 x 4 inch Basic White CS strip.

Ghost Stamping Technique

Clear Embossing

The first step is to prepare the stamps. I selected 3 of the In Bloom flowers and positioned them in the right-hand corner. I used a D size acrylic block to pick up all three stamps.

The second step is to use an Embossing Buddy to decrease the static so that the embossing powder only sticks where you want it to. Stamp the trio of flowers in Versamark onto the Flower & Field DSP in the right lower corner. Note: Stampin’ Up! no longer sells the Embossing Buddy but it is available from most online craft stores.

The third step is to apply the Clear Stampin’ Emboss Powder to the Versamark. Tip: For ease I have poured a few of the little containers of Clear Stampin’ Emboss Powder into a plastic container.

Next use the Heat Tool to melt the Clear Stampin’ Emboss Powder. Be sure to melt the entire image. When you hold it in the light, the entire image should be shiny. If it is dull, apply more heat.

In a similar manner, stamp the butterfly from Butterfly Wishes onto the Flower & Field DSP and apply the Clear Stampin’ Emboss Powder.

Use the Heat Tool again to melt the butterfly image.

Appling the Memento Ink

For the next step, ensure that your Memento ink is well inked. Use a scrap paper under your card piece. Drag the Memento Black ink pad over the top of the Flower & Field DSP and the images stamped in the Versamark and Clear Stampin’ Emboss Powder. You may need to go over it several times to get it dark enough. I like that there is a vague pattern from the Flowers & Field DSP showing through the Memento Black ink.

Use a dry Baby Wipe to rub off the black ink that is on the clear embossed images.

Viola! That is Ghost Stamping!

Putting the Card Together

Prepare the sentiment by using the Classic Label Punch to first punch out the “Happy Day” stamped on the Basic White CS. I punched the sentiment out so it was closer the right end. Punch out a label from the 1 x 4 inch Flirty Flamingo CS.

Next adhere the sentiment to the Flirty Flamingo CS Classic Label with a little of the Flirty Flamingo CS showing on the right end. Trim the sentiment card piece with your Paper Snips.

To assemble the card, first adhere the Ghost Stamping card piece to the 5 3/8 x 4 1/8 inch Flirty Flamingo CS. Use the Bone Folder to make a crisp fold at the 5 1/2 inch score line on the 4 1/4 x 11 inch Basic White CS. Next adhere the Flirty Flamingo/Ghost Stamping card piece to the front of the Basic White CS card base.

Finish the card by adhering the sentiment as shown.

Viola! You have a very unique card to wish someone a Happy Day!

Thanks so much for your visit today. I hope you will give this technique a try.

Sale-a-bration will be ending in 6 days! Remember that for every $50 you order from the 2021 January-June Catalog or the 2020-2021 Annual Catalog, you may choose FREE product from the Sale-a-bration Brochure. I will have a PDF to download for each of these below. The Flower & Field DSP used for today’s card is a FREE product from the brochure. Get you order in soon so that you do not miss out!

Thank you to all of you who place an order. If you order in the next 6 days, I will send you a FREE package of Rhinestones.

Download the 2020-2021 Annual Catalog HERE

Download the 2021 January-June Mini Catalog HERE

Download the 2021 Sale-a-bration Brochure HERE

Supplies

Product List

I hope you have a great day!

Theresa

Posted in 2020-2021 Stampin' Up! Catalog, Animals, Clean and Simple, Inspiration, Love/Affection, Stampin" Blends Alcohol Markers

Stampin’ Up!® Pampered Pets for Paper Players Challenge PP529

I am starting to participate in a new challenge with The Paper Players which you can visit by clicking HERE to see all of the entries. The challenge for this week is “Clean and Simple”. This means there are minimal layers, little to no embellishments and lots of white space.

This cute little kitty is in the Stampin’ Up!® Pampered Pets stamp set. I used the Stampin’ Blends Alcohol Markers in Flirty Flamingo, Smoky Slate and Basic Black to color the image. The sentiment is from the Zoo Globe stamp set.

Measurements: Basic White Card Stock (CS) card base: 5 1/2 x 8 1/2 inches with a score line at 4 1/4 inches; Flirty Flamingo CS: 4 x 5 1/4 inches; Basic Gray CS: 1 x 5 inches; and Basic White CS: 3 5/8 x 5 inches.

I believe it is very important to let your children know that you are proud of them from time to time. Fortunately I have four beautiful children who I am very proud of. This card will be mailed to my lovely daughter, who is not only working full time and but is also taking four courses at the local community college. I am very proud of all of her accomplishments.

Be sure to visit The Paper Players at thepaperplayers.blogspot.com to see all the entries for the Clean and Simple PP529 Challenge.

Thanks for stopping by my blog today. Be sure to stop by tomorrow for my #simplestamping blog using the new Brilliant Butterflies stamp set.

Supplies:

Product List

Have a wonderful day and Happy Crafting!

Theresa

Posted in 2020-2021 Stampin' Up! Catalog, Guys cards, Inspiration, Love/Affection

Cardz4Guyz Challenge #264- Clean & Simple with Beautiful World by Stampin’ Up!®

I really love the Cardz4Guyz Challenges because they help me think creatively outside of my usual “box”. Clean and Simple (CAS) cards are not something that comes naturally for me, so this was a nice challenge.

This card is made using the Stampin’ Up!® Beautiful World stamp set and the World Map Dies. I love the sentiment “You make the world a better place”.

This is a very quick and easy card to make. Just die cut the globe and stand, stamp the sentiment in Night of Navy ink, glue the copper strip along the side of the 3 3/4 x 5 inch Very Vanilla Card Stock (CS), mount it on a Night Of Navy CS card base and….

Viola! You have yourself a very nice masculine card letting someone special know how much they mean to you.

Thanks for visiting today. Please check out all of the entries for the Cardz4Guyz Challenge #264- Clean and Simple HERE.

Supplies

Product List

Enjoy your day!

Theresa

Posted in 2020-2021 Stampin' Up! Catalog, 2021 January-June Stampin' Up!®Mini Catalog, Fun/Fancy fold card, Love/Affection, Sale-A-Bration 2021

Happy Thoughts & Daisy Punch for Fun Fold Friday

The Happy Thoughts stamp set and Daisy Punch combined with some of the FREE Designer Series Paper from Sale-a-bration are what come together to make this pretty floral Fun Fold card. You can find the Happy Thoughts stamp set in the 2021 January-June Stampin’ Up!® Mini Catalog. The Daisy Punch and Medium Daisy Punch can be found in the 2020-2021 Stampin’ Up!® Annual Catalog. If you order all three, you will qualify for a FREE product from the Sale-a-bration Brochure- the Paper Blooms 12 x 12 inch DSP!

There are a lot of pieces to this particular Fun-Fold card. Not to worry-the easy to follow photographic instructions will help you create this card in no time.

Measurements

Measurements: Rococo Rose Card Stock (CS) card base #1: 4 1/4 x 11 inches scored at 2 3/4 and 5 1/2 inches; Rococo Rose CS card base #2: 2 3/4 x 10 inches scored at 4 3/4 and 7 1/2 inches; Basic White CS: 2 1/4 x 2 1/2 inches; Paper Blooms DSP: 2 1/2 x 4 inches, 2 1/2 x 4 1/2 inches and 4 x 5 1/4 inches; Punched out pieces: Daisy Punch: Rococo Rose CS and Petal Pink CS; Medium Daisy Punch: Night of Navy CS; Perennial Flower: Night of Navy CS and the 2 1/4 inch Circle Punch: Basic White CS. You will also need about 12 inches of the White Polka Dot Tulle Ribbon.

Stamping

Begin by stamping the sentiment “Thinking OF You” in Night Of Navy ink onto the 2 1/4 x 2 1/2 inch Basic White CS. The 2 1/4 inch length should be on the top and bottom.

Putting It Together

Start by putting together the Rococo Rose CS card base #2. First adhere the 2 1/2 x 4 1/4 inch Paper Blooms DSP to the first panel on the left. Then adhere the sentiment to the last panel on the right. Set aside.

The next step will be to work with Rococo Rose CS card base #1. Begin by adhering the 2 1/2 x 4 inch Paper Blooms DSP to the first panel on the left. Next adhere the 4 x 5 1/4 inch Paper Blooms DSP to the last panel on the right.

In order to see how this will go together, hold the two card bases as shown in the first photo. Start by adhering the left side of the top card base to the card base underneath.

This is how it will look with the card closed. Right now only the left side of the top card base is adhered.

For the next step, open the card, turn the card upside down and rotate it 180 degrees. You will be applying adhesive to the back of the right side of the top card base. The close the card and adhere the two together. In this way, the card will lay flat for mailing.

Here is the aerial view of the card when it has been adhered.

Decorating the Card Front

Begin to put the front of the card together by using Stampin’ Dimensionals to adhere the 2 1/4 inch Basic White CS circle to the left side of the front. Tie the Polka Dot Tulle Ribbon around the right side of the top card base. Trim the ends of the ribbon.

In order to give a little dimension to the daisies, use the Bone Folder to gently curve the petals back. Be careful when doing this as I have often torn the petal straight off!

Now cut the Perennial Flower Punch as shown to make some “leaves” for the front of the card.

Start with a Stampin’ Dimensional on the center of the Petal Pink Daisy Punch and adhere it to the center of the Basic White CS Circle Punch. Then use adhesive in the center of the Rococo Rose Daisy Punch and adhere it to the Petal Pink Daisy.

Now use adhesive to adhere the Night Of Navy Daisy Punch and add the “leaves”. I find it easier to place the leaves by using a tweezers.

And now for a little Bling! I just added three Rhinestone Basic Jewels to the center of the daisy. Later I realized I could have also used the Wink of Stella on the daisy to make it even more sparkly!

Viola! You have a pretty floral Fun Fold to let someone special know you’ve been thinking of them.

Thanks for visiting today. I really appreciate you. Leave me a comment to let me know how I am doing with these Fun Folds. Are they too easy? Too hard? Are the instructions helpful? I welcome any comments you have.

Specials

What is Sale-a-bration? It is your opportunity to earn FREE product with a qualifying purchase. For every $50 USD you spend at my online store, you may choose a FREE product from the Sale-a-bration Brochure! Stop by my Stampin’ Up!® website for more information HERE.

Supplies

Product List

Have a very Happy and Crafty Weekend!

Theresa

Posted in 2020-2021 Stampin' Up! Catalog, 3D Embossing Folder, Gratitude/ Thanks, Sale-A-Bration 2021

Kylie’s Stampin’ Up!® Demonstrator Training Program Blog Hop- February 2021-Thank You Cards with So Sentimental

Thank you!

Thank you for joining me for our Stampin’ Up!® Demonstrator Monthly Team Blog Hop! I am so excited that you could join us today! I know you will get lots of ideas and creative inspiration! My thank you cards are made with the So Sentimental stamp set. Be sure to visit all the different blogs and see all the different stamp sets and dies that will be used.

I belong to a group of Stampin’ Up!® Demonstrators from around the world that are taking part in training that is helping us to build a successful Stampin’ Up!® business. I am a Demonstrator in Arizona, USA. If you are not already an awesome Demonstrator, or do not have an awesome Demonstrator and live in the USA, I would love to be your most awesome Demonstrator! I really appreciate your support.

The theme for the cards today is: Thank You. I have many customers who support me and I like to send them a Thank You card every once in awhile. The following set of cards is for my fabulous customers which I will be sending to anyone who orders during the month of February.

The Thank You Cards

I made a whole set of Thank You cards using an Embossing Folder (EF) to emboss the first layer. For the second layer I cut the Flowers & Field Designer Series Paper (DSP) which you can get for FREE with a qualifying order during Sale-a-bration (January 5 – February 28, 2021) and adhered it to the first layer. The sentiment is made using the “I can’t Thank You enough” from So Sentimental and the Stitched So Sweetly Dies. The first layer of this card is made with the Meadow Moments EF and Cherry Cobbler Card Stock CS).

The measurements for the embossed layer are 4 x 5 1/4 inches. The second layer which is the Flower & Field DSP is 3 x 4 inches. The sentiment piece is adhered with Stampin’ Dimensionals. This card has the non-floral side of the DSP showing. The Flirty Flamingo CS layer is embossed with the Absolutely Argyle EF.

For this card I used the Seabed 3D EF on Just Jade CS.

All Together!

I have a whole bunch of different combinations of DSP and CS colors!

Thanks for stopping by Theresa’s Treasures. Look through the list below to see who is next in line for the Blog Hop.

Supplies

Product List

Have a wonderful creative day!

Theresa

Posted in 2020-2021 Stampin' Up! Catalog, Fun/Fancy fold card, Heart, Love/Affection, Valentine's Day

Stampin’ Up!® Heartfelt- Pop-Up Fun Fold

This Stampin’ Up! Heartfelt Pop-Up Fun Fold is a cute 3 x3 inch Valentine’s card which is easy and fun to make.

Measurements

Measurements: Rococo Rose Card Stock (CS) card base: 3x 6 inches with a score line at 3 inches; Blushing Bride CS: 2 1/2 x 4 inches.

You will also need 4 scalloped hearts. Two Rococo Rose CS and two Brushing Bride CS hearts punched with the scalloped heart punch from the Heart Punch Pack.

Stamping

Start out stamping with the large sentiment heart. Stamp with the Rococo Rose ink onto the 2 1/2 x 4 inch Brushing Bride CS. Note: Be sure to use the Stampin’ Pierce mat or a catalog to get the best stamped image with the Photopolymer (see-through) stamps.

Next stamp the little lacey heart in Rococo Rose ink onto the center of the two Blushing Bride scalloped hearts. Continuing in the Rococo Rose ink, stamp the sentiment “Love You Lots” onto the center of the remaining Rococo Rose heart.

Scoring the Hearts

Set up the Trimmer to make score lines. Start by placing the right-hand edge on the 1/4 inch mark to the left of the center. Make a score line. Now move to the right so that the center of the heart is in place and score. Lastly, move the heart to the right again so that the left-hand edge is on the 1/4 inch mark and score. Repeat for all 3 hearts.

Each of the three hearts should look like this when you are finished scoring.

Putting It All Together

You will want to use a strong tape to adhere the pop-up portion of this card. I used the Tear & Tape that Stampin’ Up!® carries. The tape will be applied to the scalloped hearts as shown above.

To assemble the pop-up, start by using your Bone Folder on the center score line for the two Blushing Bride CS scalloped hearts. Remove the protective covering of the Tear & Tape on the Rococo Rose CS scalloped heart and lay it on the table face down. Adhere the Blushing Bride CS scalloped heart folded in half as shown on the right. Next adhere the other Blushing Bride CS scalloped heart on the left.

When you open it up it should look like this.

To continue to assemble the card pieces, use the Stampin’ Dimensionals to adhere the large sentiment heart piece to the remaining Rococo Rose CS scalloped heart.

The next step is to adhere the Square Vellum Doily. I just applied the glue to 3 small areas that will be covered with the scalloped heart.

To finish up the front, apply the Rococo Rose CS scalloped heart with the large sentiment heart stamped on it to the card front.

Installing the Pop-Up

To install the pop-up, first fold the pop-up heart in half as shown.

Lay the folded heart card piece onto the inside of the card as shown. Close the card and push firmly to adhere the pop-up to the inside.

When you open the card it will look like this!

Bling!

The Champagne Rhinestone Basic Jewels are perfect for this card. I added five to the front of the card. Note: An odd number of rhinestones is visually more appealing than an even number.

Voila! You have made a fun pop-up to wish someone special a Happy Valentine’s Day!

Thank you so much for visiting today. I hope you will try this out. I ended up making several with different colors of card stock.

Supplies

Product List

New Product

The Hey Chick stamp set was re-released yesterday to pair with the Hey Birthday Chick stamp set in the 2021 January-June Stampin’ Up! Mini Catalog. Dies for both stamp sets were also released. Below is the information needed for purchase of these two awesome bundles of product. When you are ready to order, click HERE to SHOP

Have a wonderfully crafty weekend!

Theresa