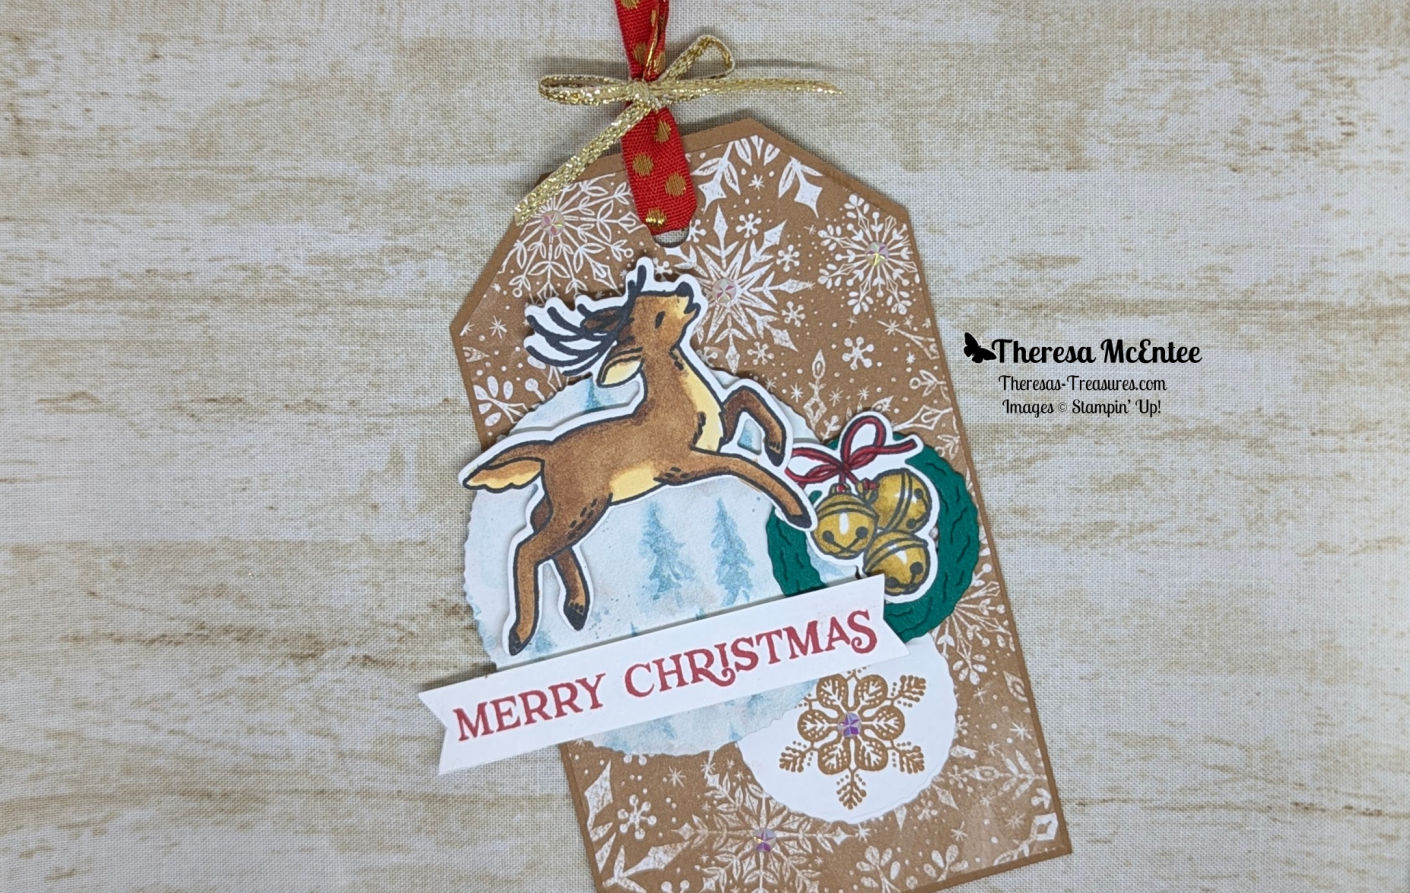
Posted in Gratitude/ Thanks, Stampin" Blends Alcohol Markers, Winter Holiday

Fitting Florets- Demonstrator Training Blog Hop

I am very happy to be making cards with this lovely collection- Fitting Florets- for Kylie & Bruno’s Demonstrator Training Program. The Demonstrator Training Program is a group of Stampin’ Up! Demonstrators from all over the world who want to improve their Stampin’ Up! business. Be sure to see everyone’s Blog on the hop and you will be amazed at all the inspiration and creativity!

My Card

The Fitting Florets Collection has been available to Demonstrators since October 4, 2022. Today, November 1, 2022 everyone will be able order it! This lovely collection includes: Framed Florets and Framed & Festive stamp sets, Framed Florets Dies, Fitting Florets Designer Series Paper (DSP) and Gold Adhesive-Backed Swirls.

Here is how to make my card

Measurements

  • Thick Basic White cardstock (cs): 4 1/4 x 11 inches for the card base. 4 x 5 1/4 inches and 3 x 4 inches for cutting the frames.
  • Vellum cs: 4 x 5 1/4 inches to cut the inside oval for the sentiment
  • Basic White cs: 4 1/4 x 11 inches to stamp the flowers & leaves on.

Instructions

  1. Stamp the flower & leaf images onto the 4 1/4 x 11 inch Basic White cs. Color with Stampin’ Blends Alcohol Markers. I used: Poppy Parade combo, Dark Cherry Cobbler, Shaded Spruce combo, Dark Mint Macaron and Light Daffodil Delight.
  1. Use the Framed Florets Dies to cut all of the images out. You will also need to stamp and color an additional small single flower, large single flower, sprig of leaves and the pair of leaves for the inside of the card.
  2. Run the Thick Basic White cs card base through the Stampin’ Cut & Emboss Machine using the Pretty Flowers Embossing Folder on the front panel. Set aside.
  3. Cut out the larger frame in the Framed Florets Dies from the Vellum cs and from the Thick Basic White cs.
  4. Cut out the smaller frame from the Thick Basic White cs.
  5. Use the Stamparatus to stamp the sentiment “Thank you with all my Heart” in Stazon Black Ink onto the oval created when you cut the large frame from the Vellum cs.
  6. Adhere the stamped Vellum cs oval to the Thick Basic White cs oval with Mini Glue Dots around the edges such that they will be covered with the flowers.
  7. Adhere the large frame cut from the Thick Basic White cs to the front of the card base.
  8. Adhere the Vellum/Thick Basic White cs oval to the center of the large frame.
  9. Use Mini Glue Dots to adhere the smaller frame over the sentiment piece.
  10. Lay the flowers and leaves down the way you would like them to look.
  11. I adhered some with Multipurpose Liquid Glue and some with Stampin’ Dimensionals.
  12. Add the Gold Adhesive-Backed Swirls.
  13. For the inside of the card adhere the images as shown below.

Voila! You have a very elegant Thank You card!

Thanks so much for stopping by Theresa McEntee’s Theresa’s Treasures Blog today for this Fitting Florets Blog Hop. Please stop by everyone’s blog and be sure to leave some love with a comment. Thanks again!

Ciao!

Theresa

Posted in 2022 July-December Mini Catalog, 3D Embossing Folder, 3D Technique, Inspiration in Ink Blog Hop, Snow, Winter Holiday

Inspirations in Ink-Christmas in July Blog Hop-July 2022-Stampin’ Up! Trees for Sale Whimsical Christmas Card

Welcome to the monthly Inspirations in Ink Blog Hop showcasing my Trees for Sale Whimsical Christmas Card. This month the theme is “Christmas in July”. The stamp set I chose for this card is Trees for Sale. I also used the Whimsical Woodland 3D Embossing Folder and the Fabulous Frame Dies.

Trees for Sale Whimsical Christmas Card

Here’s how to make a Trees for Sale Whimsical Christmas Card for yourself:

Measurements/ Supplies

  • Mint Macaron card stock card base: 4 1/4 x 11 inches scored at
    5 1/2 inches
  • Shaded Spruce card stock: two 4 x 5 1/4 inches embossed with the Whimsical Woodland 3D embossing folder
  • Real Red card stock: two cut with the Fabulous Frames die
  • Basic White card stock: two cut with the Fabulous Frames die, a 3/4 x 3 inch strip for the sentiment and a scrap for stamping the dog
  • Ink: Memento, White Craft, Mint Macaron, Shaded Spruce, Balmy Blue and Soft Suede
  • Stampin’ Up! Masking Paper
  • Red Rhinestone Basic Jewels
  • Stampin’ Blends Alcohol Markers: Dark Daffodil Delight, Dark Real Red and Light Night of Navy
  • Basic Black Stampin’ Write Marker
  • Stampin’ Dimensionals
Trees for Sale Whimsical Christmas Card

Instructions for the Trees for Sale Whimsical Christmas Card

Step 1- 3D Technique

  1. Start by using the White Craft Ink pad to drag it across both Shaded Spruce card stock card pieces embossed with the Whimsical Woodland 3D embossing folder. The “before and after” is pictured above. The White Craft Ink really helps the tree design pop! Set aside to dry.

Step 2-Stamping with Stampin’ Up! Masking Paper

  1. Take the center out of both of the Basic White card stock Fabulous Frame die cuts to stamp on.
  2. Use Soft Suede Ink to stamp the “trees for sale” sign on one of the Basic White card stock card pieces. Stamp a sign on a piece of the Masking Paper. (I used a pink sticky note so you could see what I was masking a little better)
  3. Fussy cut the sign from the Masking Paper. Cover the trees for sale sign on the stamped card piece with the Masking Paper sign.
  4. Use Mint Macaron Ink to stamp the solid small and medium sized trees.
  5. Stamp a small tree on the Masking Paper and fussy cut it.
  6. Use Shaded Spruce to stamp the detailed tree on the small tree only.
  7. Cover the small tree with the tree you cut from the Masking Paper.

Step 3-More Masking

  1. Use Shaded Spruce ink to stamp the detailed tree on all the medium trees.
  2. Remove the Masking Paper from the small tree and the Trees for Sale sign.

Step 4-Stamping the Scene

  1. Use Memento Ink to stamp the string of lights. Color the lights with Stampin’ Blends Alcohol Markers.
  2. Stamp some snowflakes and the paw prints in Balmy Blue Ink.
  3. On a scrap of Basic White card stock, stamp the dog in Soft Suede Ink. Use the Stampin’ Write Basic Black Marker to add some eyes, a nose and some spots to the dog. Fussy cut. (I cut the bottom jaw off because my dog did not look right with the jaw on)
  4. Use Stampin’ Dimensionals to adhere the dog to the scene.
  5. Stamp the sentiment “Christmas Greetings” in Real Red Ink on the 3/4 x 3 inch Basic White card stock strip.

Step 5-Stamping the Inside

  1. On the second Basic White card stock Fabulous Frame die cut, stamp “so very merry” in Real Red Ink.
  2. Stamp the snowflakes in Balmy Blue Ink.

Step 6-Assembling the Inside

  1. Assemble the inside of the card. Adhere one of the Shaded Spruce card stock embossed with the Whimsical Woodland embossing folder to the inside of the Mint Macaron card stock card base.
  2. Adhere the stamped Basic White card stock.
  3. Complete the inside by adhering the Real Red card stock Fabulous Frame die cut.

Step 7-Assembling the Card Front

  1. Adhere the second embossed Shaded Spruce card stock card piece to the front of the Mint Macaron card stock card base.
  2. Adhere the stamped Basic White card stock scene to the card front.
  3. Add the Real Red card stock Fabulous Frame die cut.
  4. Use Stampin’ Dimensionals to adhere the sentiment.
  5. Embellish with the Real Red Rhinestone Basic Jewels.

Voila!

Trees for Sale Whimsical Christmas Card

Thank you for visiting my blog today and viewing my Trees for Sale Whimsical Christmas Card. I hope you will continue on the hop.

Please click on the Blog Roll to hop along with us. You are currently at Theresa McEntee. Don’t forget when visiting to leave a little love with a comment.

Deirdre Croal – USA

Robbie Rubala – USA

Theresa McEntee – USA

Vicky Wright – Australia

Wendy Varron – USA

Christy Gridley – USA

Thank you, Theresa

Posted in Uncategorized, Winter Holiday

Merry Christmas to all!

Merry Christmas! Chag Hanukkah sameach! Season’s Greetings! Happy Kwanzaa! Wishing you warmth and peace this December Winter Solstice! Happy Holidays! Wishing you all warmth and togetherness during this special time of year!

Today’s card is a special greeting to everyone, no matter your beliefs, to wish you light, happiness and peace in the coming year! “Peace on earth will come to stay, when we live Christmas every day”- Helen Steiner Rice.

Peace,

Theresa

Posted in 2021-2022 Stampin' Up! Annual Catalog, Designer Series Paper, Fun/Fancy fold card, Gift Card Holder, Gratitude/ Thanks, Snowflakes, Winter Holiday

Stampin’ Up!® Snowflake Wishes Thank You Fun Fold Friday Gift Card Holder

Still looking for a gift for the Holidays? Consider giving a gift card in a thank you note! This Snowflake Wishes Thank You Fun Fold Friday Gift Card Holder is a great gift for anyone who helps you out on a regular basis. For example, the young man who mows your lawn, the housekeeper, the bank teller, the mail/package delivery person, the grocery clerk- you get the idea. Everyone loves to be appreciated, especially during the holidays!

Measurements

Snowflake Wishes Fun Fold Friday Thank You Card

  • Gorgeous Grape Card Stock (CS): 4 1/4 x 11 inches scored at 2 1/2 and 5 1/2 inches and 2 3/4 x 4 inches.
  • Highland Heather CS: 4 x 6 inches.
  • Basic White CS: 2 1/2 x 3 3/4 inches and 4 x 5 1/4 inches.
  • One Wonderful Snowflake

Links to the supplies are listed at the end of this blog.

Stamping Your Own Designer Series Paper (DSP)

Start out by stamping the largest snowflake in Highland Heather Ink onto the 4 x 6 inch Highland Heather CS. Then Stamp Off once when stamping the next to the largest snowflake.

Next use the Gorgeous Grape Ink and the medium sized snowflakes to stamp in the empty spaces.

To finish this card piece, stamp in Misty Moonlight Ink using the group of tiny snowflakes. This may not look great at this point, but when it is cut up and adhered to the card it will look fantastic!

More Stamping

The next step is to stamp the front of the card. Start by using the Misty Moonlight Ink to stamp the sentiment “Thank You Snow Much” onto the 2 1/2 x 3 3/4 inch Basic White CS. Then Stamp Off once using the largest snowflake with Highland Heather Ink. Using the next to the largest snowflake, stamp at full strength using Highland Heather Ink.

Use the Gorgeous Grape Ink to stamp a medium sized snowflake around the edges.

Finish this card piece by stamping the group of medium snowflakes in Misty Moonlight Ink.

Use the Misty Moonlight Ink with the group of medium snowflakes to stamp around the upper left-hand corner of the 4 x 5 1/4 inch Basic White CS. This will be the inside of the card.

Assembling the Snowflake Wishes Thank You Gift Card Holder

The first step is to cut up the DSP that you made. Cut at 2 1/4 inches and 3 1/4 inches.

Fold the Gorgeous Grape CS card base at the 5 1/2 inch score line. Then fold at the 2 1/2 inch score line. Adhere the 2 3/4 x 4 inch DSP to the left and the 2 1/4 x 4 inch DSP to the right.

Adhere the 4 x 5 1/4 inch Basic White CS to the inside. Then adhere the 1 x 4 inch DSP to the right-hand side of the Basic White CS.

Punch the end with the Label Me Lovely Punch to create a notch.

Turn the card front over and apply Tear & Tape Adhesive to the upper and lower edges. Tip: Use the Take Your Pick tool to peel the protective cover off.

Fold the card front to adhere the edges and make the pocket for the gift card.

Adhere the Basic White CS card front to the corresponding Gorgeous Grape CS. Lay on the front of the card base to get positioning.

Tip: Flip the card front over to see where to adhere the Stampin’ Dimensionals.

Finishing Touches

Add a finishing touch by applying the Wonderful Snowflake.

And of course-add Bling! The Rhinestone Basic Jewels will add some extra sparkle!

Voila! Such a wonderful way to thank those around you!

You can see some more Holiday Thank You card ideas HERE and HERE.

Thank you for visiting my blog today. I am very appreciative of you. My blog would not be successful without you!

Product List

Have a very Happy Holiday Season!

Theresa

Posted in 2021 Stampin' Up! July-December Mini Catalog, Fun/Fancy fold card, Winter Holiday

Stampin’ Up!®Penguin Place Fun Fold Christmas card

I can’t believe it! Today is the 12th day of my 12 Days of Christmas Card Making Challenge with my stamping buddy Christy. That went by so fast for me! The card today is a Stampin’ Up!® Penguin Place Fun Fold Christmas Card since it is also Fun Fold Friday!

If you would like to see the whole Gallery of the 12 Days of Christmas Card Making Challenge you can see it on my Welcome page HERE. Check out all the fabulous products I used that are available in the 2021 Stampin’ Up! July to December Mini Catalog.

Be sure to order in time to make your own Christmas cards! You can order HERE when you have your list ready! Order soon because many of the retiring products in the Mini Catalog are selling out! See the retiring list HERE.

This Penguin Place Fun Fold Christmas Card is just so cute! These penguins are adorable! And I just love the bunch of snowflakes!

And here is how the Penguin Place Fun Fold Christmas Card opens. How cool is that?! A bonus is that this card is really pretty simple to make.

Measurements

Penguin Place Fun Fold Christmas card

  • Basic White Card Stock (CS) card base: 5 1/2 x 11 inches with score lines at 4 1/4 and 8 1/2 inches.
  • Basic White CS: 3 pieces that are 3 x 3 1/2 inches and one 1 x 3 3/4 inch.
  • Real Red CS: 3 1/2 x 3 1/2 inches.
  • Pattern Party Designer Series Paper (DSP) black with white dots design: 3 x 3 inches.
  • One Wonderful Snowflake
  • Real Red 3/8 inch Double Stitched Satin Ribbon bow.

Stamping

The Stamparatus is a great way to make multiple images in a very short time. Which is what I did. You can stamp them in the standard manner as well. These penguins are stamped in Memento Black, Garden Green, Real Red and Pumpkin Pie Ink. Stamp one upside right, on the right side of the paper. Then rotate the Basic White CS 180 degrees and stamp another upside right. Then you will be able to punch the penguins out with the Penguin Builder Punch.

You will need four penguins with Garden Green scarves, and two with Real Red scarves to make the card exactly as I did.

This greeting “We Wish You a Merry Christmas” is from the Holly Jolly Wishes stamp set. Stamp the greeting in Real Red Ink onto the 1 x 3 3/4 inch Basic White CS. Then stamp the bunch of snowflakes found in the Penguin Place stamp set.

The card folds so that the front panel is 4 1/4 x 5 1/2 inches. The inside flap is 2 1/2 inches so it does not go all the way to the inside score line. On the inside center panel, use the Real Red Ink to stamp the greeting “It’s the Most Wonderful Time of the Year”. This greeting is also from the Holly Jolly Wishes stamp set.

Use Memento Black Ink and the bunch of snowflakes to stamp some all over the front panel.

To complete the stamping. Use Soft Suede Ink to stamp one set of antlers on a scrap of Basic White CS. You will need to fussy cut the antlers.

Creating the Fun Fold

The Layering Circle Dies have both scalloped and smooth-edged circles so they are very versatile. Use the 2 3/4 inch diameter scalloped circle on the front panel. Run it through the Stampin’ Cut & Emboss Machine. This will create a scalloped circle opening.

Use the same scalloped circle die to cut a scalloped circle from the 3 1/2 x 3 1/2 inch Real Red CS. The black with white dot 3 x 3 inch square is die cut with the 2 3/8 inch diameter Layering Circle Die with a smooth edge.

Fold the card base and use the Bone Folder to make the folds crisp. Apply adhesive to the half panel that peeks through the opening. Adhere the Real Red CS scalloped circle. Take care to line the edge up so that it will be able to be pulled through the opening.

Putting It All Together

Adhere the black with white dot circle. Then adhere the Wonderful Snowflake. Follow by using Stampin’ Dimensionals to adhere one of the Garden Green scarf penguins (who has the antlers on his head) and the “Merry Christmas” greeting. Finish with a Mini Glue Dot to adhere the bow.

Open the card. Adhere a Real Red scarf penguin right under the first penguin. Be sure to stay below the edge of the Real Red scalloped circle. Adhere one of the Garden Green penguins to the right of the Real Red one so they look like they are holding hands.

The next Garden Green scarf penguin is adhered to the center panel so that it looks like it is in line with the two penguins on the 2 1/2 inch flap. Open the card fully and adhere the rest of the penguins to the center panel.

Here is what the inside looks like with the 2 1/2 inch flap in place, and with the card fully opened.

Bling!

For this Penguin Place Fun Fold Christmas Card I decided that the card needed two kinds of Bling! On the black snowflakes I added clear Rhinestone Basic Jewels. And around the greeting I used the Red Rhinestone Basic Jewels. Lots of sparkle!

Voila! Such an adorable Christmas Fun Fold! The Penguin Place Fun Fold Christmas Card would be great to send off to just about anyone!

Supply List

Product List

Thanks so much for visiting today! I hope you are able to stop by the Gallery of the 12 Days of Christmas Cards on my Welcome page. Get there now by clicking HERE.

Have a very Merry Christmas and Happy Holiday Season!

Theresa

Posted in 2021 Stampin' Up! July-December Mini Catalog, Ornaments, Winter Holiday

Stampin’ Up!® Stars Are Shining Christmas Card

I am on Day 11 of the “12 Days of Christmas Card Making Challenge” with my stamping buddy Christy. Today’s card is the Stampin’ Up!® Stars Are Shining Christmas Card. For the last 10 days my blog has focused on a new holiday card showcasing a new stamp set each day. The challenge ends with tomorrow’s card. If you would like to see the whole Gallery of the 12 Days of Christmas Card Making Challenge you can see it on my Welcome page HERE. Check out all the fabulous products I used that are available in the 2021 Stampin’ Up! July to December Mini Catalog. Be sure to order in time to make your own Christmas cards! You can order HERE when you have your list ready!

Be sure to order as soon as you know what you would like. Many of the products in the 2021 July-Dec Mini Catalog are retiring. Click on the image above to see the list. Many are already SOLD OUT. There is also a delay the shipping process. Order today so you will have time to make your cards!

Joy to the World! Today’s card is a simple one. After creating the Layering Diorama with the Peaceful Deer yesterday, I needed an easier card!

Measurements

Stars Are Shining Christmas Card

  • Real Red Card Stock (CS) card base: 4 1/4 x 11 inches with a score line at 5 1/2 inches.
  • Basic White CS: two at 4 x 5 1/4 inches.
  • Tidings of Christmas 6 x 6 inch Designer Series Paper (DSP): 3 1/2 x 4 inches.
  • Real Red 3/8 inch Double-Stitched Satin Ribbon: 6 1/2 inches.

Cut the Tidings of Christmas DSP into 2 triangles. Place one triangle over the top of one of the 4 x 5 1/2 inch Basic White CS. Use a pencil to draw a line at the border of the DSP. Remove the DSP and set aside for later.

Before you start stamping, figure out where you would like the ornaments to be. Place the stamps on the paper. Include the sentiment “Joy to the World” in the lower right-hand corner. Use a pencil to mark the center of the top of each ornament.

You will have three dots where the string for the ornament needs to end. Stamp the sentiment in Memento Ink. Then stamp each of the three strings for the ornaments.

Start by stamping the middle ornament. Add the other two ornaments.

On the other 4 x 5 1/4 inch Basic White CS stamp the sentiment “The Stars are Shining Brightly”. Stamp some of the stars on the side. I stamped once, then turned the stamp 180 degrees, applied more Memento Ink, and stamped a second time.

Coloring the Ornaments

I absolutely love the Stampin’ Blend Alcohol Markers but the Stampin’ Write Markers have a finer tip. Color in some of the design with the Garden Green Stampin’ Write Marker. Finish up by using the Real Red marker.

Adhere the Tidings of Christmas DSP triangle to the top left corner.

Adhere the Real Red Double-Stitched Satin Ribbon to the front panel with Mini Glue Dots. Take care on the upper right-hand corner to have the ribbon to the left of the corner. Wrap the ribbon around to the back and adhere with a Mini Glue Dot. Trim the excess off of the top corner ribbon.

Adhere the ornament card piece to the front of the Real Red CS card base. Now adhere the inside panel to the inside of the card base.

Now for some Bling! Add some Red Rhinestone Basic Jewels. Add as many as you want! The more, the more sparkle!

Voila! A nice and simple but totally Bling! Stars are Shining Christmas Card! You could really have some fun with this one. Try different colors and patterns of DSP.

Supply List

Product List

Please remember to subscribe to my Theresa’s Treasures Paper Crafts Newsletter. I am just getting started with the Newsletter. I plan to have Up-to-date Stampin’ Up! information on promotions and goings on as well as announcements about my upcoming Zoom Classes. Once I get that going I plan to add a special PDF download for a card with each Newsletter. Subscribe by scrolling down the side bar until you get past the announcement for the Zoom Class. There is a “Subscribe to My Newsletter” form there. Or you can find the form at the end of this blog if you are on your phone.

Thanks so much for visiting today! Have a most wonderful day! The weekend is almost here!

Theresa

Posted in 2021 Stampin' Up! July-December Mini Catalog, 3D Technique, Animals, Designer Series Paper, Nature, Outdoors, Winter Holiday

Stampin’ Up!® Peaceful Deer Christmas Card

I am on Day 10 of the “12 Days of Christmas Card Making Challenge” with my stamping buddy Christy. Today’s card is a Stampin’
Up!® Peaceful Deer Christmas Card. Each day of this challenge my blog will focus on a new holiday card. The challenge goes until December 10, 2021. I plan to showcase a different stamp set with each card. This will allow you plenty of time to see the fabulous products that are available in the 2021 Stampin’ Up! July to December Mini Catalog, and to order in time to make your own Christmas cards! You can order HERE when you have your list ready!

Remember there is FREE shipping today, Dec 8, 2021, only on orders of $50 or more! Click on the free shipping image to go shopping in my Online Store.

And now for the Peaceful Deer Christmas card:

Oh deer! Look at this card with the Layering Diorama and the adorable deer (and bunny). This card is so much fun to create! Let me show you how to make one for yourself. I will go step-by-step.

Measurements

  • Garden Green Card Stock (CS) card base: 5 1/2 x 8 1/2 inches with a score line at 4 1/4 inches.
  • Garden Green CS: 4 x 5 1/4 inches and 2 1/2 x 3 3/4 inches
  • Basic White CS: 4 x 5 1/4 inches (inside), 3 x 4 1/2 inches (deer) and 2 x 3 inches (sentiment).
  • Painted Christmas 12 x 12 inch Designer Series Paper (DSP): 4 1/8 x 5 3/8 inches.
  • Pattern Party 12 x 12 inch DSP: 3 1/4 x 4 1/4 inch of the white with black dot design (not shown).

Stamping

Start by stamping the “Merry Christmas” in Real Red Ink on the 4 x
5 1/4 inch Basic White CS. Using Memento Ink, stamp the lying down deer on the lower right-hand corner. Now stamp the leaping and the standing deer, the lying deer (not shown) and the bunny onto the 3 x
4 1/2 inch Basic White CS. Note: I forgot to stamp the lying deer at this time and had to do it later.

In Garden Green Ink stamp a tall tree and the small trio of trees. Fussy cut the trees.

Finish with the stamping by using the Real Red Ink to stamp the sentiment “Sending love & peace This Season” onto the 2 x 3 inch Basic White CS. I used a label die from the Potted Succulents Die set to cut the sentiment out.

Coloring the Animals

The Stampin’ Blend Alcohol Markers are great for these animals. The deer are colored in Light and Dark Cinnamon Cider, and Ivory. The bunny is colored in the Light and Dark Smoky Slate and Petal Pink. Don’t forget to color the lying down deer on the inside panel. Fussy cut the leaping and standing deer, lying down deer(not shown) and bunny for the front of the card. Do not cut the inside panel that has the lying down deer on it!

Creating the Diorama

The Layering Diorama Dies are pictured on the left. Use the 2nd and 4th one from the center. Use the larger one to cut the Painted Christmas DSP. Center the die then move it up to about 1/4 inch from the top. Use Sticky Tape to hold it in place. Cut with the Stampin’ Cut & Emboss Machine. Lay the DSP with the hole in it over the 4 x 5 1/4 inch Garden Green CS.

Place the smaller Layering Diorama Die in the center and use sticky tape to keep in place. Run it through the Stampin’ Cut & Emboss Machine. Now you have 2 layers.

Place the Garden Green CS with the hole in it over the front of the Garden Green CS card base. Trace the hole with a pencil.

Adhere the Pattern Party DSP to cover the tracing.

Place Stampin’ Dimensionals on the back of the 4 x 5 1/4 inch Garden Green CS with the hole in it. Adhere to the card front over the Pattern Party DSP.

Similarly, place Stampin’ Dimensionals on the back of the Painted Christmas DSP. Adhere over the top of the Garden Green CS. Now you have your layered diorama! Tip: Avoid placing dimensionals right up to the edge of the hole because you will need room to insert the trees and deer.

Adding the Animals

Insert the larger tree first. I placed one Stampin’ Dimensional toward the top to lift the tree out a bit. Next add the standing deer. I used Stampin’ Dimensionals on all the animals. Add the leaping deer and the trio of trees. (Here is when I realized I did not have the lying deer! Lol!). Add the lying deer and the bunny.

Use Stampin’ Dimensionals to adhere the sentiment. Add some Bling! (Rhinestone Basic Jewels) to make stars in the sky. Tie a bow with the Real Red 3/8 inch Ruffled Ribbon and adhere with Mini Glue Dots. Adhere the inside panel with the Merry Christmas sentiment on it to the inside of the Garden Green CS card base.

Voila! That wasn’t too bad. Looks more complicated than it really is. What a fabulous Christmas card to send to an animal lover! Or anyone who likes the outdoors.

And don’t forget-today there is FREE shipping on orders $50 and over! Make your list and get FREE shipping today! Click on the free shipping image to shop in my Online Store!

Supply List

Product List

Have a wonderful rest of the day!

Theresa

Posted in 2021 Stampin' Up! July-December Mini Catalog, 3D Embossing Folder, Animals, Birds, Fun/Fancy fold card, Stampin" Blends Alcohol Markers, Winter Holiday

Stampin’ Up!® Happy Holly Days Happy Christmas card

I am on Day 9 of the “12 Days of Christmas Card Making Challenge” with my stamping buddy Christy. Today’s card is a Stampin’ Up!® Happy Holly Days Happy Christmas Card. Each day of this challenge my blog will focus on a new holiday card. The challenge goes until December 10, 2021. I plan to showcase a different stamp set with each card. This will allow you plenty of time to see the fabulous products that are available in the 2021 Stampin’ Up! July to December Mini Catalog, and to order in time to make your own Christmas cards! You can order HERE when you have your list ready! Tomorrow there is FREE shipping!

I was inspired to make this particular card by a Color Challenge that Stampin’ Up! puts out every month. This months colors are Mossy Meadow, Real Red, Crumb Cake and Gold. This Happy Holly Days Happy Christmas card shows all of these colors.

Measurements

Happy Holly Days Happy Christmas card

  • Mossy Meadow Card Stock (CS) card base: 5 1/2 x 8 1/2 inches scored at 4 1/4 inches. One end has been cut 1/2 inch shorter with the scalloped pattern in the Basic Borders Dies.
  • Basic White CS: 2 1/4 x 5 1/2 inches, 2 3/4 x 5 1/4 inches, 3 x 3 1/2 inches and 3/4 x 3 1/2 inches(not shown).
  • Real Red CS: 2 x 5 1/2 inches
  • Gold Brushed Metallic CS: 3 x 4 1/4 inches. Cut with the 3rd smallest Scalloped Contours Die.
  • Crumb Cake CS: 1 1/4 x 5 1/2 inches. Embossed with the Tasteful Textile 3D Embossing Folder

Stamping

Stamp the bird image in Sahara Sand Ink onto the 3 x 3 1/2 inch Basic White CS. Then stamp the holly image 3 times onto the 2 3/4 x 5 1/2 inch Basic White CS.

Next stamp the holly image 2 times onto the corners of the 2 3/4 x 5 1/4 inch Basic White CS. Then stamp the sentiment in Mossy Meadow Ink. Also in Mossy Meadow Ink, stamp the sentiment “Happy Christmas” onto the 3/4 x 3 1/2 inch Basic White CS (not shown).

Coloring With Stampin’ Blends Alcohol Markers

I love the Stampin’ Blends Alcohol Markers because you can blend the colors and create beautiful images. My bird doesn’t look as realistic as some, but I am satisfied with the results. I learned to use the Dark Blend first for small areas to create shadows. Then blend in the Light color. The colors here are: Dark Daffodil Delight, Dark Basic Black, and the Light and Dark Crumb Cake, Real Red and Mossy Meadow.

The same procedure, Dark Blend first followed by the Light, is followed for the holly images.

Fussy cut the bird and holly. Also fussy cut the “Happy Christmas” sentiment (not shown).

Tip: Sometimes it is very difficult to cut exactly and not have any white edge. I just use the Light Blend along the outer edge to hide the white.

Assembling the Card

Adhere the inside sentiment and the embossed Crumb Cake CS strip to the inside of the Mossy Meadow CS card base. Adhere the 2 x 5 1/2 inch Real Red CS to the front of the card base.

Now with Stampin’ Dimensionals adhere the Gold Brushed Metallic CS scalloped rectangle to the card front. Follow by adhering the bird with Stampin’ Dimensionals.

Use Mini Stampin’ Dimensionals on the center of the back of the holly leaves. Adhere as desired under the bird. To finish, adhere the sentiment “Happy Christmas” under the Gold scalloped rectangle.

Add some Wonderful Gems to make the card front sparkle a little more.

Voila! You have a very festive Happy Christmas card!

I am submitting this card to the #sucolorchallenge and to my Glimmer Gals Team page for our color challenge as well. I hope you enjoyed Day 9 of the 12 Days of Christmas Card Making Challenge. See you tomorrow with card #10!

Supply List

Click on any photo to go to my Online Store and start shopping!

Product List

Thanks for stopping by. Have a most wonderful day!

Theresa

Posted in 2021 Stampin' Up! July-December Mini Catalog, Clean and Simple, Winter Holiday

Stampin’ Up!® Frosted Gingerbread #SimpleStamping Christmas card

I am on Day 8 of the “12 Days of Christmas Card Making Challenge” with my stamping buddy Christy. Today’s card is a Stampin’ Up!® Frosted Gingerbread #SimpleStamping Christmas Card. Each day of this challenge my blog will focus on a new holiday card. The challenge goes until December 10, 2021. I plan to showcase a different stamp set with each card. This will allow you plenty of time to see the great products that are available in the 2021 Stampin’ Up! July to December Mini Catalog, and to order in time to make your own Christmas cards! You can order HERE when you have your list ready!

Many of the products in the Stampin’ Up! July-December Mini Catalog will be retiring at the end of December. If you really want something, order now because products are “while supplies last”. Get more information on the “Last Chance” products HERE

#SimpleStamping Stampin' Up! Frosted Gingerbread Christmas card

This is a perfect card for the beginner stamper to try out. I use only one stamp set, one ink and one type of paper to create this Frosted Gingerbread #SimpleStamping Christmas card.

Measurements

Frosted Gingerbread #SimpleStamping Christmas Card

  • Basic White Card Stock (CS) card base: 5 1/2 x 8 1/2 inches with a score line at 4 1/4 inches.
  • Basic White CS: 4 x 5 1/2 inches

Stamping

The first step is to use Real Red Ink to stamp the sentiment “Wishing You A Merry Christmas” on the inside panel of the Basic White CS card base. Tip: Be sure to use either the Stampin’ Pierce Mat or your catalog to stamp on. Photopolymer stamps work best with a softer surface under the card stock.

For the next step you will need either a Clear Block I or your stamp case. I will be using my stamp case. First remove the paper insert from the stamp case. Lay the border stamp on the top of the 4 x 5 1/4 inch Basic White CS to be sure it is straight. Pick the stamp up with the front of the stamp case.

Close the stamp case. Apply Real Red Ink and stamp along the upper border of the 4 x 5 1/4 inch Basic White CS.

Turn the Basic White CS so the stamped border is on the bottom. Ink the border stamp again and stamp along the top edge.

Stamp the sentiment “Sending You Peppermint Kisses” on the lower right-hand side. Now stamp the trio of peppermints to the left and slightly above the sentiment.

Assembling the Card

To finish the card, adhere the stamped panel to the front of the Basic White CS card base.

completed Stampin' Up! Frosted Gingerbread #SimpleStamping Christmas card

And Voila! That is all there is to this Frosted Gingerbread #SimpleStamping Christmas card!

Supply List

Click on any photo to go to my Online Store and start shopping!

Product List

Thank you for stopping by for Day 8 of the 12 Days of Christmas Card Making Challenge. Later today there will be a non-Christmas blog coming out. I am participating in Kylie Bertucci’s International Blog Highlights Gallery. But I will be back tomorrow with another Christmas card!

Theresa

Posted in 2021 Stampin' Up! July-December Mini Catalog, 3D Embossing Folder, Stampin" Blends Alcohol Markers, Stampin' Cut & Emboss Machine, Winter Holiday

Stampin’® Up! Great Tidings Religious Christmas Card

I am on Day 7 of the “12 Days of Christmas Card Making Challenge” with my stamping buddy Christy. Today’s card is a Stampin’ Up!® Great Tidings Religious Christmas Card. Each day of this challenge my blog will focus on a new holiday card. The challenge goes until December 10, 2021. I plan to showcase a different stamp set with each card. This will allow you plenty of time to see the great products that are available in the 2021 Stampin’ Up! July to December Mini Catalog, and to order in time to make your own Christmas cards! You can order HERE when you have your list ready!

Many of the products in the Stampin’ Up! July-December Mini Catalog will be retiring at the end of December. If you really want something, order now because products are “while supplies last”. Get more information on the “Last Chance” products HERE

I really like how colorful this Great Tidings Religious Christmas card turned out to be. The Wise Men Tidings Dies and the Gold Brushed Metallic Card Stock really make this card shine!

Measurements

Great Tidings Religious Christmas Card

  • Night of Navy Card Stock (CS) card base: 4 1/4 x 11 inches scored at 5 1/2 inches.
  • Basic White CS: 4 x 5 1/4 inches, 4 x 4 inches, and a 1/2 inch strip that is at least 3 inches long.
  • Gold Brushed Metallic CS: 5 3/8 x 4 1/8 inches.

Stamping

Use Memento Ink to stamp one each of the Three Kings onto the 4 x 4 inch Basic White CS.

Use Night of Navy Ink to stamp the sentiment “Wise men still seek Him” onto a 1/2 x 3 inch strip of Basic White CS. Also stamp, in Night of Navy Ink, the 4 x 5 1/4 inch Basic White CS with the sentiment “Sending Peace & Joy to you”, the 3 Gifts and the Star.

Use Stampin’ Blends Alcohol Markers to color the Three Kings. For skin color, I used the Light and Dark Cinnamon Cider, and Ivory. Additionally, I used the Light and Dark of: Bermuda Bay, Just Jade, Daffodil Delight, Blackberry Bliss and Night of Navy for the Kings’ dress. I shadowed the turban with Light Smoky Slate. Later I used Dark Poppy Parade for the gem in the turban and the jewel on the cloak of the middle King. Note: These are not the traditional colors for the Three Kings. Going left to right is Gaspar, Balthazar and Melchior.

Three Wise Men Dies and Hammered Metal Embossing Folder

The Three Wise Men Dies really help make the Great Tidings Religious Christmas Card shine. First die cut the Dome, placing the top of the die about 3/4 inch from the top edge and using the Stampin’ Cut & Emboss Machine. Use the dies for the Star and the Town of Bethlehem to diecut from the left over dome piece. Save the remainder of the dome cut out for future use. Tip: This is a great way to make the Gold Brushed Metallic CS last longer- use every scrap!

Use the Hammered Metal 3D Embossing Folder in the Stampin Cut & Emboss Machine for the texture on the 5 3/8 x 4 1/ 8 inch Gold Brushed Metallics CS card piece.

Assembling the Card

Adhere the inside card piece to the inside panel of the Night of Navy CS card base.

Start the front of the card by adhering the Hammered Metal Gold CS card piece to the front panel of the Night of Navy CS card base. Next adhere the Star with a Stampin’ Dimensional. Adhere the Little Town of Bethlehem flat to the background. Add the Three Kings using Stampin’ Dimensionals.

Finish the card by trimming the sentiment and adhering it to the card with Stampin’ Dimensionals. Add one large Gilded Gem to the center of the Star.

Voila! You have made a fabulous Great Tidings Religious Christmas Card!

For my family today is the second Sunday of Advent. Time is moving by so quickly! My son and husband are out to get the tree. I still need to wrap a bunch of packages to mail tomorrow. It is such a wonderful, busy time of year!

Supplies

Product List

I hope you have a Blessed Day!

Theresa