Posted in 2023-2024 Stampin' Up! Annual Catalog, 3D Embossing Folder, Designer Series Paper, Inspiration in Ink Blog Hop, Nature, Online Exclusives, Punch, Summer

Inked & Tiled Bundle for the Inspirations in Ink July 2023 Blog Hop

Today I have a beautiful Inked & Tiled “just a note” Card!

Welcome and thanks for visiting Theresa’s Treasures Paper Crafts! I am Theresa, a Stampin’ Up! Demonstrator in Arizona, USA. Today is the monthly Inspirations in Ink Blog Hop! I am excited to be hopping with very talented demonstrators from around the world. Be sure to check out everyone’s projects using the Inked & Tiled Bundle. The Inked & Tiled Bundle is in the Annual Catalog. You may order from my Online Store HERE.

Measurements

  • Thick Basic White cardstock card base: 4 1/4″ x 11″ scored at 5 1/2″ (21cm x 29.7cm scored at 10.5cm)
  • Basic White cardstock: 2″ x 3″ (6cm x 8.2cm) for the sentiment
  • Lost Lagoon cardstock: 3 1/8″ x 4 1/8″ (7.5cm x 10.3cm),
    2 1/8″ x 5 1/8″ (5.5cm x 13.7cm) and optional for leaves 2″ x 3″ (6cm x 8.2cm)
  • Inked Botanicals Designer Series Paper (DSP) Lost Lagoon patterns: 3″ x 4″ (7.2cm x 10.1cm) and 2″ x 5″ (5.2cm x 13.5cm)
  • Inked Botanicals DSP Calypso Coral pattern: 2″ x 6 3/4″ (5.2cm x 17.2cm)
  • Inked Botanicals DSP Crushed Curry pattern: 2″ x 4 1/2″ (5.2cm x 11.5cm)
  • For inside of card: Lost Lagoon cardstock: 3/4″ x 4 1/8″ (2cm x 13.9cm), Inked Botanicals Lost Lagoon pattern: 3/4″ x 5 1/2″ and 1/2″ x 4 7/8″ (2cm x 14.2cm and 1.3cm x 13.1cm)

Supplies

  • Inked & Tiled stamp set and Punch Pack Bundle
  • Basics Embossing Folder (Online Exclusive)
  • Lost Lagoon Ink
  • Lost Lagoon 1/4″ (6.4mm) Bordered Ribbon
  • Iridescent Pastel Gems
  • Bone Folder
  • Stampin’ Dimensionals
  • Paper Trimmer
  • Multipurpose Liquid Glue

Instructions

  1. Adhere the Lost Lagoon colored Inked Botanicals DSP to the corresponding Lost Lagoon cardstock card pieces.
  2. Adhere to the front of the Thick Basic White cardstock card base.
  1. Use the Basics Embossing Folder with the cross hatches to emboss the front of the Thick Basic White cardstock card base with the pieces adhered to it.
  2. Complete the inside of the card base by adhering the strips of paper.
  1. To make the flowers, first punch out 3 pieces with the star pattern punch from the Calypso Coral colored Inked Botanicals DSP.
  2. Use the “X” pattern punch to punch 3 pieces from the Crushed Curry colored Inked Botanicals DSP.
  1. I used my scoring tool to gently push down in the middle of each flower. I also made score marks on the “petals” to help create a 3D look.
  2. Adhere 1 star and 1 “X” together to make each flower.
  3. Adhere to the card front.
  4. Tie a bow with the Lost Lagoon Bordered Ribbon and adhere just under the trio of flowers.
  5. Stamp “just a NOTE” in Lost Lagoon Ink onto the Basic White cardstock.
  6. Punch the sentiment out with the “X” punch. Trim off 2 arms of the “X”.
  7. Use Stampin’ Dimensionals to adhere the sentiment to the card front.
  8. Finish by adding the Calypso Coral colored Iridescent Pastel Gems to the center of each flower.

Voila!

Thank you so much for visiting today! Please visit all the blogs in the Inspirations In Ink Blog Hop. You will be amazed and inspired by all the fun and creative projects made by the Inspirations In Ink demonstrators. 

You are currently visiting Theresa McEntee-USA creator of Theresa’s Treasures Paper Crafts.

Karen Beck – Canada    Theresa McEntee – USA   Rebecca Nutley – Australia   Robbie Rubala – USA    Vicky Wright – Australia   Christy Gridley – USA     Deirdre Croal – USA

Clickable Supply List

Product List

Have a most wonderful and creative day!

Theresa

Thinking of adding creativity to your life? Try a monthly paper crafting kit! The Paper Pumpkin Monthly Subscription delivers a kit with everything you need to make a project-right to your door! Sign up for a Pre-paid Paper Pumpkin Subscription HERE.

Ciao!

Posted in 2022-23 Stampin' Up! Annual Catalog, Avid Stamper, Gratitude/ Thanks, Punch, Shaker Card, Stampin" Blends Alcohol Markers

Kylie Bertucci’s Top 10 International Blog Highlight Winners Hop- Stampin Up!® Happiness Abounds Floral Thank You Card

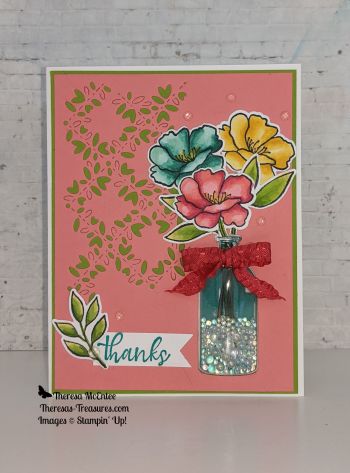
I am so excited and thankful to be part of the Top 10 Winners Hop from Kylie Bertucci’s International Blog Highlights Gallery! Thank you to everyone who voted for my card from the May International Blog Highlights, allowing me an opportunity to post on this Winners Hop today. Ten more fabulous demonstrators from around the world will be posting today too! The theme for the card today is “Thank you”.

This card was inspired by all the colorful flowers in the gardens around my house. The flowers and leaves are from the Happiness Abounds stamp set. They are colored with the Stampin’ Blends Alcohol Markers in Daffodil Delight/So Saffron, Bermuda Bay/Pool Party and Flirty Flamingo with a little Melon Mambo. The die cut background is from the Blossoming Happiness Dies that coordinate with the Happiness Abounds stamp set.

The bottle is created with a stamp from the Bottled Happiness stamp set. The Vintage Bottle Punch was used to add the Vintage Bottle Shaker Dome. Effervescent Elements create the “bubbles” in the bottle!

The “thanks” sentiment is from the Simply Succulents stamp set.

You are currently at Theresa McEntee-USA. Click on the following links to see more awesome creativity from around the world!

Thank you for visiting today!

Theresa

Product List
Posted in 2021 Stampin' Up! July-December Mini Catalog, 2021-2022 Stampin' Up! Annual Catalog, Designer Series Paper, Gratitude/ Thanks, Nature, Punch, Punch Art

Kylie’s Stampin’ Up!® International Blog Highlights Gallery- September 2021- Daisy Punch Fall Thank You card

Welcome to Theresa’s Treasures today for my Daisy Punch Fall Thank You card. I am using the Daisy and Medium Daisy Punches along with the rich colors in the Regals Designer Series Paper stack. All of these products are available for purchase in the 2021-2022 Stampin’ Up! Annual Catalog.

I am Theresa and I am a Stampin’ Up!® Demonstrator in Arizona, USA. If you do not have a Stampin’ Up! Demonstrator, live in the US, and would like a copy of the catalog, please send a request to my email: theresastreasures.az@gmail.com. I would love to help you get started on stamping and making you own cards!

Today I am taking part in Kylie Bertucci’s Monthly International Blog Highlights Gallery. The theme is- Thank You. On this gallery, you can see thank you cards made by people from all over the world! I hope you enjoy my card and take the time to see everyone else’s inspiring creations by visiting the gallery. You can get to the gallery by selecting the “Vote For Me” button at the end of this blog. Please remember to vote for my card!

About the Daisy Punch Fall Thank You card

Fall is one of my favorite times of year. I just love all of the rich colors which inspired me to make this Daisy Punch Fall Thank You card. I made this card with the following Stampin’ Up! colors: Cajun Craze, Pumpkin Pie, Crushed Curry and Old Olive. The Regals Designer Series Paper Stack which contains all of these colors is great for the background. The strips each measure 3/8 inch in width.

You also will see several embellishments I used to make the Daisy Punch Fall Thank You card extra special. The vintage Diamond Weave Ribbon #156507 and the Brushed Metallic Dots #156506 can be found in the 2021 Stampin Up! July-December Mini Catalog. The colorful sequins are from the Artistry Blooms Adhesive-Backed Sequins #152477 and can be found in the Stampin’ Up! 2021-2022 Annual Catalog.

Voila! Such a lovely combination of fall colors in this Daisy Punch Fall Thank You card!

Please vote for my card when you visit the Gallery by selecting the “Vote For Me” button below. Thank you!

Supplies

Select any photo to be directed to my Online Store.

Product List

Thanks for visiting! Happy stamping!

Theresa

Posted in 2020 August-December Mini Catalog, 2020-2021 Stampin' Up! Catalog, Animals, Designer Series Paper, Punch, Winter Holiday

Stampin’ Up!® Peace & Joy for a Cat Lovers Christmas

Good Morning! I hope you are getting started on a lovely day. I have a really cute card today using the Cat Punch and the Peace & Joy stamp set.

I just love the Stampin’ Up! color Pacific Point. It is just so soothing. I am also in love with the Snowflake Splendor Designer Series Paper (DSP) which is the snowy background. Right now you can get the DSP for 20% off during the Giant Year-End Closeout from December 8, 2020 to January 4, 2021. Shop HERE. Download the complete list of retiring products and discounts below.

The Peace & Joy stamp set has several large sentiments along with smaller strip sentiments to design your own personal sentiment. It is also on the retiring list.

Measurements: Whisper White Card Stock (CS) card base: 4 1/4 x 11 inches with a score line at 5 1/2 inches; Pacific Point CS: 4 1/8 x 5 3/8 inches and 3 x 4 inches; Snowflake Splendor DSP: 4 x 5 1/4 inches; and Whisper White CS: 3 x 3 inches, 1 1/2 x 4 inches and 1/2 x 3 inches.

Stamp the “Peace” sentiment in Pacific Point ink onto the 1 1/2 x 4 inch Whisper White CS. Stamp the sentiment “To you and yours” onto the 1/2 x 3 inch Whisper White CS. Note: When using the Photopolymer stamps, you will need something underneath like the Stampin’ Pierce Mat or a catalog to get the best image.

Fussy cut the sentiments with your Paper Snips and set aside.

Use the 2 1/4 inch Circle Punch to punch a circle on the upper portion of the Snowflake Splendor DSP in the middle. The DSP in this photo is upside down. Be sure to push the DSP all the way down into the punch.

Adhere the 3 x 3 inch Whisper White CS to the back of the Snowflake Splendor DSP covering the 2 1/4 inch circle. I am using a Silicon craft Sheet to avoid having the project stick to my table. Flip over and adhere the card piece to the 4 1/8 x 5 3/8 inch Pacific Point CS.

Punch the cat out of the 3 x 4 inch Pacific Point CS with the Cat Builder Punch. Adhere the cat in front of the “moon”.

Use Stampin’ Dimensionals to adhere the “Peace” sentiment under the cat. Adhere the “To you and yours” sentiment under the “Peace”.

Use your Bone Folder to fold the 4 1/4 x 11 inch Whisper White CS card base at the 5 1/2 inch score line. Adhere the cat card piece to the front of the card base.

Viola! You have a soothing card to send some peace to your favorite cat lover.

I really appreciate your visit today. I have been doing a 15-Day Christmas Card Challenge since December 1, 2020 if you would like to go to the previous posts and see lots of handmade Christmas card ideas. Please leave a comment and let me know which is your favorite.

Select any photo below to go directly to my Online Store.

Product List

Have a wonderful and creative day!

Theresa

Posted in 2020 August-December Mini Catalog, Designer Series Paper, Punch, Winter Holiday

Stampin’ Up!® Dove of Hope Peace on Earth Brightly Gleaming Holiday Card

Hello! This is day 2 of my 15-day Christmas Card Making Challenge. Today I am using Circle Punches and Designer Series Paper to make a shiny Holiday card.

This brightly gleaming Holiday card is made with the Dove of Hope stamp set (#153406) and the aptly named Brightly Gleaming Designer Series Paper (#150429).

Measurements: Mossy Meadow Card Stock (CS) card base: 5 1/2 x 8 1/2 inches with a score line at 4 1/4 inches; Very Vanilla CS: two at 4 x 5 1/4 inches and 2 1/2 x 4 inches; Brushed Metallic CS in copper: 2 5/8 x 5 1/8 inches and 2 3/4 x 4 inches; Brightly Gleaming DSP: 2 1/2 x 5 inches. The bow is made with the Old Olive ribbon from the All the Trimmings Ribbon Combo Pack.

Use the Mossy Meadow ink to stamp the sentiment “Peace On Earth” onto the 2 1/2 x 4 inch Very Vanilla CS. Stamp the branch below the sentiment as shown.

Use the 2 inch Circle Punch to punch out the sentiment. Set aside.

Stamp a branch onto the upper right-hand corner of one of the 4 x 5 1/4 inch Very Vanilla CS pieces. Add the ornament and the sentiment. This is the inside of the card.

Adhere the Brightly Gleaming DSP to the Brushed Metallic CS, then adhere them to the second 4 x 5 1/4 inch Very Vanilla CS card piece.

Use the Bone Folder to fold the Mossy Meadow CS card base in half at the 4 1/4 inch score line. Open the card base and adhere the 4 x 51/4 inch Very Vanilla inside card piece to the inside of the card base.

Adhere the prepared Very Vanilla CS and DSP card piece to the front of the Mossy Meadow CS card base.

Use the 2 1/4 inch Circle Punch to punch out a circle from the 2 3/4 x 4 inch copper Brushed Metallic CS. Adhere the “Peace On Earth” circle to the copper circle.

Use Stampin’ Dimensionals to adhere the sentiment piece to the card front. Use a Mini Glue Dot to adhere the bow. Note: I made a double bow by using the Bow-Easy™© by the Posi-Bendr Company.

Now for the Bling! Even though the Gilded Gems are gold and the card is more copper-colored, I thought the gems would add some more sparkle.

Use the Take Your Pick tool to easily transfer the Gilded Gems from the acetate to the front of your card.

Viola! You have a brightly gleaming Holiday card to wish some “Peace On Earth” to someone this Holiday season!

If this is your first visit to my blog, check out the post from yesterday. I am participating in a 15-day Christmas Card Challenge and I started on December 1st. Thanks for stopping by! Please leave me a comment and let me know how I am doing.

Select any photo below to go to my Online Store and start shopping.

Product List

Have a most wonderful day! Happy crafting!

Theresa

Posted in 2020 August-December Mini Catalog, 2020-2021 Stampin' Up! Catalog, Punch, Punch Art, Winter Holiday

Stampin’ Up!® Perfectly Plaid Christmas Card

Hello! Happy November! I can’t believe how fast this year is going for me! I am showing a Christmas card today because I am worried I will not be able to create and send all of my Christmas cards on time. It is good to get started early. However, I am not forgetting Thanksgiving. I plan to do a few Thanksgiving cards in the blogs over the next few weeks.

This is a fun and simple Christmas card using the Perfectly Plaid stamp set, the Pine Tree Punch and the ‘Tis The Season Designer Series Paper (DSP). You will find the Perfectly Plaid stamp set and Pine Tree Punch in the 2020-21 Stampin’ Up! Annual Catalog. The ‘Tis The Season DSP is in the 2020 Stampin’ Up! August-December Mini Catalog. Let’s get started!

Measurements: Whisper White Card Stock (CS): 4 1/4 x 11 inches with a score line at 5 1/2 inches and 2 1/4 x 4 inches; Real Red CS: 4 x 5 1/4 inches; and ‘Tis The Season DSP 2 x 5 1/4 inches and 4 different designs at 2 1/4 ix 6 inches.

Using Garden Green ink, stamp the sentiment “Merry Christmas” on the 2 1/4 x 4 inch Whisper White CS leaving space around the sentiment so you can punch it out. Stamp the sentiment “Hoping that your busy year…” on the inside of the 4 1/4 x 11 inch Whisper White CS card base.

Use the Everyday Label Punch to punch out the sentiment “Merry Christmas”. Set aside.

Get together the Pine Tree Punch and the 4 ‘Tis The Season DSP strips that measure 2 1/4 x 6 inches.

Punch out one Pine Tree from each strip of ‘Tis The Season DSP.

Adhere the 2 x 5 1/4 inch strip of the ‘Tis The Season DSP to the 4 x 5 1/4 inch Real Red CS. Fold the 4 1/4 x 11 inch Whisper White CS card base at the 5 1/2 inch score line and use the Bone Folder to make the fold crisp. Adhere the Real Red/DSP card piece to the front of the Whisper White CS card base.

Position all of the Pine Trees and the sentiment on the card front. Adhere two of the Pine Trees flat.

Adhere the third Pine Tree and the sentiment with Stampin’ Dimensionals.

Adhere the fourth Pine Tree to the inside of the card.

Now for the Bling! The Champagne Rhinestone Basic Jewels and the Star Designer Elements can both be found in the 2020-2021 Stampin’ Up! Annual Catalog.

Place a star over each tree and then scatter the Champagne Rhinestone Basic Jewels.

Viola! You have a fun and simple Christmas card!

Thank you so much for stopping by today. Announcements: Be sure to order from the Stampin’ Up! August-December Mini Catalog as soon as possible. Some items will sell out, and once they are on backorder you may not get them before Christmas. Consider purchasing a stamp kit as a gift. There are all inclusive kits in both the Annual and Mini Catalogs. If you would like a paper catalog, shoot me an email at: theresastreasures.az@gmail.com.

To get to my online store, click on any one of the photos below.

Product List

Have a wonderfully creative week!

Theresa

Posted in 2020-2021 Stampin' Up! Catalog, Birds, Punch

Posted For You Stampin’ Up!® Birthday Card for beginners

Posted for You is a fun Stampin’ Up!® stamp set in the 2020-2021 Annual Catalog that coordinates with the Rectangular Postage Stamp Punch.

The Love stamp in this stamp set reminds me of the Love Series of postage stamps. This Love postage stamp I believe is from 1982. I just love the colors and different flowers.

Today’s birthday card has its own Love stamp as well as some birds and flowers.

Measurements: Whisper White Card Stock (CS): 4 1/4 x 11 inches with a score line at 5 1/2 inches (this is the card base), 4 x 5 1/4 inches, three 2 1/2 x 4 1/2 inches and 1/2 x 4 1/2 inches; Gorgeous Grape CS: 3 1/2 x 4 inches; Highland Heather CS: 3 1/4 x 3 3/4 inches and 5/8 x 4 1/2 inches.

Use Memento ink to stamp one of each design onto the three 2 1/2 x 4 1/2 inch Whisper White CS pieces. Stamp the images about 1/4 inch away from the bottom edge so they will fit in the Rectangle Postage Stamp Punch.

Stamp the sentiment “Happy Birthday” in Memento ink onto the 1/2 x 4 1/2 inch Whisper White CS strip. Stamp about 1/4 inch away from the left edge of the Whisper White CS. Note: In this image I stamped too far away from the left edge. When I needed to use the Rectangle Postage Stamp Punch I had to trim off a little for it to fit properly.

Punch all of the stamped images out with the Rectangle Postage Stamp punch.

Punch the sentiment “Happy Birthday” out by using the Rectangle Postage Stamp Punch as shown. Do the same with the 5 /8 x 4 1/2 inch Highland Heather CS strip.

I colored the stamped images with the Watercolor Pencils Assortment 2 using the colors pictured above.

I used a heavy hand with the darker areas then lightly added color over the top to create a little more depth. Note: If you have a hard time sharpening the Watercolor Pencils, invest in a metal sharpener from an art supply store. I have found that a dull sharpener just makes the pencil tip crumble. Of course, that could also be due to living in the dry climate here in Arizona.

Adhere the stamped images and the sentiment to the corresponding Highland Heather CS.

Adhere the 3 1/4 x 3 3/4 inch Highland Heather CS to the 3 1/2 x 4 inch Gorgeous Grape CS. Now adhere the stamped image piece to the 4 x 5 1/4 inch Whisper White CS. Adhere the sentiment to the 5/8 inch piece of Highland Heather CS and then to the card front.

To add a little dimension to this card I cut the Foam Adhesive Sheets into 1/4 inch strips and placed them on the back of the 4 x 5 1/4 inch Whisper White CS as shown.

Fold the 4 1/4 x 11 inch Whisper White CS card base at the 5 1/2 inch score line using the Bone Folder so you get a crisp fold. Adhere the 4 x 5 1/4 inch Whisper White CS panel to the front of the card base.

Viola! You have made a lovely birthday card! Please leave a comment below and let me know what you think. What do you like about the post? Is there anything I could improve on?

Thanks for visiting. I hope you give this card a try. I found it to be very relaxing to color the images.

Click on any of the photos below to go to my Online Store.

Product List

Have a most wonderful week!

Theresa

Posted in Designer Series Paper, Inspiration, Mini Catalog 2020, Punch

Bonus! Card and Bookmark from one 6 x 6 inch Best Dressed Designer Series Paper!

This is a great way to use most of the 6 x 6 inch piece of a Designer Series Paper (DSP). I know a lot of folks don’t really read a real live book anymore, but you can use the bookmark in your planner, recipe book, Bible, etc. Nonetheless, an inspirational card and bookmark is a wonderful handmade gift to give someone.

Measurements: Whisper White cardstock (CS): 8 1/2 x 5 1/2 inches with a score line at 4 1/4 inches, 6 1/4 x 2 inches, 5 x 2 inches and 5 x 2 1/2 inches; Best Dressed DSP: 6 x 6 inches (I will show you how to cut to 5 1/4 x 4 inches and 5 1/4 x 1 3/4 inches); and Melon Mambo CS: 5 x 2 inches. You will also need the following Punches: 1 3/4 inch Circle, Pretty Label, Butterfly Duet and Scalloped Tag Topper.

Using the new Stampin’ Up! Paper Trimmer, make the first cut on the Best Dressed DSP at 5 1/4 inches.

Turn the paper 90 degrees. The second cut is at 4 inches. The larger piece is 5 1/4 x 4 inches, which is what you will need for the card front. The smaller piece is 5 1/4 x 2 inches. Tip: I labeled the cutting blade “CUT” and the score blade “SCORE” so I would remember which was which. It is so sad when you accidentally CUT when you meant to SCORE!

The third cut will trim the 5 1/4 x 2 inches down to 5 1/4 x 1 1/4 inches. This will be the piece for the bookmark. You will end up with a little bit of left over DSP, but not much.

Now for some stamping! I love the Butterfly Wishes stamp set because there are several different types of butterflies. These two happen to coordinate with the Butterfly Duet Punch. Stamp the larger butterfly in Melon Mambo ink onto one end of the 5 x 2 1/2 inch Whisper White CS. Stamp the smaller butterfly in Melon Mambo ink on the other end.

There are two sentiments, one for the card and one for the bookmark. Stamp the sentiment “Love to celebrate you” in Melon Mambo ink in the center of one end of the 5 x 2 inch Whisper White CS. Stamp the other sentiment “It was a perfect day because of you” in the center of the other end. Be mindful about the placement so that the punches will be able to go around the sentiments.

The punches are the 1 3/4 inch Circle Punch and the Pretty Label Punch. Use the Circle Punch to punch out the sentiment “Love to celebrate you”. Tip: I find it easier to use the punches if I lay them upside down on the table and use the heel of my hand to push down firmly and quickly.

Use the Pretty Label Punch to punch out the sentiment “It was a perfect day because of you”.

Punch out a Pretty Label using the Melon Mambo CS.

Use the Butterfly Duet Punch to punch out the two butterflies.

Punch out the smaller butterfly first, then the larger butterfly.

Use the Scalloped Tag Topper Punch with the 6 1/4 x 2 inch Whisper White CS to make the bookmark. Tip: This punch is a little different. I do flip it upside down so I can see where the paper is, but you need to squeeze it firmly and quickly to make it punch the paper. It may be better to squeeze with both hands.

Gather all the pieces as shown above to make the bookmark.

Adhere the 5 1/4 x 1 3/4 inch DSP to the Whisper White CS bookmark.

Use Stampin’ Dimensionals on the back of the sentiment and the small butterfly. Adhere these to the bookmark.

For a finishing touch, I used 6 inches of the 5/8 inch Polka Dot Tulle Ribbon and then tied a bow around it with 10 inches of Whisper White Bakers Twine.

Use the Bone Folder on the 8 1/2 x 5 1/2 inch Whisper White CS to get a nice crisp fold at the 4 1/4 inch score line. This is the card base. Adhere the 5 1/4 x 4 inch Best Dressed DSP to the front of the card base.

Adhere the Melon Mambo CS Pretty Label to the back of the Pretty Label with the sentiment on it.

Apply Stampin’ Dimensionals to the back of the sentiment label and the large butterfly. Adhere the sentiment to the card front.

I had to remove one of the Stampin’ Dimensionals so that the butterfly would sit properly over the label with the sentiment.

Tie a bow with 10 inches of the 5/8 inch Polka Dot Tulle and one with 10 inches of the Whisper White Bakers Twine. Use Glue Dots to adhere the bows to the card front.


Viola! You have a beautiful card! But wait……

Viola! You have a beautiful card and a matching bookmark! What a great gift to give to someone to uplift their spirits!

Thanks for joining me. I hope you try this out. It is a lot of fun to make! Remember that the new Annual Catalog is just around the corner, and there are many stamp sets, punches, dies and embellishments which are retiring. Go to my online store by clicking SHOP HERE and look at the Last Chance Products. There are several on sale, some at 60% off! Let me know if I can be of assistance in placing your order. Contact me in a comment on this blog, private message me on my Theresa’s Treasures Facebook page by clicking HERE, or send me an email at: theresastreasures.az@gmail.com. Also notify me if you would like a 2020-2021 Stampin’ Up! Annual Catalog mailed to you. I would love to have you as my customer!

To purchase a product listed below, click on the photo and you will go to my Online store.

Product List
Posted in Punch

Get Well World with Timeless Tulips

Hello and welcome to my blog today. In the midst of the Coronavirus, I decided to make a Get Well card for the World. There is so much healing that needs to be done right now. I know some of you have been affected more than others. I hope all of you and your families stay safe and well, and if anyone has gotten sick, I hope they recover completely.

I love the Timeless Tulips stamp set by Stampin’ Up!® and felt it was perfect for this card. The bright colors are Poppy Parade and Mango Melody.

Measurements: Poppy Parade cardstock (CS): 8 1/2 x 5 1/2 inches with a score line at 4 1/4 inches; Mango Melody CS: 5 3/8 x 4 1/8 inches; Whisper White CS: 5 1/8 x 3 7/8 inches, 5 x 3 inches and a 3 x 1/2 inch strip. You will also need a Whisper White CS that is 5 1/4 x 4 inches for the inside of the card.

Use the Poppy Parade ink to stamp the sentiment “Get Well Soon” onto the 3 x 1/2 inch strip of Whisper White CS. Use the largest tulip and stamp it in Poppy Parade ink onto the 5 x 3 inch Whisper White on the far right hand side. Tip: This is a Photopolymer stamp and you will get the best image if you stamp onto the Stampin’ Pierce Mat or use your Stampin’ Up! catalog. I cover my Stampin’ Pierce mat in white paper so the ink gets absorbed into the paper. The black cardstock is just to help you see the card piece better.

Now stamp the largest tulip in Poppy Parade ink in the upper left hand quadrant of the 5 1/8 x 3 7/8 inch Whisper White CS.

Add another large tulip on the right hand side in the center. Now use the smaller tulip and stamp it in Poppy Parade just under the large tulip in the upper left hand quadrant.

Using the Mango Melody ink, stamp the large tulip slightly higher and to the right of the one in the left upper quadrant. Stamp the tulip bud in Mango Melody just under the large Poppy Parade tulip on the right.

Stamp another large tulip onto the 5 x 3 inch Whisper White CS next to the Poppy Parade tulip. Stamp the fattest leaf in Granny Apply Green ink to the far left. Tip: Before you stamp an image that will be punched out, look at the punch to determine the placement. More on that later.

Continue to use the Granny Apple Green ink for the stems and leaves. There are two long stems. One leans to the right and the other is more straight. I used the one that leans to the right for the three tulips on the right.

Use the straighter stem on the tulips to the left.

Use the fattest leaf to stamp three leaves in Granny Apple Green ink.

With the Granny Apple Green ink use one of the skinny leaves to stamp a couple of leaves, then use the other skinny leaf to stamp a couple more leaves. This gives a nice variety of leaves and makes the bouquet look full.

Now you will see why I stamped the images the way I did. First punch out the leaf. There should be plenty of space to avoid punching out the Mango Melody tulip.

Punch out the Mange Melody tulip, then the Poppy Parade tulip last.

Apply Stampin’ Dimensionals to the back of each of the tulips and the leaf.

Tip: To make the Stampin’ Dimensionals last a little longer, I cut them in half as shown. This is much faster than cutting each one in half before you use it.

Adhere the Mango Melody tulip, then the Poppy Parade tulip. Next adhere the fat Granny apple Green leaf to the center of the bouquet.

Here is the completed card front.

Fold the 8 1/2 x 5 1/2 inch Poppy Parade cardstock at the 4 1/4 inch score line and use the Bone Folder to make the fold nice and crisp. This is the card base. Adhere the 5 3/8 x 4 1/8 inch Mango Melody CS to the front of the card base.

Adhere the stamped card piece to the card front.

Trim the sentiment a bit on each end. We are going to cut a banner end. The easiest way to make the banner symmetrical is to start with a center cut.

The next cut is from the upper corner to the top of the center cut. Repeat from the other corner.

Cut a banner end on both ends of the sentiment

Apply Stampin’ Dimensionals to the back of the sentiment and adhere it to the card front.

And Viola! You have a beautiful, soothing Get Well card. But wait….

You can step up the card a bit by adding a bow with a Glue Dot. This is the Crushed Curry 3/8 inch Seam Binding Ribbon in the Stampin’ Up! 2019-2020 Annual Catalog. Even though it is a different color than the Mango Melody, it seems to work well. But that is not all…..

There is always Bling! I added some colored rhinestones from the Holiday Rhinestone Basic Jewels to add some sparkle. Any of the 3 versions of this card would send a soothing Get Well Wish to someone who needs it. I am sending out Get Well Wishes to everyone and to Mother Earth as well.

Thank you so much for visiting today. I really enjoyed making this card. I hope you give it a try. The Timeless Tulips stamp set is wonderful to make cards for various occasions- Sympathy, Wedding, Friendship, Love, Birthday, Mother’s Day and Easter to name a few. This is a great stamp to start out with if you are just beginning to stamp at home because of its versatility.

I am an Independent Stampin’ Up!® Demonstrator and am happy to help you be more creative at home. If you need help starting out, please send me an email at theresastreasures.az@gmail.com or message me on Facebook at Facebook.com/theresastreaures.az/

Click on any image below to get to my Online Store and view that product.

Product List

Best wishes to you all for good health and healing!

Posted in balloons, Mini Catalog 2020, Punch, Sale-A-Bration 2020

Birthday Balloon Bling – Layered with Kindness

Well hello again! Great to have you visiting my blog. Today I created a very simple Birthday card with a lot of rhinestone bling and balloons!

This is a really tough time for us all, being stuck at home and not being able to hug each other for support. My goal was to create a sunny, happy card today. I love the way it turned out!

The Stampin’ Up! Layered With Kindness stamp set has a great Happy Birthday sentiment. There is a coordinating Label Me Lovely Punch to make it very fancy.

Measurements: Whisper White Card stock (CS): 8 1/2 x 5 1/2 inches with a score at 4 1/4 inches and a 3 1/2 x 2 1/2 inch piece to stamp on; Daffodil Delight CS: 5 1/4 x 4 inches; Grapefruit Grove CS: 4 1/2 x 2 3/4 inches; Birthday Bonanza Designer Series Paper (DSP):4 1/2 x 2 1/2 inches; and Terracotta Tile CS: 3 1/2 x 2 1/2 inches.

Stamp the “Happy Birthday” sentiment in Terracotta Tile ink onto the 3 1/2 x 2 1/2 inch piece of Whisper White CS. Use the Label Me Lovely Punch to punch the stamped image out.

Punch out a Lovely Label using the 3 1/2 x 2 1/2 inch piece of Terracotta Tile CS.

Cut the label in half diagonally from one corner to the other as shown.

Adhere the Terracotta Tile label to the “Happy Birthday” sentiment piece leaving just a small border on the top of the sentiment label. Tip: I use the Silicon Craft Sheet for gluing to keep the glue off of my table.

Now add the bottom half of the Terracotta Tile label to the sentiment label. Trim any edges as needed. Set aside.

Adhere the Grapefruit Grove piece to the balloons from the Birthday Bonanza DSP.

Cut a 4 inch piece of the Daffodil Delight 1/4 inch Ruched Ribbon. Apply a Glue Dot to each end.

Position the ribbon, then flip and push on the Glue Dots to adhere it in place.

Use the Bone Folder to get a nice crisp fold at the 4 1/4 inch score line on the 8 1/2 x 5 1/2 inch Whisper White CS to make the card base. Adhere the 5 1/4 x 4 inch Daffodil Delight CS to the front of the card base.

Apply Stampin’ Dimensionals to the back of the balloon piece.

Adhere the balloon piece to the card front, slightly to the right of center.

Apply a Stampin’ Dimensional to the back of the “Happy Birthday” piece behind the “Birth” side of the piece. Apply Tombow Multipurpose Liquid Glue or Snail Adhesive tape to the “Day” side.

Adhere the sentiment label to the left upper portion of the card front.

Tie a bow with the Daffodil Delight 1/4 inch Ruched Ribbon and apply a Glue Dot to the back.

Adhere the bow to the card front.

Now add the Bling! Put as many Rhinestones as you desire. I ended up using 9 rhinestones! Tip: Use the Take Your Pick tool for transferring the rhinestones from the package to the card.

And Viola! You have a bright, cheery Birthday Balloon with Bling! card to send to someone!

As I said earlier, this is a tough time. It is so important to stay optimistic. Crafting is a way to stay positive and then spread that positive feeling to someone else by sending them the card you make. I did a challenge for myself since I had many cards stashed away. I decided to send a card to someone each day for 30 days. It was a great way to get my cards out to someone and hopefully spread some hope and joy!

Sale-a-bration is winding down. The best deal of the year will only be available until March 31, 2020. There are many FREE products to choose from when you place a $50 order at my Stampin’ Up! Online Store. Click on the Stampin’ Up! Online store to connect directly to my store.

I am an Independent Stampin’ Up Demonstrator and would be happy to help you gather the supplies you need to do some crafting. Send me an email at: theresastreasures.az@gmail.com or private message me through my Facebook page at: https://www.facebook.com/theresastreasures.az/. I would also love to have you on my team of demonstrators. If you are interested, let me know.

Thanks for visiting today. I hope you feel a little more hope and joy. Hang in there!

Stampin’ Up! Products included: Stamp Set: Layered With Kindness #151655; Punch: Label Me Lovely #151296; Paper: Whisper White CS #100730, Daffodil Delight CS #119683, Grapefruit Grove #146972, Terracotta Tile CS #150884 and Birthday Bonanza DSP #151313; Ink: Terracotta Tile #150086; Clear Blocks: D #118485; Silicon Craft Sheet #127853; Bone Folder #102300; Take Your Pick tool #144107; Adhesives: Tombow Multipurpose Liquid Glue #110755, Stampin’ Dimensionals #104430 and Glue Dots #103683; Embellishments: Daffodil Delight 1/4 inch Ruched Ribbon #153815 and Rhinestone Basic Jewels #144220.