The New Horizons Designer Series Paper (DSP) available in the Stampin’ Up! 2022 Mini Catalog is just gorgeous on its own. Combine that with the On the Horizon stamp set and you can create some awesome scenes with the #SimpleStamping Technique. You end up with wonderfully beautiful scenes with very minimal work on your part!
The following cards were part of my last Zoom Card Making Class. Here is an example of a really quick and simple scene using Evening Evergreen and Blackberry Bliss Inks.
Measurements for above card
Night of Navy Card Stock (CS) card base: 5 1/2 x 8 1/2 inches with a score line at 4 1/4 inches.
New Horizons DSP: 4 x 5 1/4 inches. Cut a 1/2 x 5 1/4 inch strip for the inside.
Basic White CS: 4 x 5 1/4 inches (inside of card)
Instructions
Use the Evening Evergreen Ink to stamp the sentiment “Relax & Enjoy Your Day” in the lower left corner.
Stamp the trio of trees three times across the horizon.
Finish by stamping the birds a few times in Blackberry Bliss Ink.
Voila! That’s it!
If you like to decorate the inside you can do some simple stamping. Add the 1/2 x 5 1/4 inch New Horizons DSP for something extra special. The sentiment is from the Peaceful Moments stamp set.
Here are a few more samples of the way I used the #SimpleStamping Technique to easily and quickly create a series of gorgeous cards! And some of the cards have a very masculine feel for your special guy.
I stamped on the New Horizons DSP, then cut it into 3 pieces to give this card a different look.
Thank you so much for visiting today. I hope you have a wonderful day and have some time to do some crafting! Join me for my next Zoom Card Making Class on April 9, 2022. For more information click HERE.
Hello my fellow crafters! Happy Friday and welcome to my Friday Fun Fold! Today’s card is an Easter card made with Stampin’ Up!® Easter Friends stamp set!
Measurements & Supplies
Daffodil Delight Card Stock (CS) card base: 5 1/2 x 5 3/4 inches with a score line at 1 1/2 inches with the 5 3/4 inch side on top
Daffodil Delight CS: 1 1/2 x 5 1/2 inches and 3 x 4 1/4 inches
Basic White CS: two at 2 3/4 x 4 inches
Flowering Fields Designer Series Paper (DSP): 4 x 5 1/4 inches and two at 1 1/4 x 5 1/4 inches
Bumblebee 1/4 inch Gingham Ribbon
Iridescent Rhinestone Basic Jewels
Ink: Soft Suede, Evening Evergreen and Mango Melody
Stamping
On the first 2 3/4 x 4 inch Basic White CS stamp the bunny in Soft Suede. The “Happy Easter” is done in Evening Evergreen Ink. On the second Basic White CS stamp the sentiment “sending warm and happy wishes this spring” also in Evening Evergreen Ink. The little chick is stamped in Mango Melody Ink.
Assembling the Card
Adhere the bunny card piece to the 3 x 4 1/4 inch Daffodil Delight CS. Adhere one of the 1 1/4 x 5 1/4 inch Flowering Tulip DSP to the 1 1/2 x 5 1/2 inch Daffodil Delight CS. Adhere the other 1 1/4 x 5 1/4 inch Flowering Tulip DSP to the corresponding space on the Daffodil Delight CS card base as shown. Adhere the 4 x 5 1/4 inch Flowering Fields DSP to the inside of the card base.
Adhere the little chick card piece to the inside of the card. Close the card and lay the 1 1/2 x 5 1/2 inch Daffodil Delight CS/DSP piece in place on the right. Apply adhesive to the left and right edges of the bunny card piece and adhere to the card.
Tie a small bow with the Gingham Ribbon and use a Mini Glue Dot to adhere the bow to the bunny. Add the Iridescent Rhinestone Basic Jewels and Voila! you are all set for a Happy Easter!
I am so excited to be participating in Kylie Bertucci’s International Blog Highlight Gallery with Stampin’ Up! demonstrators from around the world! The theme for the Gallery is “Thank You”. My Happy Hedgehogs Thank You card was inspired by a Mystery Stamping that I participated in with my stamping buddies. Please go to the Gallery to view all of the different projects. While you are there, please vote for my Stampin’ Up! Happy Hedgehogs card.
This is an adorable Fun Fold!
Supplies
Stampin Up Happy Hedgehogs Thank You card
Real Red Card Stock (CS): 4 1/4 x 11 inch card base with a score line at 5 1/2 inches
Crumb Cake CS: 4 x 5 1/4 inches
Very Vanilla CS: 4 x 5 1/4 inches, 3 3/4 x 5 inches, a scalloped rectangle from Scalloped Contours Dies and a scrap of 2 x 3 1/2 inches
Hand-Penned Designer Series Paper (DSP): 2 x 5 inches
Real Red Double-Stitched Ribbon: 6 1/4 inches
Stamp Sets: Happy Hedgehog and Pansy Patch (sentiment)
Card Base
The Real Red card base for this card is easy to make. Above is a pattern. Use your Stampin’ Up! Trimmer and make a score line from the right upper corner to the lower middle. The panel on the right is the card front.
Stamping
Use Memento Black Ink to stamp the images on the Scalloped Contour Die cut rectangle. Color with the Stampin’ Blends in Real Red, Old Olive, Petal Pink, Bronze and Ivory. Stamp the other hedgehog and a mushroom onto the scrap of Very Vanilla CS and color.
Assembly
Adhere the 2 x 5 inch Hand-Penned DSP to the 3 3/4 x 5 inch Very Vanilla CS. Wrap the ribbon around and use Mini Glue Dots to adhere in place. Adhere to the 4 x 5 1/4 inch Crumb Cake CS.
Apply adhesive below the score line on the front of the Real Red CS card base. Adhere the above card piece in place. Note: Do not put adhesive all the way to the outer edges. There is a 1/4 inch border.
Adhere the Scalloped Contour stamped card piece with Stampin’ Dimensionals to the front panel. Fussy cut the other hedgehog and mushroom. Adhere with Dimensionals to the 4 x 5 1/4 inch Very Vanilla CS. Adhere to the inside of the card.
Prop the front behind the hedgehog and mushroom on the inside. Voila!
Thanks for your visit today! Please click on the button below and vote for my card. Happy crafting!
Hello and good day my crafty friends! I have the third card in a series of easy to make and beautiful #SimpleStamping cards for you! The On the Horizon #SimpleStamping Relax Card. Click HERE to see the first card in the series. You can click HERE for the second card.
The New Horizons Designer Series Paper makes the On the Horizon #SimpleStamping Relax Card card so easy! And you can make these stunning cards quickly!
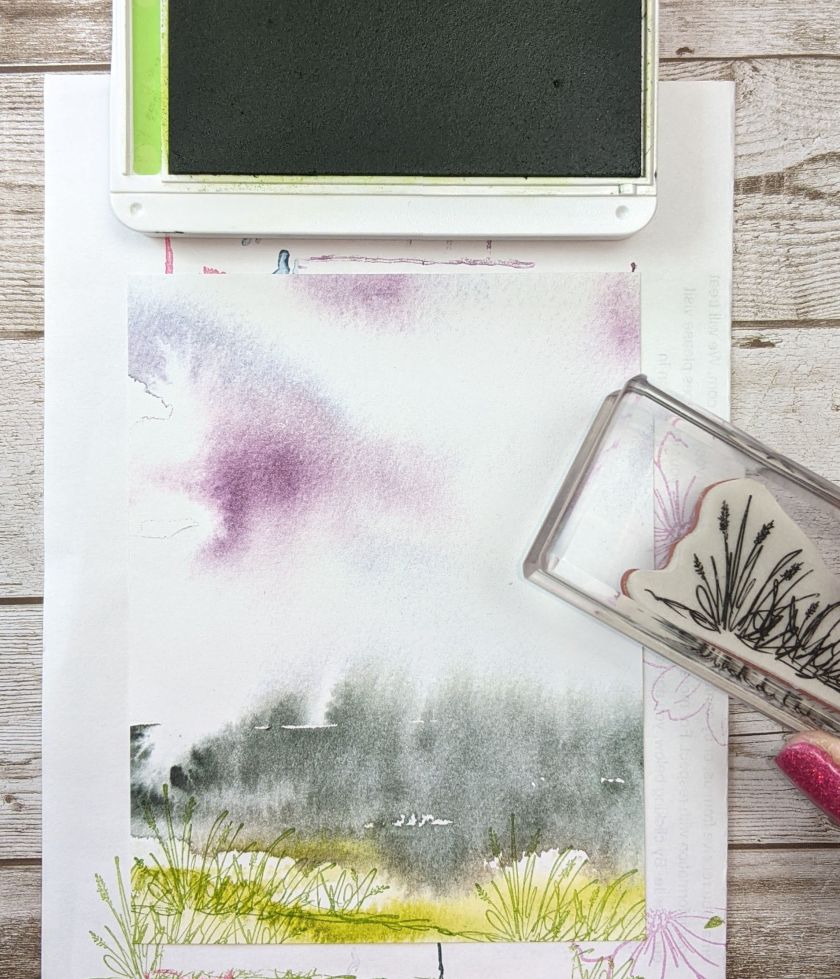
Here is the sheet of New Horizons Designer Series Paper (DSP) I chose for today’s card. Try to visualize a scene for yourself before you start to stamp.
Here is what I “saw”. Yours may be completely different.
Measurements
On the Horizon #SimpleStamping Relax Card
Evening Evergreen Card Stock (CS) card base: 5 1/2 x 8 1/2 inches with a score line at 4 1/4 inches.
Basic White CS: 4 x 5 1/4 inches
New Horizons DSP: 4 x 5 1/4 inches and a 1/2 x 5 1/4 inch strip.
Stamping
Start stamping with the Evening Evergreen Ink. First stamp the birds. Then stamp the clump of grass in the foreground.
Add the trees and the sentiment “Relax & Enjoy Your Day!”. Super easy!!
For the inside of the card, adhere the 1/2 x 5 1/4 inch strip of the New Horizons DSP to the bottom of the 4 x 5 1/4 inch Basic White CS. Stamp the trees in Evening Evergreen Ink. Add the birds and you’re done!
Assembling the Card
Adhere the inside of the card to the inside of the Evening Evergreen CS card base. Adhere the front to the front of the card base.
Voila! You have a stunning and relaxing scene to go with the “Relax & Enjoy Your Day” sentiment!
Thanks for stopping by today. Don’t forget to subscribe to my Newsletter. I am just starting out with this and need new subscribers. Thanks for all your support!
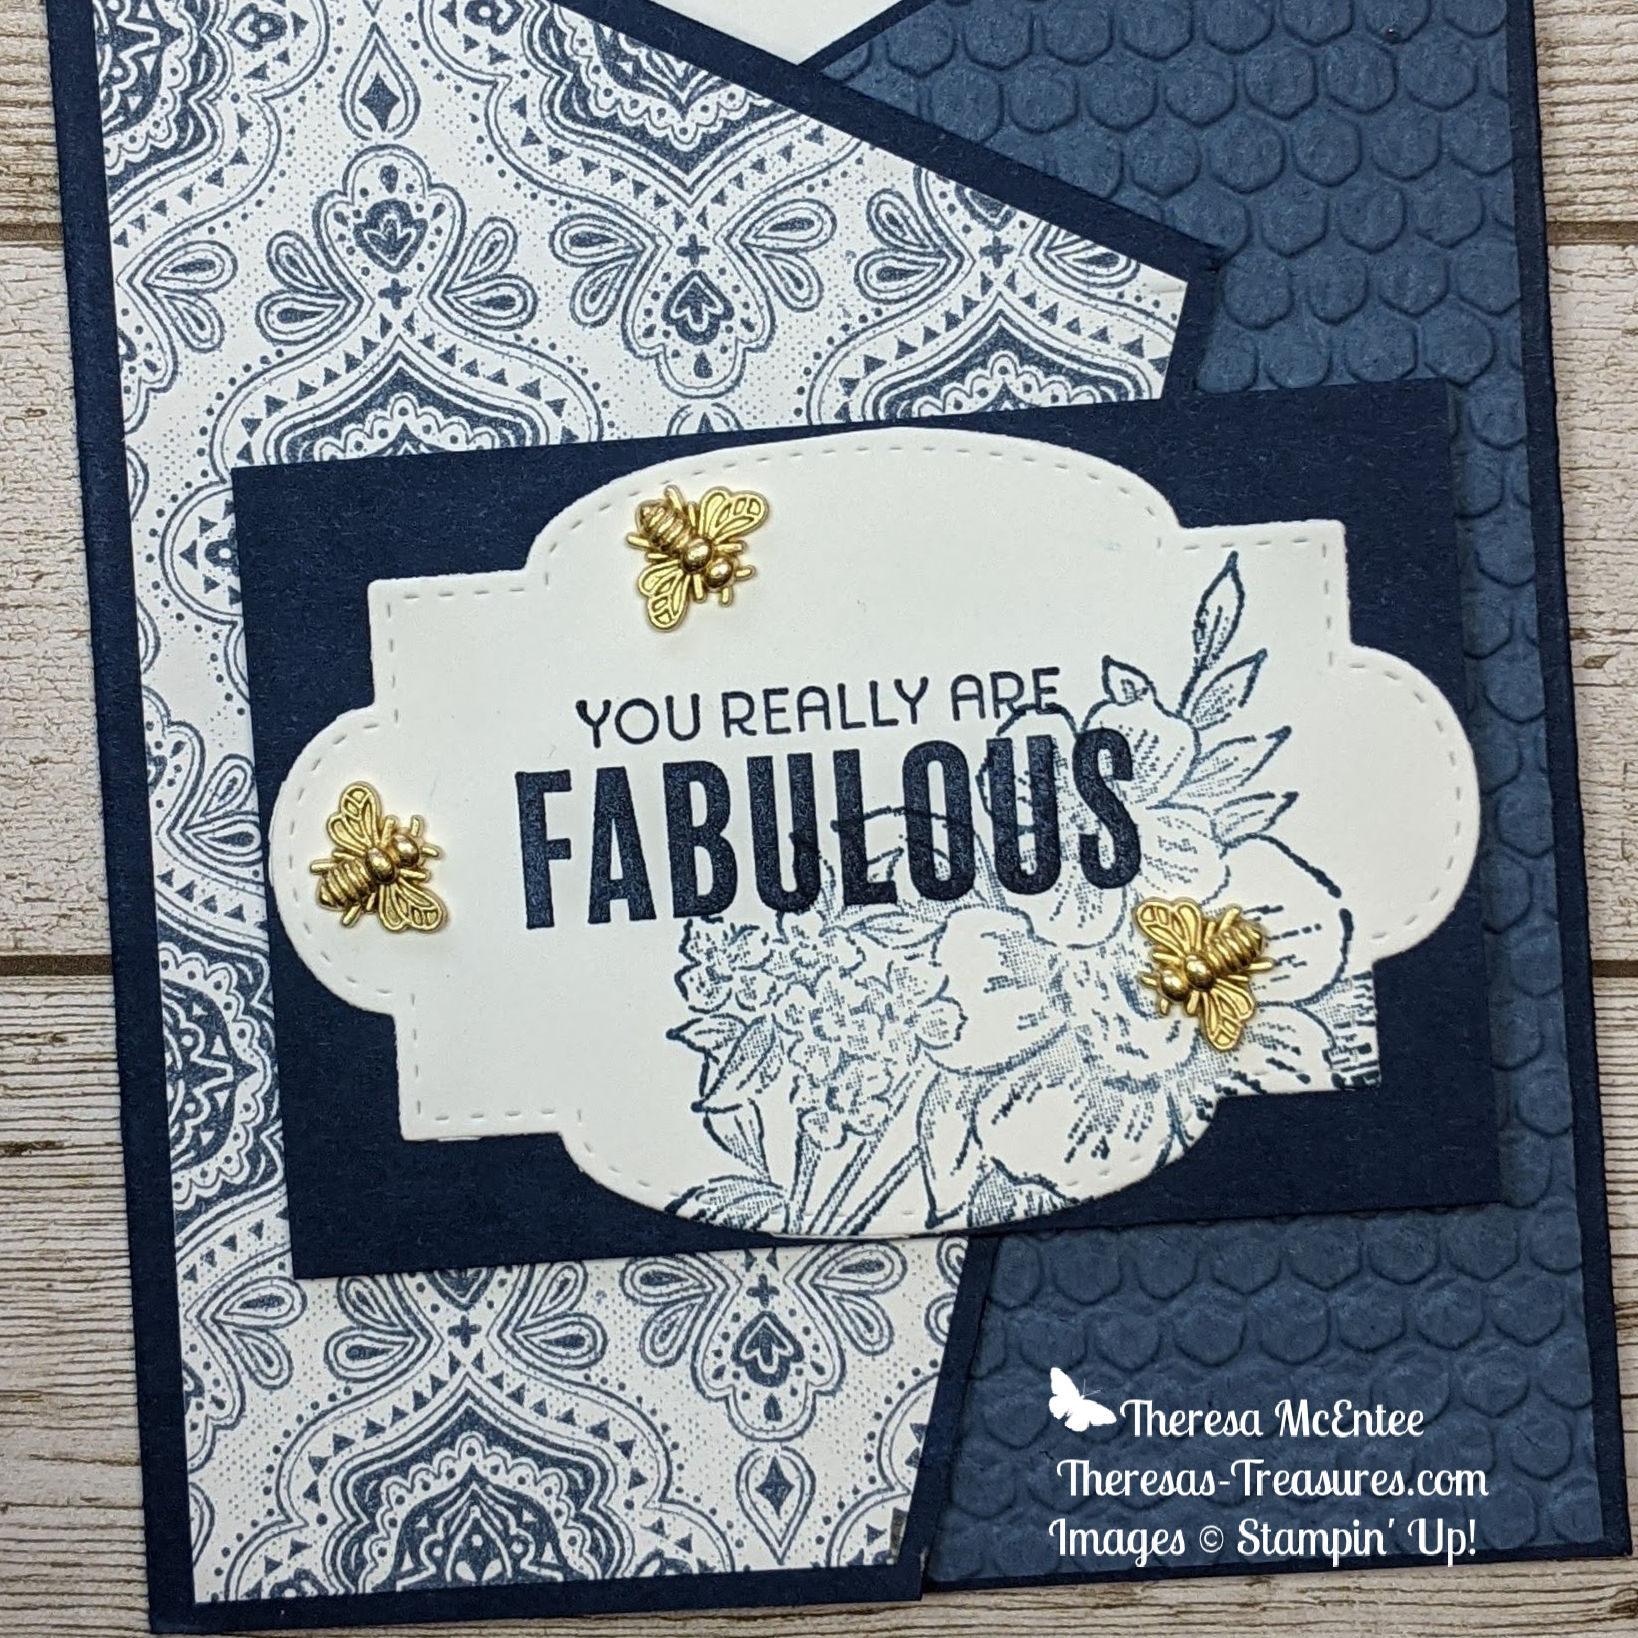
Hello! Yay for Friday! I have a nice Fun Fold card for you today using both the Blessings of Home and Slim Line Sayings stamp sets. The Heart & Home Designer Series Paper (DSP) really adds a beautiful touch.
I recommend trying to cut this card out with plain paper first. It took a couple of tries for me to get it the way I wanted. Hopefully you’ll get it on the first go around!
Measurements
Blessings of Home and Slim LineSayings You Are Fabulous Fun Fold Card
Night of Navy Card Stock (CS) card base: 5 1/2 x 11 inches
Night of Navy CS: 2 3/8 x 3 1/2 inches
Misty Moonlight CS: 3 1/8 x 5 1/4 inch
Basic White CS: 4 x 5 1/4 inch, 3 1/8 x 5 1/4 inches, and a label from the Stitched So Sweetly Dies
Heart & Home DSP: 3 1/8 x 5 1/4 inches
Ink: Night of Navy and Misty Moonlight
Preparing the Card Base
First make a score line at 3 3/8 and 7 5/8 inches. Then make a small notch on the horizontal axis at 1 1/8 and 9 7/8 inches, and on the vertical axis at 1 3/4 inches on each side.
Next make a cut between the score line and notch on the upper part of the card base bilaterally. Finally, cut between the 1 3/4 inch notch on the side and the notch on the bottom bilaterally.
Preparing the Front Panels
I found it easiest to make a pattern to use for this piece. Make a notch on the 3 1/8 x 5 1/4 inch Basic White CS 1 5/8 inches down the right-hand side and 1 1/8 inches in on the bottom from the right. Use this to cut the 3 1/8 x 5 1/4 inch Heart & Home DSP.
To make the other side, flip the pattern over. Note: This isn’t critical with a solid color, but would be if you were using a DSP on both panels. Cut the 3 1/8 x 5 1/4 inch Misty Moonlight CS. Then run this piece through the Stampin’ Cut & Emboss Machine with the Hive 3D Embossing Folder.
Stamping
Using the Misty Moonlight Ink Stamp Off once, then stamp the bunch of flowers from the Blessing of Home stamp set onto the label. Use the Night of Navy Ink to stamp the sentiment “You Really Are FABULOUS” onto the label. The sentiment is from the Slim Sayings stamp set.
Use the Misty Moonlight, Stamping Off once, to stamp the larger flowers onto the 4 x 5 1/4 inch Basic White CS. Then use the Night of Navy Ink to stamp the sentiment. This sentiment is in the Blessings of Home stamp set.
Assembling the Card
This is the back side of the card. Adhere the embossed Misty Moonlight CS to the left side and the Heart & Home DSP on the right.
Turn the card base over and adhere the inside panel.
Now adhere the sentiment label to the 2 3/8 x 3 1/2 inch Night of Navy CS. Place the sentiment label on the front of the card for placement.
Holding the sentiment in place, open the card. Draw a line with a pencil to mark the edge of the front of the card. Place Stampin’ Dimensionals where the label will adhere to the card front. Adhere the sentiment to the front of the card base.
Add some Bumblebee Trinkets and Voila! you have a fabulous card for someone fabulous!
Thank you for being so fabulous and visiting my blog. Have a fabulous Friday and a wonderful weekend!
Theresa
Stampin’ Up!® Promotions
Joining Special
Earn 2 FREE stamp sets of your choosing when you sign up to be a Stampin’ Up! demonstrator. Choose $125 of product for your Starter Kit and pay only $99 before shipping and handling! Join HERE. Contact me for more information at theresastreasures.az@gmail.com. Don’t delay-promotion ends February 28, 2022!
Paper Pumpkin Subscription
Answer the call of the wild—and your creativity—with the Safari Celebration Paper Pumpkin Kit. This playful, party-themed kit includes all the goodies and gear you need to create nine cards and coordinating envelopes in safari-inspired shapes and patterns you’ll go wild for! Make every occasion a celebration with this month’s amusing animals, beautiful botanicals, and celebratory sentiments.
Paper Pumpkin is a subscription kit. You earn FREE product when you order a pre-paid code from my Online Store. A pre-paid code will be sent in an email. Next, go to my Paper Pumpkin sign up and enter the code. You will get this Safari kit if you do so by February 10, 2022.
Paper Pumpkin Codes: just click on the link to order your Paper Pumpkin today!
You will get an email with the Pre-paid code. Then you will go to: https://bit.ly/subscribeTheresasTreasuresPaperPumpkin and enter the pre-paid code to start your subscription! Shoot me an email with any questions.
Celebrate Diversity
Lots of fun with diversity is coming on February 1, 2022. The All Together set will include 10 Stampin’ Blends for a range of skin colors. The images in the stamp set will celebrate diversity. Watch for more information on this fabulous set!
Get this FREE Creative Download from Stampin’ Up! for more on the celebration of diversity.
Thank you for your attention. If you need any assistance with your order please email me at theresastreasues.az@gmail.com
Happy day my crafty friends! I have a series of beautiful #SimpleStamping cards for you! I will show you the second one today. Click HERE to see the first card in the series.
Here is the scene for today. What do you see in your mind’s eye?
Here is my card with the addition of the birds, grass, trees and sentiment from the On the Horizon stamp set.
Measurements
New Horizons “Breathe” card
Granny Apple Green Card Stock (CS) card base: 4 1/4 x 11 inches with a score line at 5 1/2 inches
New Horizons DSP: 4 x 5 1/4 inch and a 3/4 inch strip for the inside
Basic White CS: 4 x 5 1/4 inches
Ink: Granny Apple Green, Blackberry Bliss and Evening Evergreen
Stamping
Start out with the Granny Apple Green Ink and the grass stamp from the On the Horizon stamp set. Stamp the grass on the lower portion. Next use the Evening Evergreen Ink and the small trees. Stamp some trees at full strength. For other trees Stamp Off once. This makes the trees more 3D.
To finish the card, use Blackberry Bliss Ink to stamp some birds and the sentiment “Breathe”. Now take a breath and admire your work.
Adhere the 3/4 inch strip of the New Horizons DSP to the 4 x 5 1/4 inch Basic White CS. This is the inside of the card. Use the Blackberry Bliss Ink to stamp some birds in the upper left-hand corner.
Adhere the inside panel to the inside of the Granny Apple Green CS card base. Then adhere the front panel to the front of the card base.
Voila! Gorgeous! And so simple!
Thanks for visiting today. I hope you try out this New Horizons DSP and make your own nature scenes.
Earn 2 FREE stamp sets of your choosing when you sign up to be a Stampin’ Up! demonstrator. Choose $125 of product for your Starter Kit and pay only $99 before shipping and handling! Join HERE. Contact me for more information at theresastreasures.az@gmail.com.
Why should you join my Stamping Gems Team?
you will be joining a group of stampers from all over the world who share your love of stamping
you can buy new product before customers
you have a 20% discount on future orders as long as you stay a demonstrator
if you decide you do not want to be a demonstrator, there is not any penalty for stopping
no pressure to buy or sell product
you can join my monthly Stamping Gems Team Meeting and do some Mystery Stamping
You can be a part of the Demonstrator Planning FB page, the #SU!ColorChallenge and the #SimpleStamping challenge
you can go to the Onstage Stampin Up Convention
Celebrate Diversity
Lots of fun with diversity is coming on February 1, 2022. The All Together set will include 10 Stampin’ Blends for a range of skin colors. The images in the stamp set will celebrate diversity. Watch for more information on this fabulous set!
Get this FREE Creative Download from Stampin’ Up! for more on the celebration of diversity.
Paper Pumpkin Subscription
Paper Pumpkin is a subscription kit. You earn FREE Saleabration product when you order a pre-paid code from my Online Store HERE. A pre-paid code will be sent in an email. Next, go to my Paper Pumpkin sign up and enter the code. You will get this Safari kit if you do so by February 10, 2022.
You will get an email with the Pre-paid code. Then you will need to go to: https://bit.ly/subscribeTheresasTreasuresPaperPumpkin and enter the pre-paid code to start your subscription! Shoot me an email with any questions you have.
Sunrise over Warren in Bisbee, AZ USA
Thank you for your attention. If you need any assistance with your order please email me at theresastreasues.az@gmail.com
Today I have a super quick and super simple Thank You card that looks fabulous!
I am so excited and thankful to be part of the Top 10 Winners Hop from Kylie Bertucci’s International Blog Highlights Gallery! Thank you to everyone who voted for my card from January’s International Blog Highlight, allowing me an opportunity to post on the Winners Hop today. Ten fabulous demonstrators from around the world will be posting today! The theme for the card today is “Thank you”.
The New Horizons Designer Series Paper (DSP) is so fabulous! I just love the watercolor backgrounds! This card is super easy to make.
Blackberry Bliss CS: 4 x 5 1/4 inches and 1/4 x 5 1/4 inch strip
New Horizons DSP: 4 x 4 3/4 inches and 5/8 x 5 1/4 inch strip
Basic White CS: 4 x 5 1/4 inches
Assembly
Use the Blackberry Bliss Ink to stamp the birds onto the New Horizons DSP
Use Night of Navy Ink to stamp the “thank you” sentiment (from the Free As A Bird stamp set)
Cut the New Horizons DSP at 1 3/4 inches for the bottom, and 1 1/2 inches each for the top two pieces.
first adhere the New Horizons DSP to the 4 x 5 1/4 inch Blackberry Bliss CS
then adhere the Blackberry Bliss CS/DSP to the front of the Misty Moonlight CS card base.
Finally adhere the strips of the Blackberry Bliss CS and New Horizons DSP together and then to the right side of the 4 x 5 1/4 inch Basic White CS to create the inside panel.
Use the Blackberry Bliss Ink to stamp some of the birds on the inside panel.
Adhere the inside panel to the inside of the card base.
Voila! That is all there is to it!
Thank you so much for stopping by today! Have a wonderful day! Please visit all the rest of the blogs in the Winners Blog Hop to see more fabulous creations!
Hello my stamping friends! I hope all has been well with you this week. Today I have a Friday Fun Fold Pop Up Box Birthday Card for you. I learned this fold from Rachel Tessman who made it as a Paper Pumpkin alternative. You can see her card HERE. The first go around I made several mistakes. There will be tips for you so that you will be able to avoid the same mistakes I made.
The New Horizons Designer Series Paper (DSP) is so awesome, I am in love with it! This paper is super great for scenic watercolor backgrounds. I will be using the New Horizons DSP for today’s card along with the Sailing Home stamp set.
This is a photo of the second Friday Fun Fold Pop Up Box Birthday Card card I made. I will give you tips so that your first card comes out right.
New Horizons Designer Series Paper (DSP): The scene will be portrait orientation. Cut the 6 x 6 inch scene at 4 1/4 inches first. Then cut the resulting strip to be 1 5/8 x 5 1/2 inches. Cut the scene to be 3 1/4 x 4 1/4 inches. You will need to use 2 sheets to get both scenes. One scene for the front and one for the back of the card.
Basic White CS: 2 1/2 x 1 inch (for sentiment) and 2 x 4 inch to stamp the larger sailboats on.
Night of Navy CS: 2 3/4 x 1 inch (for sentiment)
Ink: Night of Navy
Scoring the Card Base
Score at 1/2, 2 1/8, 2 5/8, 4 1/4, 5 7/8, 6 7/8 and 8 inches.
Preparing the Card Base
First Tip: Do not burnish the score lines until after you make the slot. Make the slot as thin as you can. The slot on the left is too wide. This made the finished card unstable. Use the Stampin’ Up! Trimmer to get a thin slot. Set the left edge of the card base at 4 5/16 inches and make a cut from 1 1/8 to 4 3/8 inches. Then turn the card base 180° and cut again. Use your paper snips to cut the extra piece off to make the slot.
Second Tip: Adhere the 1 5/8 x 5 1/2 inch strips of the New Horizons DSP close to the 4 1/4 inch score line, but do not cover the score line. The card should be easy to fold.
Stamping
Stamp the large sailboat twice in Night of Navy Ink onto a scrap of Basic White CS. Use a scrap of the News Horizons to stamp the small sailboat twice. You may fussy cut the sailboats or use the Smooth Sailing Dies.
Stamp the desired sentiment onto the 1 x 2 1/2 inch Basic White CS with Night of Navy Ink. I used the “Happy Birthday” from the Celebrating You stamp set.
Assembling the Fun Fold
One difference between my card and Rachel’s is that I wanted an image on both the front and the back of the card. That way there is something to look at forward and backward. Adhere the top of the two sailboat scenes together. Apply a Tear-n-Tape strip to the bottom of the back one.
Insert the sailboat scene through the slot in the card base. Align the bottom of the sailboat scene with the 1/2 inch score line. Take the protective layer off of the Tear-n-Tape on the scene. Fold the base at the 1/2 inch score line so that it sticks to the sail boat scene. Apply a strip of the Tear-n-Tape to the Misty Moonlight bottom.
Peel the protective layer off of the Tear-n-Tape. Adhere the two sailboat scene pieces together. Press down. Apply more Tear-n-Tape over the bottom of the sail boat scene. Remove the protective covering.
Fold the card base at the 4 1/4 inch score line to adhere the sides together.
Here is how the Pop Up Box looks from the side and all the way folded down. Cool right?!
Decorating the Pop Up Box
Tip: The first go around I put the small sailboat on the left and the sentiment on the right. The second time I was able to add the larger sailboat if I put the small sailboat to the right. Note: I forgot to stamp the birds on the sail boat scene for the first card. I really like the scene much better with the birds added.
On the backside, I placed the small sailboat on the left and the larger sailboat on the right as shown.
Be sure to adhere the sail boats and sentiment to the small strip under the DSP piece so that they pop up!
Finished Product
Here are the forward and backward views of the first card.
Here are the forward and backward views of the second card.
Voila! I hope you are successful with this. I really felt a sense of accomplishment after figuring this Fun Fold Pop Up Box Birthday card out.
Thanks so much for reading my blog. Please leave a comment and let me know if you like the way I am doing this blog. Helpful suggestions are welcome.
Theresa
Stampin’ Up!® Promotions
Joining Special
Earn 2 FREE stamp sets of your choosing when you sign up to be a Stampin’ Up! demonstrator. Choose $125 of product for your Starter Kit and pay only $99 before shipping and handling! Join HERE. Contact me for more information at theresastreasures.az@gmail.com.
Paper Pumpkin Subscription
Don’t monkey around and miss this amazing adventure! Unleash your creativity with February’s wildly fun kit!
Answer the call of the wild—and your creativity—with the Safari Celebration Paper Pumpkin Kit. This playful, party-themed kit includes all the goodies and gear you need to create nine cards and coordinating envelopes in safari-inspired shapes and patterns you’ll go wild for! Make every occasion a celebration with this month’s amusing animals, beautiful botanicals, and celebratory sentiments.
Paper Pumpkin is a subscription kit. You earn FREE product when you order a pre-paid code from my Online Store. A pre-paid code will be sent in an email. Next, go to my Paper Pumpkin sign up and enter the code. You will get this Safari kit if you do so by February 10, 2022.
You will get an email with the Pre-paid code. Then you will go to: https://bit.ly/subscribeTheresasTreasuresPaperPumpkin and enter the pre-paid code to start your subscription! Shoot me an email with any questions
Celebrate Diversity
Lots of fun with diversity is coming on February 1, 2022. The All Together set will include 10 Stampin’ Blends for a range of skin colors. The images in the stamp set will celebrate diversity. Watch for more information on this fabulous set!
Get this FREE Creative Download from Stampin’ Up! for more on the celebration of diversity.
Thank you for your attention. If you need any assistance with your order please email me at theresastreasues.az@gmail.com
What do you “see” in your minds eye when you look at this fabulous paper?
I saw a sunset scene. This scene is so peaceful and serene for me. All I did was to use the On the Horizon stamp set to add the birds and trees using Polished Pink Ink.
Measurements
On the Horizon #SimpleStamping Thank You Card
Polished Pink Card Stock (CS) card base: 5 1/2 x 8 1/2 inches with a score line at 4 1/4 inches.
First stamp the birds from the On the Horizons stamp set in Polished Pink Ink. Follow by stamping the trees. Stamp Off once for the trees on the left. Use Evening Evergreen Ink for the sentiment “Thanks for Everything”.
Adhere a strip of the New Horizons DSP to the left side of the 4 x 5 1/4 inch Basic White CS. Stamp the birds over the top. Adhere the front and the inside panels to the Polished Pink CS card base.
Voila! That is it! So simple and yet so fabulous! The New Horizons DSP is simply amazing!
Thanks for stopping by today! Have a wonderful crafty day!
Theresa
Stampin’ Up! Promotions
Joining Special
Earn 2 FREE stamp sets of your choosing when you sign up to be a Stampin’ Up! demonstrator. Choose $125 of product for your Starter Kit and pay only $99 before shipping and handling! Join HERE. Contact me for more information at theresastreasures.az@gmail.com.
Paper Pumpkin Subscription
Don’t monkey around and miss this amazing adventure! Unleash your creativity with February’s wildly fun kit!
Answer the call of the wild—and your creativity—with the Safari Celebration Paper Pumpkin Kit. This playful, party-themed kit includes all the goodies and gear you need to create nine cards and coordinating envelopes in safari-inspired shapes and patterns you’ll go wild for! Make every occasion a celebration with this month’s amusing animals, beautiful botanicals, and celebratory sentiments.
Paper Pumpkin is a subscription kit. You earn FREE product when you order a pre-paid code from my Online Store. A pre-paid code will be sent in an email. Next, go to my Paper Pumpkin sign up and enter the code. You will get this Safari kit if you do so by February 10, 2022.
You will get an email with the Pre-paid code. Then you will go to: https://bit.ly/subscribeTheresasTreasuresPaperPumpkin and enter the pre-paid code to start your subscription! Shoot me an email with any questions
Celebrate Diversity
Lots of fun with diversity is coming on February 1, 2022. The All Together set will include 10 Stampin’ Blends for a range of skin colors. The images in the stamp set will celebrate diversity. Watch for more information on this fabulous set!
Get this FREE Creative Download from Stampin’ Up! for more on the celebration of diversity.
Thank you for your attention. If you need any assistance with your order please email me at theresastreasues.az@gmail.com


")
")


 Designer Series Paper")


")


 Designer Series Paper")


")
")


 Designer Series Paper")
 Double-Stitched Satin Ribbon")


")


")
")
")


")


 Designer Series Paper")


")


