Posted in 2021 Stampin' Up! July-December Mini Catalog, Fun/Fancy fold card, Gratitude/ Thanks, Shaker Card, Stampin' Up! 2021-2022 Annual Catalog, Thanksgiving

Stampin’ Up!® Sweets & Treats Cloche Dome Card

Happy Thanksgiving!

Today I plan to spend some time reflecting on all I have to be grateful for. An “attitude of gratitude” really keeps me from feeling down during the holidays. I am very blessed to be able to spend Thanksgiving with family this year. We missed last year, so I feel especially grateful to be visiting this year.

I have a very fun 3D card for you today:

Doesn’t that apple pie look delicious? I actually prefer pumpkin pie, but the apple pie is a close second. Which pie do you like best? Please leave me a comment below.

Measurements

  • Cinnamon Cider Card Stock (CS) card base: 5 1/2 x 8 1/2 inches
  • Cinnamon Cider CS: 3 3/8 x 4 5/8 inches
  • Basic White CS: 3 3/4 x 3 1/2 inches and a scalloped rectangle from the Scalloped Contour Dies
  • Hand Penned 12 x 12 inch Designer Series Paper (DSP): 3 3/4 x 3 3/4

The Fun Fold Card Base

The card base is made by cutting 3/4 inch off of the top and bottom of the front panel. Emboss the back panel with the Timber 3D Embossing Folder. Set aside.

Trivia: Anyone know what a cloche (Klōsh) is? I didn’t. One definition of cloche from French, literally “bell”, is a transparent cover shaped like a bell.

Stamping & Coloring The Pie Pan

Use the Cloche Dies to cut the shape of the dome from the Scalloped Contour Die rectangle. Take care to position the die so that it is about 1/4 inch down from the top and that it is centered. Tip: I use sticky note tape to hold my dies in position while putting them through the Stampin’ Cut & Emboss Machine. Save the cut out piece. Stamp the pie stand in Memento Black Ink. Use Stampin’ Blends Alcohol Markers in Smoky Slate to color the stand. Tip: I color in the “shadows” first with the Dark Smoky Slate Blend.

Then use the Light Smoky Slate Stampin’ Blend marker to blend the border of the dark into the light. Keep moving from the edges to the center until it is all colored in.

Stamping & Coloring the Pie

Now stamp the pie onto the cut out piece of the dome. Color the pie pan with Cinnamon Cider Stampin’ Blends. Start with the Dark Cinnamon Cider Blend on the edges. Use the Ivory Stampin’ Blend to color the pie crust. Since there is only one shade of the Ivory, you can make a shadow on the edges by coloring the first layer as shown.

For the pie pan, blend with the Light Cinnamon Cider marker from both edges until you reach the middle of the pie pan. Note: I used a wee bit of the Light Cinnamon Cider Blend on the pie crust. To finish the crust I used the Ivory Blend to smooth out the darker edges until I covered the entire crust. I used the Light Real Red Stampin’ Blend for the holes in the pie crust since I am making an apple pie.

Stamping the Inside

Orient the 3 3/4 x 3 1/2 inch Basic White CS card piece with the 3 1/2 inch edge on either side. Using the Memento ink, stamp the “love ya” sentiment in the center. Add the heart in Blushing Bride ink.

Assembling the Card

Adhere the inside Basic White CS panel to the inside of the Cinnamon Cider CS card base so that it is hidden when you close the front panel. Adhere the Hand Penned DSP to the front panel. Set aside.

Do Not Adhere, but just place the complete Scalloped Contour rectangle with the pie dome on the 3 3/8 x 4 5/8 inch Cinnamon Cider CS. Adhere the pie dome without getting adhesive on the Scalloped Contour piece. Remove the Scalloped Contour rectangle. Draw some steam over the pie with the Black Stampin’ Write Marker. Yummy!

Assembling the Shaker Cloche Dome

Place about 1/2 tsp of the gold and orange Sequins for Everything on the center of the dome cut out. Remove the strip covering the adhesive on the bottom of the Cloche Shaker Dome.

Carefully line up the inside edge of the shaker dome with the dome on the Cinnamon Cider CS. Push firmly around the edge of the dome. Once adhered, remove the strip covering the adhesive on the top of the Cloche Shaker Dome.

Apply adhesive to the back of the Scalloped Contour rectangle. Place it carefully over the dome and push down to make it stick. Now the sequins can move around inside the dome! Fun!

Finishing the Card

Adhere the shaker dome card piece to the front panel of the card base. Take care not to apply adhesive to the very top and bottom. Include a sentiment if desired. I really like the sentiment “any way you slice it, I’m thankful for you”.

Voila! Such a yummy looking Sweets & Treats Cloche Shaker card! Also a great Thanksgiving card to share your gratitude with a loved one.

Supplies To Make This Card

To go to my online store, click on any of the photos below.

Product List

I am very thankful that you are visiting my blog!

Starting November 29, 2021 I am embarking on a 12 Days of Christmas Card Making Challenge with my fellow stamping friend Christy. Our plan is to create and blog about a new Christmas card every day for 12 days! Come by on Monday, November 29th and see what I have in store for you!

Again- Happy Thanksgiving!

Theresa

Posted in 2021 Stampin' Up! July-December Mini Catalog, Nature, Thanksgiving

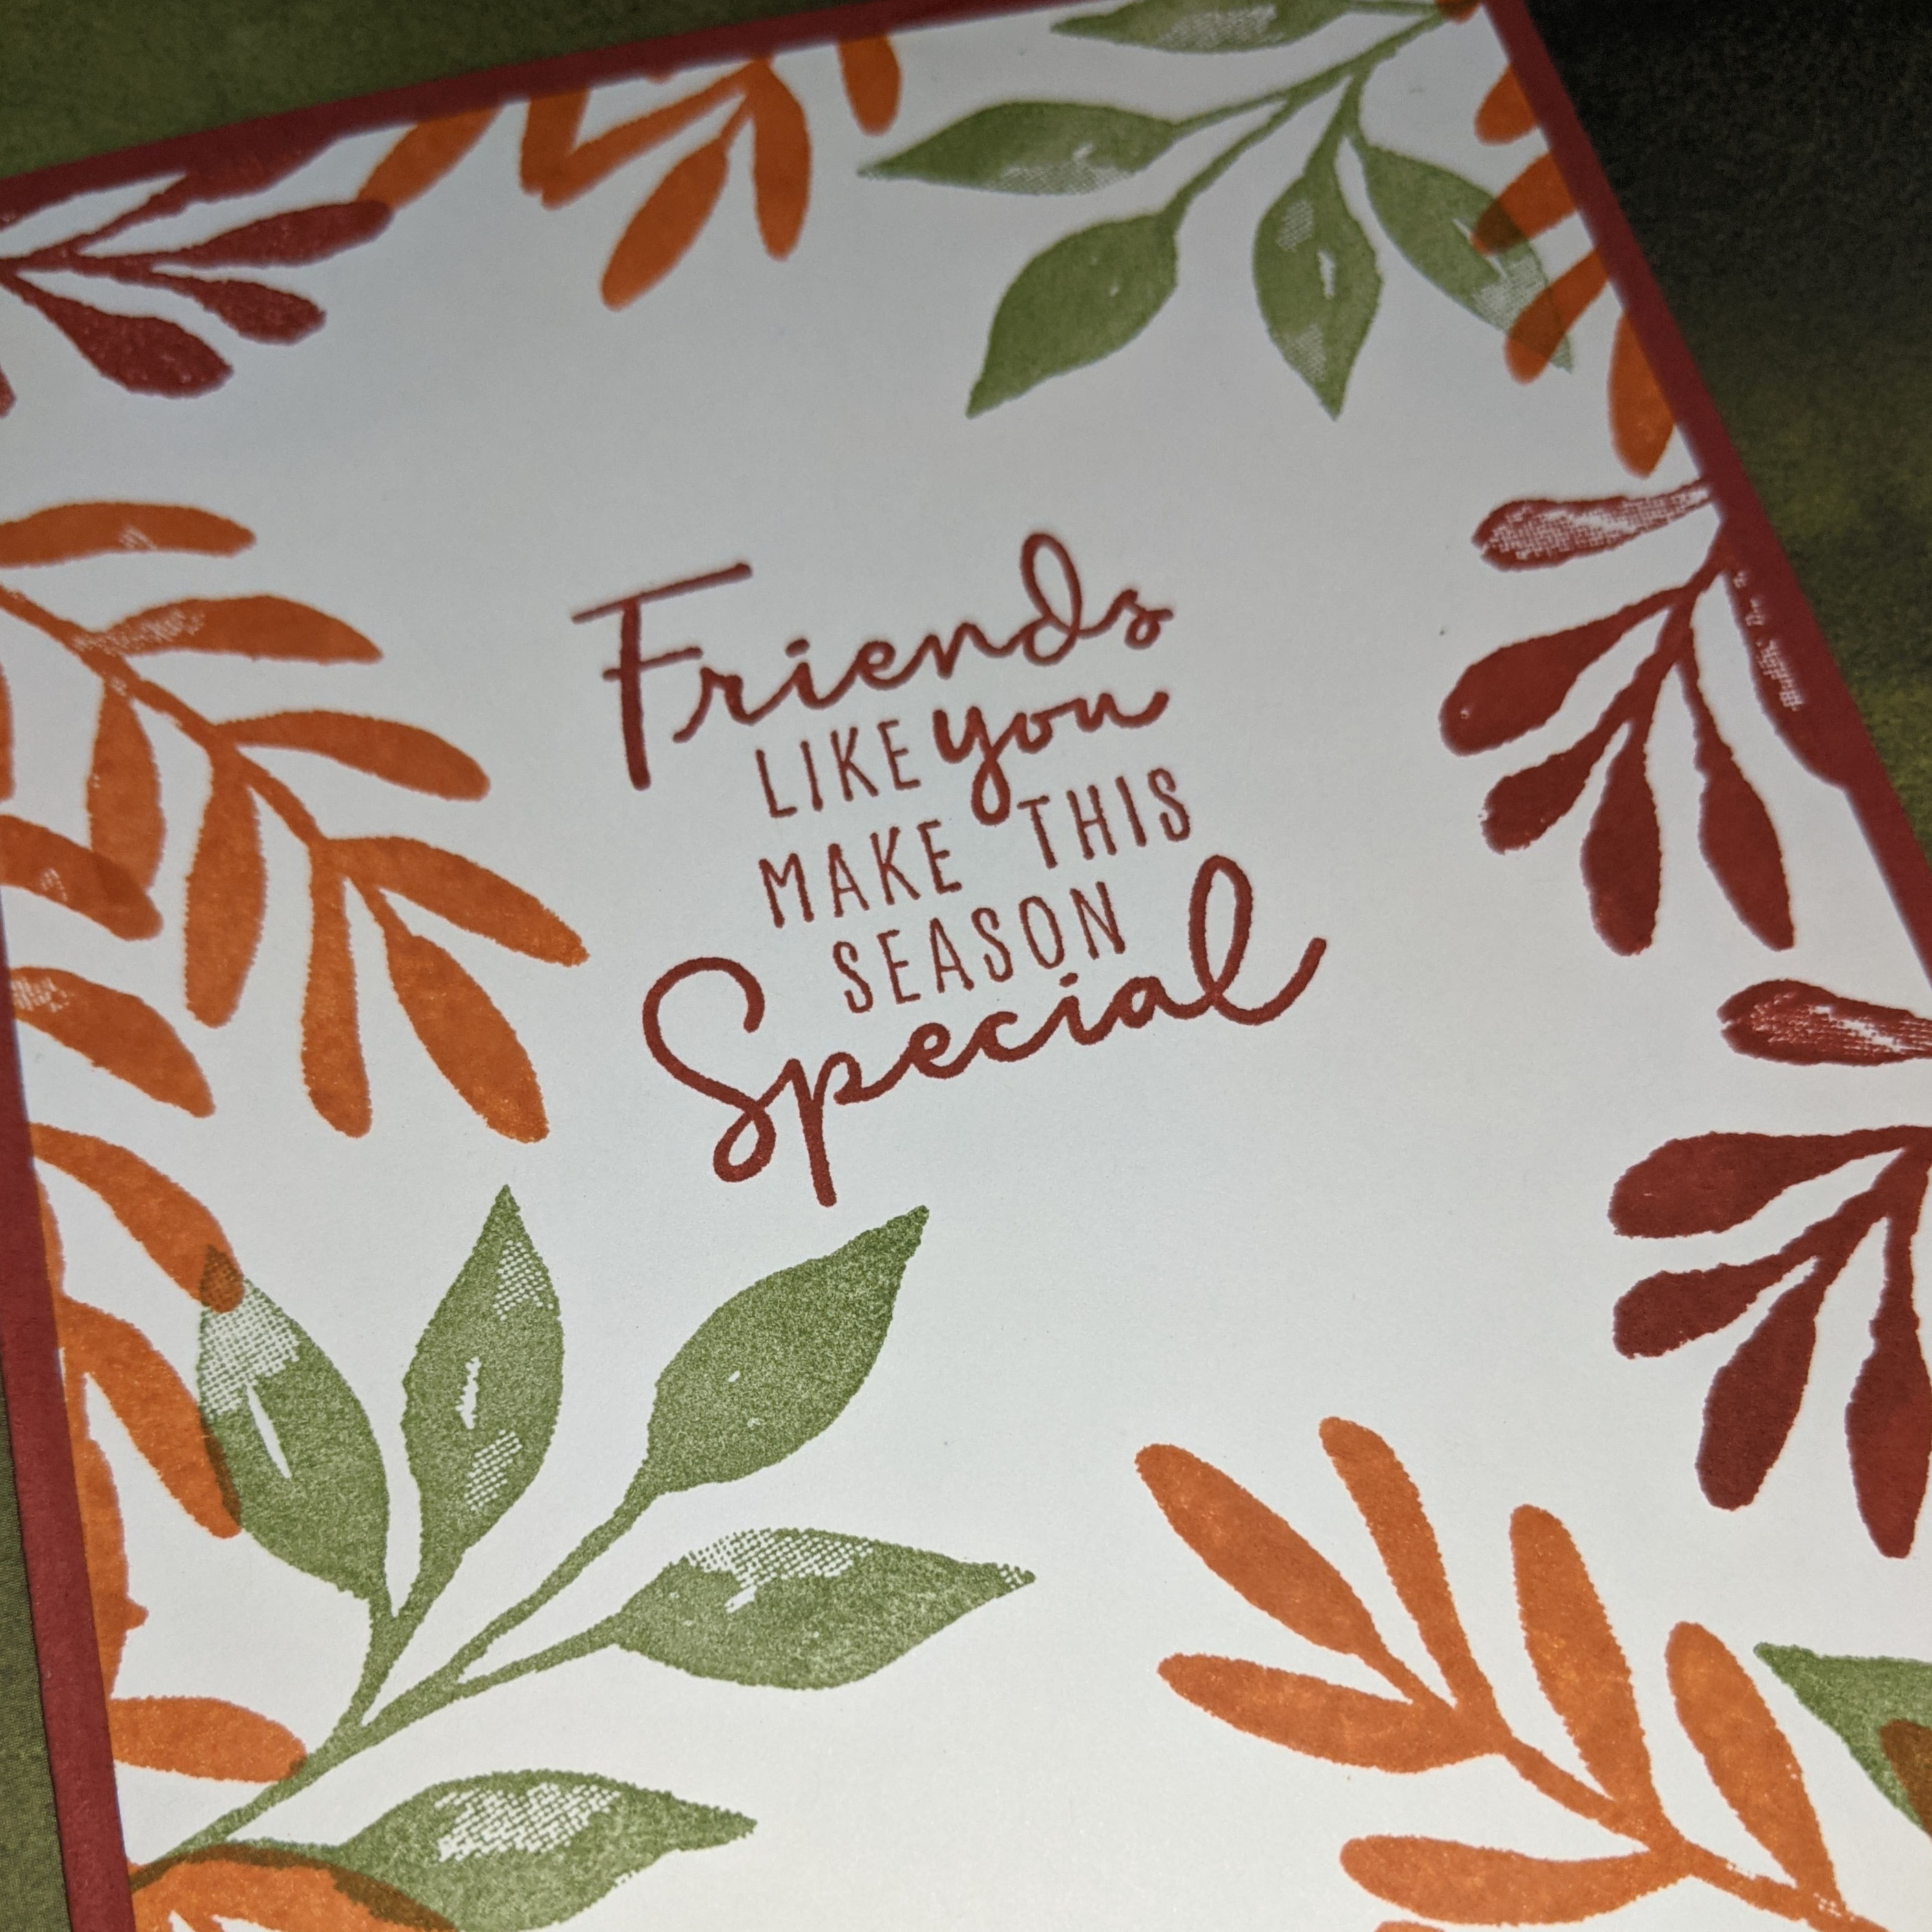
Stampin’ Up!® #SimpleStamping Fall Friendship Card

Howdy! Fall is slowly giving way to the Holiday Season. Next week I will begin to show you some Holiday cards. For today I have a lovely fall friendship card made using only stamps, ink and paper. Otherwise known as #SimpleStamping.

I am actually using the Christmas Season stamp set. But I chose fall colors so I could create a nice fall friendship card. The sentiment is part of the Christmas to Remember stamp set. Stay tuned because I will soon be using the same two stamp sets to create a Christmas card.

Measurements

  • Cajun Craze Card Stock (CS) card base: 8 1/2 x 5 1/2 inches with a score line at 4 1/4 inches.
  • Very Vanilla CS: two 5 1/4 x 4 inches
  • Note: Ink colors: Cajun Craze, Pumpkin Pie and Old Olive.

Stamping

Start out by stamping the sentiment “Friends Like You Make This Season Special” in Cajun Craze ink onto one of the 5 1/4 x 4 inch Very Vanilla CS. Stamp some leaves in Old Olive ink. Then stamp another style of leaf in Pumpkin Pie ink. I started out with 3 of each color in a triangular orientation.

Add a third style of leaf in Cajun Craze ink. Fill in the spaces as desired using any of the 3 styles of leaves and their coordinating color. On the second 5 1/4 x 4 inch Very Vanilla CS stamp in the same manner just along the right-hand side. This will be the inside of the card so you need to leave space for writing.

Assembly

Adhere the first stamped Very Vanilla CS panel to the front of the Cajun Craze CS card base. Adhere the second panel to the inside of the card base.

Voila! You have a gorgeous #SimpleStamping fall friendship card!

Bling! Alert! I added a few of the Champagne Rhinestone Basic Jewels for some extra sparkle around the sentiment! This is a step up from #SimpleStamping.

Thanks so much for stopping by today. Be sure to sign up for my newsletter by scrolling to the bottom of the side bar. I will be sending my first Theresa’s Treasures Paper Crafts Newsletter out soon!

Supplies

To purchase the Stampin’ Up! products needed to make this card yourself, click on any of the photos below and you will go to my Online Store.

Product List

Have a most wonderful day!

Theresa

Posted in 2021 Stampin' Up! July-December Mini Catalog, Avid Stamper, Gratitude/ Thanks, Thanksgiving

Stampin’ Up!® Gorgeous Leaves Paper Lattice Thanksgiving Card

Stampin’ Up! Gorgeous Leaves Paper Lattice Thanksgiving Card. I have a very colorful Thanksgiving Card made using the Gorgeous Leaves stamp set and Intricate Leaves Dies.

I also found a fun trick with the Paper Lattice! This card was inspired by one made by Mary Knabe. Click on the photo below to get to her blog.

Here is Mary Knabe’s card that inspired me

I also got some inspiration from the current Theme Challenge from The Paper Players.

Measurements

Soft Suede Card Stock (CS) card base: 11 x 4 1/4 inches with a score line at 4 1/4 inches.

Very Vanilla CS: 5 1/4 x 4 inches and 5 1/4 x 3 1/2 inches.

Pumpkin Pie, Pear Pizzazz and Crushed Curry CS: 5 1/2 x 3 /8 inches
(one of each except the Pumpkin Pie CS cut two).

Paper Lattice: one.

Label Parts

Very Vanilla CS label from the Tasteful Labels Dies.

Pumpkin Pie, Pear Pizzazz and Crushed Curry CS leaves from the Intricate Leaves Dies.

Very Vanilla CS Stitched Rectangle from the Stitched Rectangle Dies (the sentiment is from the Banner Year stamp set and is in Early Espresso ink).

Early Espresso Faux Suede Trim: approx. 7 inches to make one bow.

Stamping

Start by stamping the 5 1/4 x 4 inch Very Vanilla CS which is the inside of the card. Stampin’ Up! inks for this card are: Pumpkin Pie, Pear Pizzazz and Crushed Curry. Decorate the inside by stamping a variety of leaf shapes from the Gorgeous Leaves stamp set in a variety of color.

Weaving

Now for the fun trick! Gently weave the color CS strips into the Paper Lattice. Flip the Paper Lattice over. I recommend using the Foam Adhesive Sheets cut into 1/4 inch strips to add dimension and hold the paper strips in place on the back of the Paper Lattice.

Assembling the card

Adhere the Paper Lattice to the 5 1/4 x 3 1/2 inch Very Vanilla CS. Follow by adhering the card piece to the front of the Soft Suede CS card Base.

Complete the inside of the card by adhering the stamped 5 1/4 x 4 inch Very Vanilla CS to the inside of the Soft Suede CS card base.

Assembling the Label

Arrange the Intricate Leaves as desired and adhere them to the Very Vanilla Tasteful Label. Use Mini Stampin’ Dimensionals to adhere the “Happy Thanksgiving” sentiment over the leaves.

Adhere the label to the card front with Stampin’ Dimensionals. Adhere the Early Espresso Faux Suede bow just under the sentiment with a Mini Glue Dot.

Add some Champagne Rhinestone Jewels and Voila! you have a fun and colorful Thanksgiving card!

Supplies- Shop Here
November Host Code: BAKE6KM6*

*Use the host code when you order $50 or greater and receive a free gift from me!  If your order is over $150, please do not use this code because you can use the Stampin’ Rewards yourself. Any questions-shoot me an email at theresastreasures.az@gmail.com

You may also click on any photo below to go to my Online Store

Product List

Start With Savings Starter Kit Promotion – November 4-30!

The Start with Savings Starter Kit promotion allows you an excellent opportunity to purchase your Starter Kit at a great deal! The Starter Kit is usually $99 which is already an awesome deal! For a limited time you may choose a custom Starter Kit for only $75!!!  This is an unbeatable bargain for Stampin’ Up! product with a value of $125!

Choose your custom Starter Kit today and join my Stamping Gems Team HERE

Benefits of Joining: Early Access to New Product, 20% or more discount on future orders and becoming part of the Stamping Gems Team with a monthly meeting featuring Mystery Stamping and a group Facebook page!

I hope you are able to start enjoying all the fall colors! Be sure to use fall colors in your crafts.

This year I am doing a 12 day Holiday Card/Project Challenge with my stamping friend Christy starting November 29, 2021. Stay tuned for that!

Thanks for visiting today!

Theresa

Posted in 2020 August-December Mini Catalog, Avid Stamper, Thanksgiving

Happy Thanksgiving!

I wish all of you a very Happy Thanksgiving today! This year is a little different for sure! I hope you are able to visit virtually with your friends and family. My family is getting together on Zoom. We are quite the crowd as I am the oldest of eight!

I made this card for the Cardz4guyz Challenge # 258- Thank You/Thanksgiving. I just love the Cajun Craze card stock from Stampin’ Up!® for my fall projects. The Forever Gold Laser-cut Specialty Paper just looks so handsome next to the Cajun Craze card stock.

The wreath is made using the Gold Hoop Embellishment with some of the Forever Gold Laser-cut leaves for the background. The Very Vanilla foiled leaves are cut from the Gilded Autumn Specialty Designer Series Paper. The Gold Twine from the Forever Greenery Trim Combo Pack compliments the copper Acorn Trinkets. The sentiment is from a retired Stampin’ Up! stamp set called Pleasant Pheasants and is stamped in Cajun Craze ink.

Please have a nice day of Thanks. Remember to be thankful for all the joy you bring to the world. You are a very special and unique person.

Have a most wonderful day and a crafty week! Stop by Cardz4guyz.blogspot.com and see everyone’s cards for Challenge #258-Thank You/Thanksgiving.

Theresa

Product List
Posted in 2020-2021 Stampin' Up! Catalog, Thanksgiving

Stampin’ Up!®- Triple Stamping Fun with Floral Essence & Forever Fern

This fun fall card is made with the Triple Stamping Technique which I first learned from my stamping friend Karen Bouchikas about 8 years ago. This card is CASE’d from one of the first cards I ever made. It is super easy and looks super complicated! And- this card is so versatile!

Measurements: Cajun Craze Card Stock (CS): 5 1/2 x 8 1/2 inches with a score line at 4 1/4 inches; Very Vanilla CS: two 4 x 5 1/4 inches, 3 1/4 x 4 1/4 inches and 2 x 3 1/4 inches; Pumpkin Pie CS: 3 1/2 x 4 1/2 inches; and Mango Melody CS: 2 1/4 x 3 1/2 inches. You will also need 5 inches of the Vanilla Open Weave Ribbon from the Forever Greenery Trim Combo Pack in the 2020-21 Stampin’ Up!® Annual Catalog.

Stampin’ UP!® ink colors: Daffodil Delight, Cajun Craze and Mango Melody

Take the 3 different sizes of Very Vanilla CS and layer them. You can hold them in place with a wee bit of repositional adhesive tape. We are using the Photopolymer stamps so you will need the Stampin’ Pierce mat or a catalog.

Stamp the large solid flower in the Floral Essence Stamp Set in Cajun Craze ink onto the righthand side in the middle. Next stamp the small solid flower in the upper left and lower left corners. Do not worry about the blank spots on the flowers near the edges of the layers. This will not be visible later.

Using the Mango Melody ink and the large bunch of leaves in the Forever Greenery Stamp Set, Stamp Off first, then stamp onto the card pieces. There will be a ribbon at the level of the large solid flower, so you may stamp the leaves so the ends of the stems will be covered by the ribbon. Stamp Off the smaller bunch of leaves using the Daffodil Delight ink before stamping on your card pieces. Fill in the open spaces with the smaller leaves.

Separate the three card pieces. Leave the 4 x 5 1/4 inch Very Vanilla CS piece. Stamp another large solid flower in the Cajun Craze ink in the middle.

Carefully cut the large solid flower out of the center. Just cut in the center so you can use this piece for the final card. Fussy cut the flower.

Stamp the centers of the flowers in Daffodil Delight ink.

Stamp Off the large bunch of leaves using the Mango Melody ink and stamp the righthand border of the second 4 x 5 1/4 inch Very Vanilla CS. Next Stamp Off the smaller bunch of leaves with the Daffodil Delight ink and stamp the borders of the large bunch of leaves. This is the inside of the card.

Adhere the inside card piece to the inside of the Cajun Craze CS card base. Use your Bone Folder to make a crisp fold at the 4 1/4 inch score line on the Cajun Craze CS card base.

Adhere the smaller card pieces to the corresponding colored card stock.

Adhere the Very Vanilla Open Weave Ribbon to the back of the right side of the smaller layer, the Mango Melody card piece, with a Mini Glue Dot.

Adhere the Mango Melody CS card piece with the ribbon on it, to the Pumpkin Pie CS layer, and finally to the 4 x 5 1/4 inch Very Vanilla CS card piece. Bring the ribbon over the the left hand side.

Wrap the ribbon around to the back of the left hand side and adhere it with a Mini Glue Dot.

Now adhere all the layers to the front of the Cajun Craze CS card base.

We are going to add a little dimension by using the Stampin’ Dimensionals on the back of the flower we cut out. Adhere this flower over the stamped flower.

Viola! Now you have made a super beautiful fall card! You can add any sentiment you want- Happy Thanksgiving, Thanks, Happy Birthday, I Love You, or any other sentiment you would like to send!

I am so grateful you have stopped by today. Please let me know what you think about this card. I appreciate your comments.

Product List

Have a most wonderful Friday! Try to get some crafting done this weekend. You will be surprised how uplifting crafting can be! Going back to work on Monday may not seem as bad.

Theresa

Posted in 2020 August-December Mini Catalog, 2020-2021 Stampin' Up! Catalog, Gratitude/ Thanks, Spotlight Technique, Thanksgiving

Stampin’ Up!® Floral Essence for Thanksgiving Spotlight Note Card

Hello fellow stampers and crafters! Today I have a darling little note card made with the versatile Floral Essence Stampin’ Up! stamp set using the Spotlight Technique. These note cards are 4 x 4 inches when complete and could be used at place settings for the Thanksgiving meal (assuming that is possible this year!). Note: This card is CASE’d from Shannon West’s presentation during our recent Onstage Convention.

I am using two exceptional stamp sets: Floral Essence and A Wish For Everything. Why are they exceptional? There are endless possibilities for the beginner stamper to use the flowers in the Floral Essence stamp set, depending on the color of ink and paper chosen. Purple, pink, and yellow for Spring; bolder brighter colors for Summer; and red/green or blue/white for Winter. The colors chosen for today’s card are Fall colors. The words in the “A Wish For Everything” cover, well, just about everything a beginner would need.

Measurements: Cinnamon Cider Card Stock (CS): 4 x 8 inches with a score line at 4 inches; Very Vanilla CS: 3 3/4 x 3 3/4 inches, 2 3/4 x 3 7/8 inches and 1 x 4 inches; In Good Taste Designer Series Paper (DSP): 3 7/8 x 3 7/8 inches.

You will also need: Cinnamon Cider, Bumblebee and Just Jade ink, Champagne Rhinestone Basic Jewels, the Classic Label Punch, the 2-inch Circle Punch and the Metallic Ribbon from the Basket Weave & Metallic Ribbon Combo pack. All products are found in the 2020-21 Stampin’ Up!® Annual Catalog except the Metallic Ribbon which is on page 45 of the 2020 Stampin’ UP!® Aug-Dec Mini Catalog.

Let’s get stamping!

Use the Cinnamon Cider ink to stamp the largest solid flower slightly right of center. Be mindful of the upper border of the flower as you want it to be 1/4 inch from the top. Use the Bumblebee ink to stamp the smaller solid flower on either side as shown. Tip: The Floral Essence stamps are Photopolymer, or see-through stamps. You get the best image if you stamp on something with a little “give” to it. I am using the Stampin’ Pierce mat, covered in white scrap paper. You may also try using your catalog.

Use the Bumblebee ink to stamp the center of the large solid flower. There is a different center stamp for the smaller solid flower. Stamping off Technique: stamp once onto scrap paper before stamping the center of the smaller solid flower onto your card. This will result in the center of the smaller solid flower being a little lighter than the flower itself.

Stamp the stems in Just Jade ink. I did turn the stamp upside down to stamp the stem for the Bumblebee flower to the left. I stamped twice to get the stem for the Bumblebee flower on the right. Add the leaves.

You may fill in the open space by stamping a few leaves using the single leaf stamp.

Use the Cinnamon Cider ink to stamp a large solid flower off to the right side of the 3 3/4 x 3 3/4 inch Very Vanilla CS. This will be the inside of your card, so leave a little space for writing. While you have the Cinnamon Cider handy, stamp the sentiment “Happy Thanksgiving” onto the 1 x 4 inch Very Vanilla CS strip. Note: The sentiment is a Red Rubber stamp. You do not need the extra padding. The image for the red rubber comes out with more clarity when stamped on a hard surface. I just forgot to take the Stampin’ Pierce Mat away.

With Bumblebee ink stamp two more small solid flowers on the inside of the card. Stamp the center of the Cinnamon Cider flower. When stamping the center for the Bumblebee flowers remember to stamp off first. Add the stems and leaves in Just Jade ink.

Spotlight Technique: Use the 2 inch circle punch to punch out the Cinnamon Cider flower. I turned my card 180 degrees and put the punch upside down on the craft table so that I could see what I was punching. I wanted the edge of the circle to be 1/4 inch down from the top of the card piece.

Here is the end result.

Use a Mini Glue Dot to adhere the Metallic Ribbon to the back of the card piece you just punched.

Use a Bone Folder to fold the 4 x 8 inch Cinnamon Cider CS card base at the 4 inch score line. The Bone Folder makes a nice crisp fold. Adhere the inside panel of your card.

Adhere the 3 7/8 x 3 7/8 inch In Good Taste DSP to the card front. Now adhere the punched out card piece.

Apply Stampin’ Dimensionals or strips of the Foam Adhesive Sheets and adhere the punched out circle to the card front to complete the Spotlight Technique. Tip: I have been using the Foam Adhesive Sheets in place of the Stampin’ Dimensionals. I have had a joint fusion in my right index finger. The thumb and index finger no longer come together so it makes peeling off the small hexagonal backing of the Stampin’ Dimensionals a challenge. I found that if I cut the Foam Adhesive Sheets into 1/4 inch strips, I can use those which make peeling the backing off a bit easier.

Use a Mini Glue Dot to adhere the bow, and a Stampin’ Dimensional to adhere the sentiment. This little note card looks great, but I think we need some Bling!

The Champagne Rhinestone Basic Jewels match perfectly! That is one remarkable point regarding Stampin’ Up! products-everything matches! Each color of card stock has coordinating ink. Some colors also have matching ribbon or embellishments! In this case the Cinnamon Cider coordinates with the Metallic Ribbon, the DSP, the Cinnamon Cider ink and the Champagne Rhinestones! Anyhow, I digress. The Take Your Pick tool helps to easily transfer the tiny rhinestones to your card.

Viola! You have a darling little note card to wish someone a Happy Thanksgiving!

Thanks for joining me today. I hope you can find some time to do some crafting. If you ever have any questions, especially if you are hung up on a project, shoot me an email and I will do my best to help you sort it out. My email is: thereastreasures.az@gmail.com.

If you are in need of any product, click on any photo below to go to my online store. Let me know if I can help you narrow down your wish list to a shopping list. The Holidays will be here before you know it. It’s a great time to purchase product to make your cards. You can also get to my online store by clicking HERE.

Product List

Have a tremendous week!

Theresa

Posted in 2020 August-December Mini Catalog, Nature, Thanksgiving

Cardz4Guyz Challenge #256 Colors of Autumn/Fall

Welcome Autumn! It is still hot here in Bisbee Arizona, USA but the evenings and early mornings are cooling down a bit. Today is windy and cool. I love the changing leaves. We don’t see too much of that here, but I recently visited Kentucky and Tennessee so I saw a lot of color. So for the Cardz4Guyz challenge #256- color of Autumn/Fall, I wanted to make some falling leaves with different fall colors for my card today.

The Stampin’ Up! colors I used are: Cajun Craze, Calypso Coral, Mango Melody, and Merry Merlot. I used the Gather Together stamp set (in the 2020 Stampin’ Up! August-December Mini Catalog) to make this colorful Fall card.

For the sentiment, I cut a maple leaf with the Gathered Leaves Dies. I sponged some Cajun Craze ink around the edges of the Very Vanilla card stock leaf and stamped the sentiment “Gather Together” in Cajun Craze ink.

The trick with the leaves is that I applied ink to the die, put it on the cardstock and ran it through the Stampin’ Cut and Emboss Machine. The photo on the right shows the leaf with and without using the ink with the die.

Viola! You have a very colorful Autumn card to send to your special guy!

RamZ here loves the leaves too. He appears very happy to be in the leaf pile at my sister’s home. Beautiful golden yellow!

Thanks for stopping by for the Cardz4Guyz Challenge #256- Colors of Autumn/Fall. See more cards with this theme at the Cardz4GuyZ blog by clicking HERE.

Have a wonderful Fall day!

Theresa

Posted in 2020 August-December Mini Catalog, 2020-2021 Stampin' Up! Catalog, Love/Affection, Thanksgiving

Beautiful Autumn Harvest Blessings Stampin’ Up!®

Even though it is still in the lower 90’s (degrees F) I am anxiously anticipating the cooler weather–soon I hope! I am in the mood for Autumn so I have been making cards with that theme.

The Autumn Punch Pack consists of two leaf punches which I used for the wreath on this lovely autumn card. There is also an acorn punch in the Punch Pack. The sentiment is from an awesome stamp set called Country Home. I have made many cards with this sentiment.

Measurements: Very Vanilla Card Stock (CS): 5 1/2 x 8 1/2 inch card base with a score line at 4 1/4 inches and 3/4 x 3 inches; Bumble Bee CS: 4 x 5 1/4 inches; Forever Gold Laser-Cut Specialty Paper: one panel; scraps that measure at least 1 1/2 x 3 inches in Mango Melody CS, Cajun Craze CS, Pumpkin Pie CS and the Brushed Metal 12 x 12 inch CS in the copper and the gold. You will also need one of the Gold Hoops Embellishments and two of the Acorn Trinkets (not shown).

Stamp the sentiment “Happy harvest Blessings” in Cajun Craze ink onto the 3/4 x 3 inch Very Vanilla CS.

Punch the leaves out with the Autumn Punch Pack leaf punches. I punched out 3 of each of the colors of scrap CS with a mixture of the two leaf types.

The easiest way to adhere the leaves to the card is with the Mini Glue Dots. I stick the end of the leaf onto the Mini Glue Dot right on the roll. When I am ready to use the leaf, I just carefully peel it off of the sheet.

Use the Bone Folder to make a crisp fold at the 4 1/4 inch score line on the Very Vanilla CS card base. Adhere the 4 x 5 1/4 inch Bumble Bee CS and then the Forever Gold Laser-Cut Specialty Paper panel. To adhere the gold panel, I applied the Tombow Multipurpose Liquid Glue around the perimeter very sparingly. Adhere the Gold Hoop Embellishment by applying the Liquid Glue to the back sparingly. Put in place on the card front and apply pressure by placing something like a large punch on top to weight it down for 5 minutes.

Start by applying two Gold Brushed Metallic CS oak leaves slightly to the left of center on the Gold Hoop.

Add one leaf at a time behind the oak leaves. Use a mixture of the colors and different leaf types. Go as far as is pleasing to you.

Cut a banner end on the sentiment card piece. Apply the sentiment to the card with Stampin’ Dimensionals. Add a leaf if desired on the end of the sentiment.

This is a little difficult to see. I used the gold twine in the Forever Greenery Trim Combo Pack to make two bows. The twine was tied onto the two Acorn Trinkets before tying the bow.

To adhere the Acorn Trinkets and bows, use the Mini Glue Dots. Transfer two Mini Glue Dots with the Take Your Pick Tool and place them at the base of the gold oak leaves. Adhere the bow with the Acorn Trinkets, then apply another Mini Glue Dot and adhere the second gold twine bow. NOTE: This card will not be able to be mailed in a standard envelope because the trinkets are too large. You will need to mail it in a bubble envelope.

Now for the Bling! I added the Mango Melody sequins from the Artistry Blooms Sequins. They are very subtle but do add a little more sparkle to the card. Tip: Use the Take Your Pick tool to transfer the sequins-much easier. If you do not yet have the Take Your Pick tool, you can use a toothpick.

Viola! There you have a shiny golden leaf wreath for Autumn!

Thank you for viewing my blog today. Please “like” my blog and leave a comment to let me know what you think. And remember to mail this one in a bubble envelope because of the Acorn Trinkets.

Designer Series Paper sale is coming! From October 1-31, 2020 many of the Designer Series Papers will be 15% off! Stock up and save!

Product List

Theresa

Posted in 2020-2021 Stampin' Up! Catalog, 3D Technique, Avid Stamper, Fun/Fancy fold card, Gratitude/ Thanks, Stampin" Blends Alcohol Markers, Thanksgiving

Fun Fold Friday Box Pop Up Card with Country Home and Jar of Flowers and Coloring Tips

First I just want to take a moment to remember and reflect on all of those affected by the horrific events on September 11, 2001.

For today I have a special fun fold for you. This is a little challenging, but I will give step by step instructions. Warning, there are a lot of photos to help show how I created this card.

The Country Home and Jar of Flowers stamp sets pair together nicely. I love the sunflowers because they remind me of the approaching Autumn with their golden yellow and brown colors. The pop-up box of flowers on the inside of the card is a nice surprise!

Measurements: Cajun Craze Card Stock (CS) card base: 5 1/2 x 8 1/2 inches with a score line at 4 1/4 inches; Crumb Cake CS: 5 1/4 x 8 inches with a score line at 4 inches, 3 3/4 x 5 inches and 1 x 3 inches; Very Vanilla CS: 3 1/2 x 4 3/4 inches, 3 x 5 inches, 3/4 x 3 3/4 inches and two 1 x 1 1/2 inches.

I drew dark solid lines to indicate cutting and dashed lines for scoring. You do not need to draw the lines. First you are going to cut the 5 1/4 x 8 inch Crumb Cake CS that has the score line at 4 inches. Using your Paper Trimmer place the 5 1/2 inch side on top with the left edge at 1 inch. Cut from 2 1/2 to 5 1/2 inches. Move the left edge to 2 1/2 and make the same cut.

Turn the Crumb Cake CS until the 8 inch side is on top. With the left edge at 2 1/2 inches make a score line between the cuts from 1 inch to 2 1/2 inches. Move the left edge to 5 1/2 inches and make another score line like the first. Now you can fold the card piece so that a little box pops out.

Flip the Crumb Cake card piece and place it inside the Cajun Craze CS card base to get an idea of what it will look like.

Cut the 1 x 3 inch Crumb Cake CS in half at 1 1/2 inches. Make a scoreline at 1 inch lengthwise. Trim the corners as shown. These will be the flaps for the box top. Adhere the box flaps.

Close the card piece after you adhere the box tops to ensure it will lie flat. If not, trim the corners of the flaps a little more.

Now for the stamping! Use the Memento black ink to stamp the images that will be colored with the Stampin’ Blends Alcohol Markers. Tip: The Memento does not bleed as much as the regular ink when colored with the alcohol marker. Stamp the milk can from the Country Home stamp set onto the bottom of the 3 1/2 x 4 3/4 inch Very Vanilla CS. Stamp the bunch of sunflowers from the Jar of Flowers stamp set above the milk can, and onto the 3 x 5 inch Very Vanilla CS. Tip: To get the best stamped image with the Photopolymer stamp, you can use the Stampin’ Pierce mat or a catalog underneath. I simply forgot to use one this time.

Use Early Espresso ink to stamp the sentiment “Happy Harvest Blessings” onto the 3/4 x 4 inch strip of Very Vanilla CS. Next stamp the sentiment “You are the happy to my day” onto the Crumb Cake insert to the right hand side of the box.

I included a lot of photos to show you how I go about coloring with the Stampin’ Blends Alcohol Markers. This is just one way to go. Feel free to color how you would like. For the sunflowers I used the light and dark version of the following colors: Daffodil Delight, Mango Melody, Just Jade, Shaded Spruce, Calypso Coral and Cinnamon Cider.

For the small flower, I first colored in with the Light Calypso Coral. Then I colored the Dark Calypso Coral around the edges followed by coloring with the Light Calypso Coral to blend the dark into the light.

For the sunflowers I found it easier to color in the Dark Daffodil Delight first, then add the Light Daffodil Delight.

I added some Light Mango Melody to accentuate the shadows on the petals behind the other petals. I realized I had forgotten the little buds on the right, so I colored them in with the Light and Dark Calypso Coral.

I colored the center of the sunflower with the Light Cinnamon Cider leaving a ring that was not colored in. Next I colored in the very center and added some shading with the Dark Cinnamon Cider. Lastly, I colored the ring with the Light Daffodil Delight.

To color the leaves I started with the Light Just Jade, then added in some shading with the Dark Just Jade, followed by more Light Just Jade to blend the dark in. Lastly, I colored the small leaf fronds with the Dark Shaded Spruce at the base of the leaf, then the Light Shaded Spruce to finish.

The milk can is colored with the Light and Dark versions of Smoky Slate and Gray Granite.

I started with the Dark Smoky Slate and shaded in the borders of the milk can. My goal was to make it appear more rounded. I colored the right side a little more heavily than the left. Next I blended in the Light Smoky Slate followed by the Light Gray Granite. Tip: For better results I have found it easier to use the fine tip first when trying to make the colors gradated .

I added a single coat of the Light Gray Granite with the brush tip to blend everything together. I colored more shading with the Dark Smoky Slate to enhance the darker edges. You may set this aside until later.

I repeated the coloring process for the other two sunflower stamped images.

To prepare the sunflowers to be adhered to the inside of the box, I first cut off the smaller buds and fern frond one image. Next I fussy cut both images. To make them easier to adhere, I added a little tab by adhering the Very Vanilla CS 1 x 1 1/2 inch strips to the back of the sunflowers.

I placed the sunflowers in the box, being mindful to keep the edges in the middle from crossing over the 4 inch score line on the Crumb Cake CS. Next I used the Scoring Tool to score the sunflowers in line with the outer edge of the box. I folded the sunflowers along the score line.

I adhered the Very Vanilla CS tab on the back of the sunflowers to the back of the Crumb Cake CS box, being sure to keep the folded edge in line with the outer edge of the box. Before the glue dried, I closed the Crumb Cake CS to be sure everything was lined up and the card would be able to close. I opened the Crumb Cake CS and applied glue to the folded portion of the sunflowers, then closed the Crumb Cake CS card piece again to smooth it out.

Things are going to get a little easier soon. To adhere the Crumb Cake CS card piece to the Cajun Craze CS card base, first lay the piece in the card and apply adhesive to one side. Close the card and rub firmly.

Open the card and apply adhesive to the other side. Close and rub firmly.

Yay! What an awesome pop-up card!

Adhere the milk can piece to the 3 3/4 x 5 inch Crumb Cake CS, then adhere that to the front of the Cajun Craze CS card base. Be sure to adhere it to the correct side! Ask me why I know this!

Add the sentiment “Happy harvest Blessings” with Stampin’ Dimensionals.

Viola! You made it through! I know that was long. The card is really awesome though. I hope you take a chance and give it a try.

Thanks so much for patiently viewing my blog today. Every once in awhile I need a challenge.

Stampin’ Up! products used to make this card are pictured below. Click on any photo to go to my online store or click on https://bit.ly/ShopTheresasTreasures

Product List

Have a great day and spend some time being creative!

Theresa

Posted in Aqua Painters, Gratitude/ Thanks, Thanksgiving

Harvest Blessings

Autumn leaves filling up the street; golden colors on the lawn, natures trick or treat.-Rusty Fischer

I just love the coolness and freshness of fall! With the holidays approaching, it is a great time to stock up on some cards. Here is a card of thanks.

This beautiful fall card is a lot of fun to make because it involves using the Aqua Painter to watercolor the background. I CASE’d this card from one done by Peggy Noe. This card is for the more avid stamper as it uses 3 different stamp sets.

Measurements: Very Vanilla card stock card base: 8 1/2 x 5 1/2 inch card base scored at 4 1/4 inches and a 3 1/4 x 3/4 inch strip; Pumpkin Pie card stock: 5 1/8 x 3 1/8 inches; Fluid 100 Watercolor paper: 5 x 3 inches. You will also need ribbon from the Gather Together combo pack, Leaves Trinkets and of course an Aqua Painter. This card was made with Cajun Craze and Pumpkin Pie Stampin’ Up! ink.

First you need to use the Aqua Painter to moisten the watercolor paper. Gently squeeze the Aqua Painter until a drop of water comes to the tip of the brush. Now spread water evenly over the watercolor paper. Note: I placed the watercolor paper on my Stampin’ Pierce mat because the first stamp is a Photopolymer. The black paper is just so you can see the watercolor paper better.

Stamp the wheat bundle in Cajun Craze onto the moist watercolor paper. The more water on the paper, the more blurred the image will be. Note: The wheat bundle is from the Stampin’ Up! Gather Together stamp set.

Continue to stamp around the edge. Use the Aqua Painter again to smear the ink a little and add color to the rest of the watercolor paper.

Take the paper off the Stampin’ Pierce mat because the next stamp is red rubber. Keeping the watercolor paper moist, stamp the flower bunch in Pumpkin Pie ink around the edge of the watercolor paper. Note: The flower is from the Stampin ‘ Up! Healing Hugs stamp set.

Use the Aqua Painter to smear the Pumpkin Pie color onto the rest of the watercolor paper. Let dry or use a heat tool to expedite the drying process.

Clean the Aqua Painter by squeezing out water onto a paper towel until it runs clear.

Stamp the sentiment “Happy Harvest Blessings” in Cajun Craze. Note: This sentiment is from Stampin’ Up! Country Home stamp set.

Use your paper snips to cut a banner end on the left hand side. Tip: Start with a center cut, then cut from one corner to the center and repeat on the other side.

Use the bone folder to make a crisp fold at the 4 1/4 score line on the Very Vanilla card base.

Adhere the dried watercolor paper onto the 5 1/8 x 3 1/8 inch Pumpkin Pie card piece. Flip over to rub on the back of the piece to ensure the adhesive sticks and you don’t smear the ink.

Apply a glue dot to the ribbon by pressing the ribbon onto the roll. Put a glue dot on each end.

Line up the ribbon on the front, then flip over and press to adhere the glue dots.

Use the Cajun Craze colored twine to tie around the card and make a bow slightly to the left of center. Adhere this piece to the Very Vanilla card base.

Apply Stampin’ Dimensionals to the back of the sentiment. Tip: I cut my Dimensionals in half to make them last longer.

Position the sentiment on the bottom right hand side of the stamped piece. Use glue dots to adhere the Leaves Trinkets just under the bow.

Tip: Pick up a glue dot with a Pierce tool and apply it to the card front behind the trinkets. This will stabilize the bow and Trinkets so they do not flop around.

And there you have a beautiful fall card!

Stampin’ Up! products used include: Stamp Set: Gather Together, Country Home and Healing Hugs; Paper: Very Vanilla card stock #101650, Pumpkin Pie card stock #105117, and Fluid 100 Watercolor Paper #149612; Ink: Cajun Craze #147085 and Pumpkin Pie #147086; Blocks: D #118485 and H #118490; Adhesive: Mini Glue Dots #103683, Stampin’ Dimensionals #104430 and Multipurpose Liquid Glue #110755; Ribbon and twine: Come to Gather Ribbon Combo Pack #150456; Leaves Trinkets #146343; Aqua Painter #103954, Stampin’ Pierce Mat #126199 and Paper Snips #103579. The Take Your Pick #144107 can be used as the pierce tool.