Posted in 2025-2026 Stampin' Up! Annual Catalog, Around the World on Wednesday Blog Hop, Designer Series Paper, Gratitude/ Thanks

Around the World On Wednesday Blog Hop-June 2025- Out of the Box Challenge with Florals in Bloom

Hello and welcome! I am Theresa McEntee, creator of Theresa’s Treasures Paper Crafts. Today I have the pleasure of participating in the Blog Hop with Around the World on Wednesday (AWOW).

2025 marks a special milestone. We are celebrating 5 fabulous years of creative inspiration together! In order to honor the occasion, we are CASEing (Copy and Selectively Editing) one of our talented members each month. This month we are happy to focus on the unique and awesome work of Mikaela Titheridge from The Crafty Oink Pen.

The AWOW team put together a thematic hop to give you some inspiration for your own crafting. “Out of the Box” is this month’s theme because Mikaela often uses projects in a new and unique way. I chose one of Mikaela’s unique cards to CASE.

I also got some inspiration from a card done by Stamptastic Designs.

My Project for today

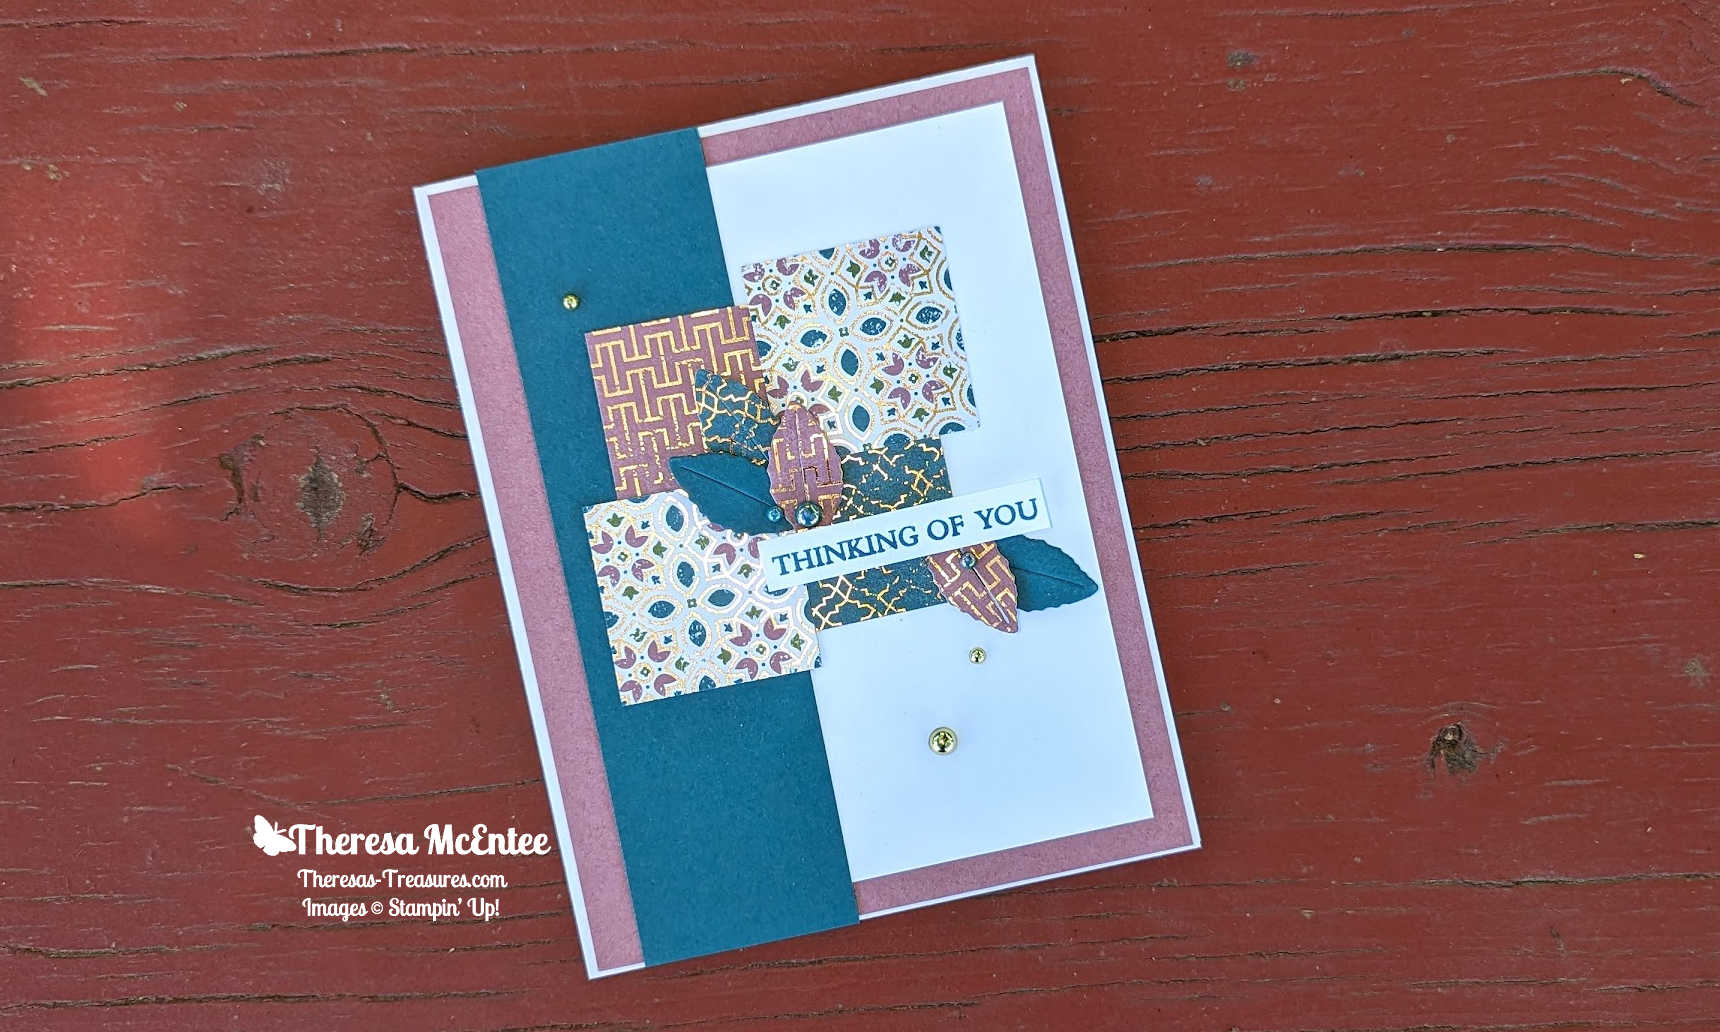
This card was made using several different stamp sets: Pretty Florals, Trusty Tools, Terrific Toadstools and Simply Said. The focus is really on the Florals in Bloom Designer Series Paper. I am so in love with this patterned paper! Each design is just wonderful!

When I saw Mikaela’s card with the torn paper, I knew that I wanted to make one too. I did mine a little bit differently. Instead of having a front panel, I have a split card front.

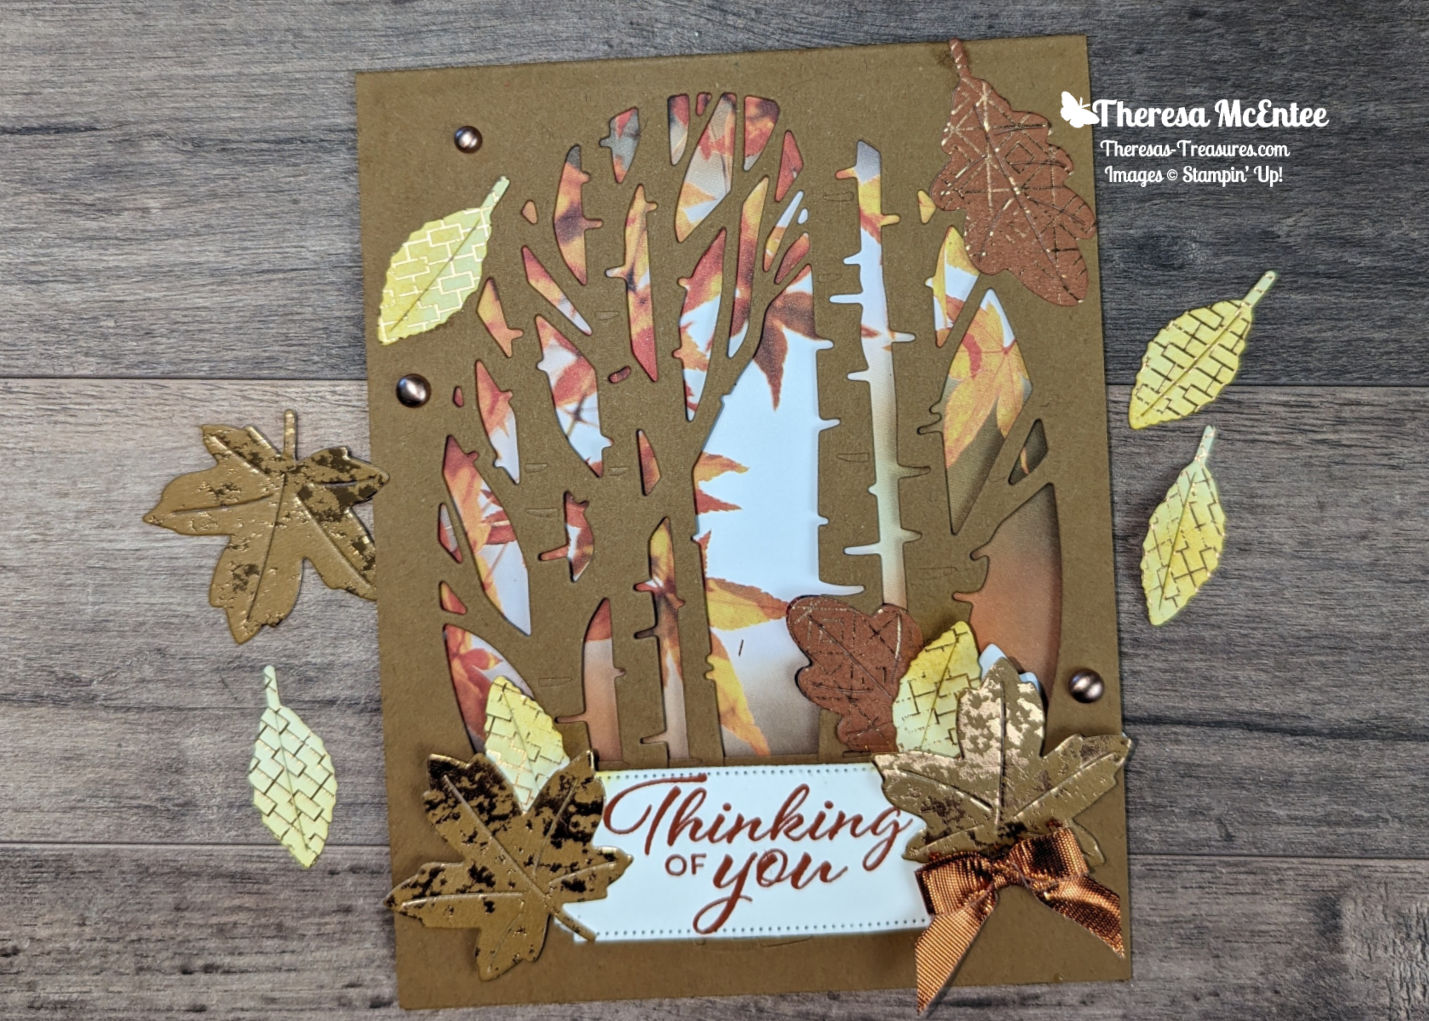
I made a second card as I was having so much fun tearing paper! Here is the other version.

The AWOW Team

I am so glad you have joined me today in this worldwide hug that stretches all the way from Australia to Alaska across twelve different time zones. Below is an image of the whole crew and where they are from around the globe. Such a talented and wonderful group of people! You will want to visit everyone to be sure to see all the fabulous projects!

We all love sharing the joy of creating with you through projects from our individual parts of the world. I hope that you will be filled with lots of inspiration!

See More Inspiring Projects

Blog Hop links

Leonie Stuart – AU
Rochelle Laird-Smith – AU
Cheryll Miller – AU
Marga Bultena – NL
Kim Fee – UK
Annette Ball – CA
Kelly Taranto – US
Chris Smith – US
Theresa McEntee – US
Teri West – US
Cheryl Hamilton – US

Thank you so much for visiting today. I hope you enjoyed learning more about our projects. Have a most wonderful day!

Theresa

Posted in Designer Series Paper

Stampin’ Up! Designer Series Paper Sale!

Save 15% on the following Stampin’ Up! Designer Series Papers August 6-31, 2024!

Choose as many as you like, but don’t delay-they may sell out!

Ciao! Theresa

Clickable Supply List

Product List
Bright & Beautiful 6" X 6" (15.2 X 15.2 Cm) Designer Series Paper
$12.50
Countryside Inn 12" X 12" (30.5 X 30.5 Cm) Designer Series Paper
$12.50
Country Lace 12" X 12" (30.5 X 30.5 Cm) Designer Series Paper
$12.50
Country Woods 12" X 12" (30.5 X 30.5 Cm) Designer Series Paper
$12.50
Full Of Life 6" X 6" (15.2 X 15.2 Cm) Designer Series Paper
$12.50
Lily Pond Lane 6" X 6" (15.2 X 15.2 Cm) Designer Series Paper
$12.50
Mediterranean Blooms 12" X 12" (30.5 X 30.5 Cm) Designer Series Paper
$12.50
Perennial Lavender 12" X 12" (30.5 X 30.5 Cm) Designer Series Paper
$12.50
Take To The Sky 12" X 12" (30.5 X 30.5 Cm) Designer Series Paper
$12.50
Thoughtful Journey 6" X 6" (15.2 X 15.2 Cm) Designer Series Paper
$12.50
To Market 12" X 12" (30.5 X 30.5 Cm) Designer Series Paper
$12.50
Unbounded Beauty 12" X 12" (30.5 X 30.5 Cm) Designer Series Paper
$12.50
Wildly Flowering 12" X 12" (30.5 X 30.5 Cm) Designer Series Paper
$12.50
Winter Meadow 12" X 12" (30.5 X 30.5 Cm) Designer Series Paper
$12.50
Posted in 2024-2026 Stampin' Up! Annual Catalog, Designer Series Paper, Fun/Fancy fold card, Ink & Inspiration Blog Hop, Online Exclusives

Latte Love & Coffee with Friends for the Ink and Inspiration Blog Hop-June 2024

Hello fellow stampers! I am Theresa McEntee-author of Theresa’s Treasures Paper Crafts. I am hopping along with the Ink & Inspiration Blog Hop crew today. You can visit super awesome blogs from around the world! The list to follow the hop is at the end of my blog post. Please stop by and see everyone’s projects!

The Ink & Inspiration Challenge is a sketch challenge this month. The image inspired me and I immediately saw the possibility of a Fun Fold. I really love to figure out new ways to make a card!

I absolutely love coffee! There are so many good memories related to relaxing with a cup of delicious coffee. For this Fun Fold card I used two stamp sets- Latte Love & Coffee with Friends. You can find Coffee with Friends in the Stampin’ Up! 2025-26 Annual Catalog. The Latte Love is an Online Exclusive.

Each of these stamp sets has images that can be used for a multitude of handmade cards. I chose the women sitting on the steps with her cup of coffee because it reminded me of myself. I love to contemplate life with a hot cup of rich savory coffee!

There are several great dies to accompany the Latte Love stamp set. I only used the outline of the cup.

The “A Little Latte” Designer Series Paper is so fun with several designs!

Thinking about possibilities for Sketch 105 led to the creation of this unique Fun Fold.

Measurements

  • Pecan Pie cardstock card base: 5 1/2″x 8 1/2″ scored at 4 1/4″
  • Pecan Pie cardstock: 3″x 4″
  • Calypso Coral cardstock: 2 3/8″ x 3 3/8″, 2 1/4″ x 2 3/4″ (to die cut coffee cup)
  • Basic White cardstock: 2 1/4″ x 3 1/4″ (for the image of the women), 2 3/4″ x 3 3/4″ (front inside piece), 3 3/4″ x 5″ (back inside piece), 2″ x 2″ (to stamp and die cut coffee)
  • A Little Latte DSP: 5 3/8″ x 8 1/4″ scored at 4 1/8″ (see template below)

DSP Template

The image of the women with the cup of coffee was colored with the Watercolor Pencils.

Supplies

  • Stamp Set: Latte Love & Coffee with Friends
  • Dies: Latte Love
  • Ink: Memento, Early Espresso, Pecan Pie & Calypso Coral
  • Embellishments: Adhesive-Backed Swirl Dots
  • Ribbon: Linen Thread
  • Watercolor Pencils Assortment 1 & 2

Instructions

  1. Use Pecan Pie Ink and stamp-off once to stamp the coffee for the coffee cup onto the Basic White cardstock. Die cut the coffee.
  2. Stamp the image of the women in Memento Ink. Color as desired.
  3. The sentiments are all stamped in Early Espresso Ink. (see below)
  4. For the back inside card piece, use Memento Ink to stamp the image of the two coffee cups with the croissants. Color as desired.
  5. Stamp the splatter and the cup rings with Pecan Pie Ink, some Stamped-Off once and some at full strength. (see below)
  6. Now stamp the ariel view of the coffee cup in Calypso Coral Ink onto the Calypso Coral cardstock. Die cut the coffee cup.

Front inside and Back inside

  1. Adhere the back inside card piece to the inside of the Pecan Pie cardstock card base. Close the card.
  2. Next fold the “A Little Latte” DSP at the 4 1/8″ score line. Adhere the DSP to the front of the Pecan Pie cardstock card base so that it will open like a second card.
  3. Open the DSP and adhere the front inside card piece to the inside of the DSP. Close the DSP.
  4. Now adhere the Basic White cardstock with the image of the women on it to the Calypso Coral cardstock. Use Stampin’ Dimensionals to adhere this to the Pecan Pie cardstock.
  5. Apply the Multipurpose Liquid Glue to the back of the bottom corner and adhere the card piece with the image of the women on it to the front of the DSP card piece.
  6. Glue the Basic White cardstock stamped with the coffee to the inside of the Calypso Coral cardstock coffee cup. Use the glue to adhere the cup to the upper right-hand corner of the card piece with the image of the woman on it.
  7. Add the Swirl Dots to the upper right-hand corner or as desired.

Voila!

I hope you enjoyed Sketch 105 and my Fun Fold card! Be sure to join the Blog Hop to see more interpretations of Sketch 105!

Blog Roll Call

Have a most wonderful day!

Theresa

Posted in 2024-2026 Stampin' Up! Annual Catalog, Around the World on Wednesday Blog Hop, Designer Series Paper, Gratitude/ Thanks, Nature, Summer

Around the World On Wednesday Blog Hop-May 2024- Sketch 106 Challenge with Spotlight on Nature

Hello and welcome! I am Theresa McEntee, creator of Theresa’s Treasures Paper Crafts. Today I have the pleasure of participating in the Blog Hop with Around the World on Wednesday (AWOW) organized by Angie McKenzie. 

On the second Wednesday of each month, the AWOW team put together a thematic hop to give you some inspiration for your own crafting. Sketch 106 is this month’s challenge.

I turned the sketch around to fit my idea.

My Project for today

This card was made using the Spotlight on Nature Bundle. The stamp set is just beautiful. The dies are a series of layering circles with different borders.

I wanted to showcase the 2024-2026 In Color Designer Series Paper. For this card, each of the five new In Colors were chosen in a different pattern of the Designer Series Paper. The 2024-26 In Colors are: Pretty in Pink, Peach Pie, Shy Shamrock, Summer Splash and Petunia Pop.

The AWOW Team

I am so glad you have joined me today in this worldwide hug that stretches all the way from Australia to Alaska across twelve different time zones. Each month this group of creative friends prepare a project for a theme. Below is an image of the whole crew and where they are from around the globe. Such a talented and wonderful group of people! You will want to visit everyone to be sure to see all the amazing projects!

We all love sharing joy with you through projects from our individual parts of the world. I hope that you will be filled with lots of inspiration!

See More Inspiring Projects

Jan Clothier – NZ

Leonie Stuart – AU

Rochelle Laird-Smith – AU

Cheryll Miller – AU

Aurélie Fabre – FR

Mikaela Titheridge – US

Angie McKenzie – US

Kelly Taranto – US

Shel Anderson – CA

Sharon Hashimoto Burkert – US

Chris Smith – US

Theresa McEntee – US

Bree Renwick – US

Lori Willcox – CA

Teri West – US

Cheryl Hamilton – US

Thank you so much for visiting today. I hope you enjoyed learning more about our projects. Have a most wonderful day!

Theresa

Posted in 3D Embossing Folder, Designer Series Paper, Ink & Inspiration Blog Hop, Love/Affection, Online Exclusives, Stampin" Blends Alcohol Markers

Online Exclusive Simply Zinnia for the Ink and Inspiration Sketch 104 Challenge Blog Hop-March 2024

Here is my Online Exclusive Simply Zinnia card for the Sketch 104 Challenge!

Hello fellow stampers! I am Theresa McEntee-author of Theresa’s Treasures Paper Crafts. I am hopping along with the Ink & Inspiration Blog Hop today. You can visit super awesome blogs from around the world! The list to join the hop is at the end of my blog post. Please stop by and see everyone’s projects!

The Ink & Inspiration Challenge this month is a Sketch Challenge. I was already playing around with the Simply Zinnia stamp set. I had stamped a bunch of the large zinnia and colored them with the Stampin’ Blends Alcohol Markers. If you haven’t tried alcohol markers yet, don’t wait any longer. The alcohol markers make coloring so fun and rewarding!

Since I already had several zinnia colored, I arranged them to correspond to the Sketch 104 Challenge. I was thrilled to see how nice they all looked together!

I love the Flowering Zinnia Designer Series Paper and but also wanted to use the Zinnia 3D Embossing Folder. So I decided to emboss the Designer Series Paper. It is very subtle and adds texture to the card.

Measurements

  • Melon Mambo cardstock card base: 5 1/2″ x 8 1/2″ scored at
    4 1/4″
  • Basic White cardstock: 4 1/4″ x 5 1/2″ (for stamping the zinnia & leaves), 4″ x 5 1/4″ (inside) and 1/2″ x 5 1/2″ (for sentiment)
  • Flowering Zinnia Designer Series Paper, Petal Pink polka dot design: 4 1/8 ” x 5 3/8″ (to die cut with the largest Deckled Rectangle Die & emboss with the Zinnia 3D Embossing Folder)
  • NOTE: save the edges when you die cut the Deckled Rectangle to use on the inside of the card

Supplies

  • Stamp Set: Simply Zinnia
  • Dies: Simply Zinnia & Deckled Rectangle
  • Embossing Folder: Zinnia 3D
  • Ink: Blackberry Bliss and Memento Ink Pads
  • Stampin’ Blends: Lemon Lolly, Daffodil Delight, Pumpkin Pie, Flirty Flamingo, Melon Mambo, Lemon Lime Twist, Old Olive & Mossy Meadow
  • Embellishments: Adhesive-Backed Shiny Sequins

Instructions

  1. Fold the Melon Mambo cardstock card base at the 4 1/4″ scoreline and burnish with the Bone Folder. Set aside.
  2. Die cut the Flowering Zinnia Designer Series Paper with the largerst Deckled Rectangle Die. Save the edges to use for the inside of the card.
  3. Run the Deckled Rectangle through the Stampin’ Cut & Emboss Machine with the Zinnia Embossing Folder. Set aside.
  4. Use Memento Ink to stamp the large zinnia three times and the leaves twice onto the 4 1/4″ x 5 1/2″ Basic White cardstock.
  5. TIP: Use the Heat Tool to dry the Memento Ink. Then when you use the Lemon Lolly Stampin’ Blend, the black Memento will not bleed into the Lemon Lolly.
  6. Color the images as desired. I usually start by coloring the shadows with a the dark shade. Then I blend it with a medium shade. And finally I blend everything with the lighter color.
  7. Die cut the zinnias and leaves with the Simply Zinnia Dies. Set aside.
  8. Use Blackberry Bliss Ink to stamp the sentiment onto the
    1/2″ x 5 1/2″ Basic White cardstock. Stamp in the center as you will use the whole piece.
  9. For the inside, use the scrap from cutting the Deckled Rectangle from the Flowering Zinnia Designer Series paper and adhere it to the 4″ x 5 1/4″ Basic White cardstock as shown below.

Assembling the Card

  1. Adhere the inside card piece to the inside of the Melon Mambo cardstock card base.

  1. Adhere the die cut and embossed Flowering Zinnia Designer Series Paper to the front of the card base.
  2. Use Stampin’ Dimensionals to adhere the sentiment to the front of of the card.
  3. Arrange the 3 zinnias on the card front. Adhere the top zinnia flat to the card front. Use 3 thicknesses of Basic White cardstock on the back of the middle zinnia. Then adhere the bottom zinnia with Stampin’ Dimensionals. Tip: place Dimensionals in the center of the back of the zinnia so you can place the leaves more easily.
  4. Adhere the leaves.
  5. Use Wink of Stella on the zinnia for extra sparkle.
  6. Embellish with the Adhesive-Backed Shiny Sequins as desired.

I hope you enjoyed my interpretation of The Sketch 104 Challenge. Be sure to visit each of the blogs below to see more ideas!

Blog Roll Call

Have a most wonderful day!

Theresa

Order Supplies Here:

Product List
Simply Zinnia Bundle (English)
$52.00
Deckled Rectangles Dies
$30.00
Zinnia 3 D Embossing Folder
$11.00
Blackberry Bliss Classic Stampin' Pad
$9.00
Tuxedo Black Memento Ink Pad
$6.50
Lemon Lolly Stampin’ Blends Combo Pack
$10.00
Daffodil Delight Stampin' Blends Combo Pack
$10.00
Pumpkin Pie Stampin' Blends Combo Pack
$10.00
Flirty Flamingo Stampin' Blends Combo Pack
$10.00
Melon Mambo Stampin' Blends Combo Pack
$10.00
Lemon Lime Twist Stampin’ Blends Combo Pack
$10.00
Old Olive Stampin' Blends Combo Pack
$10.00
Mossy Meadow Stampin' Blends Combo Pack
$10.00
Melon Mambo 8-1/2" X 11" Cardstock
$10.00
Basic White 8 1/2" X 11" Cardstock
$10.50
Flowering Zinnias 12" X 12" (30.5 X 30.5 Cm) Designer Series Paper
$12.50
Adhesive Backed Shiny Sequins
$7.50
Clear Wink Of Stella Glitter Brush
$8.00

Promotions

Shop retiring products in the 2023-24 Annual Catalog now and get up to 60% off HERE

Check out the retiring products in the 2024 january to April Mini Catalog HERE.

Posted in Designer Series Paper, Gratitude/ Thanks, Inspiration in Ink Blog Hop, Online Exclusives

Online Exclusive Simply Zinnia Bundle for the Inspirations in Ink March 2024 Blog Hop

I just love this Thank You card made with the Online Exclusives-Simply Zinnia Bundle!

Welcome! Thank you for visiting Theresa’s Treasures Paper Crafts! I am Theresa, a Stampin’ Up! Demonstrator in Arizona, USA. Today is the monthly Inspirations in Ink Blog Hop! I am excited to be hopping with talented demonstrators from around the world. Be sure to check out everyone’s projects using Stampin’ Up! Online Exclusives!

The Simply Zinnia Bundle is one of many Online Exclusives! It is only available in my Online Store. When you are ready, you may order from my Online Store HERE.

I enjoyed using the Stampin’ Blend Alcohol Markers to color the zinnia-which is one of my favorite flowers.

The Flowering Zinnias Designer Series Paper (DSP) is so vibrantly colorful! I wanted to be sure to use the DSP on my card! Too many choices!

Measurements

  • Melon Mambo cardstock card base: 5 1/2″ x 8 1/2″ scored at 4 1/4″
  • Flowering Zinnias DSP:
    • Large Floral with White background: 4 1/4″ x 5 1/4″ (die cut with the 2nd to largest Deckled Rectangle Die)
    • Melon Mambo floral design: 3 1/2″ x 4 3/4″ (die cut with the 3rd to the largest Deckled Rectangle Die)
    • Floral Design with Melon Mambo background: 1 1/4″ x 5 1/2″
  • Basic White cardstock: 2 1/2″ x 5″ (for stamping zinnia and leaf),
    1 1/4″ x 4 1/4″ (for sentiment) and 4″ x 5 1/4″ for inside

Supplies

  • Stamp Set: Simply Zinnia
  • Dies: Simply Zinnia & Deckled Rectangle
  • Ink: Blackberry Bliss & Memento ink pads
  • Stampin’ Blends: Lemon Lolly, Daffodil Delight, Flirty Flamingo, Melon Mambo, Lemon Lime Twist, Old Olive and Mossy Meadow
  • Embellishments: Adhesive-backed Shiny Sequins

Instructions

  1. Fold the Melon Mambo cardstock card base in half and burnish with a Bone Folder. Set aside.
  2. Die cut the DSP and set aside.
  3. Stamp the large zinnia image in Memento Ink onto the 2 1/2″ x 5″ Basic White cardstock. Stamp the leaves. TIP: Let dry or use your Heat Tool to dry the image more quickly so that the black ink doesn’t affect the Lemon Lolly Stampin’ Blend Ink.
  4. Color images as desired. Die cut with the Simply Zinnia Dies.
  5. Stamp the sentiment for the front of the card in Blackberry Bliss Ink onto the 1 1/4″ x 4 1/4″ Basic White cardstock. Use the largest Deckled Rectangle to die cut the edges of the sentiment.
  6. For the inside of the card, stamp the sentiment in Blackberry Bliss Ink. Stamp the trio of zinnias in Memento Ink in the lower right-hand corner. Let dry or use the Heat Tool on the trio. Color with Stampin’ Blends as desired.
  1. Adhere the inside card piece to the inside of the Melon Mambo cardstock card base.
  2. Adhere the DSP with the white background onto the front of the card base. Follow with the Melon Mambo floral DSP. Finish with the Floral strip with the pink background across the middle.
  3. Use Stampin’ Dimensionals to adhere the sentiment, zinnia and leaves.
  4. Add Bling! with the Adhesive-Backed Shiny Sequins as desired.

Voila!

Thank you so much for visiting today! I hope you enjoyed my project. Please visit all the blogs in the Inspirations In Ink Blog Hop. You will be amazed and inspired by all the fun and creative projects made by the Inspirations In Ink demonstrators. 

You are currently visiting Theresa McEntee-USA creator of Theresa’s Treasures Paper Crafts.

Blog Roll Call

Clickable Supply List

Product List
Simply Zinnia Bundle (English)
$52.00
Deckled Rectangles Dies
$30.00
Blackberry Bliss Classic Stampin' Pad
$9.00
Tuxedo Black Memento Ink Pad
$6.50
Lemon Lolly Stampin’ Blends Combo Pack
$10.00
Daffodil Delight Stampin' Blends Combo Pack
$10.00
Flirty Flamingo Stampin' Blends Combo Pack
$10.00
Melon Mambo Stampin' Blends Combo Pack
$10.00
Lemon Lime Twist Stampin’ Blends Combo Pack
$10.00
Old Olive Stampin' Blends Combo Pack
$10.00
Mossy Meadow Stampin' Blends Combo Pack
$10.00
Melon Mambo 8-1/2" X 11" Cardstock
$10.00
Basic White 8 1/2" X 11" Cardstock
$10.50
Flowering Zinnias 12" X 12" (30.5 X 30.5 Cm) Designer Series Paper
$12.50
Adhesive Backed Shiny Sequins
$7.50

Monthly Paper Pumpkin Subscription

Do you want to learn to stamp? Or do you want to build up some supplies while making awesome projects?

Start out by trying a monthly paper crafting kit! The Paper Pumpkin Monthly Subscription delivers a kit with everything you need to make a project-right to your door! Everything you need is included! You even get a ink spot in a different color every month!

Sign up for a Pre-paid Paper Pumpkin Subscription HERE.

Special Add-On Die Set for the April Paper Pumpkin is available in my Online Store HERE!

Have a most wonderful and creative day!

Ciao!

Theresa

Posted in 2024 Stampin' Up! January to April Mini Catalog, Around the World on Wednesday Blog Hop, Birds, Designer Series Paper, encouragement

Filled with Happiness Good Day Card-Around the World On Wednesday Blog Hop-March 2024-March Blues

Hello and welcome! I am Theresa McEntee, creator of Theresa’s Treasures Paper Crafts. Today I have the pleasure of participating in the Blog Hop with Around the World on Wednesday (AWOW) organized by Angie McKenzie with my Filled with Happiness Good Day Card.

On the second Wednesday of each month, the AWOW team put together a thematic hop to give you some inspiration for your own crafting. March Blues is this month’s theme.

I was really inspired by all of the beautiful blues that Stampin’ Up! has! One of the awesome characteristics of Stampin’ Up products is that they all coordinate. I did not have any trouble finding Designer Series Paper, embellishments or ribbon to go with the March Blues. I was able to color with the Stampin’ Blends to create the Filled with Happiness Good Day Card.

My Project for today

Measurements

  • Misty Moonlight cardstock card base: 5 1/2″ x 8 1/2″ scored at 4 1/4″
  • Night of Navy cardstock: 2 3/8″ x 5 1/2″
  • Poetic Expressions Designer Series Paper: 2 1/4″ x 5 1/2″ and 3/4″ x 4 1/8″
  • Basic White cardstock: two at 3″ x 3 1/2″ and 4″ x 5 1/4″

Supplies

  • Filled with Happiness Stamp
  • Modern Oval Punch
  • Ink: Night of Navy
  • Stampin’ Blends: Pool Party, Boho Blue, Balmy Blue, Night of Navy & Misty Moonlight
  • Balmy Blue & White 1/2″ Variegated Ribbon
  • Iridescent Pastel Gems

Instructions

  1. Stamp the “Good Day” image in Night of Navy Ink onto one of the 3″ x 3 1/2″ Basic White cardstock pieces. Use scissors to cut around the outer border of the sentiment.
  2. On the other 3″ x 3 1/2″ Basic White cardstock piece, stamp the bird image in Night of Navy Ink. Use the Modern Oval Punch to punch the center out.
  3. Color the bird image with the Stampin’ Blends as desired.
  4. Adhere the Poetic Expressions Designer Series Paper to the Night of Navy cardstock. Wrap the Balmy Blue & White 1/2″ Variegated Ribbon around the middle. Adhere to the back with Mini Glue Dots.
  5. Adhere this piece to the middle of the front of the Misty Moonlight cardstock card base.
  6. Make a bow and set aside.
  7. Adhere the “Good Day” sentiment piece to the left side of the card front.
  8. Use Stampin’ Dimensionals to adhere the bird image to the center of the “Good Day” sentiment piece.
  9. Adhere the bow with a Mini Glue Dot.
  10. Embellish with the Iridescent Pastel Gems.

The AWOW Team

I am so glad you have joined me today in this worldwide hug that stretches all the way from Australia to Alaska across twelve different time zones. Each month this group of creative friends prepare a project for a theme. Below is an image of the whole crew and where they are from around the globe. Such a talented and wonderful group of people! You will want to visit everyone to be sure to see all the amazing projects!

We all love sharing joy with you through projects from our individual parts of the world. I hope that you will be filled with lots of inspiration!

See More Inspiring Projects

Jan Clothier – NZ

Leonie Stuart – AU

Rochelle Laird-Smith – AU

Cheryll Miller – AU

Ximena Morales – DE

Aurélie Fabre – FR

Mikaela Titheridge – UK

Annette Ball – CA

Angie McKenzie – US

Kelly Taranto – US

Sharon Hashimoto Burkert – US

Chris Smith – US

Tricia Butts – US

Theresa McEntee – US

Lori Willcox – CA

Cheryl Hamilton – US

Thank you so much for visiting today. I hope you enjoyed learning more about our projects. Have a most wonderful day!

Theresa

Supply List

Product List
Filled With Happiness Photopolymer Stamp Set (English)
$20.00
Modern Oval Punch
$22.00
Night Of Navy Classic Stampin' Pad
$9.00
Pool Party Stampin' Blends Combo Pack
$10.00
Balmy Blue Stampin' Blends Combo Pack
$10.00
Boho Blue Stampin’ Blends Combo Pack
$10.00
Misty Moonlight Stampin' Blends Combo Pack
$10.00
Night Of Navy Stampin' Blends Combo Pack
$10.00
Misty Moonlight 8-1/2" X 11" Cardstock
$10.00
Night Of Navy 8-1/2" X 11" Cardstock
$10.00
Basic White 8 1/2" X 11" Cardstock
$10.50
Poetic Expressions 12" X 12" (30.5 X 30.5 Cm) Designer Series Paper
$12.50
Balmy Blue/White 1/2" (1.3 Cm) Variegated Ribbon
$9.00
Iridescent Pastel Gems
$8.00
Posted in 2023 Stampin' Up! Holiday Mini Catalog, 2023-2024 Stampin' Up! Annual Catalog, Blending Brushes, Designer Series Paper, encouragement, Fun/Fancy fold card, Nature, Outdoors

Around the World On Wednesday Blog Hop-November 2023- Fall Color Challenge with Aspen Trees

Hello and welcome! I am Theresa McEntee, creator of Theresa’s Treasures Paper Crafts. Today I have the pleasure of participating in the Blog Hop with Around the World on Wednesday (AWOW) organized by Angie McKenzie. On the second Wednesday of each month, the AWOW team put together a thematic hop to give you some inspiration for your own crafting. “Fall colors in Paris” is a Color Challenge for this month’s theme.

My Project for today

I was creating this card in my head over several days. I really love this particular design in the All About Autumn 6″ x 6″ Designer Series Paper pack. I wanted to used the Aspen Trees Dies too.

I do look at a lot of projects that other talented crafters make. Some of those projects inspire me and help me to create my own project. I hope my project will inspire you!

Project Details

This card was made using a variety of stamps and dies. The Autumn Leaves stamp and Dies come as a bundle (#162186). I have really liked the Aspen Dies that go with the Perched in a Tree stamp set. The Layering Leaves stamp set is great for sentiments.

Project Details

Measurements

  • Pecan Pie cardstock card base: 4 1/4″ x 11″ scored at 5 1/2″
  • Pecan Pie cardstock: 1 3/8″ x 4 1/4″ for inside
  • All About Autumn 6″ x 6″ Designer Series Paper, Autumn Leaves photo design: 4″ x 5 1/2″ scored at 1/4″
  • Basic White cardstock: 4″ x 5 1/4″ and 1 1/2″ x 3″(sentiment)
  • Dry Brushed Metallic 12″ x 12″ Specialty Designer Series Paper: 1 3/4″ x 5″ to die cut the maple leaves
  • All About Autumn DSP: White/Copper Foil design: 2″ x 2 1/4″ to die cut the small leaves and Cajun Craze/Copper Foil design: 1″ x 4 1/2″ to die cut the oak leaves

Supplies

  • Stamps & Dies: Autumn Leaves stamp set & Dies, Aspen Tree Dies, Perched in a Tree stamp set and Layering Leaves stamp set
  • Ink: Daffodil Delight & Cajun Craze
  • Blending Brush
  • Brushed Metallic Adhesive Backed Dots
  • Copper & Natural Ribbon Combo
  • Stampin’ Dimensionals & Mini Stampin’ Dimensionals
  • Mini Glue Dots

Instructions

  1. Diecut all of the leaves and set aside.
  2. Use the Aspen Trees Die to diecut the front of the Pecan Pie cardstock cardbase.
  3. Adhere the Basic White cardstock to the 1/4″ edge of the All About Autumn DSP.

  1. Stamp the sentiment from the Perched in a Tree stamp set in Cajun Craze Ink onto the Basic White cardstock. Use the the Daffodil Delight Ink to Stamp Off once then stamp the image of the leaves from the Autumn Leaves stamp set around the sentiment.
  2. Adhere the Basic White cardstock to the inside back panel of the Pecan Pie cardstock card base.
  1. Stamp the sentiment ” Thinking of You” from the Layering Leaves stamp set onto the smaller piece of Basic White cardstock. Diecut with the label from the Autumn Leaves Dies.
  2. Use the Daffodil Delight Ink and a Blending Brush to color the small leaves diecut from the white/copper foil design of the All About Autumn DSP.
  1. Place the Silicon mat between the front panel of the card base and the All About Autum DSP layer to avoid getting glue on the inside layer.
  1. Position Mini Stampin’ Dimensionals on the tree trunks to adhere the sentiment label.
  2. Start to adhere the diecut leaves. Remember that they will show through on the inside.
  1. Adhere the Pecan Pie cardstock for the inside to cover where the sentiment shows through. Then position the leaves on the inside to hide the backside of the leaves from the frontside.
  1. Add a few more leaves to the cardfront taking care that they do not show through to the inside.
  2. Tie a bow with the Copper Ribbon and adhere with a Mini Glue Dot.

Voila! That is it!

The AWOW Team

Each month this group of creative friends prepare a project for a theme. Below is an image of the whole crew and where they are from around the globe. Such a talented and wonderful group of people! You will want to visit everyone to be sure to see all the amazing projects!

I am so glad you have joined me today in this worldwide hug that stretches all the way from Australia to Alaska across twelve different time zones.  We all love sharing joy with you through projects from our individual parts of the world. I hope that you will be filled with lots of inspiration!

See More Inspiring Projects

Order Supplies Here

Product List

Thank you so much for visiting today. I hope you enjoyed learning more about my project. Have a most wonderful day!

Theresa

Posted in 2023-2024 Stampin' Up! Annual Catalog, Blending Brushes, Designer Series Paper, Ink & Inspiration Blog Hop, Nature, Online Exclusives, Outdoors, Techniques, Winter Holiday

Grassy Grove and Horse & Sleigh for the Ink and Inspiration Blog Hop-October 2023

Hello fellow stampers! You are visiting with Theresa McEntee-author of Theresa’s Treasures Paper Crafts. I am hopping with the Ink & Inspiration Blog Hop today. There are several of us- you will find the list to follow the hop at the end of my blog post.

The Ink & Inspiration Challenge is both an image and a color challenge. I was inspired by the trees and sun because I felt a feeling of serenity while I was looking at the image. The color combination is just gorgeous! Many of my faves!

How To

  1. Measurements are at the end of the blog.
  2. Start out with the One Horse Open Sleigh Designer Series Paper on the left. I thought it was a little barren. After looking through all my stamp sets, I found the perfect tree in the Grassy Grove stamp set.
  3. Tear a piece of copy paper to make an uneven edge and use as a mask so that the trees appear further away. Stamp some trees in Starry Sky Ink. The mask also provides an edge to make a snow drift for the trees to be behind. Use a Small Blending Brush with the Starry Sky Ink and a light layer to make a soft snowdrift in front of the trees.
  4. Diecut the sun with the smallest of the Deckled Circle Dies from a piece of full stick sticky paper. Tip: Diecut through 2 or more sticky sheets so that the top one will still have a full stick.
  5. Apply a light layer of Crushed Curry Ink with a Small Blending Brush where you want the sun to be. Stick the sun mask on. Blend on more Crushed Curry Ink, then blend on a little Pumpkin Pie just around the edge.
  6. To make the sun’s rays, use a scrap piece of Basic White cardstock and a Small Blending Brush. Apply a small amount of Crushed Curry Ink to the brush and very gently blend the color along the edge of the scrap of cardstock. Move the scrap a little and repeat until all the rays are done.
  7. Add more trees in Mossy Meadow Ink and Blackberry Bliss Ink.
  8. The sentiment is from the Horse & Sleigh stamp set. Stamp the sentiment for the front of the card in Starry Sky Ink onto a strip of Basic White cardstock measuring 5/8″ x 4 1/4″.
  9. The clouds come from the Trucking Along stamp set and are stamped in Gray Granite Ink.
  1. Use the torn piece of copy paper again to create the inside of the card. Stamp the trees that are in the background with Starry Sky Ink. Then as you move closer, stamp the trees in Mossy Meadow Ink then Blackberry Bliss Ink. Use a Small Blending Brush and a light layer of the Starry Sky Ink to make the snowdrifts.
  2. Stamp the sentiments for the inside of the card in Starry Sky Ink.
  3. Adhere all of the corresponding cardpieces. Use Stampin’ Dimensionals to adhere the front panel.

Add Bling

Use the 2022-24 In Color Pearls for the Bling by applying 3 of the Starry Sky pearls.

Measurements

This is a 5″ x 7″ card.

  • Starry Sky cardstock card base: 7″ x 10″ scored at 5″.
  • Basic White cardstock: 4″ x 6″ and 5/8″ x 4 1/4″
  • One Horse Open Sleigh Designer Series Paper (DSP): 4″ x 6″
  • Blackberry Bliss cardstock: two at 4 1/4″ x 6 1/4″

Order Supplies Here:

Product List

Don’t Miss Out on the best Joining Special ever!

If you live in the USA and would like to join Theresa’s Treasures Stampin’ Up! Stamping Gems Team, the best joining special is going on now until October 31, 2023!

Join at https://bit.ly/JoinTheresasTreasures

Pleae comment below if you have any questions.

Have a most wonderful day!

Theresa

Posted in 2023 Stampin' Up! Holiday Mini Catalog, 2023-2024 Stampin' Up! Annual Catalog, Avid Stamper, Designer Series Paper, encouragement, Fun/Fancy fold card, Inspiration, Nature, Outdoors

Around the World On Wednesday Blog Hop-October 2023- Sketch Challenge with Autumn Leaves Dies

Hello and welcome to a Sketch Challenge with Autumn Leaves Dies! I am Theresa McEntee, creator of Theresa’s Treasures Paper Crafts. Today I have the pleasure of participating in the Blog Hop with Around the World on Wednesday (AWOW) organized by Angie McKenzie. 

On the second Wednesday of each month, the AWOW team put together a thematic hop to give you some inspiration for your own crafting. This Sketch Challenge and the question on whether to add a bow or not is this month’s theme.

I found this Sketch Challenge to be, well, challenging. I had fallen in love with the All About Autumn Designer Series Paper and Autumn Leaves Dies. So I decided to play around with the different designs and colors. I love the little leaves in the dies!

My Project for today

I chose this color combination to be in line with the colors in the All About Autumn Designer Series Paper-Moody Mauve and Pretty Peacock. I did make this card using Basic White cardstock, but in retrospect, I should have used Very Vanilla cardstock. If I make another card, I will use the Very Vanilla cardstock.

Project Details

Measurements:

  • Very Vanilla cardstock card base: 4 1/4″ x 11″ scored at 5 1/2″
  • Very Vanilla cardstock: 3″ x 5″, 3/8″ x 2″ (sentiment) and 4″ x 5 1/4 (inside)
  • Moody Mauve cardstock: 4″ x 5 1/4″
  • Pretty Peacock cardstock: 1 1/2″ x 5 1/2″ and 1 1/2″ x 1 1/2″ (to diecut leaves)
  • Moody Mauve/Foil design of All About Autumn DSP: 1 1/8″ x 1 1/8″, 1 1/2″ x 1 1/2″ (to diecut leaves) and 3/8″ x 3 1/2″ (inside)
  • Pretty Peacock/Foil design: 1 1/8″ x 1 1/8″, 1″x 1 1/2″ (to diecut leaf) and 3/8″ x 5 1/4″ (inside)
  • Moody Mauve/Pretty Peacock/Very Vanilla/Foil design: 1 3/8″ x 1 3/8″ and 3/8″ x 4 1/2″ (inside)

Instructions

  1. Burnish the fold of the Very Vanilla cardstock card base with your Bone Folder.
  2. Use the Multipurpose Liquid Glue to adhere the All About Autumn DSP strips to the 4″x 5 1/4″ Very Vanilla cardstock to make the inside panel. Adhere it to the inside of the Very Vanilla card base.
  3. Adhere the 4″ x 5 1/4″ Moody Mauve cardstock to the front of the Very Vanilla cardbase.
  4. Position the 3″ x 5″ Very Vanilla cardstock slightly to the right and adhere in place.
  5. Now adhere the Pretty Peacock cardstock to the card front on the left side.
  6. Set up all of the squares of the All About Autumn Designer Series on the card front, and then adhere them.
  7. Diecut the little leaves, place them where you like and adhere.
  8. Stamp the sentiment in Pretty Peacock Ink. Adhere to the card front with Stampin’ Dimensionals.
  9. Add the Blooming Pearls as desired.

The AWOW Team

Each month this group of creative friends prepare a project for a theme. Below is an image of the whole crew and where they are from around the globe. Such a talented and wonderful group of people! You will want to visit everyone to be sure to see all the amazing projects!

I am so glad you have joined me today in this worldwide hug that stretches all the way from Australia to Alaska across twelve different time zones.  We all love sharing joy with you through projects from our individual parts of the world. I hope that you will be filled with lots of inspiration!

See More Inspiring Projects

Jan Clothier – NZ

Leonie Stuart – AU

Rochelle Laird-Smith – AU

Cheryll Miller – AU

Danielle Kassing – NL

Ximena Morales – DE

Aurélie Fabre – FR

Mikaela Titheridge – UK

TIna Zinck – CA

Annette Ball – CA

Angie McKenzie – US

Kelly Taranto – US

Shel Anderson – CA

Sharon Hashimoto Burkert – US

Chris Smith – US

Brenda Nelson – CA

Theresa McEntee – US >>You are here

Bree Renwick – US

Lori Willcox – CA

Teri West – US

Cheryl Hamilton – US

Thank you so much for visiting today. I hope you enjoyed learning more about my project. Have a most wonderful day!

Theresa