Hello fellow stampers! You are visiting with Theresa McEntee-author of Theresa’s Treasures Paper Crafts. I am hopping with the Ink & Inspiration Blog Hop today. There are several of us- you will find the list to follow the hop at the end of my blog post.
This is the challenge photo. What does it inspire you to make?
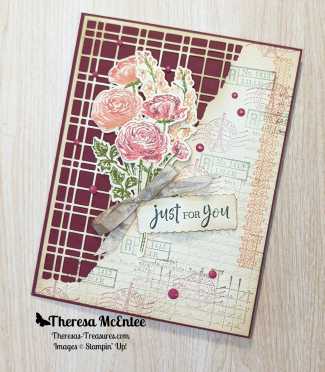
The Ink & Inspiration Challenge is both an image and a color challenge. I was inspired by the image because the flowers in the Ranunculus Romance stamp set are very similar to the photo. The colors were also very pretty and inspirational.
I had really wanted to use the Split Card Textures Dies. I got into my zone and just started stamping. Before I knew it, this card was created!
The Stampin’ Write Markers are great for applying ink to this red rubber stamp. The images of the flowers were easy to do by using the Stamparatus. That way if I missed a spot, I could reapply the ink and stamp a second time.
One of my favorite ribbons in the whole catalog is the White 1/4″ Crinkled Seam Binding Ribbon. This ribbon can be colored to coordinate with your card. Soft Suede Ink was applied with a Blending Brush until I had the off white color.
I am so honored and excited to be participating in today’s Top 10 Winners Hop for Bruno and Kylie Bertucci’s International Blog Highlights! I thank everyone who voted for my card in that hop. I combined a lot of elements to make this Gorgeous Leaves Thank You card. Saying “Thank you” is so important! You can never have enough Thank You cards. I am so excited to see everyone else’s projects too!
I primarily used the Gorgeous Leaves stamp set and Intricate Leaves Dies. Additional stamp sets used for this card included: Very Versailles (the background script) and Pansy Patch (Thank You sentiment). The label for the sentiment is from the Harvest Dies.
I took full advantage on the many fall colors Stampin’ Up!® has. The colors I used for this card are: Bumblebee, Soft Suede, Early Espresso, Cinnamon Cider, Cajun Craze, Pumpkin Pie and Old Olive.
Although they are difficult to see in this photo, the Genial Gems add a little sparkle to the Gorgeous Leaves Thank You card.
Thank you so much for visiting today! You are currently at Theresa McEntee/Theresa’s Treasures. Please visit all the inspiring ideas today.
Today’s blog is a card I created for The Paper Players Color Challenge PP553 using Real Red, Old Olive and Daffodil Delight. All very festive Holiday colors in my mind!
The background of the Very Vanilla Card Stock (CS) is embossed with the Timeworn 3DEmbossing Folder. The background right behind the bird is stamped with the Gorgeous Leaves stamp set onto a Very Vanilla CS oval. The oval dies are from my stash. I distressed the edges of the Old Olive CS oval.
I used the Stampin’ Blends Alcohol Markers combined with the Stampin’ Write Watercolor Markers to color the images. The bird is colored in Real Red as are the berries for the holly. The yellow is Daffodil Delight and the green is Old Olive.
I hope you stop by The Paper Players to see all of the entries for this color challenge PP553. I really enjoyed the challenge!
I am so honored and excited to be participating in today’s Top 10 Winners Hop! I won a spot in the Top Ten from Kylie’s International Blog Highlight. I thank everyone who voted for my card in that hop. I was feeling very creative for this card and I hope you like it. I can’t wait to see everyone’s projects!
I used a number of stamp sets for this card. I really like to mix and match! Country Home is where you will find the milk can and flowers. The “Thank You” sentiment and the script pattern are from Very Versailles. The remainder of the stamps are from: Gathered Together, Comfort & Hope and Forever Fern. Stampin’ Up!® ink colors include: Misty Moonlight, Bumblebee, Cinnamon Cider, and Early Espresso.
I have been really enjoying the versatility you get with the Stampin’ Blends Alcohol Markers. From the outside in on the milk can, I blended Dark Smoky Slate, Light Smokey Slate and Light Gray Granite. The flower arrangement has Cinnamon Cider, Just Jade and Calypso Coral.
I continued some of the design from the front to the inside of the card. The tiles from Country Home are stamped in Misty Moonlight. The grid pattern from Comfort & Hope is in Cinnamon Cider. The Forever Fern leaves are in Just Jade. The little splatter pattern stamped in Early Espresso (most are Stamped Off) is also from Forever Fern.
Techniques used to make this card include: Masking, Sponging, and Stamping Off.
Thank you so much for visiting today! You are at Theresa McEntee/Theresa’s Treasures. Have a very creative day!
It is hard to design a card for a guy when you do want to use a flower. However, the Cardz 4 Guys Challenge #50 for a card with a Good Well Wish made it the perfect time to give it a try. I hope you like what I came up with.
One of the styles I really like is grunge. This grungy background was created with Stampin’ Up! inks in Night of Navy, Balmy Blue, Crumb Cake and Soft Suede. I used some retired sets which are my favs: Gorgeous Grunge and Timeless Textures. There are similar stamps in the current catalog, but I just love these.
These particular rose and leaves are in the current Stampin’ Up! Annual Catalog and the stamp set is called Healing Hugs. This is a Distinktive stamp which to me looks more photographic. I enhanced the rose with the Pacific Point Watercolor Pencil, and the leaves with the Old Olive Watercolor Pencil to make them even more realistic.
Thanks for stopping by and viewing my Cards 4 Guys Challenge #50- Get Well Wishes. You can find out more about this challenge at cardz4guys.com. I have a lot of fun with it!
There are so many beautiful stamp sets in the new 2020-2021 Stampin’ Up! Annual Catalog! There is a style for everyone. I love to make cards with a grunge style. The Comfort and Hope and the Positive Thoughts stamp sets are a perfect combination for this style.
This card is designed with elements from both of the stamp sets. The colors are: Misty Moonlight, Just Jade and Cinnamon Cider. These are 3 of the new 2020-2022 In Colors. The In Colors are a set of 5 colors that are only available for 2 years. Every year, one set retires and one set debuts. The other 2 In Colors for the next 2 years are Magenta Madness and Bumble Bee.
Measurements: Cinnamon Cider Card Stock (CS): 11 x 4 1/4 inches with a score line at 5 1/2 inches; Very Vanilla CS: two 5 1/4 x 4 inches and one 4 x 2 inches.
Using the Cinnamon Cider ink, stamp the cross hatched image from Comfort And Hope onto both 5 1/4 x 4 inch Very Vanilla CS pieces. The image near the edge is at full strength. Without applying any more ink, stamp again just above the full strength image. On the bottom piece, stamp a third time without adding any ink. This is know as the Stamping Off Technique. I use this technique a lot when stamping in the grunge style.
On the 5 1/4 x 4 inch Very Vanilla panel for the outside of the card, add the sentiment “Hugs Prayers Love” in Cinnamon Cider ink. The little design has been Stamped Off onto the scratch paper before stamping on the card. Both of these images are in the Positive Thoughts stamp set.
The leaf branch from the Positive Thoughts stamp set is Stamped Off each time in Just Jade ink.
The roll of twine from the Positive Thoughts stamp set is stamped at full strength in the middle, then Stamped Off two times.
The large branch of leaves is Stamped Off once on scrap paper, then on to the inside panel.
Using the Misty Moonlight ink, stamp the butterfly from the Positive Thoughts stamp set once at full strength on the inside panel. Stamp three full strength images on the 4 x 2 inch Very Vanilla CS.
Fussy cut the three butterflies, or use the butterfly die on a die cutting machine. Now use the Bone Folder to curve the wings of each butterfly.
Apply one half of a Stampin’ Dimensional to the middle of the back of each butterfly.
Use your Bone Folder to fold the 11 x 4 1/4 inch Cinnamon Cider CS at the 5 1/2 inch score line. Adhere the outside panel onto the front of the card base, and then the inside panel inside.
I found it easier to space the butterflies evenly if I adhered the top butterfly near the sentiment first, then the butterfly in the bottom corner, and finally the middle butterfly.
Now for the Bling! What is grunge without some sparkle?!
I placed the Champagne Basic Rhinestones with the Take Your Pick tool.
I applied Wink of Stella to the butterflies. See how sparkly they are now! Don’t forget to add Wink of Stella to the butterfly on the inside panel.
And Viola! You have a sparkly grunge card! I really like the sentiment “Hugs Prayers Love” because it is very versatile.
I am so grateful you came by today! This card is just so fun to make! I hope you give the grunge style a try.
Click on the photo for the product you need and go directly to my online store.
This is the third in a series of cards made with stamps, ink and paper- SIP cards. For this card, I made it a little more advanced by adding a Circle Punch, a couple of techniques, Stampin’ Dimensionals and lots of Bling!
This is still a very simple card to make if you just take it step by step, so I included lots of photos. The card looks more difficult than it is. The stamp set is Forever Fern by Stampin’ Up! and is part of the Forever Greenery Suite in the new 2020-2021 Stampin’ Up! Annual Catalog. The images make it fun and easy to create elegant cards!
Measurements: Whisper White Card Stock (CS): 11 x 4 1/4 inches with a score line at 5 1/2 inches, 5 x 3 3/4 inches and 2 1/4 x 4 inches; and Misty Moonlight CS: 5 1/4 x 4 inches.
Using the Misty Moonlight ink, stamp the sentiment from the Forever Fern stamp set onto the 2 1/4 x 4 inch Whisper White CS.
Use the 1 1/2 inch Circle Punch to punch out the sentiment. Now use the punched out piece to draw a circle on the 5 x 3 3/4 inch Whisper White CS. This will be the focal point for stamping the leaves.
Using the Seaside Spray ink, stamp the largest bunch of leaves in the Forever Fern stamp set at 12 o’clock at full strength, and without adding any ink, stamp again at 4 o’clock. This is called Stamping Off. Using the Seaside Spray ink again, stamp the medium sized branch of leaves at full strength a 5 o’clock.
Stamp the long thin leaf branch in Misty Moonlight ink full strength at 1 o’clock and Stamped Off at 11 o’clock. Be mindful of where the end of the stem is. Ideally the end should stay within the pencil marked circle.
The berry type leaves are stamped in Pretty Peacock ink as shown.
One of the most fun stamps in the set is the splatter. There are so many possibilities with the splatter. For this card, I used the Seaside Spray ink and stamped full strength on some and Stamped Off on other images around the focal point.
I wanted to make this a little more interesting. I decided to use the Sponging Technique on both card pieces.
The Sponging Technique adds a darker edge to the card piece. I cut the Stampin’ Sponges into smaller pieces and label them with the color of ink. For more on how to prepare the Stampin’ Sponges click HERE. Using the Misty Moonlight ink, dab the sponge onto the ink pad. Gently rub the sponge on the edge of the card piece in a back and forth motion.
Do the same to sponge Misty Moonlight ink on the 5 x 3 3/4 inch card piece.
Adhere the sponged 5 x 3 3/4 inch card piece to the 5 1/4 x 4 inch Misty Moonlight CS. Use an eraser to erase the circle. Adhere the sentiment with Stampin’ Dimensionals.
Use the Bone Folder to fold the 11 x 4 1/4 inch Whisper White CS at the 5 1/2 inch score line. Adhere the completed card piece to the front of the Whisper White card base.
The Artistry Blooms Self-Adhesive Sequins are the perfect color to add some Bling! to this card. Use the Take Your Pick tool to easily transfer the sequins to your card.
Viola! You have a great card to send off “to a friend who makes you smile”.
Thank you for coming by today and seeing how easy it is to make this elegant card. The Forever Fern stamp set is very versatile. Check out the previous two blogs to see two other cards made from this set.
Joining Promotion
Would you like to get a FREE bundle? From now until June 30, 2020 when you sign up as a demonstrator with Stampin’ Up! you will not only get $125 worth of product for $99, you will get to choose any one stamp set with dies, or any one stamp set with a punch-for FREE!! To join clickHEREand select the Specials tab on the right. Scroll down and find the “sign up now” button. If you need any further assistance, contact me via email at theresastreasures.az@gmail.com.
Hello! I hope today finds you well. I am joining the Cardz 4 Guyz challenge #241- Use a Stencil- at cardz4guyz.blogspot.com. My card today was made with the brick wall stencil from Stampin’ Up! Pattern Party Decorative Masks and some White Embossing Paste.
I used the Geared Up Garage stamp set by Stampin’ Up!
Using Embossing Paste
Here’s how to use the Embossing Paste. Before you start to play with the paste, cut the card pieces and have the stencils ready to go. Also have a dishpan full of water with a scrub sponge. The paste likes to dry and stick to the stencil, so if you scrub it off right away you can keep the stencil looking good.
Use Painters tape to secure the corners of the stencil on one side to a piece of paper. Slide the piece of card stock under the stencil and secure the other two corners of the stencil. I used 5 1/2 x 4 1/4 inch pieces of card stock, so that I could trim them later as desired.
Pick up a fair amount of the Embossing Paste with the Diamond trowel from the set of Palette Knives Stampin’ Up! offers. Start to spread it out onto the stencil.
Keep the jar of Embossing Paste covered with a wet towel between applications so that the paste does not dry out.
Spread the paste back and forth until you are satisfied. Keeping it a little thicker in some places than others adds to the texture.
Remove the Painters tape on one side and slide the card stock piece out. Let dry for a few hours or overnight before trying to use the piece to make a card.
I made a whole bunch of card pieces. I have heard that even when the jar is screwed tight, the Embossing Paste can dry out. So I decided to just use the whole jar in one day!
Thank you so much for visiting today. Please stop by the Cardz 4 Guyz website and see all the other cards submitted with Challenge #241 – Use a Stencil. Stay safe and do some crafting today!
Hello and welcome to my blog! Today I will demonstrate the Masking Technique to make the leaves appear to be behind the flowers. This adds dimension to your card.
This card is one of three that is made using Stampin’ Up!’s Painted Harvest stamp set. The first card was a Birthday card which you can see on the previous blog. This second card is one to express gratitude. Let’s get started!
Side note: My joint replacement in my right middle finger is doing well but I do still have a bandage on it. Today I chose a purple bandage. Might as well make it colorful!
I also used the Sea of Textures stamp set to add some grunge to the card.
Measurements: 8 1/2 x 5 1/2 inch Whisper White card base scored at 4 1/4 inches, 5 1/4 x 4 inch Blushing Bride and 5 x 3 3/4 inch Whisper White.
The Stampin’ Up! ink colors for this card are: Blushing Bride, Garden Green, Crumb Cake and Early Espresso. Tip: The Early Espresso dries more slowly than the other colors so take care not to smear the ink, which I have done many times!
The clear blocks needed are: B, C, D, and H.
Tip: The stamps in this set are Photopolymer so you will need the Stampin’ Pierce Mat.
I actually made a mistake when photographing this part. You do not need the Stampin’ Pierce mat for this red rubber stamp. However, it did not seem to affect the quality of the image. Ink the stamp from the Sea of Textures stamp set with Crumb Cake and Stamp Off onto a scrap paper before stamping on the 5 x 3 3/4 inch Whisper White card piece. The idea is to create a faint frame for the flowers.
Continue around the entire border.
The flower is a Two Step Stamp. The stamp on the left is larger and less detailed than the stamp on the right. I used the larger stamp first, but you could do it either way. Try it both ways to see which is easier. Sometimes when the two layers need to be lined up, it is easier to use the more detailed stamp first as it is easier to see through the less detailed stamp.
First stamp a flower in the lower left hand corner, slightly off to the right, using the Blushing Bride ink.
Then stamp a flower in the upper left hand corner and another to the right of the flower on the bottom left hand corner. Tip: Try not to make them perfectly spaced as this does not look natural.
Now use the smaller more detailed flower stamp and stamp directly over the top of the first stamp lining up the center. It isn’t so obvious here, but the flower looks more full after the second layer is stamped on.
To stamp the center of the flower, use the Early Espresso ink and Stamp Off onto the scrap paper first.
Now to prepare for the Masking Technique. Start with three sheets of sticky note paper and stamp the image of the larger flower over the edge with the sticky on it.
Now cut around the edge. Some people cut really close to the stamped edge and others leave a little border. I left a little border.
Separate the papers so you have the three sticky note flowers.
Stick the sticky note flowers on over your stamped flowers.
Tip: Take care to line up the mask properly. Identify a recognizable part of the image to be able to place the mask over the stamped image easily.
The leaves are a Two Step Stamp also. Tip: I made a mistake when I first did this card and used the less detailed stamp on the left first. I found that it was easier to line up the second layer if the more detailed stamp on the right was used first.
Stamp the first layer of the leaves as desired around the flowers.
Go over the first layer of leaves with the second stamp.
Peel the mask off.
Oops! I had not lined my mask up properly and this left a hole in my leaves! Not to worry, there are two ways to fix this that I can think of. The first fix is to do it all over. Urgh!
The second fix is to use a Stampin’ Up! Blender Pen.
The way to use the Blender Pen is to first get some ink on the lid of your stamp pad case. Flip the ink pad over and apply firm pressure. Then open up the stamp case and there should be a nice layer of ink in the lid. Scribble the Blender Pen at the edge of the ink spot and blend it out so that there is a light amount of ink on the pen.
Now apply the ink to the paper gently with a small circular motion until the leaf looks whole again. Not too bad, eh?
When you are finished blending, scribble the Blender Pen on a scrap piece of paper until all the color is out. Now it can be used again with another color! How cool is that!?!
Okay, back to the card we were making. Use the Early Espresso ink to stamp the sentiment in the upper right hand corner. Take care not to smear the ink by allowing extra time for it to dry.
Adhere the stamped card piece to the 5 1/4 x 4 inch piece of Blushing Bride.
Adhere the Blushing Bride to the card base. Flip the card over before rubbing it so that the ink doesn’t smear.
And there you have it! Wasn’t that fun? You can do a lot of really interesting cards using the Masking Technique. Take time to play with this technique. If you liked this card and the instructions, please Like my blog. Thanks for stopping by!
The Stampin’ Up! products used include: Stamp Set: Painted Harvest #144783, Sea of Textures #146488; Cardstock: Whisper White #100730 and Blushing Bride #131198; Ink: Crumb Cake #147116, Blushing Bride #147100, Early Espresso #147114 and Garden Green #147089; Clear Blocks: B #117147, C #118486, D #118485, and H #118490; Stampin’ Pierce Mat #126199; Paper Snips #103579; Blender Pen #102845; Multipurpose Liquid Glue #110755.
This is the 2nd in a series of Blog posts about masculine cards. I have had many a time when a holiday has crept up on me before I was able to get a card ready. Ever had that happen? Well, today I am making a Father’s Day card, mostly because the sentiment is in the stamp set -Geared Up Garage-which I started using the other day. But also, I want to be ready this year!
This style of card is “grunge”. It is a lot easier than it looks!
Measurements: Whisper White card base 8 1/2 x 5 1/2 inches folded in half and burnished with the Bone Folder, Basic Black 5 1/4 x 4 inches, Whisper White 4 1/2 x 3 1/4 inches and a scrap of Whisper White 2 3/4 x 2 1/2 inches, and Real Red 2 1/4 x 1 inch.
You will also need Memento ink and a C block to start. Later you will need an A, B, C and D block.
Just a reminder for how to put the label on the new Cling Stamps. First remove the stamp. Then turn the label sheet so the words are backward. Pinch the middle of the desired label.
Gently remove the paper backing without removing the label. Place the stamp with the foam side down over the label, taking care to line up the edges. Press firmly.
Now gently remove the label attached to the stamp. This is very sticky! Do not set it down on anything. Put it on the block right away and when finished, directly back into the stamp case. I do not always put the labels on, but I typically will put on the labels for sentiments.
Use the Memento ink and stamp the Father’s Day sentiment onto the scrap of Whisper White. Note: You do not need the Piercing mat for the red rubber stamps, just stamp onto a smooth firm surface.
Use your paper snips to cut around the sentiment leaving a slight border.
Adhere the sentiment to the Real Red piece. Now cut a banner edge, first by making a cut in the center, then from each corner to the center as shown. Set aside.
Now for the “grunge”! Mount the lug nuts on an A block, the oil can on a B block, the tool box on a C block and the oil spill on a D block (Clockwise from top).
Start with the tool box since it is one of the larger images. Stamp an odd number of times.
Now stamp the oil can and then the lug nuts an odd number of times. I messed up and stamped 6 lug nuts! Fortunately the sentiment with cover one!
We are going to use a technique called “Stamping Off” for stamping the oil spill. First apply Memento ink to the oil spill stamp and stamp it on a scrap of paper. Then stamp onto the card piece. This gives a slightly lighter image. That way the oil spill doesn’t over-power the rest of the images. It just makes it “grungy”.
Continue to first stamp on the scrap paper, then on the card piece, until you like the result.
Adhere the Basic Black to the folded card base. Now adhere the stamped “grunge” piece.
Apply Dimensionals to the back of the sentiment banner and adhere to the front of the card. Viola! You have a Father’s Day card ready to go! Now, if you can just put it away somewhere where you can find it!
Stampin’ Up! products used include: Stamp set: Geared Up Garage #148590; Cardstock: Whisper White #100730, Basic Black 121045 and Real Red #102482; Ink: Memento #132708; Blocks A #118487, B #117147, C #118486 and D #118485; Paper Snips #103579; Dimensionals #104430; Multipurpose Liquid Glue #110755


")


 Crinkled Seam Binding Ribbon")


")


")


")


")


 Circle Punch")


