Posted in 2024 Stampin' Up! January to April Mini Catalog, 3D Embossing Folder, Around the World on Wednesday Blog Hop, Emboss Powder, Emboss Resist Technique, Nature, Techniques

Lovely & Sweet Emboss Resist Technique for Around the World On Wednesday Blog Hop-February 2024- Technique Challenge

Hello and welcome! I am Theresa McEntee, creator of Theresa’s Treasures Paper Crafts. Today I have the pleasure of participating in the Blog Hop with Around the World on Wednesday (AWOW) organized by Angie McKenzie. I hope you like my Lovely & Sweet Emboss Resist Technique card!

On the second Wednesday of each month, the AWOW team put together a thematic hop to give you some inspiration for your own crafting. This month’s challenge is a Technique Challenge.

Happy Valentine’s Day!

“What the world needs now is love, sweet love
It’s the only thing that there’s just too little of”

My Project for today

This card was made using the Emboss Resist Technique. I love this technique because it turns out differently each time. I also love using embossing powder. It is so magical to see the emboss powder change when you heat it up!

The Lovely & Sweet stamp set is a set of sketched botanical images. I really liked the image of the almond plant so I used it for my Technique Challenge.

Instructions

Embossing

  1. Emboss the 4″ x 5 1/4″ Fluid 100 Watercolor Paper. First use the Embossing Buddy to remove the static. Stamp the image in Versamark Ink.
  2. Sprinkle the White Emboss Powder over the ink and shake off the excess.
  3. Use a small paint brush to remove any embossing powder that is not supposed to be there.
  4. Use the Heat Tool to heat the emboss powder until it magically changes. Be sure that you have heated up all the areas.
  5. Set aside to cool for 10 minutes.

The Emboss Resist Technique

  1. With a Stampin’ Spritzer spray the paper that is embossed until damp. Use a paper towel to pat off the excess water.
  2. Start with the lightest color. Using the Pool Party Ink Pad, apply ink to an E size Clear Block.
  3. Next apply Coastal Cabana Ink on the edges alsousing the ink pad.

  1. Finish by applying some Pretty Peacock Ink to parts of the edges. Use the corner of the ink pad to apply a little ink to the center.
  2. Use the Stampin’ Spritzer to spray the block until the ink begins to run together.

  1. Flip the block over and onto the embossed Fluid 100 Watercolor Paper.
  2. Apply a little pressure by placing a punch on top.
  3. Leave alone for 10 to 15 minutes.

Assembling the Card

  1. Trim the edges and mount on a 3 5/8″ x 4 5/8″ Coastal Cabana cardstock.
  2. The card base is a 4 1/4 x 11″ Pretty Peacock cardstock with the front embossed using the Fern 3D Embossing Folder.
  3. Use Stampin’ Dimensionals to adhere the stamped card piece onto the front of the card base.

  1. Here is how I did the inside. I did not use a sentiment because I wanted to keep this as an all occasion note card.
  2. Add Bling! using the Iridescent Foil Gems.

Voila!

The AWOW Team

I am so glad you have joined me today in this worldwide hug that stretches all the way from Australia to Alaska across twelve different time zones. I hope you can feel the love!

Each month this group of creative friends prepare a project for a theme. Below is an image of the whole crew and where they are from around the globe. Such a talented and wonderful group of people! You will want to visit everyone to be sure to see all the amazing projects!

We all love sharing joy with you through projects from our individual parts of the world. I hope that you will be filled with lots of inspiration!

See More Inspiring Projects

Leonie Stuart – AU

Rochelle Laird-Smith – AU

Cheryll Miller – AU

Danielle Kassing – NL

Aurélie Fabre – FR

Mikaela Titheridge – UK

Angie McKenzie – US

Kelly Taranto – US

Sharon Hashimoto Burkert – US

Chris Smith – US

Tricia Butts – US

Theresa McEntee – US

Bree Renwick – US

Cheryl Hamilton – US

Thank you so much for visiting today. I hope you enjoyed learning more about our projects. Have a most wonderful day!

Theresa

Product List
Lovely & Sweet Cling Stamp Set (English)
$26.00
Versamark Pad
$9.50
Pool Party Classic Stampin' Pad
$9.00
Coastal Cabana Classic Stampin' Pad
$9.00
Pretty Peacock Classic Stampin’ Pad
$9.00
Fluid 100 Watercolor Paper
$9.00
Coastal Cabana 8-1/2" X 11" Cardstock
$10.00
Pretty Peacock 8-1/2" X 11" Cardstock
$10.00
Iridescent Foil Gems
$8.00
Stampin' Spritzer
$4.00
Basics Embossing Powders
$18.00
Embossing Additions Tool Kit
$27.00
Heat Tool (Us And Canada)
$31.00
Clear Block E
$13.00
Clear Block H
$9.50
Fern 3 D Embossing Folder
$10.00
Stampin' Dimensionals
$4.25
Posted in 2023-2024 Stampin' Up! Annual Catalog, Emboss Powder, Guys cards, Ink & Inspiration Blog Hop, Stampin' Emboss Powder, Watercolor Pencil

Beside Me for the Ink and Inspiration Blog Hop- July 2023

Here is my card using the Beside Me stamp set.

Hello fellow stampers! You are visiting with Theresa McEntee-author of Theresa’s Treasures Paper Crafts. I am hopping with the Ink & Inspiration Blog Hop today. There are several of us- you will find the list to follow the hop at the end of my blog post. Please visit everyone!

The Ink & Inspiration Challenge is both an image and a color challenge.

Here is the photo for the challenge. A fun and relaxing scene.

I was inspired by the photo to think of a great time on the beach during summer break. Fortunately, I had a stamp that conveys a moment of that summertime fun.

The image is part of the Beside Me stamp set. (The “Happy Birthday ” sentiment is from the Inked & Tiled stamp set.)

I had been wanting to try embossing in white emboss powder on a colored background for quite a while. I was also interested in coloring with the Watercolor Pencils using the White pencil first.

A little about how I created this card:

First I embossed the image using the White Emboss Powder & a heat tool. Tip: Remove the heat as soon as the embossing powder melts. Too much heat results in the embossing chipping off the paper.

Next I colored the entire image with the White Watercolor Pencil.

Then I used the the colored Watercolor Pencils.

For the inside, I kept it simple.

This technique was a lot of fun to try. I want to make more!

I hope you enjoyed my interpretation of this challenge. Thanks so much for stopping by. Stop by the rest of the blogs today for more inspiration!

Order Supplies Here:

Product List

Have a most wonderful day!

Theresa

Posted in 2023-2024 Stampin' Up! Annual Catalog, Emboss Powder, Gratitude/ Thanks, Lake/Sea/Ocean, Nature, Sea, Sealife, Turtle

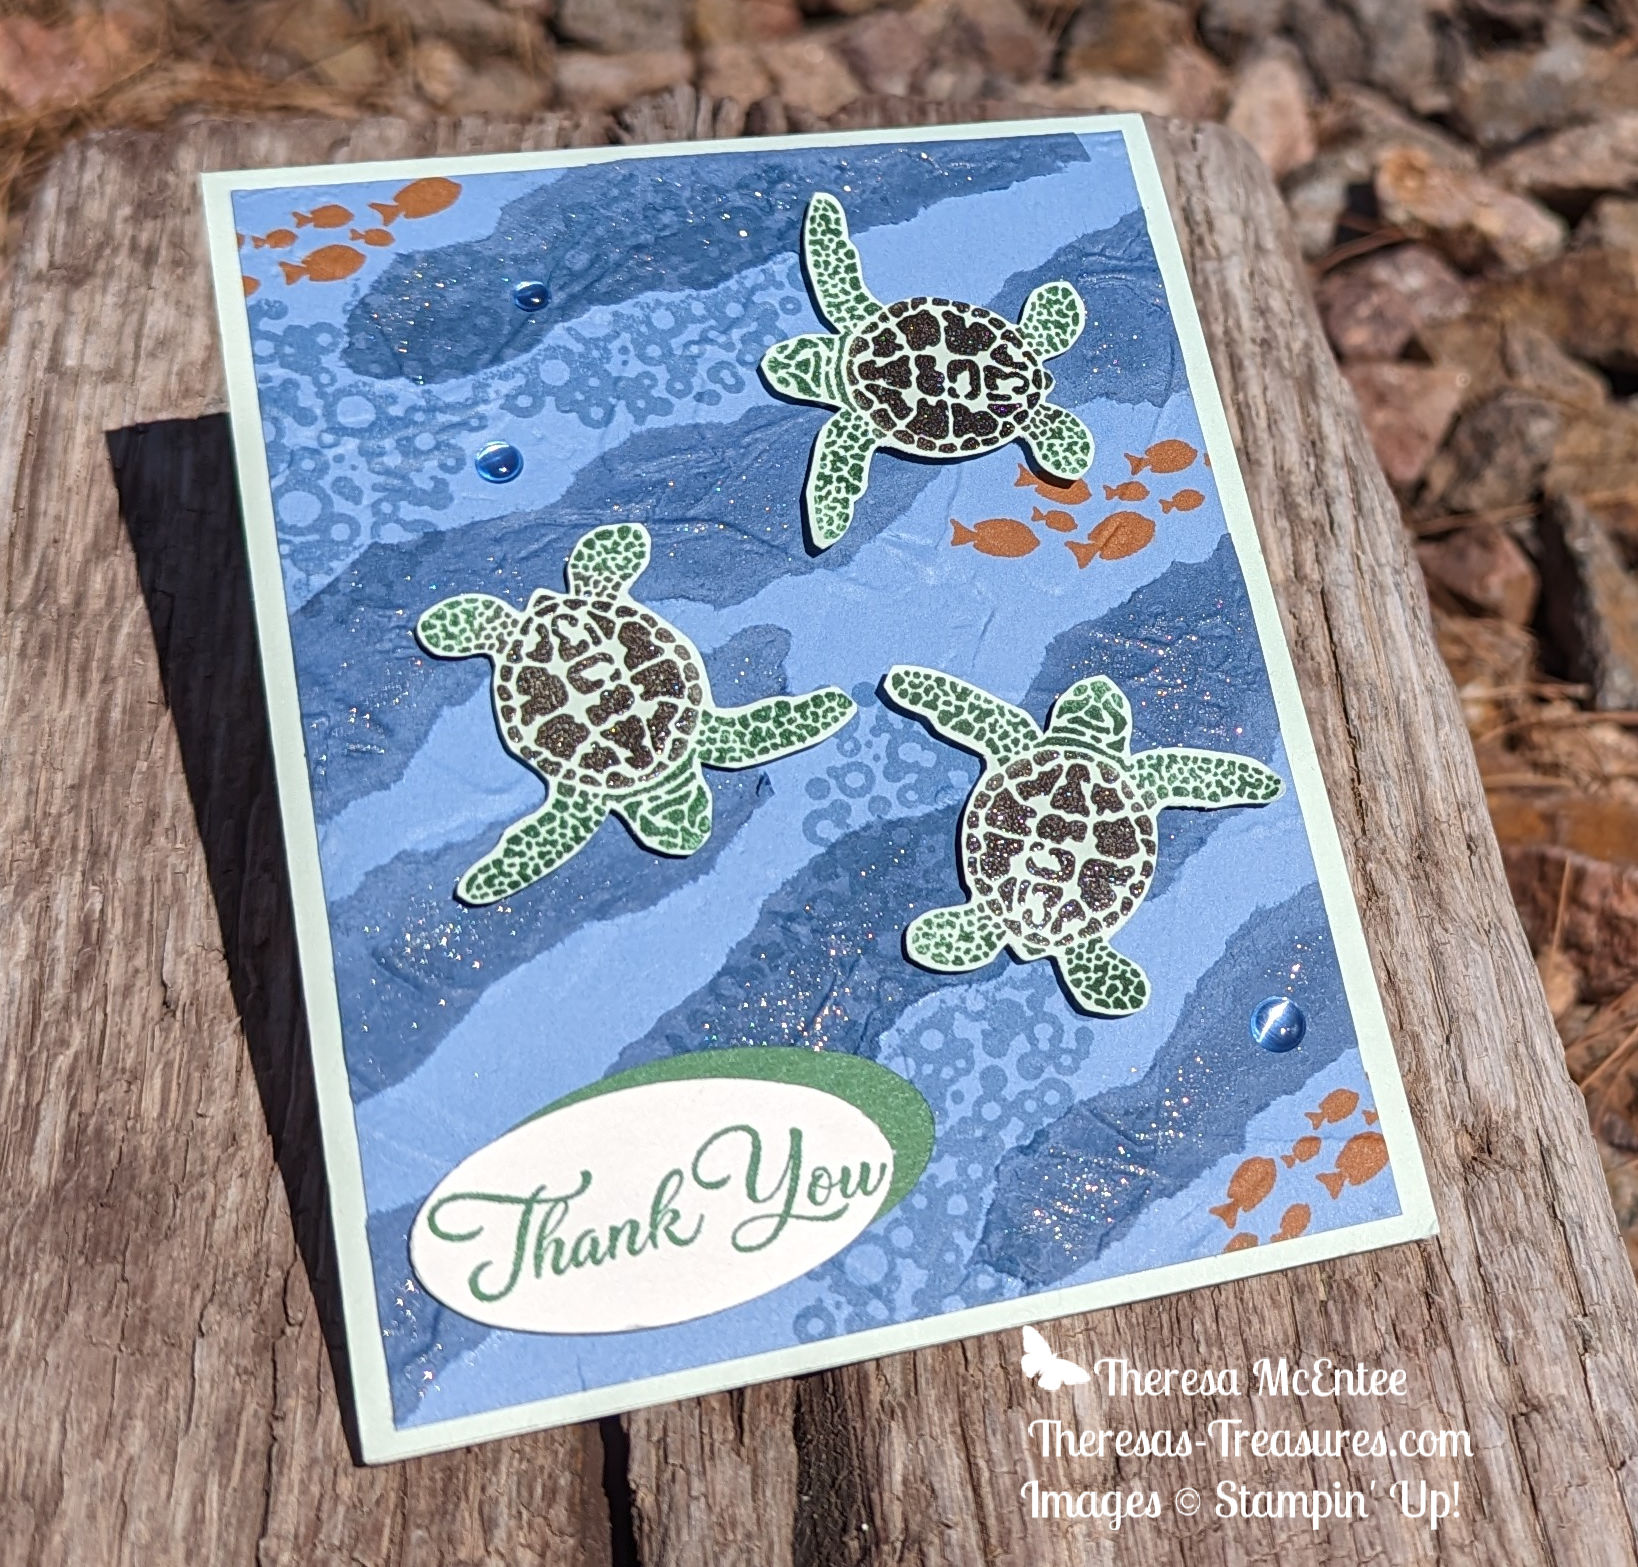
Kylie’s International Blog Highlights Gallery-May 2023: Torn Paper Sea Turtle Thank You Card

Hello, thank you for visiting Theresa’s Treasures Paper Crafts. I am Theresa, an Independent Stampin’ Up! Demonstrator in Arizona, USA. I am super excited to be participating in Kylie Bertucci’s International Blog Highlight Gallery with my torn paper Sea Turtle Thank You card. Projects in this gallery are designed by Stampin’ Up! demonstrators from around the world! The theme for this Gallery is “Thank You”.

We often forget those simple words “Thank you”. However, it is super important to show appreciation to the people in your life who have helped you, supported you or inspired you. One way to express gratitude is to send a handmade thank you card. Discover the joy in making and sending a handmade card!

I am using torn card stock to create the background “water” for these cute sea turtles!

This Sea Turtle Thank You Card showcases the Sea Turtle stamp set in the new 2023-34 Stampin’ Up! Annual Catalog.

Current Host Code: F4TT24FW

Measurements

  • Soft Sea Foam card stock (cs) card base: 4 1/4″ x 11″ scored at 5 1/2″
  • Boho Blue cs: 4″ x 5 1/4″
  • Misty Moonlight cs: 6″ x 6″ torn into strips
  • Soft Sea Foam cs: 2″ x 8″ to stamp the sea turtles on
  • Very Vanilla cs: 4″ x 5 1/4″ (inside) and 2 1/2″ x 3″ for the sentiment
  • Garden Green cs: 2 1/2″ x 3″

Supplies

  • Sea Turtle stamp set
  • Go To Greetings stamp set
  • Painted Textures Embossing Folder
  • Double Oval Punch
  • Ink: Garden Green, Early Espresso, Pumpkin Pie and Boho Blue
  • Sponge Dauber (2)
  • Clear Emboss Powder
  • Heat Tool
  • 2023-25 In Color Dots
  • Take Your Pick Tool
  • Wink of Stella
  • Stampin’ Dimensionals
  • Multipurpose Liquid Glue
  • Paper Snips
  • Stampin’ Cut & Emboss Machine

Instructions

Create the Background

  1. Adhere several of the torn Misty Moonlight cs strips onto the 4″ x 5 1/4″ Boho Blue cs with the Multipurpose Liquid Glue.
  2. Stamp some bubbles in Boho Blue ink. Then use the Pumpkin Pie ink to stamp some fish.
  3. Place the card piece in the Painted Textures Embossing Folder and run through the Stampin’ Cut & Emboss Machine.

Stamping

  1. Use a Sponge Dauber and the Garden Green Ink to apply ink to the head, tail and extremities of the baby sea turtle.
  2. Now use another Sponge Dauber and the Early Expresso Ink to daub ink onto the shell. Before the ink dries, coat the shell with Clear Emboss Powder. If some powder gets on the Garden Green Ink, use a dry paint brush to brush it away.
  3. Use the Heat Tool. Repeat until you have 4 turtles.
  4. Fussy cut.
  5. Use the Garden Green Ink and the 2 1/2″ x 3″ Very Vanilla cs to stamp the medium “Thank You” from the Go To Greetings stamp set on one end.
  6. Punch the sentiment out with the smooth oval of the Double Oval Punch.
  7. Also punch a smooth oval from the Garden Green cs. Adhere to the back of the Very Vanilla cs oval, slightly off-set.
  8. Use the Boho Blue Ink to stamp some bubbles in the lower right-hand corner of the 4″ x 5 1/4″ Very Vanilla cs.

Putting it all Together

  1. Adhere the Very Vanilla cs with the Boho Blue bubbles on it to the inside of the Soft Sea Foam cs card base.
  2. Use the Multipurpose Liquid Glue to adhere one of the turtles to the inside.
  3. Apply Wink of Stella to the Misty Moonlight cs “waves”.
  4. Apply Stampin’ Dimensionals to the other 3 sea turtles and adhere to the background.
  5. Adhere the sentiment with Stampin’ Dimensionals.
  6. Adhere the card front to the front of the Soft Sea Foam cs card base.
  7. Add the Boho Blue In Color Dots for more “bubbles”.

Voila!

I hope you enjoyed my card today using the Sea Turtle stamp set and torn card stock.

Visit my Online Store to order what you need to make this card for yourself. Photographic supply list is at the end of this blog.

Current Host Code: F4TT24FW

When you click on the Vote For Me button will see a gallery of creative inspiration from Demonstrators around the world! You can visit everyone’s blog from the photo of their card on the Gallery. You are currently at Theresa McEntee-Theresa’s Treasures-USA. Enjoy! To vote for your favorite cards, click on the small heart in the upper right-hand corner of each photo. You have 5 votes! Enjoy and come visit Theresa’s Treasures again soon!

Clickable Supply List

Product List
Paper Snips
[103579]
$11.00

Thanks again for stopping by! Have a most wonderful and crafty day!

Theresa

Posted in 2022 July-December Mini Catalog, 2022-23 Stampin' Up! Annual Catalog, Emboss Powder, Stampin" Blends Alcohol Markers

Best Witches for a Happy Halloween

Halloween is one of my favorite holidays. I used to love to sew costumes for my kids. Now I make Halloween cards to send out to everyone.

I had back surgery 4 days ago. For 3 weeks before the surgery I had been confined to my bed due to severe sciatic pain from a herniated disc. I did a lot of coloring during that time and ended up with a lot of witches and frogs from the Best Witches stamp set!

Here is one of the cards I came up with using my witch and frog.

Measurements

  • Parakeet Party cardstock (CS) card base: 8 1/2 x 5 1/2 inches with a score at 4 1/4 inches.
  • Parakeet Party cs: 1/2 x 5 inches for the stars.
  • Rustic Harvest 12 x 12 inch Designer Series Paper (DSP)-plaid design: 5 x 3 3/4 inches and 1/2 x 4 1/4 inches.
  • Basic Black cs: 1/4 x 3 inches for the sentiment.
  • Basic White cs: 3 1/2 x 4 inches for stamping the witch & frog and 4 x 5 1/4 inches for the inside of the card.

Supplies

  • Best Witches stamp set
  • Memento Ink
  • Stampin’ Blends Alcohol Markers in: Parakeet Party, Bermuda Bay, Rich Razzleberry, Fresh Freesia, SU800 (skin tone), Daffodil Delight, Poppy Parade, Pumpkin Pie and Basic Black.
  • Bermuda Bay Stampin’ Write Marker
  • Versamark Ink
  • White Emboss Powder
  • Heat Tool
  • Glitter Washi Tape
  • Witch Hat Builder Punch
  • Paper Snips
  • ruler
  • Blending Brushes
  • I also used the Scary Cute and Bottled Happiness stamp sets for the sentiments

Instructions

  1. Stamp the images onto the 3 1/2 x 4 inches Basic White cs. Color as desired with the Stampin’ Blends Alcohol Markers. Fussy cut the witch and frog.

Preparing the Paper

  1. Let’s start by preparing the paper with the Blending Brush and Parakeet Party Ink. Blend the ink onto the Rustic Harvest plaid design on the right hand side in an area where the witch will be. Make the circle large enough to surround the witch. Also blend some Parakeet Party Ink onto the 4 x 5 1/4 inch Basic White cs where you will be stamping the sentiment for the inside of the card. Blend some ink on the middle of the 1/2 x 4 1/4 inch plaid strip.
  2. Use the Bermuda Bay Stampin’ Write Marker and a ruler to draw the lines on the Rustic Harvest DSP plaid design. I did not draw the lines all the way through the area that was inked with the Parakeet Party Ink. Also draw some lines with the Bermuda Bay marker on the 1/2 x 4 1/4 inch strip of the plaid paper.

Using the Glitter Washi

  1. Use the Parakeet Party Glitter Washi to cover 2-3 inches of the end of the 1/2 x 5 inch Parakeet Party cs.
  2. Use the Basic Black Glitter Washi to make a box on the front of the Parakeet Party cs card base. The tape is placed 1/4 inch in from the edge.
  3. Use the Witch Builder Punch to cut out the stars.
  4. Complete the inside of the card by adhering the plaid strip to the left side of the 4 x 5 1/4 inch Basic White cs and adding a strip of the Parakeet Party Glitter Washi. (see photo of inside of card above).

Finishing Up

  1. Use the Versamark Ink to stamp the sentiment onto the 1/4 x 3 inch Basic Black cs. Sprinkle the White Emboss Powder on top and then shake off the excess. Use the Heat Tool to set the Emboss Powder.
  2. Adhere the 3 3/4 x 5 inch Rustic Harvest plaid onto the card front. The Basic Black Glitter Washi should show around the edges.
  3. Adhere the sentiment.
  4. Use Stampin’ Dimensionals to adhere the witch and the frog.
  5. Add the stars.
  6. Stamp the inside sentiment in Memento Ink.
  7. Adhere the plaid strip with the Parakeet Party Glitter Washi.
  8. Adhere the inside card piece to the inside of the Parakeet Party cs card base.

Voila! You have a fun Halloween card!

Try other colors.

Try other designs and have fun!

I hope you have a safe and fun Halloween!

Theresa

Posted in 2022 July-December Mini Catalog, 2022-23 Stampin' Up! Annual Catalog, 3D Embossing Folder, Designer Series Paper, Emboss Powder, Gratitude/ Thanks

Bruno & Kylie Bertucci’s Demonstrator Training Program Blog Hop- July 2022- Stampin’ Up!®Splendid Thoughts

Hello and welcome to our Stampin’ Up! Demonstrator Training Blog Hop for July 2022. I’m so happy you are joining me today! This blog hop is full of ideas and creative inspiration. We are a group of Stampin’ Up! Demonstrators from around the world taking part in training to help us build a successful Stampin’ Up! business and reach some goals we have set. Participating in a monthly Blog Hop is one goal that I have.

You may be starting here or have come from another blog – either way you can find the link list at the bottom of this post so that you can see all of the great ideas in each blog post today.

My card for the Blog Hop today is made using the Splendid Thoughts stamp set, Splendid Day Designer Series Paper (DSP) and the Twigs & Sprigs Embossing Folder.

Measurements & Supplies

  • Petal Pink Card Stock (CS) card base: 4 1/4 x 11 inches scored at 5 1/2 inches.
  • Petal Pink CS:1 5/8 x 2 5/8 inches and a 1 1/2 x 3 1/2 inch strip for the sentiment
  • Soft Sea Foam CS: 1 5/8 x 5 1/8 inches
  • Splendid Day Designer Series Paper (DSP): Soft Sea Foam pattern: 1 1/2 x 5 inches and Fresh Freesia pattern: 1 1/2 x 2 1/2 inches
  • Soft Sea Foam 3/8 inch Seam Binding Ribbon: enough to make one small bow and to wrap around the Soft Sea Foam CS.
  • Champagne Rhinestone Basic Jewels
  • Versamark Ink
  • Copper Emboss Powder
  • Heat Tool
  • Dark Petal Pink Stampin’ Blend Alcohol Marker
  • Twigs & Sprigs Embossing Folder

Instructions

  1. Stamp the “Thank You” sentiment (from the Pansy Patch stamp set) onto the strip of Petal Pink CS in Versamark Ink. Cover with the Copper Emboss Powder. Shake off the excess. Use the Heat Tool to set.
  2. Use the smooth oval on the Double Oval Punch to punch out the sentiment. Set aside.
  3. Emboss the front of the Petal Pink CS card base with the Twigs & Sprigs Embossing Folder.
  4. Adhere the Soft Sea Foam Splendid Day DSP to the Soft Sea Foam CS.
  5. Wrap the Soft Sea Foam 3/8 inch Seam Binding Ribbon around the Soft Sea Foam DSP/CS piece, about 1 inch up from the bottom.
  6. Adhere the Fresh Freesia Splendid Day DSP to the Petal Pink CS.
  7. Use Stampin’ Dimensionals to adhere the Soft Sea Foam CS/DSP card piece to the left side of the front of the Petal Pink CS card base.
  8. Use Stampin’ Dimensionals on the back of the right side of the Fresh Freesia DSP/Petal Pink CS and adhesive on the back of the left side. Adhere this to the front of the card base.
  9. Use Stampin’ Dimensionals to adhere the sentiment to the Fresh Freesia DSP.
  10. Add the Soft Sea Foam Seam Binding bow with Mini Glue Dots.
  11. Color the ladybug on the Soft Sea Foam DSP with the Dark Petal Pink Stampin’ Blend Alcohol Marker. Apply 3 of the Champagne Rhinestone Basic Jewels to the ladybug’s back.
  12. Add more Champagne Rhinestones if desired.

Voila! So fun!

Remember to visit everyone’s blog to see all the creative inspiration from around the world. You are currently at Theresa McEntee-Theresa’s Treasures-USA.

I really appreciate your visit to my blog today. Remember to sign up to receive my Theresa’s Treasures Paper Crafts Newsletter by clicking on the Subscribe to my Newsletter tab and please subscribe to my blog as well. Thanks!

Theresa

Product List
Posted in 2022-23 Stampin' Up! Annual Catalog, Avid Stamper, Designer Series Paper, Emboss Powder, Gratitude/ Thanks, Nature

Kylie’s International Blog Highlights Gallery- June 2022- Stampin’ Up!® Season of Chic Thank You card

Season of Chic Thank You card

It’s another month–my doesn’t time go fast! I am so excited to be participating in Kylie Bertucci’s International Blog Highlight Gallery with Stampin’ Up! demonstrators from around the world! The theme for the Gallery is “Thank You”. We often forget those simple words – Thank you. It is so important to show your appreciation to the people in your lives who have inspired you, helped you, and supported you by sending them a thank you card.

The Season of Chic thank you card was made using the Season of Chic stamp set and coordinating Chic Dies. You can save 10% buy ordering the two in the Season of Chic bundle!

The Texture Chic 12 x 12 inch Designer Series Paper (DSP) is amazing!

Measurements and Supplies

  • Petal Pink Card Stock (CS) card base: 5 1/2 x 8 1/2 inches with a score line at 4 1/4 inches.
  • Petal Pink CS: 1 x 5 1/2 inch for the sentiment and 5 x 5 inches to stamp the flowers on.
  • Soft Succulent CS: 4 1/8 x 5 3/8 inches and 3 x 4 inches to stamp the leaves on.
  • Texture Chic DSP: 4 x 5 1/4 inches
  • Gold Foil CS: 3 x 4 inches
  • Versamark ink
  • Gold Emboss Powder
  • Gold Brushed Metallic Dots
  • Heat Tool
  • Stampin’ Cut & Emboss Machine
  • Stampin’ Dimensionals.
  • Adhesive of choice

Instructions- Season of Chic Thank You Card

  1. Use the Versamark Ink to stamp the sentiment “Thanks” onto the 1 x 5 1/2 inch strip of Petal Pink CS. Apply the Gold Emboss Powder and use the Heat Tool to set.
  2. Use the Versamark Ink to stamp 2 solid flowers and 1 outlined flower onto the 5 x 5 inch Petal Pink CS. Stamp 2 outlined leaves and 1 solid leaf onto the 3 x 4 inch Soft Succulent CS. Emboss with the Gold Emboss Powder.
  3. Use the Chic Dies to cut out the flowers and leaves that are embossed.
  4. Use the outline dies for the leaf and flower to cut from the Gold Foil.
  5. Adhere the 4 1/8 x 5 3/8 inch Soft Succulent CS to the Petal Pink CS card base.
  6. Adhere the 4 x 5 1/4 inch Texture Chic DSP to the Soft Succulent CS.
  7. Use Stampin’ Dimensionals to adhere the sentiment strip.
  8. Arrange the flowers and leaves as desired and adhere them to the card front.
  9. Embellish with the Gold Brushed Metallic Dots.
  10. Voila!

Please click on the Vote button below to go to the International Blog Highlights Gallery and see everyone’s projects from around the world! Please vote for my card by clicking on the small heart icon in the upper right hand corner of the photo of my card. Thanks in advance!

I appreciate your visit to my blog. Remember to sign up to receive my Theresa’s Treasures Paper Crafts Blog. And learn about all the Stampin’ Up! specials by subscribing to my Newsletter!

Thanks again!

Theresa

Product List

Posted in 2021 Stampin' Up! July-December Mini Catalog, Avid Stamper, Emboss Powder, Religious, Winter Holiday

Stampin’ Up!® Angels of Peace Christmas Card

Today’s card is the Stampin’ Up!® Angels of Peace Christmas Card for Day 3 of the “12 Days of Christmas Card Making Challenge”!

Peace on Earth! I would really like to see more of that. As I said above, I am on Day 3 of the “12 Days of Christmas Card Making Challenge” with my stamping buddy Christy. I will be blogging a new holiday card each day until December 10, 2021. I plan to showcase a different stamp set with each card. This will allow you plenty of time to see the great products that are available in the 2021 Stampin’ Up! July to December Catalog and order it in time to make your own Christmas cards! You can order HERE when you have your list ready!

Disclaimer: This is a somewhat advanced card as there are several steps before you can put the card together. I used the Silver Emboss Powder, the Blending Brushes, Watercolor Pencils, the Wink of Stella, and the Metallic Mesh Ribbon in creating this fabulous card! I went through many different versions of this card before deciding on the final one.

This card will be submitted to The Paper Players PP569 Sketch Challenge.

Here is what you need to emboss: Silver Emboss Powder-Metallics, Versamark and the Heat Tool.

Measurements

  • Basic White Card Stock (CS) card base: 4 1/4 x 11 inches with a score line at 5 1/2 inches.
  • Basic White CS: 3 x 5 inches and a 3/8 x 3 7/8 inch strip.
  • Peaceful Place Designer Series Paper (DSP): one 1 7/8 x 12 inch piece of the trees and night sky design. First cut a 5 1/8 inch piece with the tree on it. Then cut the remaining DSP into a 5 inch piece. Cut that piece at 2 1/2 inches to make two small rectangles. Trim 1/8 inch off the length on each piece. You will also need a 1/2 x 4 1/2 inch piece of the night sky.
  • Disregard the white and silver design as I ended up not using it in the final version.
  • Silver Foil: 4 x 5 1/4 inches.

Stamping

Start out by making the sentiment. Use the Basic Black Stampin’ Write Marker to ink up the “Peace on Earth” only. Stamp onto the 3/8 x 3 7/8 inch Basic White CS. Set aside.

Blending with the Blending Brushes

Use medium pressure as you put the Blending Brush to the Pacific Point Ink Pad. Move in small circles until you have some ink on the Blending Brush. Practice on a scrap piece of paper, moving the Blending Brush in circles. Try different amounts of pressure. Learn which pressure is needed to lightly apply the color to the paper. Blend the Pacific Point Ink onto the top and right side of one of the night sky pieces. Next, blend the ink onto the bottom and right side of the other night sky piece.

Apply the Pacific Point Ink to the top and left side of the tree piece. Blend ink onto the ends of the 1/2 x 3 7/8 inch night sky piece.

Here is how the Peaceful Place DSP pieces will fit together when they are adhered to the Silver Foil. The strip will be used on the inside of the card.

More Stamping

Create the inside of the card by stamping in Memento ink the sentiment “Blessings to you and yours this season and in the coming year” onto the inside of the 4 1/4 x 11 inch Basic White CS card base. Stamp the snowflakes in Pacific Point ink. Adhere the 3/8 x 3 7/8 inch night sky piece to the bottom of the inside panel.

Heat Embossing the Angel

Steps for Heat Embossing:

  1. Apply an Anti-Static powder to the 3 x 5 inch Basic White CS.
  2. Use Versamark to stamp the angel onto the CS.
  3. Sprinkle the Silver Emboss Powder over the Versamark until it sticks to it evenly.
  4. Tap the paper to remove the Emboss Powder that is not stuck to the Versamark TIP: If you see some Silver Emboss Powder stuck in a place where it should not be, you can use the tip of a fine tip paint brush to remove the powder before heating.
  5. Heat the Heat Tool for about 10 seconds, then wave the heat over the Silver Emboss Powder until it is all melted. Let it cool.

Coloring the Angel

To create the angel the same way I did, you will need the Pacific Point Watercolor Pencil. First apply an even but light layer on the dress. Then darken certain areas to make shadows. I am not great at the shadows. Just do what seems right for you. The hair is a light layer of the Daffodil Delight Watercolor Pencil. The face and hand are done in a very light layer of Calypso Coral. I did color the wings and the dove, but later wished I had left it alone. To finish the angel, use the Wink of Stella on the dress and wings.

Assembling the Card

Begin by adhering the Peaceful Place DSP pieces to the 4 x 5 1/4 inch Silver Foil as shown. Next tie a bow with the 1 1/2 inch metallic Mesh Ribbon leaving long tails. Use glue dots to adhere to the card front. Then use Stampin’ Dimensionals to adhere the angel. Wrap the tails of the bow around her. Finish by adhering the sentiment.

Complete the card by adhering the Silver Foil panel to the front of the Basic White CS card base. Take care to know which panel has the inside sentiment on it so you adhere the Silver Foil to the correct side.

Add some Rhinestone Basic Jewels to the sky. Voila! You have made a beautiful, shining angel Christmas card.

Thanks for joining me for Day 3 of the “12 Days of Christmas Card Making Challenge”. I have a great 3D card for tomorrow!

Happy crafting!

Theresa

Posted in 2021 Stampin' Up! July-December Mini Catalog, 2021-2022 Stampin' Up! Annual Catalog, Emboss Powder, Ornaments, Techniques, Winter Holiday

Stampin’ Up!® Bright Baubles Gold Emboss Christmas Card

I am on Day 2 of the “12 Days of Christmas Card Making Challenge” with my stamping buddy Christy. I will be blogging a new holiday card each day until December 10, 2021. I plan to showcase a different stamp set with each card. This will allow you plenty of time to see the great products that are available in the 2021 Stampin’ Up! July to December Mini Catalog and to order in time to make your own Christmas cards!

This Stampin’ Up! Bright Baubles Gold Emboss Christmas Card is rather simple to make with the instructions that follow. The Bright Baubles stamp set is just fabulous! The ornaments are very ornate and elegant.

To be able to heat emboss you will need: Stampin’ Emboss Powder-Metallic, Versamark Ink and the Heat Tool which are found in the 2021-2022 Stampin’ Up! Annual Catalog. These supplies are pictured below with links to my Online Store.

Measurements

  • Very Vanilla Card Stock (CS): 5 1/4 x 4 inches
  • Blackberry Bliss CS card base: 11 x 4 1/4 inches with a score line at 5 1/2 inches.
  • Blackberry Bliss CS card front: 5 1/4 x 4 inches.

Stamping

Stamp the sentiment first with Blackberry Bliss ink. Be sure to try it out on a scrap piece of paper to check the alignment. Follow by stamping one of each of the gorgeous ornaments. Finish with the sparkles on either side of the sentiment. Set aside.

Embossing

It takes practice to be able to get great images with the Gold Emboss Powder on a dark card stock. I strongly recommend purchasing an Anti-Static Powder bag or pouch. This helps prevent the emboss powder from sticking to other parts of the card piece, like to the oils from fingerprints. There are many anti-static pouches available from different suppliers. Also have a microfiber cloth on hand to get the powder off after embossing.

Start the embossing process by applying the anti-static powder to the 5 1/4 x 4 inch Blackberry Bliss CS. Next stamp the image of the larger ornament in Versamark. Tap out some of the Gold Emboss Powder and move it around so it sticks to the Versamark. Take care not to touch it. Use the Heat Tool until all of the powder has melted. Follow by stamping the second ornament, applying the Gold Emboss Powder and using the Heat Tool. Repeat the process for the “JOY” sentiment.

Again repeat the embossing process for the sparkles. See how hazy the card piece looks? After the Gold Emboss Powder has cooled, use a microfiber cloth to gently rub off the anti-static powder.

Adhere the Gold Embossed Blackberry Bliss CS to the front of the Blackberry Bliss card base. Adhere the stamped Very Vanilla CS card piece to the inside of the card base.

Add some Gilded Gems and Voila! you have a gorgeous elegant handmade Christmas card!

I hope you enjoy trying this card for yourself. I actually ended up making several. The other emboss powders in the Metallics set are silver and copper. Try them out on different colors of card stock to see how fabulous they are!

The complete list of supplies will be at the end of the blog.

Retiring Products from the July – December Mini Catalog

You may download the list to look over and make your shopping list.

Supplies

Product List

Thank you very much for stopping by to see my 2nd day of the 12 Day Christmas Card Challenge! See you tomorrow for day 3!

Theresa

Posted in Avid Stamper, Emboss Powder, Fun/Fancy fold card, Nature

Stampin’ Up! Eden’s Garden Fun Fold Friday Birthday Card

Hello and Happy Friday! I am so happy to be so close to the weekend! Today I am sharing my Stampin’ Up! Eden’s Garden Fun Fold Friday Birthday Card! Yes, Fun Fold Friday is back!

Disclaimer: Today’s card is a little challenging. I am using few techniques. Let me know if you have any comments or questions about the instructions.

Today I have a very special card to share. My neighbor, who I have know for about 23 years, is turning 98! I am so excited for her! I am giving her this card to help her celebrate! Happy Birthday Jane!

The Card Base

Using the Stampin’ Up! Paper Trimmer I created the card base in Soft Succulent Card Stock (CS) with the measurements as shown above. All of the lines are scored except the two vertical lines at 1 1/4 inches and 4 1/4 inches which run from 1 inch to 5 1/4 inches in length. You will need to cut the paper along those lines. Fold as shown above.

Measurements

The first layer is Evening Evergreen CS. You will need two 1 x 3 inch pieces, a 3 x 2 3/4 inch piece and a
5 1/4 x 3/4 inch piece. The patterned paper is some of the Ever Eden Cotton Paper that I embossed with Gold Emboss Powder. You can see how to make your own patterned paper HERE. Each measurement is 1/8 inch smaller than the Evening Evergreen CS. You will need two 7/8 x 2 7/8 inch pieces, a 2 7/8 x 2 5/8 inch piece and a 5 1/8 x 5/8 inch piece. If 1/8 inches drives you nuts, you could decrease the Evening Evergreen CS measurements by 1/4 inch instead. The border would be a bit thicker.

The Gold Foil circle is from the Tasteful Labels Dies. The square is made using Partial Die Cutting with a die from the Scalloped Contours Dies. The small flower sprigs are in the Eden Dies. The center photo shows the “Happy Birthday” sentiment from the Peaceful Moments stamp set die cut with the Layered Circle Dies. The leaves and berries image is from the Eden’s Garden stamp set. This is fussy cut.

Putting the Card Base Together

The first step is to adhere the Gold Embossed Ever Eden Cotton Paper to the Evening Evergreen CS. I used a thin layer of the Multipurpose Liquid Glue spread with my finger on the back of the Embossed Cotton Paper. Then adhere these card pieces to the corresponding spot on the card base.

Adhere the 2 7/8 x 2 5/8 inch Gold Embossed Ever Eden Cotton Paper to the 3 x 2 3/4 inch Evening Evergreen CS. Follow by using Stampin’ Dimensionals to adhere the Gold Foil scalloped piece. Adhere this card piece to the center of the card base.

Adding The Decor

Use Stampin’ Dimensionals to adhere the stamped leaves and berries card piece to the center of the Gold Foil scalloped square. Adhere the “Happy Birthday” sentiment to the Gold Foil circle. Then use Stampin’ Dimensionals on the bottom half to adhere it to the front of the card base. Note: I put the Stampin’ Dimensionals only in the center of the stamped leaves and berries piece so that I can insert the flower sprigs around the edges.

Insert several of the Evening Evergreen CS flower sprigs around the sentiment and around the leaves and berries image. Add the Gold Foil flower sprigs.

Add a 5 1/4 x 3 inch Very Vanilla CS to the inside of the card. I stamped a few leaves at the edge in Evening Evergreen ink.

Bling!

Now for some Bling! The Garden Gems are really interesting. They appear to be Evening Evergreen with gold accents, but when photographed turn blue and red in places! Very cool!

Voila! You have a very special birthday card that is a little challenging but worth the effort!

It was so nice to have you drop by today. I hope you try this card out. This particular fun fold lends itself to many great cards!

Supplies- Shop Here
November Host Code: BAKE6KM6*

*Use the host code when you order $50 or greater and receive a free gift from me!  If your order is over $150, please do not use this code because you can use the Stampin’ Rewards yourself. Any questions-shoot me an email at theresastreasures.az@gmail.com

You may also click on any photo below to go to my Online Store

Product List

Start With Savings Starter Kit Promotion – November 4-30!

The Start with Savings Starter Kit promotion allows you an excellent opportunity to purchase your Starter Kit at a great deal! The Starter Kit is usually $99 which is already an awesome deal! For a limited time you may choose a custom Starter Kit for only $75!!!  This is an unbeatable bargain for Stampin’ Up! product with a value of $125!

Choose your custom Starter Kit today and join my Stamping Gems Team HERE

Benefits of Joining: Early Access to New Product, 20% or more discount on future orders and becoming part of the Stamping Gems Team with a monthly meeting featuring Mystery Stamping and a group Facebook page!

Hope to see you on my Stamping Gems Team!

Have a most wonderful day!

Theresa

Posted in Emboss Powder, Fun/Fancy fold card, Gratitude/ Thanks

Kylie’s International Blog Highlights Gallery- November 2021- Stampin’ Up!® Eden’s Garden Thank You card

Hello and welcome to Theresa’s Treasures Paper Crafts! Today I am taking part in Kylie Bertucci’s Monthly International Blog Highlights Gallery. The theme is- Thank You.

In this gallery, you can see thank you cards made by folks from all over the world! I hope you enjoy my card and then take the time to see everyone else’s inspiring creations by visiting the gallery. You can get to the gallery by selecting the Vote For Me button at the end of this blog or by clicking HERE. I would be so grateful if you stop by and vote for my card!

Here is my Eden’s Garden Thank You card. The card is made more elegant by embossing with the Gold Emboss Powder onto the Ever Eden Cotton Paper and using the Gold Foil Sheets with the Eden Dies. The extra sparkle on the flower sprig is from the Garden Gems. The sentiment is part of the Nature’s Harvest stamp set which has a coordinating label die in the Harvest Dies.

The Eden’s Garden Collection is available for purchase now!

I am a Stampin’ Up! Demonstrator and I have an Online store. If you do not already have a demonstrator I would love for you to shop with me. Shop my Online store HERE

Measurements

Card Base: Soft Succulent Card Stock (CS) 10 x 5 1/2 inches scored at 3 and 7 1/4 inches.

Basic White CS: 5 1/4 x 4 inches.

Ever Eden Cotton Paper: 5 1/2 x 4 1/4 inches

Evening Evergreen CS: 5 1/2 x 2 1/2 inches

Gold Foil Sheet: 5 1/2 x 2 inches

The sentiment label is created with a die cut Gold Foil Flower Sprig from the Eden Dies, an Evening Evergreen CS Stitched Rectangle from the Stitched Rectangle Dies and a label from the Harvest Dies. I used the Nature’s Harvest stamp set for the “Thank You” which is stamped in Evening Evergreen ink.

How To Emboss the Ever Eden Cotton Paper

When I first felt the Ever Eden Cotton paper it reminded me of tissue paper used in wrapping gifts, but thicker. The paper cuts well with the Stampin’ Up! Paper Trimmer. Be sure you have a fairly new blade. Cut the paper into four 5 1/2 x 4 1/4 inch pieces. In the photo on the left, I stamped one type of leaf in Versamark and used the Gold Emboss Powder followed by the Heat Tool. As you can see in the second photo, I stamped and embossed a second type of leaf.

In the left-hand photo, I stamped and embossed a third type of leaf. To finish it off, I stamped a fourth type of leaf. The resulting design turned out to make a great pattern!

How To Assemble the Card

Use the gorgeous Eden Dies to cut a border on the 5 1/2 x 2 inch Gold Foil Sheet, the 5 1/2 x 2 1/2 inch Evening Evergreen Card Stock (CS) and the edge of the 3 inch left hand panel on the card base.

Use the Stampin’ Up! Paper Trimmer to cut the Eden Cotton Paper that has been embossed into two 5 1/2 x 2 1/8 inch strips. Use the Multipurpose Liquid Glue spread thinly and evenly to adhere the Ever Eden Cotton Paper to the panels on the card base as shown.

Adhere the Gold Foil and the Evening Evergreen die cuts together as shown. Adhere them to the lower panel as shown.

When you fold it up, it will look like this.

For the inside of this card I stamped another sentiment from Nature’s Harvest. To make it more interesting I stamped off once then stamped the main floral image from Eden’s Garden over the sentiment.

Add the Evening Evergreen CS Stitched Rectangle label to the card front applying adhesive only to the left side. Adhere the Basic White CS “Thank You” label with Stampin’ Dimensionals. Add the Gold Foil floral sprig and the Garden Gems.

The Completed Card

Voila! You have a gorgeous elegant Thank You Card!

Supplies

SHOP HERE

Product List

I am so happy you came to visit today! I hope you have some time to craft and make this gorgeous card!

Theresa