Hello fellow stampers! You are visiting with Theresa McEntee-author of Theresa’s Treasures Paper Crafts. I am hopping with the Ink & Inspiration Blog Hop today. There are several of us- you will find the list to follow the hop at the end of my blog post.
This is both an image and a color challenge. I was inspired by the zipper in the image, closing on winter to a very colorful image with clear skies. I came up with an idea for a Torn Paper Reveal card (also known as a Torn Paper Window or Rolled Torn Paper Reveal card) using some retiring stamps and some product to be released on January 5, 2023 in the Stampin’ Up! 2023 January-April Mini Catalog.
Details
The lovely snowy trees are from the Regal Reindeer stamp set. This stamp set is still available for another week or so in the 2022 July-Dec Mini Catalog. I found the bunny in the Peaceful Deer stamp set. This stamp set is available in the Annual Catalog until the end of April 2023.
Sneak Peek! The flowers of Spring are one of the designs in the Rain or Shine 12 x 12 inch Designer Series Paper. This can be found in the soon to be released 2023 January-April Mini Catalog!
I added extra Bling! to this card with the Rhinestone Basic Jewels and Wink of Stella. The Bling! on the flowers are the Iridescent Pastel Gems! Also a Sneak Peek!
More Inspiration
I hope my projects inspires you to create. You will see more amazing inspirations along the Ink & Inspiration Blog Hop today. Take a look at the list to see who is next-you are currently visiting Theresa McEntee-USA.
Hello my stamping friends! I hope all has been well with you this week. Today I have a Friday Fun Fold Pop Up Box Birthday Card for you. I learned this fold from Rachel Tessman who made it as a Paper Pumpkin alternative. You can see her card HERE. The first go around I made several mistakes. There will be tips for you so that you will be able to avoid the same mistakes I made.
The New Horizons Designer Series Paper (DSP) is so awesome, I am in love with it! This paper is super great for scenic watercolor backgrounds. I will be using the New Horizons DSP for today’s card along with the Sailing Home stamp set.
This is a photo of the second Friday Fun Fold Pop Up Box Birthday Card card I made. I will give you tips so that your first card comes out right.
New Horizons Designer Series Paper (DSP): The scene will be portrait orientation. Cut the 6 x 6 inch scene at 4 1/4 inches first. Then cut the resulting strip to be 1 5/8 x 5 1/2 inches. Cut the scene to be 3 1/4 x 4 1/4 inches. You will need to use 2 sheets to get both scenes. One scene for the front and one for the back of the card.
Basic White CS: 2 1/2 x 1 inch (for sentiment) and 2 x 4 inch to stamp the larger sailboats on.
Night of Navy CS: 2 3/4 x 1 inch (for sentiment)
Ink: Night of Navy
Scoring the Card Base
Score at 1/2, 2 1/8, 2 5/8, 4 1/4, 5 7/8, 6 7/8 and 8 inches.
Preparing the Card Base
First Tip: Do not burnish the score lines until after you make the slot. Make the slot as thin as you can. The slot on the left is too wide. This made the finished card unstable. Use the Stampin’ Up! Trimmer to get a thin slot. Set the left edge of the card base at 4 5/16 inches and make a cut from 1 1/8 to 4 3/8 inches. Then turn the card base 180° and cut again. Use your paper snips to cut the extra piece off to make the slot.
Second Tip: Adhere the 1 5/8 x 5 1/2 inch strips of the New Horizons DSP close to the 4 1/4 inch score line, but do not cover the score line. The card should be easy to fold.
Stamping
Stamp the large sailboat twice in Night of Navy Ink onto a scrap of Basic White CS. Use a scrap of the News Horizons to stamp the small sailboat twice. You may fussy cut the sailboats or use the Smooth Sailing Dies.
Stamp the desired sentiment onto the 1 x 2 1/2 inch Basic White CS with Night of Navy Ink. I used the “Happy Birthday” from the Celebrating You stamp set.
Assembling the Fun Fold
One difference between my card and Rachel’s is that I wanted an image on both the front and the back of the card. That way there is something to look at forward and backward. Adhere the top of the two sailboat scenes together. Apply a Tear-n-Tape strip to the bottom of the back one.
Insert the sailboat scene through the slot in the card base. Align the bottom of the sailboat scene with the 1/2 inch score line. Take the protective layer off of the Tear-n-Tape on the scene. Fold the base at the 1/2 inch score line so that it sticks to the sail boat scene. Apply a strip of the Tear-n-Tape to the Misty Moonlight bottom.
Peel the protective layer off of the Tear-n-Tape. Adhere the two sailboat scene pieces together. Press down. Apply more Tear-n-Tape over the bottom of the sail boat scene. Remove the protective covering.
Fold the card base at the 4 1/4 inch score line to adhere the sides together.
Here is how the Pop Up Box looks from the side and all the way folded down. Cool right?!
Decorating the Pop Up Box
Tip: The first go around I put the small sailboat on the left and the sentiment on the right. The second time I was able to add the larger sailboat if I put the small sailboat to the right. Note: I forgot to stamp the birds on the sail boat scene for the first card. I really like the scene much better with the birds added.
On the backside, I placed the small sailboat on the left and the larger sailboat on the right as shown.
Be sure to adhere the sail boats and sentiment to the small strip under the DSP piece so that they pop up!
Finished Product
Here are the forward and backward views of the first card.
Here are the forward and backward views of the second card.
Voila! I hope you are successful with this. I really felt a sense of accomplishment after figuring this Fun Fold Pop Up Box Birthday card out.
Thanks so much for reading my blog. Please leave a comment and let me know if you like the way I am doing this blog. Helpful suggestions are welcome.
Theresa
Stampin’ Up!® Promotions
Joining Special
Earn 2 FREE stamp sets of your choosing when you sign up to be a Stampin’ Up! demonstrator. Choose $125 of product for your Starter Kit and pay only $99 before shipping and handling! Join HERE. Contact me for more information at theresastreasures.az@gmail.com.
Paper Pumpkin Subscription
Don’t monkey around and miss this amazing adventure! Unleash your creativity with February’s wildly fun kit!
Answer the call of the wild—and your creativity—with the Safari Celebration Paper Pumpkin Kit. This playful, party-themed kit includes all the goodies and gear you need to create nine cards and coordinating envelopes in safari-inspired shapes and patterns you’ll go wild for! Make every occasion a celebration with this month’s amusing animals, beautiful botanicals, and celebratory sentiments.
Paper Pumpkin is a subscription kit. You earn FREE product when you order a pre-paid code from my Online Store. A pre-paid code will be sent in an email. Next, go to my Paper Pumpkin sign up and enter the code. You will get this Safari kit if you do so by February 10, 2022.
You will get an email with the Pre-paid code. Then you will go to: https://bit.ly/subscribeTheresasTreasuresPaperPumpkin and enter the pre-paid code to start your subscription! Shoot me an email with any questions
Celebrate Diversity
Lots of fun with diversity is coming on February 1, 2022. The All Together set will include 10 Stampin’ Blends for a range of skin colors. The images in the stamp set will celebrate diversity. Watch for more information on this fabulous set!
Get this FREE Creative Download from Stampin’ Up! for more on the celebration of diversity.
Thank you for your attention. If you need any assistance with your order please email me at theresastreasues.az@gmail.com
Still looking for a gift for the Holidays? Consider giving a gift card in a thank you note! This Snowflake Wishes Thank You Fun Fold Friday Gift Card Holder is a great gift for anyone who helps you out on a regular basis. For example, the young man who mows your lawn, the housekeeper, the bank teller, the mail/package delivery person, the grocery clerk- you get the idea. Everyone loves to be appreciated, especially during the holidays!
Measurements
Snowflake Wishes Fun Fold Friday Thank You Card
Gorgeous Grape Card Stock (CS): 4 1/4 x 11 inches scored at 2 1/2 and 5 1/2 inches and 2 3/4 x 4 inches.
Highland Heather CS: 4 x 6 inches.
Basic White CS: 2 1/2 x 3 3/4 inches and 4 x 5 1/4 inches.
One Wonderful Snowflake
Links to the supplies are listed at the end of this blog.
Stamping Your Own Designer Series Paper (DSP)
Start out by stamping the largest snowflake in Highland Heather Ink onto the 4 x 6 inch Highland Heather CS. Then Stamp Off once when stamping the next to the largest snowflake.
Next use the Gorgeous Grape Ink and the medium sized snowflakes to stamp in the empty spaces.
To finish this card piece, stamp in Misty Moonlight Ink using the group of tiny snowflakes. This may not look great at this point, but when it is cut up and adhered to the card it will look fantastic!
More Stamping
The next step is to stamp the front of the card. Start by using the Misty Moonlight Ink to stamp the sentiment “Thank You Snow Much” onto the 2 1/2 x 3 3/4 inch Basic White CS. Then Stamp Off once using the largest snowflake with Highland Heather Ink. Using the next to the largest snowflake, stamp at full strength using Highland Heather Ink.
Use the Gorgeous Grape Ink to stamp a medium sized snowflake around the edges.
Finish this card piece by stamping the group of medium snowflakes in Misty Moonlight Ink.
Use the Misty Moonlight Ink with the group of medium snowflakes to stamp around the upper left-hand corner of the 4 x 5 1/4 inch Basic White CS. This will be the inside of the card.
Assembling the Snowflake Wishes Thank You Gift Card Holder
The first step is to cut up the DSP that you made. Cut at 2 1/4 inches and 3 1/4 inches.
Fold the Gorgeous Grape CS card base at the 5 1/2 inch score line. Then fold at the 2 1/2 inch score line. Adhere the 2 3/4 x 4 inch DSP to the left and the 2 1/4 x 4 inch DSP to the right.
Adhere the 4 x 5 1/4 inch Basic White CS to the inside. Then adhere the 1 x 4 inch DSP to the right-hand side of the Basic White CS.
Punch the end with the Label Me Lovely Punch to create a notch.
Turn the card front over and apply Tear & Tape Adhesive to the upper and lower edges. Tip: Use the Take Your Pick tool to peel the protective cover off.
Fold the card front to adhere the edges and make the pocket for the gift card.
Adhere the Basic White CS card front to the corresponding Gorgeous Grape CS. Lay on the front of the card base to get positioning.
Tip: Flip the card front over to see where to adhere the Stampin’ Dimensionals.
Finishing Touches
Add a finishing touch by applying the Wonderful Snowflake.
And of course-add Bling! The Rhinestone Basic Jewels will add some extra sparkle!
Voila! Such a wonderful way to thank those around you!
You can see some more Holiday Thank You card ideas HERE and HERE.
Thank you for visiting my blog today. I am very appreciative of you. My blog would not be successful without you!
I have another sneak peek from the upcoming 2022 Stampin’ Up! Jan-June Mini Catalog- Tulip Fields! This is an awesome stamp set which is part of the Flowering Fields Suite. This suite includes: 2 stamp sets, 2 die sets, the Flowering Fields Designer Series Paper (DSP), Evening Evergreen Windowpane Check Ribbon, and Brushed Brass Butterflies!! If you want this Suite now you can get it in your Starter Kit when you join my Stamping Gems Team! More info on that will follow. Otherwise, the Flowering Fields Suite will be available for purchase on January 4, 2022.
It is so much fun to put scenes like this one together! I encourage you to take some time to let your creativity bubble up and see what your scene might look like!
Measurements for Sneak Peek-Tulip Fields
Sneak Peek-Tulip Fields
Pear Pizzazz Card Stock (CS): 5 1/2 x 8 1/2 inches with a score line at 4 1/4 inches
Basic White CS: two at 4 x 5 1/4 inches and a 1/2 x 3 inch strip.
Stamping the Tulip Fields
The first step is to use Memento Black Ink and stamp the windmill onto one of the 4 x 5 1/4 inch Basic White CS. Also stamp a windmill onto a sticky note. (Full sticky notes work best and can be found on Amazon HERE.) The windmill will be used as a Mask.
Fussy cut the windmill stamped on the sticky note paper. Set aside. Now draw a light pencil line for the horizon and another 2 lines for the path away from the door of the wind mill.
The Masking Technique. First put a strip of sticky paper above the horizon. This is the first mask. Use Poppy Parade Ink to stamp the triangle of tulips as shown.
Cover the path with sticky note paper. Stamp in Daffodil Delight Ink to one side of the path. Move the sticky paper and then stamp on the other side of the path.
Use the sticky note paper to help you stamp a row of tulips in Mango Melody Ink between the Poppy Parade tulips and the Daffodil Delight tulips. To finish, complete the row of flowers up to the horizon stamping in Rich Razzleberry Ink.
Blending the Sky
Now move the sticky note strip so it is under the horizon. Apply the fussy cut windmill.
Use the Stampin’ Up! Blending Brushes to make a nice sky. Start with the Balmy Blue Ink. Move the Blending Brush in a circular motion on the ink pad. Then using the same circular motion, gradually apply the ink to your card front. I liked that the sky turned out a little blotchy. Next use Pacific Point Ink just around the edges to help the scene “Pop”!
Coloring the Windmill
Remove the sticky strip and the sticky windmill. Save the windmill to use again later. Use the Stampin’ Write Markers in Sahara Sand, Crumb Cake and Soft Suede to color the windmill.
More Stamping
Reapply the sticky strip mask to define the path from the door of the windmill. Use Pear Pizzazz Ink and the triangle of tulip stamp to complete the path.
Tip: I used the Stampin’ Write Markers to fill in some small white spaces between the different colors of tulips.
A trick for stamping the tree in two colors. First ink up the tree in Pear Pizzazz ink. Then carefully ink up the trunk using the corner of the Soft Suede ink pad. Stamp the tree on the horizon.
Add some more smaller trees on the horizon.
Finishing Touches
Use Pear Pizzazz Ink to stamp the sentiment “happy birthday” from the Timeless Tulips stamp set onto a 1/2 inch strip of Basic White CS. Cut the right-hand end to look like a banner.
Another coordinating stamp set, Timeless Tulips, is in the 2021-22 Stampin’ Up! Annual Catalog. With the Rich Razzleberry Ink, stamp a few of the small tulips on the second 4 x 5 1/4 inch Basic White CS. Then stamp one in Mango Melody Ink and three in Poppy Parade Ink. Finish the stamping by adding some leaves in Pear Pizzazz Ink.
To create the clouds you will need the White Stampin’ Chalk Marker. First stamp the clouds in Balmy Blue Ink. Let them dry. Then use the Chalk Marker to add dimension to the clouds.
Assembling the Card
Adhere the windmill card piece to the front of the Pear Pizzazz CS card base. Then adhere the larger tulip piece to the inside of the card base. That’s all there is to it!
Use Stampin’ Dimensionals to add the “happy birthday” sentiment and Voila! You have a beautiful little scene! That was so much fun! I just love how it turned out!
Today I am taking part in Kylie Bertucci’s Monthly International Blog Highlights Gallery. The theme is- Thank You. It is so important to thank those who inspire us. Those who help us out. Those who have our back.
On this gallery, you can see thank you cards made by people from all over the world! I hope you enjoy my Snowflake Wishes Thank You card and take the time to see everyone else’s inspiring creations by visiting the gallery. You can get to the gallery by selecting the “Vote For Me” button at the end of this blog.
The Thank You sentiment if from the Sweet Ice Cream stamp set. All of the stamped snowflakes are from the Snowflake Wishes stamp set. The Stampin’ Up! color is Pacific Point. I ended up with several packages of the Wonderful Snowflakes, so I really wanted to make a card with them.
Using the Blending Brushes
To create the background I used the Blending Brush with Pacific Point Ink on Basic White Card Stock (CS). A few tips:
Gently swirl the Blending Brush on the ink pad in a circular motion.
Touch your scrap paper before blending the color onto your Basic White CS.
Move the Blending Brush in a circular motion with light pressure, then medium pressure as the color leaves the brush.
Go slow to keep the color blending on smoothly. You will need many layers.
The Blending Brushes do take some practice. My goal is to eventually have a very smooth transition of color.
The Wonderful Snowflakes are super fun! When the light hits just right you see a rainbow!
I added lots of the Rhinestone Basic Jewels for sparkle! Voila! Such a pleasant Thank You card to send off!
Please vote for my card when you visit the Gallery by selecting the “Vote For Me” button below. Thank you!
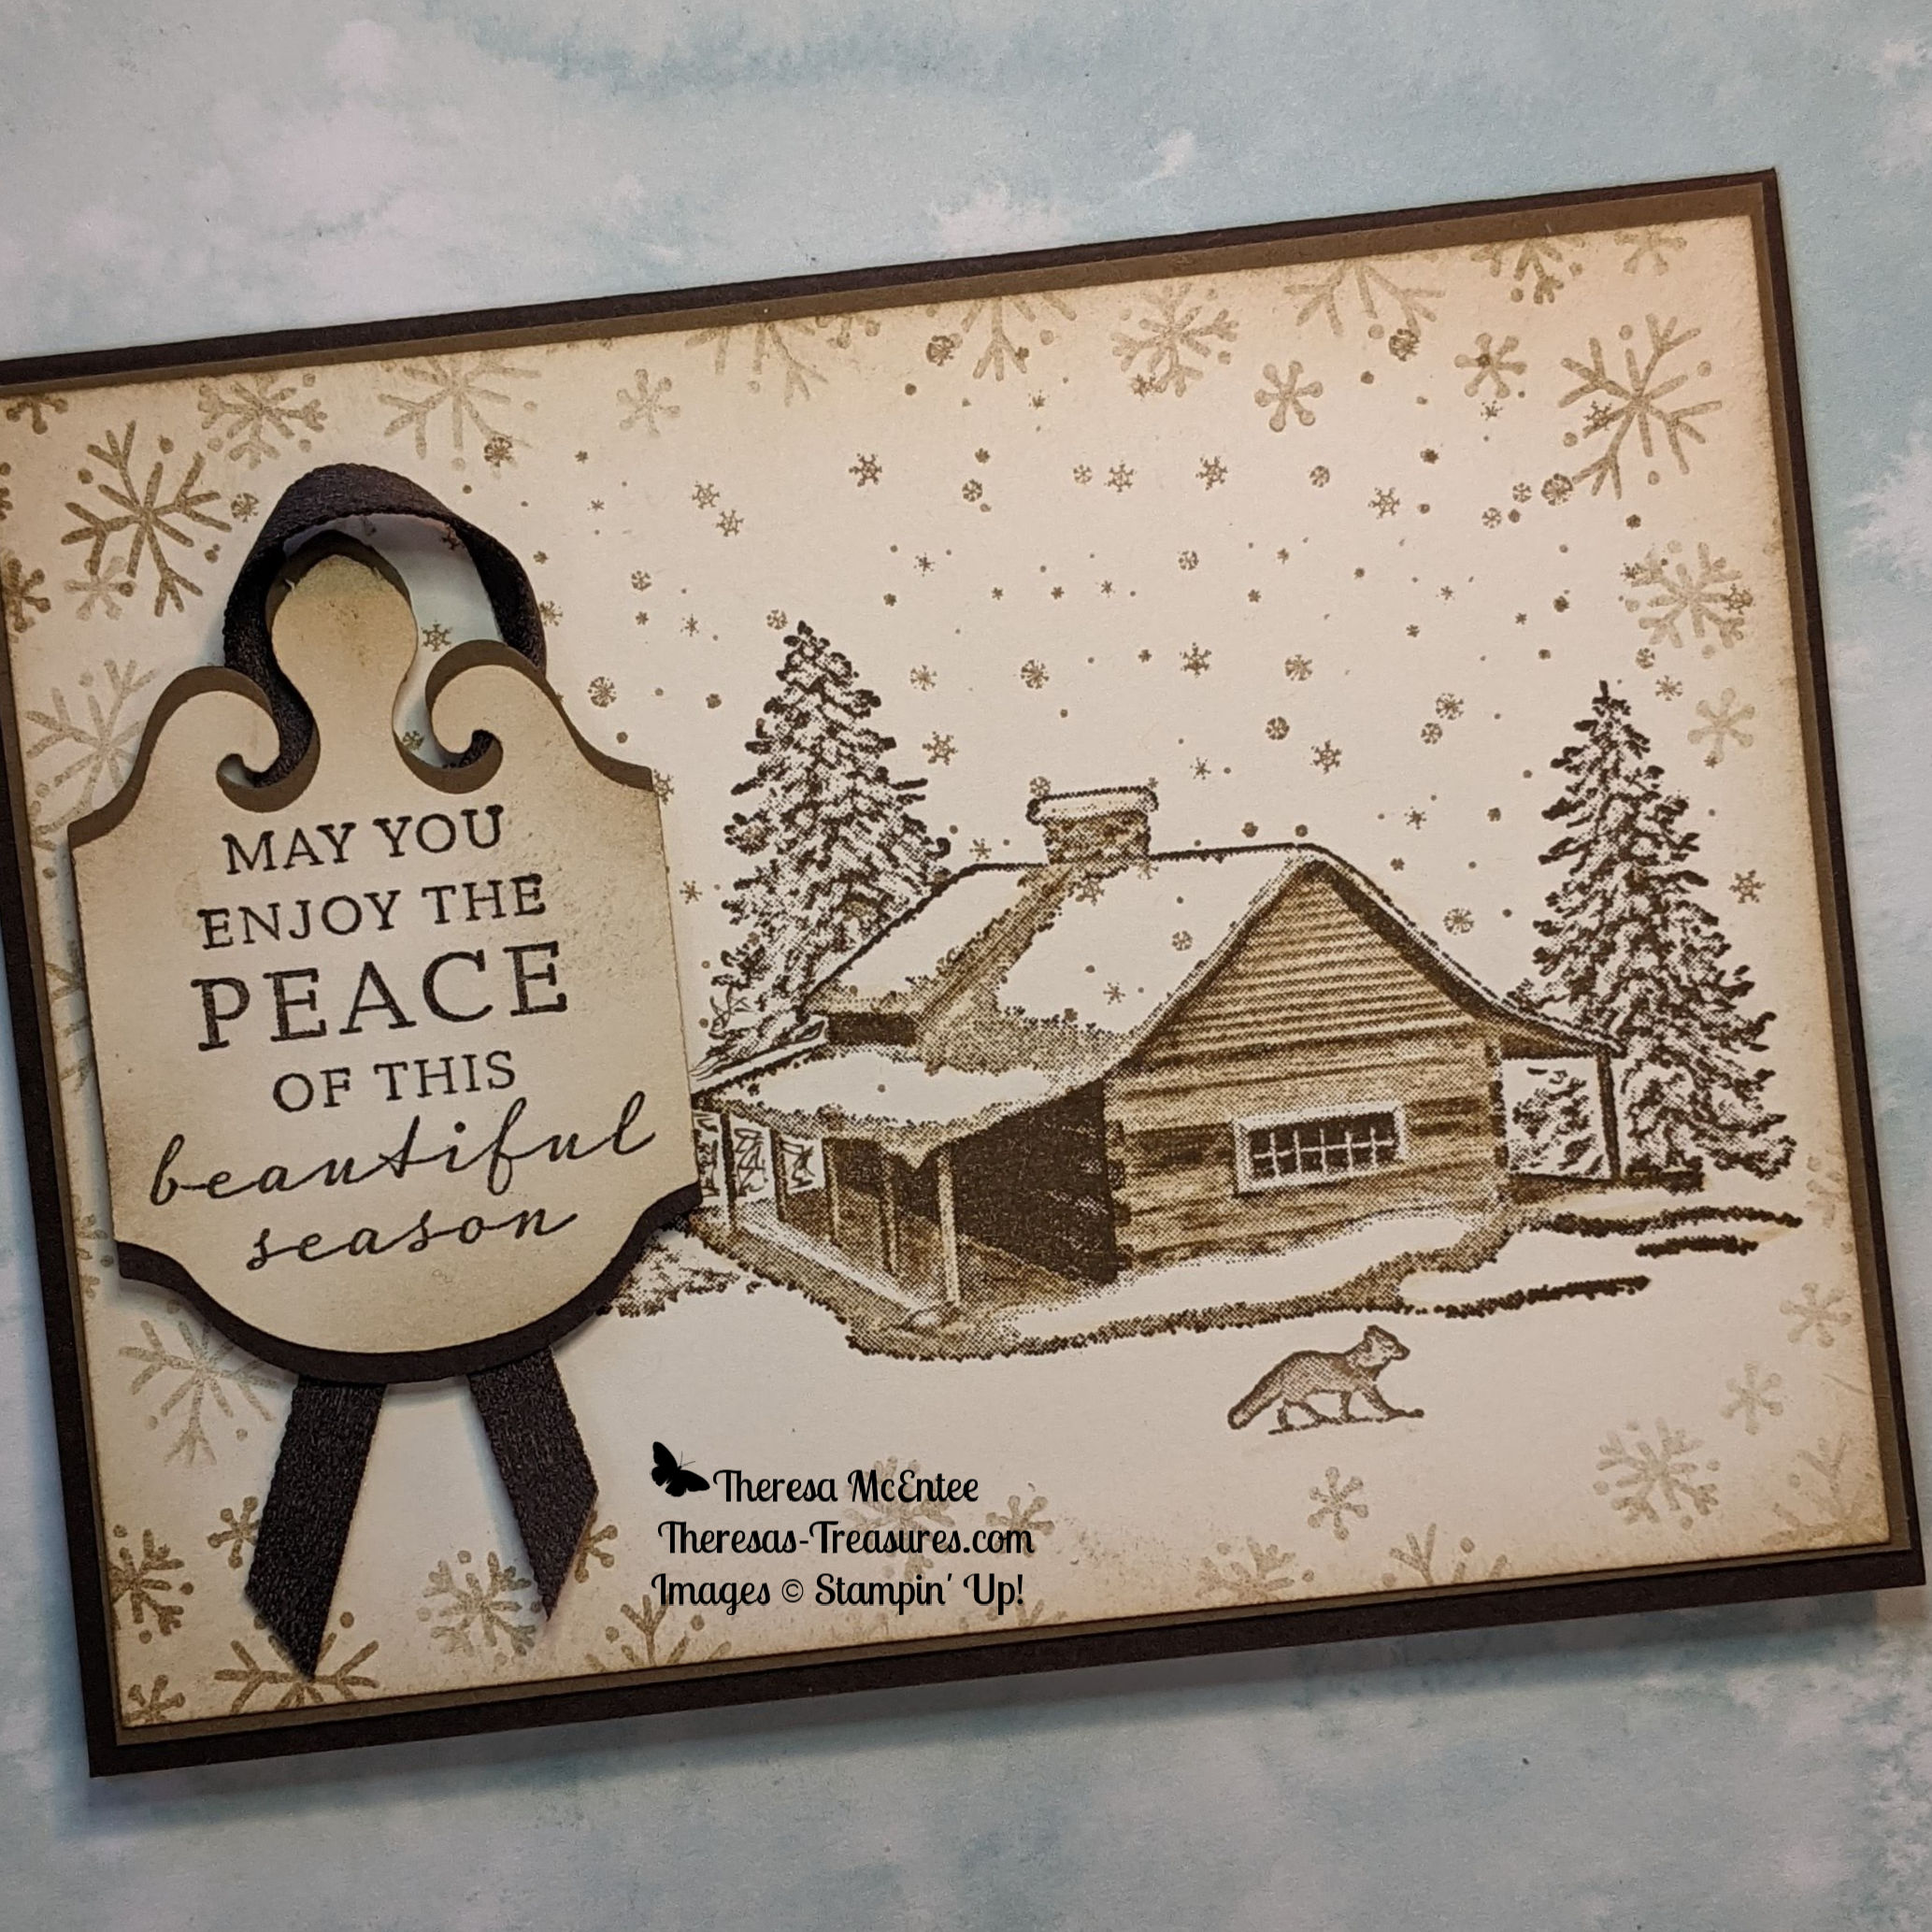
I am on Day 6 of the “12 Days of Christmas Card Making Challenge” with my stamping buddy Christy. Today’s card is a Stampin’® Up! Peaceful Cabin Masculine Christmas card. Each day my blog will focus on a new holiday card. The challenge goes until December 10, 2021. I plan to showcase a different stamp set with each card. This will allow you plenty of time to see the great products that are available in the 2021 Stampin’ Up! July to December Mini Catalog, and to order in time to make your own Christmas cards! You can order HERE when you have your list ready!
Early Espresso Card Stock (CS) card base: 5 1/2 x 8 1/2 inches with a score line at 4 1/4 inches.
Early Espresso CS: 2 1/4 x 3 1/4 inches
Soft Suede CS: 4 x 5 1/4 inches and 2 1/4 x 3 1/4 inches
Very Vanilla CS: 4 x 5 1/4 inches (inside), 3 7/8 x 5 1/8 inches (front) and 2 1/4 x 3 1/4 inches. Note: the front is slightly smaller than the inside.
Early Espresso 1/4 inch Faux Suede Trim: 8 inches
How to Use the Blending Brushes
First place your 3 7/8 x 5 1/8 inch Very Vanilla CS card piece on a scrap of paper. Apply slight pressure as you move the brush in a circular motion on the Crumb Cake ink pad. Tap onto the scrap paper. Then apply light pressure and move in a circular motion along the edge of the card piece. Start light and go slow. You can go over the area until it is as dark as you desire.
I wanted the very edge to be a little darker than the border of the card piece. You can hold the card piece up and scrape the Blending Brush on the very edge to accomplish this look.
To finish up with the Blending Brushes, stamp the sentiment “May You Enjoy The Peace of this beautiful season” in Early Espresso ink onto the 2 1/4 x 3 1/4 inch Very Vanilla CS. Punch the sentiment out with the Elegant Tag Punch. Use the Blending Brush with the Crumb Cake ink to blend the ink around the edges of the Elegant Punch.
Stamping
Stamp the cabin in Soft Suede ink onto the 4 x 51/4 inch Very Vanilla CS that has been shaded with the Blending Brush. Use the Blender Pen to smooth out the color on the cabin.
The tree stamp in the Peaceful Cabin stamp set is a group of 3 trees on one stamp. I cut my trees apart so that I would have more flexibility in using the trees.
Masking
Stamp the cabin onto some sticky paper and fussy cut. Lay it over the cabin on the Very Vanilla CS. Using the Soft Suede Ink, stamp some trees around the cabin.
I used the single stamp of the tree to stamp a tree on the right side of the cabin.
Sometimes when you stamp over another piece of paper, the image doesn’t take near the edge of the paper. Use the Soft Suede Stampin’ Write Marker to make the tree image complete.
More Stamping
Stamp the small snowflakes in Crumb Cake ink around the cabin. In the Snowman Season stamp set, there is a group of snowflakes. I stamped these in Crumb Cake ink, Stamping Off once, around the border of the card piece.
Fill in with the small snowflakes as you desire.
Stamp the little dog (or fox) in Crumb Cake. Use the Blender Pen to smooth out the color.
The 4 x 5 1/4 inch Very Vanilla CS is the inside of the card. Use the Blending Brush and the Crumb Cake Ink to blend some shadow in the upper left and lower right-hand corner. Stamp some trees in Soft Suede Ink in the lower right-hand corner. Use the small snowflakes and Crumb Cake Ink in both corners. Stamp the “Merry Christmas” sentiment from the Snowman Season in Early Espresso Ink.
Assembling the Card
Punch an Elegant Tag from both the 2 1/4 x 3 1/4 inch Early Espresso and 2 1/4 x 3 1/4 inch Soft Suede CS. Cut the Early Espresso tag and the Soft Suede tag in half. Use the Soft Suede CS on the top of the back of the Very Vanilla CS tag. Adhere the bottom half of the Early Espresso tag to the bottom of the Very Vanilla CS tag.
Make a loop with the 1/4 inch Early Espresso Faux Suede Trim and adhere to the back to the back of the Elegant Tag with Mini Glue Dots.
Adhere the Very Vanilla CS with the “Merry Christmas” to the inside of the Early Espresso CS card base. For the card front, first adhere the cabin Very Vanilla CS to the 4 x 5 1/4 inch Soft Suede CS. Then adhere the cabin piece to the front of the card base. Use Stampin’ Dimensionals to adhere the Elegant Tag sentiment to the left side of the card front.
Voila! You have a masculine Christmas card for your favorite guy! Stop by the Cardz4Guyz to see more masculine cards.
Have a wonderful weekend! We will be getting ready for Christmas. I have packages to get ready to mail. My husband just put all the lights on the house. Now for the tree and getting the Christmas cards ready to mail!
I am on Day 4 of the “12 Days of Christmas Card Making Challenge” with my stamping buddy Christy. Each day my blog will focus on a new holiday card. The challenge is until December 10, 2021. I plan to showcase a different stamp set with each card. This will allow you plenty of time to see the great products that are available in the 2021 Stampin’ Up! July to December Mini Catalog and to order in time to make your own Christmas cards! You can order HERE when you have your list ready!
Today’s card is the Stampin’ Up!® Classic Cloche Dome Christmas Shaker Card. The card shaker is made with the Cloche Dome and the Subtle Shimmer Sequins.
Measurements
Classic Cloche Dome Christmas Shaker Card
Real Red Card Stock (CS) card base: 5 1/2 x 8 1/2 inches with a score line at 4 1/4 inches
Basic White CS: 4 x 5 1/4 inches and 3 1/2 x 3 3/4 inches
Heartwarming Hugs Designer Series Paper (DSP): 4 x 5 1/4 inches
A more complete supply list is at the end of the blog
The Cloche Dome can be used with two different stamp sets- the Classic Cloche and the Sweets & Treats! Click on either one to go directly to my Online Store and start shopping.
Stamping
First use the Cloche Dies to cut out the space for the dome. Then use Real Red Ink to stamp the sentiment under the dome.
This little image of the birds in the dome is actually a 3-Step Stamp. First- stamp the outline of the birds and branches in Memento ink. Second- use the stamp with just the branches with Garden Green Ink. Third- use the stamp with the body of the birds and stamp in Real Red Ink. (I really struggled to get these to line up. I ended up using the Stamparatus because I could place the 2nd and 3rd stamps more accurately.) Alternatively, you could always color in the image using the Garden Green and Real Red Stampin’ Write Markers.
Stamp the 3-Step Stamp of the bird image on the lower right-hand corner of the 4 x 5 1/4 inch Basic White CS. Add the sentiment in Real Red Ink.
Assembling the Card
Adhere the stamped card piece to the inside of the Real Red CS card base.
Adhere the Heartwarming Hugs DSP to the card front. Then lay but DO NOT ADHERE both of the pieces with the dome. Adhere the dome piece with the birds stamped on it ONLY. Pull the sentiment piece away.
Adding the Dome and Sequins
I like to place a few of the Rhinestone Basic Jewels on the bird card piece. The sequins will fall to the bottom of the plastic dome when the card is upright. Having a few rhinestones allows the sparkle to stay. Now add about a teaspoon of the Subtle Shimmer Sequins onto the center of the bird card piece. (In hindsight, I could have added about 2x the amount of sequins that I did).
Peel the protective cover off of the inside of the Cloche Dome. Carefully place it over the bird card piece and press firmly to adhere.
Now peel the protective cover off of the front of the Cloche Dome. Apply adhesive to the back of the sentiment card piece. Carefully position this piece over the Cloche Dome. Press firmly to adhere.
Add a bow made from the Real Red Double Stitched Satin Ribbon. Voila! The card is finished. Shake it to see how fabulous this shaker card is!
I also have a blog about a Thanksgiving Shaker Card made with the Sweets & Treats stamp set. Check it out HERE.
I really hope you give shaker cards a try. It is such a fun alternative to the standard card!
Specials
If you are unable to read the list, I recommend looking at the photos of the products available when you click on the Last Chance pop up on my Online Store website HERE.
I am on Day 2 of the “12 Days of Christmas Card Making Challenge” with my stamping buddy Christy. I will be blogging a new holiday card each day until December 10, 2021. I plan to showcase a different stamp set with each card. This will allow you plenty of time to see the great products that are available in the 2021 Stampin’ Up! July to December Mini Catalog and to order in time to make your own Christmas cards!
This Stampin’ Up! Bright Baubles Gold Emboss Christmas Card is rather simple to make with the instructions that follow. The Bright Baubles stamp set is just fabulous! The ornaments are very ornate and elegant.
To be able to heat emboss you will need: Stampin’ Emboss Powder-Metallic, Versamark Ink and the Heat Tool which are found in the 2021-2022 Stampin’ Up! Annual Catalog. These supplies are pictured below with links to my Online Store.
Blackberry Bliss CS card base: 11 x 4 1/4 inches with a score line at 5 1/2 inches.
Blackberry Bliss CS card front: 5 1/4 x 4 inches.
Stamping
Stamp the sentiment first with Blackberry Bliss ink. Be sure to try it out on a scrap piece of paper to check the alignment. Follow by stamping one of each of the gorgeous ornaments. Finish with the sparkles on either side of the sentiment. Set aside.
Embossing
It takes practice to be able to get great images with the Gold Emboss Powder on a dark card stock. I strongly recommend purchasing an Anti-Static Powder bag or pouch. This helps prevent the emboss powder from sticking to other parts of the card piece, like to the oils from fingerprints. There are many anti-static pouches available from different suppliers. Also have a microfiber cloth on hand to get the powder off after embossing.
Start the embossing process by applying the anti-static powder to the 5 1/4 x 4 inch Blackberry Bliss CS. Next stamp the image of the larger ornament in Versamark. Tap out some of the Gold Emboss Powder and move it around so it sticks to the Versamark. Take care not to touch it. Use the Heat Tool until all of the powder has melted. Follow by stamping the second ornament, applying the Gold Emboss Powder and using the Heat Tool. Repeat the process for the “JOY” sentiment.
Again repeat the embossing process for the sparkles. See how hazy the card piece looks? After the Gold Emboss Powder has cooled, use a microfiber cloth to gently rub off the anti-static powder.
Adhere the Gold Embossed Blackberry Bliss CS to the front of the Blackberry Bliss card base. Adhere the stamped Very Vanilla CS card piece to the inside of the card base.
Add some Gilded Gems and Voila! you have a gorgeous elegant handmade Christmas card!
I hope you enjoy trying this card for yourself. I actually ended up making several. The other emboss powders in the Metallics set are silver and copper. Try them out on different colors of card stock to see how fabulous they are!
The complete list of supplies will be at the end of the blog.
Retiring Products from the July – December Mini Catalog
You may download the list to look over and make your shopping list.
I did not have any stamps with gnomes or fairies. I decided to try to make a gnome with Punch Art. Punch Art used to be the art of making images using the Stampin’ Up! punches. However, right now there are not many punches in basic shapes like circles, squares and triangles. But there are many shapes in the Stampin’ Up! Dies that can be used!
The face and the boots are made from the Ice Cream Cone Builder Punch. The black lines are where I cut the punch. The little pompom for the gnome hat is from the Pierced Blooms Dies. The remaining pieces are different sizes of triangles from the Stitched Triangle Dies. The face is Blushing Bride Card Stock (CS). For the hat I used the Tidings of Christmas 6 x 6 Designer Series Paper (DSP). The boots are made with Early Espresso CS and the body is made with Soft Succulent CS. The beard and the pompom are in Basic White CS.
Assembly
First place the triangle for the body on the card front to be able to position the boots. After adhering the boots, use Stampin’ Dimensionals to adhere the body. Trim off the very tip of the triangle for the body.
Slide the white beard triangle under the “nose”. Then adhere the hat. Position the Stampin’ Dimensionals as shown.
Adhere the face with the beard and hat over the body. Stamp your greeting. I used the greeting from the Joyful Life stamp. The greeting is stamped in Soft Succulent ink.
Adhere the card front to a 5 1/4 x 4 inch piece of the Christmas Tidings DSP. Finish the card by adhering this piece to the front of an 11 x 4 1/4 inch Basic White CS card base.
Voila! A cute gnome is created for a whimsical holiday card! Stop by The Paper Players Challenge PP568 to see more cards made in the “Clean and Simple” style with gnomes or fairies.
I hope this card has brightened your day a little if you needed it. Stop by tomorrow for a 3D Thanksgiving shaker card made with the Stampin’ Up! Cloche Shaker Dome!
Remember that if you wish to subscribe to my newsletter, you can do so by scrolling down the side bar until you get to the “Subscribe to My Newsletter” form. I sent my very first Theresa’s Treasures Paper Crafts Newsletter out this past Monday. Constructive feedback on how to make my newsletter better for you is welcome.
Welcome to my blog today! I have a card that I am submitting to the Cardz4Guyz Challenge #284 Gingham, Checks or Plaid. I had a lot of fun with this card. I wanted to use the Wonderful Snowflakes which are laser-cut snowflakes from an iridescent white paper. They are so beautiful!
I also used the So Many Snowflakes Dies to cut smaller snowflakes from the scrap left behind after punching the Wonderful Snowflakes out. Stampin’ Up! colors used are Pool Party, Coastal Cabana and Bermuda Bay.
The Snowflake Wishes stamp set has many snowflakes in different sizes. It also has a great sentiment that goes along with the snowflakes-“May Your Season Sparkle”. The sentiment inside is “Snowflake Wishes for a Merry Christmas”.
I made my own plaid by taking the black and white gingham from the Pattern Party Designer Series Paper and drawing a Bermuda Bay line over the center of the white column. I used the Pool Party Stampin’ Blend Alcohol maker on some of the the grey gingham squares to add more color.
The scalloped rectangle is a die from the Scalloped Contours Dies. And I added just a little Bling! with the Basic Rhinestone Jewels.


")
")


")


")
")


 Faux Suede Trim")


")

")


 Double-Stitched Satin Ribbon")


")


 Designer Series Paper")


")


 Host Designer Series Paper")