Posted in 2020-2021 Stampin' Up! Catalog, Cars, Guys cards, Stamping-off technique

Stampin’ Up!® Simple Stamping with Moving Along

Hello! I hope you all had a great weekend. Today I have a fun simple stamping card. The Moving Along stamp set by Stampin’ Up! is great for simple stamping. You can create a fun scene with all the little stamps in this set.

There are 24 stamps in this set! Each of the vehicles is a Two-Step Stamp. I recently made a going away card for someone with this set. The card for today is more of a congratulations and happy travels card.

This card is made with several ink colors that are good for a beginner stamper to have on hand. The primary colors are: Pacific Point (blue), Poppy Parade (red) and Daffodil Delight (yellow). I also used Smoky Slate (grey) and Memento black ink.

Measurements

Measurements: Basic White Card Stock (CS) card base: 5 1/2 x 8 1/2 inches with a score line at 4 1/4 inches; Poppy Parade CS: 4 1/8 x 5 3/8 inches; and Basic White CS: 4 x 5 1/4 inches.

Stamping

First I used the Smoky Slate ink to stamp the road on the bottom of the 4 x 5 1/4 inch Basic White CS.

Next switch to the Memento Black ink and stamp the outline for the little car and then the railroad tracks. My tracks are not quite straight so I guess the train ride will be a little bumpy!

Continuing with the Memento black ink, stamp the outline of the train, the caboose and the helicopter. Things are starting to look busy!

Finishing up with the Memento black ink, stamp the banner behind the vehicles. On hindsight, the train could be moved a little to the right so that the banner fits better.

To complete the card we just need to fill in the color which is the second step of the Two Step Stamping. I stamped the train in Smoky Slate, the car in Daffodil Delight, the caboose in Poppy Parade and the helicopter in Pacific Point ink. The blades on the helicopter are stamped in Smoky Slate ink. Now we can add the sentiments. I wanted it to be colorful so I just stamped the sentiments in the coordinating color of the vehicle. You can also add some birds with the Smoky Slate ink. Tip: I put both of the bird stamps on one block and stamped them together.

In order to finish the scene, add some clouds in Pacific Point ink. Tip: To make some clouds look farther away I used the Stamping Off Technique. Stamp the image once, then without adding more ink, stamp a second time.

Putting It All Together

Now we are ready to put it all together. First, adhere the stamped Basic White CS to the 4 1/8 x 5 3/8 inch Poppy Parade CS. There will be a very thin line of color showing around the stamped card piece. Use your Bone Folder to make a crisp fold at the 4 1/4 inch score line on the Basic White CS card base. Adhere the stamped card piece to the front of the Basic White CS card base.

Viola! You have a great card to wish someone a congratulations and happy travels.

Thank you for visiting my blog today. I am a Stampin’ Up! Demonstrator in Arizona, USA and I sell all of the products I use on my cards. Right now is Sale-a-bration! During Sale-a-bration you can choose a FREE product from the Sale-a-bration Brochure when you order $50 in the US. If you are in need of a 2021 January-June Stampin’ Up!® Mini catalog or 2020-2021 Stampin’ Up!® Annual catalog please leave me a comment or go to my Facebook page at Theresa’s Treasures Arts & Crafts and leave me a private message.

Supplies

Product List

Have a great day!

Theresa

Posted in 2020-2021 Stampin' Up! Catalog, Animals, Fish, Guys cards, Lake/Sea/Ocean, Sea, Sealife

Cardz 4 Guyz Challenge # 251- Gone Fishing with Whale Done

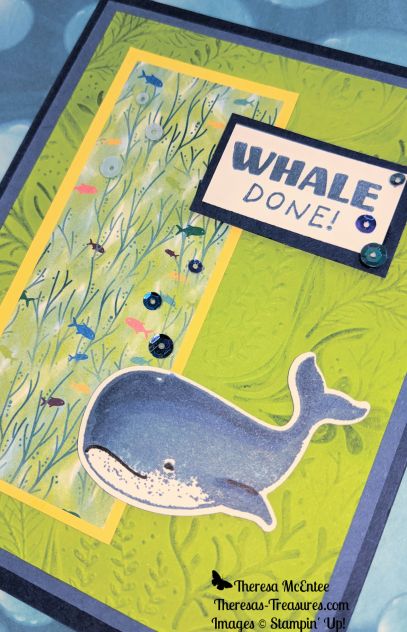
The Cardz4Guyz Challenge #251 is Gone Fishing. I didn’t have any fishing stamp sets, but I do have a big fish in the fun Whale Done stamp set and some great Whale of a Time Designer Series Paper (DSP).

The card base is Night Of Navy cardstock. The next layer is Misty Moonlight. For the Granny Apple Green panel I embossed it with the Seabed 3D Embossing Folder. Next I used a Sponge Dauber to sponge on some Granny Apple Green ink and highlight the fabulous design made by the embossing. Inside the card, I used a panel of Whisper White card stock, then adhered a 1 inch strip of the little fish pattern of the DSP with an edge of Night Of Navy card stock.

I first stamped the whale in Misty Moonlight ink. I used the Stampin’ Blends Alcohol Markers in Light and Dark Balmy Blue, and Light and Dark Misty Moonlight to enhance the whales features. I used the Basic Black Stampin’ Write marker to bring out the whales smile and eye, and add shadow to the fin. I punched the whale out with the Whale Builders Punch. I used the Whale of a Time Sequins to add “bubbles” above the whale and the little fish.

The fun and colorful little fish pattern of the Whale of a Time DSP on the card front is bordered by Daffodil Delight card stock.

I hope you like my card. Please leave a comment and share what you think. I appreciate you stopping by today. Go to the Cardz4Guyz blog and see everyone else’s cards! Lots of great inspiration!

If you would like to purchase the Stampin’ Up! products I used for this card, please visit my Online Store HERE.

Colors for this card included:

Products included: (click on photo to go to my Online Store)

Product List

Have a great day!

Theresa

Posted in Avid Stamper, Barbecue, Guys cards, Summer

Cardz4Guyz Challenge # 243 Use Dies as a Main Feature

Here is a little extra post for the avid stamper. It is for the Cardz4Guyz Challenge #243 to Use Dies as a Main Feature.

I am so looking forward to the day when we will be able to be outside and have family and friends over for a big barbecue! That thought is what inspired me to make this card.

I used a lot of different products for this scene. The Stampin’ Up!® products are listed below.

Do you see all the lovely yellow butterflies! And don’t forget a drink!

Thanks for stopping by to see my card for the Cardz4Guyz Challenge to Use Dies as a Main Feature! It is so fun to have a challenge to do!

The Stampin’ Up! Products are:

Product List
Posted in Uncategorized

Congratulations

This is the time of year I just love because of all the beautiful flowers and blooms everywhere, even here in the desert. This crocus is peeking out from a background of Agave. It always seems a bit too busy though!

I am still in a splint from my joint replacement surgery, but am starting to feel a little better. I have a great card for a congratulations which I had designed for the class I held this past weekend. With the help of several friends, I was able to have class! I would not have been able to do it without Julie, Amanda and Jeanne doing the prep for me! Thank you!

Here is the card which can be used for a variety of congratulatory situations. It is made with Stampin’ Up!’s Dandelion Wishes stamp set which is in the Annual Catalog. The “Congratulations” sentiment is from the Well Said stamp set in the Occasions Catalog.

I am sorry that I cannot do photographs to show you how this is made right now. I hope to be able to so in the next 2-3 weeks. I am trying not to do too much so everything heals up really well. Easier said than done! I hope to have another card to at least show you soon!