Posted in 2023-2024 Stampin' Up! Annual Catalog, 2024 Stampin' Up! January to April Mini Catalog, Animals, Avid Stamper, Birds, Gratitude/ Thanks, Nature, Online Exclusives, Shaker Card, Techniques, Training Group Blog Hop by Kylie & Bruno Bertucci

Thoughtful Expressions Shaker Thank You Card for Bruno & Kylie Bertucci’s Demonstrator Training Group Blog Hop-January 2024

Hello! Welcome to Kylie & Bruno Bertucci’s Free Demonstrator Training Group Blog Hop for January 2024. I am Theresa with Theresa’s Treasures Paper Crafts and I have a Thoughtful Expressions Shaker Thank You card for you today. Thanks so much for joining me today!

We are a group of Stampin’ Up! Demonstrators from around the world. We are members of this free training group to help us build a successful Stampin’ Up! business. My goal this year is to continue to participate in the monthly Blog Hop to show you the card I will send my customers as a thank you for ordering from me. The Thoughtful Expressions Shaker Thank You Card should be a fun card to receive!

This blog hop is full of ideas and creative inspiration! Be sure to visit everyone’s blog by clicking on the links at the end of my blog. Please leave some comments so we know how we are doing.

Why did I make this Thoughtful Expressions Shaker Thank You Card? My sister wanted to learn how to make shaker cards. The basic card was one of the samples I showed her. When I saw the beautiful hummingbird in the Thoughtful Expressions stamp set, I thought–why not add a hummingbird to the front? So I had my idea for my customer thank you card!

Measurements

  • Blueberry Bushel cardstock (cs): 5 1/2″ x 8 1/2″ scored at 4 1/4″
  • Blueberry Bushel cs: 4 x 5 1/4″ for front panel that is diecut
  • Fluid 100 Watercolor Paper: 3 1/2″ x 3 1/2″ for the hummingbird and 4 1/4″ x 4 1/4″ for the inside panel
  • Basic White card stock (cs): 2″ x 2″ for sentiment on front
  • Meandering Meadows Designer Series Paper (DSP) an Online Exclusive!: 4″ x 5 1/4″
  • Window Sheets: 3 3/4″ x 5″

Supplies

  • Stamp Set: Thoughtful Expressions and Wildlife Wonder (sentiment)
  • Dies: Thoughtful Expressions and Garden Meadow
  • Ink: Pads: Blueberry Bushel, Smoky Slate and Memento; Re-Inkers: Lemon Lime Twist, Granny Apple Green, Tahitian Tide, Orchid Oasis, Fresh Freesia and Crushed Curry
  • Embellishments: Iridescent Shaker Circles
  • Additional: Foam Adhesive Strips, Stampin’ Dimensionals and Multipurpose Liquid Glue, and Wink of Stella

Instructions

Shaker Card

  1. Diecut the 4″ x 5 1/4″ Blueberry Bushel cs with the large arched window die in the Garden Meadow Dies. With the same die, diecut the 4″ x 5 1/4″ Meandering Meadow DSP.
  2. Lay the Blueberry Bushel cs diecut panel on the front of the card base.
  3. Apply Multipurpose Liquid Glue to the back of the arched window you diecut from the DSP. Insert it in the Blueberry Bushel cs frame to adhere it to the front of the card base.
  1. Remove the Blueberry Bushel cs frame. Flip this over and adhere the Window Sheet. Place Stampin’ Dimensionals in the corners and on the sides.
  1. Tip #1: to reduce the sequins sticking to the edge of the Foam Adhesive Strip, apply the Embossing Buddy to the edge that will be facing inside the shaker. ( first photo below)
  2. Tip #2: to help the Foam Adhesive Strip cover the archway and remain flat, use your Paper Snips to make a nick in the outside edge. (second photo below with arrows)
  3. Add the Iridescent Circles to the inside of the area framed with the Foam Adhesive Strips. (second photo below)
  4. Remove the protective cover on the Foam Adhesive Strips as well as the Stampin’ Dimensionals on the frame with the window sheet. Turn the frame over and carefully adhere it to the Foam Adhesive Strips and the front of the card base. (third photo below)
  1. Yay! the shaker card is done. Now for the decorating!

Watercoloring the Hummingbird

  1. Ink up the hummingbird with Smokey Slate Ink. Use a Sponge Dauber to apply Memento Ink to the face, bill and neck. Stamp on to the Fluid 100 Watercolor Paper.
  1. Drop one drop of Orchid Oasis Ink from the Re-Inker onto a clear block. Use a small paint brush. Put the paint brush in water and touch it to a small amount of the Orchid Oasis Ink. Spread it on the clear block until it is diluted. Then apply it to the hummingbird wings. Follow with the remaining colors making some areas light and some dark for shading. Add the Wink of Stella if desired.

Finishing the card

  1. Use the Thoughtful Expressions Die to diecut the Watercolor Paper for the inside. Stamp the small sprig of flowers in Smoky Slate Ink. Watercolor with Crushed Curry, Lemon Lime Twist and Granny Apple Green Inks. Adhere to the inside of the card base.
  1. Use Blueberry Bushel Ink to stamp the sentiment from the Wildlife Wonder stamp set, onto the Basic White cs. Diecut with the smallest of the Thoughtful Expressions dies.
  2. Use Stampin’ Dimensionals to adhere the hummingbird and sentiment to the card front.

Voila!

Remember to visit everyone’s blog. You will see creative inspiration from Demonstrators around the world! You are currently at Theresa McEntee-Theresa’s Treasures-USA. Enjoy!

I appreciate your visit to my blog today. Please subscribe to my blog so you will continue to see these blogs. If you need any assistance with placing an order so you can make your own card, let me know in the comments. Thanks!

Have a most wonderful day! Happy crafting!

Theresa

Stampin’ Up Promotions

Sale-a-bration

What is Sale-a-Bration? It is a wonderful time of year for those ordering from Stampin’ Up! For every $50 USD you order, there are FREE products to choose from! Sale-a-bration starts January 4, 2024 and ends February 29, 2024.

Clickable Supply List

Product List
Thoughtful Expressions Bundle (English)
$55.75
Wildlife Wonder Cling Stamp Set (English)
$24.00
Garden Meadow Dies
$36.00
Meandering Meadows 6" X 6" (15.2 X 15.2 Cm) Designer Series Paper
$12.50
Iridescent Shaker Circles
$7.00
Granny Apple Green Classic Stampin' Ink Refill
$5.00
Tahitian Tide Classic Stampin' Ink Refill
$5.00
Orchid Oasis Classic Stampin' Ink Refill
$5.00
Fresh Freesia Classic Stampin' Ink Refill
$5.00
Lemon Lime Twist Classic Stampin' Ink Refill
$5.00
Crushed Curry Classic Stampin' Ink Refill
$5.00
Blueberry Bushel Classic Stampin' Pad
$9.00
Smoky Slate Classic Stampin' Pad
$9.00
Tuxedo Black Memento Ink Pad
$6.50
Blueberry Bushel 8-1/2" X 11" Cardstock
$10.00
Basic White 8 1/2" X 11" Cardstock
$10.50
Fluid 100 Watercolor Paper
$9.00
Window Sheets
$5.00
Foam Adhesive Strips
$8.00
Clear Wink Of Stella Glitter Brush
$8.00
Posted in 2022-23 Stampin' Up! Annual Catalog, Avid Stamper, Gratitude/ Thanks, Punch, Shaker Card, Stampin" Blends Alcohol Markers

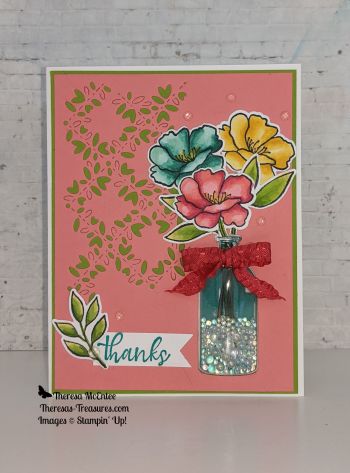
Kylie Bertucci’s Top 10 International Blog Highlight Winners Hop- Stampin Up!® Happiness Abounds Floral Thank You Card

I am so excited and thankful to be part of the Top 10 Winners Hop from Kylie Bertucci’s International Blog Highlights Gallery! Thank you to everyone who voted for my card from the May International Blog Highlights, allowing me an opportunity to post on this Winners Hop today. Ten more fabulous demonstrators from around the world will be posting today too! The theme for the card today is “Thank you”.

This card was inspired by all the colorful flowers in the gardens around my house. The flowers and leaves are from the Happiness Abounds stamp set. They are colored with the Stampin’ Blends Alcohol Markers in Daffodil Delight/So Saffron, Bermuda Bay/Pool Party and Flirty Flamingo with a little Melon Mambo. The die cut background is from the Blossoming Happiness Dies that coordinate with the Happiness Abounds stamp set.

The bottle is created with a stamp from the Bottled Happiness stamp set. The Vintage Bottle Punch was used to add the Vintage Bottle Shaker Dome. Effervescent Elements create the “bubbles” in the bottle!

The “thanks” sentiment is from the Simply Succulents stamp set.

You are currently at Theresa McEntee-USA. Click on the following links to see more awesome creativity from around the world!

Thank you for visiting today!

Theresa

Product List
Posted in 2021 Stampin' Up! July-December Mini Catalog, 2021-2022 Stampin' Up! Annual Catalog, Birds, Nature, Shaker Card, Stamparatus, Winter Holiday

Stampin’ Up!® Classic Cloche Dome Christmas Shaker Card

I am on Day 4 of the “12 Days of Christmas Card Making Challenge” with my stamping buddy Christy. Each day my blog will focus on a new holiday card. The challenge is until December 10, 2021. I plan to showcase a different stamp set with each card. This will allow you plenty of time to see the great products that are available in the 2021 Stampin’ Up! July to December Mini Catalog and to order in time to make your own Christmas cards! You can order HERE when you have your list ready!

Today’s card is the Stampin’ Up!® Classic Cloche Dome Christmas Shaker Card. The card shaker is made with the Cloche Dome and the Subtle Shimmer Sequins.

Measurements

Classic Cloche Dome Christmas Shaker Card

  • Real Red Card Stock (CS) card base: 5 1/2 x 8 1/2 inches with a score line at 4 1/4 inches
  • Basic White CS: 4 x 5 1/4 inches and 3 1/2 x 3 3/4 inches
  • Heartwarming Hugs Designer Series Paper (DSP): 4 x 5 1/4 inches
  • One Cloche Shaker Dome #156387 (Order HERE)
  • A more complete supply list is at the end of the blog

The Cloche Dome can be used with two different stamp sets- the Classic Cloche and the Sweets & Treats! Click on either one to go directly to my Online Store and start shopping.

Stamping

First use the Cloche Dies to cut out the space for the dome. Then use Real Red Ink to stamp the sentiment under the dome.

This little image of the birds in the dome is actually a 3-Step Stamp. First- stamp the outline of the birds and branches in Memento ink. Second- use the stamp with just the branches with Garden Green Ink. Third- use the stamp with the body of the birds and stamp in Real Red Ink. (I really struggled to get these to line up. I ended up using the Stamparatus because I could place the 2nd and 3rd stamps more accurately.) Alternatively, you could always color in the image using the Garden Green and Real Red Stampin’ Write Markers.

Stamp the 3-Step Stamp of the bird image on the lower right-hand corner of the 4 x 5 1/4 inch Basic White CS. Add the sentiment in Real Red Ink.

Assembling the Card

Adhere the stamped card piece to the inside of the Real Red CS card base.

Adhere the Heartwarming Hugs DSP to the card front. Then lay but DO NOT ADHERE both of the pieces with the dome. Adhere the dome piece with the birds stamped on it ONLY. Pull the sentiment piece away.

Adding the Dome and Sequins

I like to place a few of the Rhinestone Basic Jewels on the bird card piece. The sequins will fall to the bottom of the plastic dome when the card is upright. Having a few rhinestones allows the sparkle to stay. Now add about a teaspoon of the Subtle Shimmer Sequins onto the center of the bird card piece. (In hindsight, I could have added about 2x the amount of sequins that I did).

Peel the protective cover off of the inside of the Cloche Dome. Carefully place it over the bird card piece and press firmly to adhere.

Now peel the protective cover off of the front of the Cloche Dome. Apply adhesive to the back of the sentiment card piece. Carefully position this piece over the Cloche Dome. Press firmly to adhere.

Add a bow made from the Real Red Double Stitched Satin Ribbon. Voila! The card is finished. Shake it to see how fabulous this shaker card is!

I also have a blog about a Thanksgiving Shaker Card made with the Sweets & Treats stamp set. Check it out HERE.

I really hope you give shaker cards a try. It is such a fun alternative to the standard card!

Specials

If you are unable to read the list, I recommend looking at the photos of the products available when you click on the Last Chance pop up on my Online Store website HERE.

Supplies

Product List

Thanks for stopping by for the 4th day of my 12 Days of Christmas Card Making Challenge! I hope you will come by for tomorrow’s card!

Theresa

Posted in 2021 Stampin' Up! July-December Mini Catalog, Fun/Fancy fold card, Gratitude/ Thanks, Shaker Card, Stampin' Up! 2021-2022 Annual Catalog, Thanksgiving

Stampin’ Up!® Sweets & Treats Cloche Dome Card

Happy Thanksgiving!

Today I plan to spend some time reflecting on all I have to be grateful for. An “attitude of gratitude” really keeps me from feeling down during the holidays. I am very blessed to be able to spend Thanksgiving with family this year. We missed last year, so I feel especially grateful to be visiting this year.

I have a very fun 3D card for you today:

Doesn’t that apple pie look delicious? I actually prefer pumpkin pie, but the apple pie is a close second. Which pie do you like best? Please leave me a comment below.

Measurements

  • Cinnamon Cider Card Stock (CS) card base: 5 1/2 x 8 1/2 inches
  • Cinnamon Cider CS: 3 3/8 x 4 5/8 inches
  • Basic White CS: 3 3/4 x 3 1/2 inches and a scalloped rectangle from the Scalloped Contour Dies
  • Hand Penned 12 x 12 inch Designer Series Paper (DSP): 3 3/4 x 3 3/4

The Fun Fold Card Base

The card base is made by cutting 3/4 inch off of the top and bottom of the front panel. Emboss the back panel with the Timber 3D Embossing Folder. Set aside.

Trivia: Anyone know what a cloche (Klōsh) is? I didn’t. One definition of cloche from French, literally “bell”, is a transparent cover shaped like a bell.

Stamping & Coloring The Pie Pan

Use the Cloche Dies to cut the shape of the dome from the Scalloped Contour Die rectangle. Take care to position the die so that it is about 1/4 inch down from the top and that it is centered. Tip: I use sticky note tape to hold my dies in position while putting them through the Stampin’ Cut & Emboss Machine. Save the cut out piece. Stamp the pie stand in Memento Black Ink. Use Stampin’ Blends Alcohol Markers in Smoky Slate to color the stand. Tip: I color in the “shadows” first with the Dark Smoky Slate Blend.

Then use the Light Smoky Slate Stampin’ Blend marker to blend the border of the dark into the light. Keep moving from the edges to the center until it is all colored in.

Stamping & Coloring the Pie

Now stamp the pie onto the cut out piece of the dome. Color the pie pan with Cinnamon Cider Stampin’ Blends. Start with the Dark Cinnamon Cider Blend on the edges. Use the Ivory Stampin’ Blend to color the pie crust. Since there is only one shade of the Ivory, you can make a shadow on the edges by coloring the first layer as shown.

For the pie pan, blend with the Light Cinnamon Cider marker from both edges until you reach the middle of the pie pan. Note: I used a wee bit of the Light Cinnamon Cider Blend on the pie crust. To finish the crust I used the Ivory Blend to smooth out the darker edges until I covered the entire crust. I used the Light Real Red Stampin’ Blend for the holes in the pie crust since I am making an apple pie.

Stamping the Inside

Orient the 3 3/4 x 3 1/2 inch Basic White CS card piece with the 3 1/2 inch edge on either side. Using the Memento ink, stamp the “love ya” sentiment in the center. Add the heart in Blushing Bride ink.

Assembling the Card

Adhere the inside Basic White CS panel to the inside of the Cinnamon Cider CS card base so that it is hidden when you close the front panel. Adhere the Hand Penned DSP to the front panel. Set aside.

Do Not Adhere, but just place the complete Scalloped Contour rectangle with the pie dome on the 3 3/8 x 4 5/8 inch Cinnamon Cider CS. Adhere the pie dome without getting adhesive on the Scalloped Contour piece. Remove the Scalloped Contour rectangle. Draw some steam over the pie with the Black Stampin’ Write Marker. Yummy!

Assembling the Shaker Cloche Dome

Place about 1/2 tsp of the gold and orange Sequins for Everything on the center of the dome cut out. Remove the strip covering the adhesive on the bottom of the Cloche Shaker Dome.

Carefully line up the inside edge of the shaker dome with the dome on the Cinnamon Cider CS. Push firmly around the edge of the dome. Once adhered, remove the strip covering the adhesive on the top of the Cloche Shaker Dome.

Apply adhesive to the back of the Scalloped Contour rectangle. Place it carefully over the dome and push down to make it stick. Now the sequins can move around inside the dome! Fun!

Finishing the Card

Adhere the shaker dome card piece to the front panel of the card base. Take care not to apply adhesive to the very top and bottom. Include a sentiment if desired. I really like the sentiment “any way you slice it, I’m thankful for you”.

Voila! Such a yummy looking Sweets & Treats Cloche Shaker card! Also a great Thanksgiving card to share your gratitude with a loved one.

Supplies To Make This Card

To go to my online store, click on any of the photos below.

Product List

I am very thankful that you are visiting my blog!

Starting November 29, 2021 I am embarking on a 12 Days of Christmas Card Making Challenge with my fellow stamping friend Christy. Our plan is to create and blog about a new Christmas card every day for 12 days! Come by on Monday, November 29th and see what I have in store for you!

Again- Happy Thanksgiving!

Theresa