These Quick & Easy Handmade Cards with Stampin’ Up! Adorable Owls make a fun activity for you!
Supplies
These owls are just so–well Adorable! And the Dandy Designs Designer Series Paper (DSP) gives you a wide variety of bright & fun designs to choose from.
You can choose how you would like to color these cute owls. I used the Stampin’ Blends Alcohol Markers in Daffodil Delight, Balmy Blue, Granny Apple Green, Calypso Coral, Fresh Freesia and Ivory/Bronze. The sentiment is stamped in Memento Black Ink.
Measurements
Basic White card stock (cs) card base: 5 1/2 x 8 1/2 inches with a score line at 4 1/4 inches.
Basic White cs: 3 x 9 inches to stamp all three owls
You can choose the Dandy Designs DSP for FREE with a $100 USD order! And if you have a longer shopping list, you can choose both the Adorable Owls and the Dandy Designs DSP for FREE with a $150 USD order!
I hope you enjoyed my Quick & Easy Handmade Cards with the Stampin’ Up! Adorable Owls!
Basic White card stock (cs) card base: 5 1/2 x 8 1/2 inches with a score line at 4 1/4 inches
Basic White cs: 4 1/4 x 5 1/2 inches to die cut the large scalloped rectangle and 2 x 3 1/4 inches for the sentiment
Blackberry Bliss cs: 1 1/8 x 2 3/8 inches to go behind the sentiment
Hues of Happiness DSP; enough to die cut the flowers and leaves needed
Supplies
Happiness Abounds stamp set
Blossoming Happiness Dies
Scalloped Contours Dies (also on sale!)
Pretty Flowers Embossing Folder (also on sale!)
Blackberry Bliss Ink
Foam Adhesive Sheets: one sheet cut into 1/4 inch strips
Stampin’ Dimensionals
Multipurpose Liquid Glue
Opal Rounds
Stampin’ Cut & Emboss Machine
Instructions
Run the 4 1/4 x 5 1/2 inch Basic White cs through the Stampin’ Cut & Emboss Machine with the Pretty Flowers Embossing Folder. Then run it through with the large scalloped rectangle in the Scalloped Contours Dies. Set aside
Use the Blackberry Ink and the “You are wonderful in every way” sentiment. Stamp onto the 2 x 3 1/4 inch Basic White cs. Run this through the Stampin’ Cut & Emboss Machine with the smaller scalloped rectangle in the Scalloped Contours Dies.
Adhere the sentiment to the Blackberry Bliss cs. Set aside.
4. Use the Blossoming Happiness Dies to die cut the flowers from the Hues of Happiness DSP.
Tip: When adding dimension to the card with a large card piece, use the Foam Adhesive sheets cut into 1/4 inch strips. You get more even support of the card piece.
5. Adhere the large embossed scalloped Basic White cs rectangle to the front of the Basic White cs card base with the 1/4 inch strips of the Foam Adhesive Sheets.
6. Adhere the sentiment with the 1/4 inch Foam Adhesive strips. Use a couple of Stampin’ Dimensionals in the center of the larger flower to adhere it. Add the smaller flower and leaves by sliding them under the larger flower. I use the Multipurpose Liquid Glue for this. It is easier to slide the card pieces.
7. Add the Opal Rounds and Voila! you have a very elegant card!
I am on Day 8 of the “12 Days of Christmas Card Making Challenge” with my stamping buddy Christy. Today’s card is a Stampin’ Up!® Frosted Gingerbread #SimpleStamping Christmas Card. Each day of this challenge my blog will focus on a new holiday card. The challenge goes until December 10, 2021. I plan to showcase a different stamp set with each card. This will allow you plenty of time to see the great products that are available in the 2021 Stampin’ Up! July to December Mini Catalog, and to order in time to make your own Christmas cards! You can order HERE when you have your list ready!
Many of the products in the Stampin’ Up! July-December Mini Catalog will be retiring at the end of December. If you really want something, order now because products are “while supplies last”. Get more information on the “Last Chance” products HERE
This is a perfect card for the beginner stamper to try out. I use only one stamp set, one ink and one type of paper to create this Frosted Gingerbread #SimpleStamping Christmas card.
Basic White Card Stock (CS) card base: 5 1/2 x 8 1/2 inches with a score line at 4 1/4 inches.
Basic White CS: 4 x 5 1/2 inches
Stamping
The first step is to use Real Red Ink to stamp the sentiment “Wishing You A Merry Christmas” on the inside panel of the Basic White CS card base. Tip: Be sure to use either the Stampin’ Pierce Mat or your catalog to stamp on. Photopolymer stamps work best with a softer surface under the card stock.
For the next step you will need either a Clear Block I or your stamp case. I will be using my stamp case. First remove the paper insert from the stamp case. Lay the border stamp on the top of the 4 x 5 1/4 inch Basic White CS to be sure it is straight. Pick the stamp up with the front of the stamp case.
Close the stamp case. Apply Real Red Ink and stamp along the upper border of the 4 x 5 1/4 inch Basic White CS.
Turn the Basic White CS so the stamped border is on the bottom. Ink the border stamp again and stamp along the top edge.
Stamp the sentiment “Sending You Peppermint Kisses” on the lower right-hand side. Now stamp the trio of peppermints to the left and slightly above the sentiment.
Assembling the Card
To finish the card, adhere the stamped panel to the front of the Basic White CS card base.
And Voila! That is all there is to this Frosted Gingerbread #SimpleStamping Christmas card!
Supply List
Click on any photo to go to my Online Store and start shopping!
Thank you for stopping by for Day 8 of the 12 Days of Christmas Card Making Challenge. Later today there will be a non-Christmas blog coming out. I am participating in Kylie Bertucci’s International Blog Highlights Gallery. But I will be back tomorrow with another Christmas card!
I did not have any stamps with gnomes or fairies. I decided to try to make a gnome with Punch Art. Punch Art used to be the art of making images using the Stampin’ Up! punches. However, right now there are not many punches in basic shapes like circles, squares and triangles. But there are many shapes in the Stampin’ Up! Dies that can be used!
The face and the boots are made from the Ice Cream Cone Builder Punch. The black lines are where I cut the punch. The little pompom for the gnome hat is from the Pierced Blooms Dies. The remaining pieces are different sizes of triangles from the Stitched Triangle Dies. The face is Blushing Bride Card Stock (CS). For the hat I used the Tidings of Christmas 6 x 6 Designer Series Paper (DSP). The boots are made with Early Espresso CS and the body is made with Soft Succulent CS. The beard and the pompom are in Basic White CS.
Assembly
First place the triangle for the body on the card front to be able to position the boots. After adhering the boots, use Stampin’ Dimensionals to adhere the body. Trim off the very tip of the triangle for the body.
Slide the white beard triangle under the “nose”. Then adhere the hat. Position the Stampin’ Dimensionals as shown.
Adhere the face with the beard and hat over the body. Stamp your greeting. I used the greeting from the Joyful Life stamp. The greeting is stamped in Soft Succulent ink.
Adhere the card front to a 5 1/4 x 4 inch piece of the Christmas Tidings DSP. Finish the card by adhering this piece to the front of an 11 x 4 1/4 inch Basic White CS card base.
Voila! A cute gnome is created for a whimsical holiday card! Stop by The Paper Players Challenge PP568 to see more cards made in the “Clean and Simple” style with gnomes or fairies.
I hope this card has brightened your day a little if you needed it. Stop by tomorrow for a 3D Thanksgiving shaker card made with the Stampin’ Up! Cloche Shaker Dome!
Remember that if you wish to subscribe to my newsletter, you can do so by scrolling down the side bar until you get to the “Subscribe to My Newsletter” form. I sent my very first Theresa’s Treasures Paper Crafts Newsletter out this past Monday. Constructive feedback on how to make my newsletter better for you is welcome.
I have been wanting to participate in The Paper Players Challenges for several weeks now. Life just seems to get in the way. Today I had some time to prepare a Clean and Simple card using Polka Dots for The Paper Players Challenge PP541.
I just love the Quiet Meadow stamp set in the 2021-2022 Stampin’ Up! Annual Catalog with the delicate flowers. My Grandmother used to have a fabulous flower garden in Kentucky. There were so many beautiful flowers but one of my favorite was the Sweet Williams. The flowers on this card look like the Sweet Williams, so that is how I colored them.
Here is a close up to show you the coloring more easily. I used the Stampin’ Blends Alcohol Markers in Magenta Madness and Granny Apple Green. These come in a light and dark shade so you can make the image more 3D. I still need a little practice on the shading.
Here is the photo I referred to for my coloring. I have tried to grow Sweet Williams here in Arizona but the deer think they are dessert!
I really enjoyed making this card. I did use the Masking Technique to stamp the Polka Dot pattern around the Sweet Williams.
I have listed the supplies I used to make this card below. I am an Independent Stampin’ Up! Demonstrator. If you do not already have a Demonstrator, I would love to be your Demonstrator. If you click on the photos of the products below you will go directly to my Online Store. You may also visit my website HERE. If you have any questions, please shoot me an email at: theresastreasures.az@gmail.com.
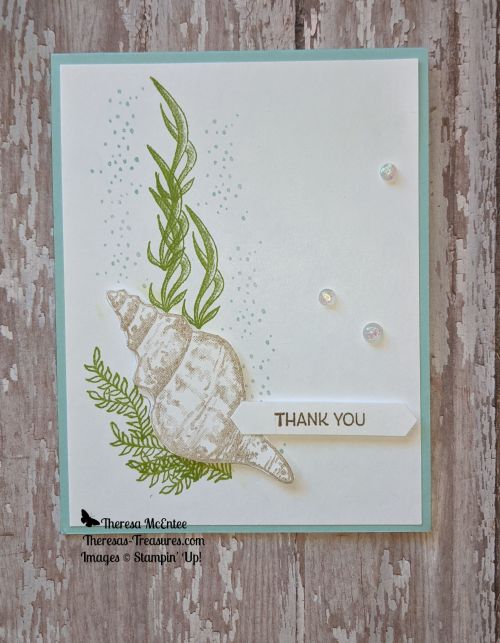
Welcome to Theresa’s Treasures today for my Thank You using Friends Are Like Seashells. I am Theresa and I am a Stampin’ Up!® Demonstrator in Arizona, USA. Today I am taking part in Kylie Bertucci’s Monthly International Blog Highlights Gallery. The theme is- Thank You. On this gallery, you can see thank you cards made by folks from all over the world! I hope you enjoy my card and take the time to see everyone else’s creations by visiting the gallery. You can get to the gallery by selecting the “Vote For Me” button at the end of this blog. Please vote for my card while you are at the gallery.
The Stampin’ Up® Friends Are Like Seashells stamp set lends itself to a lot of creative cards. There are 23 different stamps in this set! I have only used 5 of the stamps in the set for this card.
The card base is Pool Party Card Stock (CS). The remaining CS is Basic White. The ink colors are: Pool Party, Granny Apple Green and Soft Suede. The seashell has been Stamped Off once. I embellished the card with Opal Rounds. The sentiment is made with the Classic Label Punch.
Viola! That is all it takes!
Please vote for my card when you visit the Gallery by selecting the “Vote For Me” button below. Thank you!
I am starting to participate in a new challenge with The Paper Players which you can visit by clicking HERE to see all of the entries. The challenge for this week is “Clean and Simple”. This means there are minimal layers, little to no embellishments and lots of white space.
This cute little kitty is in the Stampin’ Up!® Pampered Pets stamp set. I used the Stampin’ Blends Alcohol Markers in Flirty Flamingo, Smoky Slate and Basic Black to color the image. The sentiment is from the Zoo Globe stamp set.
Measurements: Basic White Card Stock (CS) card base: 5 1/2 x 8 1/2 inches with a score line at 4 1/4 inches; Flirty Flamingo CS: 4 x 5 1/4 inches; Basic Gray CS: 1 x 5 inches; and Basic White CS: 3 5/8 x 5 inches.
I believe it is very important to let your children know that you are proud of them from time to time. Fortunately I have four beautiful children who I am very proud of. This card will be mailed to my lovely daughter, who is not only working full time and but is also taking four courses at the local community college. I am very proud of all of her accomplishments.
Be sure to visit The Paper Players at thepaperplayers.blogspot.com to see all the entries for the Clean and Simple PP529 Challenge.
Thanks for stopping by my blog today. Be sure to stop by tomorrow for my #simplestamping blog using the new Brilliant Butterflies stamp set.


")
 Designer Series Paper")


")


 Designer Series Paper")


")


 Designer Series Paper")


")