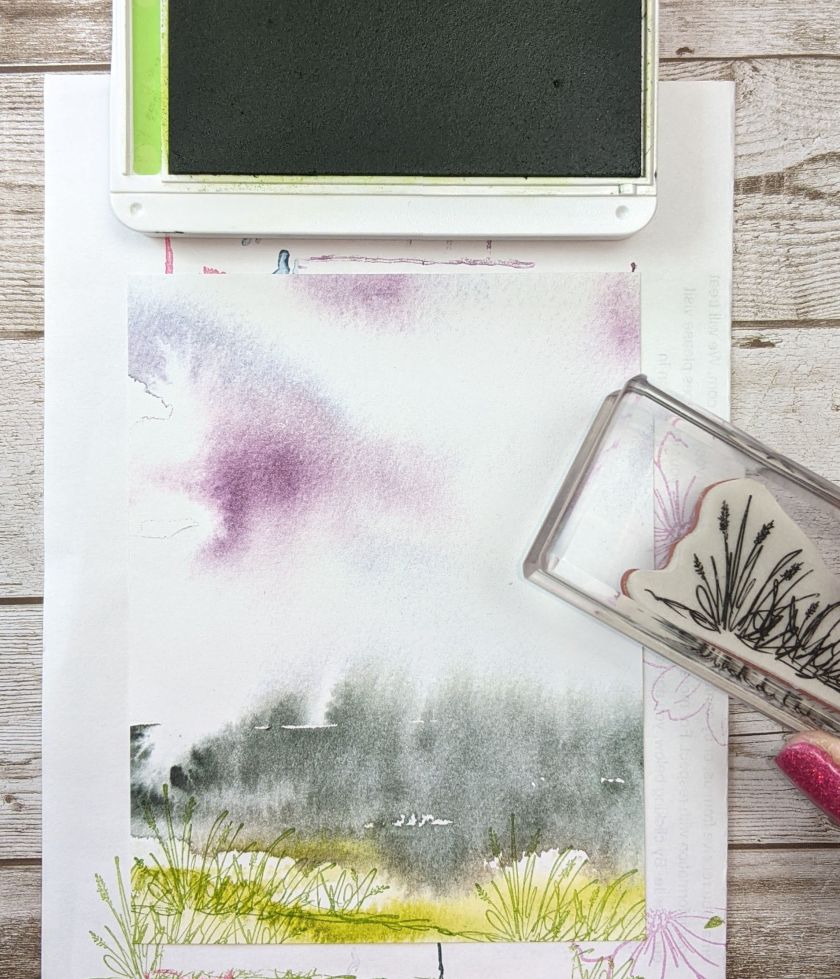
The New Horizons Designer Series Paper (DSP) available in the Stampin’ Up! 2022 Mini Catalog is just gorgeous on its own. Combine that with the On the Horizon stamp set and you can create some awesome scenes with the #SimpleStamping Technique. You end up with wonderfully beautiful scenes with very minimal work on your part!
The following cards were part of my last Zoom Card Making Class. Here is an example of a really quick and simple scene using Evening Evergreen and Blackberry Bliss Inks.
Measurements for above card
Night of Navy Card Stock (CS) card base: 5 1/2 x 8 1/2 inches with a score line at 4 1/4 inches.
New Horizons DSP: 4 x 5 1/4 inches. Cut a 1/2 x 5 1/4 inch strip for the inside.
Basic White CS: 4 x 5 1/4 inches (inside of card)
Instructions
Use the Evening Evergreen Ink to stamp the sentiment “Relax & Enjoy Your Day” in the lower left corner.
Stamp the trio of trees three times across the horizon.
Finish by stamping the birds a few times in Blackberry Bliss Ink.
Voila! That’s it!
If you like to decorate the inside you can do some simple stamping. Add the 1/2 x 5 1/4 inch New Horizons DSP for something extra special. The sentiment is from the Peaceful Moments stamp set.
Here are a few more samples of the way I used the #SimpleStamping Technique to easily and quickly create a series of gorgeous cards! And some of the cards have a very masculine feel for your special guy.
I stamped on the New Horizons DSP, then cut it into 3 pieces to give this card a different look.
Thank you so much for visiting today. I hope you have a wonderful day and have some time to do some crafting! Join me for my next Zoom Card Making Class on April 9, 2022. For more information click HERE.
Hello my fellow crafters! Happy Friday and welcome to my Friday Fun Fold! Today’s card is an Easter card made with Stampin’ Up!® Easter Friends stamp set!
Measurements & Supplies
Daffodil Delight Card Stock (CS) card base: 5 1/2 x 5 3/4 inches with a score line at 1 1/2 inches with the 5 3/4 inch side on top
Daffodil Delight CS: 1 1/2 x 5 1/2 inches and 3 x 4 1/4 inches
Basic White CS: two at 2 3/4 x 4 inches
Flowering Fields Designer Series Paper (DSP): 4 x 5 1/4 inches and two at 1 1/4 x 5 1/4 inches
Bumblebee 1/4 inch Gingham Ribbon
Iridescent Rhinestone Basic Jewels
Ink: Soft Suede, Evening Evergreen and Mango Melody
Stamping
On the first 2 3/4 x 4 inch Basic White CS stamp the bunny in Soft Suede. The “Happy Easter” is done in Evening Evergreen Ink. On the second Basic White CS stamp the sentiment “sending warm and happy wishes this spring” also in Evening Evergreen Ink. The little chick is stamped in Mango Melody Ink.
Assembling the Card
Adhere the bunny card piece to the 3 x 4 1/4 inch Daffodil Delight CS. Adhere one of the 1 1/4 x 5 1/4 inch Flowering Tulip DSP to the 1 1/2 x 5 1/2 inch Daffodil Delight CS. Adhere the other 1 1/4 x 5 1/4 inch Flowering Tulip DSP to the corresponding space on the Daffodil Delight CS card base as shown. Adhere the 4 x 5 1/4 inch Flowering Fields DSP to the inside of the card base.
Adhere the little chick card piece to the inside of the card. Close the card and lay the 1 1/2 x 5 1/2 inch Daffodil Delight CS/DSP piece in place on the right. Apply adhesive to the left and right edges of the bunny card piece and adhere to the card.
Tie a small bow with the Gingham Ribbon and use a Mini Glue Dot to adhere the bow to the bunny. Add the Iridescent Rhinestone Basic Jewels and Voila! you are all set for a Happy Easter!
I’m excited to be training with Bruno and Kylie again this year and participating in our monthly Blog Hop with amazing Stampin’ Up! Demonstrators from around the world. The purpose of this blog hop is to allow each of us in the training group an opportunity to learn and practice new skills to better ourselves and our Stampin’ Up! business. The benefit to you is that you get to “hop around the world” and get inspiration from many awesome Stampin’ Up! Demonstrators! You are currently at Theresa’s Treasures with Theresa McEntee from Bisbee, Arizona USA to see my Friendly Hello Thank You Card . Be sure to visit everyone’s blog and see how the creative energy results in a variety of fabulous cards and projects!
Friendly Hello Thank You Card
The Theme is “Thank You” and you will receive this exclusive Friendly Hello Thank You Card as a gift for your order during the month of February 2022. You may place your order in my Online Store HERE or by selecting an item from the photographic supply list at the end of this blog. The Host Code is: 9UGD7RDM
Friendly Hello Thank You Card
I really enjoyed creating with the Friendly Hello stamp set and designer series paper bundle to make all of these different Friendly Hello Thank You Cards. You cannot buy the Friendly Hello Bundle. You must earn it as part of the Stampin’ Up! Sale-a-bration. But hurry, Sale-a-bration ends on February 28, 2022! Details on how to earn this set will be at the end of the blog.
Friendly Hello Thank You Card
Measurements and Supplies
Basic Black Card Stock (CS) card base: 5 1/2 x 8 1/2 inches with a score line at 4 1/4 inches.
Basic Black CS: 2 5/8 x 2 5/8 inches
Basic White CS: 2 1/2 x 2 1/2 inches, 4 x 5 1/4 inches (inside panel)
Friendly Hello Designer Series Paper (DSP): 3 strips measuring 1 1/4 x 5 1/2 inches
Ink: Memento, Pool Party, Highland Heather, Pale Papaya and Granny Apple Green
Ribbon: White 1/4 inch (6.4 mm) Crinkled Seam Binding Ribbon
Embellishment: Polished Dots.
Inside of card
Instructions
Stamp the sentiment in Memento Ink and the bird image in Pool Party Ink onto the 2 1/2 x 2 1/2 inch Basic White CS.
Use the other images in the stamp set and the different colors of ink to stamp the inside of the card (the Basic White CS 4 x 5 1/4 inch).
Adhere the inside panel to the inside of the Basic Black CS card base.
Position the 3 strips of Friendly Hello DSP on the front of the Basic Black CS card base.
Adhere in place.
Adhere the stamped 2 1/2 x 2 1/2 inch Basic White CS to the 2 5/8 x 2 5/8 inch Basic Black CS.
Use Black Stampin’ Dimensionals to adhere the sentiment card piece to the front of the card.
Tie a bow with the White Crinkled Seam Binding Ribbon and adhere to the card front with a Mini Glue Dot.
Add some Polished Dots to the flowers as desired.
Friendly Hello Thank You Card
Voila! This Friendly Hello Thank You Card is fairly quick and simple to make, and looks great for expressing my gratitude to my customers.
You are at Theresa McEntee-Theresa’s Treasures-USA. Stop by the next blog on the list to see another fabulous Thank You card!
In order to make my Friendly Hello Thank You Card you will need the Friendly Hello stamp set and Friendly Hello Designer Series Paper which you much earn with a $100 USD order. There are other great Sale-a-bration products which can be earned with a $50 USD order. Check out the Stampin’ Up! Sale-a-Bration Brochure to see what you may like. The Host Code is: 9UGD7RDM
Thanks so much for stopping by. I hope to be mailing you a Friendly Hello Thank You Card for your order. If you have any questions about how to place an order, or about any of the Stampin’ Up! products, shoot me an email at: theresastreasures.az@gmail.com.
Hello and good day my crafty friends! I have the third card in a series of easy to make and beautiful #SimpleStamping cards for you! The On the Horizon #SimpleStamping Relax Card. Click HERE to see the first card in the series. You can click HERE for the second card.
The New Horizons Designer Series Paper makes the On the Horizon #SimpleStamping Relax Card card so easy! And you can make these stunning cards quickly!
Here is the sheet of New Horizons Designer Series Paper (DSP) I chose for today’s card. Try to visualize a scene for yourself before you start to stamp.
Here is what I “saw”. Yours may be completely different.
Measurements
On the Horizon #SimpleStamping Relax Card
Evening Evergreen Card Stock (CS) card base: 5 1/2 x 8 1/2 inches with a score line at 4 1/4 inches.
Basic White CS: 4 x 5 1/4 inches
New Horizons DSP: 4 x 5 1/4 inches and a 1/2 x 5 1/4 inch strip.
Stamping
Start stamping with the Evening Evergreen Ink. First stamp the birds. Then stamp the clump of grass in the foreground.
Add the trees and the sentiment “Relax & Enjoy Your Day!”. Super easy!!
For the inside of the card, adhere the 1/2 x 5 1/4 inch strip of the New Horizons DSP to the bottom of the 4 x 5 1/4 inch Basic White CS. Stamp the trees in Evening Evergreen Ink. Add the birds and you’re done!
Assembling the Card
Adhere the inside of the card to the inside of the Evening Evergreen CS card base. Adhere the front to the front of the card base.
Voila! You have a stunning and relaxing scene to go with the “Relax & Enjoy Your Day” sentiment!
Thanks for stopping by today. Don’t forget to subscribe to my Newsletter. I am just starting out with this and need new subscribers. Thanks for all your support!
Happy day my crafty friends! I have a series of beautiful #SimpleStamping cards for you! I will show you the second one today. Click HERE to see the first card in the series.
Here is the scene for today. What do you see in your mind’s eye?
Here is my card with the addition of the birds, grass, trees and sentiment from the On the Horizon stamp set.
Measurements
New Horizons “Breathe” card
Granny Apple Green Card Stock (CS) card base: 4 1/4 x 11 inches with a score line at 5 1/2 inches
New Horizons DSP: 4 x 5 1/4 inch and a 3/4 inch strip for the inside
Basic White CS: 4 x 5 1/4 inches
Ink: Granny Apple Green, Blackberry Bliss and Evening Evergreen
Stamping
Start out with the Granny Apple Green Ink and the grass stamp from the On the Horizon stamp set. Stamp the grass on the lower portion. Next use the Evening Evergreen Ink and the small trees. Stamp some trees at full strength. For other trees Stamp Off once. This makes the trees more 3D.
To finish the card, use Blackberry Bliss Ink to stamp some birds and the sentiment “Breathe”. Now take a breath and admire your work.
Adhere the 3/4 inch strip of the New Horizons DSP to the 4 x 5 1/4 inch Basic White CS. This is the inside of the card. Use the Blackberry Bliss Ink to stamp some birds in the upper left-hand corner.
Adhere the inside panel to the inside of the Granny Apple Green CS card base. Then adhere the front panel to the front of the card base.
Voila! Gorgeous! And so simple!
Thanks for visiting today. I hope you try out this New Horizons DSP and make your own nature scenes.
Earn 2 FREE stamp sets of your choosing when you sign up to be a Stampin’ Up! demonstrator. Choose $125 of product for your Starter Kit and pay only $99 before shipping and handling! Join HERE. Contact me for more information at theresastreasures.az@gmail.com.
Why should you join my Stamping Gems Team?
you will be joining a group of stampers from all over the world who share your love of stamping
you can buy new product before customers
you have a 20% discount on future orders as long as you stay a demonstrator
if you decide you do not want to be a demonstrator, there is not any penalty for stopping
no pressure to buy or sell product
you can join my monthly Stamping Gems Team Meeting and do some Mystery Stamping
You can be a part of the Demonstrator Planning FB page, the #SU!ColorChallenge and the #SimpleStamping challenge
you can go to the Onstage Stampin Up Convention
Celebrate Diversity
Lots of fun with diversity is coming on February 1, 2022. The All Together set will include 10 Stampin’ Blends for a range of skin colors. The images in the stamp set will celebrate diversity. Watch for more information on this fabulous set!
Get this FREE Creative Download from Stampin’ Up! for more on the celebration of diversity.
Paper Pumpkin Subscription
Paper Pumpkin is a subscription kit. You earn FREE Saleabration product when you order a pre-paid code from my Online Store HERE. A pre-paid code will be sent in an email. Next, go to my Paper Pumpkin sign up and enter the code. You will get this Safari kit if you do so by February 10, 2022.
You will get an email with the Pre-paid code. Then you will need to go to: https://bit.ly/subscribeTheresasTreasuresPaperPumpkin and enter the pre-paid code to start your subscription! Shoot me an email with any questions you have.
Sunrise over Warren in Bisbee, AZ USA
Thank you for your attention. If you need any assistance with your order please email me at theresastreasues.az@gmail.com
Hello my stamping friends! I hope all has been well with you this week. Today I have a Friday Fun Fold Pop Up Box Birthday Card for you. I learned this fold from Rachel Tessman who made it as a Paper Pumpkin alternative. You can see her card HERE. The first go around I made several mistakes. There will be tips for you so that you will be able to avoid the same mistakes I made.
The New Horizons Designer Series Paper (DSP) is so awesome, I am in love with it! This paper is super great for scenic watercolor backgrounds. I will be using the New Horizons DSP for today’s card along with the Sailing Home stamp set.
This is a photo of the second Friday Fun Fold Pop Up Box Birthday Card card I made. I will give you tips so that your first card comes out right.
New Horizons Designer Series Paper (DSP): The scene will be portrait orientation. Cut the 6 x 6 inch scene at 4 1/4 inches first. Then cut the resulting strip to be 1 5/8 x 5 1/2 inches. Cut the scene to be 3 1/4 x 4 1/4 inches. You will need to use 2 sheets to get both scenes. One scene for the front and one for the back of the card.
Basic White CS: 2 1/2 x 1 inch (for sentiment) and 2 x 4 inch to stamp the larger sailboats on.
Night of Navy CS: 2 3/4 x 1 inch (for sentiment)
Ink: Night of Navy
Scoring the Card Base
Score at 1/2, 2 1/8, 2 5/8, 4 1/4, 5 7/8, 6 7/8 and 8 inches.
Preparing the Card Base
First Tip: Do not burnish the score lines until after you make the slot. Make the slot as thin as you can. The slot on the left is too wide. This made the finished card unstable. Use the Stampin’ Up! Trimmer to get a thin slot. Set the left edge of the card base at 4 5/16 inches and make a cut from 1 1/8 to 4 3/8 inches. Then turn the card base 180° and cut again. Use your paper snips to cut the extra piece off to make the slot.
Second Tip: Adhere the 1 5/8 x 5 1/2 inch strips of the New Horizons DSP close to the 4 1/4 inch score line, but do not cover the score line. The card should be easy to fold.
Stamping
Stamp the large sailboat twice in Night of Navy Ink onto a scrap of Basic White CS. Use a scrap of the News Horizons to stamp the small sailboat twice. You may fussy cut the sailboats or use the Smooth Sailing Dies.
Stamp the desired sentiment onto the 1 x 2 1/2 inch Basic White CS with Night of Navy Ink. I used the “Happy Birthday” from the Celebrating You stamp set.
Assembling the Fun Fold
One difference between my card and Rachel’s is that I wanted an image on both the front and the back of the card. That way there is something to look at forward and backward. Adhere the top of the two sailboat scenes together. Apply a Tear-n-Tape strip to the bottom of the back one.
Insert the sailboat scene through the slot in the card base. Align the bottom of the sailboat scene with the 1/2 inch score line. Take the protective layer off of the Tear-n-Tape on the scene. Fold the base at the 1/2 inch score line so that it sticks to the sail boat scene. Apply a strip of the Tear-n-Tape to the Misty Moonlight bottom.
Peel the protective layer off of the Tear-n-Tape. Adhere the two sailboat scene pieces together. Press down. Apply more Tear-n-Tape over the bottom of the sail boat scene. Remove the protective covering.
Fold the card base at the 4 1/4 inch score line to adhere the sides together.
Here is how the Pop Up Box looks from the side and all the way folded down. Cool right?!
Decorating the Pop Up Box
Tip: The first go around I put the small sailboat on the left and the sentiment on the right. The second time I was able to add the larger sailboat if I put the small sailboat to the right. Note: I forgot to stamp the birds on the sail boat scene for the first card. I really like the scene much better with the birds added.
On the backside, I placed the small sailboat on the left and the larger sailboat on the right as shown.
Be sure to adhere the sail boats and sentiment to the small strip under the DSP piece so that they pop up!
Finished Product
Here are the forward and backward views of the first card.
Here are the forward and backward views of the second card.
Voila! I hope you are successful with this. I really felt a sense of accomplishment after figuring this Fun Fold Pop Up Box Birthday card out.
Thanks so much for reading my blog. Please leave a comment and let me know if you like the way I am doing this blog. Helpful suggestions are welcome.
Theresa
Stampin’ Up!® Promotions
Joining Special
Earn 2 FREE stamp sets of your choosing when you sign up to be a Stampin’ Up! demonstrator. Choose $125 of product for your Starter Kit and pay only $99 before shipping and handling! Join HERE. Contact me for more information at theresastreasures.az@gmail.com.
Paper Pumpkin Subscription
Don’t monkey around and miss this amazing adventure! Unleash your creativity with February’s wildly fun kit!
Answer the call of the wild—and your creativity—with the Safari Celebration Paper Pumpkin Kit. This playful, party-themed kit includes all the goodies and gear you need to create nine cards and coordinating envelopes in safari-inspired shapes and patterns you’ll go wild for! Make every occasion a celebration with this month’s amusing animals, beautiful botanicals, and celebratory sentiments.
Paper Pumpkin is a subscription kit. You earn FREE product when you order a pre-paid code from my Online Store. A pre-paid code will be sent in an email. Next, go to my Paper Pumpkin sign up and enter the code. You will get this Safari kit if you do so by February 10, 2022.
You will get an email with the Pre-paid code. Then you will go to: https://bit.ly/subscribeTheresasTreasuresPaperPumpkin and enter the pre-paid code to start your subscription! Shoot me an email with any questions
Celebrate Diversity
Lots of fun with diversity is coming on February 1, 2022. The All Together set will include 10 Stampin’ Blends for a range of skin colors. The images in the stamp set will celebrate diversity. Watch for more information on this fabulous set!
Get this FREE Creative Download from Stampin’ Up! for more on the celebration of diversity.
Thank you for your attention. If you need any assistance with your order please email me at theresastreasues.az@gmail.com
What do you “see” in your minds eye when you look at this fabulous paper?
I saw a sunset scene. This scene is so peaceful and serene for me. All I did was to use the On the Horizon stamp set to add the birds and trees using Polished Pink Ink.
Measurements
On the Horizon #SimpleStamping Thank You Card
Polished Pink Card Stock (CS) card base: 5 1/2 x 8 1/2 inches with a score line at 4 1/4 inches.
First stamp the birds from the On the Horizons stamp set in Polished Pink Ink. Follow by stamping the trees. Stamp Off once for the trees on the left. Use Evening Evergreen Ink for the sentiment “Thanks for Everything”.
Adhere a strip of the New Horizons DSP to the left side of the 4 x 5 1/4 inch Basic White CS. Stamp the birds over the top. Adhere the front and the inside panels to the Polished Pink CS card base.
Voila! That is it! So simple and yet so fabulous! The New Horizons DSP is simply amazing!
Thanks for stopping by today! Have a wonderful crafty day!
Theresa
Stampin’ Up! Promotions
Joining Special
Earn 2 FREE stamp sets of your choosing when you sign up to be a Stampin’ Up! demonstrator. Choose $125 of product for your Starter Kit and pay only $99 before shipping and handling! Join HERE. Contact me for more information at theresastreasures.az@gmail.com.
Paper Pumpkin Subscription
Don’t monkey around and miss this amazing adventure! Unleash your creativity with February’s wildly fun kit!
Answer the call of the wild—and your creativity—with the Safari Celebration Paper Pumpkin Kit. This playful, party-themed kit includes all the goodies and gear you need to create nine cards and coordinating envelopes in safari-inspired shapes and patterns you’ll go wild for! Make every occasion a celebration with this month’s amusing animals, beautiful botanicals, and celebratory sentiments.
Paper Pumpkin is a subscription kit. You earn FREE product when you order a pre-paid code from my Online Store. A pre-paid code will be sent in an email. Next, go to my Paper Pumpkin sign up and enter the code. You will get this Safari kit if you do so by February 10, 2022.
You will get an email with the Pre-paid code. Then you will go to: https://bit.ly/subscribeTheresasTreasuresPaperPumpkin and enter the pre-paid code to start your subscription! Shoot me an email with any questions
Celebrate Diversity
Lots of fun with diversity is coming on February 1, 2022. The All Together set will include 10 Stampin’ Blends for a range of skin colors. The images in the stamp set will celebrate diversity. Watch for more information on this fabulous set!
Get this FREE Creative Download from Stampin’ Up! for more on the celebration of diversity.
Thank you for your attention. If you need any assistance with your order please email me at theresastreasues.az@gmail.com
Still looking for a gift for the Holidays? Consider giving a gift card in a thank you note! This Snowflake Wishes Thank You Fun Fold Friday Gift Card Holder is a great gift for anyone who helps you out on a regular basis. For example, the young man who mows your lawn, the housekeeper, the bank teller, the mail/package delivery person, the grocery clerk- you get the idea. Everyone loves to be appreciated, especially during the holidays!
Measurements
Snowflake Wishes Fun Fold Friday Thank You Card
Gorgeous Grape Card Stock (CS): 4 1/4 x 11 inches scored at 2 1/2 and 5 1/2 inches and 2 3/4 x 4 inches.
Highland Heather CS: 4 x 6 inches.
Basic White CS: 2 1/2 x 3 3/4 inches and 4 x 5 1/4 inches.
One Wonderful Snowflake
Links to the supplies are listed at the end of this blog.
Stamping Your Own Designer Series Paper (DSP)
Start out by stamping the largest snowflake in Highland Heather Ink onto the 4 x 6 inch Highland Heather CS. Then Stamp Off once when stamping the next to the largest snowflake.
Next use the Gorgeous Grape Ink and the medium sized snowflakes to stamp in the empty spaces.
To finish this card piece, stamp in Misty Moonlight Ink using the group of tiny snowflakes. This may not look great at this point, but when it is cut up and adhered to the card it will look fantastic!
More Stamping
The next step is to stamp the front of the card. Start by using the Misty Moonlight Ink to stamp the sentiment “Thank You Snow Much” onto the 2 1/2 x 3 3/4 inch Basic White CS. Then Stamp Off once using the largest snowflake with Highland Heather Ink. Using the next to the largest snowflake, stamp at full strength using Highland Heather Ink.
Use the Gorgeous Grape Ink to stamp a medium sized snowflake around the edges.
Finish this card piece by stamping the group of medium snowflakes in Misty Moonlight Ink.
Use the Misty Moonlight Ink with the group of medium snowflakes to stamp around the upper left-hand corner of the 4 x 5 1/4 inch Basic White CS. This will be the inside of the card.
Assembling the Snowflake Wishes Thank You Gift Card Holder
The first step is to cut up the DSP that you made. Cut at 2 1/4 inches and 3 1/4 inches.
Fold the Gorgeous Grape CS card base at the 5 1/2 inch score line. Then fold at the 2 1/2 inch score line. Adhere the 2 3/4 x 4 inch DSP to the left and the 2 1/4 x 4 inch DSP to the right.
Adhere the 4 x 5 1/4 inch Basic White CS to the inside. Then adhere the 1 x 4 inch DSP to the right-hand side of the Basic White CS.
Punch the end with the Label Me Lovely Punch to create a notch.
Turn the card front over and apply Tear & Tape Adhesive to the upper and lower edges. Tip: Use the Take Your Pick tool to peel the protective cover off.
Fold the card front to adhere the edges and make the pocket for the gift card.
Adhere the Basic White CS card front to the corresponding Gorgeous Grape CS. Lay on the front of the card base to get positioning.
Tip: Flip the card front over to see where to adhere the Stampin’ Dimensionals.
Finishing Touches
Add a finishing touch by applying the Wonderful Snowflake.
And of course-add Bling! The Rhinestone Basic Jewels will add some extra sparkle!
Voila! Such a wonderful way to thank those around you!
You can see some more Holiday Thank You card ideas HERE and HERE.
Thank you for visiting my blog today. I am very appreciative of you. My blog would not be successful without you!
I have an exciting new stamp set to give you a sneak peak of today- Honeybee Home. The 2022 January-June Stampin’ Up! Mini Catalog premieres on January 4, 2022! There are so many great stamp sets, Designer Series Papers, Dies and Embossing Folders in this catalog! If you would like me to be your Stampin’ Up! Demonstrator and are in need of a catalog, drop me an email with your name and address. I will send you a Catalog and a free gift! My email is theresastreasures.az@gmail.com.
Now for the card!
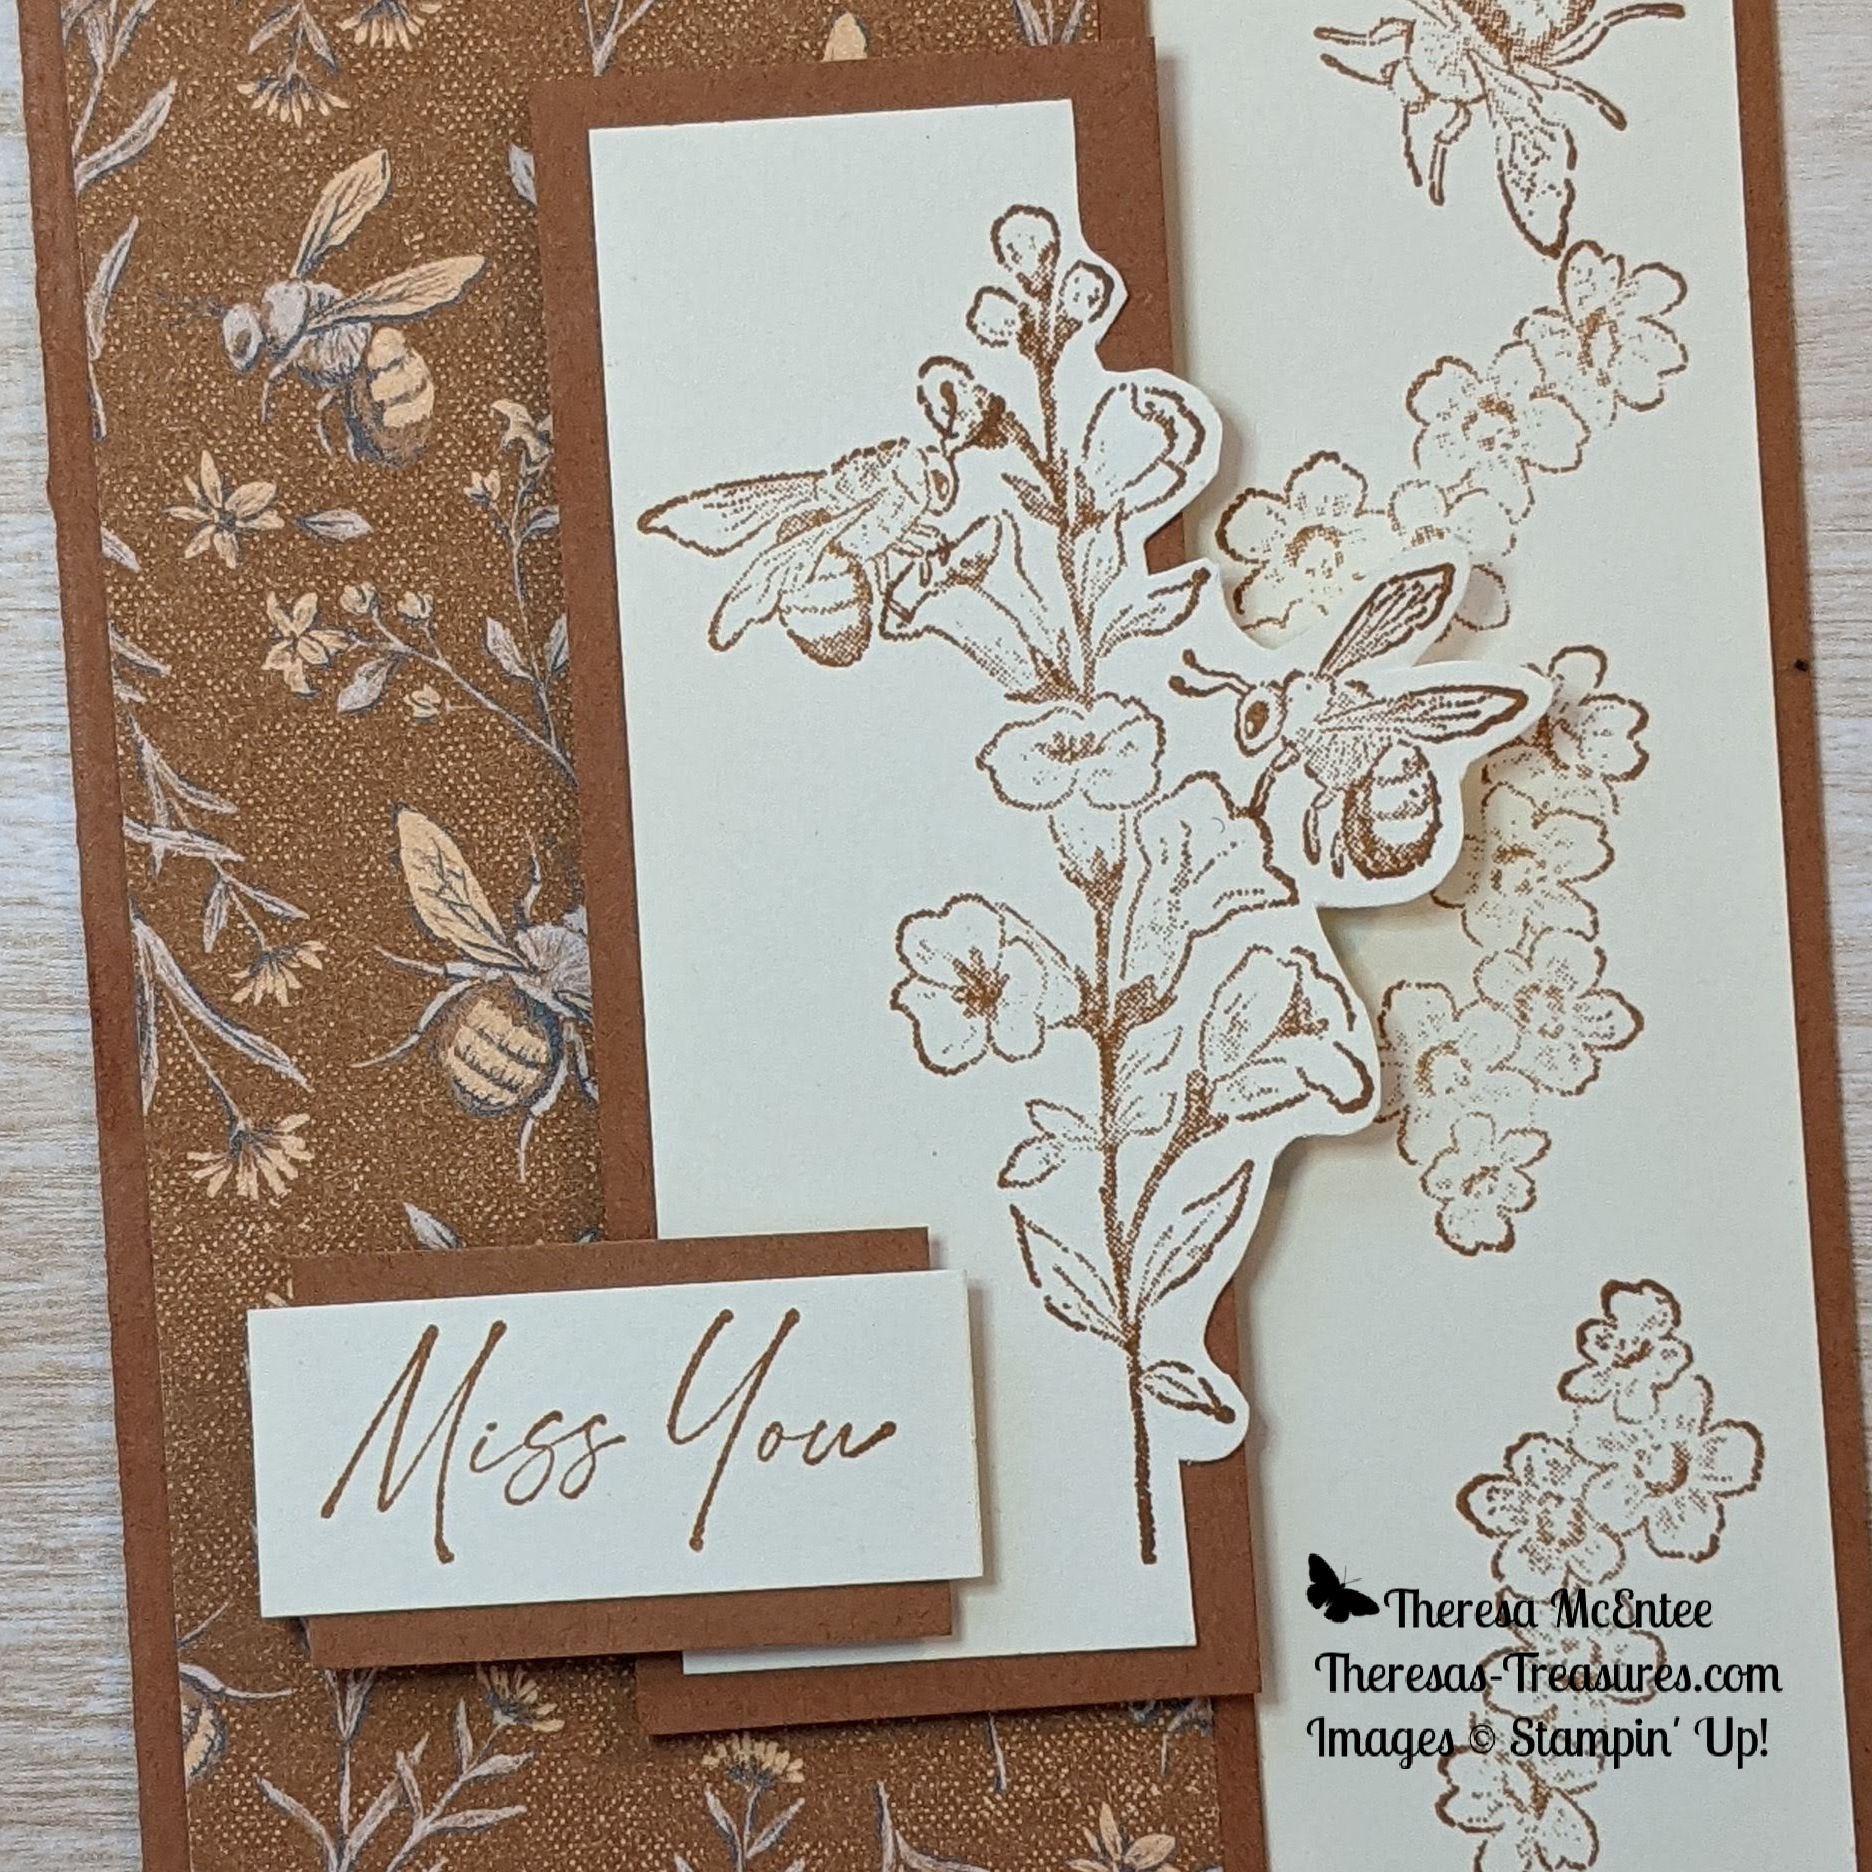
The elements that come together to make this “Miss You” Honeybee Home card are in the Heart & Home Suite. The Heart & Home Designer Series Paper (DSP) is just gorgeous!
Measurements
Honeybee Home Miss You Card
Cinnamon Cider Card Stock (CS) card base: 5 1/2 x 8 1/2 inches with a score line at 4 1/4 inches ( We will cut this to get the other Cinnamon Cider CS card pieces).
Very Vanilla CS: 4 x 5 1/4 inches, 2 1/2 x 3 3/4 inches and 3/4 x 1 3/4 inches (not pictured).
Heart & Home DSP: 2 1/2 x 5 1/4 inches.
Cutting the Card Base
Cut 1 1/2 inches off the left side of the Cinnamon Cider CS card base. This creates the card base and a 1 1/2 x 5 1/2 inch Cinnamon Cider CS piece. Cut 1 1/2 inches off the end of this piece. Now you have all of the card pieces needed.
Stamping
Start out by stamping the inside of the card. Use Cinnamon Cider Ink to stamp the largest Honeybee onto the top of the 4 x 5 1/4 inch Very Vanilla CS. Then stamp the group of flowers along the side.
Now stamp the flower with the stem onto the center of the 2 1/2 x 3 3/4 inch Very Vanilla CS. Next stamp the two bees in profile. Stamp close to the flowers so it looks like the bees are attending to the flowers.
To finish up the stamping, stamp the sentiment “Miss You” onto the 3/4 x 1 3/4 inch Very Vanilla CS.
Putting the Honeybee Home card together
Use the Paper Snips to cut the right side of the flower with the honeybees. Next adhere this piece to the 1 1/2 x 4 inch Cinnamon Cider CS. The cut portion of the flowers will hang over the edge of the Cinnamon Cider CS.
Adhere the stamped 4 x 5 1/4 inch Very Vanilla CS to the inside of the Cinnamon Cider CS card base.
Fold the left-hand flap forward and adhere the Heart & Home DSP to the front panel. (Sorry-forgot to make a photo!)
Adhere the “Miss You” sentiment to the left over Cinnamon Cider CS piece. Trim to about 1/4 inch on either side.
Stampin’ Dimensionals
Apply Stampin’ Dimensionals to the back of the flower and honeybee piece. Also apply a Stampin’ Dimensional on the back of the sentiment on the right. Apply two Dimensionals to the back of the sentiment on the left. You’ll see why you need two in a minute.
Remove the protective covering for the Stampin’ Dimensionals and adhere the flower and honeybee piece first. The edge of the Cinnamon Cider CS should line up with the right-sided edge of the front flap. Follow by adhering the sentiment. As you will see, you need two Dimensionals on the left because the right side is elevated by two.
Voila! You have lovely Honeybee Home “Miss You” card!
I loved making this card. I initially did not have any idea how it would turn out. Sometimes I just start out by cutting the card base and stamping some images. Then I start to see how I want them to come together.
It is very subtle, but you can add Bling!. I added the Champagne Rhinestone Jewels to the center of some of the flowers on the card to the right. In person, the rhinestones really sparkle!
Supply List
The Honeybee Home stamp set and the Heart & Home DSP will be available to order starting January 4, 2022.
Have a wonderful day! I hope you take some time to craft. This is the best time of year to make cards and papercrafts because you can give them away as Holiday gifts!