

Happy day my crafty friends! I have a series of beautiful #SimpleStamping cards for you! I will show you the second one today. Click HERE to see the first card in the series.

The New Horizons Designer Series Paper really makes the card for you. And they turn out to be stunning cards with minimal effort on your part!

Here is the scene for today. What do you see in your mind’s eye?

Here is my card with the addition of the birds, grass, trees and sentiment from the On the Horizon stamp set.
Measurements

New Horizons “Breathe” card
- Granny Apple Green Card Stock (CS) card base: 4 1/4 x 11 inches with a score line at 5 1/2 inches
- New Horizons DSP: 4 x 5 1/4 inch and a 3/4 inch strip for the inside
- Basic White CS: 4 x 5 1/4 inches
Ink: Granny Apple Green, Blackberry Bliss and Evening Evergreen
Stamping
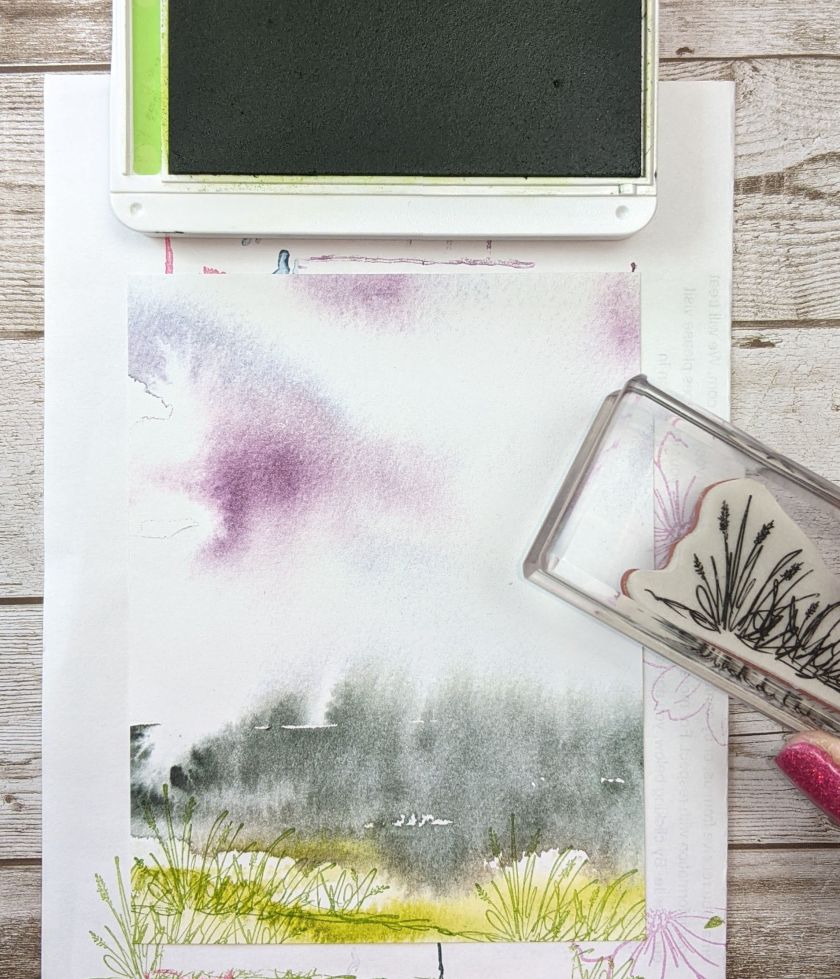


Start out with the Granny Apple Green Ink and the grass stamp from the On the Horizon stamp set. Stamp the grass on the lower portion. Next use the Evening Evergreen Ink and the small trees. Stamp some trees at full strength. For other trees Stamp Off once. This makes the trees more 3D.

To finish the card, use Blackberry Bliss Ink to stamp some birds and the sentiment “Breathe”. Now take a breath and admire your work.

Adhere the 3/4 inch strip of the New Horizons DSP to the 4 x 5 1/4 inch Basic White CS. This is the inside of the card. Use the Blackberry Bliss Ink to stamp some birds in the upper left-hand corner.

Adhere the inside panel to the inside of the Granny Apple Green CS card base. Then adhere the front panel to the front of the card base.

Voila! Gorgeous! And so simple!
Thanks for visiting today. I hope you try out this New Horizons DSP and make your own nature scenes.
Theresa
Product List")
")
")
 Designer Series Paper")


Stampin’ Up! Promotions
Joining Special

Earn 2 FREE stamp sets of your choosing when you sign up to be a Stampin’ Up! demonstrator. Choose $125 of product for your Starter Kit and pay only $99 before shipping and handling! Join HERE. Contact me for more information at theresastreasures.az@gmail.com.
Why should you join my Stamping Gems Team?
- you will be joining a group of stampers from all over the world who share your love of stamping
- you can buy new product before customers
- you have a 20% discount on future orders as long as you stay a demonstrator
- if you decide you do not want to be a demonstrator, there is not any penalty for stopping
- no pressure to buy or sell product
- you can join my monthly Stamping Gems Team Meeting and do some Mystery Stamping
- You can be a part of the Demonstrator Planning FB page, the #SU!ColorChallenge and the #SimpleStamping challenge
- you can go to the Onstage Stampin Up Convention
Celebrate Diversity

Lots of fun with diversity is coming on February 1, 2022. The All Together set will include 10 Stampin’ Blends for a range of skin colors. The images in the stamp set will celebrate diversity. Watch for more information on this fabulous set!
Get this FREE Creative Download from Stampin’ Up! for more on the celebration of diversity.
Paper Pumpkin Subscription

Paper Pumpkin is a subscription kit. You earn FREE Saleabration product when you order a pre-paid code from my Online Store HERE. A pre-paid code will be sent in an email. Next, go to my Paper Pumpkin sign up and enter the code. You will get this Safari kit if you do so by February 10, 2022.
Paper Pumpkin Codes:
• 3-Month Prepaid Paper Pumpkin Subscription [137859] $63.00 : —https://bit.ly/3qin54v
• 6-Month Prepaid Paper Pumpkin Subscription [137860] $114.00:–https://bit.ly/3njb4tE
• One year Prepaid Paper Pumpkin Subscription [137861] $220.00:–https://bit.ly/3zNjj66
You will get an email with the Pre-paid code. Then you will need to go to: https://bit.ly/subscribeTheresasTreasuresPaperPumpkin and enter the pre-paid code to start your subscription! Shoot me an email with any questions you have.

Thank you for your attention. If you need any assistance with your order please email me at theresastreasues.az@gmail.com


")


")


")
")
")

 Specialty Designer Series Paper")
 Cotton Paper")


")
")


 Designer Series Paper")


")


