Posted in 2023 Stampin' Up! Holiday Mini Catalog, 2023-2024 Stampin' Up! Annual Catalog, Avid Stamper, Designer Series Paper, Gratitude/ Thanks, Nature, Outdoors

Kylie’s International Blog Highlights Gallery-October 2023: Autumn Leaves Gratitude Card

Hello! Welcome to Theresa’s Treasures Paper Crafts. I am Theresa, an Independent Stampin’ Up! Demonstrator in Arizona, USA. I am excited to be participating in Kylie Bertucci’s International Blog Highlight Gallery with my Autumn Leaves Gratitude card. Today I am sharing my card and blogging along with a very creative group of Stampin’ Up! demonstrators from around the world! Please be sure to see all of the inspirational projects by visiting everyone’s blog. You will need to click on the “Vote” button below to see the Gallery.

The theme for this Gallery is “Thank You”.

It is so important to show appreciation to those who have helped you, supported you and inspired you. One way to express gratitude is to send a handmade thank you card! Discover the joy in making and sending a handmade card for yourself!

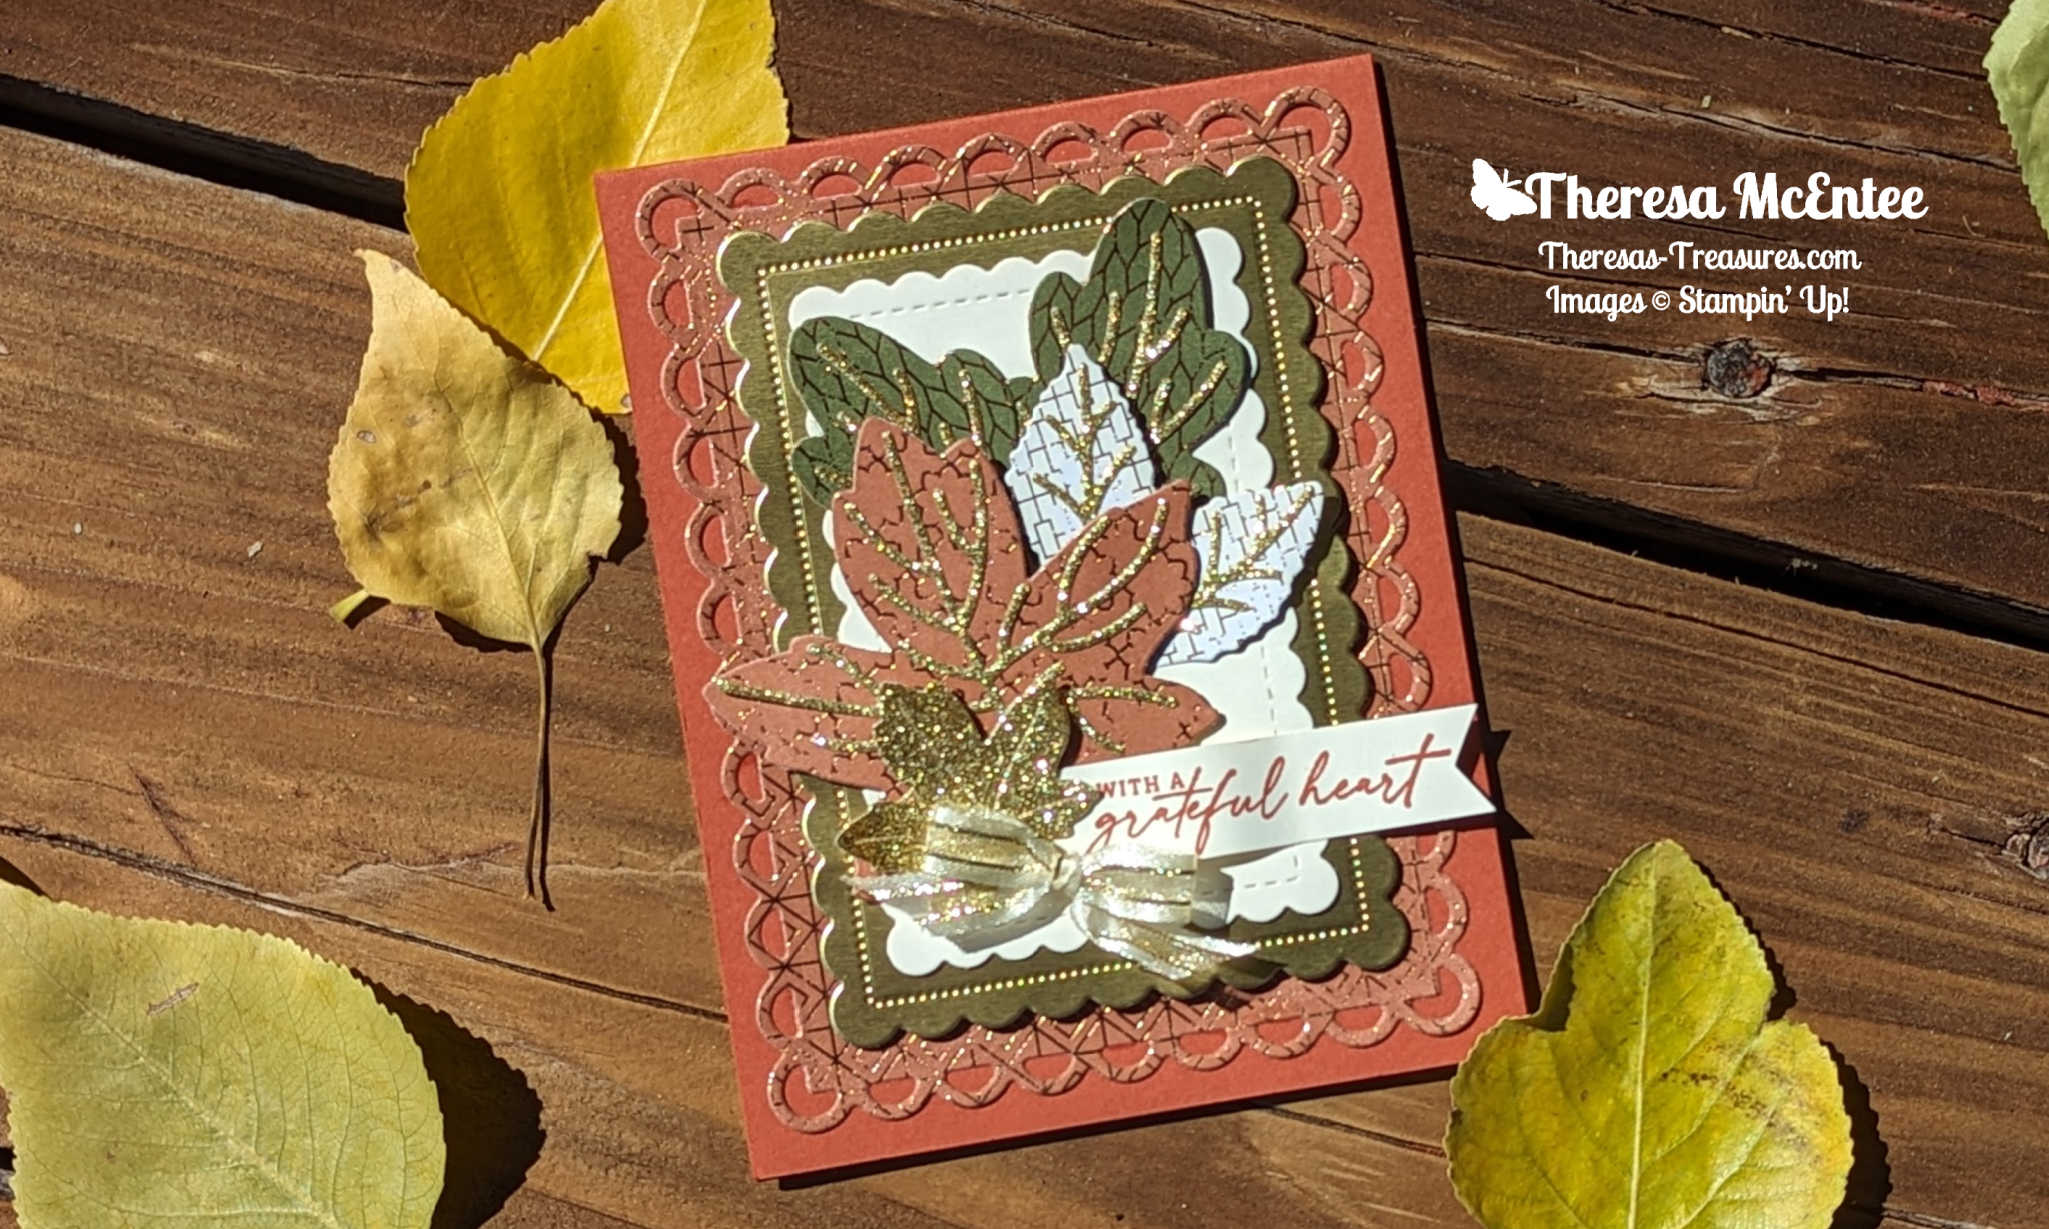
This Autumn Leaves Gratitude Card showcases the Autumn Leaves Bundle, All About Autumn Designer Series Paper * and the Online Exclusive-Silver & Gold Self-Adhesive Glimmer Paper.

*The All About Autumn Designer Series Paper is due to be back in stock this week.

Current Host Code: 9EVUAPUT

Measurements

  • Copper Clay cardstock card base: 4 1/4″ x 11″ scored at 5 1/2″
  • All About Autumn Designer Series Paper:
    Copper Clay/Foil design: 4 1/4″ x 5 1/2″ (diecut with the largest Scalloped Contours Die), 3″ x 3 1/4″ (diecut the largest leaf in the Autumn Leaves Dies) and 1/2″ x 5 1/4″(inside)
    Mossy Meadow/Foil design: 2 1/2″ x 3″(diecut with the large narrow leaf die)
    White/Foil design: 2 1/4″ x 2 1/4″( diecut with the leaf duo)
  • Gold Self-Adhesive Glimmer Paper: 3″ x 12″
  • Gold Foil: 3 1/4″ x 4 3/4″ (diecut with the 2nd from the largest Scalloped Contours Die)
  • Very Vanilla cardstock: 5/8″ x 2 3/4″ for the sentiment, 2 3/4″ x 4″(diecut with the 3rd from the largest Scalloped Contours Die) and 4″ x 5 1/4″ for the inside

Supplies

  • Autumn Leaves stamp set & dies
  • Scalloped Contours Dies
  • Copper Clay Ink
  • Gold & Vanilla 3/8″ Satin Edged Ribbon
  • Stampin’ Dimensionals & Mini Dimensionals
  • Mini Glue Dot
  • Stampin’ Cut & Emboss Machine

Instructions

  1. Fold the Copper Clay cardstock card base in half and set aside.
  2. Stamp the sentiment in Copper Clay Ink onto the 5/8″ x 2 3/4″ Very Vanilla cardstock. Cut the right-hand end into a banner.
  3. Die cut all of the leaves, scalloped rectangles and the veins for the leaves.
  4. Remove the protective backing on the Gold Glimmer Paper and adhere the veins to the corresponding leaves.
  5. Adhere the Copper Clay/Foil scalloped rectangle to the front of the Copper Clay cardstock card base.
  6. Stampin’ Dimensionals are used to adhere the Gold Foil scalloped rectangle to the card front.
  7. Use Multipurpose Liquid Glue or the Stampin’ Seal to adhere the Very Vanilla cardstock scalloped rectangle to the Gold Foil layer.
  8. Arrange the leaves on the Very Vanilla cardstock scalloped rectangle. I started with the Mossy Meadow/Foil leaves in the background. A Mini Stampin’ Dimensional was applied to the back of the tip of the right-hand Mossy Meadow/Foil leaf to raise it up a bit.
  9. Add the Copper Clay/Foil leaf using Stampin’ Dimensionals. Slide the White/Foil leaves behind the Copper Clay/Foil leaf. Mini Stampin’ Dimensionals are on the back of the tip of each leaf.
  10. Use a Stampin’ Dimensional on the back of the middle of the sentiment and glue on either end. Adhere to the card front. This gives the sentiment banner a wavy look.
  11. To adhere the small Gold Glimmer Paper maple leaf, apply a Stampin’ Dimensional to it without removing the protective backing. Adhere to the left of the sentiment.
  12. Make a small bow using the Gold & Vanilla 3/8″ Satin Edged Ribbon. Adhere to the card front using a Mini Glue Dot.
  1. Complete the inside by adhering the 1/2″ x 5 1/4″ strip of the Copper Clay/Foil DSP to the right-hand side of the 4″ x 5 1/4″ Very Vanilla cardstock. Adhere 2 oak leaves diecut from the Gold Glimmer Paper. Adhere the panel to the inside of the card base.

Voila!

I hope you enjoyed my gratitude card today using the Autumn Leaves Bundle. I really loved sharing it with you!

Visit my Online Store to order what you need to make this card for yourself. A photographic supply list is at the end of this blog.

Current Host Code: 9EVUAPUT

You are currently at Theresa McEntee-Theresa’s Treasures-USA. When you click on the Vote For Me button above you will see the Gallery of creative inspiration from Demonstrators around the world! Remember to visit everyone’s blog by clicking on the photo of their card in the Gallery.

To vote for your favorite cards, click on the small heart in the upper right-hand corner of each photo. You have 5 votes! Enjoy and come visit Theresa’s Treasures again soon!

Clickable Supply List

Product List

Thanks again for stopping by! Have a most wonderful and crafty day!

Theresa

Posted in Designer Series Paper, Inspiration in Ink Blog Hop, Nature

Translucent Florals Bundle for the Inspirations in Ink September 2023 Blog Hop

Today I have an awesome Translucent Florals Bundle Birthday Card!

Welcome and thanks for visiting Theresa’s Treasures Paper Crafts! I am Theresa, a Stampin’ Up! Demonstrator in Arizona, USA. Today is the monthly Inspirations in Ink Blog Hop! I am excited to be hopping with talented demonstrators from around the world. Be sure to check out everyone’s Translucent Florals projects. You may order from my Online Store HERE.

Measurements

  • Basic White cardstock card base: 4 1/4″ x 11″ scored at 5 1/2″
  • Basic White cardstock: 3″ x 4 1/2″ for stamping the branch of leaves, 2 1/2″ x 2 1/2″ to diecut the stitched square, and 3/4″ x 1 1/2″ for the sentiment
  • Pretty Peacock cardstock: 1 3/4″ x 3 3/4″ and 1 1/4″ x 4 3/4″ for inside
  • Parakeet Party cardstock: 3 1/4″ x 4 3/4″
  • Delightful Floral Designer Series Paper: 3″ x 4 1/2″ of the light leaf design and 1 1/2″ x 3 1/2″ and 1/2″ x 5 1/2″ of the dark leaf design

Supplies

Instructions

  1. Prepare the branch of leaves stamp by first using the Lemon Lolly Stampin’ Write Marker to color the top end of the leaves.
  2. Next use the Parakeet Party Stampin’ Write Marker to color the bottom portion of the leaves.
  3. Lastly, use the Pretty Peacock Stampin’ Write Marker to color the stem. Add in a line in the center of each leaf.
  4. Huff on the stamp, then stamp onto the 3″ x 4 1/2″ Basic White cardstock. Hold the stamp on the paper for at least 10 seconds. This will give you the variegated coloration.
  5. Use the Translucent Florals Dies to diecut the branch of leaves. Set aside.
  6. Use the Pretty Peacock Ink to stamp “Happy Birthday” onto the 3/4″ x 1 1 /2″ Basic White cardstock. Cut the end to form a banner. Set aside.
  7. Adhere the Delightful Florals Designer Series Paper to the corresponding cardstock.
  8. Adhere the Parakeet Party cardstock/Delightful Floral Designer Series Paper card piece to the front of the Basic White cardstock card base.
  9. Use Stampin’ Dimensioals to adhere the Pretty Peacock cardstock/Delightfull Floral Designer Series Paper card piece to the right-hand side of the front panel on the card base.
  10. Apply Stampin’ Dimensionals to the back of the stitched square. On the back of the left side of the stitched square apply another layer of Stampin’ Dimensionals. Adhere to the front of the card.
  11. Use the Multipurpose Liquid Glue to adhere the stamped branch of leaves to the Basic White cardstock stitched square.
  12. Use the glue to adhere the sentiment to the lower left side of the card front.
  13. Adhere the 1/2″ strip of the Delightful Floral Designer Series Paper to the right side of the inside. Then adhere the 1/4″ Pretty Peacock strip.
  1. Embellish with the Loose Frosted Dots as desired.

Voila!

Thank you so much for visiting today! Please visit all the blogs in the Inspirations In Ink Blog Hop. You will be amazed and inspired by all the fun and creative projects made by the Inspirations In Ink demonstrators. 

You are currently visiting Theresa McEntee-USA creator of Theresa’s Treasures Paper Crafts.

Clickable Supply List

Product List

Have a most wonderful and creative day!

Theresa

Posted in 2023 Stampin' Up! Holiday Mini Catalog, 2023-2024 Stampin' Up! Annual Catalog, Avid Stamper, Designer Series Paper, encouragement, Fun/Fancy fold card, Inspiration, Nature, Outdoors

Around the World On Wednesday Blog Hop-September 2023- “Let’s Take a Walk” with Autumn Leaves

Hello and welcome! “Let’s Take A Walk” with Autumn Leaves! I am Theresa McEntee, creator of Theresa’s Treasures Paper Craft. Today I have the pleasure of participating in the Blog Hop with Around the World on Wednesday (AWOW) organized by Angie McKenzie. On the second Wednesday of each month, the AWOW team put together a thematic hop to give you some inspiration for your own crafting. “Lets Take a Walk” is this month’s theme.

My Project for today

When I was about 4 years old, I lived in the country in Pennsyvania USA. My Mom & I would go for a daily walk down the tree-lined dirt road. The image on the All About Autumn Designer Series Paper brings me back to this time period. We each had a pram. My little brother was in my Mom’s pram. I had a collection of Black Walnuts and Roly-Polies in mine! Lol!

Project Details

This card was made using Copper Clay, Daffodil Delight and Cajun Crazed colored cardstock. The sentiment is embossed in Copper Emboss Powder onto a Very Vanilla cardstock. The sentiment is diecut with a die from the He’s All That Dies. The card is embellihed around the sentiment with the Adhesive-Backed Sparkle Gems.

The inside panels are cut with the Deckled Rectangle Dies.

The AWOW Team

Each month this group of creative friends prepare a project for a theme. Below is an image of all of the crew and where they are from around the globe. Such a talented and wonderful group of people! You will want to visit everyone to be sure to see all the amazing projects!

I am so glad you have joined me today in this worldwide hug that stretches all the way from Australia to Alaska across twelve different time zones.  We all love sharing joy with you through projects from our individual parts of the world. I hope that you will be filled with lots of inspiration!

See More Inspiring Project

Thank you so much for visiting today. I hope you enjoyed learning more about my project. Have a most wonderful day!

Theresa

Posted in 2023 Stampin' Up! Holiday Mini Catalog, 2023-2024 Stampin' Up! Annual Catalog, Designer Series Paper, Glow In The Dark Specialty Paper, Gratitude/ Thanks

Kylie’s International Blog Highlights Gallery-September 2023: Lighting the Way Glow in the Dark Thank You Card

Hello, thank you for visiting Theresa’s Treasures. I am Theresa, an Independent Stampin’ Up! Demonstrator in Arizona, USA. I am really excited to be participating in Kylie Bertucci’s International Blog Highlight Gallery with my Lighting the Way Glow in the Dark Thank You card. Today I am blogging along with very creative Stampin’ Up! demonstrators from around the world! Please be sure to see all of the inspirational projects by visiting everyone’s blog. You will need to click on the “Vote” button below to see the Gallery. Once in the Gallery you can vote for up to 5 projects.

The theme for the Gallery is “Thank You”.

We often forget those simple words “Thank you”. However, it is so very important to show appreciation to the people in your life who have helped you, supported you or inspired you. One way to express gratitude is to send a handmade thank you card. Discover the joy in making and sending a handmade card!

This Lighting the Way Glow in the Dark Thank You Card showcases the Lighting the Way Photopolymer Stamp Set and Lighting the Way Dies which are in the 2023-24 Stampin’ Up Annual Catalog. The All About Autumn Designer Series Paper & the Glow In the Dark 6″ x 6″ Specialty Paper are in the upcoming 2023 Stampin’ Up! Mini Holiday Catalog. The Mini Holiday Catalog goes live on September 6, 2023!

Current Host Code: SBVQNPYQ

Measurements

  • Copper Clay cardstock card base: 4 1/4″ x 11″ scored at 5 1/2″
  • Mossy Meadow cardstock: 3″ x 4″ to diecut the lantern, and
    1/2″ x 2 3/4″
  • Basic Black cardstock: 1 1/4″ x 4″ to diecut the three fireflies
  • Glow in the Dark 6″ x 6″ Specialty Paper: 3 1/4″ x 3 1/4″ to diecut the Deckled Circles, 1 1/2″ x 1 3/4″ to diecut the middle of the lantern, 1/2″ x 2 3/4″ to diecut the three fireflies and 5/8″ x 3 1/2″ for the sentiment
  • All About Autumn Designer Series Paper: 4 1/8″ x 5 3/8″ and
    3/8″ x 5 1/4″ in the Mossy Meadow and Copper Foil design and
    3 3/4″ x 5″ in the autumn leaves design.
  • Very Vanilla cardstock: 4″ x 5 1/4″

Supplies

  • Lighting the Way Photopolymer Stamp set & Dies
  • Deckled Circle Dies (in the 2023 Mini Catalog)
  • Stampin’ Emboss Powder-Metallics-Copper
  • Versamark Ink
  • Embossing Additions Tool Kit
  • Heat Tool
  • Copper Clay Ink
  • Adhesive-Backed Sparkle Gems
  • Stampin’ cut & Emboss Machine
  • Paper Snips
  • Multipurpose Liquid Glue
  • Paper Trimmer

Instructions

Creating the Lantern

  1. Diecut the Deckled Circle and lantern center from the Glow In The Dark Specialty Paper. Use Deckled Circle Die #1, #2, #4 and #5 counting from the smallest.
  2. Fit the Glow In the Dark Specialty Paper pieces in the center of the lantern.
  3. Lay the two diecut Deckled Circles on the back side of the lantern.
  4. Adhere the 1/2″ x 2 3/4″ Mossy Meadow cardstock strip to secure all of the Glow In The Dark pieces in place.

Create the Sentiment & Fireflies

  1. Diecut three fireflies from both the Basic Black cardstock and the Glow in the Dark Specialty Paper.
  2. Cut the bottoms off of the Glow in the Dark fireflies and adhere them to the Basic Black fireflies.
  1. Be sure to use the Embossing Buddy on the strip of Glow in the Dark Specialty Paper before stamping the sentiment in Versamark Ink.
  2. Use caution with the Heat Tool so you do not overheat the paper.
  3. Trim both ends into a banner.

Finishing Up

  1. Adhere the Mossy Meadow/Copper Foil design to the front of the Copper Clay cardstock card base.
  2. Adhere the autumn leaves design on top of that.
  3. Use the Copper Clay Ink to stamp the sentiment “You are all kinds of wonderful” onto the Very Vanilla cardstock.
  4. Adhere the strip of Mossy Meadow/Copper Foil onto the Very Vanilla cardstock on the right-hand side.
  1. Now adhere the Very Vanilla stamped card piece to the inside of the Copper Clay card base.
  2. Use Stampin’ Dimensionals to adhere the lantern to the card front.
  3. The fireflies and sentiment strip are also adhered using the Stampin’ Dimensionals.

Add Bling! with the Adhesive-Backed Sparkle Gems!

Voila!

I hope you enjoyed my card today using the Lighting the Way Photopolymer Stamp Set and Dies.

Visit my Online Store to order what you need to make this card for yourself. A photographic supply list is at the end of this blog. Note: the All About Autumn & Glow In the Dark papers are not available until September 6, 2023.

Current Host Code: SBVQNPYQ

You are currently at Theresa McEntee-Theresa’s Treasures-USA. When you click on the Vote For Me button above you will see the Gallery of creative inspiration from Demonstrators around the world! Remember to visit everyone’s blog by clicking on the photo of their card in the Gallery.

To vote for your favorite cards, click on the small heart in the upper right-hand corner of each photo. You have 5 votes! Enjoy and come visit Theresa’s Treasures again soon!

Clickable Supply List

Product List

Thanks again for stopping by! Have a most wonderful and crafty day!

Theresa

Posted in 2023-2024 Stampin' Up! Annual Catalog, Designer Series Paper, Fun/Fancy fold card, Gratitude/ Thanks

Stamp-Along Online Retreat

Sunday September 3rd is the last day to sign up for the Make-n-Take Option!

Stamp-Along with me and my two fellow Stampin’ Up! demonstrators, Christy & Jeanne, for a two day Inked & Tiled Online Retreat on Friday, September 29th & Saturday, September 30th, 2023.

Join us for a fun weekend of card making full of ideas, tips, and inspiration! Our Stamp~Along online retreat is open to all levels – experienced crafter to beginner. We’ve created a paced format designed for you to stamp along with us during our live videos. And the videos will be available for replay afterward.

Online Retreat Details:

  • Exclusive Facebook Group for the Online Retreat
  • 6 Stamp-Along Facebook lives (replays will be available)
  • 6 PDF Tutorials plus 3 Bonus PDF Tutorials
  • 4 different bundles featured
  • Option to purchase the Make-N-Take Kit for 6 cards 
  • And prizes!

There are 2 options to join –

  • Purchase the Make-N-Take Kit for $47
  • or Get the Online Pass only for $22

The Make-n-Take Option-CLOSED

-must purchase by Sunday September 3, 2023

The Make-n-Take Kit* Includes:

  • Access to Stamp-Along Inked & Tiled Online Retreat Facebook Lives & Group Page.
  • 6 PDF tutorials plus 3 additional bonus card PDF tutorials.
  • a Make-N-Take Kit for the 6 Retreat cards which includes cardstock card pieces, die cuts & embossed elements.
  • A pack of Inked Botanicals Designer Series Paper for you to pre-cut your panels & punched elements
  • A spool of Lost Lagoon Bordered ribbon.
  • A pack of Iridescent Rhinestones Basic Jewels
  • & Prizes!

*Does not include the Inked & Tiled Bundle, ink or basic stamping supplies i.e. glue, scissors, needed to make the Retreat cards. 

Make-N-Take Kits will be mailed out by September 15th to ensure kits arrive before the Online Retreat.

Do you need to order the Inked & Tiled Bundle? Order from my Online Store HERE. You may also order the ink and any stamping supplies you need in my Online Store. The ink needed is: Crushed Curry # 147087, Calypso Coral #147101 and Lost Lagoon #161678.

Purchase Online Retreat With Make-N-Take Kit $47 USD (must sign up by Sept. 3rd) – CLOSED

The Online Pass Option: Closed

-Register by Friday September 15, 2023

The Online Pass Option* Includes:

  • Access to Stamp-Along Inked & Tiled Facebook Lives & Group Page.
  • The 6 Retreat cards plus three Bonus card PDF Tutorials.
  • Prizes!

*Does not include the Inked & Tiled Bundle or card Make-N-Take kit. 

Don’t have the Inked & Tiled bundle? You can order from my Online Store HERE.

Purchase Online Pass Only $22 USD (Sign up by Sept. 15th) – closed

I hope to stamp along with you for the Online Retreat! It will be so much fun!

Theresa

Posted in 2023 Stampin' Up! Holiday Mini Catalog, 2023-2024 Stampin' Up! Annual Catalog, Designer Series Paper, Fun/Fancy fold card, Inspiration in Ink Blog Hop, Nature, Online Exclusives, Outdoors, Stampin" Blends Alcohol Markers

Trucking Along Bundle for the Inspirations in Ink Fun Fold Blog Hop – September 2023

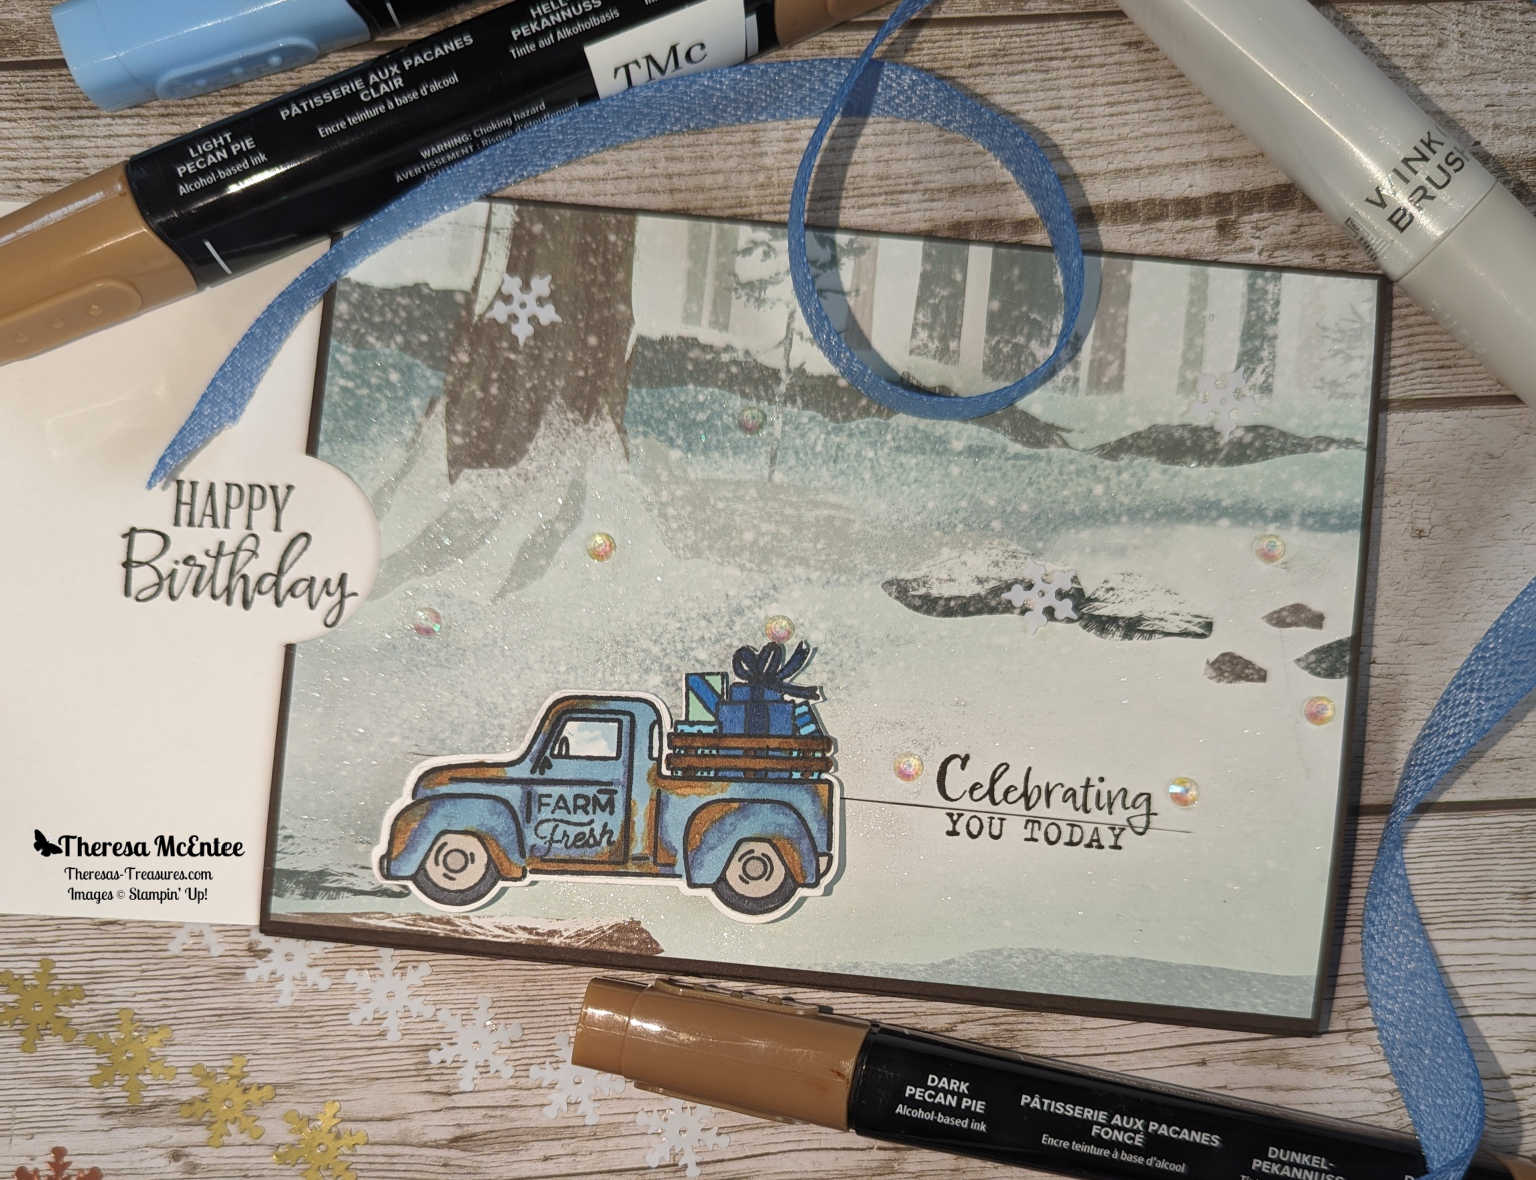
Today I have an awesome Trucking Along Bundle Slit Slider Birthday Card!

Welcome and thanks for visiting Theresa’s Treasures Paper Crafts! I am Theresa, a Stampin’ Up! Demonstrator in Arizona, USA. Today is the monthly Inspirations in Ink Blog Hop! I am excited to be hopping with talented demonstrators from around the world. Be sure to check out everyone’s Fun Fold projects. The Trucking Along Bundle is an Online Exclusive and is not found in any catalog. You may order from my Online Store HERE.

Today’s Blog Hop is a Fun Fold Hop. Each of us is demonstrating a different Fun Fold. I first learned about the Slit Slider Card from Tina Hamp, who learned it from Julie Davidson. Tina made a Slit Slider Card with the Legendary Ride motorcylcle set. Julie did a cute Slit Slider Card with an octopus. Julie has a video demonstrator of her card HERE.

Measurements

  • Early Espresso cardstock card base: 5 1/2″ x 8 1/2″ scored at 1/2″ & 4 1/2″
  • Basic White cardstock: 3 3/4″ x 5 1/4″ (inside) and 3/4″ x 3″ (mechanism)
  • One Horse Open Sleigh 6″ x 6″ Designer Series Paper (DSP):
    3 3/4″ x 5 1/4″

Supplies

  • Trucking Along stamp set & punch
  • Beside Me stamp (Celebrating You Today sentiment)
  • Peaceful Moments stamp (Happy Birthday sentiment)
  • Ink: Memento Black & Early Espresso
  • Stampin’ Blends Alcohol Markers: Pecan Pie, Boho Blue, Misty Moonlight, Azure Afternoon, Night of Navy, Blueberry Bushel Basic Black, Smoky Slate, Gray Granite and Color Lifter
  • Foam Adhesive Strip
  • Multipurpose Liquid Glue
  • Tear & Tape Adhesive
  • 3/8″ Textured Ribbon in Boho Blue
  • Adhesive Backed Snowflake Assortment (Online Exclusive)
  • Iridescent Rhinestone Basic Jewels
  • Wink of Stella

Instructions

Prepare the Card Base

  1. Adhere the designer series paper to the Early Espresso card base.
  2. Make a circular finger notch at the midline of the DSP panel on the left. (Use the Circle Dies or the retired 1″ circle punch)
  3. Place the Early Espresso card base in your trimmer at the 1 1/2″ mark, with the 1/2″ score line to the left.
  1. Make a cut from 3/4″ down to 4 3/4″.

Stamping

  1. Use Memento Ink to stamp the pick up truck on a scrap of Basic White cardstock. Stamp the “Farm Fresh” sentiment on the door.
  2. Color with the Stampin’ Blends Alcohol Markers as desired.
  1. Stamp the “Happy Birthday” sentiment on the Basic White cardstock for the inside. Punch a hole in the midline near the left edge for the ribbon. Thread the ribbon through the hole. Tip: this ribbon frays easily so I used a lighter to melt the ends.
  2. Stamp “Celebrate You Today” to straddle the slit and so that it will hide behind the pick up truck.

Putting it Together

  1. Take out the 3/4″ x 3″ Basic White cardstock strip. Add a strip of the Adhesive Foam Strips to the bottom as close to the edge as possible. This is the mechanism for moving the pick up.
  1. Slide the strip into the slit, up underneath until the strip of Foam Adhesive Strips is close to the slit.
  2. Flip this over.
  1. Apply Multipurpose Liquid Glue (or Tear & Tape) to 2/3 of the top of the Basic White cardstock strip.
  2. Adhere the Basic White cardstock with the Happy Birthday sentiment to the strip by laying it in position to cover the panel. Be sure the Happy Birthday is on the back to the right.
  1. Fold the Early Espresso cardstock on the score lines. Use a strip of Tear & Tape on the 1/2″ flap. Fold the top panel down over the 1/2″ strip and secure it.
  2. Flip over to the front. Adhere the pick up to the mechanism.
  1. Add the Wink of Stella to the snow drifts.
  2. Add the Iridescent Rhinestones as desired.

Voila!

Thank you so much for visiting today! Please visit all the blogs in the Inspirations In Ink Blog Hop. You will be amazed and inspired by all the fun and creative projects made by the Inspirations In Ink demonstrators. 

You are currently visiting Theresa McEntee-USA creator of Theresa’s Treasures Paper Crafts.

Clickable Supply List

Product List

Stamp-Along Online Retreat

Join me with my fellow Demonstrator friends Christy & Jeanne for a relaxed paced online retreat where you will be able to “Stamp Along” with us. We will demonstrate 6 cards you can make with the Make-n-Take Kit you can purchase. You will need to purchase the Inked & Tiled Bundle to complete the cards.

Learn more about the Stamp-Along Online Retreat by clicking on the “My Class Schedule” tab up top.

Paper Pumpkin Monthly Subscription

Thinking of adding creativity to your life? Try a monthly paper crafting kit! The Paper Pumpkin Monthly Subscription delivers a kit with everything you need to make a project-right to your door! Sign up for a Pre-paid Paper Pumpkin Subscription HERE.

Have a most wonderful and creative day!

Theresa

Ciao!

Posted in 2023-2024 Stampin' Up! Annual Catalog, 3D Embossing Folder, Designer Series Paper, Inspiration in Ink Blog Hop, Nature, Online Exclusives, Punch, Summer

Inked & Tiled Bundle for the Inspirations in Ink July 2023 Blog Hop

Today I have a beautiful Inked & Tiled “just a note” Card!

Welcome and thanks for visiting Theresa’s Treasures Paper Crafts! I am Theresa, a Stampin’ Up! Demonstrator in Arizona, USA. Today is the monthly Inspirations in Ink Blog Hop! I am excited to be hopping with very talented demonstrators from around the world. Be sure to check out everyone’s projects using the Inked & Tiled Bundle. The Inked & Tiled Bundle is in the Annual Catalog. You may order from my Online Store HERE.

Measurements

  • Thick Basic White cardstock card base: 4 1/4″ x 11″ scored at 5 1/2″ (21cm x 29.7cm scored at 10.5cm)
  • Basic White cardstock: 2″ x 3″ (6cm x 8.2cm) for the sentiment
  • Lost Lagoon cardstock: 3 1/8″ x 4 1/8″ (7.5cm x 10.3cm),
    2 1/8″ x 5 1/8″ (5.5cm x 13.7cm) and optional for leaves 2″ x 3″ (6cm x 8.2cm)
  • Inked Botanicals Designer Series Paper (DSP) Lost Lagoon patterns: 3″ x 4″ (7.2cm x 10.1cm) and 2″ x 5″ (5.2cm x 13.5cm)
  • Inked Botanicals DSP Calypso Coral pattern: 2″ x 6 3/4″ (5.2cm x 17.2cm)
  • Inked Botanicals DSP Crushed Curry pattern: 2″ x 4 1/2″ (5.2cm x 11.5cm)
  • For inside of card: Lost Lagoon cardstock: 3/4″ x 4 1/8″ (2cm x 13.9cm), Inked Botanicals Lost Lagoon pattern: 3/4″ x 5 1/2″ and 1/2″ x 4 7/8″ (2cm x 14.2cm and 1.3cm x 13.1cm)

Supplies

  • Inked & Tiled stamp set and Punch Pack Bundle
  • Basics Embossing Folder (Online Exclusive)
  • Lost Lagoon Ink
  • Lost Lagoon 1/4″ (6.4mm) Bordered Ribbon
  • Iridescent Pastel Gems
  • Bone Folder
  • Stampin’ Dimensionals
  • Paper Trimmer
  • Multipurpose Liquid Glue

Instructions

  1. Adhere the Lost Lagoon colored Inked Botanicals DSP to the corresponding Lost Lagoon cardstock card pieces.
  2. Adhere to the front of the Thick Basic White cardstock card base.
  1. Use the Basics Embossing Folder with the cross hatches to emboss the front of the Thick Basic White cardstock card base with the pieces adhered to it.
  2. Complete the inside of the card base by adhering the strips of paper.
  1. To make the flowers, first punch out 3 pieces with the star pattern punch from the Calypso Coral colored Inked Botanicals DSP.
  2. Use the “X” pattern punch to punch 3 pieces from the Crushed Curry colored Inked Botanicals DSP.
  1. I used my scoring tool to gently push down in the middle of each flower. I also made score marks on the “petals” to help create a 3D look.
  2. Adhere 1 star and 1 “X” together to make each flower.
  3. Adhere to the card front.
  4. Tie a bow with the Lost Lagoon Bordered Ribbon and adhere just under the trio of flowers.
  5. Stamp “just a NOTE” in Lost Lagoon Ink onto the Basic White cardstock.
  6. Punch the sentiment out with the “X” punch. Trim off 2 arms of the “X”.
  7. Use Stampin’ Dimensionals to adhere the sentiment to the card front.
  8. Finish by adding the Calypso Coral colored Iridescent Pastel Gems to the center of each flower.

Voila!

Thank you so much for visiting today! Please visit all the blogs in the Inspirations In Ink Blog Hop. You will be amazed and inspired by all the fun and creative projects made by the Inspirations In Ink demonstrators. 

You are currently visiting Theresa McEntee-USA creator of Theresa’s Treasures Paper Crafts.

Karen Beck – Canada    Theresa McEntee – USA   Rebecca Nutley – Australia   Robbie Rubala – USA    Vicky Wright – Australia   Christy Gridley – USA     Deirdre Croal – USA

Clickable Supply List

Product List

Have a most wonderful and creative day!

Theresa

Thinking of adding creativity to your life? Try a monthly paper crafting kit! The Paper Pumpkin Monthly Subscription delivers a kit with everything you need to make a project-right to your door! Sign up for a Pre-paid Paper Pumpkin Subscription HERE.

Ciao!

Posted in Designer Series Paper, Gratitude/ Thanks, Stampin' Up! Online Exclusives

Kylie’s International Blog Highlights Gallery-March 2023: Irresistible Blooms Thank You Card

Hello, welcome & thank you for visiting Theresa’s Treasures! I am Theresa, an Independent Stampin’ Up! Demonstrator in Arizona, USA. I am very excited to be participating in Kylie Bertucci’s International Blog Highlight Gallery with my Irresistible Blooms Thank You card, along with Stampin’ Up! demonstrators from around the world! The theme for this Gallery is “Thank You”.

We often forget those simple words “Thank you”. However, it is very important to show appreciation to those in your life who have helped you, supported you or inspired you. One way to express gratitude is to send a handmade thank you card. I hope you discover the joy in making and sending a handmade card like I have!

This Irresistible Blooms Thank You Card showcases the Online Exclusive Irresistible Blooms Collection! You can purchase the Irresistible Blooms products in my Online Store HERE.

Current Host Code: F3NU6AVH

Measurements

  • Soft Succulent card stock (CS) card base: 4 1/4″ x 11″ scored at
    5 1/2″
  • Hello, Irresistible 6″ x 6″ Designer Series Paper (DSP): Background design: 4 1/8″ x 5 3/8 “; & the Soft Seafoam leaf pattern for diecutting the leaves
  • Evening Evergreen cs: 2″ x 6″ for “lines & dots” pattern die cut
  • Daffodil Delight cs: 3″ x 5 1/2 ” for stamping & die cutting the flowers
  • Basic White cs: 4″ x 5 1/4″ (inside) & 2″ x 3″ for sentiment label

Supplies

  • Irresistible Blooms stamp set & dies (Only available Online)
  • Painted Labels Dies
  • Ink: Evening Evergreen & Daffodil Delight
  • 3/8″ Open Weave Ribbon in Evening Evergreen
  • Iridescent Pastel Gems
  • Wink of Stella Glitter Brush

Instructions

  • Use the Stamparatus for the best images. Stamp 2 small & 1 large flower in Daffodil Delight ink on Daffodil Delight cs.
  • Use the Stampin’ Cut & Emboss Machine to diecut the flowers.
  • Diecut the Irresistible Blooms “lines & dots” pattern die from Evening Evergreen cs.
  • Diecut leaves from the Soft Seafoam leaf pattern of the Hello, Irresistible DSP.
  • Stamp “Thank You” in Evening Evergreen Ink onto the 2″ x 3″ Basic White cs.
  • Diecut the sentiment with the Painted Label Dies.
  • Stamp Off the leaf & splatter stamps with Evening Evergreen Ink onto the 4″ x 5 1/4″ Basic White cs to create the inside of the card.

Assemble the Card

  • Adhere the stamped Basic White cs to the inside of the Soft Succulent cs card base.
  • Adhere the background pattern of the Hello, Irresistible DSP to the front of the card base.
  • Adhere the “lines & dots” diecut to the left side of the card front.
  • Adhere the top flower flat.
  • Use Stampin’ Dimensionals to adhere the remaining flowers and the “Thank You” sentiment.
  • Add the leaves.
  • Add the bow using a Mini Glue Dot.
  • Add Bling! using the Iridescent Pastel Gems & the Wink of Stella Glitter Brush.

Voila!

I hope you enjoyed my Irresistible Blooms Thank You Card today.

Remember to visit everyone’s blog. When you click on the Vote For Me button you will see a gallery of creative inspiration from Demonstrators around the world! You are currently at Theresa McEntee-Theresa’s Treasures-USA. To vote for your favorite cards, click on the small heart in the upper right-hand corner of each photo. You have 5 votes! Enjoy and come visit Theresa’s Treasures again soon!

Visit my Online Store to order what you need to make this card for yourself. Photographic supply list is at the end of this blog.

Current Host Code: F3NU6AVH

Clickable Supply List

Product List
Stamparatus
[146276]
$49.00

Thanks again for stopping by! Have a most wonderful and crafty day!

Theresa

Posted in 2023 January-April Mini Catalog, Animals, Designer Series Paper, Gratitude/ Thanks, Sale-a-Bration 2023, Stampin" Blends Alcohol Markers, Summer, Turtle

Kylie & Bruno Bertucci’s Demonstrator Training Program Blog Hop-February 2023- Playing in the Rain Thank You Card

Hello! Welcome to the Stampin’ Up! Demonstrator Training Blog Hop for February 2023. I’m Theresa with Theresa’s Treasures Paper Crafts. I am so glad you are joining me today for my Playing in the Rain Thank You card! We are a group of Stampin’ Up! Demonstrators from around the world. We are taking part in training to help us build a successful Stampin’ Up! business. The thank you notes we create are for our customers who place an order during the month of February. This blog hop is full of ideas and creative inspiration! Be sure to visit everyone’s blog by clicking on the links at the end of my blog.

This super sweet Thank You card is very simple to make. The Playing in the Rain stamp set not only has this cute turtle, but also a bunny & a fox. The Rain or Shine Specialty Designer Series Paper has many fun designs. Several have a shimmer added! All of the Stampin’ Up! products used to create this Playing in the Rain Thank You card can be purchased in my Online Store.

Measurements

  • Basic White card stock (cs) card base: 5 1/2″ x 8 1/2″ with a score line at 4 1/2″
  • Balmy Blue cs: 5 3/8″ x 4 1/8″
  • Basic White cs: 3 1/4″ x 3 1/4″
  • Rain or Shine 12″ x 12″ Specialty Designer Series Paper (DSP) flower pattern: 2 1/4″ x 3 1/4″

Supplies

  • Playing in the Rain stamp set
  • Pansy Patch stamp set
  • Stylish Shapes Dies
  • Into the Clouds Embossing Folder (FREE with $50 USD purchase during Sale-a-Bration)
  • Ink: Balmy Blue & Memento
  • Stampin’ Blends Alcohol Markers: Granny Apple Green, Crumb Cake, Pumpkin Pie and Daffodil Delight
  • Stampin’ Write Markers: Mango Melody (Brights Collection)
  • Brushed Brass Butterflies
  • Balmy Blue & White 1/2″ Variegated Ribbon

Instructions

  1. Use the Stylish Shapes stitched square Die to cut a 2 3/4″ square from the 3 1/4″ square of Basic White cs.
  2. Stamp the turtle in Memento ink. Stamp the group of daisies next to the turtle.
  3. Use the Balmy Blue Ink and the “Thank You” sentiment from the Pansy Patch stamp set. Stamp “Thank You” in the upper left-hand corner.
  4. Stamp the clouds around the turtle in Balmy Blue Ink.
  5. Color the center of the daisies with the Daffodil Delight Stampin’ Blend. The petals are colored with the Mango Melody Stampin’ Write Marker.
  6. Color the turtle with the Granny Apple Green and Crumb Cake Stampin’ Blends. Use the Crumb Cake Blend to add a bit of ground under the turtle.
  7. Color the Brass Butterflies with the Pumpkin Pie Blend.
  8. Emboss the Balmy Blue cs with the Into the Clouds Embossing Folder.
  9. Wrap a 6 1/2″ length of the Balmy Blue & White Ribbon around the embossed Balmy Blue cs.
  10. Tie a bow with the Balmy Blue & White Ribbon and set aside.
  11. Adhere the Balmy Blue cs to the front panel of the Basic White cs card base.
  12. Now adhere the flower pattern of the Rain or Shine DSP to the left side of the card front.
  13. Use Stampin’ Dimensionals to adhere the stamped Basic White cs stitched square slight to the right of center.
  14. Use a Mini Glue Dot to adhere the bow to the right side.
  15. Add the Pumpkin Pie colored Brushed Brass Butterflies as desired.

Voila!

Remember to visit everyone’s blog. You will see creative inspiration from Demonstrators around the world! You are currently at Theresa McEntee-Theresa’s Treasures-USA. Enjoy the Hop!

I appreciate your visit to my blog today. Remember to sign up for my Theresa’s Treasures Paper Crafts Newsletter. You can click on the “Subscribe to my Newsletter” tab. Please subscribe to my blog as well. If you need any assistance with placing your order, let me know in the comments. Thanks!

Have a most wonderful day! Happy crafting!

Theresa

Product List
Paper Snips
[103579]
$11.00
Posted in 2022-23 Stampin' Up! Annual Catalog, 2023 January-April Mini Catalog, 3D Embossing Folder, Designer Series Paper, Gratitude/ Thanks, Stamparatus, Stampin" Blends Alcohol Markers

Kylie’s International Blog Highlights Gallery-January 2023: Two-Tone Flora & Something Fancy Thank You

I am so excited to be participating in Kylie Bertucci’s International Blog Highlight Gallery with my Two-Tone & Something Fancy Thank You card, along with Stampin’ Up! demonstrators from around the world! The theme for this Gallery is “Thank You”.

We often forget those simple words – “Thank you”. However, it really is important to show your appreciation to the people in your life who have helped you or inspired you in some way. And don’t forget those who have supported you. Be sure to send a handmade thank you card to express your appreciation often. Spread joy! We really need more joy in the world today!

This thank you card spotlights the Two-Tone Flora stamp set, Two-Tone Flora Dies, Something Fancy stamp set & Something Fancy Dies, The Embossing Folder is the new Cane Weave 3D. The cool geometric paper is the Dandy Designs 12 x 12 inch Designer Series Paper (DSP), FREE during Sale-a-bration with a qualifying order. The current Host Code is MBR2U6TN.

Measurements

  • Basic White card stock (cs) card base: 4 1/4 x 11 inches with a score line at 5 1/2 inches
  • Basic White cs: 2 x 2 inches (to stamp & die cut the sentiment),
    3 x 3 inches (to die-cut the stitched circle) and enough scrap to stamp all of the images on
  • Calypso Coral cs: 4 x 5 1/4 inches
  • Petal Pink cs: 1 1/4 x 3 3/4 inches (to die cut the banner) and
    2 1/4 x 5 1/8 inches
  • Dandy Designs DSP: 2 x 5 inches

Supplies

Instructions

  • I recommend using the Stamparatus for Two-Step Stamping. I find it is much easier to line up the second stamp. Each flower is a Two-Step Stamp. Stamp the larger part of the flower in Petal Pink Ink first. Then stamp the detailed stamp in Calypso Coral. The small bunch of flowers is stamped in Fresh Freesia Ink first. Then stamped in Blackberry Bliss Ink. Use the Blackberry Bliss Stampin’ Write Marker to draw the center of each of the Petal Pink flowers.
  • Next, stamp the “Thank You” sentiment in Blackberry Bliss Ink. Die cut the sentiment using the Something Fancy Dies.
  • Use the Stylish Shapes Dies to die cut the 2 1/2 inch stitched circle and the banner.
  • Use the Stampin’ Cut & Emboss Machine to emboss the 4 x 5 1/4 inch Calypso Coral cs with the Cane Weave Embossing Folder
  • Adhere the Cane Weave card piece to the front of the Basic White cs card base.
  • Adhere the Dandy Designs DSP to the 2 1/4 x 5 1/8 inch Petal Pink cs. Then adhere this to the left side of the card front.
  • Use Stampin’ Dimensionals to adhere the sentiment.
  • Adhere the Petal Pink cs banner. Use Stampin’ Dimensionals to adhere the Basic White cs stitched circle.
  • Place the flowers as desired. Use Stampin’ Dimensionals on some flowers. Add the leaves.
  • Color the White Seam Binding Ribbon with the Dark Fresh Freesia Stampin’ Blend Alcohol Marker. Tie into a bow. Adhere to the card front with a Mini Glue Dot.

Bling! Use the Adhesive-Backed Milky Dots in Petal Pink to add Bling! to the card front.

Voila!

Experiment with different colors to see which one you like best!

I hope you enjoyed my card today using the new Two-Tone Flora and Something Fancy Bundles. Visit my Online Store to order what you need to make this card for yourself. Please use Host Code MBR2U6TN

Please vote for my card today by clicking on the Vote Button. You will be taken to the Gallery. My card is
# 20. Click on the small heart in the upper right corner to vote. Thanks in advance.

Product List
Stamparatus
[146276]
$49.00

Thanks again for stopping by! Have a most wonderful and crafty day!

Theresa

Joining Special

Joining my Stamping Gems Team couldn’t be better. You have 3 options as shown on the image above. If you have any questions email me at theresastreasures.az@gmail.com. I would love to talk with you!

2023 Sale-a-bration now until February 28, 2023

Check out the Sale-a-bration Brochure to see all of the FREE products you can earn with a qualifying order. Note: Ordering the two-Tone Flora Bundle & the Something Fancy Bundle will allow you to choose the Dandy Designs DSP for FREE!

2023 Mini Catalog now until April 30, 2023

Check out all the new Stampin’ Up! products in the 2023 Jan-Apr Mini Catalog!

Click on the images above to view the Sale-a-bration Brochure & the 2023 January-April Mini Catalog. Keep a list and visit my Online Store using the current host code HERE