Hello and welcome! I am Theresa McEntee, creator of Theresa’s Treasures Paper Crafts. Today I have the pleasure of participating in the Blog Hop with Around the World on Wednesday (AWOW).
2025 marks a special milestone. We are celebrating 5 fabulous years of creative inspiration together! In order to honor the occasion, we are CASEing (Copy and Selectively Editing) one of our talented members each month. This month we are happy to focus on the unique and awesome work of Mikaela Titheridge fromThe Crafty Oink Pen.
The AWOW team put together a thematic hop to give you some inspiration for your own crafting. “Out of the Box” is this month’s theme because Mikaela often uses projects in a new and unique way. I chose one of Mikaela’s unique cards to CASE.
I also got some inspiration from a card done by Stamptastic Designs.
My Project for today
This card was made using several different stamp sets: Pretty Florals, Trusty Tools, Terrific Toadstools and Simply Said. The focus is really on the Florals in Bloom Designer Series Paper. I am so in love with this patterned paper! Each design is just wonderful!
When I saw Mikaela’s card with the torn paper, I knew that I wanted to make one too. I did mine a little bit differently. Instead of having a front panel, I have a split card front.
I made a second card as I was having so much fun tearing paper! Here is the other version.
The AWOW Team
I am so glad you have joined me today in this worldwide hug that stretches all the way from Australia to Alaska across twelve different time zones. Below is an image of the whole crew and where they are from around the globe. Such a talented and wonderful group of people! You will want to visit everyone to be sure to see all the fabulous projects!
We all love sharing the joy of creating with you through projects from our individual parts of the world. I hope that you will be filled with lots of inspiration!
Hello and welcome! I am Theresa McEntee, creator of Theresa’s Treasures Paper Crafts. Today I have the pleasure of participating in the Blog Hop with Around the World on Wednesday (AWOW) organized by Angie McKenzie with my Filled with Happiness Good Day Card.
On the second Wednesday of each month, the AWOW team put together a thematic hop to give you some inspiration for your own crafting. March Blues is this month’s theme.
I was really inspired by all of the beautiful blues that Stampin’ Up! has! One of the awesome characteristics of Stampin’ Up products is that they all coordinate. I did not have any trouble finding Designer Series Paper, embellishments or ribbon to go with the March Blues. I was able to color with the Stampin’ Blends to create the Filled with Happiness Good Day Card.
My Project for today
Measurements
Misty Moonlight cardstock card base: 5 1/2″ x 8 1/2″ scored at 4 1/4″
Night of Navy cardstock: 2 3/8″ x 5 1/2″
Poetic Expressions Designer Series Paper: 2 1/4″ x 5 1/2″ and 3/4″ x 4 1/8″
Basic White cardstock: two at 3″ x 3 1/2″ and 4″ x 5 1/4″
Supplies
Filled with Happiness Stamp
Modern Oval Punch
Ink: Night of Navy
Stampin’ Blends: Pool Party, Boho Blue, Balmy Blue, Night of Navy & Misty Moonlight
Balmy Blue & White 1/2″ Variegated Ribbon
Iridescent Pastel Gems
Instructions
Stamp the “Good Day” image in Night of Navy Ink onto one of the 3″ x 3 1/2″ Basic White cardstock pieces. Use scissors to cut around the outer border of the sentiment.
On the other 3″ x 3 1/2″ Basic White cardstock piece, stamp the bird image in Night of Navy Ink. Use the Modern Oval Punch to punch the center out.
Color the bird image with the Stampin’ Blends as desired.
Adhere the Poetic Expressions Designer Series Paper to the Night of Navy cardstock. Wrap the Balmy Blue & White 1/2″ Variegated Ribbon around the middle. Adhere to the back with Mini Glue Dots.
Adhere this piece to the middle of the front of the Misty Moonlight cardstock card base.
Make a bow and set aside.
Adhere the “Good Day” sentiment piece to the left side of the card front.
Use Stampin’ Dimensionals to adhere the bird image to the center of the “Good Day” sentiment piece.
Adhere the bow with a Mini Glue Dot.
Embellish with the Iridescent Pastel Gems.
The AWOW Team
I am so glad you have joined me today in this worldwide hug that stretches all the way from Australia to Alaska across twelve different time zones. Each month this group of creative friends prepare a project for a theme. Below is an image of the whole crew and where they are from around the globe. Such a talented and wonderful group of people! You will want to visit everyone to be sure to see all the amazing projects!
We all love sharing joy with you through projects from our individual parts of the world. I hope that you will be filled with lots of inspiration!
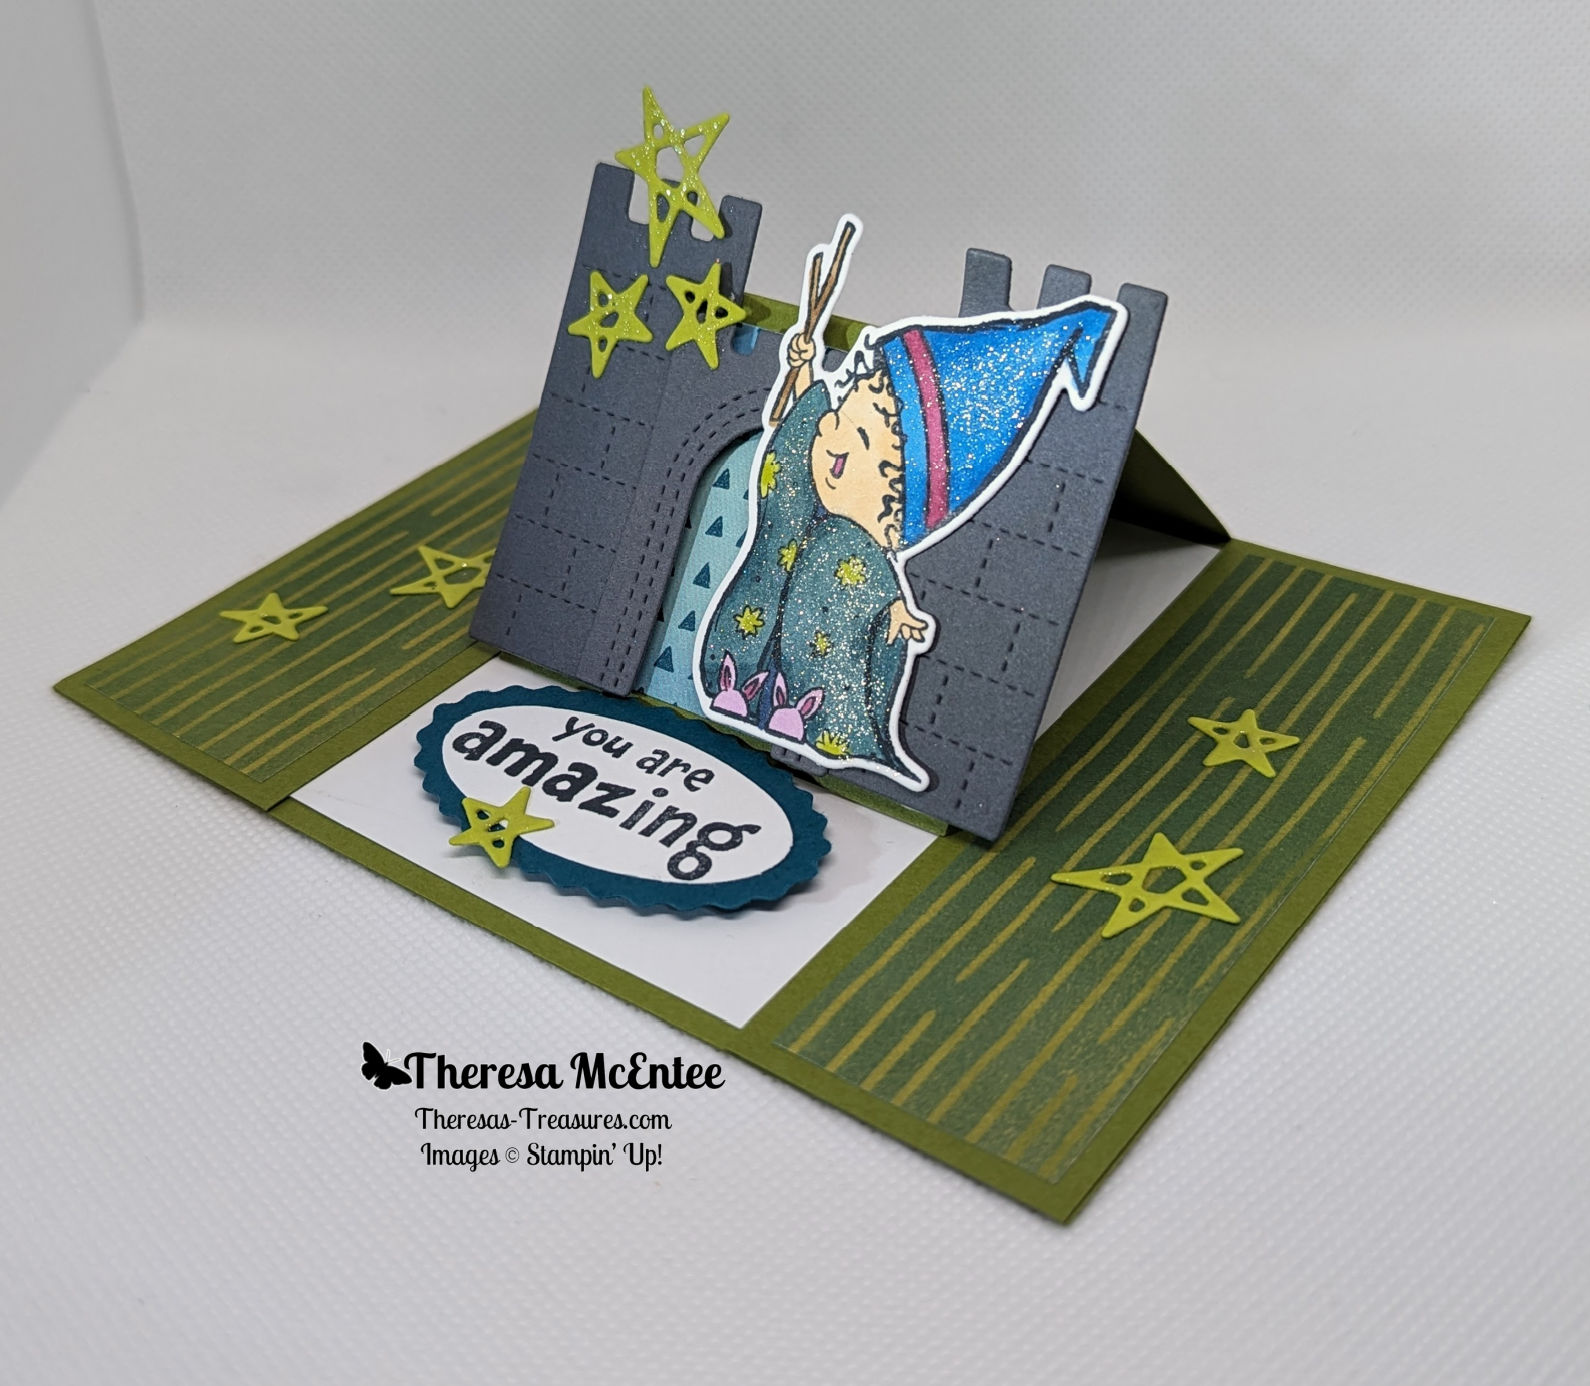
Hello! Welcome to Theresa’s TreasuresPaper Crafts. I am Theresa, an Independent Stampin’ Up! Demonstrator in Arizona, USA. I am so excited to be participating in Kylie Bertucci’s International Blog Highlight Gallery with my Kiddin’ Around “You Are Amazing” card. Today I am blogging along with a very creative group of Stampin’ Up! demonstrators from around the world! Please be sure to see all of the inspirational projects by visiting everyone’s blog. You will need to click on the “Vote” button below to see the Gallery.
The theme for this Gallery is “Thank You”.
We often forget those simple words “Thank you”. However, it is also important to let those who have helped you, supported you or inspired you, know just how amazing you think they are! One way to share your feelings is to send a handmade card. Discover the joy in making and sending a handmade card for yourself!
This Kiddin’ Around “You Are Amazing” Card showcases the Kiddin’ Around Bundle in the 2024 Stampin’ Up! Mini Catalog. Today I used both the stamp set and the dies, as well as the Just Kiddin’ 12″ x 12″ Designer Series Paper.
Current Host Code: K3Q7NG2M
Measurements
Old Olive cardstock card base: 5 1/2″ x 8 1/2″ scored at 4 1/4″
Basic White cardstock: 3 1/4″ x 4″, 2 1/2″ x 3″ (to stamp the child) and 1 1/2″ x 3″ (for sentiment)
Basic Gray cardstock: 3″ x 4″ (to diecut the castle pieces)
Lemon Lime Twist cardstock: 1 1/2″ x 9″ (to diecut the stars)
Pretty Peacock cardstock: 1 1/2″ x 3″
Just Kiddin’ 12″ x 12″ Designer Series Paper: two at 1 1/2″ x 4″ (Olive Green/Lemon Lime Twist “grass” pattern and 1 3/4″ x 2 1/4″ (ombre blue with mini triangles pattern for the “sky”)
Supplies
Kiddin’ Around Bundle
Double Oval Punch
Paper Trimmer
Stampin’ Cut & Emboss Machine
Ink: Memento Ink Pad
Stampin’ Blends Alcohol Markers: Azure Afternoon, Berry Burst, Fresh Freesia, Lemon-Lime Twist, Pecan Pie, Pretty Peacock and 800/light Medium Deep.
Instructions
Prepping the Card Base
Fold the 5 1/2″ x 8 1/2″ Old Olive cardstock card base at the 4 1/4″ score line.
With the 5 1/2″ side on top, cut at 1 1/2″ down to the 4 1/4″ fold. Then make another cut down to the fold at 4″.
With the 8 1/2″ side on top, score at 2″ between the 1 1/2″ and 4″ cuts.
Turn the cardbase so that the 5 1/2″ side is on top with the cut side on top.
In the center of the area below the fold, adhere the Basic White cardstock.
Adhere each of the 1 1/2″ flaps to the cardbase.
Now adhere the two 1 1/4″ x 4″ strips of Olive Green/Lemon Lime Twist Just Kiddin’ Designer Series Paper “grass” to either side of the cardbse.
Fold the center of the card base down and adhere the “sky”below the fold of the front flap.
Prepping the Rest of the Card Pieces
From the Lemon Lime Twist diecut the stars three times so that you have 9 stars.
Die cut two of the castle towers and one arch from the Basic Grey cardstock.
In Memento Ink, stamp the sentiment “you are amazing” onto the 1 1/2″ x 3″ Baisc White cardstock so that you can punch it out with the smaller smooth oval in the Dual Oval Punch.
Punch the sentiment out. Punch a scalloped oval from the Pretty Peacock cardstock.
Also with Memento Ink, stamp the image of the child onto the 2 1/2″ x 3″ Basic White cardstock. Wait until after you color to die cut the image.
Color the image with Stampin’ Blends Alcohol Markers. Colors are as follows: hat-Berry Burst & Azure Afternoon; Face– 800 of the Medium Deep Natural Tones & Berry Burst for the mouth; magic wand- Pecan Pie; gown– Pretty Peacock and Lemon Lime Twist for the stars; Bunny Slippers-Fresh Fresia and Berry Burst for the inner ear.
Die cut the child.
Assembling the Card
Use Stampin’ Dimensionals to adhere one castle tower to each side of the front flap. There is 1/4″ that hangs off the edge.
Apply a Stampin’ Dimensional behind the top of the arch. Apply a thin line of the Multipurpose Liquid Glue along the outer edge behind the left & right sides of the arch. Adhere to the front flap between the towers.
The image of the child is adhered using Stampin’ Dimensionals behind the left side and glue behind the right side.
Adhere the sentiment to the Pretty Peacock cardstock scalloped oval.
Then use Stampin’ Dimensionals to adhere the sentiment to the center of the Basic White cardstock under the front flap.
Adhere the stars as desired.
Embellish with Wink of Stella applied to the gown, hat and the stars.
Add Bling! if desired.
Voila!
I hope you enjoyed my card today using the Kiddin’ Around Bundle.
Visit my Online Store to order what you need to make this card for yourself. Photographic supply list is at the end of this blog.
Current Host Code: K3Q7NG2M
You are currently at Theresa McEntee-Theresa’s Treasures-USA. When you click on the Vote For Me button above you will see the Gallery of creative inspiration from Demonstrators around the world! Remember to visit everyone’s blog by clicking on the photo of their card in the Gallery.
To vote for your favorite cards, click on the small heart in the upper right-hand corner of each photo. You have 5 votes! Enjoy and come visit Theresa’s Treasures again soon!
Hello fellow stampers! You are visiting with Theresa McEntee-author of Theresa’s Treasures Paper Crafts. I am hopping with the Ink & Inspiration Blog Hop today. There are several of us- you will find the list to follow the hop at the end of my blog post. Please visit everyone!
The Ink & Inspiration Challenge is both an image and a color challenge.
Here is the photo for the challenge. A fun and relaxing scene.
I was inspired by the photo to think of a great time on the beach during summer break. Fortunately, I had a stamp that conveys a moment of that summertime fun.
The image is part of the Beside Me stamp set. (The “Happy Birthday ” sentiment is from the Inked & Tiled stamp set.)
I had been wanting to try embossing in white emboss powder on a colored background for quite a while. I was also interested in coloring with the Watercolor Pencils using the White pencil first.
A little about how I created this card:
First I embossed the image using the White Emboss Powder & a heat tool. Tip: Remove the heat as soon as the embossing powder melts. Too much heat results in the embossing chipping off the paper.
Next I colored the entire image with the White Watercolor Pencil.
Then I used the the colored Watercolor Pencils.
For the inside, I kept it simple.
This technique was a lot of fun to try. I want to make more!
I hope you enjoyed my interpretation of this challenge. Thanks so much for stopping by. Stop by the rest of the blogs today for more inspiration!
Hello fellow stampers! I have a very simple and cute Love Cats Valentine’s card today. The stamp set is Love Cats from the Stampin’ Up! 2023 January-April Mini Catalog! You can start purchasing product from the Mini Catalog today! You can order from my Online Store HERE!
Measurements
Basic White card stock (cs) card base: 4 1/4 x 11 inches with a score line at 5 1/2 inches
Basic White cs: 2 3/4 x 4 inches
Melon Mambo cs: 3 1/4 x 3 1/2 inches
Flirty Flamingo cs: 3 x 4 1/4 inches
Dandy Designs 12 x 12 inch Designer Series Paper: 4 x 5 1/4 inches (FREE with $100 order during Sale-a-bration!)
Supplies
Love Cats stamp set
Stamparatus
Memento Black Ink
Melon Mambo Ink
Melon Mambo Stampin’ Write Marker
Opaque Adhesive-Backed Gems
Scotch Tape
Stampin’ Dimensionals
Multipurpose Liquid Glue
Instructions
I strongly recommend using the Stamparatus for the cat. Stamping solid images is much easier when you use the Stamparatus because you can re-stamp several times to get a nice solid black color.
Cover the little heart with a piece of scotch tape before you apply the Memento Black Ink. Remove the piece of tape before stamping onto the 2 3/4 x 4 inch Basic White cs. Repeat as many times as you need to in order to get a nice black cat.
Then use the Melon Mambo Stampin’ Write Marker to apply ink to the little heart. Stamp and repeat until dark enough.
Stamp the sentiment with the Melon Mambo Ink.
Remove the paper from the Stamparatus.
Stamp the sentiment “Hi there, VALENTINE” on the inside panel of the Basic White cs card base.
Adhere the Dandy Designs DSP to the front panel of the Basic White cs card base.
Adhere the stamped cat card piece to the Flirty Flamingo cs.
Adhere the Melon Mambo card piece to the front of the card.
Use Stampin’ Dimensionals to adhere the Flirty Flamingo cs/stamped cat card piece to the card front.
Add the Melon Mambo Opaque Adhesive-Backed Gems as desired. Bling!
Voila!
This is a simple and quick Valentine’s card! Be sure to look through the Stampin’ Up! 2023 January-April Mini Catalog and place your order starting today- January 5, 2023. Round up to the next $50 so you can choose a Sale-a-bration Reward for FREE! Sale-a-bration ends February 28,2023.
Hello and Happy Monday! We the made cards in the Stampin’ Up! Kits Collection- The Best Remedy at my Zoom Card Making Class this last Saturday. So much fun and we all ended up with 9 great Get Well cards!
Card #1
The first card has a sweet little skunk with a paired sentiment “Even though this stinks…”. There are two choices for what follows. I chose “I’m here for you”. You could also choose “Feel better soon”. Notice the sparkling flower sequins! I only have one card left. I have already mailed the other two away!
Card #2
There is also an ice-cream-eating mouse! He/she recommends ice cream as a remedy! Which I will wholeheartedly agree with! I made three different versions of this card just by cutting the pink background. I like to figure out how to make alternative cards, limiting myself to what comes in the kit.
Card #3
This adorable little chick has an old-fashioned ice pack on his head. He has a sweet sentiment “A little bird told me you were under the weather”. Check out the shiny sequins over his head! Again, I created three versions of the card. I did this just by placing the dark blue panel in a different position each time.
I highly recommend this kit to beginning and experienced crafters alike. You can put the cards together rather quickly. It is a good idea to have Get Well cards on hand. You never know when a Get Well card will be needed.
Next Zoom Class with Theresa’s Treasures
I am creating the next cards for my December 10, 2022 Zoom Card Making Class. I am using the Kindest Gnomes stamp set and Gnomes Dies. If you would like to join us, please email me for more information at theresastreasures.az@gmail.com. I will also update the information on this blog ASAP. Order soon as there is Thanksgiving Holiday that will slow shipping down as well as the beginning of the Christmas Holiday season.
Hello and welcome to our Stampin’ Up! Demonstrator Training Blog Hop for June 2022. I’m so happy you are joining me today! This blog hop is full of ideas and creative inspiration. We are a group of Stampin’ Up! Demonstrators from around the world taking part in training to help us build a successful Stampin’ Up! business and reach some goals we have set. Participating in a monthly Blog Hop is one goal that I have.
You may be starting here or have come from another blog – either way you can find the link list at the bottom of this post so that you can see all of the great ideas in each blog post today.
My card is made using Stampin’ Up! This Birthday Piggy stamp set. The image is colored with the Stampin’ Blends Alcohol Markers. The patterned paper is found in the Tea Boutique Designer Series Paper (DSP) pack. The texture is created using the Painted Texture Embossing Folder.
Measurements and Supplies
Basic White Card Stock (CS) card base: 5 1/2 x 8 1/2 inches with a score line at 4 1/4 inches
Basic White CS: 2 1/2 x 3 inches to stamp the piggy on
Petal Pink CS: 4 x 5 1/4 inches embossed with the Painted Texture Embossing Folder
Adhere the Tea Boutique DSP to the left side of the Petal Pink CS that has been embossed with the Textured Paint Embossing Folder. It will hang off the edge on the top and bottom by 1/8 of an inch.
Wrap the White 1/4 inch Crinkled Seam Binding Ribbon around the card piece and tie a bow to the left side.
Adhere this card piece to the front panel of the Basic White CS card base.
Stamp the little piggy in Memento Ink and color as desired with the Stampin’ Blends Alcohol Markers.
Stamp the sentiment with Memento Ink.
Use Stampin’ Dimensionals to adhere the piggy card piece to the card front.
Embellish with the Iridescent Rhinestone Basic Jewels.
Voila! Super simple and so darn cute!
Remember to visit everyone’s blog to see all the creative inspiration from around the world. You are currently at Theresa McEntee-Theresa’s Treasures-USA.
I really appreciate your visit to my blog today. Remember to sign up to receive my Theresa’s Treasures Paper Crafts Newsletter by clicking on the Subscribe to my Newsletter tab and please subscribe to my blog as well. Thanks!
The New Horizons Designer Series Paper (DSP) available in the Stampin’ Up! 2022 Mini Catalog is just gorgeous on its own. Combine that with the On the Horizon stamp set and you can create some awesome scenes with the #SimpleStamping Technique. You end up with wonderfully beautiful scenes with very minimal work on your part!
The following cards were part of my last Zoom Card Making Class. Here is an example of a really quick and simple scene using Evening Evergreen and Blackberry Bliss Inks.
Measurements for above card
Night of Navy Card Stock (CS) card base: 5 1/2 x 8 1/2 inches with a score line at 4 1/4 inches.
New Horizons DSP: 4 x 5 1/4 inches. Cut a 1/2 x 5 1/4 inch strip for the inside.
Basic White CS: 4 x 5 1/4 inches (inside of card)
Instructions
Use the Evening Evergreen Ink to stamp the sentiment “Relax & Enjoy Your Day” in the lower left corner.
Stamp the trio of trees three times across the horizon.
Finish by stamping the birds a few times in Blackberry Bliss Ink.
Voila! That’s it!
If you like to decorate the inside you can do some simple stamping. Add the 1/2 x 5 1/4 inch New Horizons DSP for something extra special. The sentiment is from the Peaceful Moments stamp set.
Here are a few more samples of the way I used the #SimpleStamping Technique to easily and quickly create a series of gorgeous cards! And some of the cards have a very masculine feel for your special guy.
I stamped on the New Horizons DSP, then cut it into 3 pieces to give this card a different look.
Thank you so much for visiting today. I hope you have a wonderful day and have some time to do some crafting! Join me for my next Zoom Card Making Class on April 9, 2022. For more information click HERE.
I’m so excited to be training with Bruno and Kylie again this year and participating in our monthly Blog Hop with amazing Stampin’ Up! Demonstrators from around the world. The purpose of this blog hop is to allow each of us in the training group an opportunity to learn and practice new skills to better ourselves and our Stampin’ Up! business. The benefit to you is that you get to “hop around the world” and get inspiration from many awesome Stampin’ Up! Demonstrators!
You are currently at Theresa’s Treasures with Theresa McEntee from Bisbee, Arizona USA to see my Waves of the Ocean Thank You Card . You will receive this card when you place an order with my Online Store during the month of March using the Host Code: TX3SVV3U. Be sure to visit everyone’s blog and see how the creative energy results in a variety of fabulous cards and projects!
This is a super simple card! You can make many very quickly!
Supplies
Granny Apple Green Card Stock (CS) card base: 5 1/2 x 8 1/2 inches with a score line at 4 1/4 inches
Blue Foils Specialty Paper: 4 x 5 1/4 inches and a 1/2 x 4 inch strip
Waves of the Ocean Designer Series Paper (DSP): 3 3/4 x 5 inches and a 3/4 inch strip
Basic White CS: 4 x 5 1/4 inches
Waves of Inspiration stamp set for the sentiment on the inside of the card (not shown)
Encircled in Friendship stamp set for the sentiment
Hippo & Friends Dies
Old Olive/Pretty Peacock 3/8 inch Reversible Ribbon
Rhinestone Waves Basic Jewels
Here is another card using Pool Party CS for the card base and the Night of Navy Blue Foil.
I quickly made all of these variations! To determine the colors to use, look at the label on the Waves of the Ocean DSP and the coordinating colors will be listed.
Voila! This Waves of the Ocean Thank You Card is simple and quick but great for expressing my gratitude to my customers.
You are at Theresa McEntee-Theresa’s Treasures-USA. Stop by the next blog on the list to see another fabulous Thank You card!
Thanks so much for stopping by. I hope to be mailing you a Waves of the Ocean Thank You Card for your order. If you have any questions about how to place an order, or about any of the Stampin’ Up! products, shoot me an email at: theresastreasures.az@gmail.com.
Hello my fellow crafters! Happy Friday and welcome to my Friday Fun Fold! Today’s card is an Easter card made with Stampin’ Up!® Easter Friends stamp set!
Measurements & Supplies
Daffodil Delight Card Stock (CS) card base: 5 1/2 x 5 3/4 inches with a score line at 1 1/2 inches with the 5 3/4 inch side on top
Daffodil Delight CS: 1 1/2 x 5 1/2 inches and 3 x 4 1/4 inches
Basic White CS: two at 2 3/4 x 4 inches
Flowering Fields Designer Series Paper (DSP): 4 x 5 1/4 inches and two at 1 1/4 x 5 1/4 inches
Bumblebee 1/4 inch Gingham Ribbon
Iridescent Rhinestone Basic Jewels
Ink: Soft Suede, Evening Evergreen and Mango Melody
Stamping
On the first 2 3/4 x 4 inch Basic White CS stamp the bunny in Soft Suede. The “Happy Easter” is done in Evening Evergreen Ink. On the second Basic White CS stamp the sentiment “sending warm and happy wishes this spring” also in Evening Evergreen Ink. The little chick is stamped in Mango Melody Ink.
Assembling the Card
Adhere the bunny card piece to the 3 x 4 1/4 inch Daffodil Delight CS. Adhere one of the 1 1/4 x 5 1/4 inch Flowering Tulip DSP to the 1 1/2 x 5 1/2 inch Daffodil Delight CS. Adhere the other 1 1/4 x 5 1/4 inch Flowering Tulip DSP to the corresponding space on the Daffodil Delight CS card base as shown. Adhere the 4 x 5 1/4 inch Flowering Fields DSP to the inside of the card base.
Adhere the little chick card piece to the inside of the card. Close the card and lay the 1 1/2 x 5 1/2 inch Daffodil Delight CS/DSP piece in place on the right. Apply adhesive to the left and right edges of the bunny card piece and adhere to the card.
Tie a small bow with the Gingham Ribbon and use a Mini Glue Dot to adhere the bow to the bunny. Add the Iridescent Rhinestone Basic Jewels and Voila! you are all set for a Happy Easter!


")


 Designer Series Paper")
 Variegated Ribbon")


")


 Designer Series Paper")


")
")


")


 Designer Series Paper")


")


")


 Designer Series Paper")
 Crinkled Seam Binding Ribbon")


")
")


 Designer Series Paper")


")


 Specialty Paper")
 Designer Series Paper")

 Reversible Ribbon")


")


 Designer Series Paper")
