Welcome to day 13 of my 15-Day Christmas Card Challenge! Today’s card is made mostly with dies and the Stampin’ Cut & Emboss Machine. The sentiments are from the Dove of Hope and the Itty Bitty Christmas stamp sets. The Dove of Hope is in the 2020 Stampin Up! Mini Catalog and the Itty Bitty Christmas is in the 2020-21 Annual Catalog
The dove from the Detailed Dove Dies is definitely the star of the show for this card. The equally elegant layers for the background are from the Ornate Layers Dies.
These Ornate Layers Dies are simply amazing and allow so many possibilities for fancy detailed cards. They are available from the 2020-21 Stampin’ Up! Annual Catalog HERE.
Measurements: Whisper White Card Stock card base: 4 1/4 x 11 inches with a score line at 5 1/2 inches; Whisper White CS: 3 3/4 x 5 1/4 inch Ornate Layer, the Detailed Dove body and 2 wings, and 1/2 x 3 inch strip; Feels Like Frost Designer Series Paper (DSP): 3 1/8 x 4 5/8 inch Ornate Layer; and a double strand bow with the 1/4 inch Seaside Spray Metallic Ribbon.
Using the Seaside Spray ink, stamp the sentiment “May your season be filled with all the wonder and blessings of Christmas” from the Dove of Hope stamp set onto the inside panel of the Whisper White CS card base. Stamp the sentiment “Peace & Happiness” from Itty Bitty Christmas on the 1/2 x 3 inch strip of Whisper White CS.
Trim the sentiment “Peace & Happiness” as shown.
Adhere the back wing onto the body of the dove. Now adhere the front wing. When gluing smaller parts, I use the Silicon Craft Sheet to keep the glue from getting on my table.
I have found that cutting the Foam Adhesive Sheets into 1/4 inch strips is a great way to add dimension on a large card piece.
Adhere the Whisper White CS Ornate Layer frame to the front panel of the Whisper White CS card base. Be sure the inside sentiment is in the right place. Adhere the Feels Like Frost DSP Ornate Layer to the card front. Use Stampin’ Dimensionals to adhere the dove and the sentiment.
Adhere the Seaside Spray bow and Viola! you have an elegant Christmas card to wish some Peace & Happiness to someone special.
Thanks for visiting today. I hope you have mailed off your cards! I am still finishing up the letter I put inside the cards before I can mail them off. I intend to be finished by Monday. Wish me luck!
Click on any photo below to go to my Online Store and start shopping.
Hello! Well, it is almost Friday. Yay! We made it through another week! I have an extra fun card for you today!
One of the perks of being a Stampin’ Up! Demonstrator is that you are able to attend the Onstage Stampin’ Up! Convention in November of each year. This last Onstage there was a presentation by Rosemarrie Gonzalez on how to make this faux shaker card that I am going to share today.
Snowman Season is an adorable stamp set with this happy snowman. He reminds me of young children putting their faces up in the snowfall to catch snowflakes on their tongue. This is a very simple shaker card to make.
Measurements: Thick Whisper White Card Stock (CS) card base: 4 1/4 x 5 1/2 inches; Green Foil Sheet: 4 1/8 x 5 3/8 inches (I used a rectangle die to cut the center of the green foil so I can save it to use on another card); Whisper White CS: 3 7/8 x 5 1/8 inches and a Stitched Nested Label die cut (the 3rd up from the smallest): and Red Foil Sheet Stitched Nested Label die cut (4th up from the smallest). I also die cut some snowflakes from Silver Foil Sheets with the So Many Snowflakes Dies.
On the back of the Thick Whisper White CS card base, stamp the sentiment “Merry Christmas” in Shaded Spruce ink. Next stamp the sentiment “Hoping this season builds heartwarming memories” in Real Red ink. Add a few snowflakes in Smoky Slate ink. I Stamped Off some of the snowflakes.
Stamp the happy snowman in Memento Black ink. Add some snowflakes in Smoky Slate ink, some full strength and some Stamped Off.
I used the Stampin’ Blends Alcohol Markers to color the happy snowman. The colors are the Light and Dark: Smoky Slate, Pumpkin Pie, Real Red and Shaded Spruce.
Slide the happy snowman card piece into one of the Stampin’ Up! Clear Envelopes (p. 153 in the Annual Catalog, item #102619).
Add a spoon or two of the Snowflake Sequins.
Push the card piece into the lower left corner, flip over and seal the top to be snug on the right hand border.
Fold the excess envelope down and seal with Scotch Tape. Viola! A shaker card!
Using the 1/4 inch Crinkled Seam Binding, wrap it around the shaker card and tie in a bow. Tip: When no one is around to hold the tie, I use tweezers. This bow is made extra special by tying in an extra piece. It is hard to see but the bow has 2 tails on each side.
Adhere the Green Foil rectangle to the Thick Whisper White piece. Be sure you have the sentiment on the back facing the right way. Adhere the shaker card piece to the Green Foil and Thick Whisper White CS with 1/4 inch strips of the Foam Adhesive Sheets. So cute!
Use the Shaded Spruce ink to stamp the sentiment “Let It Snow” onto the Whisper White die cut Stitched Nested Label. Stamp some snowflakes around the border in Smoky Slate ink. Adhere to the Red Foil Stitched Nested Label die cut.
Adhere the Red Foil to the front of the shaker card piece. Add the Silver Foil snowflake die cuts as desired.
Viola! You have a really fun and happy snowman shaker card for Christmas!
I am so glad you stopped by to see this fun and easy Faux Shaker card technique! I was so “Wow’d” when Rosemarrie demonstrated this technique.
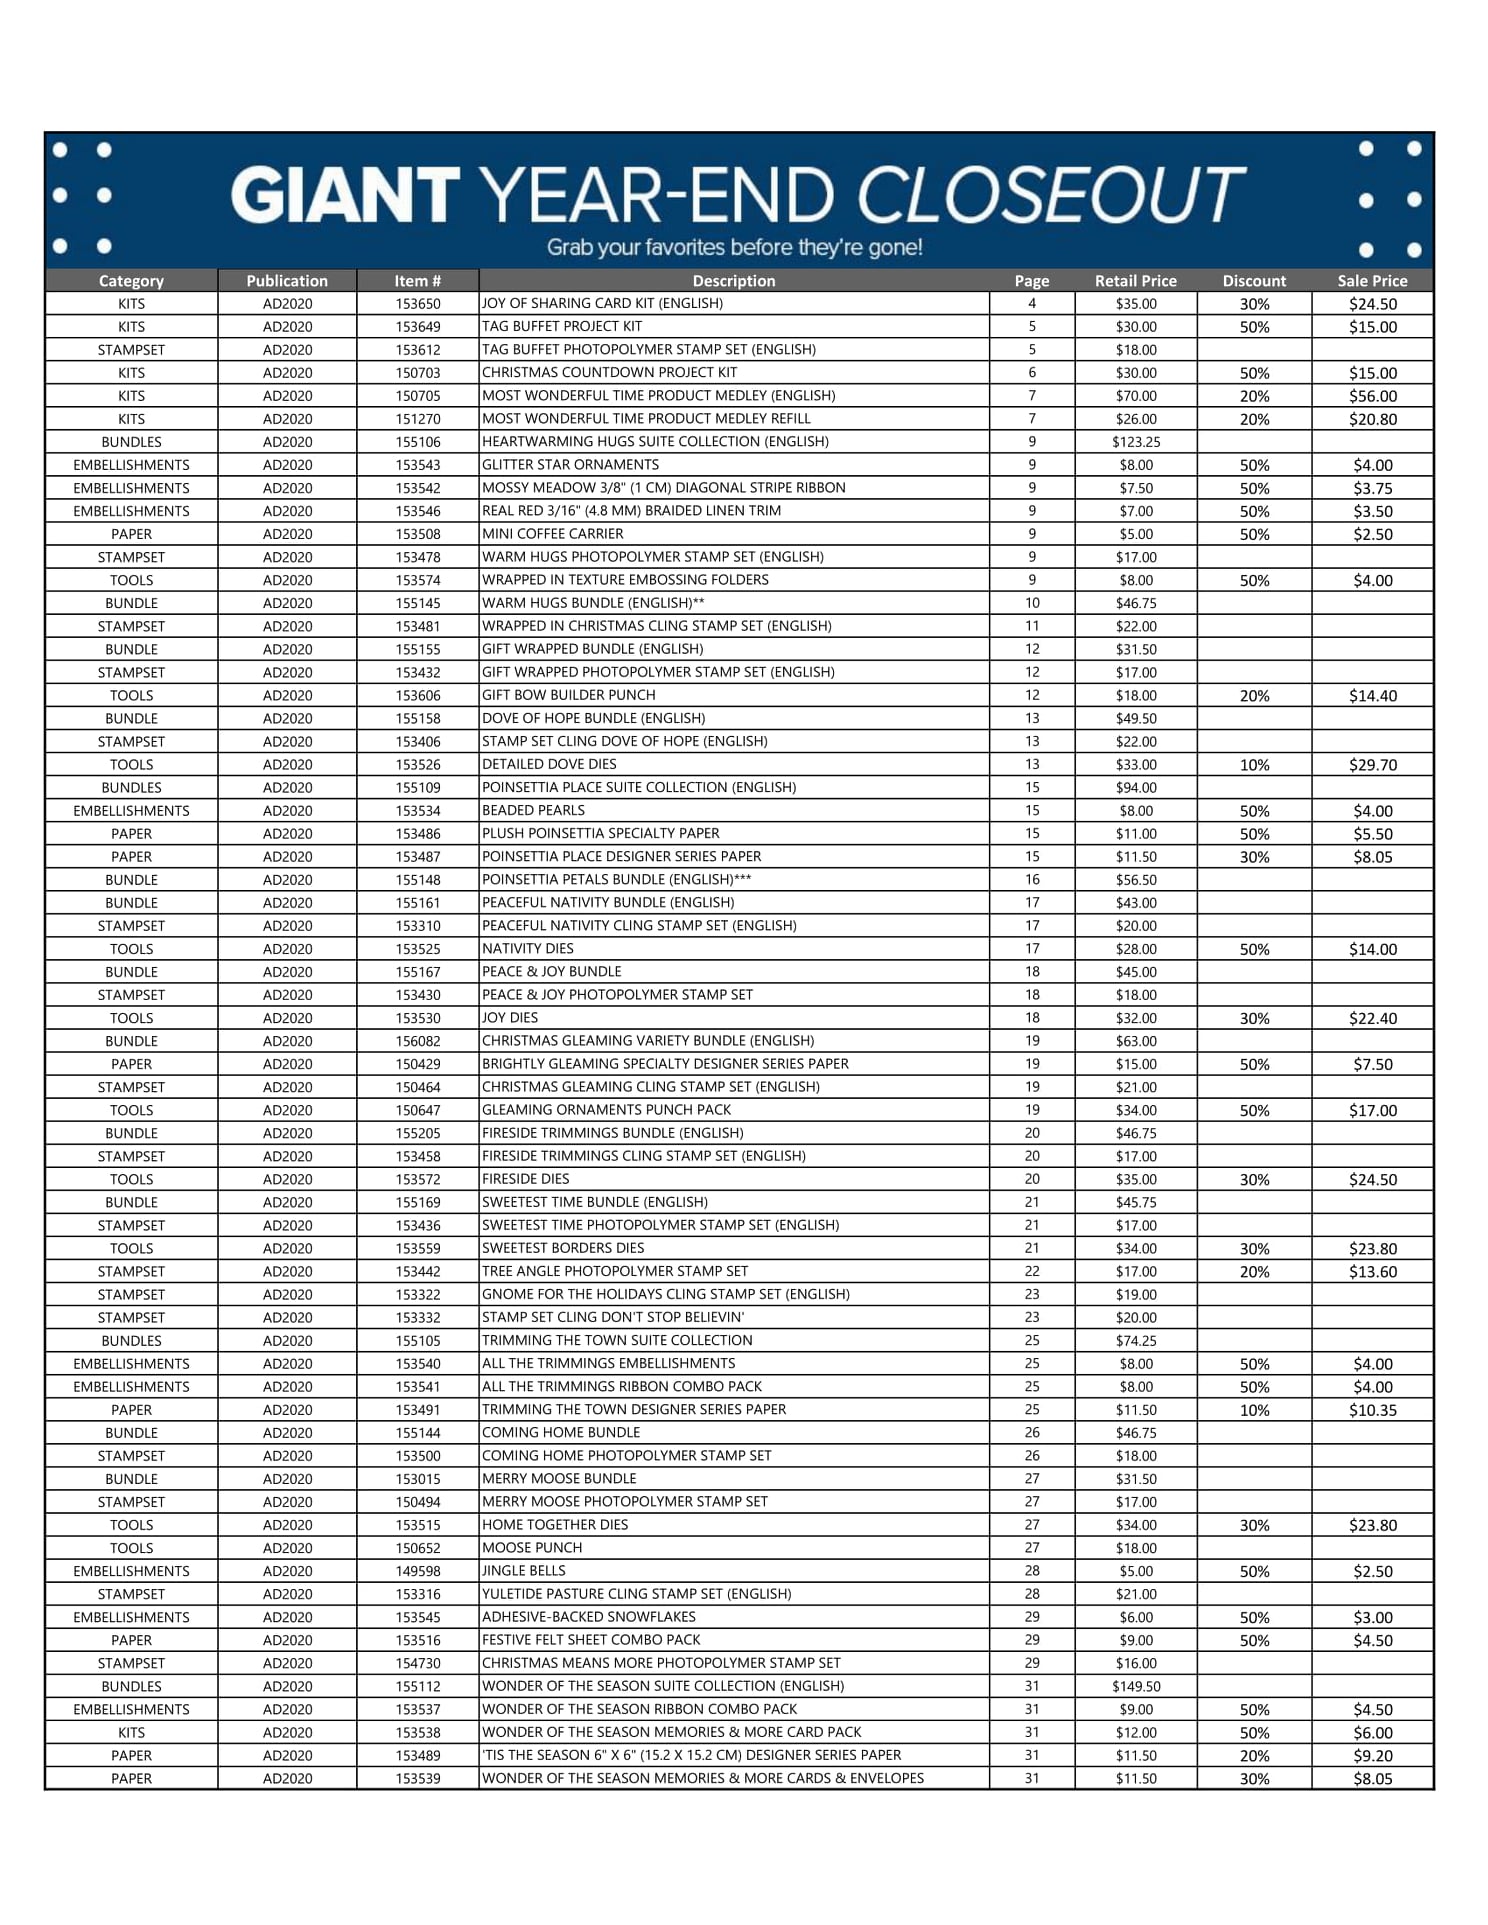
The Giant Year-End Closeout is still going on. If you haven’t had a chance to check out the discounts, please download the list below. The closeout will end on January 4, 2021 but as products run out-that is it!
Good Morning! I hope you are getting started on a lovely day. I have a really cute card today using the Cat Punch and the Peace & Joy stamp set.
I just love the Stampin’ Up! color Pacific Point. It is just so soothing. I am also in love with the Snowflake Splendor Designer Series Paper (DSP) which is the snowy background. Right now you can get the DSP for 20% off during the Giant Year-End Closeout from December 8, 2020 to January 4, 2021. Shop HERE. Download the complete list of retiring products and discounts below.
The Peace & Joy stamp set has several large sentiments along with smaller strip sentiments to design your own personal sentiment. It is also on the retiring list.
Measurements: Whisper White Card Stock (CS) card base: 4 1/4 x 11 inches with a score line at 5 1/2 inches; Pacific Point CS: 4 1/8 x 5 3/8 inches and 3 x 4 inches; Snowflake Splendor DSP: 4 x 5 1/4 inches; and Whisper White CS: 3 x 3 inches, 1 1/2 x 4 inches and 1/2 x 3 inches.
Stamp the “Peace” sentiment in Pacific Point ink onto the 1 1/2 x 4 inch Whisper White CS. Stamp the sentiment “To you and yours” onto the 1/2 x 3 inch Whisper White CS. Note: When using the Photopolymer stamps, you will need something underneath like the Stampin’ Pierce Mat or a catalog to get the best image.
Fussy cut the sentiments with your Paper Snips and set aside.
Use the 2 1/4 inch Circle Punch to punch a circle on the upper portion of the Snowflake Splendor DSP in the middle. The DSP in this photo is upside down. Be sure to push the DSP all the way down into the punch.
Adhere the 3 x 3 inch Whisper White CS to the back of the Snowflake Splendor DSP covering the 2 1/4 inch circle. I am using a Silicon craft Sheet to avoid having the project stick to my table. Flip over and adhere the card piece to the 4 1/8 x 5 3/8 inch Pacific Point CS.
Punch the cat out of the 3 x 4 inch Pacific Point CS with the Cat Builder Punch. Adhere the cat in front of the “moon”.
Use Stampin’ Dimensionals to adhere the “Peace” sentiment under the cat. Adhere the “To you and yours” sentiment under the “Peace”.
Use your Bone Folder to fold the 4 1/4 x 11 inch Whisper White CS card base at the 5 1/2 inch score line. Adhere the cat card piece to the front of the card base.
Viola! You have a soothing card to send some peace to your favorite cat lover.
I really appreciate your visit today. I have been doing a 15-Day Christmas Card Challenge since December 1, 2020 if you would like to go to the previous posts and see lots of handmade Christmas card ideas. Please leave a comment and let me know which is your favorite.
Select any photo below to go directly to my Online Store.
Thank you for stopping by Theresa’s Treasures today. I am Theresa and I am a Stampin’ Up!® Demonstrator in Arizona, USA. Today I am taking part in Kylie Bertucci’s Monthly International Blog Highlights Gallery. The theme is- Thank You. On this gallery, you can see thank you cards made by people from all over the world! My thank you card with the Arrange a Wreath stamp set was such fun to make! I hope you enjoy it. Please remember to visit the Highlights Gallery and vote for me! Thank you!
I have really been enjoying the versatility with the different wreaths I can create with the Arrange a Wreath Bundle. I wanted a winter-themed wreath for this card so I used Cherry Cobbler with Garden Green and Old Olive as the base colors. I added the Daffodil Delight and Mango Melody to brighten up the wreath.
I used the Fluid 100 Watercolor Paper to make all of the flowers.
To color the watercolor paper, I used an E sized Clear Block. Just using the Daffodil Delight ink pad, I dabbed some ink onto the block.
Next I dabbed on a little Mango Melody, then Real Red and Cherry Cobbler.
I used a small spray bottle of water to dampen the paper, then sprayed a liberal amount of water onto the block with the ink. Next I flipped the block over onto the watercolor paper. I let this sit with a little weight on it for about 10 minutes.
Here it is when it is dry. This one came out a little dark with more of the reds. Sometimes it comes out with more yellows. I used the dies in the Wreath Builder Die set to cut out all the flowers.
The background is made with the Brick & Mortar 3D Embossing Folder. I sponged some of the Cherry Cobbler on the more prominent bricks. The sentiment from Peaceful Moments was stamped on Crumb Cake card stock after it was embossed with the Pinewood Planks 3D Embossing Folder.
Voila! You have a fabulous thank you card for someone special!
Click on the button below to vote for my card and see all of the thank you cards in the International Blog Highlight Gallery.
If you need to shop for any of the products to make this card yourself, click on any photo below and you will go to my Online Store.
Today is December 5th, the 5th day of my 15-Day Christmas Card Challenge and my daughters birthday! Happy Birthday Kathryn!
Today’s card is a Fun Fold using the Perfectly Plaid stamp set and Pine Tree Punch which are found in the 2020-21 Stampin’ Up!® Annual Catalog.
This festive Fun Fold has textured pine trees made with one of the Greenery Embossing Folders and the Stampin’ Cut & Emboss Machine. If this is not available to you, I did make another version with plain pine trees which was also very festive.
Measurements:Thick Whisper White Card Stock (CS) card base: 4 1/4 x 5 1/2 inches; Whisper White CS: 4 1/2 x 5 inches with a score line at 2 1/2 inches, 1 3/4 x 3 1/2 inches and a 3 1/4 x 6 inch piece that has been embossed with the Greenery Embossing Folder; Cherry Cobbler CS: 4 x 5 1/4 inches; and Classic Christmas 6 x 6 inch Designer Series Paper (DSP): 2 1/4 x 4 1/4 inches.
Stamp the sentiment “Merry Christmas” in Cherry Cobbler ink onto the 1 3/4 x 3 1/2 inch Whisper White CS. Cut out with the Layering Ovals Dies. Note: Be sure to use some padding under the Photopolymer (see-through) stamps like the Stampin’ Pierce Mat or a Stampin’ Up! catalog to get the best stamped image.
Fold the 4 1/2 x 5 inch Whisper White CS at the 2 1/2 inch score line, and stamp the Christmas tree and sentiment in Cherry Cobbler ink on the inside.
Line up the Pine Tree Punch with the grain on the Greenery Embossed Whisper White CS and punch out the pine trees. You will need three.
Adhere the 4 x 5 1/4 inch Cherry Cobbler CS to the 4 1/4 x 5 1/2 inch Thick Whisper White CS. Adhere the 2 1/4 x 4 1/4 inch Classic Christmas DSP to the front of the stamped 4 1/2 x 5 inch Whisper White CS.
I have found it very useful to cut the Foam Adhesive Sheets into 1/4 inch strips. To make the sentiment sturdy, I used 2 strips on the back, leaving space on the top so that the Fun Fold card can slide under the top of the oval.
Adhere the Fun Fold card so that a very small bit of the edge slides under the oval sentiment. You want it to be securely closed, but easy to open.
Adhere the embossed pine trees with Stampin’ Dimensionals or strips of the Foam Adhesive Sheet. Place one on each end, then add the middle pine tree.
This makes a very nice simple card. However, there is always Bling! that can be added to step it up a bit!
First I added a little sparkle to the trees with the Wink of Stella Glitter Brush. Unfortunately I could not get the sparkle to show up on the photos. In real life it looks very pretty and glistening.
Second, I added the Holiday Rhinestone Basic Jewels to add a little color and decorate the pine trees. I used the yellow rhinestone as a star on each tree, then used the red and green rhinestones for ornaments. Note: Use a toothpick or the Take Your Pick tool to easily move the rhinestones from the acetate to your card.
Viola! You have a unique festive Fun Fold Christmas card to send off!
Thank you for visiting Theresa’s Treasures Blog today. I am having so much fun with the 15-Day Christmas Card Challenge. I challenge you to do your own 15-Day Challenge and make your own cards!
I am on day 4 of my 15-Day Christmas Card Challenge! Today I have a gorgeous poinsettia card wishing a Merry Christmas!
The Poinsettia Petals stamp set and coordinating Poinsettia Dies create the perfect poinsettia for this card. The background has a Christmas Layers Die which is in the 2020-21 Stampin’ Up Annual Catalog. The Poinsettia Petals and Poinsettia Dies are in the 2020 Aug-Dec Mini Catalog.
Measurements: Very Vanilla CS card base: 4 1/4 x 11 inches with a score line at 5 1/2 inches; Very Vanilla CS: 3 7/8 x 5 1/8 inches, 7/8 x 3 1/4 inches, 5 x 5 inches and 4 x 6 inches; Mossy Meadow CS: 4 1/8 x 5 3/8 inches and 3 x 4 inches; and Real Red: 4 x 5 3/4 inches.
Warning: this blog is a little longer than usual so I can introduce some new products with some tips.
Stamp the sentiment ” Merry Christmas” in Mossy Meadow ink onto the 7/8 x 3 1/4 inch Very Vanilla CS. Set aside.
To make the background a little more interesting I stamped some small dots from the Gather Together stamp set in Real Red and in Mossy Meadow by Stamping Off first. Set aside.
To make it more simple to stamp all the pieces for the poinsettia, berries and leaves I used the Stamparatus. Tip: The Poinsettia Petals stamps are Photopolymer. In order to get a good image, it is helpful to use the Stamparatus Deluxe Foam Mat. The other option which I had used for quite awhile it to use the Stamparatus Foam Mat with a Silicone mat on top.
I placed the card stock I want to stamp on about 1 inch from the inner edge. Tip: If the stamp is too close to the inner edge it will not stamp all the way. Position the two leaves and the berries on one half of the 4 x 6 inch Very Vanilla CS. Trick: I wrapped my magnets in colorful duct tape with a little extra tab to grab onto. This makes it easier to pick the magnets up. It also prevents them from getting stuck together.
Apply Memento Black Ink to the stamps, close the panel and press firmly and evenly.
Turn the Very Vanilla CS and stamp onto the other side. As you can see, there is an area that did not get stamped on the upper right leaf. This is the beauty of the Stamparatus. Just apply more Memento ink, close the panel, press more firmly on the unstamped area, lift the panel and Viola! the problem area is fixed!
Using the second panel, position the three sizes of poinsettia on the 5 x 5 inch Very Vanilla CS. Repeat the process. Note: If you wanted to make, say 25 cards, that were all similar, this is the way to do it quickly. You just keep stamping until you have as many as you want. Can you tell I love my Stamparatus!
When I am done stamping I stamp onto a scrap paper to remove most of the ink. I then use my Simply Shammy moistened with water to clean the stamps. The Simply Shammy can be rinsed out although the ink does stain it a bit.
I used the Stampin’ Blends Alcohol Markers to color the poinsettia, leaves and berries. The colors I used were: Light & Dark: Cherry Cobbler, Real Red, Mossy Meadow and Old Olive. I used Light Mango Melody for the center of the poinsettia. For the berries I used the Bronze and Ivory. The images are cut with the Poinsettia Dies.
The leaves and petals of the poinsettia can be curved with the Bone Folder to add dimension to the card.
The last piece needed is the branch of leaves from the Christmas Layers Dies. I cut the branch into three smaller branches. Now we can put it all together.
Adhere the branches onto the stamped Very Vanilla CS card piece. Use a Stampin’ Dimensional on the center of the largest poinsettia and adhere it to the card piece. Add the berries. Since the petals of the poinsettia are not adhered, the berries slide right under the petals.
Use Stampin’ Dimensionals in the center of the two remaining poinsettias and adhere them to the first poinsettia. Adhere the leaves in place. Use Stampin’ Dimensionals to adhere the sentiment “Merry Christmas”.
Adhere the Cherry Cobbler CS to the front of the Very Vanilla CS card base, then adhere the Mossy Meadow CS. Finish the card by adhering the poinsettia panel to the card front.
Add a little sparkle with the Wink of Stella Glitter Brush.
Of course, I think the card needs a little more Bling! Add the Cherry Cobbler rhinestones that are in the Holiday Rhinestone Basic Jewels for a touch of sparkle in the background.
Viola! You have a gorgeous poinsettia card to wish someone a Merry Christmas!
Thanks for hanging in there today. This one was a little long. I wanted to be sure to introduce some new products and techniques with a few tips & tricks..
All of the products I used to create this card are pictured below. Select any photo to go to my Online Store and start shopping. If you have any questions, please send me an email at theresastreasures.az@gmail.com
I hope you give this one a try. It is a little bit of a challenge, but the end result gives a nice feeling of accomplishment. Have a great day and spend some quality time stamping soon!
Welcome to December! It finally got below freezing here in Arizona. It is still very sunny during the day, but Brrrr! Today I am showing a card made only with stamps, ink and paper- aka-#simplestamping.
The Winter Woods Stampin’ Up!® stamp set is in the 2020-21 Stampin’ Up! Annual Catalog on page 61. I love this set because I can create a serene scene with the magnificent trees in this awesome stamp set. And I love the sentiment!
Measurements: Whisper White Card Stock (CS) card base: 5 1/2 x 8 1/2 inches with a score line at 4 1/4 inches; Whisper White CS: 1 5/8 x 2 1/8 inches; Shaded Spruce CS: 4 x 5 1/4 inches and 1 3/4 x 2 1/4 inches; Soft Seafoam CS: 3 3/4 x 5 inches.
Start by stamping the group of trees in Shaded Spruce ink onto the 3 3/4 x 5 inch Soft Seafoam CS. Next stamp the large evergreen tree on the left side slightly covering the first group of trees. Tip: This is a red rubber stamp. You will get the best image by stamping on a smooth hard surface, like the top of a table.
Stamp another evergreen tree on the right-hand side, then without adding more ink, stamp under the bare trees on the left-hand side. Add some ink, stamp onto the scrap paper and then stamp onto the left-hand side slightly above the first evergreen tree. This technique is called Stamping Off and helps to give the tree line a 3D look. Stamp off a few more times to add more fullness under the bare trees on the right.
Stamp some of the smaller evergreen trees on the inside of the Whisper White CS card base in the bottom right-hand corner. Stamp off for one of the trees. Now stamp the sentiment “Thinking Of You This Season” onto the 1 5/8 x 2 1/8 inch Whisper White CS. Stamp two of the pine branches under the sentiment.
Adhere the sentiment to the 1 3/4 x 2 1/4 inch Shaded Spruce CS. Adhere the Soft Seafoam CS with the trees stamped on it to the 4 x 5 1/4 inch Shaded Spruce CS, then adhere it to the front of the Whisper White CS card base.
Use Stampin’ Dimensionals to adhere the sentiment card piece to the card front.
Viola! You have a fabulous seasonal card to let someone know you are thinking of them! And all you needed was stamps, ink and paper!
However, I will show you a few other options for this card if you feel it needs a little Bling! Bling! is my thing!
You could add a few of the Red Rhinestone Basic Jewels to the branches.
You could also use the Rhinestone Basic Jewels to add some stars in the sky. No matter which version you send, you will be spreading some Holiday Cheer!
Thanks for stopping by today! I really appreciate all the wonderful comments! A big thank you to all of you who placed an order.
Select any photo below to connect with my Online Store and start shopping!
This fun fall card is made with the Triple Stamping Technique which I first learned from my stamping friend Karen Bouchikas about 8 years ago. This card is CASE’d from one of the first cards I ever made. It is super easy and looks super complicated! And- this card is so versatile!
Measurements: Cajun Craze Card Stock (CS): 5 1/2 x 8 1/2 inches with a score line at 4 1/4 inches; Very Vanilla CS: two 4 x 5 1/4 inches, 3 1/4 x 4 1/4 inches and 2 x 3 1/4 inches; Pumpkin Pie CS: 3 1/2 x 4 1/2 inches; and Mango Melody CS: 2 1/4 x 3 1/2 inches. You will also need 5 inches of the Vanilla Open Weave Ribbon from the Forever Greenery Trim Combo Pack in the 2020-21 Stampin’ Up!® Annual Catalog.
Take the 3 different sizes of Very Vanilla CS and layer them. You can hold them in place with a wee bit of repositional adhesive tape. We are using the Photopolymer stamps so you will need the Stampin’ Pierce mat or a catalog.
Stamp the large solid flower in the Floral Essence Stamp Set in Cajun Craze ink onto the righthand side in the middle. Next stamp the small solid flower in the upper left and lower left corners. Do not worry about the blank spots on the flowers near the edges of the layers. This will not be visible later.
Using the Mango Melody ink and the large bunch of leaves in the Forever Greenery Stamp Set, Stamp Off first, then stamp onto the card pieces. There will be a ribbon at the level of the large solid flower, so you may stamp the leaves so the ends of the stems will be covered by the ribbon. Stamp Off the smaller bunch of leaves using the Daffodil Delight ink before stamping on your card pieces. Fill in the open spaces with the smaller leaves.
Separate the three card pieces. Leave the 4 x 5 1/4 inch Very Vanilla CS piece. Stamp another large solid flower in the Cajun Craze ink in the middle.
Carefully cut the large solid flower out of the center. Just cut in the center so you can use this piece for the final card. Fussy cut the flower.
Stamp the centers of the flowers in Daffodil Delight ink.
Stamp Off the large bunch of leaves using the Mango Melody ink and stamp the righthand border of the second 4 x 5 1/4 inch Very Vanilla CS. Next Stamp Off the smaller bunch of leaves with the Daffodil Delight ink and stamp the borders of the large bunch of leaves. This is the inside of the card.
Adhere the inside card piece to the inside of the Cajun Craze CS card base. Use your Bone Folder to make a crisp fold at the 4 1/4 inch score line on the Cajun Craze CS card base.
Adhere the smaller card pieces to the corresponding colored card stock.
Adhere the Very Vanilla Open Weave Ribbon to the back of the right side of the smaller layer, the Mango Melody card piece, with a Mini Glue Dot.
Adhere the Mango Melody CS card piece with the ribbon on it, to the Pumpkin Pie CS layer, and finally to the 4 x 5 1/4 inch Very Vanilla CS card piece. Bring the ribbon over the the left hand side.
Wrap the ribbon around to the back of the left hand side and adhere it with a Mini Glue Dot.
Now adhere all the layers to the front of the Cajun Craze CS card base.
We are going to add a little dimension by using the Stampin’ Dimensionals on the back of the flower we cut out. Adhere this flower over the stamped flower.
Viola! Now you have made a super beautiful fall card! You can add any sentiment you want- Happy Thanksgiving, Thanks, Happy Birthday, I Love You, or any other sentiment you would like to send!
I am so grateful you have stopped by today. Please let me know what you think about this card. I appreciate your comments.
Have a most wonderful Friday! Try to get some crafting done this weekend. You will be surprised how uplifting crafting can be! Going back to work on Monday may not seem as bad.
Hello fellow stampers and crafters! Today I have a darling little note card made with the versatile Floral Essence Stampin’ Up! stamp set using the Spotlight Technique. These note cards are 4 x 4 inches when complete and could be used at place settings for the Thanksgiving meal (assuming that is possible this year!). Note: This card is CASE’d from Shannon West’s presentation during our recent Onstage Convention.
I am using two exceptional stamp sets: Floral Essence and A Wish For Everything. Why are they exceptional? There are endless possibilities for the beginner stamper to use the flowers in the Floral Essence stamp set, depending on the color of ink and paper chosen. Purple, pink, and yellow for Spring; bolder brighter colors for Summer; and red/green or blue/white for Winter. The colors chosen for today’s card are Fall colors. The words in the “A Wish For Everything” cover, well, just about everything a beginner would need.
Measurements: Cinnamon Cider Card Stock (CS): 4 x 8 inches with a score line at 4 inches; Very Vanilla CS: 3 3/4 x 3 3/4 inches, 2 3/4 x 3 7/8 inches and 1 x 4 inches; In Good Taste Designer Series Paper (DSP): 3 7/8 x 3 7/8 inches.
You will also need: Cinnamon Cider, Bumblebee and Just Jade ink, Champagne Rhinestone Basic Jewels, the Classic Label Punch, the 2-inch Circle Punch and the Metallic Ribbon from the Basket Weave & Metallic Ribbon Combo pack. All products are found in the 2020-21 Stampin’ Up!® Annual Catalog except the Metallic Ribbon which is on page 45 of the 2020 Stampin’ UP!® Aug-Dec Mini Catalog.
Let’s get stamping!
Use the Cinnamon Cider ink to stamp the largest solid flower slightly right of center. Be mindful of the upper border of the flower as you want it to be 1/4 inch from the top. Use the Bumblebee ink to stamp the smaller solid flower on either side as shown. Tip: The Floral Essence stamps are Photopolymer, or see-through stamps. You get the best image if you stamp on something with a little “give” to it. I am using the Stampin’ Pierce mat, covered in white scrap paper. You may also try using your catalog.
Use the Bumblebee ink to stamp the center of the large solid flower. There is a different center stamp for the smaller solid flower. Stamping off Technique: stamp once onto scrap paper before stamping the center of the smaller solid flower onto your card. This will result in the center of the smaller solid flower being a little lighter than the flower itself.
Stamp the stems in Just Jade ink. I did turn the stamp upside down to stamp the stem for the Bumblebee flower to the left. I stamped twice to get the stem for the Bumblebee flower on the right. Add the leaves.
You may fill in the open space by stamping a few leaves using the single leaf stamp.
Use the Cinnamon Cider ink to stamp a large solid flower off to the right side of the 3 3/4 x 3 3/4 inch Very Vanilla CS. This will be the inside of your card, so leave a little space for writing. While you have the Cinnamon Cider handy, stamp the sentiment “Happy Thanksgiving” onto the 1 x 4 inch Very Vanilla CS strip. Note: The sentiment is a Red Rubber stamp. You do not need the extra padding. The image for the red rubber comes out with more clarity when stamped on a hard surface. I just forgot to take the Stampin’ Pierce Mat away.
With Bumblebee ink stamp two more small solid flowers on the inside of the card. Stamp the center of the Cinnamon Cider flower. When stamping the center for the Bumblebee flowers remember to stamp off first. Add the stems and leaves in Just Jade ink.
Spotlight Technique: Use the 2 inch circle punch to punch out the Cinnamon Cider flower. I turned my card 180 degrees and put the punch upside down on the craft table so that I could see what I was punching. I wanted the edge of the circle to be 1/4 inch down from the top of the card piece.
Here is the end result.
Use a Mini Glue Dot to adhere the Metallic Ribbon to the back of the card piece you just punched.
Use a Bone Folder to fold the 4 x 8 inch Cinnamon Cider CS card base at the 4 inch score line. The Bone Folder makes a nice crisp fold. Adhere the inside panel of your card.
Adhere the 3 7/8 x 3 7/8 inch In Good Taste DSP to the card front. Now adhere the punched out card piece.
Apply Stampin’ Dimensionals or strips of the Foam Adhesive Sheets and adhere the punched out circle to the card front to complete the Spotlight Technique. Tip: I have been using the Foam Adhesive Sheets in place of the Stampin’ Dimensionals. I have had a joint fusion in my right index finger. The thumb and index finger no longer come together so it makes peeling off the small hexagonal backing of the Stampin’ Dimensionals a challenge. I found that if I cut the Foam Adhesive Sheets into 1/4 inch strips, I can use those which make peeling the backing off a bit easier.
Use a Mini Glue Dot to adhere the bow, and a Stampin’ Dimensional to adhere the sentiment. This little note card looks great, but I think we need some Bling!
The Champagne Rhinestone Basic Jewels match perfectly! That is one remarkable point regarding Stampin’ Up! products-everything matches! Each color of card stock has coordinating ink. Some colors also have matching ribbon or embellishments! In this case the Cinnamon Cider coordinates with the Metallic Ribbon, the DSP, the Cinnamon Cider ink and the Champagne Rhinestones! Anyhow, I digress. The Take Your Pick tool helps to easily transfer the tiny rhinestones to your card.
Viola! You have a darling little note card to wish someone a Happy Thanksgiving!
Thanks for joining me today. I hope you can find some time to do some crafting. If you ever have any questions, especially if you are hung up on a project, shoot me an email and I will do my best to help you sort it out. My email is: thereastreasures.az@gmail.com.
If you are in need of any product, click on any photo below to go to my online store. Let me know if I can help you narrow down your wish list to a shopping list. The Holidays will be here before you know it. It’s a great time to purchase product to make your cards. You can also get to my online store by clickingHERE.
Thank you for joining me for our Stampin’ Up!® Demonstrator Monthly Team Blog Hop! I am so happy that you could join us today for this blog hop to get ideas and creative inspiration. We are a group of Stampin’ Up!® Demonstrators from around the world that are taking part in training that is helping us to build a successful Stampin’ Up!® business and reach some goals we have set. I really appreciate your support.
You may be starting here at Theresa’s Treasures or have come from another blog – either way you can find the link list at the bottom of this post so that you can see every blog post and idea today. Enjoy!
The theme for the cards today is: Thank You. I have many customers who support me and I like to send out a Thank You card every once in awhile. The following set of cards is for my awesome customers.
I must admit that I was not a fan of any plaid. However, I really like the plaid in the Plaid Tidings Designer Series Paper. I used the Old World Paper 3D Embossing Folder to make the Whisper White card stock background.
Tip for arthritic hands: I have a difficult time with the Stampin’ Dimensionals due to mobility problems from arthritic changes in my fingers. I found that if I cut the Foam Adhesive Sheets into 1/4 inch strips I can use them on the back of labels and such. This is so much easier to peel off than those hexagonal Dimensionals!
The sentiment “I Can’t Thank You Enough” is from the So Sentimental stamp set. The dies are from Stitched So Sweetly. I hand-colored the Whisper White Crinkled Seam Binding Ribbon to match the color of the card stock. Be sure to heat set, otherwise you get very inky fingers!
I have the cards open in two different ways to add variety to the Thank You notes.
“I can’t thank you enough” for stopping by today.
There is an amazing line up of Stampin’ Up!® demonstrators from around the world that are working hard to learn how to be even more successful. I know you are going to love seeing all the amazing projects today. Be sure you comment and show them some love so they keep creating and sharing fantastic ideas for us all.
Don’t miss one blog link. Remember you are currently on my page – Theresa McEntee-Theresa’s Treasures. See who is below me to know where to go next.