Posted in 2021-2022 Stampin' Up! Annual Catalog, Designer Series Paper, Fun/Fancy fold card, Gratitude/ Thanks, Mystery Stamping

Fun Fold Friday- Stampin’ Up!® Artistically Inked Thank You Card

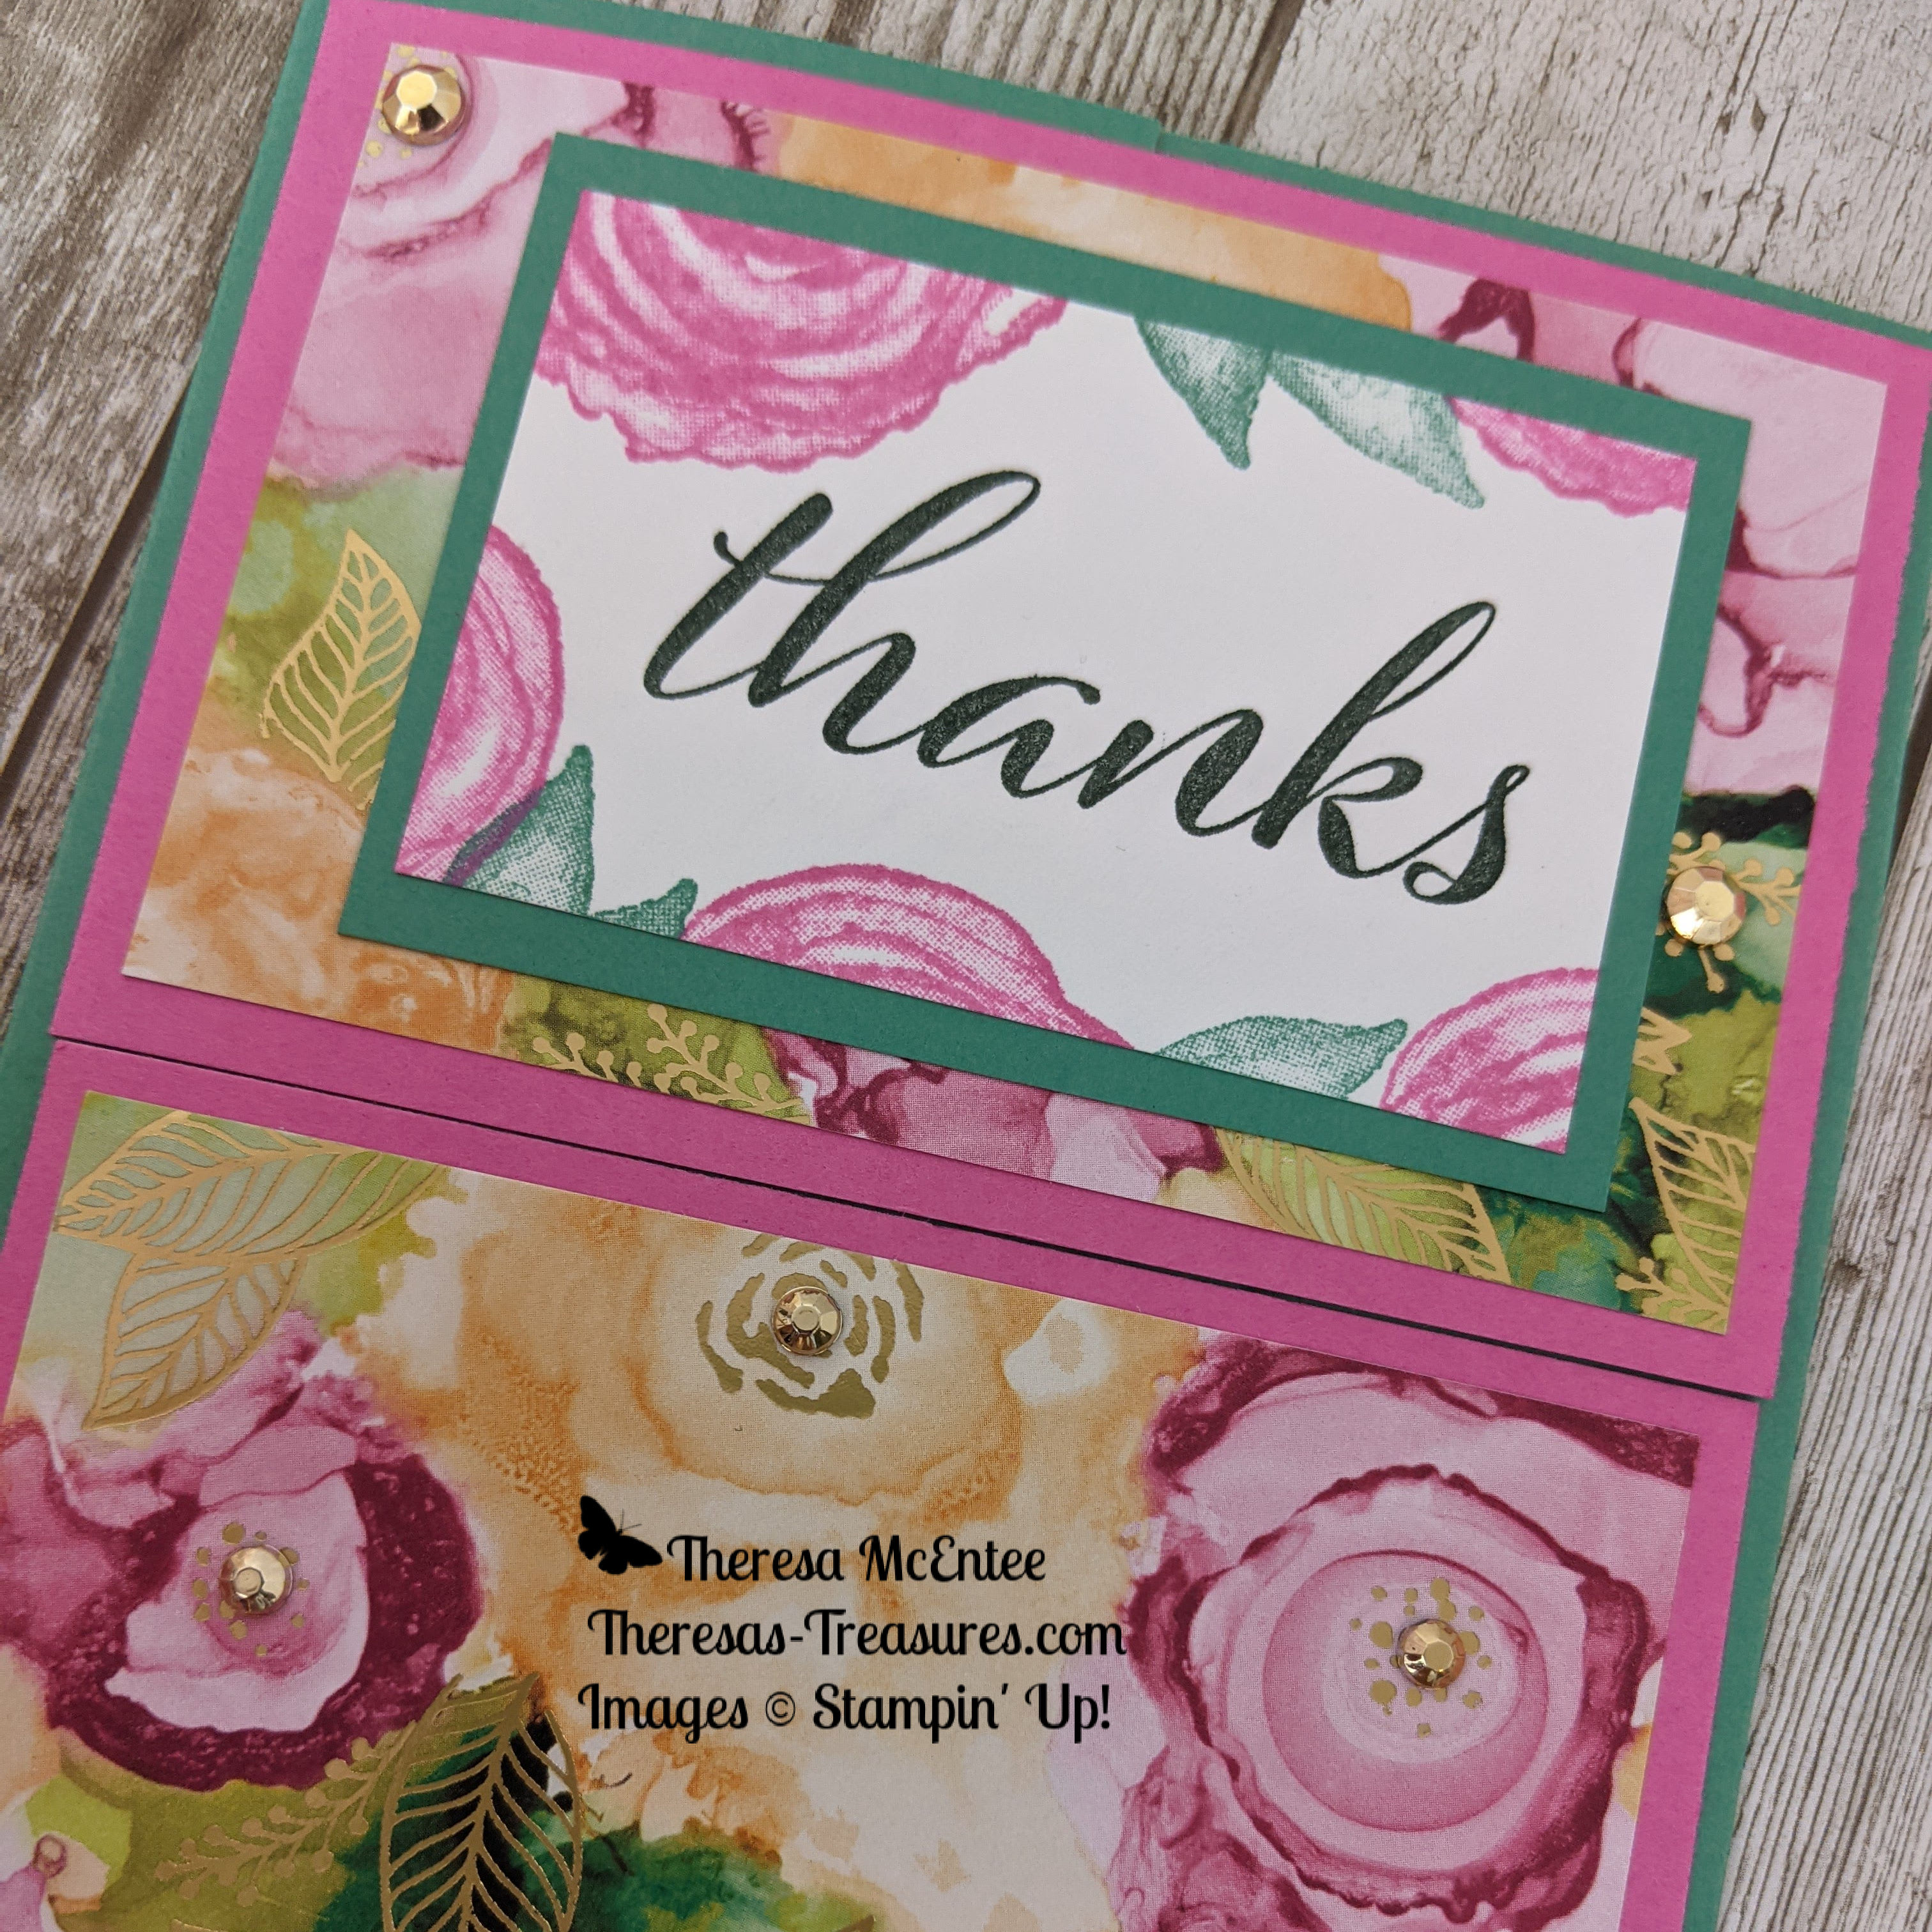
Join me today to make this gorgeous Artistically Inked Thank You card!

It is gradually getting cooler here in Arizona, but I am not quite ready to show Christmas cards yet. Today I have a Fun Fold that I had my Stamping Gems Team members make as a Mystery Stamping activity.

Fun Fold Friday is on!

Mystery Stamping is a fun way to make cards together. You give the clues one by one. Each person picks the paper and stamp set they want to use. All of the cards are uniquely different. Usually you do not show the finished card until the end.

Clue #1 Supplies

  1. Color Card Stock (CS) Color A: 8 1/2 x 5 1/2 inches with score lines at 2 1/8 and 6 3/8 inches. (This is the card base and it is in portrait orientation.) You also need a 3 x 2 inch piece.
  2. Color CS Color B: choose a color to coordinate with Color A. Two 4 x 2 5/8 inches.
  3. Designer Series Paper (DSP) to coordinate with the Color A and Color B CS. Two 3 3/4 x 2 3/8 inches.
  4. Basic White CS: 2 3/4 x 1 3/4 inches and 5 1/4 x 4 inches.
  5. A sentiment stamp to fit inside the 2 3/4 x 1 3/4 inch Basic White CS card piece.
  6. Images to make a border around the sentiment and the inside of the card.
  7. Coordinating ink, embellishments, adhesive and Stampin’ Dimensionals.

Clue #2

Stamp your sentiment onto the 2 3/4 x 1 3/4 inch Basic White CS. Stamp images around the sentiment.

Clue #3

Stamp the images around the outside edge of the 5 1/4 x 4 inch Basic White CS. Leave the center blank so one could write a note.

Clue #4

Adhere the sentiment to the 3 x 2 inch Color A CS. Adhere the 5 1/4 x 4 inch Basic White CS to the center panel of the 8 1/2 x 5 1/2 inch Color A CS.

Clue #5

Adhere the DSP to the Color B CS. Repeat for the other pieces. You should have two identical card pieces.

Clue #6

Bring the 2 side panels together so they meet in the center of the card. Apply adhesive to the back of the left half of one of the card pieces with the DSP on it. Adhere this to the top of the left-hand panel. Now apply adhesive to the back of the right side of the second DSP card piece. Adhere it to the bottom of the right-hand panel.

Clue # 7

Use Stampin’ Dimensionals to adhere the sentiment to the center of the upper DSP card piece.

Clue #8

Use embellishments as desired.

Voila! That is the Mystery Stamping Fun Fold using the Artistically Inked stamp set and Expressions in Ink DSP! The Mystery Stamping is a really fun way for my Stamping Gems Team and me to stamp together as part of our monthly team meeting.

Product List

I hope you have some time to do some crafting this weekend! I find stamping and card making is so peaceful and relaxing.

Bye for now!

Theresa

Posted in 2021 Stampin' Up! July-December Mini Catalog, 2021-2022 Stampin' Up! Annual Catalog, Slim Line Cards, Snow, Snowflakes

Stampin’ Up!® Wonderful Snowflakes Season’s Greetings

Although I am not quite ready for Christmas cards, I couldn’t resist using the Wonderful Snowflakes as part of my card for The Paper Players Color Challenge PP567.

Here is my card:

This is a Slim Line card. The card base measures 8 1/2 x 7 inches with a score line at 3 1/2 inches. The scalloped rectangle in the background is not a Stampin’ Up! product, but I hear tell that there are some Slim Line Dies in the upcoming Stampin’ Up! 2022 Jan-June Mini Catalog!

The Wonderful Snowflakes are iridescent! The greeting from the Christmas To Remember stamp set is embossed with Silver Emboss Powder. The embossed snowflakes behind the sentiment are from the Time of Giving stamp set. The ribbon is the White 1/4 inch Crinkled Seam Binding in the Stampin’ Up! 2021-22 Annual Catalog.

I added a lot of Bling! using the Rhinestone Basic Jewels. There are 16 rhinestones on this card!

I love to enter The Paper Player Challenges because I need to push myself to imagine and think outside of my usual modus operandi. I find that I create cards in a new and exciting way.

Voila! That is it for today! Thanks for stopping by. Stop by The Paper Players and see the other entries to the Color Challenge PP567 HERE

Have a most wonderful day!

Theresa

Posted in 2021-2022 Stampin' Up! Annual Catalog

Stampin’ Up!® 24 Hour Flash Sale tomorrow!

Great News

Great news! There is a Stampin’ Up!® 24 Hour Flash Sale tomorrow, October 20, 2021, of 15% off cling stamps* in the 2021-22 Stampin’ Up! Annual Catalog!! You can stock up on your favorite stamp sets! Also consider gifts for the upcoming Holidays!

Cling Stamps on Sale

Click on the banner to see the PDF of the cling stamp sets included in the 24 Hour 15% off sale on Wednesday, October 20, 2021!

*Excludes Host Sets

Shop Now

Click HERE to shop now at my Online Store!

Happy shopping!

Theresa

Posted in 2021-2022 Stampin' Up! Annual Catalog, Gratitude/ Thanks, Mystery Stamping

Bruno and Kylie Bertucci’s Demonstrator Training Program Blog Hop- October 2021 Mystery Stamping Thank You Card*

I have an exciting card to share for Bruno and Kylie’s Demonstrator Training Blog Hop today that was a Mystery Stamping I participated in. I will explain more about that in a minute.

Thank you for joining me today for our Stampin’ Up!® Demonstrator Training Program Monthly Blog Hop! The Demonstrator Training Program is for Stampin’ Up! Demonstrators all over the world who are working towards bettering their business. Be sure to visit all the blogs and see all the different Thank You cards from around the world! I know you will get lots of ideas and creative inspiration! If you wish to become a Stampin’ up! Demonstrator please let me know by commenting on this post or sending me an email at theresastreasures.az@gmail.com Now for the card:

Mystery Stamping is when you are given the measurements for the pieces and then you get “clues” on how to put the card together without knowing what the card looks like. So fun!!

*This card is compliments of Lorraine Masters-Green, who I believe got the idea from Sharon Armstrong.

Clue #1 Card Recipe & Supplies:

1. Colored Card Stock (CS) Color A (ex. Misty Moonlight): 8 1/2 x 5 1/2 inches with a score at 4 1/4 inches, 4 x 5 1/4 inches, and 2 1/8 x 2 1/8 inches.

2. Colored CS Color B (ex. Just Jade): 3 1/2 x 3 1/2 inches

3. Basic White CS: 3 1/4 inches x 3 1/4 inches, and a scrap for the sentiment and image.

4. Designer Series Paper (DSP): 5 coordinating pieces 1 x 1 inch (can be different or 2 of one pattern and 3 of another). My DSP is from the Pattern Party DSP in the Annual Catalog.

5. Sentiment stamp and punch or die to cut it out.

6. Image stamp or dies to cut an image from DSP to fit on 2 1/8 x 2 1/8 inch Color A CS piece. I used Simply Succulents for my image and my sentiment.

7. Ink, embossing folder, adhesive, dimensionals. and embellishments.

Clue # 2- The card is in a portrait orientation.

The remaining clues are the directions on how to put the pieces together. The fun part is that you don’t know what the card is supposed to look like until you are done! It is a blast!

If you need the remaining clues for this card, just leave a comment or send me an email and I will send them to you.

Voila! After you follow all of the clues you have a fun Thank You card. Since I had so much fun making this card, I decided to use it as a thank you note to my September customers.

Be sure to click on the next person in line to see more amazing cards. You are at Theresa McEntee-Theresa’s Treasures-USA

Product List

Thanks for stopping by today! Have a great day!

Theresa

Posted in 2021-2022 Stampin' Up! Annual Catalog, Gratitude/ Thanks, Nature

Kylie’s Stampin’ Up!® International Blog Highlights Gallery- October 2021- Love of Leaves and Color & Contour Fall Thank You card

Hello and welcome to Theresa’s Treasures Paper Crafts today! I have a beautiful fall card made with Stampin’ Up!® Love of Leaves and Color & Contour stamp sets. Stampin’ Up! has several colors that are perfect for fall! You will find everything you need in the Stampin’ Up! 2021-2022 Annual Catalog.

Today I am taking part in Kylie Bertucci’s Monthly International Blog Highlights Gallery. The theme is- Thank You. In this gallery, you can see thank you cards made by people from all over the world! I hope you enjoy my card and take the time to see everyone else’s inspiring creations by visiting the gallery. You can get to the gallery by selecting the Vote For Me button at the end of this blog. Please stop by and vote for my card.

I am Theresa and I am a Stampin’ Up!® Demonstrator in Arizona, USA. If you do not have a Stampin’ Up! Demonstrator, live in the US, and would like a copy of the catalog, please send a request to my email: theresastreasures.az@gmail.com. I would love to help you get started on stamping and making you own cards!

Making the card-Stamping

The first step in making this card is to stamp all of the leaves from the Love of Leaves stamp set onto Basic White Card Stock (CS). The Stampin’ Up! ink colors for the leaves are: Granny Apple Green, Mango Melody and Cajun Craze. Next stamp the flowers from the Color & Contour stamp set onto Basic White CS. The outline of the flowers is inked in Cajun Craze. The flower color is Mango Melody.

Coordinating Dies

Now you can use the coordinating dies for the Love of Leaves stamp set- the Stitched Leaves Dies. These dies both cut and emboss! You can see the embossed stitching on each of the leaves. The upper edge of the background is embossed with one of the dies in this set.

To make the flowers more 3D, I used the round end of the cap on the Take Your Pick Tool to apply gentle pressure to the back of the flowers. This makes them more puffy.

Arranging the Pieces

Now that you have all the pieces, you can arrange them how you like. First adhere the Mango Melody background onto a Cajun Craze CS card base. Lay the leaves down on the card front first until you like the look. Then add the flowers. Next, adhere everything in place. Add the Genial Gems as desired to the flower center for extra sparkle.

The sentiment is stamped in Cajun Craze ink onto a 1/2 inch Basic White CS strip. Add the sentiment to your card.

Voila! You have a beautiful fall Thank You card! Feel free to decorate the inside of the card too!

Voting

Your vote is very much appreciated. Please select the button below and you will be directed to the Blog Highlight Gallery.

Supplies

Product List

Thank you for coming by!

Theresa

Posted in 2021-2022 Stampin' Up! Annual Catalog, Gratitude/ Thanks, Techniques

Bruno and Kylie Bertucci’s Demonstrator Training Program Blog Hop- September 2021 Thank You Cards with the Alcohol Technique

Thank you for joining me today for our Stampin’ Up!® Demonstrator Training Program Monthly Blog Hop! I am so excited to show you a Thank You card made using the Alcohol Technique with the Stampin’ Blends Alcohol Markers by Stampin’ Up!®. The markers are available in the 2021-22 Stampin’ Up! Annual Catalog. Be sure to visit all the blogs and see all the different Thank You cards from around the world! I know you will get lots of ideas and creative inspiration!

The theme for the cards today is: Thank You. I am so grateful to have customers who support me. The following set of cards is for my fabulous customers who ordered during the last 3 months.

The Alcohol Technique with the Stampin’ Blends Alcohol Markers is so much fun! My sister was visiting and I let her try it. She had a ball! This card is made with Bermuda Bay and Night of Navy. This card is a regular A2 size card. I will not be describing the technique here, I did describe it in detail on my blog from September 6, 2021. The sentiment label comes from the Tasteful Labels Dies.

I will show you a lot of examples of my thank you cards. I used 2 stamp sets for the “Thank You” sentiment. The larger “Thank You” is from the Sweet Ice Cream stamp set. The small “Thanks” is in the From All Of Us stamp set. These cards are all from the Basic White Notecards and Envelopes #159232. Colors used include: Fresh Freesia with Blackberry Bliss, Misty Moonlight with Night of Navy and Rich Razzleberry alone (I just realized the Rich Razzleberry is retired, sorry).

These are both note cards as well. The one on the left is with Bermuda Bay and Misty Moonlight. The card on the right is with Blackberry Bliss and Rich Razzleberry.

I used the Stitched Triangle Dies to create the notecard on the right. Misty Moonlight and Night of Navy help create the card on the right.

So as you can see, each time you do the Alcohol Technique is turns out to be unique!

Thanks for stopping by Theresa’s Treasures. Look through the list below to see who is next in line for the Blog Hop.

Supplies

Product List

Happy Stamping!

Theresa

Posted in 2021 Stampin' Up! July-December Mini Catalog, 2021-2022 Stampin' Up! Annual Catalog, Designer Series Paper, Gratitude/ Thanks, Nature, Punch, Punch Art

Kylie’s Stampin’ Up!® International Blog Highlights Gallery- September 2021- Daisy Punch Fall Thank You card

Welcome to Theresa’s Treasures today for my Daisy Punch Fall Thank You card. I am using the Daisy and Medium Daisy Punches along with the rich colors in the Regals Designer Series Paper stack. All of these products are available for purchase in the 2021-2022 Stampin’ Up! Annual Catalog.

I am Theresa and I am a Stampin’ Up!® Demonstrator in Arizona, USA. If you do not have a Stampin’ Up! Demonstrator, live in the US, and would like a copy of the catalog, please send a request to my email: theresastreasures.az@gmail.com. I would love to help you get started on stamping and making you own cards!

Today I am taking part in Kylie Bertucci’s Monthly International Blog Highlights Gallery. The theme is- Thank You. On this gallery, you can see thank you cards made by people from all over the world! I hope you enjoy my card and take the time to see everyone else’s inspiring creations by visiting the gallery. You can get to the gallery by selecting the “Vote For Me” button at the end of this blog. Please remember to vote for my card!

About the Daisy Punch Fall Thank You card

Fall is one of my favorite times of year. I just love all of the rich colors which inspired me to make this Daisy Punch Fall Thank You card. I made this card with the following Stampin’ Up! colors: Cajun Craze, Pumpkin Pie, Crushed Curry and Old Olive. The Regals Designer Series Paper Stack which contains all of these colors is great for the background. The strips each measure 3/8 inch in width.

You also will see several embellishments I used to make the Daisy Punch Fall Thank You card extra special. The vintage Diamond Weave Ribbon #156507 and the Brushed Metallic Dots #156506 can be found in the 2021 Stampin Up! July-December Mini Catalog. The colorful sequins are from the Artistry Blooms Adhesive-Backed Sequins #152477 and can be found in the Stampin’ Up! 2021-2022 Annual Catalog.

Voila! Such a lovely combination of fall colors in this Daisy Punch Fall Thank You card!

Please vote for my card when you visit the Gallery by selecting the “Vote For Me” button below. Thank you!

Supplies

Select any photo to be directed to my Online Store.

Product List

Thanks for visiting! Happy stamping!

Theresa

Posted in 2021-2022 Stampin' Up! Annual Catalog, Animals, Blends Alcohol Technique, Guys cards, Sea, Techniques

Cardz4Guyz Challenge #278- Things With Tails and Stampin’ Up!® Turtle Friends with the Stampin’ Blends Alcohol Technique

I have such an exciting and fun card to share today! The cute Turtle Friends stamp set and Turtle Punch come together with the Stampin’ Blends Alcohol Technique for this cute card.

Stampin’ Blends Alcohol Technique

What you will need to do this technique is 99% Isopropyl Alcohol, a plastic dish for the alcohol, a paint brush, a straw, vellum card stock and the Stampin’ Blends Alcohol Markers. I recommend the Stampin’ Up! brand of vellum because it is thicker than the other brand I tried. The thicker vellum doesn’t curl as much when it dries.

I cut my vellum card stock to 4 1/4 x 5 1/2 inches. Using a light, medium and dark color of Stampin’ Blends Marker, I randomly colored in blotches to fill the paper. Here I am using Dark Fresh Freesia, Dark Highland Heather and Dark Blackberry Bliss. (For the turtle card, I used Dark Pool Party, Dark Bermuda Bay and Dark Misty Moonlight Stampin’ Blends Alcohol Markers.)

I filled in the spaces for this piece with the Dark Misty Moonlight. Next, dip the paint brush in the dish with the alcohol in it, and then dab it onto the vellum card stock. You can blow through the straw to help the alcohol spread, making neat patterns with the ink. I used my Stampin’ Up! Heat Tool to spread the alcohol and also to dry it. Use the low setting so you don’t melt the vellum.

When the vellum card stock is dried, use a glue stick or spread the Tombow Multipurpose Liquid Glue in a thin continuous layer on the back. Adhere to a piece of Basic White Card Stock. Now you just get the other basic pieces for a card together and Viola! you have a fun and cool card!

Back to the Turtle Card

The Scalloped Contour Dies make the waves on the Vellum Alcohol Technique card piece, as well as on a 5 x 1 1/2 inch Misty Moonlight Card Stock piece. These were adhered together slightly layered, then adhered to a 5 x 3 3/4 inch Pool Party Card Stock embossed with the Painted Texture 3D Embossing Folder. Next, the Pool Party card piece was adhered to the 5 1/4 x 4 inch Misty Moonlight Card Stock. To finish, adhere the Misty Moonlight/Pool Party card piece to the front of a 5 1/2 x 8 1/2 inch Basic White Card Stock card base.

Now for the turtles. The images were stamped onto Basic White Card Stock in Memento ink and colored with Stampin’ Blends Alcohol Markers in Dark Pool Party, Light Bermuda Bay and Light Misty Moonlight. Bermuda Bay ink was used to stamp the turtle’s shell. The little bird and the “Happy Birthday” sentiment were stamped in Misty Moonlight ink. I used a scrap of the Alcohol Technique card piece on the inside.

Add a few blue rhinestones from the Holiday Basic Rhinestone Jewels and Voila! You have a fun and cute birthday card for your favorite little guy!

Thanks for stopping by today. Please visit the Cardz4Guyz blog to see other great card ideas with the theme # 278-Things With Tails.

Supplies

Click on any photo to be connected with my online store.

Product List

Happy Stamping!

Theresa

Posted in 2021-2022 Stampin' Up! Annual Catalog, Emboss Powder, Gratitude/ Thanks, Nature, Stampin" Blends Alcohol Markers, Techniques

Thank You Card for Bruno and Kylie Bertucci’s Demonstrator Training Program Blog Hop- August 2021 with Daisy Garden by Stampin’ Up!®

Thank you for joining me today for our Stampin’ Up!® Demonstrator Training Program Monthly Blog Hop! I am so excited to show you a Thank You card made with product from the 2021-2022 Stampin’ Up! Annual Catalog! Be sure to visit all the blogs and see all the different Thank You cards from around the world! I know you will get lots of ideas and creative inspiration!

The theme for the cards today is: Thank You. I am grateful to have customers who support me and I send them a Thank You card every once in awhile. The following set of cards is for my fabulous customers who ordered during the summer.

I really enjoyed making this card using Embossing and the Stampin’ Blends Alcohol Markers.

Embossing

I chose the Evening Evergreen Card Stock as my background because I wanted a nice contrast. The first step is to stamp the Daisy Garden stamp onto the Evening Evergreen CS with Versamark ink and use the White Emboss Powder. Be sure to let the powder cool after using the Heat Tool. You don’t want the melted Emboss Powder to smear when you try to color the daisies. I ended up just coloring the flowers. When I colored the stems, it did not really show up well.

Coloring

This is a close up of my coloring. I applied the Light Polished Pink Stampin’ Blend Alcohol Markers to the entire flower. Then I used the Dark Polished Pink around the center of the flowers. I used the Light Polished Pink again to blend the colors together.

I experimented with several different colors for these daisies.

The sentiment is from the Celebrate Sunflowers stamp set.

Voila! You have a fairly quick and simple Thank You card.

Thanks for stopping by Theresa’s Treasures. Look through the list below to see who is next in line for the Blog Hop.

Product List

Thank you and have a wonderful day!

Theresa

Posted in 2021-2022 Stampin' Up! Annual Catalog, Designer Series Paper, Gratitude/ Thanks, Guys cards, Nature, Outdoors

Cardz4Guyz Challenge #276- Shades of Blue- Very Easy Masculine Card

This card shows a breathtaking scene that is very easy to create for the Cardz4Guyz Challenge #276-Shades of Blue. The scene is from the Beauty of the Earth Designer Series Paper from the 2021-22 Annual Stampin’ Up Catalog. The sentiment is from the Shaded Summer stamp set.

The completed scene is created by using the Evergreen Border Punch and the Majestic Mountain Dies. So simple!

This is such a great card to give to thank the man in your life for going above and beyond for you.

Thanks for visiting today! Be sure to check out the rest of the entries for this challenge at http://cardz4guyz.blogspot.com.

Theresa
