
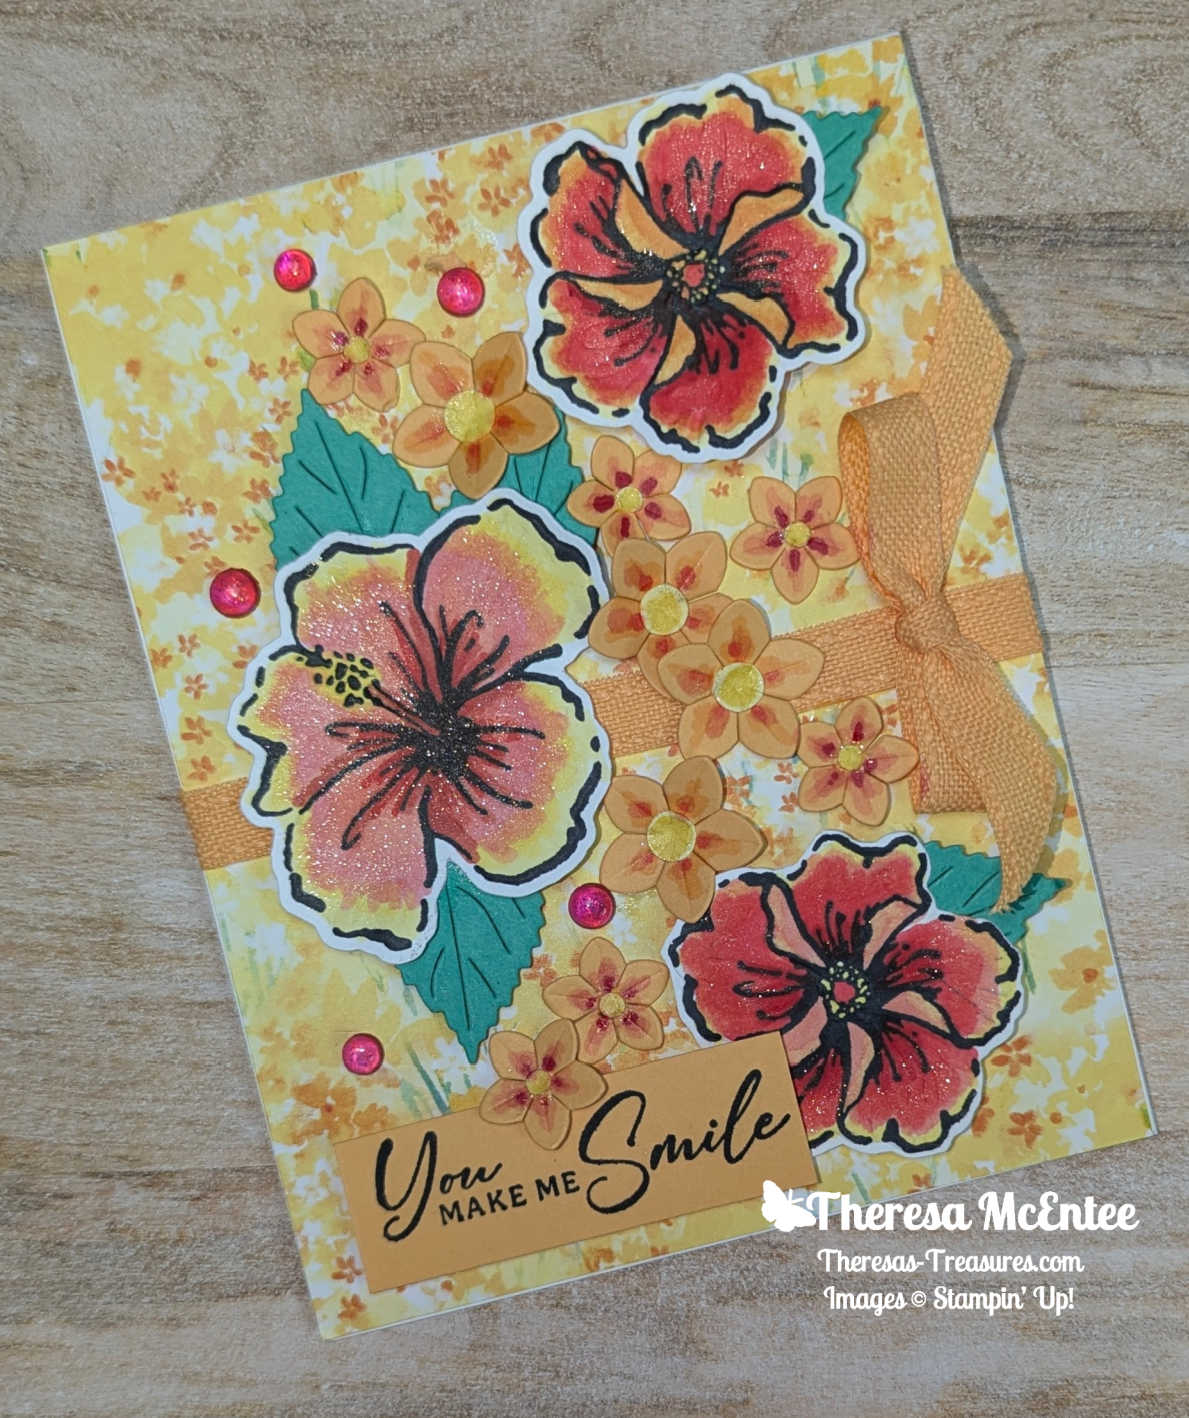

Hello fellow stampers! I am Theresa McEntee-author of Theresa’s Treasures Paper Crafts Blog. Today I am hopping along with the Ink & Inspiration Blog Hop Demonstrators with my Happy Hibiscus card. It is the last hop of 2024! You can visit super awesome blogs from around the world! The list to join the hop is at the end of my blog post. Please stop by and see everyone’s projects!


Some of the Stampin’ Up! products I used for this colorful card are a sneak peek of what is in the 2025 January to April Mini Catalog! Specifically, the Bloom Impression 12″ x 12″ Designer Series Paper and Sunny Day Iridescent Dots which will be available for purchase on January 7, 2025! If you are in need of a catalog, be sure to let me know in the comments.


This month the Ink & Inspiration Challenge is a Sketch challenge. I was inspired by the sketch and wanted to use something other than the square and rectangle shapes. I chose the Happy Hibiscus Bundle from the Online Exclusives since the flowers were large enough to substitute for the squares and rectangle in the sketch. Also, I really enjoy coloring with the Stampin’ Blend Alcohol Markers! It is so fun to blend the colors together!

Measurements
- Basic White cardstock card base: 4 1/4″ x 11″, scored at 5 1/2″
- Basic White cardstock for stamping the flowers and
leaves: 4 1/4″ x 5 1/2″ - Peach Pie cardstock: 2″ x 4 1/2″ to die cut 6 small flowers &
4 large flowers - Peach Pie cardstock: 2 1/4″ for the sentiment
- Shy Shamrock cardstock: 1 3/4″ x 5″ to die cut 5 leaves
- Lemon Lolly cardstock: 1/2″ x 3″to use a hole punch to make
6 small flower centers & 4 large centers - Bloom Impressions 12″ x 12″ Designer Series Paper: yellow floral pattern: 4 1/2″ x 5 1/2″, 3/8″ x 5 1/2, 3/8″ x 4″, 1/8″ x 5 1/2″
& 1/8″ x 3 3/4″

Supplies
- Stamp Set: Happy Hibiscus
- Dies: Happy Hibiscus Hybid Dies
- Embossing Folder: Happy Hibiscus Hybrid 3D Embossing Folder
- Ink: Memento Black Ink Pad
- Stampin’ Blends Alcohol Markers: Lemon Lolly Combo Pack, Calypso Coral Light, Poppy Parade Combo Pack, Melon Mambo Combo Pack, Pretty in Pink Combo Pack & a Color Lifter.
- Embellishments: Sunny Day Iridescent Dots and Wink of Stella Clear Glitter Brush
- Ribbon: Peach Pie 3/8″ Bordered Ribbon

Instructions
- Use the Memento Black Ink to stamp the images of the flowers & leaves onto the Basic White cardstock. Also stamp the sentiment onto the Peach Pie cardstock.
- Color as desired. I used the Stampin’ Blends Alcohol Markers. You could use the Blends, the Watercolor Pencils or the Stampin’ Write Markers. Have fun!
- Use the Happy Hibiscus Hybid Dies and Hybrid 3D Embossing Folder to cut & add dimension to the stamped flowers. It does take a little practice to use this. I recommend practicing on images stamped in Memento Ink on scrap paper first. Watch the following video on how to use the Hybrid Dies & 3D Embossing Folder.
- Die cut the Peach Pie cardstock flowers & the Shy Shamrock cardstock leaves.
- Use the Stampin’ Blends Alcohol Markers to add some color to the center of each of the Peach Pie cardstock flowers.
- Use two sizes of hole punches to make the Lemon Lolly cardstock flower centers. Adhere the centers to the middle of each of the Peach Pie cardstock flowers. Add some Wink of Stella to each flower.
Assembling the Card
- Wrap a 6″ piece of the Peach Pie Ribbon around the Bloom Impressions panel. Secure with Mini Glue Dots. Tie a bow and adhere to the far right. I use a combination of the Mini Glue Dots and Tombow Multipurpose Liquid Glue so that the bow will stay on more securely.
- Adhere the Bloom Impressions Designer Series Paper panel with the ribbon around it to the front of the Basic White cardstock card base.
- Adhere the strips of Bloom Impressions Designer Series Paper to the inside of the card base as shown below.

- Use Stampin’ Dimensionals to adhere the sentiment to the lower left-hand corner of the card front.
- Adhere the die cut Shy Shamrock cardstock leaves to the back of the stamped & colored flowers. Use Stampin’ Dimensionals to adhere the 3 flowers to the card front. Add some Wink of Stella to each flower.


- Adhere the stamped & colored leaves to the small flower for the inside. Then use the Tombow Glue to adhere the flower & leaves to the lower right-hand corner of the inside.

- Use the Mini Glue Dots and a little Tombow Glue to adhere the Peach Pie Cardstock die cut flowers.
- Finish the card front by adding the Sunny Day Iridescent Dots.
¡Voila!

I hope you enjoyed my interpretation of Sketch 107. You are currently at Theresa McEntee-USA author of Theresa’s Treasures Paper Crafts Blog. Be sure to visit everyone on the Blog Roll Call for lots of awesome inspiration!
Blog Roll Call
Have a most wonderful day!
Theresa
Order Supplies Here:
Product List ") $59.25 |  $8.00 |  $11.00 |  $11.00 |  $11.00 |
 $11.00 |  $11.00 |  $5.50 |  $13.00 |  $11.50 |
 $11.50 |  $11.50 |  $9.00 |


")


 Designer Series Paper")
 Variegated Ribbon")


")


 Designer Series Paper")

 Metallic Woven Ribbon")


")


")


 Designer Series Paper")


")
")


 Host Designer Series Paper")


")


 Designer Series Paper")

 Variegated Ribbon")


")


")
 Designer Series Paper")


")

")


 Designer Series Paper")


