Posted in 2024 Stampin' Up! January to April Mini Catalog, 3D Embossing Folder, Around the World on Wednesday Blog Hop, Emboss Powder, Emboss Resist Technique, Nature, Techniques

Lovely & Sweet Emboss Resist Technique for Around the World On Wednesday Blog Hop-February 2024- Technique Challenge

Hello and welcome! I am Theresa McEntee, creator of Theresa’s Treasures Paper Crafts. Today I have the pleasure of participating in the Blog Hop with Around the World on Wednesday (AWOW) organized by Angie McKenzie. I hope you like my Lovely & Sweet Emboss Resist Technique card!

On the second Wednesday of each month, the AWOW team put together a thematic hop to give you some inspiration for your own crafting. This month’s challenge is a Technique Challenge.

Happy Valentine’s Day!

“What the world needs now is love, sweet love
It’s the only thing that there’s just too little of”

My Project for today

This card was made using the Emboss Resist Technique. I love this technique because it turns out differently each time. I also love using embossing powder. It is so magical to see the emboss powder change when you heat it up!

The Lovely & Sweet stamp set is a set of sketched botanical images. I really liked the image of the almond plant so I used it for my Technique Challenge.

Instructions

Embossing

  1. Emboss the 4″ x 5 1/4″ Fluid 100 Watercolor Paper. First use the Embossing Buddy to remove the static. Stamp the image in Versamark Ink.
  2. Sprinkle the White Emboss Powder over the ink and shake off the excess.
  3. Use a small paint brush to remove any embossing powder that is not supposed to be there.
  4. Use the Heat Tool to heat the emboss powder until it magically changes. Be sure that you have heated up all the areas.
  5. Set aside to cool for 10 minutes.

The Emboss Resist Technique

  1. With a Stampin’ Spritzer spray the paper that is embossed until damp. Use a paper towel to pat off the excess water.
  2. Start with the lightest color. Using the Pool Party Ink Pad, apply ink to an E size Clear Block.
  3. Next apply Coastal Cabana Ink on the edges alsousing the ink pad.

  1. Finish by applying some Pretty Peacock Ink to parts of the edges. Use the corner of the ink pad to apply a little ink to the center.
  2. Use the Stampin’ Spritzer to spray the block until the ink begins to run together.

  1. Flip the block over and onto the embossed Fluid 100 Watercolor Paper.
  2. Apply a little pressure by placing a punch on top.
  3. Leave alone for 10 to 15 minutes.

Assembling the Card

  1. Trim the edges and mount on a 3 5/8″ x 4 5/8″ Coastal Cabana cardstock.
  2. The card base is a 4 1/4 x 11″ Pretty Peacock cardstock with the front embossed using the Fern 3D Embossing Folder.
  3. Use Stampin’ Dimensionals to adhere the stamped card piece onto the front of the card base.

  1. Here is how I did the inside. I did not use a sentiment because I wanted to keep this as an all occasion note card.
  2. Add Bling! using the Iridescent Foil Gems.

Voila!

The AWOW Team

I am so glad you have joined me today in this worldwide hug that stretches all the way from Australia to Alaska across twelve different time zones. I hope you can feel the love!

Each month this group of creative friends prepare a project for a theme. Below is an image of the whole crew and where they are from around the globe. Such a talented and wonderful group of people! You will want to visit everyone to be sure to see all the amazing projects!

We all love sharing joy with you through projects from our individual parts of the world. I hope that you will be filled with lots of inspiration!

See More Inspiring Projects

Leonie Stuart – AU

Rochelle Laird-Smith – AU

Cheryll Miller – AU

Danielle Kassing – NL

Aurélie Fabre – FR

Mikaela Titheridge – UK

Angie McKenzie – US

Kelly Taranto – US

Sharon Hashimoto Burkert – US

Chris Smith – US

Tricia Butts – US

Theresa McEntee – US

Bree Renwick – US

Cheryl Hamilton – US

Thank you so much for visiting today. I hope you enjoyed learning more about our projects. Have a most wonderful day!

Theresa

Product List
Lovely & Sweet Cling Stamp Set (English)
$26.00
Versamark Pad
$9.50
Pool Party Classic Stampin' Pad
$9.00
Coastal Cabana Classic Stampin' Pad
$9.00
Pretty Peacock Classic Stampin’ Pad
$9.00
Fluid 100 Watercolor Paper
$9.00
Coastal Cabana 8-1/2" X 11" Cardstock
$10.00
Pretty Peacock 8-1/2" X 11" Cardstock
$10.00
Iridescent Foil Gems
$8.00
Stampin' Spritzer
$4.00
Basics Embossing Powders
$18.00
Embossing Additions Tool Kit
$27.00
Heat Tool (Us And Canada)
$31.00
Clear Block E
$13.00
Clear Block H
$9.50
Fern 3 D Embossing Folder
$10.00
Stampin' Dimensionals
$4.25
Posted in 2023 Stampin' Up! Holiday Mini Catalog, 2023-2024 Stampin' Up! Annual Catalog, Blending Brushes, Designer Series Paper, Fun/Fancy fold card, Nature, Outdoors

Around the World On Wednesday Blog Hop-November 2023- Fall Color Challenge with Aspen Trees

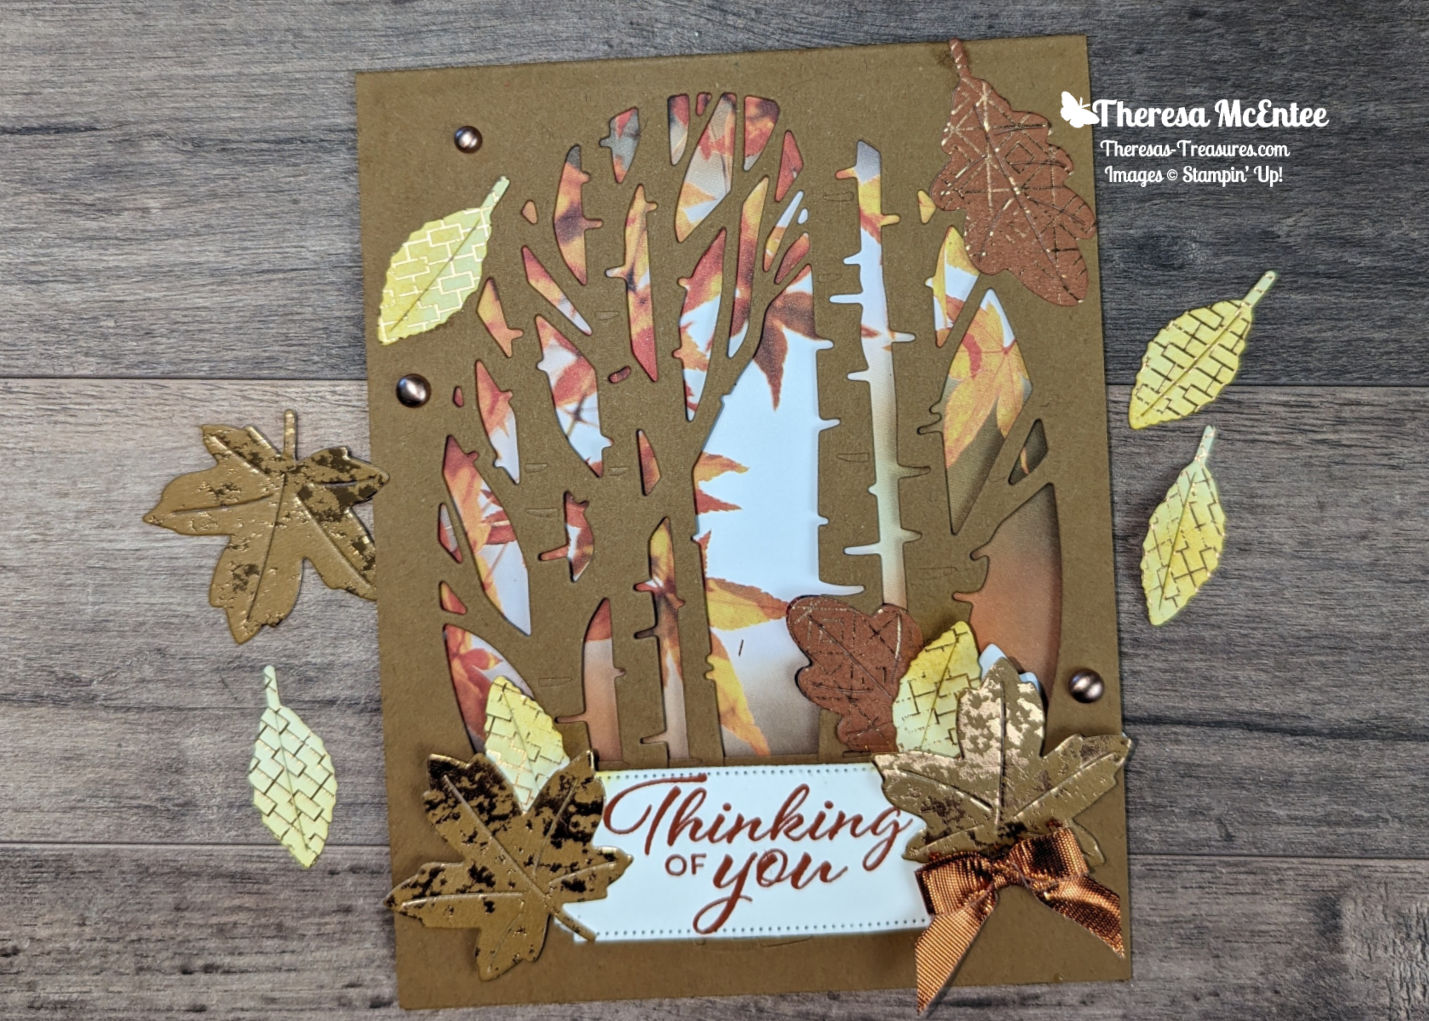
Hello and welcome! I am Theresa McEntee, creator of Theresa’s Treasures Paper Crafts. Today I have the pleasure of participating in the Blog Hop with Around the World on Wednesday (AWOW) organized by Angie McKenzie. On the second Wednesday of each month, the AWOW team put together a thematic hop to give you some inspiration for your own crafting. “Fall colors in Paris” is a Color Challenge for this month’s theme.

My Project for today

I was creating this card in my head over several days. I really love this particular design in the All About Autumn 6″ x 6″ Designer Series Paper pack. I wanted to used the Aspen Trees Dies too.

I do look at a lot of projects that other talented crafters make. Some of those projects inspire me and help me to create my own project. I hope my project will inspire you!

Project Details

This card was made using a variety of stamps and dies. The Autumn Leaves stamp and Dies come as a bundle (#162186). I have really liked the Aspen Dies that go with the Perched in a Tree stamp set. The Layering Leaves stamp set is great for sentiments.

Project Details

Measurements

  • Pecan Pie cardstock card base: 4 1/4″ x 11″ scored at 5 1/2″
  • Pecan Pie cardstock: 1 3/8″ x 4 1/4″ for inside
  • All About Autumn 6″ x 6″ Designer Series Paper, Autumn Leaves photo design: 4″ x 5 1/2″ scored at 1/4″
  • Basic White cardstock: 4″ x 5 1/4″ and 1 1/2″ x 3″(sentiment)
  • Dry Brushed Metallic 12″ x 12″ Specialty Designer Series Paper: 1 3/4″ x 5″ to die cut the maple leaves
  • All About Autumn DSP: White/Copper Foil design: 2″ x 2 1/4″ to die cut the small leaves and Cajun Craze/Copper Foil design: 1″ x 4 1/2″ to die cut the oak leaves

Supplies

  • Stamps & Dies: Autumn Leaves stamp set & Dies, Aspen Tree Dies, Perched in a Tree stamp set and Layering Leaves stamp set
  • Ink: Daffodil Delight & Cajun Craze
  • Blending Brush
  • Brushed Metallic Adhesive Backed Dots
  • Copper & Natural Ribbon Combo
  • Stampin’ Dimensionals & Mini Stampin’ Dimensionals
  • Mini Glue Dots

Instructions

  1. Diecut all of the leaves and set aside.
  2. Use the Aspen Trees Die to diecut the front of the Pecan Pie cardstock cardbase.
  3. Adhere the Basic White cardstock to the 1/4″ edge of the All About Autumn DSP.

  1. Stamp the sentiment from the Perched in a Tree stamp set in Cajun Craze Ink onto the Basic White cardstock. Use the the Daffodil Delight Ink to Stamp Off once then stamp the image of the leaves from the Autumn Leaves stamp set around the sentiment.
  2. Adhere the Basic White cardstock to the inside back panel of the Pecan Pie cardstock card base.
  1. Stamp the sentiment ” Thinking of You” from the Layering Leaves stamp set onto the smaller piece of Basic White cardstock. Diecut with the label from the Autumn Leaves Dies.
  2. Use the Daffodil Delight Ink and a Blending Brush to color the small leaves diecut from the white/copper foil design of the All About Autumn DSP.
  1. Place the Silicon mat between the front panel of the card base and the All About Autum DSP layer to avoid getting glue on the inside layer.
  1. Position Mini Stampin’ Dimensionals on the tree trunks to adhere the sentiment label.
  2. Start to adhere the diecut leaves. Remember that they will show through on the inside.
  1. Adhere the Pecan Pie cardstock for the inside to cover where the sentiment shows through. Then position the leaves on the inside to hide the backside of the leaves from the frontside.
  1. Add a few more leaves to the cardfront taking care that they do not show through to the inside.
  2. Tie a bow with the Copper Ribbon and adhere with a Mini Glue Dot.

Voila! That is it!

The AWOW Team

Each month this group of creative friends prepare a project for a theme. Below is an image of the whole crew and where they are from around the globe. Such a talented and wonderful group of people! You will want to visit everyone to be sure to see all the amazing projects!

I am so glad you have joined me today in this worldwide hug that stretches all the way from Australia to Alaska across twelve different time zones.  We all love sharing joy with you through projects from our individual parts of the world. I hope that you will be filled with lots of inspiration!

See More Inspiring Projects

Order Supplies Here

Product List

Thank you so much for visiting today. I hope you enjoyed learning more about my project. Have a most wonderful day!

Theresa

Posted in 2023 Stampin' Up! Holiday Mini Catalog, 2023-2024 Stampin' Up! Annual Catalog, Avid Stamper, Designer Series Paper, Fun/Fancy fold card, Inspiration, Nature, Outdoors

Around the World On Wednesday Blog Hop-October 2023- Sketch Challenge with Autumn Leaves Dies

Hello and welcome to a Sketch Challenge with Autumn Leaves Dies! I am Theresa McEntee, creator of Theresa’s Treasures Paper Crafts. Today I have the pleasure of participating in the Blog Hop with Around the World on Wednesday (AWOW) organized by Angie McKenzie. 

On the second Wednesday of each month, the AWOW team put together a thematic hop to give you some inspiration for your own crafting. This Sketch Challenge and the question on whether to add a bow or not is this month’s theme.

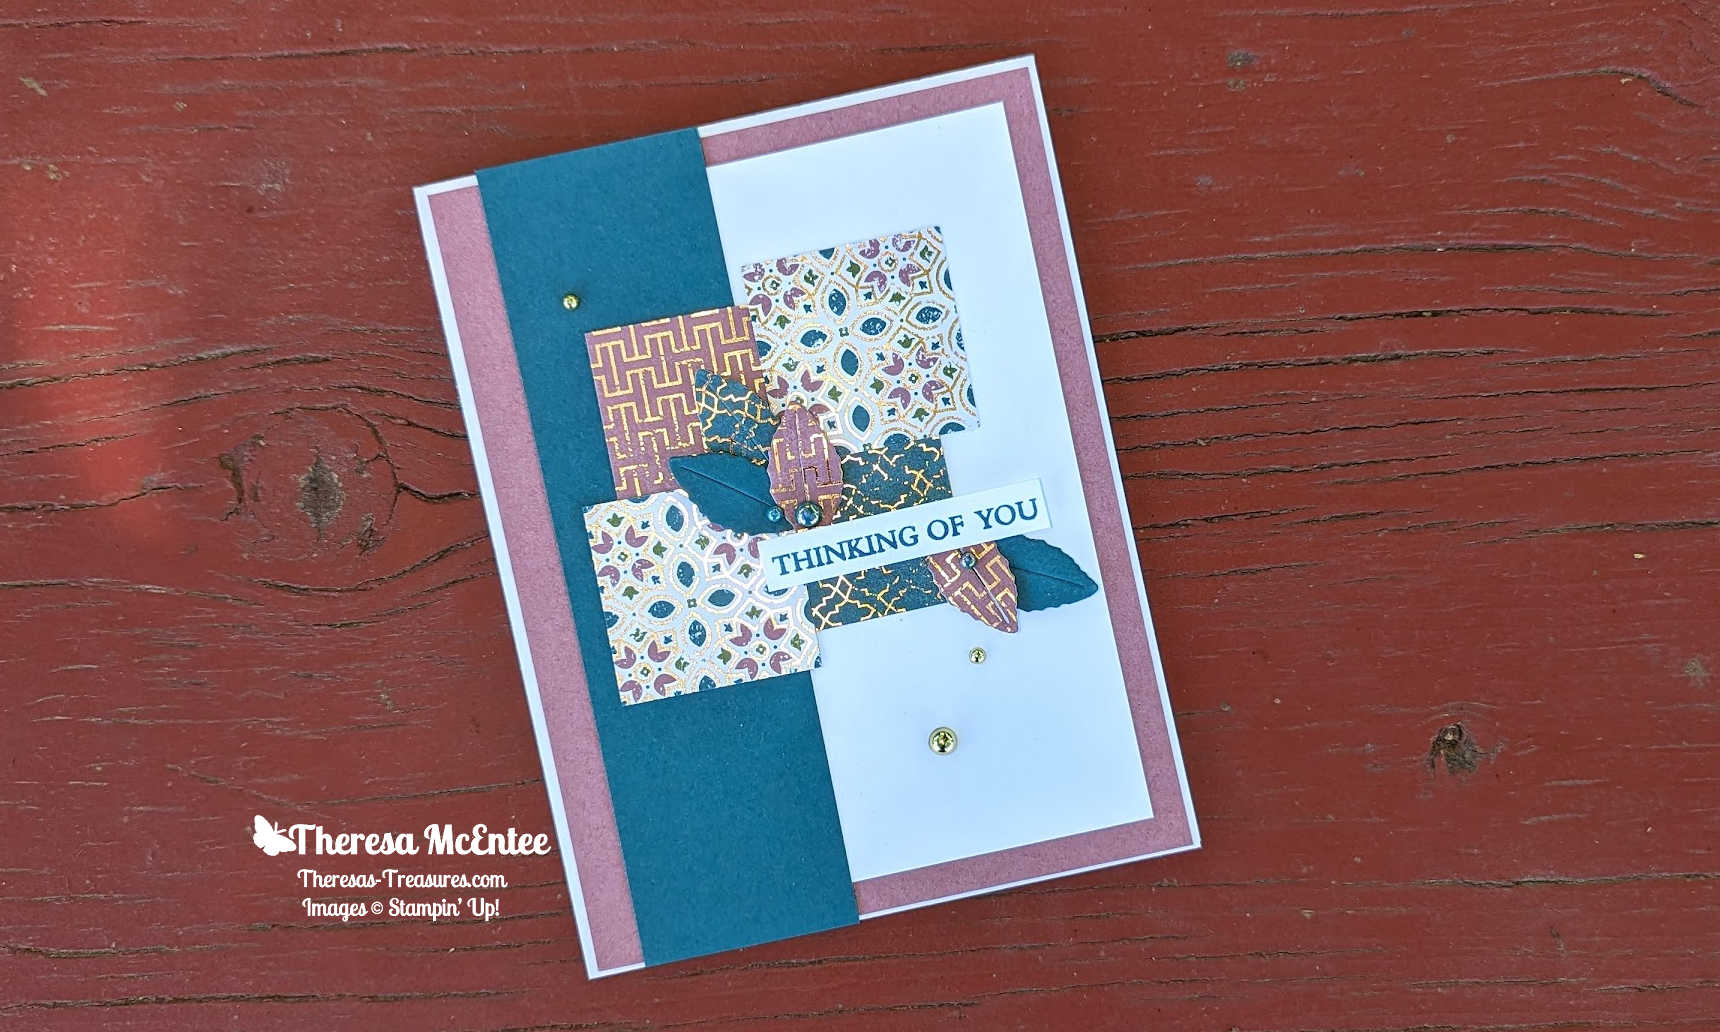
I found this Sketch Challenge to be, well, challenging. I had fallen in love with the All About Autumn Designer Series Paper and Autumn Leaves Dies. So I decided to play around with the different designs and colors. I love the little leaves in the dies!

My Project for today

I chose this color combination to be in line with the colors in the All About Autumn Designer Series Paper-Moody Mauve and Pretty Peacock. I did make this card using Basic White cardstock, but in retrospect, I should have used Very Vanilla cardstock. If I make another card, I will use the Very Vanilla cardstock.

Project Details

Measurements:

  • Very Vanilla cardstock card base: 4 1/4″ x 11″ scored at 5 1/2″
  • Very Vanilla cardstock: 3″ x 5″, 3/8″ x 2″ (sentiment) and 4″ x 5 1/4 (inside)
  • Moody Mauve cardstock: 4″ x 5 1/4″
  • Pretty Peacock cardstock: 1 1/2″ x 5 1/2″ and 1 1/2″ x 1 1/2″ (to diecut leaves)
  • Moody Mauve/Foil design of All About Autumn DSP: 1 1/8″ x 1 1/8″, 1 1/2″ x 1 1/2″ (to diecut leaves) and 3/8″ x 3 1/2″ (inside)
  • Pretty Peacock/Foil design: 1 1/8″ x 1 1/8″, 1″x 1 1/2″ (to diecut leaf) and 3/8″ x 5 1/4″ (inside)
  • Moody Mauve/Pretty Peacock/Very Vanilla/Foil design: 1 3/8″ x 1 3/8″ and 3/8″ x 4 1/2″ (inside)

Instructions

  1. Burnish the fold of the Very Vanilla cardstock card base with your Bone Folder.
  2. Use the Multipurpose Liquid Glue to adhere the All About Autumn DSP strips to the 4″x 5 1/4″ Very Vanilla cardstock to make the inside panel. Adhere it to the inside of the Very Vanilla card base.
  3. Adhere the 4″ x 5 1/4″ Moody Mauve cardstock to the front of the Very Vanilla cardbase.
  4. Position the 3″ x 5″ Very Vanilla cardstock slightly to the right and adhere in place.
  5. Now adhere the Pretty Peacock cardstock to the card front on the left side.
  6. Set up all of the squares of the All About Autumn Designer Series on the card front, and then adhere them.
  7. Diecut the little leaves, place them where you like and adhere.
  8. Stamp the sentiment in Pretty Peacock Ink. Adhere to the card front with Stampin’ Dimensionals.
  9. Add the Blooming Pearls as desired.

The AWOW Team

Each month this group of creative friends prepare a project for a theme. Below is an image of the whole crew and where they are from around the globe. Such a talented and wonderful group of people! You will want to visit everyone to be sure to see all the amazing projects!

I am so glad you have joined me today in this worldwide hug that stretches all the way from Australia to Alaska across twelve different time zones.  We all love sharing joy with you through projects from our individual parts of the world. I hope that you will be filled with lots of inspiration!

See More Inspiring Projects

Jan Clothier – NZ

Leonie Stuart – AU

Rochelle Laird-Smith – AU

Cheryll Miller – AU

Danielle Kassing – NL

Ximena Morales – DE

Aurélie Fabre – FR

Mikaela Titheridge – UK

TIna Zinck – CA

Annette Ball – CA

Angie McKenzie – US

Kelly Taranto – US

Shel Anderson – CA

Sharon Hashimoto Burkert – US

Chris Smith – US

Brenda Nelson – CA

Theresa McEntee – US >>You are here

Bree Renwick – US

Lori Willcox – CA

Teri West – US

Cheryl Hamilton – US

Thank you so much for visiting today. I hope you enjoyed learning more about my project. Have a most wonderful day!

Theresa

Posted in 2023 Stampin' Up! Holiday Mini Catalog, 2023-2024 Stampin' Up! Annual Catalog, Avid Stamper, Designer Series Paper, Fun/Fancy fold card, Inspiration, Nature, Outdoors

Around the World On Wednesday Blog Hop-September 2023- “Let’s Take a Walk” with Autumn Leaves

Hello and welcome! “Let’s Take A Walk” with Autumn Leaves! I am Theresa McEntee, creator of Theresa’s Treasures Paper Craft. Today I have the pleasure of participating in the Blog Hop with Around the World on Wednesday (AWOW) organized by Angie McKenzie. On the second Wednesday of each month, the AWOW team put together a thematic hop to give you some inspiration for your own crafting. “Lets Take a Walk” is this month’s theme.

My Project for today

When I was about 4 years old, I lived in the country in Pennsyvania USA. My Mom & I would go for a daily walk down the tree-lined dirt road. The image on the All About Autumn Designer Series Paper brings me back to this time period. We each had a pram. My little brother was in my Mom’s pram. I had a collection of Black Walnuts and Roly-Polies in mine! Lol!

Project Details

This card was made using Copper Clay, Daffodil Delight and Cajun Crazed colored cardstock. The sentiment is embossed in Copper Emboss Powder onto a Very Vanilla cardstock. The sentiment is diecut with a die from the He’s All That Dies. The card is embellihed around the sentiment with the Adhesive-Backed Sparkle Gems.

The inside panels are cut with the Deckled Rectangle Dies.

The AWOW Team

Each month this group of creative friends prepare a project for a theme. Below is an image of all of the crew and where they are from around the globe. Such a talented and wonderful group of people! You will want to visit everyone to be sure to see all the amazing projects!

I am so glad you have joined me today in this worldwide hug that stretches all the way from Australia to Alaska across twelve different time zones.  We all love sharing joy with you through projects from our individual parts of the world. I hope that you will be filled with lots of inspiration!

See More Inspiring Project

Thank you so much for visiting today. I hope you enjoyed learning more about my project. Have a most wonderful day!

Theresa

Posted in 2023-2024 Stampin' Up! Annual Catalog, Love/Affection

Cheerful Daisies Friendship Card for the Inspirations in Ink June 2023 Blog Hop

Today I have an awesome Cheerful Daisies Friendship Card!

Welcome and thanks for visiting Theresa’s Treasures Paper Crafts! I am Theresa and I am a Stampin’ Up! Demonstrator in Arizona, USA. Today is the monthly Inspirations in Ink Blog Hop! I am excited to be hopping with talented demonstrators from around the world. Be sure to check out everyone’s projects using the Cheerful Daisies Bundle. The Cheerful Daisies Bundle is in the Stampin’ Up! 2023-24 Annual Catalog. You may order from my Online Store HERE.

Measurements

  • Thick Basic White cardstock card base: 4 1/4″ x 11″ scored at 5 1/2″ (10.5cm x 29.7cm scored at 14.85cm)
  • Petal Pink cardstock: 4 1/4″ x 5 1/2″ (11cm x 14.5cm) for diecutting the largest Scalloped Contours Die
  • Basic White cardstock: 3 1/2″ x 4 3/4″ (9cm x 12cm) for diecutting the next smaller Scalloped Contours Die
  • Basic White cardstock: 4″ x 5 1/4″ (9.8cm x 14.2cm) Inside
  • Petal Pink cardstock: 3 1/4″ x 4″ (8.2cm x 12cm) for diecutting the 3rd layer of the daisies
  • Crushed Curry cardstock: 3 1/4″ x 4″ (8.2cm x 12cm) for diecutting the 2nd layer of the daisies
  • Lemon Lolly cardstock: 3 1/4″ x 4″ (8.2cm x 12cm) for diecutting the base layer of the daisies
  • Early Espresso cardstock: 1″ x 1 1/2″ (2.5cm x 3.8cm) for diecutting the center of the daisies
  • Garden Green cardstock: 3″ x 5″ (7.5cm x 12.5cm) for diecutting the leaves

Supplies

  • Cheerful Daisies stamp set and die Bundle
  • Scalloped Contours Dies
  • Ink: Early Espresso, Garden Green, Crushed Curry, Lemon Lolly and Petal Pink
  • Iridescent Rhinestone Basic Jewels
  • Adhesives: Multipurpose Liquid Glue and Stampin’ Dimensionals

Instructions

  1. Die cut all of the pieces as outlined above.
  2. Fold the Thick Basic White card base and set aside.
  3. Stamp with the small daisy outline stamp 3 times in the lower right hand corner of the 4″ x 5 1/4″ Basic White cardstock for the inside. Use the Early Espresso Ink. Then stamp the small daisy solid stamp to fill in the outline. Stamp one with Crushed Curry Ink, one with Petal Pink Ink and one with Lemon Lolly Ink. lastly, Stamp Off once using the small leaf stamp and Garden Green Ink to add the leaves.
  1. Adhere the completed inside card piece to the inside of the Thick Basic White card base. Set aside.
  2. Use Early Espresso Ink and the sentiment stamp “Your Friendship Means Everything” to stamp in the upper left-hand corner of the Basic White cardstock Scalloped Contours diecut.
  3. Use the Multipurpose Liquid Glue to adhere the layers of each of the daisies together. Adhere the Early Espresso cardstock flower centers.
  4. Arrange the Garden Green cardstock leaves and stem on the Basic White Scalloped Contours diecut. Position the flowers and see how you like the arrangement. Use Multipurpose Liquid Glue to adhere the stem and leaves. Then use Stampin’ Dimensionals to adhere the daisies.
  5. Adhere the completed Basic White Scalloped Contour diecut onto the Petal Pink Scalloped Contours diecut using Stampin’ Dimensionals.
  6. Use the Multipurpose Liquid Glue to adhere the Petal Pink Scalloped Contours diecut to the front of the Thick Basic White card base.
  7. Add as many of the Iridescent Rhinestone Basic Jewels as you wish!

Voila!

Thank you so much for visiting today! Please visit all the blogs in the Inspirations In Ink Blog Hop. You will be amazed and inspired by all the fun and creative projects made by the Inspirations In Ink demonstrators. 

You are currently visiting Theresa McEntee-USA creator of Theresa’s Treasures Paper Crafts.

Blog Line Up

Deirdre Croal – USA

Julie Golding-Page – Canada

Karen Beck – Canada 

Theresa McEntee – USA

Rebecca Nutley – Australia

Robbie Rubala – USA 

Christy Gridley – USA  

Have a most wonderful and creative day!

Theresa

Would you like the start getting a discount on quality Stampin’ Up! supplies? Join my Stamping Gems Team today! And if you have a long wish list, you can join to get $155 UDS in product for $99 USD! This is the best deal in the whole catalog! Click HERE to order your starter kit!

This special ends June 30, 2023! Join and order now to be able to get what you want!

Thinking of adding creativity to your life? Try a monthly paper crafting kit! The Paper Pumpkin Monthly Subscription delivers a kit with everything you need to make a project-right to your door! Sign up for a Pre-paid Paper Pumpkin Subscription HERE.

Ciao!

Posted in 2023 January-April Mini Catalog, Animals, Blending Brushes, Inspiration in Ink Blog Hop, Outdoors, Stampin' Write Marker

Inspirations in Ink Blog Hop January 2023- On the Farm Bundle Fun Fold

Welcome and thanks for visiting Theresa’s Treasures Paper Crafts! I am Theresa and I am a Stampin’ Up! Demonstrator in Arizona, USA. Today is the monthly Inspirations in Ink Blog Hop! I am excited to be hopping with awesome demonstrators from around the world. Be sure to check out everyone’s projects using the On the Farm Bundle or Dainty Delights Bundle. These will be available to purchase in the 2023 Jan-April Mini Catalog which is going live on January 5, 2023! On that day you may order form my Online Store HERE.

Today I am showcasing the On the Farm Bundle.

Measurements

  • Cherry Cobbler card stock(cs) card base: 4 1/4 x 11 inches scored and folded at 5 1/2 inches
  • Garden Green cs: 4 x 5 1/4 inches
  • Sahara Sand cs: 3 3/4 x 5 inches
  • Basic White cs: 4 x 5 1/4 (inside), 2 1/4 x 3 1/2 inches (to stamp the cow) and 3 x 4 1/4 inches (cut with the Scalloped Contours Dies)
  • New FREE Sale-a-bration Day at the Farm 12 x 12 inch Designer Series Paper(DSP)-chicken wire design: 2 x 5 inches (When you purchase the On the Farm Bundle January 5, 2023 you will be able to choose this DSP for FREE!)

Supplies

  • On the Farm Bundle
  • Scalloped Contours Dies
  • Early Espresso Faux Suede Ribbon: 6 inches
  • Enamel Dot Essentials (New)
  • Memento Black Ink
  • Balmy Blue Ink pad
  • Garden Green Ink Pad
  • Pear Pizzazz Ink pad
  • Stampin’ Write Markers in Garden Green, Cherry Cobbler, Soft Suede, Sahara Sand and Pear Pizzazz
  • Small Blending Brush (New)
  • Mini Glue Dots
  • Stampin’ Dimensionals
  • Multipurpose Liquid Glue

Instructions

  1. This is a pattern for the card base. You will flip it over and turn it so that the scored panel is on the left.

Making the Inside of the Card

2. Take out the 4 x 5 1/4 inch Basic White cs. Use the Balmy Blue Ink and the Small Blending Brush to apply ink to the lower right corner.

3. Stamp the grass in Garden Green ink leaving spaces. Use Pear Pizzazz Ink to fill in the spaces.

4. Take out the 2 1/4 x 3 1/2 inch Basic White cs. Use Memento Ink to stamp the cow.

5. Color in the cow’s spots with the Soft Suede Stampin’ Write Marker. Use the Sahara Sand Marker to make a shadow on the cow’s belly and back legs.

6. Use the On the Farm Dies to die cut the cow.

7. Use Stampin’ Dimensionals to adhere the cow to the Basic White cs panel. Adhere to the inside of the Cherry Cobbler cs. Note: this will be the side that is NOT scored.

Making the Outside of the Card

8. Adhere the Chicken Wire design from the Day at the Farm DSP to the bottom of the Sahara Sand cs.

9. Wrap the Early Espresso Faux Suede Ribbon around the front. Then adhere to the back with Mini Glue Dots. Adhere this card piece to the Garden Green cs. Set aside.

10. Die cut the 3 x 4 1/4 inch Basic White cs with the corresponding Scalloped Contours die. Use Memento Ink to stamp the barn on the Basic White cs. Stamp a second barn onto a full sticky paper (yellow). Fussy cut just inside the border. Adhere to the barn.

11. Stamp the silo next to the barn. Stamp a second silo on the full sticky paper. Fussy cut jsut inside the border. Adhere to the silo.

12. Now stamp the hills.

13. Stamp more hills. Add the trees and cloud. Remove the sticky note paper. Stamp the sentiment.

Coloring

1. Color the barn with the Cherry Cobbler Stampin’ Write Marker. I used a White Gel Pen to draw the barn doors.

2. Color the hills and trees with the Garden Green and Pear Pizzazz markers. The tree trunks are colored with the Soft Suede marker.

3. Use the Balmy Blue Ink and a Small Blending Brush (New) to gradually blend on the sky color.

4. Adhere the Scalloped Contours die cut to the card front with Stampin’ Dimensionals.

5. Adhere the Garden Green cs layer to the front of the card base by applying adhesive below the score line as shown. (Add the Enamel Dot Essentials as shown)

6. Tuck the front of the card base behind the cow on the inside as shown below.

Voila!

Thank you so much for visiting today! Please visit all the blogs in this hop. You will see all the fun and inspiring projects made by the Inspirations In Ink demonstrators. You are currently visiting Theresa McEntee-USA creator of Theresa’s Treasures Paper Crafts.

Deirdre Croal – USA   

Julie Golding – Canada   

Rebecca Nutley – Australia

Robbie Rubala – USA   

Theresa McEntee – USA  

Vicky Wright – Australia

Karen Gilbert Beck – Canada

Christy Gridley – USA  

Supply List

Product List

Be sure to make out your wish list now and shop my Online Store HERE on Thursday January 5, 2023!

Have a wonderful and safe day!

Theresa