Have you been wanting to add some fun and creativity to your life this year? I have an awesome answer!
A subscription to Paper Pumpkin is perfect for starting out. Each month you will receive a box filled with all the supplies you need to complete a project.
And- No- the cute bunny is not included. But what you will get is the supplies to create 3 standard cards, 3 slimline cards and 3 gift boxes.
If you would like more information, email me at: theresastreasures.az@gmail.com.
Click HERE to subscribe and start being more creative!
Hello and welcome! I am Theresa McEntee, creator of Theresa’s Treasures Paper Crafts. Today I have the pleasure of participating in the Blog Hop with Around the World on Wednesday (AWOW) organized by Angie McKenzie.
On the second Wednesday of each month, the AWOW team put together a thematic hop to give you some inspiration for your own crafting. Sketch Challenge 105 is this month’s theme.
My Card
About My Card
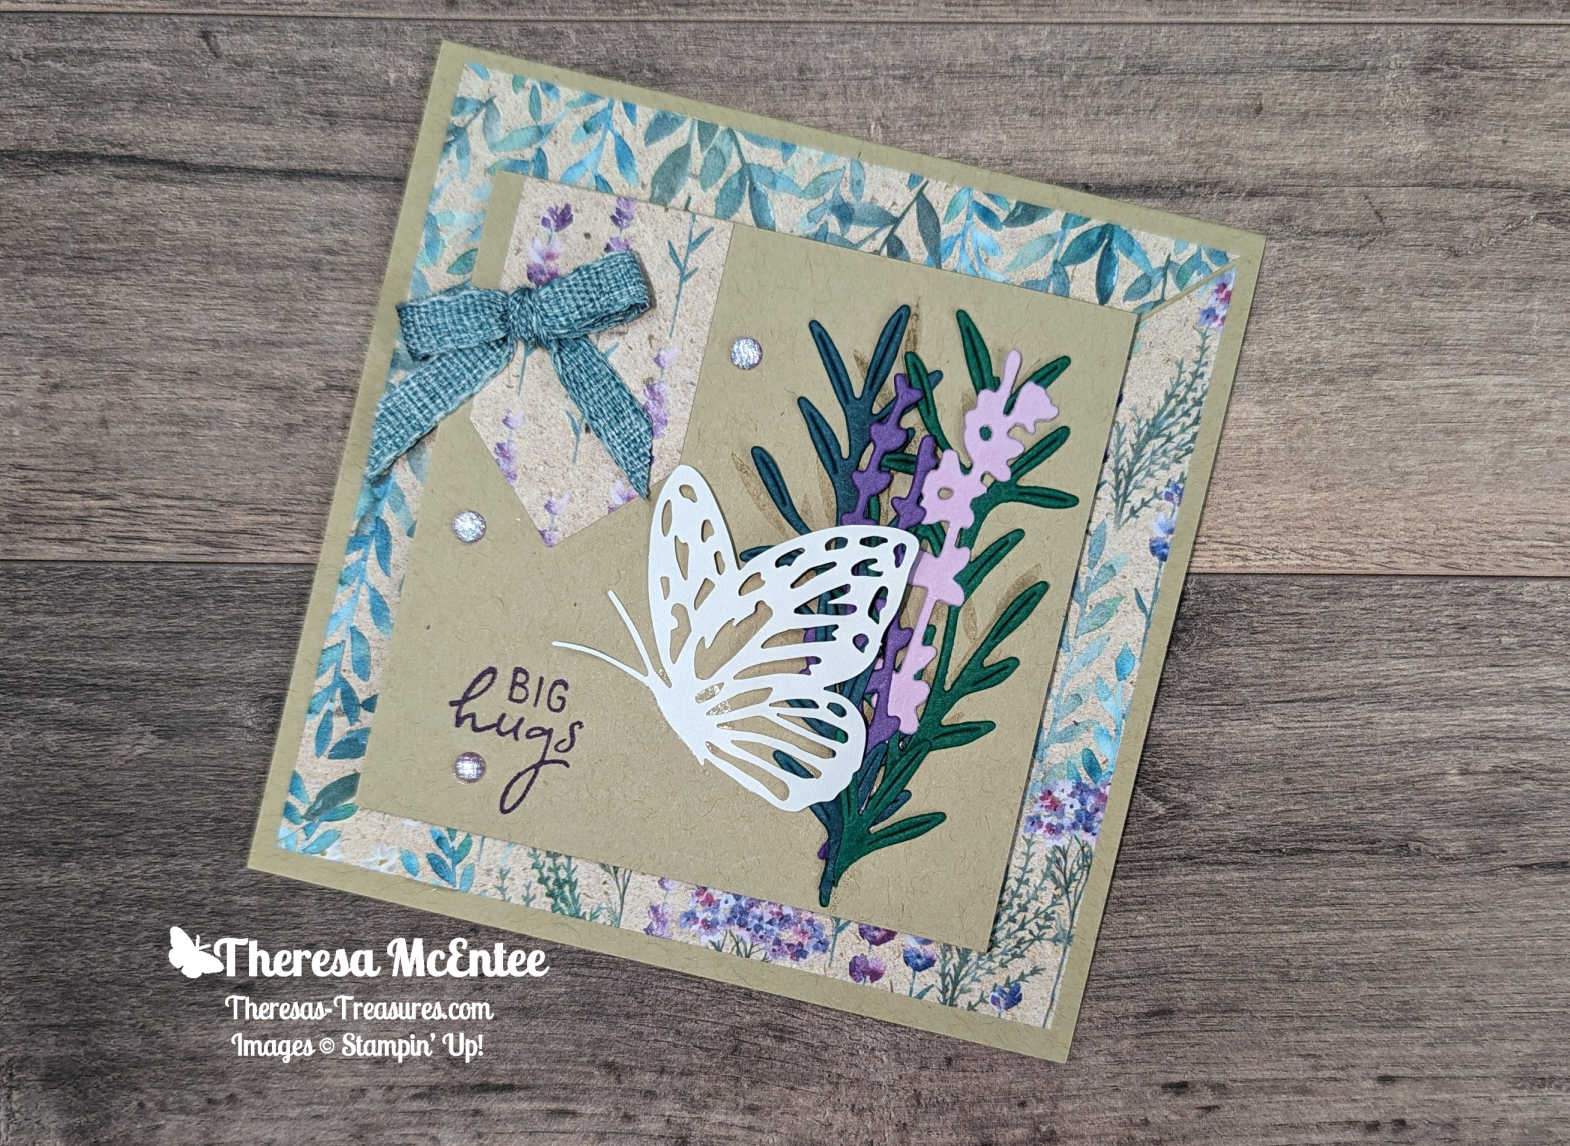
This card was made using the new Painted Lavender Bundle in the 2024 Stampin’ Up! January to April Mini Catalog which just went live on January 4, 2024! It is an amazing catalog! I liked this bundle in particular because lavendar is one of my favorite flowers- I just love the scent! I also love purple so the Perennial Lavendar Designer Series Paper really appealed to me!
The Crumb Cake cardstock(cs) card base is 4 1/4″ x 8 1/2″ scored at 4 1/4″. The first layer is made with 2 different patterns of the Perennial Lavender DSP. I cut a 4″ square of each pattern, then cut at the diagonal. The second layer is Crumb Cake cs at 3 1/4″ square. I stamped the sentiment “Big Hugs” from the Perennial Postage stamp set in Gorgeous Grape Ink.
I stamped some leaves in Crumb Cake Ink to give the idea of a shadow behind the foliage. The die cut leaves are in Pretty Peacock and Shaded Spruce cs. The larger flowers are cut from Fresh Freesia cs. The smaller flowers from Gorgeous Grape cs. The banner is another pattern from the Perennial Lavendar DSP. I am so in love with the Paper Butterfly Accents! I left this butterfly white, but you can use a Sponge Dauber or Blending Brush to make the butterfly any color you desire! Finally, the bow is madew with the Lost Lagoon 1/4″ Ribbon from the 2023-24 Stampin’ Up! Annual Catalog.
The AWOW Team
I am so glad you have joined me today in this worldwide hug that stretches all the way from Australia to Alaska across twelve different time zones. Each month this group of creative friends prepare a project for a theme. Below is an image of the whole crew and where they are from around the globe. Such a talented and wonderful group of people! You will want to visit everyone to be sure to see all the amazing projects!
We all love sharing joy with you through projects from our individual parts of the world. I hope that you will be filled with lots of inspiration!
Hello! Welcome to Theresa’s TreasuresPaper Crafts. I am Theresa, an Independent Stampin’ Up! Demonstrator in Arizona, USA. I am really excited to be participating in Kylie Bertucci’s International Blog Highlight Gallery with my Seasonal Branches Thank You card.
Today I am blogging along with a very creative group of Stampin’ Up! demonstrators from around the world! You will be able to see all of the awesome blogs by clicking on the “Vote” button below to see the Gallery.
The theme for this Gallery is “Thank You”. We often forget those simple words. However, it is so important to show appreciation to others. One way to express gratitude is to send a handmade thank you card! I hope you will discover the joy in making and sending a handmade card for yourself!
This Seasonal Branches Thank You Card showcases the Seasonal Branches Bundle which coordinates with the FREE Sale-a-bration Flight & Airy Designer Series Paper (DSP). You can get the FREE Sale-a-bration products with a $50 USD purchase! Please use the Host Code if your purchase is less than $150 USD. Otherwise, you can use the Stampin’ Rewards yourself!
Current Host Code: 6B4FJPWS
Measurements
Pecan Pie cardstock (cs) card base: 5 1/2″ x 8 1/2″ scored at 4 1/4″
Flight & Airy DSP Pecan Pie mosaic pattern (1st layer): 4″ x 5 1/4″
Misty Moonlight cs: 4″ x 4″ to die cut the Deckled Circle
Flight & Airy DSP light blue with flowers pattern: 3 3/4″ x 3 3/4″ to die cut the Deckled Circle
Basic White cs: 2″ x 2 1/2″ to die cut the sentiment with the stitched rectangle from the Timeless Arrangements Dies
Basic White cs: 3 1/2″ x 4 3/4″ to die cut the inside panel with the Deckled Rectangle Dies
Calypso Coral, Pecan Pie and Garden Green cs to die cut the flowers, branches and leaves.
Fluid 100 5″ x 7″ Watercolor Paper: to stamp the bird on
Supplies
Seasonal Branches stamp set & Dies (Bundle #161365)
Die cut all of the pieces except the bird. You will need 5 Calypso Coral cs flowers, 1 small and 1 large Pecan Pie branch and 7 Garden Green cs leaves.
Use the Deckled Circle Die #8 from center for the Misty Moonlight and the Deckled Circle Die #7 for the Flight & Airy blue floral pattern. Use the Deckeld Rectangle Die #6 from center for the larger Basic White cs and the Timeless Arrangements Die for the smaller Basic White cs.
Use Smoky Slate Ink to stamp the bird onto the Fluid 100 Watercolor Paper. Then use a small paint brush with the Misty Moonlight, Fresh Freesia and Memento Inks to watercolor the bird. Die cut the bird with the Seasonal Branches Dies.
Stamp the sentiment onto the Timeless Arrangements diecut in Misty Moonlight Ink.
Use Calypso Coral Ink to stamp the individual flower onto the inside panel. Add the individual leaf in Garden Green Ink. Adhere to the inside of the Pecan Pie cs cardbase.
Adhere the Flight & Airy Pecan Pie mosaic pattern to the front of the Pecan Pie cs card base.
After you adhere the Flight & Airy DSP blue floral pattern Deckled Circle to the Misty Moonlight cs Deckled Circle- use Stampin’ Dimensionals to adhere it to the left side of the card front.
Use Stampin’ Dimensionals to adhere the sentiment to the lower right-hand corner.
Add the branches, flowers and leaves with Multipurpose Liquid Glue.
Finish up by adhering the watercolored bird with Stampin’ Dimensionals.
Add Bling!
Don’t forget to add some Bling! to the centers of the flowers on the card front with the Adhesive-Backed Solid Gems!
Voila!
I hope you enjoyed my card today using the Seasonal Branches Bundle along with the FREE Sale-a-bration Flight & Airy Designer Series Paper.
Visit my Online Store to order what you need to make this card for yourself. Photographic supply list is at the end of this blog.
Current Host Code: 6B4FJPWS
You are currently at Theresa McEntee-Theresa’s Treasures-USA. When you click on the Vote For Me button above you will see the Gallery of creative inspiration from Demonstrators around the world! Remember to visit everyone’s blog by clicking on the photo of their card in the Gallery.
To vote for your favorite cards, click on the small heart in the upper right-hand corner of each photo. You have 5 votes! Enjoy and come visit Theresa’s Treasures again soon!
Thanks again for stopping by! Have a most wonderful and crafty day!
Theresa
SALE-A- BRATION
What is Sale-a-bration? It is the best time of the Stampin’ Up!® year! When you make a qualifying purchase, you can choose from several products that are FREE! If you need to know more, shoot me an email at theresastreasures.az@gmail.com!
Welcome and thanks for visiting Theresa’s Treasures Paper Crafts! I am Theresa, a Stampin’ Up! Demonstrator in Arizona, USA. Today is the monthly Inspirations in Ink Blog Hop! I am excited to be hopping with talented demonstrators from around the world. Be sure to check out everyone’s Hey Chuck Bundle projects. The Hey Chuck Bundle is in the Annual Catalog. When you are ready, you may order from my Online Store HERE.
I decided to make a Christmas card with the Hey Chuck chickens to spotlight the versatility of this set. I stamped the hat and scarf from the Beary Cute stamp set in the 2023 Mini Catalog. The lovely sentiment is also from the Beary Cute stamp set.
I used Wink of Stella to make the chicken very sparkly! Just right for the holidays!
Measurements
Poppy Parade cardstock: 4 1/4″ x 11″ scored at 5 1/2″
Basic White cardstock: 3 1/4″ x 4 3/4″ (for the diecut Deckled Rectangle inside), 3 1/4″ x 3 1/4″ (for the diecut Deckled Circle on front), 1/2″ x 3″ for the sentiment and enough to stamp the images.
Shaded Spruce cardstock: 2 1/4″ x 5 1/2″
Brights 6″x 6″ DSP in Poppy Parade, striped pattern: 2″ x 5 1/2″
Daffodil Delight cardstock: 2″ x 2 1/2″ (for the diecut sun)
Die cut the Deckled Circle (#6 from center), the Deckled Rectangle (#6 from center) and the sun.
Use Memento Ink to stamp the two chickens and the tree (from Beary Cute). Diecut the chickens after you color them with the Stampin’ Blends Alcohol Markers as desired.
Use Shaded Spruce Ink to stamp the inside of the tree. Fussy cut the tree.
Stamp two hats and one scarf in Shaded Spruce Ink. Fussy cut.
Also use the Shaded Spruce Ink to stamp the “Merry Christmas” sentiment from Beary Cute onto the 1/2″ x 3″ Basic White cardstock strip. Cut the ends into a banner.
Use Poppy Parade Ink to stamp “Rise and Shine” on the Deckled Rectangle (portrait orientation). I had to stamp a few stars around the inside sentiment because I was covering up a halo-oopsy!
Adhere the Brights Designer Series Paper Poppy Parade, stripe pattern, onto the Shaded Spruce cardstock.
Adhere this to the card front, slightly to the left.
Use Stampin’ Dimensionals to adhere the Deckled Circle to the card front.
Adhere the sun with Multipurpose Liquid Glue or Stampin’ Seal.
Use Stampin’ Dimensionals to adhere the colored fat chicken to the card front. Add the scarf and hat.
Use Stampin’ Dimensionals on each end of the sentiment, and glue in the center to adhere the sentiment banner.
For the inside, adhere the Deckled Rectangle followed by the Christmas tree. Finish with the colored skinny chicken and the hat.
Embellish the chickens with Wink of Stella.
Add the Iridescent Rhinestone Basic Jewels.
Voila!
Thank you so much for visiting today! Please visit all the blogs in the Inspirations In Ink Blog Hop. You will be amazed and inspired by all the fun and creative projects made by the Inspirations In Ink demonstrators.
You are currently visiting Theresa McEntee-USA creator of Theresa’s Treasures Paper Crafts.
Hello! Welcome to the Kylie & Bruno Bertucci’s Demonstrator Training Blog Hop for November 2023. I’m Theresa with Theresa’s Treasures Paper Crafts. I have a Fluffiest Friends Thank You card today. I am so glad you are joining me!
We are a group of Stampin’ Up! Demonstrators from around the world. We are taking part in training to help us build a successful Stampin’ Up! business. My goal this year is to participate in the monthly Blog Hop every month and show the card I will send my customers when they order from me. This blog hop is full of ideas and creative inspiration! Be sure to visit everyone’s blog by clicking on the links at the end of my blog.
Measurements
Very Vanilla Thick card stock (cs):4 1/4″ x 11″ scored at 5 1/2″
Very Vanilla cs: 4″ x 5 1/4″, 1 1/2″ x 2 1/2″ for sentiment
Basic White cs: 2 1/2″ x 3 1/2″ (for beaver image)
Copper clay cs: 2 1/4″ x 5 1/2″
Traditions of St. Nick Designer Series Paper (DSP): 2″ x 5 1/4″
Supplies
Fluffiest Friends stamp set & dies
Wildlife Wonder stamp set (for sentiment)
Nested Essentials Dies (to cut out sentiment)
Stampin’ Blend Markers
Memento Black Ink
Early Espresso Ink
Center Stripe Ribbon
Brushed Metallic Adhesive-Backed Dots
Instructions
Stamp the beaver in Memento Ink. Color as desired with the Stampin’ Blends Markers.
Stamp the sentiment in Early Espresso Ink. Cut out with the smallest of the rectangular dies in the Nested Essentials Dies.
Wrap the ribbon around the 4″ x 5 1/4″ Very Vanilla cs. Adhere with Mini Glue Dots on the back. Apply Stampin’ Dimensionals to the back.
Adhere the Very Vanilla cs/ribbon piece to the card base.
Adhere the Traditions of St Nick DSP to the Copper Clay cs. Apply Stampin’ Dimensionals. to the back. Adhere to the card front.
Use a Mini Glue Dot to adhere a bow tied with the Center Stripe Ribbon to the card front.
Use Stampin’ Dimensionals to adhere the beaver to the card front.
Decorate the inside as desired.
Voila!
Remember to visit everyone’s blog. You will see creative inspiration from Demonstrators around the world! You are currently at Theresa McEntee-Theresa’s Treasures-USA. Enjoy!
I appreciate your visit to my blog today. Please subscribe to my blog so you will continue to see these blogs. If you need any assistance with placing an order so you can make your own card, let me know in the comments. Thanks!
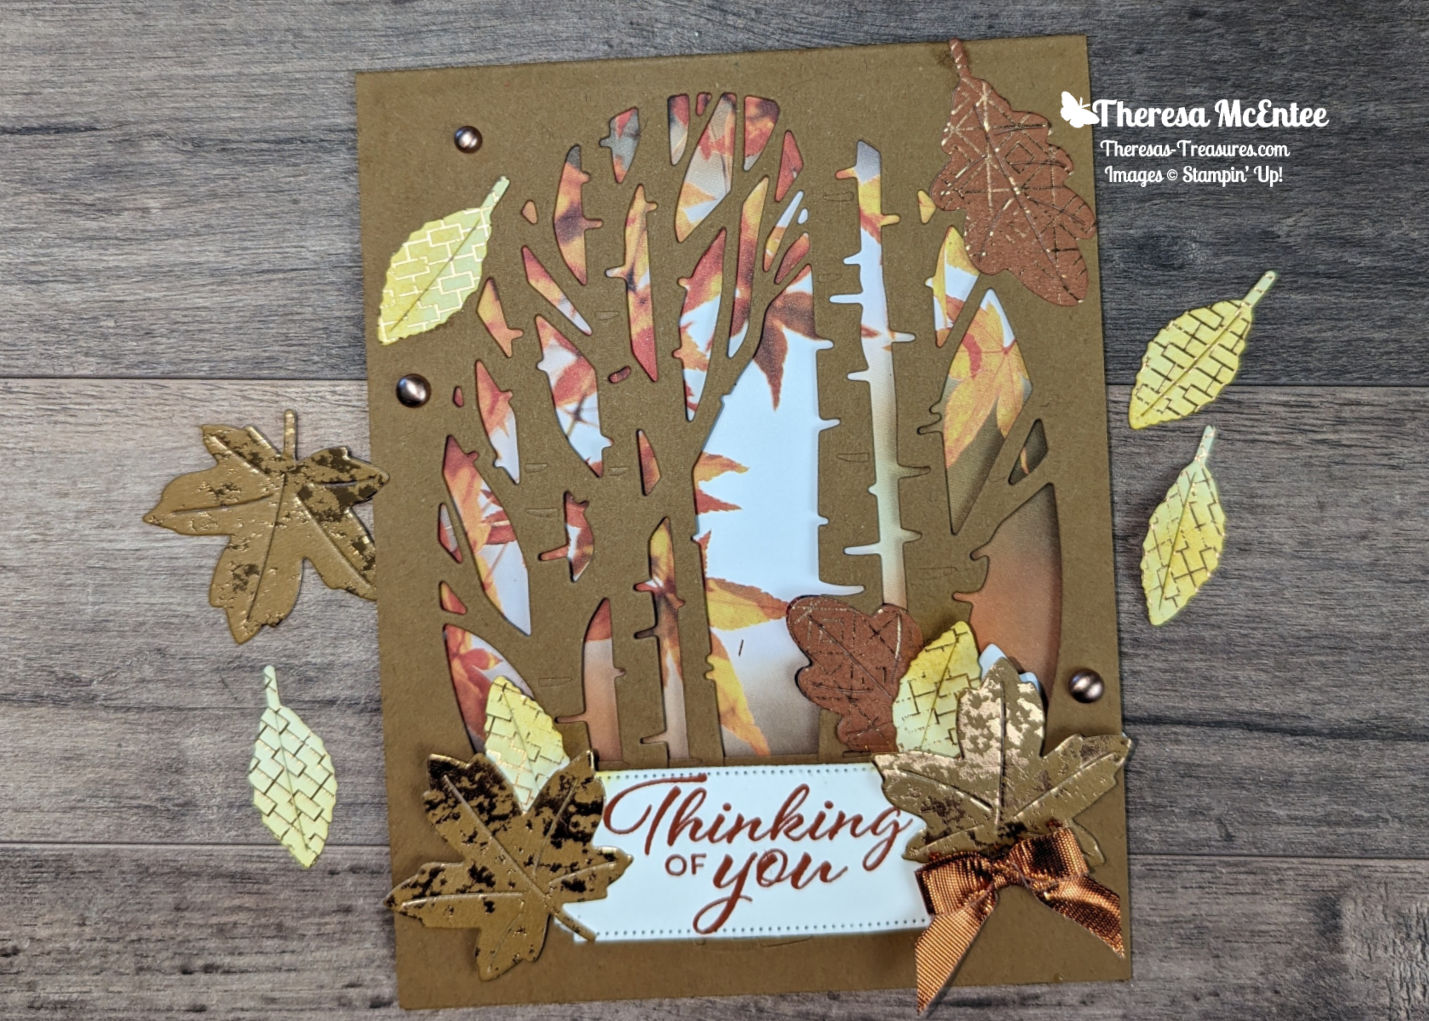
Hello and welcome! I am Theresa McEntee, creator of Theresa’s Treasures Paper Crafts. Today I have the pleasure of participating in the Blog Hop with Around the World on Wednesday (AWOW) organized by Angie McKenzie. On the second Wednesday of each month, the AWOW team put together a thematic hop to give you some inspiration for your own crafting. “Fall colors in Paris” is a Color Challenge for this month’s theme.
My Project for today
I was creating this card in my head over several days. I really love this particular design in the All About Autumn 6″ x 6″ Designer Series Paper pack. I wanted to used the Aspen Trees Dies too.
I do look at a lot of projects that other talented crafters make. Some of those projects inspire me and help me to create my own project. I hope my project will inspire you!
Project Details
This card was made using a variety of stamps and dies. The Autumn Leaves stamp and Dies come as a bundle (#162186). I have really liked the Aspen Dies that go with the Perched in a Tree stamp set. The Layering Leaves stamp set is great for sentiments.
Project Details
Measurements
Pecan Pie cardstock card base: 4 1/4″ x 11″ scored at 5 1/2″
Pecan Pie cardstock: 1 3/8″ x 4 1/4″ for inside
All About Autumn 6″ x 6″ Designer Series Paper, Autumn Leaves photo design: 4″ x 5 1/2″ scored at 1/4″
Basic White cardstock: 4″ x 5 1/4″ and 1 1/2″ x 3″(sentiment)
Dry Brushed Metallic 12″ x 12″ Specialty Designer Series Paper: 1 3/4″ x 5″ to die cut the maple leaves
All About Autumn DSP: White/Copper Foil design: 2″ x 2 1/4″ to die cut the small leaves and Cajun Craze/Copper Foil design: 1″ x 4 1/2″ to die cut the oak leaves
Supplies
Stamps & Dies: Autumn Leaves stamp set & Dies, Aspen Tree Dies, Perched in a Tree stamp set and Layering Leaves stamp set
Ink: Daffodil Delight & Cajun Craze
Blending Brush
Brushed Metallic Adhesive Backed Dots
Copper & Natural Ribbon Combo
Stampin’ Dimensionals & Mini Stampin’ Dimensionals
Mini Glue Dots
Instructions
Diecut all of the leaves and set aside.
Use the Aspen Trees Die to diecut the front of the Pecan Pie cardstock cardbase.
Adhere the Basic White cardstock to the 1/4″ edge of the All About Autumn DSP.
Stamp the sentiment from the Perched in a Tree stamp set in Cajun Craze Ink onto the Basic White cardstock. Use the the Daffodil Delight Ink to Stamp Off once then stamp the image of the leaves from the Autumn Leaves stamp set around the sentiment.
Adhere the Basic White cardstock to the inside back panel of the Pecan Pie cardstock card base.
Stamp the sentiment ” Thinking of You” from the Layering Leaves stamp set onto the smaller piece of Basic White cardstock. Diecut with the label from the Autumn Leaves Dies.
Use the Daffodil Delight Ink and a Blending Brush to color the small leaves diecut from the white/copper foil design of the All About Autumn DSP.
Place the Silicon mat between the front panel of the card base and the All About Autum DSP layer to avoid getting glue on the inside layer.
Position Mini Stampin’ Dimensionals on the tree trunks to adhere the sentiment label.
Start to adhere the diecut leaves. Remember that they will show through on the inside.
Adhere the Pecan Pie cardstock for the inside to cover where the sentiment shows through. Then position the leaves on the inside to hide the backside of the leaves from the frontside.
Add a few more leaves to the cardfront taking care that they do not show through to the inside.
Tie a bow with the Copper Ribbon and adhere with a Mini Glue Dot.
Voila! That is it!
The AWOW Team
Each month this group of creative friends prepare a project for a theme. Below is an image of the whole crew and where they are from around the globe. Such a talented and wonderful group of people! You will want to visit everyone to be sure to see all the amazing projects!
I am so glad you have joined me today in this worldwide hug that stretches all the way from Australia to Alaska across twelve different time zones. We all love sharing joy with you through projects from our individual parts of the world. I hope that you will be filled with lots of inspiration!
Hello fellow stampers! You are visiting with Theresa McEntee-author of Theresa’s Treasures Paper Crafts. I am hopping with the Ink & Inspiration Blog Hop today. There are several of us- you will find the list to follow the hop at the end of my blog post.
The Ink & Inspiration Challenge is both an image and a color challenge. I was inspired by the trees and sun because I felt a feeling of serenity while I was looking at the image. The color combination is just gorgeous! Many of my faves!
How To
Measurements are at the end of the blog.
Start out with the One Horse Open Sleigh Designer Series Paper on the left. I thought it was a little barren. After looking through all my stamp sets, I found the perfect tree in the Grassy Grove stamp set.
Tear a piece of copy paper to make an uneven edge and use as a mask so that the trees appear further away. Stamp some trees in Starry Sky Ink. The mask also provides an edge to make a snow drift for the trees to be behind. Use a Small Blending Brush with the Starry Sky Ink and a light layer to make a soft snowdrift in front of the trees.
Diecut the sun with the smallest of the Deckled Circle Dies from a piece of full stick sticky paper. Tip: Diecut through 2 or more sticky sheets so that the top one will still have a full stick.
Apply a light layer of Crushed Curry Ink with a Small Blending Brush where you want the sun to be. Stick the sun mask on. Blend on more Crushed Curry Ink, then blend on a little Pumpkin Pie just around the edge.
To make the sun’s rays, use a scrap piece of Basic White cardstock and a Small Blending Brush. Apply a small amount of Crushed Curry Ink to the brush and very gently blend the color along the edge of the scrap of cardstock. Move the scrap a little and repeat until all the rays are done.
Add more trees in Mossy Meadow Ink and Blackberry Bliss Ink.
The sentiment is from the Horse & Sleigh stamp set. Stamp the sentiment for the front of the card in Starry Sky Ink onto a strip of Basic White cardstock measuring 5/8″ x 4 1/4″.
The clouds come from the Trucking Along stamp set and are stamped in Gray Granite Ink.
Use the torn piece of copy paper again to create the inside of the card. Stamp the trees that are in the background with Starry Sky Ink. Then as you move closer, stamp the trees in Mossy Meadow Ink then Blackberry Bliss Ink. Use a Small Blending Brush and a light layer of the Starry Sky Ink to make the snowdrifts.
Stamp the sentiments for the inside of the card in Starry Sky Ink.
Adhere all of the corresponding cardpieces. Use Stampin’ Dimensionals to adhere the front panel.
Add Bling
Use the 2022-24 In Color Pearls for the Bling by applying 3 of the Starry Sky pearls.
Measurements
This is a 5″ x 7″ card.
Starry Sky cardstock card base: 7″ x 10″ scored at 5″.
Basic White cardstock: 4″ x 6″ and 5/8″ x 4 1/4″
One Horse Open Sleigh Designer Series Paper (DSP): 4″ x 6″
Blackberry Bliss cardstock: two at 4 1/4″ x 6 1/4″
If you live in the USA and would like to join Theresa’s Treasures Stampin’ Up! Stamping Gems Team, the best joining special is going on now until October 31, 2023!
Hello! Welcome to Bruno & Kylie Bertucci’s Demonstrator Training Blog Hop for October 2023. I’m Theresa with Theresa’s Treasures Paper Crafts. I have a Hello card made with the Abundant Beauty Decorative Masks for you today. I am so glad you are joining me!
We are a group of Stampin’ Up! Demonstrators from around the world, interested in building a successful Stampin’ Up! business. My goal this year is to continue to participate in the monthly Blog Hop. I will be showing the card I send my customers when they order from me. This blog hop is full of ideas and creative inspiration! Be sure to visit everyone’s blog by clicking on the links at the end of my blog.
Pumpkin Pie cardstock: 4 1/4″x 5 1/2″ (for diecutting the 2nd from the largest Deckled Circles Die)
Basic White card stock: 2″ x 3″, 4″ x 5 1/4″ and 4″ x 5 1/4″ (for diecutting the 4th from the largest Deckled Circles Die)
Supplies
Abundant Beauty Decorative Masks
Layering Leaves stamp set for the sentiment
Autumn Leaves Dies
Ink: Daffodil Delight, Pumpkin Pie, Cajun Craze, Lemon Lime Twist, Parakeet Party, Granny Apple Green, Pecan Pie and Early Espresso
Small Blending Brushes (at least 2 packs)
Real Red & Burlap Ribbon Combo Pack
Rustic Metallic Adhesive-Backed Dots
Instructions
Blending the Flower Petals
Diecut the Deckled Circle from the Basic White cardstock.
Secure it to a piece of scrap paper with removable adhesive.
Secure the scrap paper to the work space with tape.
Lay the #1 Decorative Mask over your Deckled Circle cardpiece as desired. Take note of where the notch along the edge of the mask is. Use a pen to draw a line along that edge to help with placement of the next masks.
Secure the Decorative Mask with some removable tape (sticky note tape).
Use a Small Blending Brush and the Daffodil Delight Ink to apply ink along the tips of the flower petals. You can make this as light or as dark as you wish. See photo above on left.
Now use another Small Blending Brush and the Cajun Craze Ink. Apply a layer of ink around the center circle.
Lastly blend in Pumpkin Pie Ink with a third blending brush to complete the flower petals.
Carefully remove the mask without disturbing the cardpiece.
Blending the Leaves
Lay the #2 mask with the leaves by matching up the notch on the edge of the mask with the mark you made on the scrap paper.
Secure the mask with removable tape.
Use a clean Small Blending Brush to apply the Lemon Lime Twist Ink to the leaves first. Then apply the Parakeet Party Ink leaving a bit of the Lemon Lime Twist showing on the upper edge of each leaf.
Finish the leaf by blending in some of Granny Apple Green Ink along the bottom edge of each leaf.
Carefully remove the mask.
Blending the Center of the Flower
The last 2 masks will complete the center of the flower.
Lay mask # 3 over the card piece matching the notch. Secure it with the removable tape.
Use a Small Blending Brush to apply the Pecan Pie Ink.
Carefully remove mask #3.
Lay mask #4 over the card piece, matching the notch and securing it to the scrap paper.
Apply Early Espresso Ink.
Remove the mask.
Tip: Be sure to keep the masks away from your cardpieces as they will have residual ink on them. Rinse them in water. Use a mild soap if needed.
Blending the Flower for the Inside
Repeat the above process to blend on a small flower in the lower right-hand corner of the Basic White cardstock for the inside of the card.
Adhere this piece to the inside of the Cajun Craze cardstock card base.
Assemble the Card
Use the Deckled Circles Die to diecut from the Pumpkin Pie cardstock.
Adhere the Basic White cardstock card piece with the flowers on it to the Pumpkin Pie cardstock circle.
Position the circles on the front of the Cajun Craze cardstock card base and trim any excess that is on the left border.
Adhere this to the card base.
Use Early Espresso Ink and the “Hello” sentiment from the Layering Leaves stamp set to stamp onto the 2″ x 3″ Basic White cardstock. Diecut with the label die from the Autumn Leaves Dies. Use Stampin’ Dimensionals to adhere the sentiment to the card front.
Tie a bow with the Burlap Ribbon and adhere to the card front with a few Mini Glue Dots.
Bling! Apply the Rustic Metallic Dots as desired.
Voila!
Remember to visit everyone’s blog. You will see creative inspiration from Demonstrators around the world! You are currently at Theresa McEntee-Theresa’s Treasures-USA. Enjoy!
I appreciate your visit to my blog today. Those who place an order with me during October will receive one of today’s cards as a thank you!
Please subscribe to my blog so you will continue to see these blogs. If you need any assistance with placing an order so you can make your own card, let me know in the comments. Thanks!
Welcome and thanks for visiting Theresa’s Treasures Paper Crafts! I am Theresa, a Stampin’ Up! Demonstrator in Arizona, USA. Today is the monthly Inspirations in Ink Blog Hop! I am excited to be hopping with talented demonstrators from around the world. Be sure to check out everyone’s Magical Meadow Bundle projects. The Magical Bundle is in the 2023 Mini Catalog. When you are ready, you may order from my Online Store HERE.
I made this card using most of the diecuts form the Magical Meadow Die set using the colors shown in the catalog for this set. I love the color combination and how the bouquet turned out!
Measurements
Blueberry Bushel cardstock card base: 4 1/4″ x 11″ scored at 5 1/2″
Gray Granite cardstock: 4 1/4″ x 5 1/2″ (to diecut with the largest Scalloped Contour Die)
Basic White cardstock: 3 3/4″ x 5″ (inside), 2 1/4″ x 2 1/4″ (to diecut the circle with Labels Aglow Dies) and 3 1/2″ x 5″ (to diecut with the 2nd to the largest Scalloped Contour Die)
Scrap cardstock in Moody Mauve, Lost Lagoon, Shaded Spruce and Blueberry Bushel to diecut the foliage
Supplies
Magical Meadow stamp set & dies
Scalloped Contours Dies
Labels Aglow Dies
Blueberry Bushel Ink
Blending Brush
Tinsel Gems 4 Pack
White & Silver Ribbon
Voila!
Thank you so much for visiting today! Please visit all the blogs in the Inspirations In Ink Blog Hop. You will be amazed and inspired by all the fun and creative projects made by the Inspirations In Ink demonstrators.
You are currently visiting Theresa McEntee-USA creator of Theresa’s Treasures Paper Crafts.
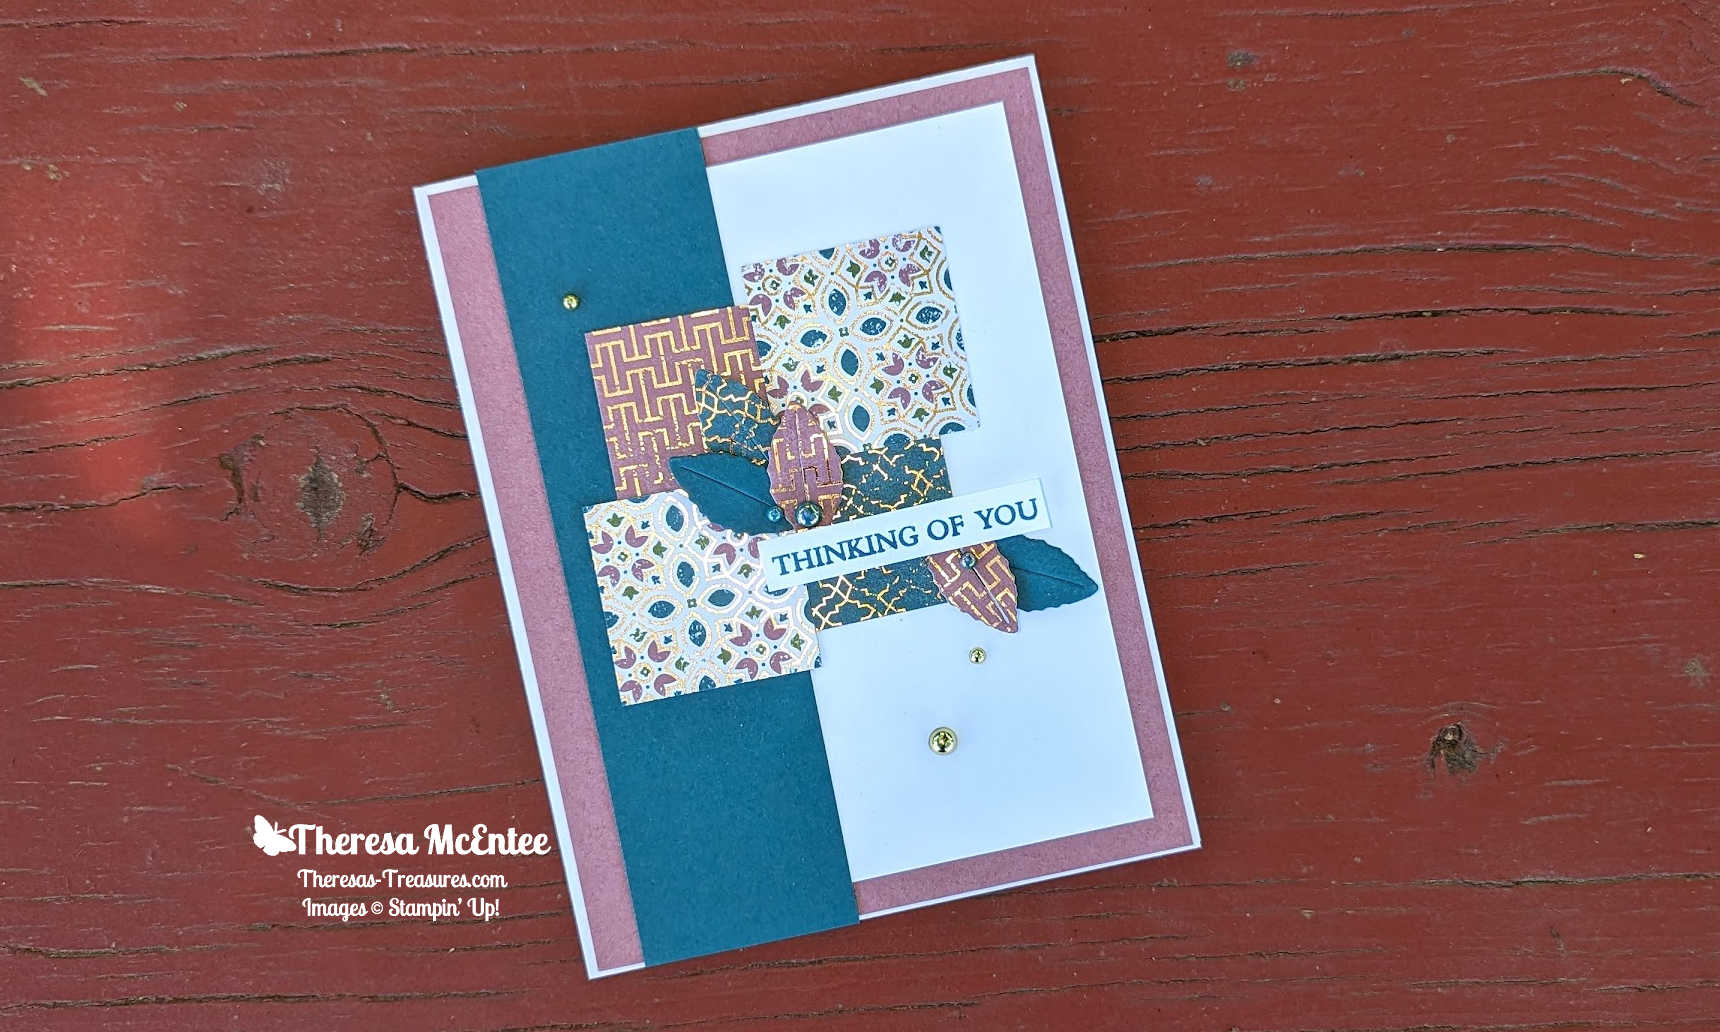
Hello and welcome to a Sketch Challenge with Autumn Leaves Dies! I am Theresa McEntee, creator of Theresa’s Treasures Paper Crafts. Today I have the pleasure of participating in the Blog Hop with Around the World on Wednesday (AWOW) organized by Angie McKenzie.
On the second Wednesday of each month, the AWOW team put together a thematic hop to give you some inspiration for your own crafting. This Sketch Challenge and the question on whether to add a bow or not is this month’s theme.
I found this Sketch Challenge to be, well, challenging. I had fallen in love with the All About Autumn Designer Series Paper and Autumn Leaves Dies. So I decided to play around with the different designs and colors. I love the little leaves in the dies!
My Project for today
I chose this color combination to be in line with the colors in the All About Autumn Designer Series Paper-Moody Mauve and Pretty Peacock. I did make this card using Basic White cardstock, but in retrospect, I should have used Very Vanilla cardstock. If I make another card, I will use the Very Vanilla cardstock.
Project Details
Measurements:
Very Vanilla cardstock card base: 4 1/4″ x 11″ scored at 5 1/2″
Very Vanilla cardstock: 3″ x 5″, 3/8″ x 2″ (sentiment) and 4″ x 5 1/4 (inside)
Moody Mauve cardstock: 4″ x 5 1/4″
Pretty Peacock cardstock: 1 1/2″ x 5 1/2″ and 1 1/2″ x 1 1/2″ (to diecut leaves)
Moody Mauve/Foil design of All About Autumn DSP: 1 1/8″ x 1 1/8″, 1 1/2″ x 1 1/2″ (to diecut leaves) and 3/8″ x 3 1/2″ (inside)
Pretty Peacock/Foil design: 1 1/8″ x 1 1/8″, 1″x 1 1/2″ (to diecut leaf) and 3/8″ x 5 1/4″ (inside)
Moody Mauve/Pretty Peacock/Very Vanilla/Foil design: 1 3/8″ x 1 3/8″ and 3/8″ x 4 1/2″ (inside)
Instructions
Burnish the fold of the Very Vanilla cardstock card base with your Bone Folder.
Use the Multipurpose Liquid Glue to adhere the All About Autumn DSP strips to the 4″x 5 1/4″ Very Vanilla cardstock to make the inside panel. Adhere it to the inside of the Very Vanilla card base.
Adhere the 4″ x 5 1/4″ Moody Mauve cardstock to the front of the Very Vanilla cardbase.
Position the 3″ x 5″ Very Vanilla cardstock slightly to the right and adhere in place.
Now adhere the Pretty Peacock cardstock to the card front on the left side.
Set up all of the squares of the All About Autumn Designer Series on the card front, and then adhere them.
Diecut the little leaves, place them where you like and adhere.
Stamp the sentiment in Pretty Peacock Ink. Adhere to the card front with Stampin’ Dimensionals.
Add the Blooming Pearls as desired.
The AWOW Team
Each month this group of creative friends prepare a project for a theme. Below is an image of the whole crew and where they are from around the globe. Such a talented and wonderful group of people! You will want to visit everyone to be sure to see all the amazing projects!
I am so glad you have joined me today in this worldwide hug that stretches all the way from Australia to Alaska across twelve different time zones. We all love sharing joy with you through projects from our individual parts of the world. I hope that you will be filled with lots of inspiration!


")


 Designer Series Paper")


")


")
")
")


 Specialty Designer Series Paper")
 Specialty Designer Series Paper")


")
")
")


 Designer Series Paper")