I love getting costumes made for my kids, even though now that they are older the costumes are more complicated. I love to sew and don’t get a chance until Halloween. However, even more than sewing costumes, I love to stamp and create fun Halloween cards to send out!
The card I created for today is very quick and simple to make. The images are from the Stampin’ Up!® Have a Hoot stamp set in the August-December 2020 Mini Catalog. The little owl is so adorable!
Measurements: Basic Black Card Stock (CS) card base: 4 1/4 x 11 inches with a score line at 5 1/2 inches; Whisper White CS: 4 x 5 1/4 inches and 2 x 2 3/4 inches; Mango Melody CS: 2 x 2 3/4 inches; and Magic in this Night Designer Series Paper (DSP): 2 x 5 1/2 inches. Note: when cutting the DSP, position a spider’s web in the center and on the top of the card piece.
Using the Memento Black ink, stamp the owl in the tree onto the 2 x 2 3/4 inch Whisper White CS.
Use the Memento ink to stamp the little owl hiding behind the pumpkin onto the lower righthand corner of the 4 x 5 1/4 inch Whisper White CS. Stamp the “Boo!” sentiment above the owl.
I used the Stampin’ Blends Alcohol Markers in: Basic Black, Pumpkin Pie, Mango Melody, So Saffron, Cinnamon Cider, Bronze and Just Jade.
I started with the Dark Cinnamon Cider around the outer edges of the owl, then filled it in with the Light Cinnamon Cider.
I colored the tree with the Bronze, the spider with Basic Black, the talons and beak with Dark Mango Melody and the eyes with Dark So Saffron.
The pumpkin was colored along the outer edge with Dark Pumpkin Pie. Next I colored with Light Pumpkin Pie and then Dark Mango Melody blended in moving toward the center of the pumpkin. The eyes of the owl and pumpkin face are colored in Dark So Saffron. I colored the stem in Dark Just Jade.
The owl was again colored with the Dark Cinnamon Cider around the outer edges and Light Cinnamon Cider toward the center of the owl.
Adhere the 4 x 5 1/4 inch Whisper White CS with the owl and pumpkin to the inside of the Basic Black CS card base.
Use the Bone Folder to fold the Basic Black card base at the 5 1/2 inch score line to get a crisp fold. Adhere the 2 x 5 1/2 inch Magic In This Night DSP to the card front on the left with the spider’s web on top.
Adhere the owl in the tree to the 2 x 2 3/4 inch Mango Melody CS slightly off-set. Adhere this to the card front.
Now the Bling! The Iridescent Pearls in the 2020 Mini Catalog are so awesome! As you move the pearls, the color changes from Pretty Peacock to Gorgeous Grape to Shaded Spruce!
I added a few of the Iridescent Pearls to the center of the strip of DSP and then scattered around on the Basic Black CS.
Viola! Such an adorable Halloween card that was so quick to put together! Thanks for visiting today!
There is a 24 hour Stamp Sale coming up! The 15% off selected stamp sets starts September 23, 2020 at 12 am and ends at 11:50pm. More information is below including a list of the stamp sets on sale. Consider purchasing stamp sets for gifts to give this holiday season. ShopHEREand use Host Code: RVC2GE3V before check out.
This funtastic Pampered Pets stamp set is perfect for the dog or cat lover! This card is for my daughter who has both a dog and three cats.
This is a very common and easy fun-fold with a slight variation to make it more interesting. I turned the Real Red Card Stock (CS) that goes behind the stamped puppy card piece to make it diamond-shaped.
Measurements: Real Red CS card base is 4 1/4 x 11 inches with score lines at 2 3/4 and 5 1/2 inches; Real Red CS: 2 3/4 x 2 3/4 inches; Whisper White CS: 2 3/4 x 2 3/4 inches and 4 x 5 1/4 inches; Playful Pets Designer Series Paper (DSP): 2 1/2 x 4 inches.
With Memento Black ink stamp the puppy onto the 2 3/4 x 2 3/4 inch Whisper White CS. Tip: We will be coloring with the Stampin’ Blends Alcohol Markers and the Memento ink will not bleed.
Stamp the sentiment “I hope your day is a real treat” in Memento ink onto the lower right hand corner of the 4 x 5 1/4 inch Whisper White CS. Add the little pet food bowl and then the hearts.
The Stampin’ Blends Alcohol Marker colors are: Light Basic Black and Light and Dark: Smoky Slate, Flirty Flamingo and Real Red. I also used the Real Red Stampin’ Write marker that is part of the Regals Assortment for the collar and dog’s mouth.
First color with the Stampin’ Blends Light Basic Black to accentuate the edges and shadows. Add the Dark Smoky Slate and blend it into the Light Basic Black.
Blend in the Light Smoky Slate. Tip: When blending the light color into the darker colors, use a small circular motion. I added a little Light Flirty Flamingo to the belly, ear and nose.
Color the mouth and collar with the Stampin’ Write Real Red Marker. The tip is finer so it is easier to put the ink just where you want it. Add a little Basic Black ink to the nose.
Color in the hearts with the Light Flirty Flamingo Stampin’ Blend and add a slight shadow on the right hand side of each heart with the Dark Flirty Flamingo. The pet food bowl is colored with the Light Real Red Stampin’ Blend on one half, and the Dark Real Red on the other half.
Take the Real Red CS card base and use your Bone Folder to make a Z-fold as shown.
Adhere the 2 3/4 x 2 3/4 inch Playful Pets DSP to the front panel of the Z-fold. Adhere the sentiment card piece to the inside.
Apply adhesive to half of the 2 3/4 x 2 3/4 inch Real Red “diamond-shape” and apply to the front panel over the Playful Pets DSP. Be mindful of the placement so that the sentiment shows completely when the card is closed.
Apply adhesive to the colored puppy card piece and adhere it to the Real Red diamond-shaped card piece. Be mindful of the lower right corner so that it does not cover the sentiment.
Viola! This card is a playful fun-fold that was pretty quick to make! I hope my daughter gets hers in the mail before this blog posts!
Thank you for stopping by today. There is a joining special I wanted to let you know about. If you would like to join my Theresa’s Stamping Gems team, you may purchase a Starter Kit for $99 and you will get $125 worth of product of your choice. But there is more!
The Get & Go Starter Kit promotion is meant to give those who sign up to be a Stampin’ Up!® Demonstrator additional products to help them get started right away. In addition to the already great-valued Starter Kit mentioned above, new recruits will receive pre-cut paper, stamps, and embellishments to use in their first event.
The new recruit will also receive enough cardstock pieces to make 16 cards, a pack of Rhinestone Basic Jewels, the So Much Love stamp set, and the Queen Anne’s Lace stamp set—all for their first event.
Here is what you get in the pre-cut card kit:
Granny Apple Green card pack contents 8-1/2″ x 5-1/2″ (21.6 x 14 cm) Granny Apple Green Cardstock 3″x 4″ (7.6 x 10.2 cm) Bermuda Bay Cardstock 3″x 4″ (7.6 x 10.2 cm) Coastal Cabana Cardstock 3/4″x 4″ (1.9 x 10.2 cm) Daffodil Delight Cardstock 5-3/4″ x 4-3/8″ (14.6 x 11.1 cm) Whisper White Envelope
Coastal Cabana card pack contents 2-1/4″ x 3-1/2″ (5.7 x 8.9 cm) Whisper White Cardstock 2-3/4″ x 4″ (7 x 10.2 cm) Daffodil Delight Cardstock 3″ x 4″ (7.6 x 10.2 cm) Bermuda Bay Cardstock 8-1/2 x 5-1/2″ (21.6 x 14 cm) Coastal Cabana Cardstock 5-3/4″ x 4-3/8″ (14.6 x 11.1 cm) Whisper White Envelope
Here are a few examples of cards you could make with the kit.
Why join as a Demonstrator?
Do you love to craft? Would you like to work from home? Do you enjoy people? Then becoming a Stampin’ Up! demonstrator may be the perfect opportunity for you.
DEMONSTRATOR BENEFITS
Get 20%–25% off all Stampin’ Up!® products.
Earn additional income based on your sales and recruiting–just how much extra income is up to you.
Set your own schedule and put in as much (or as little) time as you’d like.
Get support through online training resources, a quarterly e-magazine, events, and a demonstrator-only online community with thousands of project ideas.
Access to regular promotions, giving you an opportunity to contact customers.
Opportunity to earn incentive trips.
Chance to learn creative tips and techniques, share ideas, and come into contact with new friends who love paper-crafting as much as you do!
Create Your Starter Kit Today!
If you have any questions about joining my Stampin Gems Team or becoming a Stampin’ Up!® Demonstrator please email me at: theresastreasures.az@gmail.com.
Products used for the Playful Pampered Pet card include those listed below. To purchase a product, click on the photo and you will be connected to my Online Store.
First I just want to take a moment to remember and reflect on all of those affected by the horrific events on September 11, 2001.
For today I have a special fun fold for you. This is a little challenging, but I will give step by step instructions. Warning, there are a lot of photos to help show how I created this card.
The Country Home and Jar of Flowers stamp sets pair together nicely. I love the sunflowers because they remind me of the approaching Autumn with their golden yellow and brown colors. The pop-up box of flowers on the inside of the card is a nice surprise!
Measurements: Cajun Craze Card Stock (CS) card base: 5 1/2 x 8 1/2 inches with a score line at 4 1/4 inches; Crumb Cake CS: 5 1/4 x 8 inches with a score line at 4 inches, 3 3/4 x 5 inches and 1 x 3 inches; Very Vanilla CS: 3 1/2 x 4 3/4 inches, 3 x 5 inches, 3/4 x 3 3/4 inches and two 1 x 1 1/2 inches.
I drew dark solid lines to indicate cutting and dashed lines for scoring. You do not need to draw the lines. First you are going to cut the 5 1/4 x 8 inch Crumb Cake CS that has the score line at 4 inches. Using your Paper Trimmer place the 5 1/2 inch side on top with the left edge at 1 inch. Cut from 2 1/2 to 5 1/2 inches. Move the left edge to 2 1/2 and make the same cut.
Turn the Crumb Cake CS until the 8 inch side is on top. With the left edge at 2 1/2 inches make a score line between the cuts from 1 inch to 2 1/2 inches. Move the left edge to 5 1/2 inches and make another score line like the first. Now you can fold the card piece so that a little box pops out.
Flip the Crumb Cake card piece and place it inside the Cajun Craze CS card base to get an idea of what it will look like.
Cut the 1 x 3 inch Crumb Cake CS in half at 1 1/2 inches. Make a scoreline at 1 inch lengthwise. Trim the corners as shown. These will be the flaps for the box top. Adhere the box flaps.
Close the card piece after you adhere the box tops to ensure it will lie flat. If not, trim the corners of the flaps a little more.
Now for the stamping! Use the Memento black ink to stamp the images that will be colored with the Stampin’ Blends Alcohol Markers. Tip: The Memento does not bleed as much as the regular ink when colored with the alcohol marker. Stamp the milk can from the Country Home stamp set onto the bottom of the 3 1/2 x 4 3/4 inch Very Vanilla CS. Stamp the bunch of sunflowers from the Jar of Flowers stamp set above the milk can, and onto the 3 x 5 inch Very Vanilla CS. Tip: To get the best stamped image with the Photopolymer stamp, you can use the Stampin’ Pierce mat or a catalog underneath. I simply forgot to use one this time.
Use Early Espresso ink to stamp the sentiment “Happy Harvest Blessings” onto the 3/4 x 4 inch strip of Very Vanilla CS. Next stamp the sentiment “You are the happy to my day” onto the Crumb Cake insert to the right hand side of the box.
I included a lot of photos to show you how I go about coloring with the Stampin’ Blends Alcohol Markers. This is just one way to go. Feel free to color how you would like. For the sunflowers I used the light and dark version of the following colors: Daffodil Delight, Mango Melody, Just Jade, Shaded Spruce, Calypso Coral and Cinnamon Cider.
For the small flower, I first colored in with the Light Calypso Coral. Then I colored the Dark Calypso Coral around the edges followed by coloring with the Light Calypso Coral to blend the dark into the light.
For the sunflowers I found it easier to color in the Dark Daffodil Delight first, then add the Light Daffodil Delight.
I added some Light Mango Melody to accentuate the shadows on the petals behind the other petals. I realized I had forgotten the little buds on the right, so I colored them in with the Light and Dark Calypso Coral.
I colored the center of the sunflower with the Light Cinnamon Cider leaving a ring that was not colored in. Next I colored in the very center and added some shading with the Dark Cinnamon Cider. Lastly, I colored the ring with the Light Daffodil Delight.
To color the leaves I started with the Light Just Jade, then added in some shading with the Dark Just Jade, followed by more Light Just Jade to blend the dark in. Lastly, I colored the small leaf fronds with the Dark Shaded Spruce at the base of the leaf, then the Light Shaded Spruce to finish.
The milk can is colored with the Light and Dark versions of Smoky Slate and Gray Granite.
I started with the Dark Smoky Slate and shaded in the borders of the milk can. My goal was to make it appear more rounded. I colored the right side a little more heavily than the left. Next I blended in the Light Smoky Slate followed by the Light Gray Granite. Tip: For better results I have found it easier to use the fine tip first when trying to make the colors gradated .
I added a single coat of the Light Gray Granite with the brush tip to blend everything together. I colored more shading with the Dark Smoky Slate to enhance the darker edges. You may set this aside until later.
I repeated the coloring process for the other two sunflower stamped images.
To prepare the sunflowers to be adhered to the inside of the box, I first cut off the smaller buds and fern frond one image. Next I fussy cut both images. To make them easier to adhere, I added a little tab by adhering the Very Vanilla CS 1 x 1 1/2 inch strips to the back of the sunflowers.
I placed the sunflowers in the box, being mindful to keep the edges in the middle from crossing over the 4 inch score line on the Crumb Cake CS. Next I used the Scoring Tool to score the sunflowers in line with the outer edge of the box. I folded the sunflowers along the score line.
I adhered the Very Vanilla CS tab on the back of the sunflowers to the back of the Crumb Cake CS box, being sure to keep the folded edge in line with the outer edge of the box. Before the glue dried, I closed the Crumb Cake CS to be sure everything was lined up and the card would be able to close. I opened the Crumb Cake CS and applied glue to the folded portion of the sunflowers, then closed the Crumb Cake CS card piece again to smooth it out.
Things are going to get a little easier soon. To adhere the Crumb Cake CS card piece to the Cajun Craze CS card base, first lay the piece in the card and apply adhesive to one side. Close the card and rub firmly.
Open the card and apply adhesive to the other side. Close and rub firmly.
Yay! What an awesome pop-up card!
Adhere the milk can piece to the 3 3/4 x 5 inch Crumb Cake CS, then adhere that to the front of the Cajun Craze CS card base. Be sure to adhere it to the correct side! Ask me why I know this!
Add the sentiment “Happy harvest Blessings” with Stampin’ Dimensionals.
Viola! You made it through! I know that was long. The card is really awesome though. I hope you take a chance and give it a try.
Thanks so much for patiently viewing my blog today. Every once in awhile I need a challenge.
Stampin’ Up! products used to make this card are pictured below. Click on any photo to go to my online store or click on https://bit.ly/ShopTheresasTreasures
This wonderful summer Birthday card was inspired by a swap I received. A swap is a card that you make multiple copies of and take to a stamping event with you. There you will meet others who have made swap and you swap cards with them. Unfortunately I have lost the name of who made the swap I was inspired by.
Measurements: Very Vanilla Card Stock (CS): 4 1/4 x 11 inch card base with a score line at 5 1/2 inches, two 4 x 5 1/4 inch, 2 x 4 1/2 inches and 1 x 3 3/4 inches.
I used Memento ink for the stamping and I colored with Stampin’ Blends Alcohol Markers. I used the light and dark Blend of each of the following colors: Pool Party, Purple Posy, Petal Pink, Crumb Cake and Soft Suede.
Using the Memento ink, stamp the sea horse onto the 2 x 4 1/2 inch Very Vanilla CS and the “Happy Birthday” sentiment onto the 1 x 3 3/4 inch strip of Very Vanilla CS.
On one of the 4 x 5 1/4 inch Very Vanilla CS pieces I stamped a row of the conch shell, then added the sand dollars.
Next I stamped the snail shell. I filled in the spaces with the clam shell. I added another conch shell on the very bottom left and top right. This is a slightly organized random pattern in my book! Ha, ha! 🙂
Don’t do this step because it turned out to be a mistake later on but i wanted to share this with you so you won’t make the same mistake. On the inside of the card base I stamped another sea horse and two sand dollars. I recommend that you stamp the sea horse and sand dollars onto the other 4 x 5 1/4 inch Very Vanilla CS piece.
Again do not do this step. Once I used the Stampin’ Blends to color the sea horse and sand dollars, I realized that the markers bled through to the back. Whoa! 😲 The way I fixed it is that I cut the inside panel to be 4 x 5 1/4 inches and made another 4 1/4 x 11 inch Very Vanilla CS card base.
On with the fun. Color the sea horse with the light and dark Soft Suede Blends.
For each of the shells, I decided to add a shadow to the lower right hand side. I did this by first coloring in the shell with the Light Crumb Cake Blend. I then went over the lower right with the Dark Crumb Cake Blend. Lastly I went over the area I wanted shadowed again with the Light Crumb Cake Blend to blend the light and dark together.
I repeated the process with all the shells. The conch shells are colored in Petal Pink. The snail shell is colored in Pool Party and the clam shell in Purple Posy.
Fussy cut the sea horse that is stamped on the 2 x 4 1/2 inch Very Vanilla CS. Place cut up Stampin’ Dimensionals and Mini Stampin’ Dimensionals on the tail and head, leaving the body without Dimensionals.
Adhere the body of the sea horse to the left side of the Happy Birthday sentiment. Cut a banner end on the right end of the sentiment strip.
Adhere the 4 x 5 1/4 inch Very Vanilla CS stamped with the sea horse to the inside of the 4 1/4 x 11 inch Very Vanilla CS card base. Use the Bone Folder on the 5 1/2 inch score line to make a crisp fold.
Adhere the other 4 1/4 x 5 inch Very Vanilla CS stamped with the shells to the card front. Use Stampin’ Dimensionals on the back of the sentiment strip and adhere in place.
Now for some Bling! The Wink of Stella Glitter Brush is perfect for adding a little sparkle to the sea horse.
Viola! You have a fun end of summer Birthday card to send off to someone special. I just love the sparkle!
Thank you for visiting theresas-treasures.com today. I hope you enjoyed this end of summer card. I am looking forward to some cooler temperatures, but here in Arizona it may be quite awhile. Good thing I can craft inside!
Hi! Welcome to Theresa’s Treasures. I’m Theresa and I’m an Independent Stampin’ Up!® Demonstrator in Arizona, USA. I’m so excited to be taking part in Kylie’s Demonstrator Training Blog Hop today. We are a group of Stampin’ Up!® Demonstrators from around the world that are taking part in training that is helping us to build a successful Stampin’ Up!® business and reach some goals we have set. We appreciate your support. This Blog Hop is a really fun way to see projects from Demonstrators around the world! I just love all the creativity! You may be starting here or have come from another blog – either way you can find the link list at the bottom of this post so that you can see every blog post and idea today. Please try and visit all sites and see how inspired you can become!
I can’t believe the Stampin’ Up!® August-December 2020 Mini Catalog is live already! I chose the Poinsettia Place Suite for my card today. So much loveliness!
I made a lot of different poinsettia cards by placing the Poinsettia Petals stamps on my Stamparatus and stamping a bunch of them onto 5 1/2 x 5 1/2 inch Very Vanilla Card Stock (CS). I colored each one in a different color scheme using the Stampin’ Blends Alcohol Markers then ran them through my cutting machine. I’ve made about 4 different poinsettia cards so far. This was a really quick way to stamp a bunch of poinsettia pieces.
I stamped the poinsettia and leaves for this card in Soft Suede ink. I used a blender pen for shadowing, then sponged the edges of the poinsettia in Soft Suede ink. The leaves were sponged with Garden Green ink, then Soft Suede ink on the edges. I crinkled the paper a little before laying it out on the card for added dimension.
For the “Merry Christmas” sentiment I stamped it in Early Espresso ink then cut it out with the Stitched Rectangle Dies by extending the rectangle to fit the sentiment with partial die cutting. The edges of the sentiment as well as the edges of the 1st layer of Very Vanilla CS were also sponged in Soft Suede ink.
Thanks so much for stopping by today. If your have any questions or comments, please leave them below or send to theresastreasures.az@gmail.com.
Don’t miss one blog link. Remember you are currently on my page – Theresa McEntee Theresa’s Treasures- see who is below me to know where to go next.
The supplies are pictured below. To go to my online store, click on any of the photos.
One of the special ways I share my cards is by making religious cards and donating them to my church to sell in their gift shop.
The new stamp set called His Love by Stampin’ Up!® lends itself to several great card ideas.
This is a general note card which is very versatile. You could send someone encouragement to help them through a hard time, or send the card to celebrate a baptism, first communion or confirmation.
I created this card from one of my sketches. When I receive a card from someone, or see something on Pinterest or the Web, I copy down a sketch of the basic elements of the card onto a 5 1/2 x 4 1/4 inch white card stock. I keep these for times when I need a starting point to create a card.
Measurements: Whisper White Card Stock (CS) card base: 4 1/4 x 11 inches with a score line at 5 1/2 inches, 3 x 4 inches and 4 x 5 1/4 inches; Night of Navy CS: 4 1/8 x 5 3/8 inches and a 3/4 x 4 1/8 inch strip; Artistry Blooms Designer Series Paper (DSP): 4 x 5 1/4 inches. 1/4 inch Metallic ribbon in Seaside Spray: 5 1/2 inches.
Additional supplies: Memento ink; Stampin Blends Alcohol Markers in Ivory and Light and Dark Balmy Blue; super sticky note paper for a mask; Basic Pearl Jewels; Foam Adhesive Sheet; Glue Dots and Multipurpose Liquid Glue.
Stamp the inside of the card first. Stamp the sentiment “His Love Never Fails” and the image of the Bible in Memento ink on to the 4 x 5 1/4 inch Whisper White CS. Set aside.
Stamp the praying hands in Memento ink onto the lower left corner of the 3 x 4 inch Whisper White CS and onto the super sticky note paper.
Trim the super sticky note paper praying hands close to the outline with Paper Snips. This is your Mask. Place the mask over the stamped praying hands. Stamp the sentiment “Faith” in Memento ink on to the bottom right corner. Now using Night Of Navy ink, stamp the cross over the mask.
Let the ink dry for a minute or two, then remove the mask. Such a fun technique!
Color the cross as desired with the light and dark Balmy Blue Stampin’ Blends Alcohol Markers. I colored the hands with the Ivory Stampin’ Blend. You could also use Crumb Cake, Soft Suede or Petal Pink Stampin’ Blends for the skin color.
Add a little of the light and dark Balmy Blue to the ribbon in the Bible.
Adhere the 4 x 5 1/4 inch Artistry Blooms DSP to the 4 1/8 x 5 3/8 inch Night of Navy CS.
Use Glue Dots on the ends of the 1/4 inch Metallic ribbon to adhere it to the 3/4 x 4 1/8 inch strip of Night Of Navy CS. Adhere the ribbon and Night of Navy CS piece to the Artistry Blooms DSP on the Night Of Navy CS.
To give the card a little dimension, I used the new Foam Adhesive Sheet. First I cut the sheet into four 3 3/4 x 1/4 inch strips.
I adhered the four strips to the back of the praying hands piece, then adhered it to the card front. This is a lot easier than using 15+ of the Stampin’ Dimensionals!
Use the Bone Folder to fold the 4 1/4 x 11 inch Whisper White CS at the 5 1/2 inch score line. This is your card base. Adhere the praying hands and cross piece to the front of the card base. Adhere the inside piece to the inside of the card base.
Now for some Bling!
First I placed the large pearl in the center of the cross. I then placed the smallest pearls on each arm of the cross.
Next I placed 3 medium sized pearls on the background in a triangular orientation. Finally, I added some of the smaller pearls next to the medium sized pearls to make three clusters of pearls.
Now for the final touch, a bit of Wink of Stella on the arms of the cross.
And Viola! You now have a very versatile religious card! I just love how this turned out.
Here are two other versions using the same sketch as the starting point.
Thanks so much for stopping by. I hope you give this a try. Anytime you receive a card and you like the layout, try jotting it down as a sketch to use to start another card. It is a lot of fun to come up with designs using a sketch to start.
Don’t forget about Bonus Days! This promotion ends on August 3, 2020! Take advantage of this promotion: for a $50 order before August 3, 2020, you earn a $5 coupon to use starting August 4, 2020. That is the day the 2020 Holiday Catalog goes live! There are so many wonderful holiday products! I will be starting to show cards made with holiday product soon. I seriously cannot believe it is almost August! At this rate, Christmas will sneak up on me before I know it!
Hi! Welcome to Theresa’s Treasures. I’m Theresa and I’m an Independent Stampin’ Up! Demonstrator in Arizona, USA. I’m so excited to be taking part in Kylie’s Demonstrator Training Blog Hop today. This is a really fun way to share my creations, and have the opportunity to see projects from many other demonstrators from around the world! I especially love to hear your comments!
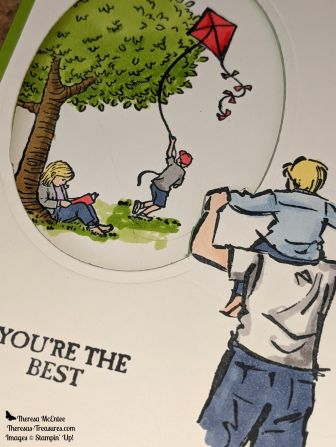
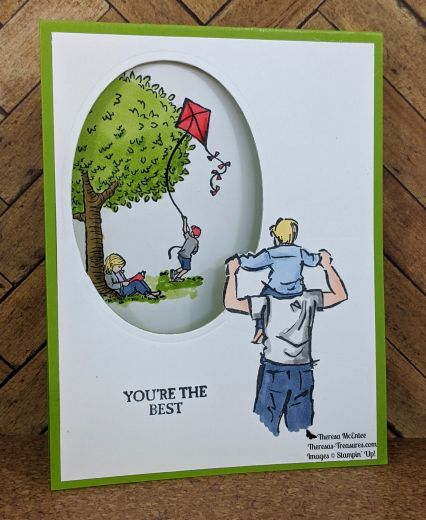
I had a lot of fun with this card. The images are from A Good Man and Summer Days stamp sets. I used to love to go kite flying when I was growing up. My Dad would make the kites and inevitably the kite string would break and the kite would never be seen again! We would be so sad, but he would just make another and we would try flying it again. This scene brings back those fond memories.
Here is a close up of the images. It really looks like the man with the child on his shoulders is watching the boy flying the kite!
I used the Layering Ovals Dies to cut out an oval except for around the man’s arm. This is a trick you can do by placing the cutting plate only on part of the card then running it through the Big Shot. It will only cut out what is under the plate. I ran it through a second time to get the other side of the arm. The arm was then fussy cut with paper snips.
I used the Stampin’ Blends Alcohol markers to color the scene. The cardstock is Granny Apple Green so I used the Granny Apple Green alcohol marker for the tree and the grass. The jeans are Misty Moonlight. The child’s shirt is Balmy Blue and the gray I used is Smokey Slate. To add some color I used Poppy Parade for the kite, ball cap and girl’s book. The blond hair is a light So Saffron. The girl’s shirt is Highland Heather and the tree trunk is Soft Suede. In every case I used the light shade of the color, then added shadow with the dark shade.
I hoped you enjoyed my card. You can purchase all the supplies needed to make your own card by visiting my online store HERE, or clicking on any of the product photos below.
Thank you so much for stopping by. Please visit all the blogs participating in this hop to see all the fun and inspiring projects by demonstrators from around the world. You are currently visiting Theresas Treasures.
Boy is it hot today! Even though it is only 7 am I have been out watering my flowers I am hot and sweaty! I love flowers both real and on stamps. The Celebrate Sunflowers stamp set by Stampin’ Up! is just so beautiful and fun to color. Especially if you have some Stampin’ Blends Alcohol Markers. The Blends make it possible to color the flowers so they are just so lovely!
This card can be used for several occasions making it very versatile.
Measurements: Whisper White Card Stock (CS): 11 x 4 1/4 inches with a score line at 5 1/2 inches, 5 x 3 3/4 inches, 2 1/2 x 2 1/2 inches and 3 1/2 x 3/4 inches; Bumble Bee CS: 5 1/4 x 4 inches.
Using Memento Black ink, stamp the sentiment “Let’s Celebrate You” onto the 3 1/2 x 3/4 inch Whisper White CS. Stamp the smaller sunflower onto the 2 1/2 x 2 1/2 inch Whisper White CS. Then stamp the larger sunflower on the 5 x 3 3/4 inch Whisper White CS slightly on the right and leaving enough space on top for the sentiment.
The Stampin’ Blend Alcohol Marker colors I used are the light and dark Soft Suede, Daffodil Delight, Mango Melody, and Old Olive. I also used Light Calypso Coral (not pictured).
I colored the leaves with the Light Old Olive, then added the Dark Old Olive as an accent.
The center of the flower is colored first in Light Daffodil Delight, then Light Soft Suede. The Dark Soft Suede is used to make some dots on the Light Soft Suede.
The first layer of petals is colored with the Light Daffodil Delight. I accented these petals with Dark Daffodil Delight by drawing on the lines that are already on the petals. The back petals are also colored in Light Daffodil Delight but I used the Dark Daffodil Delight more heavily on those petals. Set this aside while we color the larger sunflower.
The top layer of petals are colored in the Light Daffodil Delight. The next layer of petals are colored in Light Mango Melody. The center of the flower was done with the Light and Dark Soft Suede and Light Daffodil Delight.
The back layer of petals are colored in Dark Mango Melody. I used the Dark Daffodil Delight to accent the Light Daffodil Delight petals in the first layer by drawing on the lines that were already there.
I used the Dark Mango to accent the petals colored in Light Mango and added Light Calypso Coral to accent the Dark Mango petals.
I used the edge of the Light Daffodil Delight to accent the border around the sentiment. Tip: Use a light touch as the alcohol markers bleed slightly and if held on the paper too long they will leave a blotch.
Use your Paper Snips to fussy cut the smaller sunflower. Sometimes I leave a slight white border around the image when I fussy cut. Today I cut right next to the outer black line. Either way looks fine.
Use the Bone Folder to make a crisp fold at the 5 1/2 inch score line on the 11 x 4 1/4 inch Whisper White CS card base. Adhere the 5 1/4 x 4 inch Bumble Bee CS to the front of the card base. Now adhere the larger sunflower panel to the Bumble Bee CS.
Adhere the smaller sunflower and sentiment to the card front with Stampin’ Dimensionals.
And now for the Bling! No card of mine is complete without some Bling! The Gold Glitter Dots add just the right amount of sparkle.
I use the Take Your Pick tool to transfer the Gold Glitter Dots easily from the acetate sheet to the card front.
Viola! You have a lovely, cheery and bright card to help someone celebrate–a birthday, a promotion, a great report card–anything!
Thanks for being here today! I hope your day is very bright and cheery!
Good day! I hope this post finds all of you staying healthy. If you are stuck at home, remember all those projects you wished you had time for? Well, get them out and spend the time working on them. That will help you feel more positive and productive!
Today’s card is a little silly and very cute. It is a great Birthday greeting for just about anyone except perhaps the most serious among us.
These little Meerkats are just too cute!
And there is a little surprise inside! A cute lizard with a birthday hat next to a cactus.
The Gang’s All Meer cannot be bought. You can get it free with a $50 purchase from my Stampin’ Up! Online store. Click here for the store. Do not delay because this offer is only good until March 31, 2020.
Well, let’s get started and make this card!
Measurements: Very Vanilla Card stock (CS): 8 1/2 x 5 1/2 inches with a score line at 4 1/4 inches, 3 1/4 x 2 1/2 inches, 3 1/2 x 2 1/2 inches, 3 x 1 inches, and (not pictured) 5 1/4 x 4 inches; Pool Party CS: 5 1/4 x 4 inches and 3 x 2 1/4 inches.
Use Memento ink to stamp the group of Meerkats onto the 3 1/2 x 2 1/2 inch piece of Very Vanilla CS, and the sentiment “Happy Birthday to a Stand Up Friend” onto the 3 x 1 inch piece of Very Vanilla CS.
I used the Stampin’ Blends Alcohol Markers in: Ivory, Light and Dark Crumb Cake and Light Old Olive to color the Meerkats. Check out all the Stampin’ Blends here.
There are many ways to color with the alcohol markers. I will just share what I did. I first did a Goggle search of Meerkat images to get the coloring close to natural. I started with the Ivory to color the bellies and a little on the head. I added the Light Crumb Cake for the rest of the body and head.
I used the Dark Crumb Cake for the outline of the eyes and the Light Old Olive to add some color.
Measure a length of the 5/8 inch Burlap Ribbon that is about 8 inches long. Use the Glue Dots to adhere the ribbon to the card. Tip: I put the ribbon over the the Glue Dot while it is still on the roll to adhere the dot to the ribbon. See the Burlap Ribbon here.
Adhere the ribbon to the card. Use the Take Your Pick Tool to transfer a Glue Dot under the ribbon to hold it in place. Click here to see the Take Your Pick Tool.
Tie a knot to use on the front of the card. First overlap the ribbon, then push the end through the hole.
It should turn out like this. It is a little flattened so it will lay on the card properly. Set aside.
Trim the piece with the Meerkats on it to 2 3/4 x 2 inches. Apply Stampin’ Dimensionals to the back and set aside.
Adhere the 3 x 2 1/4 inch Pool Party CS to the 3 1/4 x 2 1/2 inch Very Vanilla CS.
Apply Stampin’ Dimensionals to the back of the Very Vanilla /Pool Party piece and set aside.
Trim the sentiment to 1 3/8 inches and apply Stampin’ Dimensionals to the back. Set aside.
Now to put it all together! Adhere the Pool Party with Burlap Ribbon piece to the card front. Adhere the Meerkats to the Very Vanilla/Pool Party piece.
Adhere the Meerkat piece to the left of the card front. Now add the sentiment to the right lower corner.
Place the knotted Burlap Ribbon on the card and trim to size.
Use a Stampin’ Dimensional to adhere the knotted Burlap Ribbon to the card front.
Now to make the surprise inside the card! Stamp the little cactus in Memento ink onto the 5 1/4 x 4 inch Very Vanilla CS. Now stamp the little lizard next to the cactus.
Use Call Me Clover ink (or your favorite color of ink) to stamp the mini birthday hat onto the head of the lizard. So Cute!!
To color the cactus and lizard I used the Stampin’ Blends Alcohol Markers in: light and dark Lovely Lipstick, light and dark Old Olive and light Crumb Cake. Check out all the Stampin’ Blends here.
I first used the light Old Olive Stampin’ Blend, then used the dark Old Olive Stampin’ Blend to try to create some shadow.
I used the light Old Olive Stampin’ Blend to color the little lizard. I then colored the inside of the cactus flower with light Lovely Lipstick.
Add the dark Lovely Lipstick for the outer part of the cactus flower. I used the light Crumb Cake to color the sand and make a little shadow for the lizard.
Adhere this piece to the inside of the card.
And Viola! You have a really cute and silly Birthday card! I hope you get a chance to try this card. Thank you for joining me today! Have a great day and stay safe and healthy! Please leave me a comment and let me know what you think of the cards I demonstrate. Any suggestions are welcome!
Stampin’ Up! Products used include: Stamp Set: The Gang’s All Meer #152294 (free with a $50 purchase); Paper: Very Vanilla CS #101650 and Pool Party CS #122924; Ink: Memento #132708 and Call Me Clover #147139; Stampin’ Blends Alcohol Markers: Ivory #144606, Light and Dark Crumb Cake Combo #144601, Light and Dark Old Olive Combo #144597, and Light and Dark Lovely Lipstick Combo #147281; Clear Blocks: A #118487, B #117147, C #118486 and D #118485; Take Your Pick #144107; Adhesives: TomBow Multipurpose Liquid Glue #110755, Glue Dots #103683 and Stampin’ Dimensionals #104430; and 5/8 inch Burlap Ribbon #141487.
This is a very simple and beautiful card. I like to practice an attitude of gratitude. Gratitude has been shown to have positive effects on your overall health, increasing happiness and decreasing depression. This card is fun and straight-forward to make. I did go into more detail to help anyone just starting out stamping. There are 10 tips!
Measurements: Whisper White card stock (CS): 8 1/2 x 5 1/2 inches scored at 4 1/4 inches, 3 x 1 3/4 inches and 2 3/4 x 1 1/4 inches; Terracotta Tile: 5 7/8 x 4 1/8 inches; Gold Glimmer Paper: 5 1/4 x 3/4 inches; Ornate Garden Specialty Designer Series Paper (DSP): 5 1/4 x 2 inches; Old Olive: 3 x 1 1/2 inches. You also need the Ornate Garden Ribbon: 6 1/2 inches for the ribbon around the card and approximately 10 inches to make the bow. Tip #1: Learn how to tie the bow here.
Let’s start stamping! You will stamp the “Thanks” sentiment from the Ornate Thanks Stamp set in Terracotta Tile ink onto the 2 3/4 x 1 1/4 inch piece of Whisper White CS. I stamped a little bit towards the left and above center to allow space for the daisy. Tip #2: This is a Photopolymer stamp (one you can see through). You will need a pad of some sort. I am using the Stampin’ Pierce mat. This is used for Photopolymer stamps to get a better image. You may also use your catalog as a pad if needed.
Stamp the daisy in Memento ink onto the 3 x 1 3/4 inch piece of Whisper White CS. Tip #3: This is a red rubber stamp. You get the best image by stamping on a smooth, firm surface. Note: You can easily see the foam the red rubber rests on. The pink line on top of the foam is the red rubber.
You will need several colors of Stampin’ Blends Alcohol Markers. I started with Light So Saffron alcohol marker (AM) to color the flower petals. Next I used the Dark Daffodil Delight AM to trace the lines in the petals, and make a little ring around the flower center. Tip #4: Practice using the alcohol markers before you do your card. It takes a very light touch to get the ink on the paper, and sometimes it bleeds too far. There is a fine tip and a brush tip. Use the fine tip for small or thin areas and the brush tip for larger areas. Some papers bleed more than others. The Stampin’ Up! Whisper White does not bleed much. It is the best that I have found.
Use the Bronze AM to color the flower center. The Light Old Olive AM is used first for the stem and the leaf.
The reason the markers are called Stampin’ Blends is because you can blend the light and dark shades to make shadows on the image. If you are really good, the image will look 3-D. Tip #5: First apply a thin layer of the Light Old Olive. Then use the fine tip of the Dark Old Olive to trace the line in the leaf and darken the base of the leaf. Finally, use the Light Old Olive to blend the light and dark shades together. Viola!
Fussy cut the daisy cutting as close to the black outline as possible. (“Fussy cut” is the term for cutting an image out with the Paper Snips.)
Tip #6: To get rid of the remaining white on the border, you can go over it with the Basic Black Stampin’ Write marker as shown.
Now it’s time to put everything together. Adhere the Ornate Garden DSP to the bottom of the Terracotta Tile piece, leaving an eighth of an inch border. Then adhere the strip of Gold Glimmer Paper. Tip #7: Try different adhesives to see what you like best. Read all about adhesives here.
Adhere the ribbon to the card front with glue dots. Apply one glue dot to each end of the ribbon. Tip #8: To get the glue dot on the ribbon it is easier to just put the ribbon on top of the glue dot as it is on the roll.
Hold the ribbon in place, flip the card and stick the glue dots down.
Fold the 8 1/2 x 5 1/2 inch Whisper White CS at the 4 1/4 inch score line. This is the card base. Now adhere the decorated card front piece to the front of the Whisper White card base.
Adhere the “Thanks” sentiment to the Old Olive CS piece. We are going to adhere the Thanks piece with Stampin’ Dimensionals. These are little foam pieces with adhesive on both sides. They lift the paper slightly to give dimension to the card.
Tip #9: I usually cut my Stampin’ Dimensionals in half so they last longer. I also cut the part that remains after using all the dimensionals as shown. Apply the Stampin’ Dimensionals to the back of the Thanks piece.
Adhere the Thanks piece to the card front. Now adhere the little daisy we colored and cut out next to the sentiment.
Lastly, add the bow with a glue dot. Tip #9: Apply the glue dot to the back of the bow by placing the bow on the glue dot while it is still on the roll. Gently peel it off of the roll and adhere the bow to the card.
Viola! You have a beautiful thank you card! Tip #10: Now that you have completed the card, send it to someone to let them know how much gratitude you have for them! Too often we make these beautiful cards and then we keep them in a box or something. I am guilty of doing just that, so I have challenged myself to send one card every day for 30 days. I am on day 18. It has been fun and I have gotten wonderful feedback from the folks I have sent cards to!
As always, thank you so much for joining me and reading my blog. I am very grateful to all of you for supporting me in this endeavor!
I am a Stampin’ Up! Demonstrator. If you see anything you would like to purchase, please visit my online store here. If you would like to contact me, follow me on Facebook here or shoot me an email at: Theresastreasures.az@gmail.com.
Stampin’ Up! products used include: Stamp Set: Ornate Thanks #149471 and Ornate Style #152572; Paper: Whisper White CS #100730, Terracotta Tile CS #150884, Gold Glimmer Paper #146958, Ornate Garden DSP #152488 and Old Olive CS #100702; Ink: Terracotta Tile #150884 and Memento #132708; Clear Blocks: D #118485 and H #118490; Adhesives: Tombow Multipurpose Liquid Glue #110755, Glue Dots #103683 and Stampin’ Dimensionals #104430; Embellishments: Ornate Garden Ribbon Combo Pack #152479.