Posted in 2020-2021 Stampin' Up! Catalog, Hello, Love/Affection

Simple Stamping with Blossoms in Bloom for a Colorful Hello Card

Hello lovely crafty people. This lovely and colorful card is really very simple to make. There is some fussy cutting, but otherwise this card is made with just stamping.

The Blossoms in Bloom stamp set by Stampin’ Up! is in the 2020-2021 Stampin’ Up! Annual Catalog. This stamp set is so fun to create with! The sentiments in the set allow you to design a variety of cards ranging from Happy Birthday to Get Well, and Hello to Thank You. The Blossoms in Bloom would be a great stamp set for the beginning stamper.

So let’s get stamping!

Measurements: Pacific Point Card Stock (CS): 8 1/2 x 5 1/2 inches with a score line at 4 1/4 inches; Whisper White CS: two 5 1/4 x 4 inches and a scrap strip measuring a least 8 1/2 x 1 1/2 inches. Note: I also needed a 1/2 inch strip of Whisper White to fix a mistake.

First apply the sentiments “HELLO” and “I LIKE YOU A LOT” to a clear block. Stamp the sentiments in Night Of Navy ink at a diagonal onto one of the 5 1/4 x 4 inch Whisper White CS. Tip: Remember to use the Pierce Mat (or a Stampin’ Up Catalog) under the clear Photopolymer stamps.

For the large stamps, I find it easier to apply the ink evenly if I flip the stamp upside down on the table to apply the ink.

Stamp the bunch of blossoms in Pacific Point ink onto the lower right hand corner. Apply more ink and stamp in the upper left hand corner. These blossoms are just so beautiful!

There are two different medium sized five-petaled flowers. Apply them to a clear block. Stamp the flowers in Magenta Madness onto a scrap piece of Whisper White CS until you have 8 flowers. Fussy cut the flowers.

Stamp the center of the Pacific Point flowers in Early Espresso ink. Stamp the center of the Magenta Madness flowers in Bumble Bee ink. Adhere the Magenta Madness flowers to the card with Stampin’ Dimensionals.

Stamp the tiny five-petaled flowers in Balmy Blue ink. I just stamped the tiny five-petaled flowers on randomly.

As I was happily stamping the tiny leaves in Granny Apple Green I dropped the block with the stamp onto my card! Ugh! Not to worry, there is almost always a way to fix a mistake.

I finished stamping the tiny leaves, then took a 1/2 inch strip of Whisper White CS and stamped the sentiments again. I cut the ends to be banner ends and applied the strip with Stampin’ Dimensionals. Mistake fixed! Whew!

Stamp the large blossoms in Pacific Point ink onto the other 5 1/4 x 4 inch Whisper White CS. Stamp onto the lower right hand corner. Add some of the Magenta Madness flowers with Stampin’ Dimensionals.

Randomly stamp some tiny five-petaled flowers in Balmy Blue ink and some tiny leaves in Granny Apple Green ink. Apply the finished inside card piece to the inside of the 8 1/2 x 5 1/2 inch Pacific Point CS card base. Be sure to use a Bone Folder after folding on the 4 1/4 inch score line to make the fold crisp.

Adhere the front card piece to the front of the Pacific Point CS card base.

Viola! You have made a beautiful, colorful bunch of blossoms to send to someone and spread some cheer!

Thank you so much for visiting my blog. I really appreciate you. Please leave a comment and let me know how I am doing. Do you like the cards in general? Is there anything you would like me to blog about? I would love to hear from you!

Product List

Have a very beautiful and creative day!

Theresa

Posted in 2020-2021 Stampin' Up! Catalog, Father's Day, Guys cards, Inspiration, Love/Affection, Stampin" Blends Alcohol Markers, Stampin' Up! 2019-2020 Annual Catalog, Summer

Kylie’s Demonstrator Training Blog Hop- July 2020

Hi! Welcome to Theresa’s Treasures. I’m Theresa and I’m an Independent Stampin’ Up! Demonstrator in Arizona, USA. I’m so excited to be taking part in Kylie’s Demonstrator Training Blog Hop today. This is a really fun way to share my creations, and have the opportunity to see projects from many other demonstrators from around the world! I especially love to hear your comments!

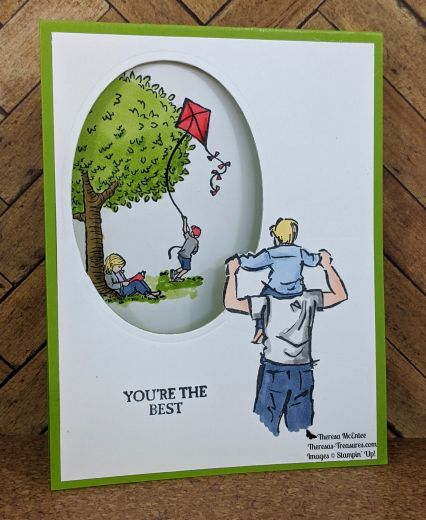
I had a lot of fun with this card. The images are from A Good Man and Summer Days stamp sets. I used to love to go kite flying when I was growing up. My Dad would make the kites and inevitably the kite string would break and the kite would never be seen again! We would be so sad, but he would just make another and we would try flying it again. This scene brings back those fond memories.

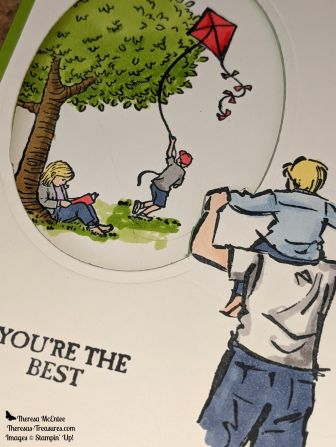
Here is a close up of the images. It really looks like the man with the child on his shoulders is watching the boy flying the kite!

I used the Layering Ovals Dies to cut out an oval except for around the man’s arm. This is a trick you can do by placing the cutting plate only on part of the card then running it through the Big Shot. It will only cut out what is under the plate. I ran it through a second time to get the other side of the arm. The arm was then fussy cut with paper snips.

I used the Stampin’ Blends Alcohol markers to color the scene. The cardstock is Granny Apple Green so I used the Granny Apple Green alcohol marker for the tree and the grass. The jeans are Misty Moonlight. The child’s shirt is Balmy Blue and the gray I used is Smokey Slate. To add some color I used Poppy Parade for the kite, ball cap and girl’s book. The blond hair is a light So Saffron. The girl’s shirt is Highland Heather and the tree trunk is Soft Suede. In every case I used the light shade of the color, then added shadow with the dark shade.

I hoped you enjoyed my card. You can purchase all the supplies needed to make your own card by visiting my online store HERE, or clicking on any of the product photos below.

Product List

Thank you so much for stopping by. Please visit all the blogs participating in this hop to see all the fun and inspiring projects by demonstrators from around the world. You are currently visiting Theresas Treasures.

Have a Happy Crafty Day!

Theresa

Posted in 2020-2021 Stampin' Up! Catalog, Grunge style, Love/Affection, Nature, Stamping-off technique

Positive Thoughts with Comfort and Hope

There are so many beautiful stamp sets in the new 2020-2021 Stampin’ Up! Annual Catalog! There is a style for everyone. I love to make cards with a grunge style. The Comfort and Hope and the Positive Thoughts stamp sets are a perfect combination for this style.

This card is designed with elements from both of the stamp sets. The colors are: Misty Moonlight, Just Jade and Cinnamon Cider. These are 3 of the new 2020-2022 In Colors. The In Colors are a set of 5 colors that are only available for 2 years. Every year, one set retires and one set debuts. The other 2 In Colors for the next 2 years are Magenta Madness and Bumble Bee.

Measurements: Cinnamon Cider Card Stock (CS): 11 x 4 1/4 inches with a score line at 5 1/2 inches; Very Vanilla CS: two 5 1/4 x 4 inches and one 4 x 2 inches.

Using the Cinnamon Cider ink, stamp the cross hatched image from Comfort And Hope onto both 5 1/4 x 4 inch Very Vanilla CS pieces. The image near the edge is at full strength. Without applying any more ink, stamp again just above the full strength image. On the bottom piece, stamp a third time without adding any ink. This is know as the Stamping Off Technique. I use this technique a lot when stamping in the grunge style.

On the 5 1/4 x 4 inch Very Vanilla panel for the outside of the card, add the sentiment “Hugs Prayers Love” in Cinnamon Cider ink. The little design has been Stamped Off onto the scratch paper before stamping on the card. Both of these images are in the Positive Thoughts stamp set.

The leaf branch from the Positive Thoughts stamp set is Stamped Off each time in Just Jade ink.

The roll of twine from the Positive Thoughts stamp set is stamped at full strength in the middle, then Stamped Off two times.

The large branch of leaves is Stamped Off once on scrap paper, then on to the inside panel.

Using the Misty Moonlight ink, stamp the butterfly from the Positive Thoughts stamp set once at full strength on the inside panel. Stamp three full strength images on the 4 x 2 inch Very Vanilla CS.

Fussy cut the three butterflies, or use the butterfly die on a die cutting machine. Now use the Bone Folder to curve the wings of each butterfly.

Apply one half of a Stampin’ Dimensional to the middle of the back of each butterfly.

Use your Bone Folder to fold the 11 x 4 1/4 inch Cinnamon Cider CS at the 5 1/2 inch score line. Adhere the outside panel onto the front of the card base, and then the inside panel inside.

I found it easier to space the butterflies evenly if I adhered the top butterfly near the sentiment first, then the butterfly in the bottom corner, and finally the middle butterfly.

Now for the Bling! What is grunge without some sparkle?!

I placed the Champagne Basic Rhinestones with the Take Your Pick tool.

I applied Wink of Stella to the butterflies. See how sparkly they are now! Don’t forget to add Wink of Stella to the butterfly on the inside panel.

And Viola! You have a sparkly grunge card! I really like the sentiment “Hugs Prayers Love” because it is very versatile.

I am so grateful you came by today! This card is just so fun to make! I hope you give the grunge style a try.

Click on the photo for the product you need and go directly to my online store.

Product List

Have a wonderful and crafty day!

Theresa

Posted in 2020-2021 Stampin' Up! Catalog, Hello, Love/Affection, Nature, Stamping-off technique

Forever Greenery in Blue- SIP Series #2

This is the second in the SIP series. SIP stands for stamps, ink and paper. The three cards in the series are made primarily from SIP-but with a little Bling! added at the end. The Forever Fern stamp set is part of the Forever Greenery Suite in the New 2020-2021 Stampin’ Up! Annual Catalog.

Here are the three cards in the SIP Series. The previous blog is for the card lying down with the sentiment “Love and Laughter Forever After” on it. You can see that card by clicking HERE.

Here is today’s card. This is my “Stamp it, Cut it, and Paste It” card. This great card is really very straightforward to make. The stamping pattern of the leaves is nearly identical to SIP card #1 in the previous blog.

Measurements: Whisper White Card Stock (CS): 11 x 4 1/4 inches with a score line at 5 1/2 inches and 5 x 3 3/4 inches; Misty Moonlight CS: 5 1/4 x 4 inches.

The first step is to cut 1/4 inch off the top of the 5 x 3 3/4 inch Whisper White CS.

Next stamp in Misty Moonlight ink the largest bunch of leaves in the Forever Fern stamp set. Before you put more ink on the stamp, stamp it in the upper right hand corner. This is a different version of the Stamping Off Technique using both the full strength and the Stamped Off image on the same card.

Using the Pretty Peacock ink, stamp once on the lower part of the card next to the first image. Stamp once under the first stamp in the right hand corner, then once above the first stamp.

Stamp the smaller bunch of leaves in Seaside Spray ink using the Stamping Off Technique.

Now that we have “Stamped It” we can “Cut it”. Cut 1 1/2 inches off the top and off the bottom.

Now we can add the sentiment “Hello” in Misty Moonlight ink.

I found it to be the most easy to have everything spaced evenly if I “Pasted it” by putting the bottom panel on first, followed by the top panel, then the center panel.

Fold the 11 x 4 1/4 inch Whisper White CS at the 5 1/2 inch score line and use the Bone Folder to get a crisp fold. Adhere this panel onto front of the Whisper White card base. You could leave the card just as it is, or you could add some Bling!

The Bling! or embellishment I chose for this card is the Artistry Blooms Self-Adhesive Sequins. They come in a rainbow of colors, of which the blue matches this card.

Tip: Transfer the self-adhesive sequins from the acetate sheet to the card with the Take Your Pick tool. Just slide the pick under the adhesive and move it to where you want it on the card. Apply light pressure on the sequin and remove the pick.

And Viola! you have made an elegant “Hello” card! Great to send to new or old friend to just say “Hello”.

Thanks for coming by and looking at my card. I really love how fast and simple it is to make elegant cards with the Forever Fern stamp set. I have also made some cards with greens, pinks and purples. It is a very versatile stamp set!

Would you like a Bundle for FREE? You can get any one stamp set with coordinating dies or any one stamp set with coordinating punch when you join Stampin’ Up! as a demonstrator. You choose your Starter Kit and pay $99 for $125 worth of product. Then you choose your FREE bundle! Next you will have 20% off of future orders as long as you continue to be a Stampin’ Up! Demonstrator. I have had a blast since signing up 4 years ago! I have not only improved my artistic skills, but also my business skills. And I have met so many new friends! Click HERE and then choose the Specials tab on the right. Scroll down and select “sign up now”. If you have any questions, please do not hesitate to comment or send me an email at theresastreasures.az@gmail.com. Thanks!

If you would like to purchase any Stampin’ Up! products in my Online Store just click on any photo below.

Product List

Have a most wonderful day!

Theresa

Posted in 2020-2021 Stampin' Up! Catalog, Love/Affection, Stampin" Blends Alcohol Markers, Summer

Celebrate Sunflowers and Celebrate You

Boy is it hot today! Even though it is only 7 am I have been out watering my flowers I am hot and sweaty! I love flowers both real and on stamps. The Celebrate Sunflowers stamp set by Stampin’ Up! is just so beautiful and fun to color. Especially if you have some Stampin’ Blends Alcohol Markers. The Blends make it possible to color the flowers so they are just so lovely!

This card can be used for several occasions making it very versatile.

Measurements: Whisper White Card Stock (CS): 11 x 4 1/4 inches with a score line at 5 1/2 inches, 5 x 3 3/4 inches, 2 1/2 x 2 1/2 inches and 3 1/2 x 3/4 inches; Bumble Bee CS: 5 1/4 x 4 inches.

Using Memento Black ink, stamp the sentiment “Let’s Celebrate You” onto the 3 1/2 x 3/4 inch Whisper White CS. Stamp the smaller sunflower onto the 2 1/2 x 2 1/2 inch Whisper White CS. Then stamp the larger sunflower on the 5 x 3 3/4 inch Whisper White CS slightly on the right and leaving enough space on top for the sentiment.

The Stampin’ Blend Alcohol Marker colors I used are the light and dark Soft Suede, Daffodil Delight, Mango Melody, and Old Olive. I also used Light Calypso Coral (not pictured).

I colored the leaves with the Light Old Olive, then added the Dark Old Olive as an accent.

The center of the flower is colored first in Light Daffodil Delight, then Light Soft Suede. The Dark Soft Suede is used to make some dots on the Light Soft Suede.

The first layer of petals is colored with the Light Daffodil Delight. I accented these petals with Dark Daffodil Delight by drawing on the lines that are already on the petals. The back petals are also colored in Light Daffodil Delight but I used the Dark Daffodil Delight more heavily on those petals. Set this aside while we color the larger sunflower.

The top layer of petals are colored in the Light Daffodil Delight. The next layer of petals are colored in Light Mango Melody. The center of the flower was done with the Light and Dark Soft Suede and Light Daffodil Delight.

The back layer of petals are colored in Dark Mango Melody. I used the Dark Daffodil Delight to accent the Light Daffodil Delight petals in the first layer by drawing on the lines that were already there.

I used the Dark Mango to accent the petals colored in Light Mango and added Light Calypso Coral to accent the Dark Mango petals.

I used the edge of the Light Daffodil Delight to accent the border around the sentiment. Tip: Use a light touch as the alcohol markers bleed slightly and if held on the paper too long they will leave a blotch.

Use your Paper Snips to fussy cut the smaller sunflower. Sometimes I leave a slight white border around the image when I fussy cut. Today I cut right next to the outer black line. Either way looks fine.

Use the Bone Folder to make a crisp fold at the 5 1/2 inch score line on the 11 x 4 1/4 inch Whisper White CS card base. Adhere the 5 1/4 x 4 inch Bumble Bee CS to the front of the card base. Now adhere the larger sunflower panel to the Bumble Bee CS.

Adhere the smaller sunflower and sentiment to the card front with Stampin’ Dimensionals.

And now for the Bling! No card of mine is complete without some Bling! The Gold Glitter Dots add just the right amount of sparkle.

I use the Take Your Pick tool to transfer the Gold Glitter Dots easily from the acetate sheet to the card front.

Viola! You have a lovely, cheery and bright card to help someone celebrate–a birthday, a promotion, a great report card–anything!

Thanks for being here today! I hope your day is very bright and cheery!

Product List

Theresa🦋

Posted in 2020-2021 Stampin' Up! Catalog, encouragement, Fun/Fancy fold card, Love/Affection

Friday’s Fun Fold Card with Forever Fern

Hello and welcome to Friday! Yes, you made it through another week! On Fridays I will post a Technique or Fun Fold. Today’s card is a fun fold that is really very simple to make.

The Stampin’ Up! Forever Fern stamp set is new in the 2020-2021 Stampin’ Up! Annual Catalog. There are many leaf images that make creating with the set very rewarding. There is even a little “splatter” stamp as you can see from the Pretty Peacock splatter on the inside of the card.

Measurements: Garden Green Card Stock (CS): 11 x 4 1/4 inches with a score line at 2 3/4 and 5 1/2 inches, and 4 x 3 1/2 inches; Whisper White CS: 5 1/4 x 4 inches and two 4 x 2 1/2 inches; Forever Greenery Designer Series Paper DSP) in two different designs: 4 x 2 1/2 inches and 3 3/4 x 3 1/4 inches. You will also need the Polka Dot Tulle Ribbon in a 5 inch and 9 inch length, and some gold leaves from the Forever Gold Laser-cut Specialty Paper.

Let’s start stamping! Use the Garden Green ink for the bunch of leaves from the Forever Fern stamp set to stamp onto the 4 x 2 1/2 inch Whisper White CS. Then use the Pretty Peacock ink to stamp the butterfly from the Positive Thoughts stamp set leaving space around the leaves and butterfly so they can be cut out.

Fussy cut the bunch of leaves and the butterfly, then set aside.

Using Garden Green ink, stamp the sentiment “Friends like you mean more every year” from the Positive Thoughts stamp set onto the 5 1/4 x 4 inch Whisper White in the center and slightly above the midline. Now stamp the large bunch of leaves in the upper right and left corners, not quite symmetrically.

Now stamp the medium leaf branch in Old Olive around the perimeter. Generally, 3 is a good number of one image (although I broke this rule with the large branch 😊).

The smaller branch of leaves is stamped in Pear Pizzazz ink (oops, I broke the rule of 3’s again!). I still like the way it looks, so I guess I can get away with it this time!

If you want, add some of the splatters with Pretty Peacock ink. Some are full strength, others are Stamped Off.

Fold the 11 x 4 1/4 inch Garden Green CS at the 5 1/2 inch score line and use the Bone Folder to get a crisp fold. Now fold at the 2 3/4 inch score line. Use the Bone Folder again.

Adhere the 3 3/4 x 3 1/4 inch Forever Greenery DSP to the 4 x 3 3/4 inch Garden Green CS. Use Glue Dots to adhere the 5 inch piece of Polka Dot Tulle Ribbon.

Use the Bone Folder to curve the wings of the butterfly.

Punch a circle with the 2 1/4 inch Circle Punch and adhere it to the card panel with Stampin’ Dimensionals.

Adhere the Forever Gold Laser-cut Specialty Paper gold leaf branch to the punched out circle. Use Stampin’ Dimensionals to adhere the Garden Green bunch of leaves and the Pretty Peacock butterfly. Use a Glue Dot to adhere the ribbon that is tied from the 9 inch piece of Polka Dot Tulle Ribbon. Set aside.

Adhere the 4 x 2 1/2 inch Forever Greenery DSP to the 4 1/4 x 2 3/4 inch section on the outside of the card base. Now adhere the 5 1/4 x 4 inch panel to the inside of the card.

This is the card so far. Lay the panel with the gold leaf and butterfly in place.

Make a light pencil mark on the butterfly panel to help you know where to put the Stampin’ Dimensionals.

Adhere the butterfly panel to the card front.

Now for the Bling! Today I am using the Gold Metallic Pearls. The Take Your Pick tool is the easiest way to transfer these tiny pearls from the sheet to your card.

And Viola! you have a really pretty fun fold to send to a good friend!

Promotion

Join my Stamping Gems Team during the month of June and you can pay $99 for $125 of Stampin’ Up! product! You will also get to choose a FREE Bundle!! You may choose any one stamp set with a punch, or one stamp set with dies. If you are interested please comment or email me at: theresastreasures.az@gmail.com.

Product List

Thanks for joining me today! It is so fun to make cards when you have such great stamp sets!

Theresa

Posted in Avid Stamper, Blender Pen, Love/Affection, Watercolor Techniques

Sneak Peek- Jar of Flowers

There is only one more week before the new 2020-2021 Stampin’ Up! Annual Catalog is live! Since I am an Independent Stampin’ Up! Demonstrator I got to order for the catalog a month early. Here is a sneak peek at a new stamp set called Jar of Flowers!

The really fun part about this card is that there are Mason Jar Shaker domes and Flowers for Every Season Gems you can use to make a Shaker card! I will also show a Technique today using the Watercolor Pencils and the Blender Pen.

Measurements: Whisper White Card Stock (CS): 8 1/2 x 5 1/2 inches with a score line at 4 1/4 inches, 5 x 2 inches and 4 x 2 1/2 inches; Flowers For Every Season Designer Series Paper (DSP): 5 3/8 x 4 1/8 inches; and a new In Color – Magenta Madness: 5 3/8 x 2 1/4 inches.

Stamp the sentiment “Just Thinking Of You” from the Many Mates stamp set in Melon Mambo ink onto the bottom of the 4 x 2 1/2 inch Whisper White CS. Use the Timeless Label Punch to punch it out with the sentiment on one end. Put the punch as close to the words as you can.

Now insert the punched label back into the punch so the words are as close to the edge as possible.

Use the 1 1/2 inch Circle punch to punch a circle out of the 5 x 2 1/2 inch Magenta Madness CS. Be sure to leave a 1/4 inch border because you will be using this as part of your card. Adhere the sentiment punch to the circle punch. Trim the sides with your Paper Snips. Set aside.

Set up the 5 x 2 inch Whisper White CS on the Pierce Mat to be able to stamp with the Jar Of Flowers Photopolymer stamp set. I tried using Gray Granite ink but it was too light. I found if you use Smokey Slate ink and you Stamp Off on a scrap paper once before stamping on the card piece you get the right intensity of gray for using the Watercolor Pencils.

Stamp off onto the scrap paper once before stamping the stems and the bunch of flowers. The lid to the Mason jar is not Stamped Off.

I put the Flowers for Every Season DSP that I wanted for the background next to my jar of flowers so I could copy the coloring. I used colors from both sets of the Stampin’ Up! Watercolor Pencils. I started with Garden Green for the leaves and stems, Daffodil Delight for the little bunches of flowers, and Pumpkin Pie for the center of the Daffodil Delight flowers. I use a light touch first to color the entire image, then I press a little harder in spots where I would like to have the image shaded.

I used the Coastal Cabana Watercolor Pencil to create a water level in the jar. Next I used Real Red to color the poppies. Again, I used a light touch to color in the image and then press harder to shade. When I color lightly, I move the pencil in small circles and rotate the pencil every so often so that it stays sharp.

I used the Melon Mambo Watercolor Pencil to color the tulips and the Night of Navy to color the sprigs of small flowers.

Now for the fun part! I used the Blender Pen which is filled with a specialized solution for easy blending. The tulip I am pointing to has been treated with the Blender Pen and the other tulips have not. I have already used the Blender Pen on the water and stems. I use a light touch and start in the lighter colored area of the image, moving toward the shaded part. When you are done with one color, you simply write on a scrap of paper with the Blender Pen until it writes clear. Take your time with this. The Blender Pen smooths out the colored pencil.

Now I used the Jar of Flowers punch to punch the Mason Jar out. You will have the Mason jar, the bunch of flowers and need the Magenta Madness CS piece.

Do not adhere the bunch of flower piece. Just lay it on the Magenta Madness CS to help position the Mason Jar. Adhere the Mason Jar to the Magenta Madness CS.

Peel off the protective layer on the top of the Mason Jar Shaker Dome. Adhere the bunch of flowers piece to the top of the Mason Jar Shaker Dome. Take care to position the paper because the adhesive on the dome is very sticky and once the paper is on it, it will stay there!

Note to self: Leave at least a 1/4 inch under the stamped jar so that the Mason Jar Shaker Dome doesn’t stick out! Fortunately, it was easy to trim with the Paper Snips.

Adhere the 5 3/8 x 4 1/8 inch Flowers For Every Season DSP to the Whisper White CS card base. Then adhere the Magenta Madness piece to the left side of the card front. Now for some Bling! The Flowers For Every Season Gems include green faceted gems and epoxy drops.

Place a few of the gems and drops on the Mason Jar. Remove the protective layer from the back of the Mason Jar Shaker Dome. Apply some adhesive to the rest of the back of the bunch of flowers card piece. Adhere the Whisper White bunch of flowers piece to the Magenta Madness piece on the card front. Take care with placement as the Mason Jar Shaker Dome adhesive adheres quickly and doesn’t allow any “wiggle” room.

Adhere the sentiment “Just Thinking Of You” to the right side of the card front with Stampin’ Dimensionals. To make the card extra special you can add a strip of the Flowers For Every Season DSP to the inside of the card. (Measurement: 5 3/8 x 3/4 inches)

Add a bow with the 2020-2022 In Color Bumblebee 1/4 inch ribbon and adhere it to the card with a Mini Glue Dot. Viola! What a colorful and gorgeous card!

Thank you for enjoying the Sneak Peek today! I really enjoyed making the card. If you would like to purchase the products I used, you will be able to on June 3, 2020 after noon Mountain Time.

Product List
Posted in Animals, Aqua Painters, Love/Affection, Stampin' Up! 2019-2020 Annual Catalog

This Little Piggy is Giving back! #Sharesunshine

Today’s card uses one of the sentiments in the Share Sunshine PDF Download.

MAKING A DIFFERENCE: COVID-19 PRODUCT GIVEBACK
Stampin’ Up! is committed to making a difference in our global communities and caring about people first. As part of their Making a Difference program they’re offering a product giveback opportunity to support organizations that are helping COVID-19 frontline responders and communities vulnerable to the pandemic. You can purchase the Share Sunshine PDF Download and Stampin’ Up! will donate 100% of the proceeds to COVID-19 efforts. The Share Sunshine PDF Download is a digital stamp set that’s packed with both lighthearted and heartfelt sentiments and imagery relevant to the unique COVID-19 and social distancing situation we’re currently experiencing–including many ideas that came from they’re customers! You can use the download in your card making and paper crafting projects. Simply print the imagery on cardstock and cut it out using our Paper Trimmer, punches, or dies. Since we are physically distanced from each other, now is a perfect time to share sunshine with our friends and family by sending cards!
Buy the PDF here: https://covid19.stampinup.com/products/giving-back-us-ca
Share your projects on social media and tag them with #sharesunshine.

The sentiment for today’s card is on page 11 of the digital download. I printed it on a sheet of Shimmery White Card stock(CS) and then cut it out with my Stampin’ Up! Paper Trimmer. I printed on the Shimmery White CS because I wanted to do some water-coloring. The Shimmery White CS holds up better with water-coloring than the Whisper White CS does.

Ok, let’s get started putting together This Little Piggy!

Measurements: Whisper White Card stock (CS): 8 1/2 x 5 1/2 inches with a score line at 4 1/4 inches and a 1/2 inch strip; Shimmery White CS: 3 1/2 x 2 1/4 inches; Pear Pizzazz CS: 5 3/8 x 4 1/8 inches and 3 3/4 x 2 1/2 inches; Perennial Essence Designer Series Paper (DSP): 5 1/4 x 4 inches.

I stamped the little piggy onto Petal Pink CS in Memento ink. I added a little shadow with the Dark Petal Pink Stampin’ Blend Alcohol Marker.

I made the little mask by cutting a rectangle from the 1/2 strip of Whisper White CS. I added stitching with the Stampin’ Write Marker in Basic Black.

I used the Take Your Pick Tool on the Pierce Mat to punch a little hole at the neckline in order to thread the “elastic” for the mask through it. For the “elastic” I used the White Solid Bakers Twine (which is retiring).

I used a Dental Floss threader to thread the Solid White Baker’s Twine through the hole. I secured it on the back of the pig with a Mini Glue Dot.

I pulled the Solid White Bakers Twine up, around and down to make an “X” over the piggy’s snout. I secured the end in place with the same Mini Glue Dot. Glue the mask in place over the “X”.

Squeeze the Balmy Blue ink pad in the middle by laying it upside down on the table and applying pressure to the middle of the pad. This should put ink on the inside of the lid. If not, you could use a drop of the Balmy Blue Re-inker. Use the Aqua Painter (Water Painters) to apply a layer of water onto the Shimmery White CS. Now put some ink on the Aqua Painter, and starting at the top, spread the ink down the paper going back and forth. If the ink is not dark enough, add more ink to the brush and go over the paper again. You may clean the Aqua Painter by squeezing water from it onto a paper towel. If the ink on your paper is too dark, just go over it with the Aqua Painter using plain water. Let dry completely. When dry, adhere the Shimmery White CS to the 3 3/4 x 2 1/2 inch Pear Pizzazz CS.

Adhere the Perennial Essence DSP to the 5 1/4 x 4 inch Pear Pizzazz CS. Use the Bone Folder to make a crisp fold at the 4 1/4 inch score line on the 8 1/2 x 5 1/2 inch Whisper White CS, then adhere the piece to the front of the Whisper White card base.

Use the Stampin’ Dimensionals to adhere the watercolor card piece and the little piggy. I used 1/2 of a Stampin’ Dimensional on each end of the “i miss your face” sentiment and used glue on the center to adhere it in place.

And Viola! you have a COVID-19 “situation-appropriate” card to #Sharesunshine with someone! Please consider purchasing the PDF Digital Download here: https://covid19.stampinup.com/products/giving-back-us-ca

Thanks so much for stopping by for the “This Little Piggy” card. I had so much fun with this one and I hope you will try it out. The This Little Piggy stamp set is set to retire on June 2 , 2020-so if you want it, get it now at my Online Store by clicking SHOP .

You can also order by clicking on one of the photos below:

Product List

Have a wonderful day!

Theresa

Posted in Designer Series Paper, Love/Affection, Mini Catalog 2020, Photopolymer, Punch, Sale-A-Bration 2020

Two Heartfelt Hearts

It’s Valentine’s week and it is not just for couples. This is a great time to let someone know just how much you love them.

These two Valentine’s Day cards are just wonderful for sharing your love. Today I will show you how to make the Two Hearts card.

This card is made with the Stampin’ Up! Heartfelt stamp set available in the 2020 Mini Catalog which you can view at my store.

Measurements: Whisper White Card stock (CS) 8 1/2 x 5 1/2 inches scored at 4 1/4 inches and 5 x 3 3/4 inches, Real Red CS 5 1/4 x 4 inches, From My Heart Designer Series Paper (DSP) 5 x 2 1/4 inches and a strip of the foil hearts from the From My Heart DSP.

Adhere the 5 x 2 1/4 inch From My Heart DSP to the bottom of the 5 x 3 3/4 inch Whisper White CS.

Tip: Since this stamp set is Photopolymer, use the Stampin’ Pierce mat to get the best image. Stamp the sentiment “Roses are red, Violets are blue” in Real Red ink onto the right side of the Whisper White CS portion, just above the border of the From My Heart DSP.

Use the Bone Folder to fold the 8 1/2 x 5 1/2 inch Whisper White CS at the 4 1/4 inch score line. This is your card base.

Stamp the sentiment “Being friends is better than eating candy (but let’s do that too)” on the inside of the Whisper White CS card base in Real Red ink.

Stamp a few heart doilies on the inside with Flirty Flamingo ink.

You can clean the extra ink off of the Stampin’ Pierce mat with a baby wipe or wet rag.

Punch out the foil hearts from the From My Heart DSP using the scalloped-edged heart punch from the Heart Punch Pack.

Adhere the stamped Whisper White card piece to the 5 1/4 x 4 inch Real Red CS.

Measure the Red Double-Stitched Satin Ribbon to be about 1 inch longer on each side of the card piece.

Use a Mini Glue Dot to adhere the ribbon to the card piece. Tip: The easiest way to get the glue dot onto the ribbon is to press the ribbon on top of the glue dot while it is on the roll.

I also put a glue dot in the center of the ribbon to hold it in place, then flip the card piece over and adhere the ribbon to the back side.

Adhere the card piece to the front of the Whisper White card base, making sure the inside sentiment is in the proper orientation.

Apply Stampin’ Dimensionals to the back of the Flirty Flamingo foil heart.

Tip: When you have used all the Dimensionals there is a border left behind. Cut into smaller pieces and use these as well.

Position the two foil hearts, then adhere the Real Red foil heart with Tombow Multipurpose Liquid Glue or Snail Adhesive.

Peel off the protective cover on the Stampin’ Dimensionals and adhere the Flirty Flamingo foil heart over the top of the Real Red foil heart.

Next you will need some Red Rhinestone Basic Jewels and the Take Your Pick tool to add some bling. (Sorry about the blurry photo of the rhinestones).

Use the pick end of the Take Your Pick tool to get under the adhesive of the rhinestone and move it into position on your card. Gently press on the rhinestone with your finger to secure it to the card and remove the pick.

I used three rhinestones.

And Viola! my fellow stampers! You have a wonderful card to send to share your love with someone special!

This is the best time of year to order products from Stampin’ Up! because it is Sale-a-bration! That means for every $50 of product you order, you may choose from a Sale-a-bration Brochure and receive FREE PRODUCT! There are stamp sets, Designer Series Paper, sequins and twine and even an embossing folder! Shop Now at my online store. If you need any assistance please email me at theresastreasures.az@gmail.com or send me a message on my facebook page

Stampin’ Up! supplies used include: Stamp Set: Heartfelt #151417; Punch: Heart Punch Pack #151292; Paper: Whisper White CS #100730, Real Red CS #102482 and the From My Heart DSP #151189; Ink: Real Red #147084 and Flirty Flamingo #147052; Clear Blocks C #118486 and H #118490; Bone Folder #102300; Take Your Pick tool #144107; Paper Snips #103579; Adhesives: Tombow Multipurpose Liquid Glue #110755, Mini Glue Dots #103683 and Stampin’ Dimensionals #104430; Embellishments: Real Red 3/8 inch Double-stitched satin ribbon #151115 and Red Rhinestone Basic Jewels #146924; and the Stampin’ Pierce Mat #126199.

Posted in Love/Affection

Heartfelt Love

One of the best things about making cards is that you can share a little love with someone and make their day. I find that I also get a good feeling by sharing a card with someone.

Since Valentine’s Day is coming I decided to stock up on some cards for the occasion.

Stampin’ Up!’s Heartfelt stamp set, available in the new 2020 Mini Catalog, is great for spreading some love.

I also made this version using the sentiment in the Meant to Be stamp set.

The Meant to Be stamp set is in the 2019-2020 Stampin’ Up! Annual Catalog.

Measurements: Whisper White cardstock (CS) 8 1/2 x 5 1/2 inches scored at 4 1/4 inches for the card base and a 4 x 3 inch piece; Flirty Flamingo CS 5 3/8 x 4 1/8 inches; From My Heart Specialty Designer Series Paper (DSP) 5 3/8 x 3 inches; Sparkle Glimmer Paper 4 x 3 inches; and one Flirty Flamingo Heart Doily. If you want to make both versions of the card you would need two of each piece.

In addition I used the Heart Punch Pack. This is available as a set or you can get a bundle that includes the Heartfelt stamp set and the Heart Punch Pack.

Stamp the heart sentiment from the Heartfelt stamp set in Stampin’ Up! Real Red ink and punch out with the smooth edged heart punch.

For the second card, use the sentiment from the Meant to Be stamp set and punch with the smooth edged heart punch.

Use the scalloped edge heart punch to punch a heart from the Sparkle Glimmer Paper.

Use the Bone Folder to fold the card base and make a crisp fold.

Adhere the From My Heart DSP to the 5 3/8 x 4 1/8 inch piece of Flirty Flamingo CS. Using the Real Red 3/8 inch Double-Stitched Ribbon, measure about 1 inch past each side.

Use a Glue Dot by putting the ribbon over the Glue Dot to apply one to each end. Position the ribbon and press the edge around to the back to adhere the ribbon.

Add Stampin’ Dimensionals to the back of the heart sentiment. I cut my Stampin Dimensionals in half to make them last longer. Adhere the Stampin’ Dimensionals to the other sentiment if you are making both versions.

Peel the protective cover from the Stampin’ Dimensionals and adhere to the Sparkle Glimmer scalloped heart.

Adhere the Sparkle Glimmer scalloped heart to the Flirty Flamingo Heart Doily. Tip: I use the Tombow Multipurpose Liquid Glue. You may also use the Snail Adhesive. I prefer the Tombow because it allows you to adjust the piece for a second after you adhere the two pieces together. Also, the Tombow holds for a longer period of time.

Adhere the Heart Doilies to the left side of the From My Heart DSP.

Tie a bow with the Real Red 3/8 inch Double-Stitched Ribbon and adhere to the right side of the card with a few Glue Dots. To see how to make a bow, look for the To Make A Bow Video in this post https://theresas-treasures.com/2019/11/19/christmas-is-coming/

Use the Take Your Pick Tool to pick up a From My Heart Faceted Gem.

Apply a small dot of the Tombow or use a Glue Dot to adhere to the front of the card. Tip: If you place the embellishment in a triangle it appears more pleasing to the eye.

And Viola! you now have a couple of Valentine’s Day cards ready to send some love to someone special! I hope you enjoyed this post. Leave a comment and let me know how I am doing.

This is the best time of year to order products from Stampin’ Up! because it is Sale-a-bration! That means for every $50 of product you order, you may choose from a Sale-a-bration Brochure and receive FREE PRODUCT! There are stamp sets, Designer Series Paper, sequins and twine and even an embossing folder! Go to my website at https://theresastreasures.stampinup.net/ and select the Shop Now button to reach my online store. If you need any assistance please email me at theresastreasures.az@gmail.com.

Stampin’ Up! Products used included: Stamp Set: Heartfelt #151417 and Meant to Be #148626; Punch: Heart Punch Pack #151292; Paper: Whisper White CS #100730, Flirty Flamingo CS #141416, From My Heart Specialty DSP #151189, Sparkle Glimmer Paper #146957; Ink: Real Red #147084; Clear Block: D #118485; Bone Folder #102300; Take Your Pick #144107; Adhesives: Glue Dots #103683, Stampin’ Dimensionals #104430, Tombow Multipurpose Liquid Glue #110755; Embellishments: Real Red 3/8 inch Double-Stitched Ribbon #151155, From My Heart Faceted Gems #151154; and the Heart Doily #151191. You save 10% by ordering the Heartfelt Bundle #153775 which includes the Heartfelt stamp set and the Heart Punch Pack. If you would like to have it all you may order the From My Heart Suite Bundle #153931 which includes the Heartfelt stamp set, the Heart Punch Pack, From My Heart Specialty DSP, From My Heart Faceted Gems, Real Red 3/8 inch Double-Stitched Ribbon, Heart Doilies and Heart Foil Tins.