Yay! I may it through the 15-Day Christmas Card Challenge!
Today’s card is pretty simple but festive. The Stampin’ Up! Tree Angle stamp set has several trees to choose from. I just love the bold sentiment “Joy & Cheer”. The Designer Series Paper (DSP) is from the ‘Tis The Season DSP which is currently on sale at 20% off HERE.
Measurements: Whisper White Card Stock (CS) card base: 5 1/2 x 8 1/2 inches with a score line at 4 1/4 inches; Cherry Cobbler CS: 4 x 5 1/4 inches; Whisper White CS: 3 7/8 x 5 1/8 inches, 3 x 5 inches; Shaded Spruce CS: 1 1/4 x 5 1/8 inches; and ‘Tis the Season DSP: 11/2 x 5 1/8 inches.
Using Cherry Cobbler ink, stamp the sentiment “Happy wishes to you and yours” on the inside panel of the Whisper White CS card base. Stamp the sentiment “Joy & Cheer” onto the lower right-hand corner of the 4 x 5 1/4 inch Whisper White CS. Note: Use the Stampin’ Pierce Mat or a catalog with the Photopolymer stamps to get the best image.
Stamp the medium tree in Cherry Cobbler ink on the middle of the 3 x 5 inch Whisper White CS. Turn the card piece 180 degrees. Stamp the other 2 trees in Shaded Spruce ink as shown.
Fussy Cut all of the trees.
Adhere the ‘Tis the Season DSP to the Shaded Spruce CS. Adhere the “Joy & Cheer” card piece to the Cherry Cobbler CS, then to the front of the Whisper White CS card base. Tip: Use the Silicone Craft Sheet to keep from getting glue on your table.
Adhere the Shaded Spruce CS/’Tis the Season DSP to the card front. Adhere the Shaded Spruce tree as shown.
Use Stampin’ Dimensionals to adhere the last two trees as shown.
Time for the Bling! The Star Designer Elements are in the 2020-21 Stampin’ Up! Annual Catalog HERE.
Add one star to the top of each tree.
Viola! You have a nice traditional Christmas card to wish some Joy & Cheer to someone special.
Thank you so much for visiting today. I hope you enjoyed the 15-Day Christmas Card Challenge. You can see all of the cards on my “Home” tab up top. There are links to the blog post under each photo so you can look at the ones you like.
Wow! I can’t believe how fast the time is going! 11 days until Christmas! I still need to get my cards out. I have them all made, the letter is written, I just need to put the letter and card in an envelope and address them. That is my goal for today.
This is an easy Fun Fold using the Snowflake Wishes stamp set and Snowflake Splendor Designer Series Paper. You can put this card together quickly and have a festive winter card ready to send out in no time.
This lovely wintery card is great for showcasing your Designer Series Paper. I know I have quite a stash. Pick out 3 different designs of the Snowflake Splendor DSP.
Measurements: Pool Party Card Stock (CS) card base: 5 1/2 x 11 inches with score lines at 1 3/8 inch, 4 1/8 inches and 6 7/8 inches; Pool Party CS belly band: 1 1/4 x 10 inches scored at 3 1/2 inches and 7 5/8 inches; Snowflake Splendor DSP: two at 1 1/8 x 5 1/4 inches, 2 1/2 x 5 1/4 inches and 3 7/8 x 5 1/4 inches; and Whisper White CS: 2 1/2 x 4 inches, 2 1/2 x 5 1/4 inches and 3/4 x 4 inches. You will also need 10 inches of the 1/4 inch Snowflake Splendor Ribbon to adhere to the belly band, and you will need a bow.
With Bermuda Bay ink stamp the sentiment “May Your Season Sparkle” onto the 2 1/2 x 5 1/4 inch Whisper White CS. Use Pool Party ink to stamp the group of small snowflakes on the corners. Note: Remember to use the Stampin’ Pierce Mat or a catalog to stamp on with the Photopolymer Stamps to be sure to get the best images.
Use the Bermuda Bay ink to stamp the sentiment “Snowflake Wishes For a Merry Christmas” onto the 3/4 x 4 inch strip of Whisper White CS. Use Pool Party ink to stamp a snowflake onto the 2 1/2 x 4 inch Whisper White CS. Use the 2 1/4 inch Circle Punch to punch out the snowflake. Set aside.
Fold the Pool Party CS card base as shown. Use your Bone Folder to make all of the folds nice and crisp. Lay the card flat on the table.
Adhere one of the 1 1/8 x 5 1/4 inch pieces of the Snowflake Splendor DSP on the front flap.
Open the card and lay flat on the table. Adhere the other 1 1/8 x 5 1/4 inch piece of Snowflake Splendor DSP to the other side of the front flap. Next adhere the 2 1/2 x 5 1/4 inch Snowflake Splendor DSP and then the 2 1/2 x 5 1/4 inch Whisper White CS with the sentiment stamped on it.
Finish with the 3 7/8 x 5 1/4 inch Snowflake Splendor DSP on the last panel.
Fold the card up again and wrap the 1 1/4 x 10 inch Pool Party CS around the card snuggly. This is the belly band. You want it to slide off easily but not fall off. Adhere the end in front.
Cut a banner end on both ends of the sentiment and adhere to the lower portion of the belly band.
Wrap the 10-inch piece of the Snowflake Splendor Ribbon around the belly band and glue in place with the ends meeting in front. Adhere the snowflake with Stampin’ Dimensionals. Adhere the Snowflake Splendor Ribbon bow with glue dots.
There are a lot of Bling! possibilities for this card to make it sparkle. I used both the Holiday Rhinestone Basic Jewels and the Snowflake Adhesive-Backed Embellishments.
I placed the light blue Holiday Rhinestone Basic Jewels in the center of and around the large snowflake, then added the Snowflake Embellishments to the background.
Viola! You have a beautiful Fun Fold for sending Christmas Wishes!
I really appreciate you stopping by today. I hope you try this fun card. Best of luck with all your Christmas cards if you haven’t gotten them out yet.
Hello! The Christmas Gleaming stamp set and coordinating Gleaming Ornament Punches are so much fun to use to create gorgeous Christmas cards.
The Brightly Gleaming Specialty Designer Series Paper (DSP) is so beautiful with the copper foil accents. The paper is currently 50% off, item #150429. Shop HERE.
Measurements: Very Vanilla Card Stock (CS) card base: 4 1/4 x 11 inches with a score line at 5 1/2 inches, 3 3/4 x 5 inches and 3 x 4 inches; Old Olive CS: 4 x 5 1/4 inches; Brushed Metallic CS in copper: 2 1/2 x 4 inches; Brightly Gleaming DSP: 1 5/8 x 4 7/8 inches for the striped pattern and 3 7/8 x 2 1/4 inches.
Adhere the Brightly Gleaming DSP card pieces to the 3 3/4 x 5 inch Very Vanilla CS as shown. Use Old Olive ink to stamp the sentiment “MERRY Christmas” onto the Very Vanilla CS.
Use a Bone Folder to make a nice crisp fold at the 5 1/2 inch score line on the 4 1/4 x 11 inch Very Vanilla CS card base. Adhere the 4 x 5 1/4 inch Old Olive to the front of the Very Vanilla card base, then adhere the DSP card piece to the Old Olive CS.
Punch a 2-inch circle with the 2-inch Circle Punch and then adhere it to the card front with Stampin’ Dimensionals.
Stamp the ornament on the left in Night of Navy and the ornament on the right in Pretty Peacock. Use the Gleaming Ornament Punch to punch out the 2 stamped ornaments. Note: the Gleaming Ornaments Punch Pack is also 50% off! Item #150647.
Adhere the 2 ornaments to the Brushed Metallic CS circle. Add a bow tied from the Night Of Navy ribbon in the Playing With Patterns Ribbon Combo Pack. I tied my bow using 2 strands of the Night Of Navy ribbon. Adhere the bow with a Mini Glue Dot.
Viola! You have a gorgeous and somewhat masculine card to wish someone a “Merry Christmas”!
I am so glad you were able to stop by today. I hope you have a relaxing and craft-filled weekend!
Click on any photo below to go to my Online Store.
Hello! Well, it is almost Friday. Yay! We made it through another week! I have an extra fun card for you today!
One of the perks of being a Stampin’ Up! Demonstrator is that you are able to attend the Onstage Stampin’ Up! Convention in November of each year. This last Onstage there was a presentation by Rosemarrie Gonzalez on how to make this faux shaker card that I am going to share today.
Snowman Season is an adorable stamp set with this happy snowman. He reminds me of young children putting their faces up in the snowfall to catch snowflakes on their tongue. This is a very simple shaker card to make.
Measurements: Thick Whisper White Card Stock (CS) card base: 4 1/4 x 5 1/2 inches; Green Foil Sheet: 4 1/8 x 5 3/8 inches (I used a rectangle die to cut the center of the green foil so I can save it to use on another card); Whisper White CS: 3 7/8 x 5 1/8 inches and a Stitched Nested Label die cut (the 3rd up from the smallest): and Red Foil Sheet Stitched Nested Label die cut (4th up from the smallest). I also die cut some snowflakes from Silver Foil Sheets with the So Many Snowflakes Dies.
On the back of the Thick Whisper White CS card base, stamp the sentiment “Merry Christmas” in Shaded Spruce ink. Next stamp the sentiment “Hoping this season builds heartwarming memories” in Real Red ink. Add a few snowflakes in Smoky Slate ink. I Stamped Off some of the snowflakes.
Stamp the happy snowman in Memento Black ink. Add some snowflakes in Smoky Slate ink, some full strength and some Stamped Off.
I used the Stampin’ Blends Alcohol Markers to color the happy snowman. The colors are the Light and Dark: Smoky Slate, Pumpkin Pie, Real Red and Shaded Spruce.
Slide the happy snowman card piece into one of the Stampin’ Up! Clear Envelopes (p. 153 in the Annual Catalog, item #102619).
Add a spoon or two of the Snowflake Sequins.
Push the card piece into the lower left corner, flip over and seal the top to be snug on the right hand border.
Fold the excess envelope down and seal with Scotch Tape. Viola! A shaker card!
Using the 1/4 inch Crinkled Seam Binding, wrap it around the shaker card and tie in a bow. Tip: When no one is around to hold the tie, I use tweezers. This bow is made extra special by tying in an extra piece. It is hard to see but the bow has 2 tails on each side.
Adhere the Green Foil rectangle to the Thick Whisper White piece. Be sure you have the sentiment on the back facing the right way. Adhere the shaker card piece to the Green Foil and Thick Whisper White CS with 1/4 inch strips of the Foam Adhesive Sheets. So cute!
Use the Shaded Spruce ink to stamp the sentiment “Let It Snow” onto the Whisper White die cut Stitched Nested Label. Stamp some snowflakes around the border in Smoky Slate ink. Adhere to the Red Foil Stitched Nested Label die cut.
Adhere the Red Foil to the front of the shaker card piece. Add the Silver Foil snowflake die cuts as desired.
Viola! You have a really fun and happy snowman shaker card for Christmas!
I am so glad you stopped by to see this fun and easy Faux Shaker card technique! I was so “Wow’d” when Rosemarrie demonstrated this technique.
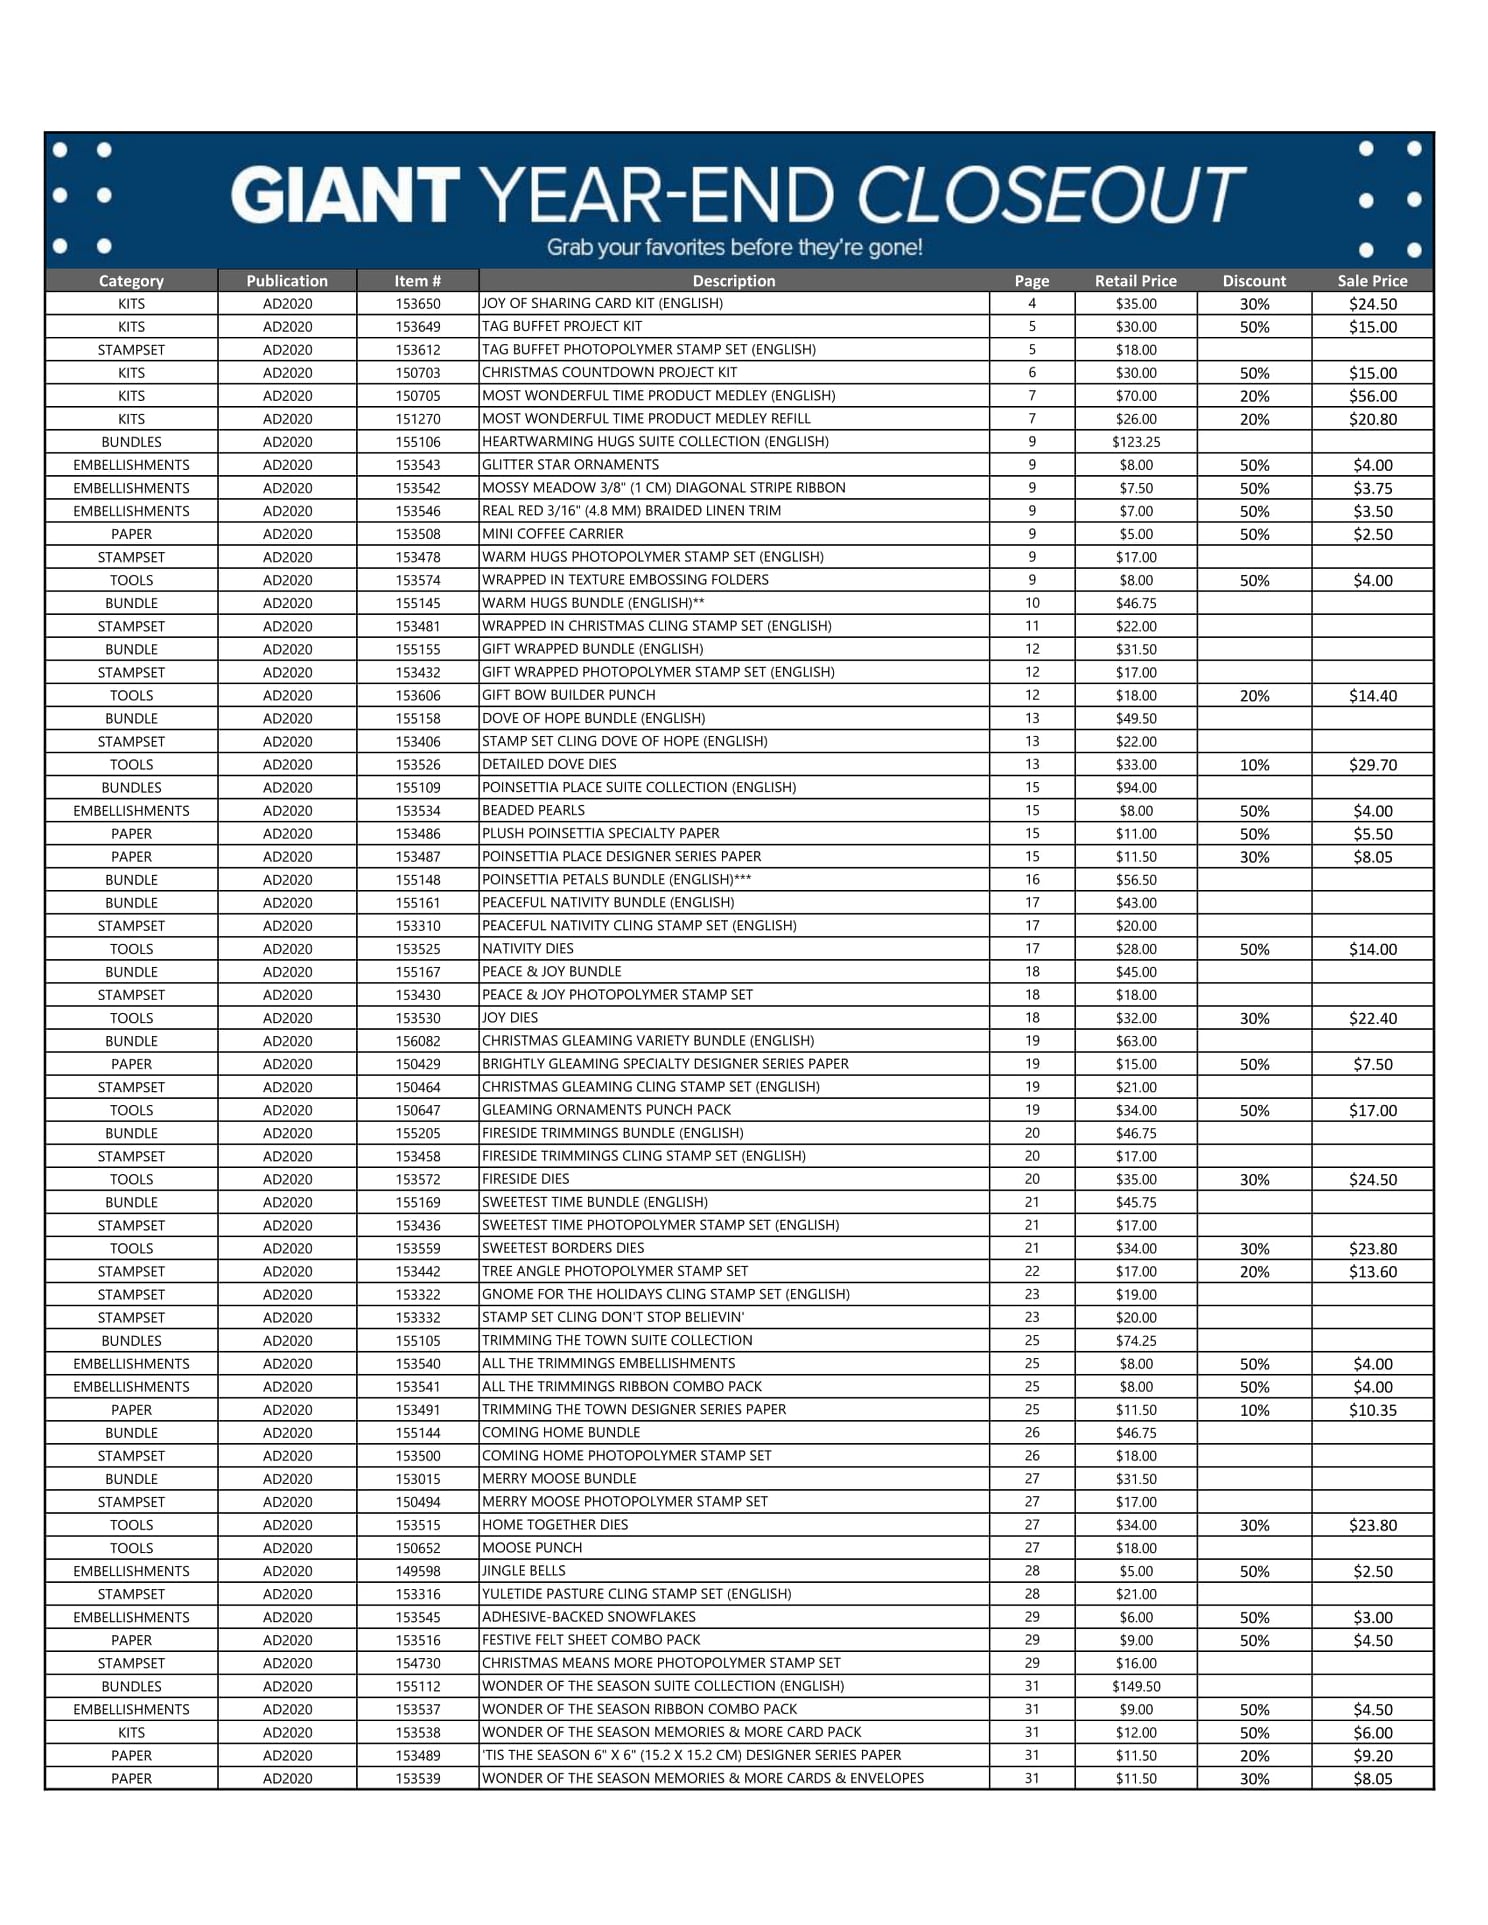
The Giant Year-End Closeout is still going on. If you haven’t had a chance to check out the discounts, please download the list below. The closeout will end on January 4, 2021 but as products run out-that is it!
Good Morning! I hope you are getting started on a lovely day. I have a really cute card today using the Cat Punch and the Peace & Joy stamp set.
I just love the Stampin’ Up! color Pacific Point. It is just so soothing. I am also in love with the Snowflake Splendor Designer Series Paper (DSP) which is the snowy background. Right now you can get the DSP for 20% off during the Giant Year-End Closeout from December 8, 2020 to January 4, 2021. Shop HERE. Download the complete list of retiring products and discounts below.
The Peace & Joy stamp set has several large sentiments along with smaller strip sentiments to design your own personal sentiment. It is also on the retiring list.
Measurements: Whisper White Card Stock (CS) card base: 4 1/4 x 11 inches with a score line at 5 1/2 inches; Pacific Point CS: 4 1/8 x 5 3/8 inches and 3 x 4 inches; Snowflake Splendor DSP: 4 x 5 1/4 inches; and Whisper White CS: 3 x 3 inches, 1 1/2 x 4 inches and 1/2 x 3 inches.
Stamp the “Peace” sentiment in Pacific Point ink onto the 1 1/2 x 4 inch Whisper White CS. Stamp the sentiment “To you and yours” onto the 1/2 x 3 inch Whisper White CS. Note: When using the Photopolymer stamps, you will need something underneath like the Stampin’ Pierce Mat or a catalog to get the best image.
Fussy cut the sentiments with your Paper Snips and set aside.
Use the 2 1/4 inch Circle Punch to punch a circle on the upper portion of the Snowflake Splendor DSP in the middle. The DSP in this photo is upside down. Be sure to push the DSP all the way down into the punch.
Adhere the 3 x 3 inch Whisper White CS to the back of the Snowflake Splendor DSP covering the 2 1/4 inch circle. I am using a Silicon craft Sheet to avoid having the project stick to my table. Flip over and adhere the card piece to the 4 1/8 x 5 3/8 inch Pacific Point CS.
Punch the cat out of the 3 x 4 inch Pacific Point CS with the Cat Builder Punch. Adhere the cat in front of the “moon”.
Use Stampin’ Dimensionals to adhere the “Peace” sentiment under the cat. Adhere the “To you and yours” sentiment under the “Peace”.
Use your Bone Folder to fold the 4 1/4 x 11 inch Whisper White CS card base at the 5 1/2 inch score line. Adhere the cat card piece to the front of the card base.
Viola! You have a soothing card to send some peace to your favorite cat lover.
I really appreciate your visit today. I have been doing a 15-Day Christmas Card Challenge since December 1, 2020 if you would like to go to the previous posts and see lots of handmade Christmas card ideas. Please leave a comment and let me know which is your favorite.
Select any photo below to go directly to my Online Store.
Today I am returning to some simple stamping for my beginner stampers. The Merry Moose stamp set by Stampin’ Up! will not be available for much longer. It retires at the end of December. So if you would like this beauty, order early. Today is the start of the Giant Year End Close Out Sale. Check out all the sales and discounts at the end of my blog.
The Merry Moose stamp set is really fun and perfect for the outdoors person. I will show you a little technique with sponging & masking today to get the snowdrift.
Measurements: Shaded Spruce Card Stock (CS) card base: 5 1/2 x 8 1/2 inches with a score line at 4 1/4 inches; Whisper White CS: two at 4 x 5 1/4 inches; white copy paper: 4 x 6 inches.
Cut the 4 x 6 inch piece of copy paper as shown. This will be the mask to make the snowdrift.
Place the copy paper over one of the 4 x 5 1/4 inch Whisper White CS card pieces. Use a removable tape runner if needed to hold it in place. Using a sponge and the Balmy Blue ink dab the sponge on the ink. Sponge the ink onto the Whisper White CS in a gentle circular motion along the edge of the mask. Then sponge lightly above that to color the “sky”.
Leaving the mask in place, use the Shaded Spruce ink and the pine tree stamp to stamp two trees. Leave a space between the trees to stamp a third tree. Note: These are Photopolymer stamps and need a little padding from a Stampin’ Pierce Mat or catalog to look best.
Remove the copy paper mask. Stamp the third tree between the other two trees. Leave space under the third tree to put your sentiment.
Stamp the moose in Soft Suede ink. The moose is a Two Step Stamp. Here I stamped the detailed stamp after the plain stamp. However, I stamped the detailed stamp first followed by the plain stamp and felt it was easier for me to see to line everything up. Try it both ways to determine which works well for you. I did Stamp Off the plain moose stamp so that I could see the details on the moose more easily.
Stamp the sentiment “Merry Christmoose” in the Shaded Spruce ink.
Use the Shaded Spruce ink and stamp some pine trees on the other 4 x 5 1/2 inch Whisper White CS. I stamped once at full strength. The other two trees are Stamped Off first. Add the sentiment “enjoy the stillness of the season” over the trees. Adhere the panel to the inside of the Shaded Spruce CS card base.
Use your Bone Folder to fold the card base at the 4 1/4 inch score line. Adhere the front panel to the front of the card base.
Viola! That is all there is to it! This is a great card for the outdoors person and is so fun to make! Plus a little humor is good for the soul!
For those of you who love Bling! as much as I do, here is another version of the Merry Moose card with Rhinestone Basic Jewels added like stars in the sky.
Thanks for visiting today! Please leave me a comment and let me know which card has been your favorite during the first 7 days of my 15-Day Christmas Card Making Challenge.
To download the pdf of the retiring product in the 2020 August-December Stampin’ Up! Mini Catalog select the download button below.
Hello! This is day 2 of my 15-day Christmas Card Making Challenge. Today I am using Circle Punches and Designer Series Paper to make a shiny Holiday card.
This brightly gleaming Holiday card is made with the Dove of Hope stamp set (#153406) and the aptly named Brightly Gleaming Designer Series Paper (#150429).
Measurements: Mossy Meadow Card Stock (CS) card base: 5 1/2 x 8 1/2 inches with a score line at 4 1/4 inches; Very Vanilla CS: two at 4 x 5 1/4 inches and 2 1/2 x 4 inches; Brushed Metallic CS in copper: 2 5/8 x 5 1/8 inches and 2 3/4 x 4 inches; Brightly Gleaming DSP: 2 1/2 x 5 inches. The bow is made with the Old Olive ribbon from the All the Trimmings Ribbon Combo Pack.
Use the Mossy Meadow ink to stamp the sentiment “Peace On Earth” onto the 2 1/2 x 4 inch Very Vanilla CS. Stamp the branch below the sentiment as shown.
Use the 2 inch Circle Punch to punch out the sentiment. Set aside.
Stamp a branch onto the upper right-hand corner of one of the 4 x 5 1/4 inch Very Vanilla CS pieces. Add the ornament and the sentiment. This is the inside of the card.
Adhere the Brightly Gleaming DSP to the Brushed Metallic CS, then adhere them to the second 4 x 5 1/4 inch Very Vanilla CS card piece.
Use the Bone Folder to fold the Mossy Meadow CS card base in half at the 4 1/4 inch score line. Open the card base and adhere the 4 x 51/4 inch Very Vanilla inside card piece to the inside of the card base.
Adhere the prepared Very Vanilla CS and DSP card piece to the front of the Mossy Meadow CS card base.
Use the 2 1/4 inch Circle Punch to punch out a circle from the 2 3/4 x 4 inch copper Brushed Metallic CS. Adhere the “Peace On Earth” circle to the copper circle.
Now for the Bling! Even though the Gilded Gems are gold and the card is more copper-colored, I thought the gems would add some more sparkle.
Use the Take Your Pick tool to easily transfer the Gilded Gems from the acetate to the front of your card.
Viola! You have a brightly gleaming Holiday card to wish some “Peace On Earth” to someone this Holiday season!
If this is your first visit to my blog, check out the post from yesterday. I am participating in a 15-day Christmas Card Challenge and I started on December 1st. Thanks for stopping by! Please leave me a comment and let me know how I am doing.
Select any photo below to go to my Online Store and start shopping.
Welcome to December! It finally got below freezing here in Arizona. It is still very sunny during the day, but Brrrr! Today I am showing a card made only with stamps, ink and paper- aka-#simplestamping.
The Winter Woods Stampin’ Up!® stamp set is in the 2020-21 Stampin’ Up! Annual Catalog on page 61. I love this set because I can create a serene scene with the magnificent trees in this awesome stamp set. And I love the sentiment!
Measurements: Whisper White Card Stock (CS) card base: 5 1/2 x 8 1/2 inches with a score line at 4 1/4 inches; Whisper White CS: 1 5/8 x 2 1/8 inches; Shaded Spruce CS: 4 x 5 1/4 inches and 1 3/4 x 2 1/4 inches; Soft Seafoam CS: 3 3/4 x 5 inches.
Start by stamping the group of trees in Shaded Spruce ink onto the 3 3/4 x 5 inch Soft Seafoam CS. Next stamp the large evergreen tree on the left side slightly covering the first group of trees. Tip: This is a red rubber stamp. You will get the best image by stamping on a smooth hard surface, like the top of a table.
Stamp another evergreen tree on the right-hand side, then without adding more ink, stamp under the bare trees on the left-hand side. Add some ink, stamp onto the scrap paper and then stamp onto the left-hand side slightly above the first evergreen tree. This technique is called Stamping Off and helps to give the tree line a 3D look. Stamp off a few more times to add more fullness under the bare trees on the right.
Stamp some of the smaller evergreen trees on the inside of the Whisper White CS card base in the bottom right-hand corner. Stamp off for one of the trees. Now stamp the sentiment “Thinking Of You This Season” onto the 1 5/8 x 2 1/8 inch Whisper White CS. Stamp two of the pine branches under the sentiment.
Adhere the sentiment to the 1 3/4 x 2 1/4 inch Shaded Spruce CS. Adhere the Soft Seafoam CS with the trees stamped on it to the 4 x 5 1/4 inch Shaded Spruce CS, then adhere it to the front of the Whisper White CS card base.
Use Stampin’ Dimensionals to adhere the sentiment card piece to the card front.
Viola! You have a fabulous seasonal card to let someone know you are thinking of them! And all you needed was stamps, ink and paper!
However, I will show you a few other options for this card if you feel it needs a little Bling! Bling! is my thing!
You could add a few of the Red Rhinestone Basic Jewels to the branches.
You could also use the Rhinestone Basic Jewels to add some stars in the sky. No matter which version you send, you will be spreading some Holiday Cheer!
Thanks for stopping by today! I really appreciate all the wonderful comments! A big thank you to all of you who placed an order.
Select any photo below to connect with my Online Store and start shopping!
It is Thanksgiving in a few days and like many we will not be visiting family as usual. Aside from the Thanksgiving festivities we will still try to have, I think it would be fun to make cards as a family. Stampin’ Up! Snowflake Wishes has many different snowflakes which makes this wonderful Christmas card simple and fun to stamp.
I love the colors of blue that Stampin’ Up! has! Pacific Point, Coastal Cabana and Pool Party are the colors on this wintery card.
Measurements: Whisper White Card Stock (CS): the card base, 5 1/2 x 8 1/2 inches with a score line at 4 1/4 inches, and a 3 3/4 x 5 inch panel; Pacific Point CS: 4 x 5 1/4 inches.
The first step is to stamp a sentiment in Pacific Point ink on the lower right hand side. I chose this fancy “Merry Christmas” from the Tag Buffet stamp set. Note: when using the Photopolymer Stamps, the see-through stamps, you need a little padding to get a good image. The Stampin’ Pierce Mat works well. If you don’t have one try your Stampin’ Up! Catalog.
I decided on 4 different snowflakes ranging in size from large to small. The larger snowflake is stamped in Coastal Cabana ink slightly above the level of the sentiment.
The snowflake that is the next size smaller is Stamped Off using the Pool Party ink. Stamping Off: this is a technique whereby you first stamp onto a scrap of paper, then on your project. This allows you to stamp the image a shade lighter.
I decided I needed another large snowflake in the Coastal Cabana ink to balance the design by stamping in the lower right-hand corner.
Next I added several slightly smaller snowflakes in the Pool Party ink at full strength.
The smallest snowflake is Stamped Off in Pacific Point ink.
Here is the completed card front.
Now to stamp the inside of the card. Start with the larger snowflake in the Coastal Cabana ink in the lower right-hand corner of the 5 1/2 x 8 1/2 inch Whisper White CS card base.
Stamp Off to add the next size smaller snowflake in Pool Party ink. The next smaller snowflake after that is stamped in Pool Party ink at full strength.
The smallest snowflake is Stamped Off in Pacific Point ink.
This is the completed inside of the Whisper White CS card base.
Fold the card base at the 4 1/4 inch score line and press with the Bone Folder to get a crisp fold. Adhere the 4 x 5 1/4 inch Pacific Point CS to the front of the Whisper White CS card base. Adhere the stamped snowflake card piece to the Pacific Point CS.
You could leave the card as is. I have a passion for Bling! which is basically anything shiny and sparkly. I added the Rhinestone Basic Jewels to the center of most of the snowflakes. The Take Your Pick Tool makes transferring the Rhinestones to your card very easy.
Viola! You have a dazzling festive Christmas card to send off to someone! My goal was to make 40 Christmas cards by Thanksgiving. I am only halfway there, but I plan to keep at it in the next couple of days. Then I plan to enlist my husband’s help to address them all!
Today, Tuesday November 24, 2020 is the Online Extravaganza! For 24 hours only, you can get selected products in the Annual Catalog at 10% off! Shop early so you can get what you want. There is an exclusion list posted below. When you are ready, you can shop by clicking HERE.
If you would like to go directly to the Online Store you can click on any photo below.
Hello and Happy Friday! This month is flying by! I was looking forward to visiting my family for Thanksgiving, but they have a shelter in place order. Needless to say, none of use is getting together in person. We might try meeting on Zoom. Looking on the bright side- I can stay home and make more Christmas cards!
The card for today’s Fun Fold Friday is called a Gate Fold Card. The band with the poinsettia on it is a Belly Band. This elegant holiday card is super simple to make so you can send one to your friends & family to spread the Holiday Cheer.
Measurements: Very Vanilla Card Stock (CS) card base: 5 1/2 x 8 1/2 scored at 2 1/8 and 6 3/8 inches; Very Vanilla CS: 5 x 5 inch for stamping, a 2 inch circle and 1 3/4 x 2 3/4 inches; Red Velvet Paper: 2 x 3 inches and 1 1/2 x 9 1/8 inches; and the Poinsettia Place Designer Series Paper (DSP): 2 x 5 3/8 inches. You will also need 9 1/8 inches of the Vanilla open weave ribbon from the Forever Greenery Trim Combo Pack.
Stamping: Starting with the Memento Black ink, stamp one of the complete poinsettias, two berry sprigs and three leaves onto the 5 x 5 inch Very Vanilla CS. Use the Real Red ink to stamp the sentiment “May Magic & Wonder bloom this holiday” onto the 1 3/4 x 2 3/4 inch Very Vanilla CS.
I used the Stampin Blends Alcohol Markers to color the images. If you have not tried them yet, I highly recommend them. I have tried other alcohol markers that are more expensive and have not gotten results as good as I have with the Stampin’ Blends. The colors for this card are: Light & Dark Real Red, Dark Cherry Cobbler, Light & Dark Mango Melody, Light & Dark Old Olive and Dark Mossy Meadow. I will show you how I got the look I did, but this is just one way. There are many other ways to color with the Blends. To start off, I colored the leaves completely with the Light Old Olive.
I added some shading with the Dark Old Olive followed by the Dark Mossy Meadow. You could go over the leaf again with the Light Old Olive to blend everything together.
The berry sprigs were colored first with Light Real Red, then Dark Real Red followed by a little Dark Cherry Cobbler. For the poinsettia, I outlined the top layer of petals with the Dark Cherry Cobbler to try and achieve a 3D look. Next I colored the entire poinsettia with the Light Real Red.
I blended the Cherry Cobbler outline into the Light Real Red with the Dark Real Red. To add a finishing touch, I added a little more shadow with the Dark Cherry Cobbler. Note: The best part of coloring with the Stampin’ Blends Alcohol Markers is experimenting with them yourself to see what kind of look you get.
Cut all the images out either by Fussy Cutting with your Paper Snips or using the coordinating Poinsettia Dies with the Stamp and Cut Machine. Fold the Very Vanilla card base with the Bone Folder to get crisp folds.
Adhere the Poinsettia Place DSP to the front flaps. Adhere the 2 x 3 inch Red Velvet to the inside. Use Stampin’ Dimensionals to add the sentiment card piece on top of the Red Velvet.
Add the berry sprigs. Tip: For very delicate items I use a tweezers to position the item after first applying a wee bit of glue.
Wrap the 1 1/2 x 9 1/8 inch Red Velvet Paper around the card so that it is snug but not tight. You want it to slide off easily, but not fall off. Also wrap the ribbon around. I did not need to glue the ribbon to the Red Velvet except where I attached the ends of the Belly Band in the front. Tip: I recommend using a strong adhesive to attach the ends of the Belly Band. Examples of a strong adhesive are the Tombow Multipurpose Liquid Glue and the Tear & Tape. Both can be found in the 2020-21 Stampin’ Up!® Annual Catalog.
Adhere the poinsettia leaves to the Very Vanilla 2 inch circle. Use Stampin’ Dimensionals to adhere the poinsettia.
Use Stampin’ Dimensionals to adhere the Very Vanilla CS Circle to the front of the Belly Band, covering the ends of the Belly Band. Add some Bling! with the Holiday Rhinestone Basic Jewels. Tip: I use the Take Your Pick Tool to transfer the rhinestones to the card.
Viola! That is all there is to it! This card is a really fun way to share the Holiday Cheer with a loved one!
Click on the image to go to my Online Store
On Tuesday, November 24, 2020 there will be 10% off select products from the Annual Catalog. If you are still planning your Christmas cards, look over pages 56 to 63 of the 2020-21 Stampin’ Up! Annual Catalog. There are 12 stamp sets for the Holidays! Click HERE to check it out now!
Thank you to all of you who came by today. I so appreciate you! Thank you to all of you who have placed orders to help me keep my business going. These are difficult times and it is so nice to have your support. I have my own “Black Friday” Special. When you place an order for $35 or more between November 22 -27, 2020, you will receive your choice of a free package of Rhinestone Basic Jewels or a Bone Folder from me!
I hope you have a wonderful weekend and are able to start on your Holiday cards & gifts!


 Designer Series Paper")


")

 Ribbon")
 Circle Punch")


")
")


")
")


 Crinkled Seam Binding Ribbon")


")


 Circle Punch")


