

Hello and welcome! I am Theresa McEntee, creator of Theresa’s Treasures Paper Crafts. Today I have the pleasure of participating in the Blog Hop with Around the World on Wednesday (AWOW) organized by Angie McKenzie. This is Sketch Challenge 107 with More Than Autumn.

On the second Wednesday of each month, the AWOW team put together a thematic hop to give you some inspiration for your own crafting. Sketch 107 is this month’s theme.

Sketch 107 with More Than Autumn


My Project for today
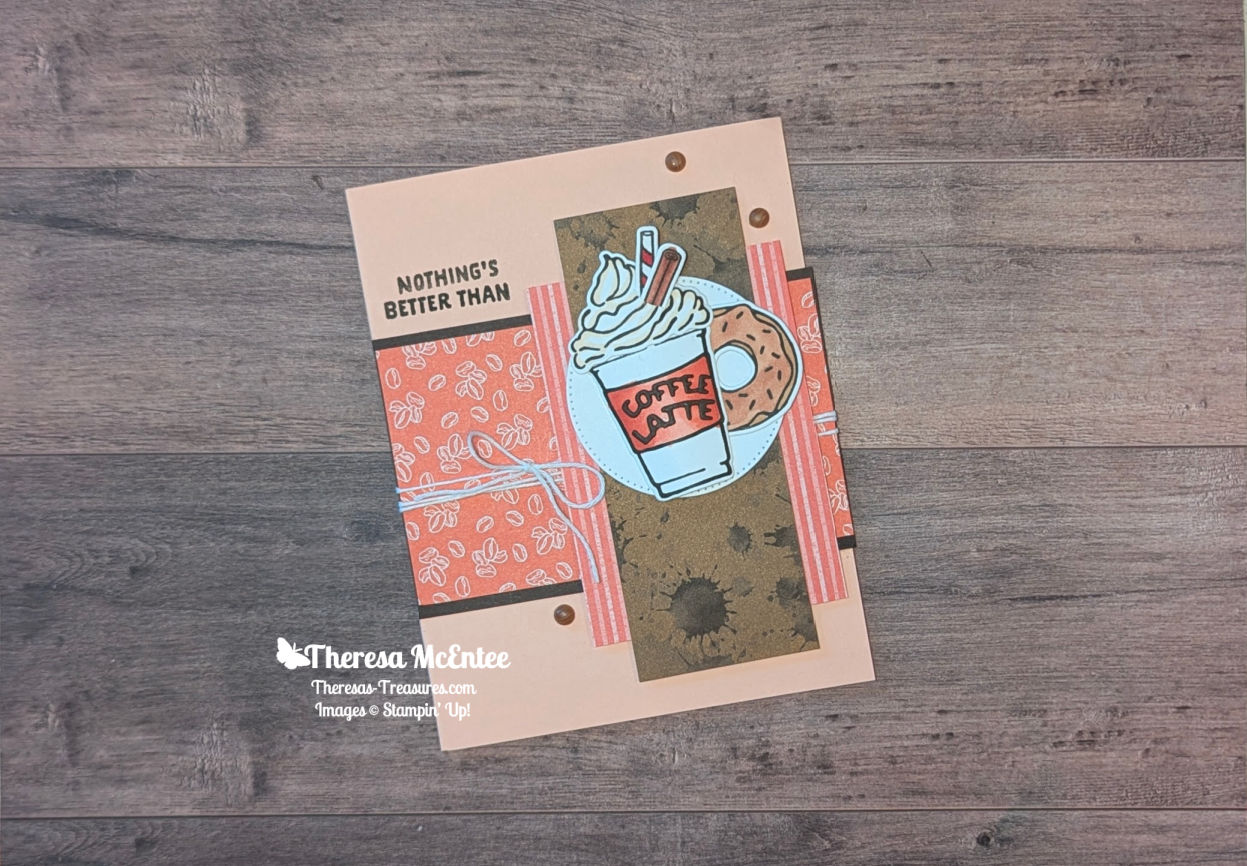
I really love coffee. That first sip of coffee in the morning is just so tasty!
I have very fond memories of visiting Italy with my husband and stopping in the little corner cafes to get a Café Latte. We had a special way to enjoy the foam, which is a lot thicker than in the US. We would sprinkle sugar on the foam and eat it with a spoon before finally drinking the Café Latte. Yum!


The More Than Autumn Bundle has so many images and words to choose from. I enjoyed creating this card!

The patterned paper (Designer Series Paper (DSP)) is from the A Little Latte paper pack (an Online Exclusive) and the Sublte DSP in Calypso Coral. The card base is Petal Pink cardstock. Accents are Early Espresso cardstock. The Baker’s Twine ties is all together!
The AWOW Team
I am so glad you have joined me today in this worldwide hug that stretches all the way from Australia to Alaska across twelve different time zones. Each month this group of creative friends prepare a project for a theme. Below is an image of the whole crew and where they are from around the globe. Such a talented and wonderful group of people! You will want to visit everyone to be sure to see all the amazing projects!

We all love sharing joy with you through projects from our individual parts of the world. I hope that you will be filled with lots of inspiration!
See More Inspiring Projects

Blog Hop Roll Call
Thank you so much for visiting today. I hope you enjoyed learning more about our projects. Have a most wonderful day!
Theresa
Stamp Sale!!!

Get 15% off your favorite stamps from the Annual Catalog starting October 7th until October 9th! Shop HERE!
Kit Collection Sale-15% Off!

All kits are 15% off! Shop the kit collection HERE!
Starter Kit Special

You can join my Stamping Gems Team with this Starter Kit Special. Benefits are: 20% discount on future purchases as long as you are a demonstrator, monthly Stamping Gems Team meeting with mystery stamping, ability to order new product before every one else and belonging to a great community of like-minded crafters! Join HERE!
Paper Pumpkin 40% Off Sale

Subscribe to Paper Pumpking and get 40% off your first month! Receive a new kit that includes everything you need to make a project every month! Try it out with this 40% off the first month! Subscribe HERE!


")
")


")
")


")


 Designer Series Paper")
 Striped Trim")


")


