Welcome and thanks for visiting Theresa’s Treasures Paper Crafts! I am Theresa, a Stampin’ Up! Demonstrator in Arizona, USA. Today is the monthly Inspirations in Ink Blog Hop! I am excited to be hopping with talented demonstrators from around the world. Be sure to check out everyone’s Magical Meadow Bundle projects. The Magical Bundle is in the 2023 Mini Catalog. When you are ready, you may order from my Online Store HERE.
I made this card using most of the diecuts form the Magical Meadow Die set using the colors shown in the catalog for this set. I love the color combination and how the bouquet turned out!
Measurements
Blueberry Bushel cardstock card base: 4 1/4″ x 11″ scored at 5 1/2″
Gray Granite cardstock: 4 1/4″ x 5 1/2″ (to diecut with the largest Scalloped Contour Die)
Basic White cardstock: 3 3/4″ x 5″ (inside), 2 1/4″ x 2 1/4″ (to diecut the circle with Labels Aglow Dies) and 3 1/2″ x 5″ (to diecut with the 2nd to the largest Scalloped Contour Die)
Scrap cardstock in Moody Mauve, Lost Lagoon, Shaded Spruce and Blueberry Bushel to diecut the foliage
Supplies
Magical Meadow stamp set & dies
Scalloped Contours Dies
Labels Aglow Dies
Blueberry Bushel Ink
Blending Brush
Tinsel Gems 4 Pack
White & Silver Ribbon
Voila!
Thank you so much for visiting today! Please visit all the blogs in the Inspirations In Ink Blog Hop. You will be amazed and inspired by all the fun and creative projects made by the Inspirations In Ink demonstrators.
You are currently visiting Theresa McEntee-USA creator of Theresa’s Treasures Paper Crafts.
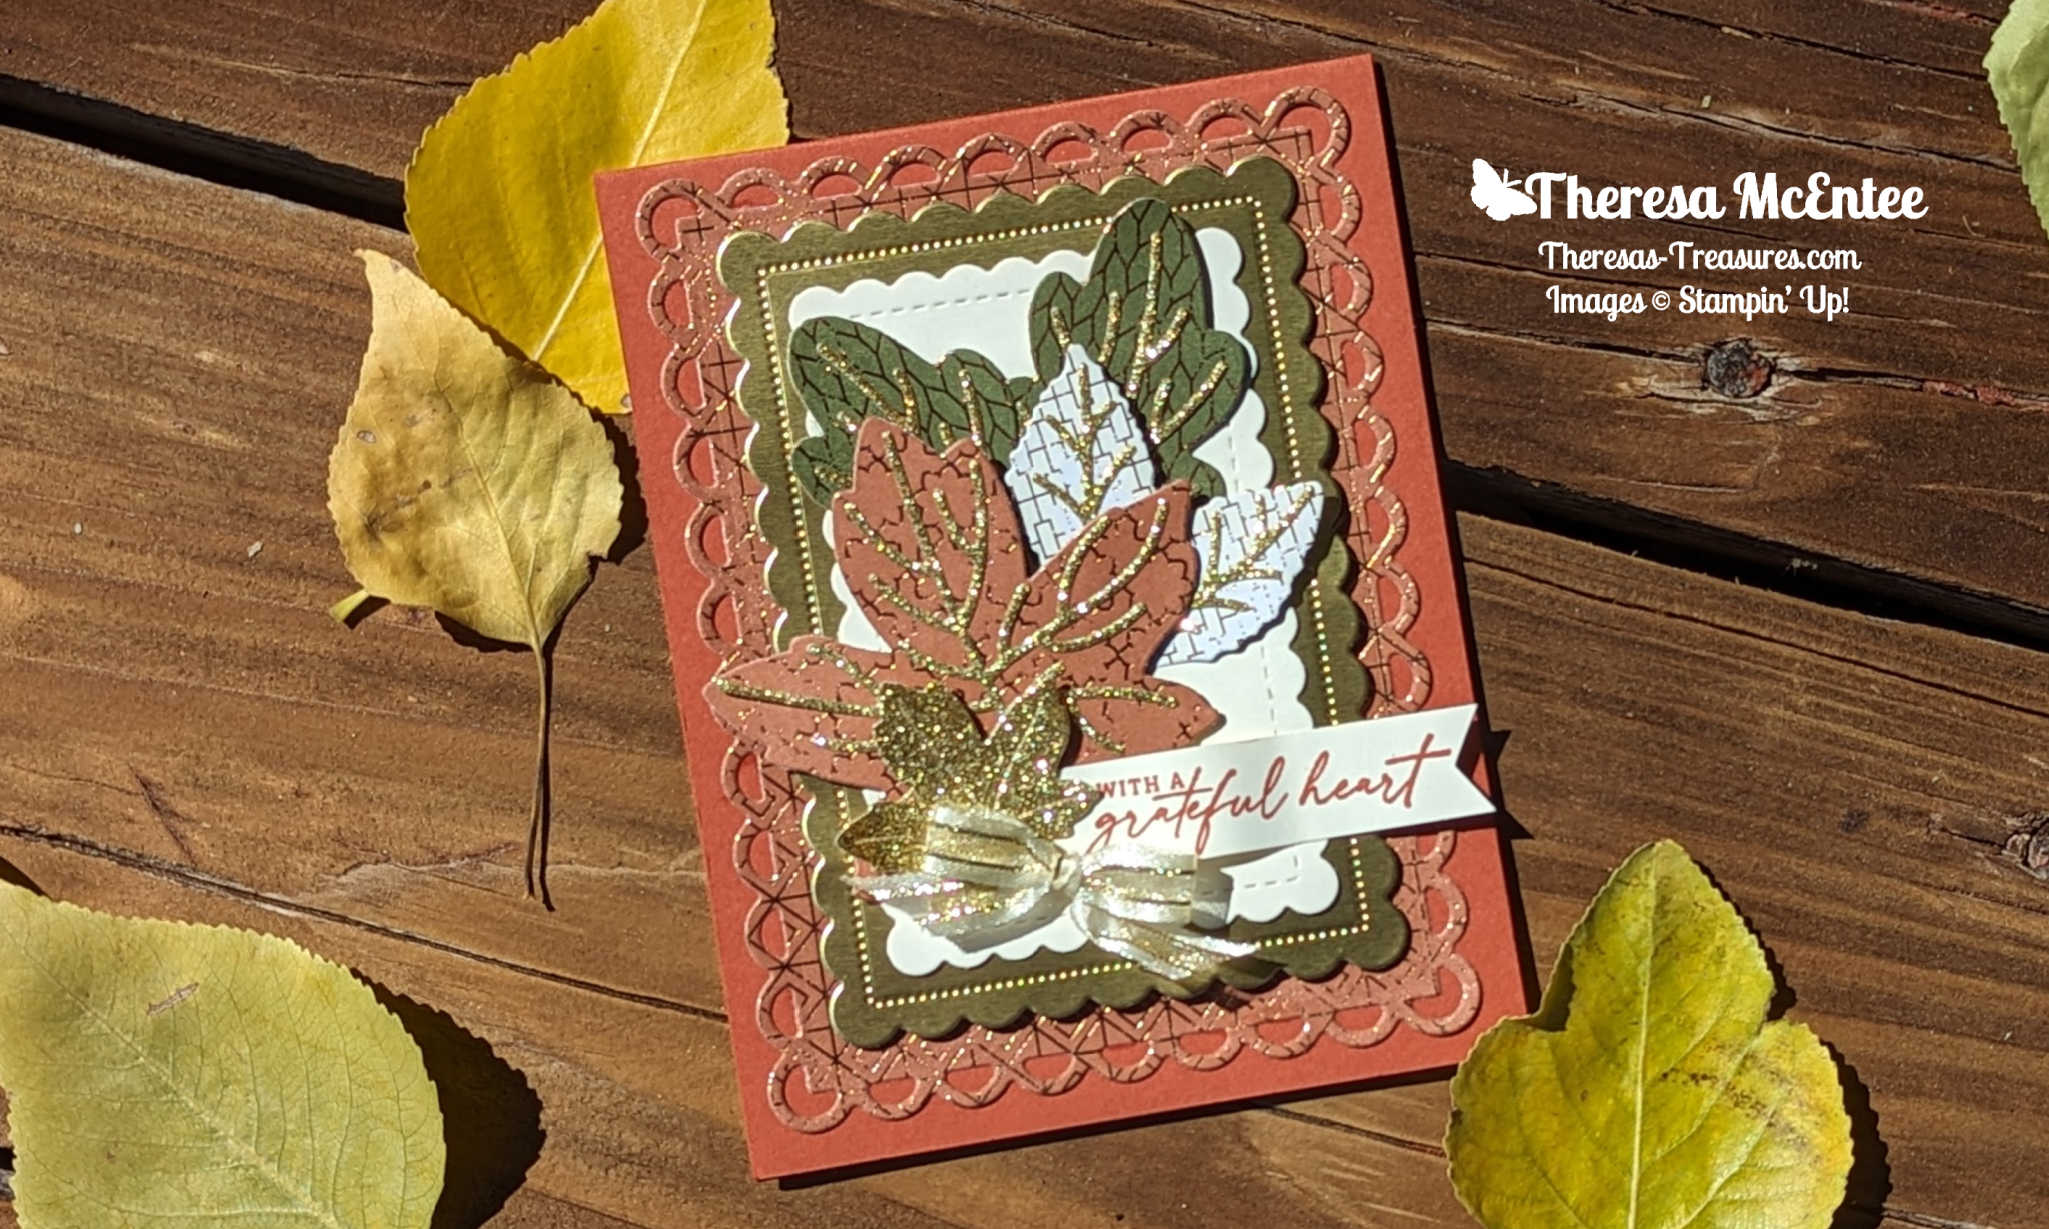
Hello! Welcome to Theresa’s TreasuresPaper Crafts. I am Theresa, an Independent Stampin’ Up! Demonstrator in Arizona, USA. I am excited to be participating in Kylie Bertucci’s International Blog Highlight Gallery with myAutumn Leaves Gratitude card. Today I am sharing my card and blogging along with a very creative group of Stampin’ Up! demonstrators from around the world! Please be sure to see all of the inspirational projects by visiting everyone’s blog. You will need to click on the “Vote” button below to see the Gallery.
The theme for this Gallery is “Thank You”.
It is so important to show appreciation to those who have helped you, supported you and inspired you. One way to express gratitude is to send a handmade thank you card! Discover the joy in making and sending a handmade card for yourself!
*The All About Autumn Designer Series Paper is due to be back in stock this week.
Current Host Code: 9EVUAPUT
Measurements
Copper Clay cardstock card base: 4 1/4″ x 11″ scored at 5 1/2″
All About Autumn Designer Series Paper: Copper Clay/Foil design: 4 1/4″ x 5 1/2″ (diecut with the largest Scalloped Contours Die), 3″ x 3 1/4″ (diecut the largest leaf in the Autumn Leaves Dies) and 1/2″ x 5 1/4″(inside) Mossy Meadow/Foil design: 2 1/2″ x 3″(diecut with the large narrow leaf die) White/Foil design: 2 1/4″ x 2 1/4″( diecut with the leaf duo)
Gold Self-Adhesive Glimmer Paper: 3″ x 12″
Gold Foil: 3 1/4″ x 4 3/4″ (diecut with the 2nd from the largest Scalloped Contours Die)
Very Vanilla cardstock: 5/8″ x 2 3/4″ for the sentiment, 2 3/4″ x 4″(diecut with the 3rd from the largest Scalloped Contours Die) and 4″ x 5 1/4″ for the inside
Supplies
Autumn Leaves stamp set & dies
Scalloped Contours Dies
Copper Clay Ink
Gold & Vanilla 3/8″ Satin Edged Ribbon
Stampin’ Dimensionals & Mini Dimensionals
Mini Glue Dot
Stampin’ Cut & Emboss Machine
Instructions
Fold the Copper Clay cardstock card base in half and set aside.
Stamp the sentiment in Copper Clay Ink onto the 5/8″ x 2 3/4″ Very Vanilla cardstock. Cut the right-hand end into a banner.
Die cut all of the leaves, scalloped rectangles and the veins for the leaves.
Remove the protective backing on the Gold Glimmer Paper and adhere the veins to the corresponding leaves.
Adhere the Copper Clay/Foil scalloped rectangle to the front of the Copper Clay cardstock card base.
Stampin’ Dimensionals are used to adhere the Gold Foil scalloped rectangle to the card front.
Use Multipurpose Liquid Glue or the Stampin’ Seal to adhere the Very Vanilla cardstock scalloped rectangle to the Gold Foil layer.
Arrange the leaves on the Very Vanilla cardstock scalloped rectangle. I started with the Mossy Meadow/Foil leaves in the background. A Mini Stampin’ Dimensional was applied to the back of the tip of the right-hand Mossy Meadow/Foil leaf to raise it up a bit.
Add the Copper Clay/Foil leaf using Stampin’ Dimensionals. Slide the White/Foil leaves behind the Copper Clay/Foil leaf. Mini Stampin’ Dimensionals are on the back of the tip of each leaf.
Use a Stampin’ Dimensional on the back of the middle of the sentiment and glue on either end. Adhere to the card front. This gives the sentiment banner a wavy look.
To adhere the small Gold Glimmer Paper maple leaf, apply a Stampin’ Dimensional to it without removing the protective backing. Adhere to the left of the sentiment.
Make a small bow using the Gold & Vanilla 3/8″ Satin Edged Ribbon. Adhere to the card front using a Mini Glue Dot.
Complete the inside by adhering the 1/2″ x 5 1/4″ strip of the Copper Clay/Foil DSP to the right-hand side of the 4″ x 5 1/4″ Very Vanilla cardstock. Adhere 2 oak leaves diecut from the Gold Glimmer Paper. Adhere the panel to the inside of the card base.
Voila!
I hope you enjoyed my gratitude card today using the Autumn Leaves Bundle. I really loved sharing it with you!
Visit my Online Store to order what you need to make this card for yourself. A photographic supply list is at the end of this blog.
Current Host Code: 9EVUAPUT
You are currently at Theresa McEntee-Theresa’s Treasures-USA. When you click on the Vote For Me button above you will see the Gallery of creative inspiration from Demonstrators around the world! Remember to visit everyone’s blog by clicking on the photo of their card in the Gallery.
To vote for your favorite cards, click on the small heart in the upper right-hand corner of each photo. You have 5 votes! Enjoy and come visit Theresa’s Treasures again soon!
Today I have an awesome Cheerful Daisies Friendship Card!
Welcome and thanks for visiting Theresa’s Treasures Paper Crafts! I am Theresa and I am a Stampin’ Up! Demonstrator in Arizona, USA. Today is the monthly Inspirations in Ink Blog Hop! I am excited to be hopping with talented demonstrators from around the world. Be sure to check out everyone’s projects using the Cheerful Daisies Bundle. The Cheerful Daisies Bundle is in the Stampin’ Up! 2023-24 Annual Catalog. You may order from my Online Store HERE.
Measurements
Thick Basic White cardstock card base: 4 1/4″ x 11″ scored at 5 1/2″ (10.5cm x 29.7cm scored at 14.85cm)
Petal Pink cardstock: 4 1/4″ x 5 1/2″ (11cm x 14.5cm) for diecutting the largest Scalloped Contours Die
Basic White cardstock: 3 1/2″ x 4 3/4″ (9cm x 12cm) for diecutting the next smaller Scalloped Contours Die
Basic White cardstock: 4″ x 5 1/4″ (9.8cm x 14.2cm) Inside
Petal Pink cardstock: 3 1/4″ x 4″ (8.2cm x 12cm) for diecutting the 3rd layer of the daisies
Crushed Curry cardstock: 3 1/4″ x 4″ (8.2cm x 12cm) for diecutting the 2nd layer of the daisies
Lemon Lolly cardstock: 3 1/4″ x 4″ (8.2cm x 12cm) for diecutting the base layer of the daisies
Early Espresso cardstock: 1″ x 1 1/2″ (2.5cm x 3.8cm) for diecutting the center of the daisies
Garden Green cardstock: 3″ x 5″ (7.5cm x 12.5cm) for diecutting the leaves
Supplies
Cheerful Daisies stamp set and die Bundle
Scalloped Contours Dies
Ink: Early Espresso, Garden Green, Crushed Curry, Lemon Lolly and Petal Pink
Iridescent Rhinestone Basic Jewels
Adhesives: Multipurpose Liquid Glue and Stampin’ Dimensionals
Instructions
Die cut all of the pieces as outlined above.
Fold the Thick Basic White card base and set aside.
Stamp with the small daisy outline stamp 3 times in the lower right hand corner of the 4″ x 5 1/4″ Basic White cardstock for the inside. Use the Early Espresso Ink. Then stamp the small daisy solid stamp to fill in the outline. Stamp one with Crushed Curry Ink, one with Petal Pink Ink and one with Lemon Lolly Ink. lastly, Stamp Off once using the small leaf stamp and Garden Green Ink to add the leaves.
Adhere the completed inside card piece to the inside of the Thick Basic White card base. Set aside.
Use Early Espresso Ink and the sentiment stamp “Your Friendship Means Everything” to stamp in the upper left-hand corner of the Basic White cardstock Scalloped Contours diecut.
Use the Multipurpose Liquid Glue to adhere the layers of each of the daisies together. Adhere the Early Espresso cardstock flower centers.
Arrange the Garden Green cardstock leaves and stem on the Basic White Scalloped Contours diecut. Position the flowers and see how you like the arrangement. Use Multipurpose Liquid Glue to adhere the stem and leaves. Then use Stampin’ Dimensionals to adhere the daisies.
Adhere the completed Basic White Scalloped Contour diecut onto the Petal Pink Scalloped Contours diecut using Stampin’ Dimensionals.
Use the Multipurpose Liquid Glue to adhere the Petal Pink Scalloped Contours diecut to the front of the Thick Basic White card base.
Add as many of the Iridescent Rhinestone Basic Jewels as you wish!
Voila!
Thank you so much for visiting today! Please visit all the blogs in the Inspirations In Ink Blog Hop. You will be amazed and inspired by all the fun and creative projects made by the Inspirations In Ink demonstrators.
You are currently visiting Theresa McEntee-USA creator of Theresa’s Treasures Paper Crafts.
Would you like the start getting a discount on quality Stampin’ Up! supplies? Join my Stamping Gems Team today! And if you have a long wish list, you can join to get $155 UDS in product for $99 USD! This is the best deal in the whole catalog! Click HERE to order your starter kit!
This special ends June 30, 2023! Join and order now to be able to get what you want!
Thinking of adding creativity to your life? Try a monthly paper crafting kit! The Paper Pumpkin Monthly Subscription delivers a kit with everything you need to make a project-right to your door! Sign up for a Pre-paid Paper Pumpkin Subscription HERE.
From November 15 – 18, 2022 Stampin’ Up! will be having a Seasonal Sale on select stamps, dies, embossing folders, punches and Designer Series Paper. Print out the PDF at the end of this blog for a complete list of sale items. Shop my Online Store HERE. The current host code is: U73F9HD2
I have 3 cards to show you today using products that are on sale!
Let’s Set Sail
This colorful card is made with the Let’s Set Sail stamp set, Sailboat Builder Punch and Rays of Light stamp set. All are going to be ON SALE! I have a past blog post HERE if you want to see how to create this card for yourself.
Happiness Abounds
The Happiness Abounds stamp set has some great sentiments like the one on this elegant card. The flowers are from the Hues Of Happiness Designer Series Paper. The scalloped rectangles are found in the Scalloped Contours Dies. The embossed background is made with the Pretty Flowers Embossing Folder. And–you guessed it–these are all going to be ON SALE!
Nature’s Prints
The third and final card is created using the Nature’s Prints stamp set, Natural Prints Dies and Sun Prints Designer Series Paper. Yep-all are going to be ON SALE!
Do not miss out on this awesome sale! There are 7 pages of product in the PDF that are included in this Seasonal Sale starting Tuesday November 15 and ending Friday November 18, 2022. Print the PDF. Plan ahead and order early! Supplies will definitely run out! Please use Host Code: U73F9HD2
I am on Day 9 of the “12 Days of Christmas Card Making Challenge” with my stamping buddy Christy. Today’s card is a Stampin’ Up!® Happy Holly Days Happy Christmas Card. Each day of this challenge my blog will focus on a new holiday card. The challenge goes until December 10, 2021. I plan to showcase a different stamp set with each card. This will allow you plenty of time to see the fabulous products that are available in the 2021 Stampin’ Up! July to December Mini Catalog, and to order in time to make your own Christmas cards! You can order HERE when you have your list ready! Tomorrow there is FREE shipping!
I was inspired to make this particular card by a Color Challenge that Stampin’ Up! puts out every month. This months colors are Mossy Meadow, Real Red, Crumb Cake and Gold. This Happy Holly Days Happy Christmas card shows all of these colors.
Measurements
Happy Holly Days Happy Christmas card
Mossy Meadow Card Stock (CS) card base: 5 1/2 x 8 1/2 inches scored at 4 1/4 inches. One end has been cut 1/2 inch shorter with the scalloped pattern in the Basic Borders Dies.
Basic White CS: 2 1/4 x 5 1/2 inches, 2 3/4 x 5 1/4 inches, 3 x 3 1/2 inches and 3/4 x 3 1/2 inches(not shown).
Real Red CS: 2 x 5 1/2 inches
Gold Brushed Metallic CS: 3 x 4 1/4 inches. Cut with the 3rd smallest Scalloped Contours Die.
Crumb Cake CS: 1 1/4 x 5 1/2 inches. Embossed with the Tasteful Textile 3D Embossing Folder
Stamping
Stamp the bird image in Sahara Sand Ink onto the 3 x 3 1/2 inch Basic White CS. Then stamp the holly image 3 times onto the 2 3/4 x 5 1/2 inch Basic White CS.
Next stamp the holly image 2 times onto the corners of the 2 3/4 x 5 1/4 inch Basic White CS. Then stamp the sentiment in Mossy Meadow Ink. Also in Mossy Meadow Ink, stamp the sentiment “Happy Christmas” onto the 3/4 x 3 1/2 inch Basic White CS (not shown).
Coloring With Stampin’ Blends Alcohol Markers
I love the Stampin’ Blends Alcohol Markers because you can blend the colors and create beautiful images. My bird doesn’t look as realistic as some, but I am satisfied with the results. I learned to use the Dark Blend first for small areas to create shadows. Then blend in the Light color. The colors here are: Dark Daffodil Delight, Dark Basic Black, and the Light and Dark Crumb Cake, Real Red and Mossy Meadow.
The same procedure, Dark Blend first followed by the Light, is followed for the holly images.
Fussy cut the bird and holly. Also fussy cut the “Happy Christmas” sentiment (not shown).
Tip: Sometimes it is very difficult to cut exactly and not have any white edge. I just use the Light Blend along the outer edge to hide the white.
Assembling the Card
Adhere the inside sentiment and the embossed Crumb Cake CS strip to the inside of the Mossy Meadow CS card base. Adhere the 2 x 5 1/2 inch Real Red CS to the front of the card base.
Now with Stampin’ Dimensionals adhere the Gold Brushed Metallic CS scalloped rectangle to the card front. Follow by adhering the bird with Stampin’ Dimensionals.
Use Mini Stampin’ Dimensionals on the center of the back of the holly leaves. Adhere as desired under the bird. To finish, adhere the sentiment “Happy Christmas” under the Gold scalloped rectangle.
Add some Wonderful Gems to make the card front sparkle a little more.
Voila! You have a very festive Happy Christmas card!
I am submitting this card to the #sucolorchallenge and to my Glimmer Gals Team page for our color challenge as well. I hope you enjoyed Day 9 of the 12 Days of Christmas Card Making Challenge. See you tomorrow with card #10!
Supply List
Click on any photo to go to my Online Store and start shopping!


")


 Adhesive Backed Glimmer Paper")
 Specialty Designer Series Paper")
 Satin Edged Ribbon")


")


