Posted in 2024 Stampin' Up! January to April Mini Catalog, Baby Wipe Technique, Hello, Inspiration in Ink Blog Hop, Love/Affection, Nature

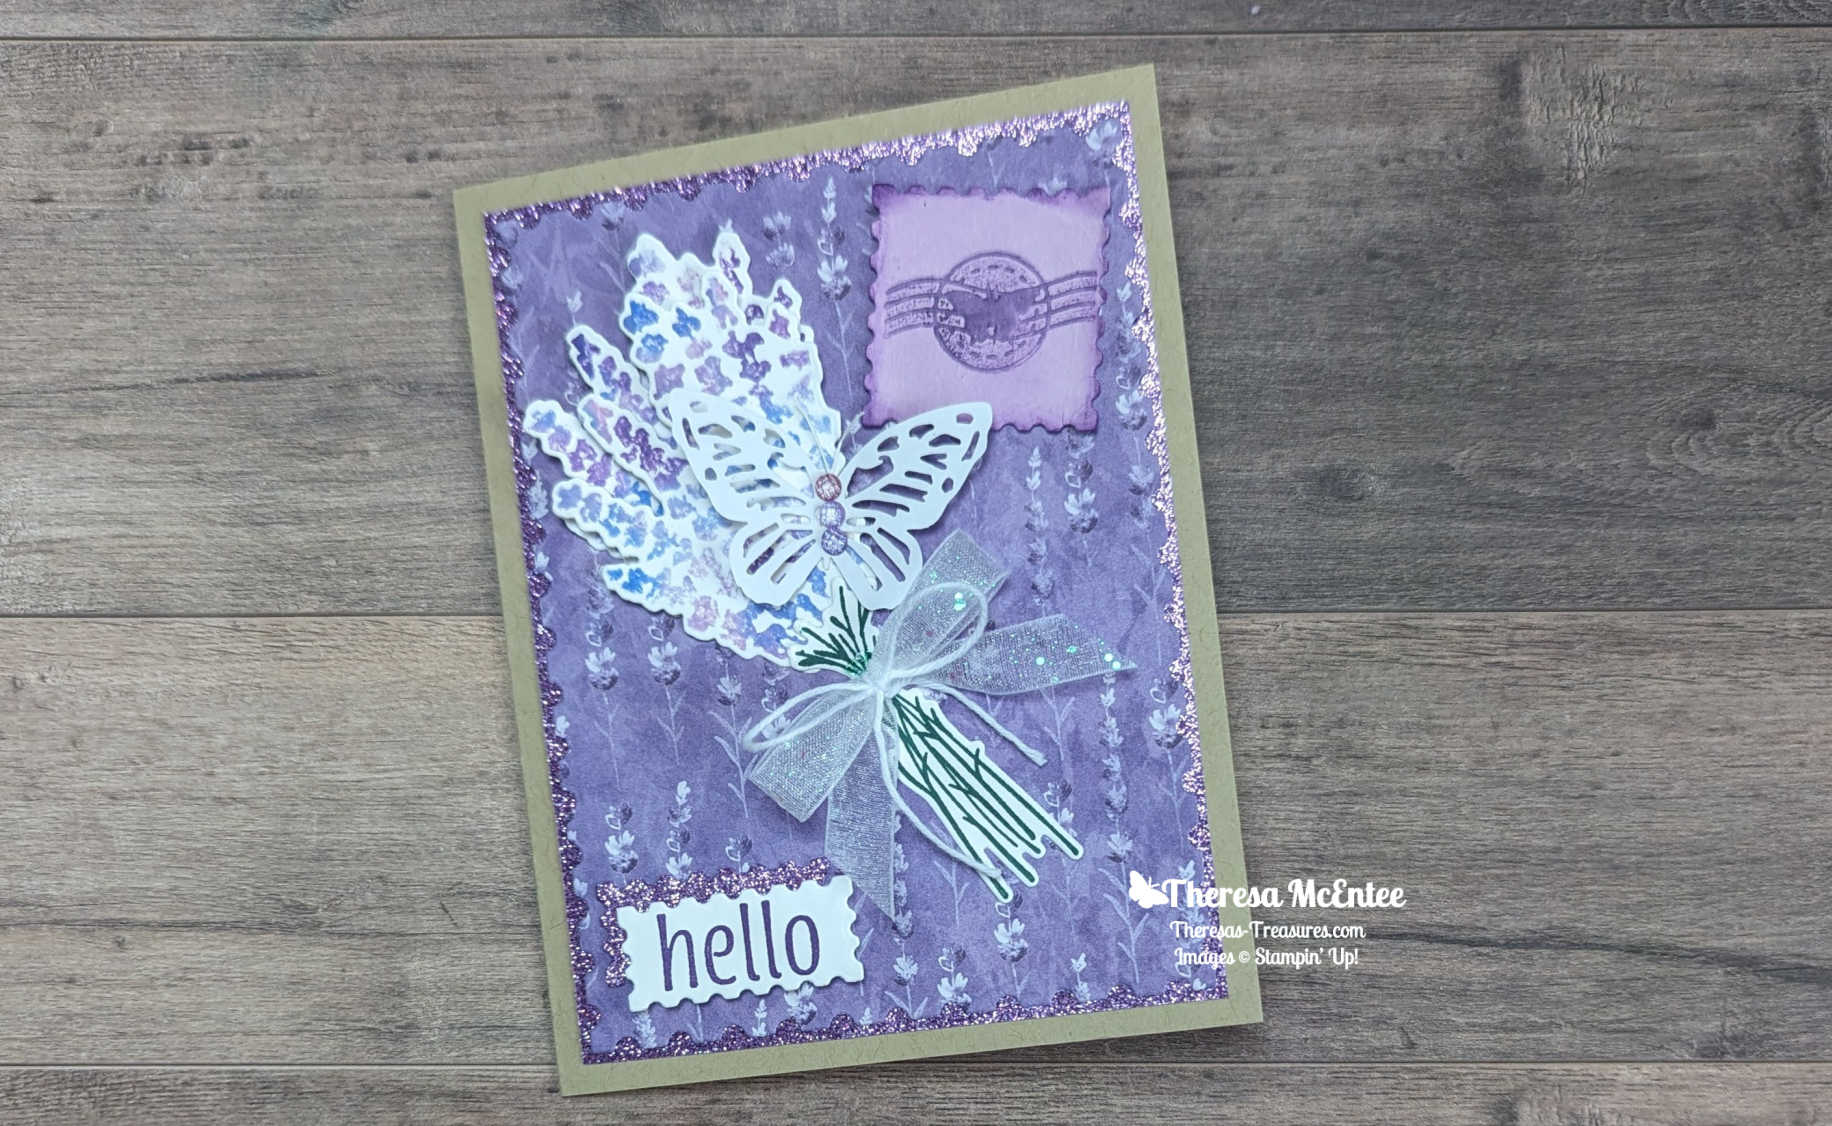
Painted Lavender Bundle & Baby Wipe Technique Hello card for the Inspirations in Ink Blog Hop – January 2024

This is my Hello card made with the Painted Lavender Bundle & the Baby Wipe Technique.

Welcome! Thank you for visiting Theresa’s Treasures Paper Crafts! I am Theresa, a Stampin’ Up! Demonstrator in Arizona, USA. Today is the monthly Inspirations in Ink Blog Hop! I am excited to be hopping with talented demonstrators from around the world! Be sure to check out everyone’s Painted Lavender Bundle projects. The Painted Lavender Bundle is in the 2024 January to April Mini Catalog. When you are ready, you may order from my Online Store HERE.

I absolutely love purple, lavender and butterflies! The Painted Lavendar Bundle is part of the Perennial Lavendar Suite which includes all of these elements!

I wanted to use the Baby Wipe Technique to be able to have multiple colors of flowers when I used the lavender flower stamp. I love how it came out!

Measurements

  • Crumb Cake cardstock (cs): 5 1/2″ x 8 1/2″ scored at 4 1/4″
  • Basic White cs: 3 3/4″ x 5″ (to diecut the inside), 4″ x 5 1/4″ (for stamping) and 1″ x 2″ (to stamp and diecut sentiment)
  • Highland Heather Glimmer Sheet: 3 7/8″ x 5 1/8″ and 1″ x 2″ (to diecut with smallest rectangular Perennial Postage Die)
  • Perennial Lavender DSP: 4 1/4″ x 5″ (to diecut with the largest Perennial Postage Die)
  • Fresh Freesia cs: 1 3/4″ x 1 3/4″ (to diecut with square Perennial Postage Die and emboss with the butterfly die)

Supplies

  • Stamp Sets: Painted Lavender & Artistically Inked (sentiment)
  • Dies: Painted Lavendar & Perennial Postage
  • Ink: Fresh Freesia, Highland Heather, Orchid Oasis, Gorgeous Grape & Shaded Spruce
  • Embellishments: Purple Fine Shimmer Gems
  • Ribbon: White Glitter Organza Ribbon and White Bakers Twine

Instructions

Baby Wipe Technique

  • To set up the Baby Wipes place about 5 Baby Wipes folded in half on one side the the Standard Stamp Case.
  • Randomly drop a few drops of each color of ink on the pile of Baby Wipes.
  • Use the lavender flower stamp and tap down on the Baby Wipes in a small circular motion. Stamp onto the Basic White cs. Ink up the stamp in a different area of the Baby Wipe and stamp the bunch of lavender flowers four times (you only need two of the stamped flowers for this card).

  • Use the other bunch of flowers and the Baby Wipe Technique to stamp flowers on the Basic White cs for the inside of the card. Stamp the leaves in Shaded Spruce Ink. Stamp at full strenth in the center, then Stamp Off once when stamping on each side.

Gathering the Pieces

  • Use the 2nd to largest Perennial Postage Die to diecut the stamped Basic White cs for the inside. Adhere the cardpiece to the inside of the Crumb Cake cs card base.
  • Diecut the stamped lavendar flowers with the Painted Lavender Dies.
  • Stamp the stems in Shaded Spruce Ink onto the Basic White cs. Diecut with the Painted Lavender Dies.
  • Use the square Perennial Postage Die to cut from the Fresh Freesia cs. Sponge the edges with a Sponge Dauber and Gorgeous Grape Ink.
  • Use the Stampin’ Write Marker in Gorgeous Grape to apply ink to the butterfly postage stamp die. Carefully lay the die on the Fresh Freesia cs and run throught the Stampin’ Cut & Emboss Machine. Carefully remove the die from the paper.
  • Stamp “Hello” in Gorgeous Grape Ink onto the strip of Basic White cs. Use the smallest rectangular die in the Perennial Postage Dies to diecut the sentiment. Also use the same die on the strip of Highland Heather Glimmer Paper.

Assembling the Card

  • Use the largest Perennial Postage Die to diecut the Perennial Lavendar DSP. Adhere the DSP to the Highland Heather Glimmer Paper. TIP: I used a Deckled Rectangle Die to cut the center form the Highland Heather Glimmer Paper before adhering the DSP to it.
  • Use Stampin’ Dimensionals to adhere the Glimmer Paper/DSP panel to the card front.
  • Adhere one bunch of the lavendar flowers to the card by applying adhesive only to the base. Use the Bone Folder to curl up the edges of the flowers.

  • For the 2nd bunch of lavendar flowers, use Stampin’ Dimensionals on the top and an adhesive at the base. (shown above). Adhere to the top of the other bunch of lavendar flowers but shifted to the left.
  • Now adhere the Fresh Freesia cs postage stamp cardpiece at a slight tilt in the upper right-hand corner.
  • Add the stems to the base of flowers.
  • Next adhere the small Highland Heather Glimmer Paper diecut to the Perennial Lavendar DSP. Use Stampin’ Dimensionals to adhere the “Hello” slightly lower and to the right of the Glimmer Paper.

Embellishment

  • Tie a bow with the White Glitter Organdy Ribbon. Then tie White Bakers Twine around the center of the bow. Tie a bow. Add to the stem of the lavendar bunch on the card front.
  • Use Mini Glue Dots to adhere the butterfly from the Paper Butterfly Accents.
  • Add one of each color of the Purple Fine Shimmer Gems to the body of the butterfly.

Voila!

Thank you so much for visiting today! I hope you enjoyed my project. Please visit all the blogs in the Inspirations In Ink Blog Hop. You will be amazed and inspired by all the fun and creative projects made by the Inspirations In Ink demonstrators. 

You are currently visiting Theresa McEntee-USA creator of Theresa’s Treasures Paper Crafts.

Blog Hop Line Up

Clickable Supply List

Product List
Painted Lavender Bundle
$46.75
Perennial Postage Dies
$33.00
Artistically Inked Cling Stamp Set
$24.00
Fresh Freesia Classic Stampin' Ink Refill
$5.00
Highland Heather Classic Stampin' Ink Refill
$5.00
Gorgeous Grape Classic Stampin' Ink Refill
$5.00
Orchid Oasis Classic Stampin' Ink Refill
$5.00
Shaded Spruce Classic Stampin' Pad
$9.00
Gorgeous Grape Classic Stampin' Pad
$9.00
Regals Stampin' Write Markers
$35.00
Crumb Cake 8-1/2" X 11" Cardstock
$10.00
Fresh Freesia 8 1/2" X 11" Cardstock
$10.00
Basic White 8 1/2" X 11" Cardstock
$10.50
Perennial Lavender 12" X 12" (30.5 X 30.5 Cm) Designer Series Paper
$12.50
Three Color Glimmer 12" X 12" (30.5 X 30.5 Cm) Specialty Paper
$10.50
White 3/8'' (1 Cm) Glittered Organdy Ribbon
$8.50
Baker's Twine Essentials Pack
$11.00
Purple Fine Shimmer Gems
$8.00
Paper Butterfly Accents
$8.00
Clear-Mount Stamp Cases
$9.00

Paper Pumpkin Monthly Kit

Thinking of adding creativity to your life this year? Start out by trying a monthly paper crafting kit! The Paper Pumpkin Monthly Subscription delivers a kit with everything you need to make a project-right to your door! Sign up for a Pre-paid Paper Pumpkin Subscription HERE.

Have a most wonderful and creative day!

Ciao!

Theresa

Posted in 2024 Stampin' Up! January to April Mini Catalog, 3D Embossing Folder, Inspiration in Ink Blog Hop

Painted Lavendar & Hot Air Balloon for the Ink & Inspiration Blog Hop-January 2024

Hello fellow stampers! I am Theresa McEntee-author of Theresa’s Treasures Paper Crafts. I am hopping along with the Ink & Inspiration Blog Hop today. You can visit super awesome blogs from around the world! The list to follow the hop is at the end of my blog post. Please stop by and see everyone’s projects!

The Ink & Inspiration Challenge is both an image and a color challenge. I was inspired by the image because I love spring flowers and look forward to my flower garden blooming each year. I absolutly love all of the colors! They are so vibrant and happy!

I grew up in Albuquerque New Mexico USA which is the Hot Air Balloon Capital of the World! Each year there is a Balloon Fiesta which lasts a whole week. There were over 500 hot air balloons at the 2023 Fiesta, which was attended by over 900,000 visitors! When Stampin’ Up!® brought out the Hot Air Balloon Bundle in the 2024 Mini Catalog- I was ecstatic! I could not wait to use the Hot Air Balloons with the Painted Lavender Bundle for this challenge.

Measurements

  • Azure Afternoon cardstock (cs) card base: 5 1/2″ x 8 1/2″ scored at 4 1/4″
  • Azure Afternoon cs: 4″x 5 1/4″ (1st layer)
  • Highland Heather Glimmer Paper: 3 3/8″ x 4 5/8″
  • Basic White cs: two 3 3/4″ x 5″ (diecut with Perennial Postage Die-one for front & one for inside), 2″ x 4″ (to stamp balloon and diecut clouds) and 1/2″ x 4 1/4″ (sentiment)
  • Melon Mambo cs: 2″ x 2 1/2″ to die cut balloon gandola

Supplies

  • Stamp Sets: Painted Lavender & Hot Air Balloon
  • Dies: Perennial Postage & Hot Air Balloon
  • Embossing Folder: Painted Textures
  • Ink: Poppy Parade, Melon Mambo, Daffodil Delight, Granny Apple Green, Highland Heather and Azure Afternoon
  • Embellishments: Wink of Stella
  • Other: Blending Brush

Instructions

  1. Fold the card base at the score line and burnish with the Bone Folder.
  2. Emboss the 1st layer with the Painted Textures Embossing Folder (EF). Adhere to the front of the card base.
  3. Diecut the 2 Basic White cs panels for the front & inside with the 2nd to largest Perennial Postage Die.
  4. Stamp the 1st part of the balloon envelope with Highland Heather Ink. Stamp the 2nd part with Azure Afternoon Ink. Stamp the sentiment onto the 1/2″ Basic White cs in the middle of the strip with Azure Afternoon Ink.
  5. On one diecut Basic White cs panel, use the Blending Brush with Azure Afternoon Ink to lightly blend a cloudy sky. On the 2nd Basic White cs diecut Basic White cs, blend the ink along the edges.
  1. To finish the 2nd panel for the inside of the card, use Granny Apple Green Ink. Stamp the grass from the Painted Lavender stamp set in the lower right-hand corner, going from tall to short as you move left. Add the tiny flowers in the Highland Heather Ink. Adhere to the inside of the Azure Afternoon cs card base.

  1. Go back to the 1st Basic White diecut for the front of the card.The flowers & grass are from the Painted Lavender stamp set. Stamp the grass in Granny Apple Green Ink on either side of the bottom edge. Then stamp the small tight bunch of flowers in Melon Mambo on either side and in the middle. Stamp the tiny flowers in Highland Heather Ink. Next, stamp the tall thin stalk of flowers in Daffodil Delight Ink to fill in. Finally, stamp the wider stalk of flowers in Poppy Parade Ink.

  1. Adhere to the Highland Heather Glimmer Paper. Tip: I use one of the Deckled Rectangle Dies to cut the center out of the Glimmer Paper diecut. This helps decrease the weight of the card and you have more Glimmer Paper to play with later!

  1. Stick the Stampin’ Dimensionals on the back so that they are attached to both the Glimmer Paper and the Basic White cs. Adhere to the card front.
  2. Adhere 2 of the clouds flat and the 3rd cloud on Dimensionals.
  3. Adhere the 2 pieces of the gondola together. Then adhere it to the balloon envelope.
  4. Use Stampin’ Dimensionals to adhere the balloon to the card front.
  5. Adhere the sentiment to the corner before you trim the edges. This way it will fit nicely.

I hope you give this card a try. I had such fun designing it and putting it together! Hopefully you will have fun too!

Blog Roll Call

Have a most wonderful day!

Theresa

Order Supplies Here:

Product List
Painted Lavender Bundle
$46.75
Hot Air Balloon Bundle (English)
$45.00
Perennial Postage Dies
$33.00
Painted Texture 3 D Embossing Folder
$10.00
Poppy Parade Classic Stampin' Pad
$9.00
Melon Mambo Classic Stampin' Pad
$9.00
Daffodil Delight Classic Stampin' Pad
$9.00
Granny Apple Green Stampin' Pad
$9.00
Highland Heather Classic Stampin' Pad
$9.00
Azure Afternoon Classic Stampin' Pad
$9.00
Azure Afternoon 8 1/2" X 11" Cardstock
$10.00
Three Color Glimmer 12" X 12" (30.5 X 30.5 Cm) Specialty Paper
$10.50
Basic White 8 1/2" X 11" Cardstock
$10.50
Melon Mambo 8-1/2" X 11" Cardstock
$10.00
Clear Wink Of Stella Glitter Brush
$8.00
Blending Brushes
$13.00