Posted in 2020-2021 Stampin' Up! Catalog, Animals, Fish, Guys cards, Lake/Sea/Ocean, Sea, Sealife

Cardz 4 Guyz Challenge # 251- Gone Fishing with Whale Done

The Cardz4Guyz Challenge #251 is Gone Fishing. I didn’t have any fishing stamp sets, but I do have a big fish in the fun Whale Done stamp set and some great Whale of a Time Designer Series Paper (DSP).

The card base is Night Of Navy cardstock. The next layer is Misty Moonlight. For the Granny Apple Green panel I embossed it with the Seabed 3D Embossing Folder. Next I used a Sponge Dauber to sponge on some Granny Apple Green ink and highlight the fabulous design made by the embossing. Inside the card, I used a panel of Whisper White card stock, then adhered a 1 inch strip of the little fish pattern of the DSP with an edge of Night Of Navy card stock.

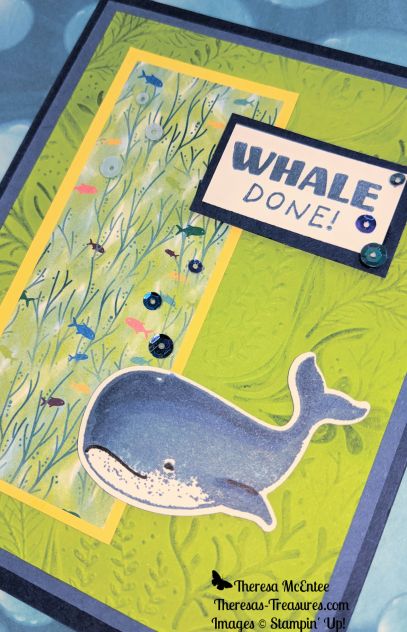
I first stamped the whale in Misty Moonlight ink. I used the Stampin’ Blends Alcohol Markers in Light and Dark Balmy Blue, and Light and Dark Misty Moonlight to enhance the whales features. I used the Basic Black Stampin’ Write marker to bring out the whales smile and eye, and add shadow to the fin. I punched the whale out with the Whale Builders Punch. I used the Whale of a Time Sequins to add “bubbles” above the whale and the little fish.

The fun and colorful little fish pattern of the Whale of a Time DSP on the card front is bordered by Daffodil Delight card stock.

I hope you like my card. Please leave a comment and share what you think. I appreciate you stopping by today. Go to the Cardz4Guyz blog and see everyone else’s cards! Lots of great inspiration!

If you would like to purchase the Stampin’ Up! products I used for this card, please visit my Online Store HERE.

Colors for this card included:

Products included: (click on photo to go to my Online Store)

Product List

Have a great day!

Theresa

Posted in 2020-2021 Stampin' Up! Catalog, Fun/Fancy fold card, Guys cards

Adventure Awaits with this Fun Fold Card

Happy Friday! Today I have a Fun Fold card for you using the World of Good Suite in the new 2020-2021 Stampin’ Up! Annual Catalog. The stamp set is Beautiful World. This card can be a wonderful masculine card.

A great part of this card is that it highlights the World of Good Specialty Designer Series Paper (DSP). This paper has travel patterns- some accented with brass foil!

The Adventure Awaits Fun fold card opens like the top of a cardboard box. All of the flaps end up being tucked in behind the 2 1/4 inch Brass Foil Circle.

Measurements: Misty Moonlight Card Stock (CS): 8 1/2 x 11 inches for the card base, and 4 x 2 1/4 inches: Very Vanilla CS: 5 1/4 x 4 inches and 4 x 2 inches; Brass Foil Sheet: 4 x 2 1/2 inches; and the World of Good Specialty DSP in 4 different designs: 2 5/8 x 1 7/8 inches each.

Use the Simply Scored scoring board to make the card base. Place the 8 1/2 x 11 inch Misty Moonlight CS with the 8 1/2 inch side on top. Use the Simply Scored Stylus to score at 2 1/8 and at 6 3/8 inches.

Turn the Misty Moonlight CS and score the 11 inch side at 2 3/4 and 8 1/4 inches.

Cut along the scorelines to cut off the four corner pieces.

Using the corner punch on the Detailed Trio Punch, round all of the corners.

Use the Bone Folder to make a crisp fold on all the scorelines. Check to see that the opposite flaps meet in the middle. Now fold the four flaps as you would fold the top of a cardboard box.

Using a non-permanent adhesive, place the World of Good Specialty DSP pieces on the card as you would like them to be. Open the card and flip over. This will allow you to see which corner of the DSP needs to be rounded with the corner punch.

Use the Detailed Trio Punch to round the appropriate corners on the DSP. Adhere the DSP pieces to the card base with a permanent adhesive. Fold the card back up to be sure all looks well.

In Misty Moonlight ink, stamp the sentiment “Life’s a beautiful journey” followed by the sentiment “Congratulations on this new beginning” onto the 5 1/4 x 4 inch Very Vanilla CS. Stamp the ink bottle and the little squiggle. On the 4 x 2 1/4 inch Very Vanilla CS stamp the globe on one end allowing space around it so you can punch it out. Now stamp the sentiment “Adventure Awaits” on the other end.

The compass and feather are stamped in Cinnamon Cider ink.

Punch the globe out with the 1 3/4 inch Circle Punch. Fussy cut the “Adventure Awaits”. Note: I didn’t realize that the 1 3/4 inch Circle Punch is retired. I recommend fussy cutting the globe because the next size, the 1 1/2 inch Circle Punch, cuts off too much of the image.

Use the 2 1/4 inch Circle Punch to cut out a circle from the Brass Foil. Tip: When punching the foil, I get a better results if I punch it out with the punch on the table, and the foil side facing towards the table.

Use the 2 inch Circle Punch to punch a circle from the 4 x 2 1/4 inch Misty Moonlight CS. Adhere the Misty Moonlight circle to the Brass Foil circle, then adhere the globe to the Misty Moonlight circle.

Lay the globe piece slightly above and to the left of center- to make it easier to open the flaps than if it is in the center. Adhere the sentiment “Adventure Awaits” to the card front. Tip: I use tweezers when I want to position something small that cannot easily be held by hand, so that it is straight.

Use a pencil to mark the edge of the globe piece. Apply Stampin’ Dimensionals just to that flap.

Adhere the globe to the card front.

Open the card up and adhere the inside piece.

Viola! The Adventure Awaits Fun Fold Card is completed and ready to send to someone! The new adventure could be many different occasions including: a new job, starting college, traveling, marriage, or retirement. This also makes a great masculine card.

Thank you for coming by and viewing my blog. I appreciate you very much. Please leave a comment if you like the card and whether or not you like the Fun Fold Cards in general. Please let me know how I am doing.

Click on the photo of the product you need and go directly to my online store.

Product List

I hope you have a wonderful and creative day!

Theresa

Posted in balloons, beginner stamper, Cars, Simple stamping, Stampin' Up! 2019-2020 Annual Catalog, Vintage

Take a Ride With Me for the last time

The end of the Stampin’ Up! 2019-2020 Annual Catalog is fast approaching. The last day to order from this catalog is on June 2, 2020. Ride With Me is a really cute stamp set with an adorable old fashioned pickup truck that will be retiring. There are coordinating Truck Ride Dies with which you can put together a 3D truck. Today’s card will be simple and straightforward. My mother told me she once drove a Cherry Red pickup truck when she first learned to drive. I made this pickup red in her memory.

There are 2 of the retiring colors on this card – Lovely Lipstick and Blueberry Bushel. I have really enjoyed this set of In Colors and will be sad to see them go.

Measurements: Whisper White Card Stock (CS): the card base is 11 x 4 1/4 inches with a score line at 5 1/2, and you need a 3 3/4 x 3 inch piece for stamping; Blueberry Bushel CS: 4 x 3 1/4 inches; and the 2018-2020 In Color Designer Series Paper (DSP): 4 1/4 x 2 1/2 inches in Lovely Lipstick.

I initially stamped everything in Memento Black ink. I did not like how the “I ❤ STMPN” blended in with the door.

I decided to try stamping the pickup in Lovely Lipstick ink. The balloons are stamped in Memento Black ink.

I thought the “I ❤ STMPN” stood out a little better when it was stamped in Memento ink on the Lovely Lipstick pickup truck.

I used Stampin’ Blends Alcohol markers in Dark Basic Black, Light Smokey Slate and Dark Daffodil Delight to start coloring the pickup.

The body of the pickup is colored with Dark Lovely Lipstick Stampin’ Blend alcohol marker. I went over the wheel covers twice to make them stand out. I also went along the edge of the door twice on either side of the “I ❤ STMPN”. I colored one of the balloons in Lovely Lipstick.

The Blueberry Bushel does not come in an alcohol marker so I used the Stampin’ Write marker which is water based to color two of the balloons.

I adhered the stamped pickup card piece to the 4 x 3 1/4 inch Blueberry Bushel CS. The card base was folded and burnished with the Bone Folder to create a crisp fold. The 2018-2020 In Color Lovely Lipstick DSP was adhered onto the center of the card front. The pickup card piece was then adhered with Stampin’ Dimensionals.

Now for some Bling! I used the Rhinestone Basic Jewels, the Holiday Rhinestone Basic Jewels and the Red Rhinestone Basic Jewels. Lots of color and sparkle!

Using the Take Your Pick tool to transfer the rhinestones to the card, I applied one rhinestone in the corresponding colors to each balloon.

Also added a trio of the Red Rhinestone Basic Jewels to the Lovely Lipstick DSP.

And Viola! there is your Old Fashioned pickup truck with lots of balloons and bling! If you leave off the “I ❤ STMPN” you could use this card for just about any celebration.

Make sure you take a last look at the Stampin’ Up! 2019-2020 Annual Catalog and order anything you have had on your wish list now. Time is running out! There is only 1 week left before many products retire!

Thanks for stopping by and reviewing my blog. If you have any comments, please leave them below. I would love to hear from you and hear how I am doing. I have been advised to try to use fewer photographs so that it will be easier to view my blog on the phone without using all the battery power. Let me know if there is something you like to see that I have left out. Your feedback is very important. Thanks in advance.

To purchase a product, click on the photo below.

Product List
Posted in Blender Pen, Father's Day, Guys cards, Stampin' Up! 2019-2020 Annual Catalog, Vintage

Cardz4Guyz Challenge #244- Vintage

Today’s card is a Father’s Day card in a Vintage style. I made this now because I know how Father’s Day sneaks up on me!

The card is made with the Stampin’ Up! A Good Man stamp set. The paper is Soft Suede, Early Espresso and Very Vanilla cardstock (CS). The printed paper is from the Stampin’ Up! Come Sail Away Designer Series Paper (DSP). The ink for the man is Soft Suede. I used a Blender Pen to slightly color the image. The sentiment is stamped in Early Espresso ink. I used Linen Thread as an embellishment.

The measurements are: Soft Suede CS: 8 1/2 x 5 1/2 inches with a score line at 4 1/4 inches for the card base; Early Espresso CS: 4 x 3 inches and 4 1/4 x 1/2 inches; Very Vanilla CS: 5 1/4 x 4 inches for the inside of the card, 4 x 3 inches and 3 x 3/4 inches; and the Come Sail Away DSP: 4 x 2 1/4 inches.

Instructions:

  1. Fold the Soft Suede card base at the 4 1/4 inch score line.
  2. Stamp the man in Soft Suede ink onto the 4 x 3 inch Very Vanilla CS. Use one of the Layering Ovals Dies in a cutting machine to cut out around the man.
  3. Use the Blender Pen to blend some of the ink onto the shirt and pants. i made the pants slightly darker than the shirt.
  4. Use the next size up on the Layering Ovals Dies to cut an oval from the 4 x 3 inch Early Espresso CS.
  5. Adhere the two ovals together.
  6. Stamp the sentiment “You do a great job of being a great guy” in Early Espresso ink onto the 3 x 3/4 inch Very Vanilla CS.
  7. Tie a 22 inch piece of Linen Thread twice around the 4 1/2 x 1/2 inch strip of Early Espresso CS. Tie in place to one side.
  8. Adhere the DSP to the front of the card base.
  9. Adhere the Early Espresso CS wrapped with the Linen Thread onto the card with adhesive.
  10. Use Stampin’ Dimensionals on the back of the oval piece stamped with the man, and the strip with the sentiment.
  11. Adhere the man and sentiment.

Viola! And that is it! Now you are ready for Father’s Day too!

Thanks for visiting today. This card is made for the Cardz4Guyz Challenge #244 to make a vintage card. View other great Vintage cards at Cardz4Guyz.blogspot.com.

If you would like to purchase any Stampin’ Up! products, they are shown below. Just click on the photo and you will be connected with my Online Stampin’ Up! Store. I am an Independent Stampin’ Up! Demonstrator and would be honored to help you order what you need. Contact me by commenting on this blog, or send me an email at theresastreasures.az@gmail.com.

Product List

Enjoy your day and stay safe and healthy! Happy crafting!

-Theresa

Posted in Avid Stamper, Barbecue, encouragement, Guys cards, Summer

Cardz4Guyz Challenge # 243 Use Dies as a Main Feature

Here is a little extra post for the avid stamper. It is for the Cardz4Guyz Challenge #243 to Use Dies as a Main Feature.

I am so looking forward to the day when we will be able to be outside and have family and friends over for a big barbecue! That thought is what inspired me to make this card.

I used a lot of different products for this scene. The Stampin’ Up!® products are listed below.

Do you see all the lovely yellow butterflies! And don’t forget a drink!

Thanks for stopping by to see my card for the Cardz4Guyz Challenge to Use Dies as a Main Feature! It is so fun to have a challenge to do!

The Stampin’ Up! Products are:

Product List
Posted in Cars, Grunge style, Guys cards

Cardz 4 Guyz Challenge #241 Use a Stencil

Hello! I hope today finds you well. I am joining the Cardz 4 Guyz challenge #241- Use a Stencil- at cardz4guyz.blogspot.com. My card today was made with the brick wall stencil from Stampin’ Up! Pattern Party Decorative Masks and some White Embossing Paste.

I used the Geared Up Garage stamp set by Stampin’ Up!

Using Embossing Paste

Here’s how to use the Embossing Paste. Before you start to play with the paste, cut the card pieces and have the stencils ready to go. Also have a dishpan full of water with a scrub sponge. The paste likes to dry and stick to the stencil, so if you scrub it off right away you can keep the stencil looking good.

Use Painters tape to secure the corners of the stencil on one side to a piece of paper. Slide the piece of card stock under the stencil and secure the other two corners of the stencil. I used 5 1/2 x 4 1/4 inch pieces of card stock, so that I could trim them later as desired.

Pick up a fair amount of the Embossing Paste with the Diamond trowel from the set of Palette Knives Stampin’ Up! offers. Start to spread it out onto the stencil.

Keep the jar of Embossing Paste covered with a wet towel between applications so that the paste does not dry out.

Spread the paste back and forth until you are satisfied. Keeping it a little thicker in some places than others adds to the texture.

Remove the Painters tape on one side and slide the card stock piece out. Let dry for a few hours or overnight before trying to use the piece to make a card.

I made a whole bunch of card pieces. I have heard that even when the jar is screwed tight, the Embossing Paste can dry out. So I decided to just use the whole jar in one day!

Thank you so much for visiting today. Please stop by the Cardz 4 Guyz website and see all the other cards submitted with Challenge #241 – Use a Stencil. Stay safe and do some crafting today!

Posted in beginner stamper, Cars, Cling Stamp, Designer Series Paper, Occasions Catalog 2019

Fast Car Card

Still looking for a great card for your guy? This is a fast one, and is the last in a series of 3 masculine cards using the Stampin’ Up! Geared Up Garage Stamp Set. Today I introduce you to a card made with Stampin’ Up! Designer Series Paper.

Stampin’ Up! has several types of paper, one being Designer Series (DSP). This paper is a little thinner than cardstock and will have a pattern on both sides. Some come in 12 x 12 inch size. The Classic Garage Designer Series Paper comes in 6 x 6 inches with 4 each of 12 double-sided designs.

The designs are pictured above. For this card I chose the lug nut design.

Measurements: Whisper White card base 8 1/2 x 5 1/2 inches folded in half at 4 1/4 inches; Whisper White 3 1/2 x 2 inches and 3 x 3/4 inches; Shaded Spruce 5 1/2 x 3 1/4 inches and Classic Garage DSP 5 1/2 x 3 inches.

This card will also be pretty quick to make. First I adhered the DSP to the Shaded Spruce. Then I adhered that piece to the card base.

I stamped the car image in Memento ink onto the Whisper White 3 1/2 x 2 inch piece.

Next, I stamped the sentiment “All Geared Up To Celebrate” onto the 3/4 inch strip of Whisper White. It is important to get the label on straight so you can stamp straight! See the post on the Stampin’ Up! Cling Stamps to help you do this.

I cut the banner edge as shown.

I added 3 Stampin’ Dimensionals to raise the sentiment up a bit.

You can leave the car this way, or choose to color it. Refer to the first post in this series for instructions on coloring and shading with the Stampin’ Blends markers.

So there you have it my friends! A fast car card that was fast to make!

Stampin’ Up! continues their Sale-a-bration sale! For every $50 you spend, you can choose a free product from the Sale-a-bration brochure.

Stampin’ Up! Products used include: Stamp Set: Geared Up Garage #148590; Cardstock: Whisper White #100730 and Shaded Spruce #146981; Classic Garage Designer Series Paper #148482; Ink: Memento #132708; Stampin’ Blends: Real Red combo pack #147935; Clear Block: C #118486 and D #118485; Paper Snips #103579; Stampin’ Dimensionals #104430; and Multipurpose Liquid Glue #110755.

Posted in beginner stamper, Cling Stamp, Father's Day, Grunge style, Occasions Catalog 2019, Stamping-off technique

Father’s Day in January?

This is the 2nd in a series of Blog posts about masculine cards. I have had many a time when a holiday has crept up on me before I was able to get a card ready. Ever had that happen? Well, today I am making a Father’s Day card, mostly because the sentiment is in the stamp set -Geared Up Garage-which I started using the other day. But also, I want to be ready this year!

This style of card is “grunge”. It is a lot easier than it looks!

Measurements: Whisper White card base 8 1/2 x 5 1/2 inches folded in half and burnished with the Bone Folder, Basic Black 5 1/4 x 4 inches, Whisper White 4 1/2 x 3 1/4 inches and a scrap of Whisper White 2 3/4 x 2 1/2 inches, and Real Red 2 1/4 x 1 inch.

You will also need Memento ink and a C block to start. Later you will need an A, B, C and D block.

Just a reminder for how to put the label on the new Cling Stamps. First remove the stamp. Then turn the label sheet so the words are backward. Pinch the middle of the desired label.

Gently remove the paper backing without removing the label. Place the stamp with the foam side down over the label, taking care to line up the edges. Press firmly.

Now gently remove the label attached to the stamp. This is very sticky! Do not set it down on anything. Put it on the block right away and when finished, directly back into the stamp case. I do not always put the labels on, but I typically will put on the labels for sentiments.

Use the Memento ink and stamp the Father’s Day sentiment onto the scrap of Whisper White. Note: You do not need the Piercing mat for the red rubber stamps, just stamp onto a smooth firm surface.

Use your paper snips to cut around the sentiment leaving a slight border.

Adhere the sentiment to the Real Red piece. Now cut a banner edge, first by making a cut in the center, then from each corner to the center as shown. Set aside.

Now for the “grunge”! Mount the lug nuts on an A block, the oil can on a B block, the tool box on a C block and the oil spill on a D block (Clockwise from top).

Start with the tool box since it is one of the larger images. Stamp an odd number of times.

Now stamp the oil can and then the lug nuts an odd number of times. I messed up and stamped 6 lug nuts! Fortunately the sentiment with cover one!

We are going to use a technique called “Stamping Off” for stamping the oil spill. First apply Memento ink to the oil spill stamp and stamp it on a scrap of paper. Then stamp onto the card piece. This gives a slightly lighter image. That way the oil spill doesn’t over-power the rest of the images. It just makes it “grungy”.

Continue to first stamp on the scrap paper, then on the card piece, until you like the result.

Adhere the Basic Black to the folded card base. Now adhere the stamped “grunge” piece.

Apply Dimensionals to the back of the sentiment banner and adhere to the front of the card. Viola! You have a Father’s Day card ready to go! Now, if you can just put it away somewhere where you can find it!

Stampin’ Up! products used include: Stamp set: Geared Up Garage #148590; Cardstock: Whisper White #100730, Basic Black 121045 and Real Red #102482; Ink: Memento #132708; Blocks A #118487, B #117147, C #118486 and D #118485; Paper Snips #103579; Dimensionals #104430; Multipurpose Liquid Glue #110755

Posted in beginner stamper, Sale-A-Bration 2019, Simple stamping

Garage Grunge

Ever have trouble coming up with just the right card for a guy? There are plenty of flowers, butterflies, cakes and treats that lend themselves to more feminine cards. But what to do for a more masculine card?

The next series of 3 Blog posts with show several cards made with the Stampin’ Up! Geared Up Garage stamp set. I will also introduce the concept of a “grunge” style of card. So let’s rev up our engines and Go!

Measurements: Whisper White card base 8 1/2 x 5 1/2 inches folded in half. Poppy Parade 4 x 2 1/2 inches and Whisper White 3 3/4 x 2 1/4 inches.

First I would like to share a tip. I use a Bone Folder to rub the folded edge of my card base. This makes the fold a lot tighter and it looks more professional.

Tip: I mounted the car stamp onto a D block from corner to corner. This way you can get a slightly larger stamp on a smaller block. Using Memento ink, stamp the car image onto the Whisper White rectangular piece.

Mount the sentiment “You’re a Classic” on an H block and ink it in Memento ink. Be sure to push straight down and straight up with moderate pressure in order to get the ink evenly on the sentiment. I placed the car image on the Poppy Parade rectangle without adhesive for placement before stamping the sentiment on the card base.

Now adhere the car image to the Poppy Parade rectangle, then adhere them to the card base. Here is the first version of this card. You can stop right here, or pull ahead for a more “souped-up” version!

You can “soup it up” by adding red color to the car, or by adding “grunge” or both . First we will add color to the car.

Stampin’ Up! has the most amazing alcohol markers called Stampin’ Blends. The amazing part is that the markers come in a light and a dark version of many of the same colors used for the ink and cardstock.

There are many ways to use the Stampin’ Blends to get an interesting image. First, I used the light Poppy Parade on the whole car. Next, I added the dark Poppy Parade to the areas I wanted shaded. Lastly, I used the light Poppy Parade again to blend the edges.

Now let’s add some “grunge”!

I am going to use the “oil stain” and “lug nuts” to make the card more interesting. This is not for everyone, so if you don’t like it, just leave it as is.

First I put the Poppy Parade rectangle with the car image on the top of the card without adhesive for placement. Next, I added the oil stains, then the lug nuts. Tip: Often an odd number of a design element looks better than an even number. For example: 3 lug nut images is more interesting than 2. I did only 2 oil stains because of the size of this element but I rotated the stamp so it looks like 2 different images.

Now adhere the car image to the Poppy Parade rectangle, then to the card base.

Here is the completely “souped-up” version of the car card with “grunge”!

Join me for the next blog where I will show a Father’s Day card using the “grunge” style!

To purchase the supplies needed for these cards, select the “Click for my store” button at the top. It is currently the best time to buy Stampin’ Up! products because of Sale-a-bration, during which for every $50 you spend, you may select a free item from the Sale-a-bration brochure. Happy shopping!

Supplies used include: Stamp set: Geared Up Garage #148590; Cardstock: Whisper White #100730 and Poppy Parade #119793; Ink: Memento #132708; Stampin’ Blends: Poppy Parade combo pack #147275; Blocks: A #118487, D #118485 and H #118490; Bone Folder #102300 and Multipurpose Liquid Glue #110755