Hello and welcome! I am Theresa McEntee, creator of Theresa’s Treasures Paper Crafts. Today I have the pleasure of participating in the Blog Hop with Around the World on Wednesday (AWOW).
2025 marks a special milestone. We are celebrating 5 fabulous years of creative inspiration together! In order to honor the occasion, we are CASEing (Copy and Selectively Editing) one of our talented members each month. This month we are happy to focus on the unique and awesome work of Mikaela Titheridge fromThe Crafty Oink Pen.
The AWOW team put together a thematic hop to give you some inspiration for your own crafting. “Out of the Box” is this month’s theme because Mikaela often uses projects in a new and unique way. I chose one of Mikaela’s unique cards to CASE.
I also got some inspiration from a card done by Stamptastic Designs.
My Project for today
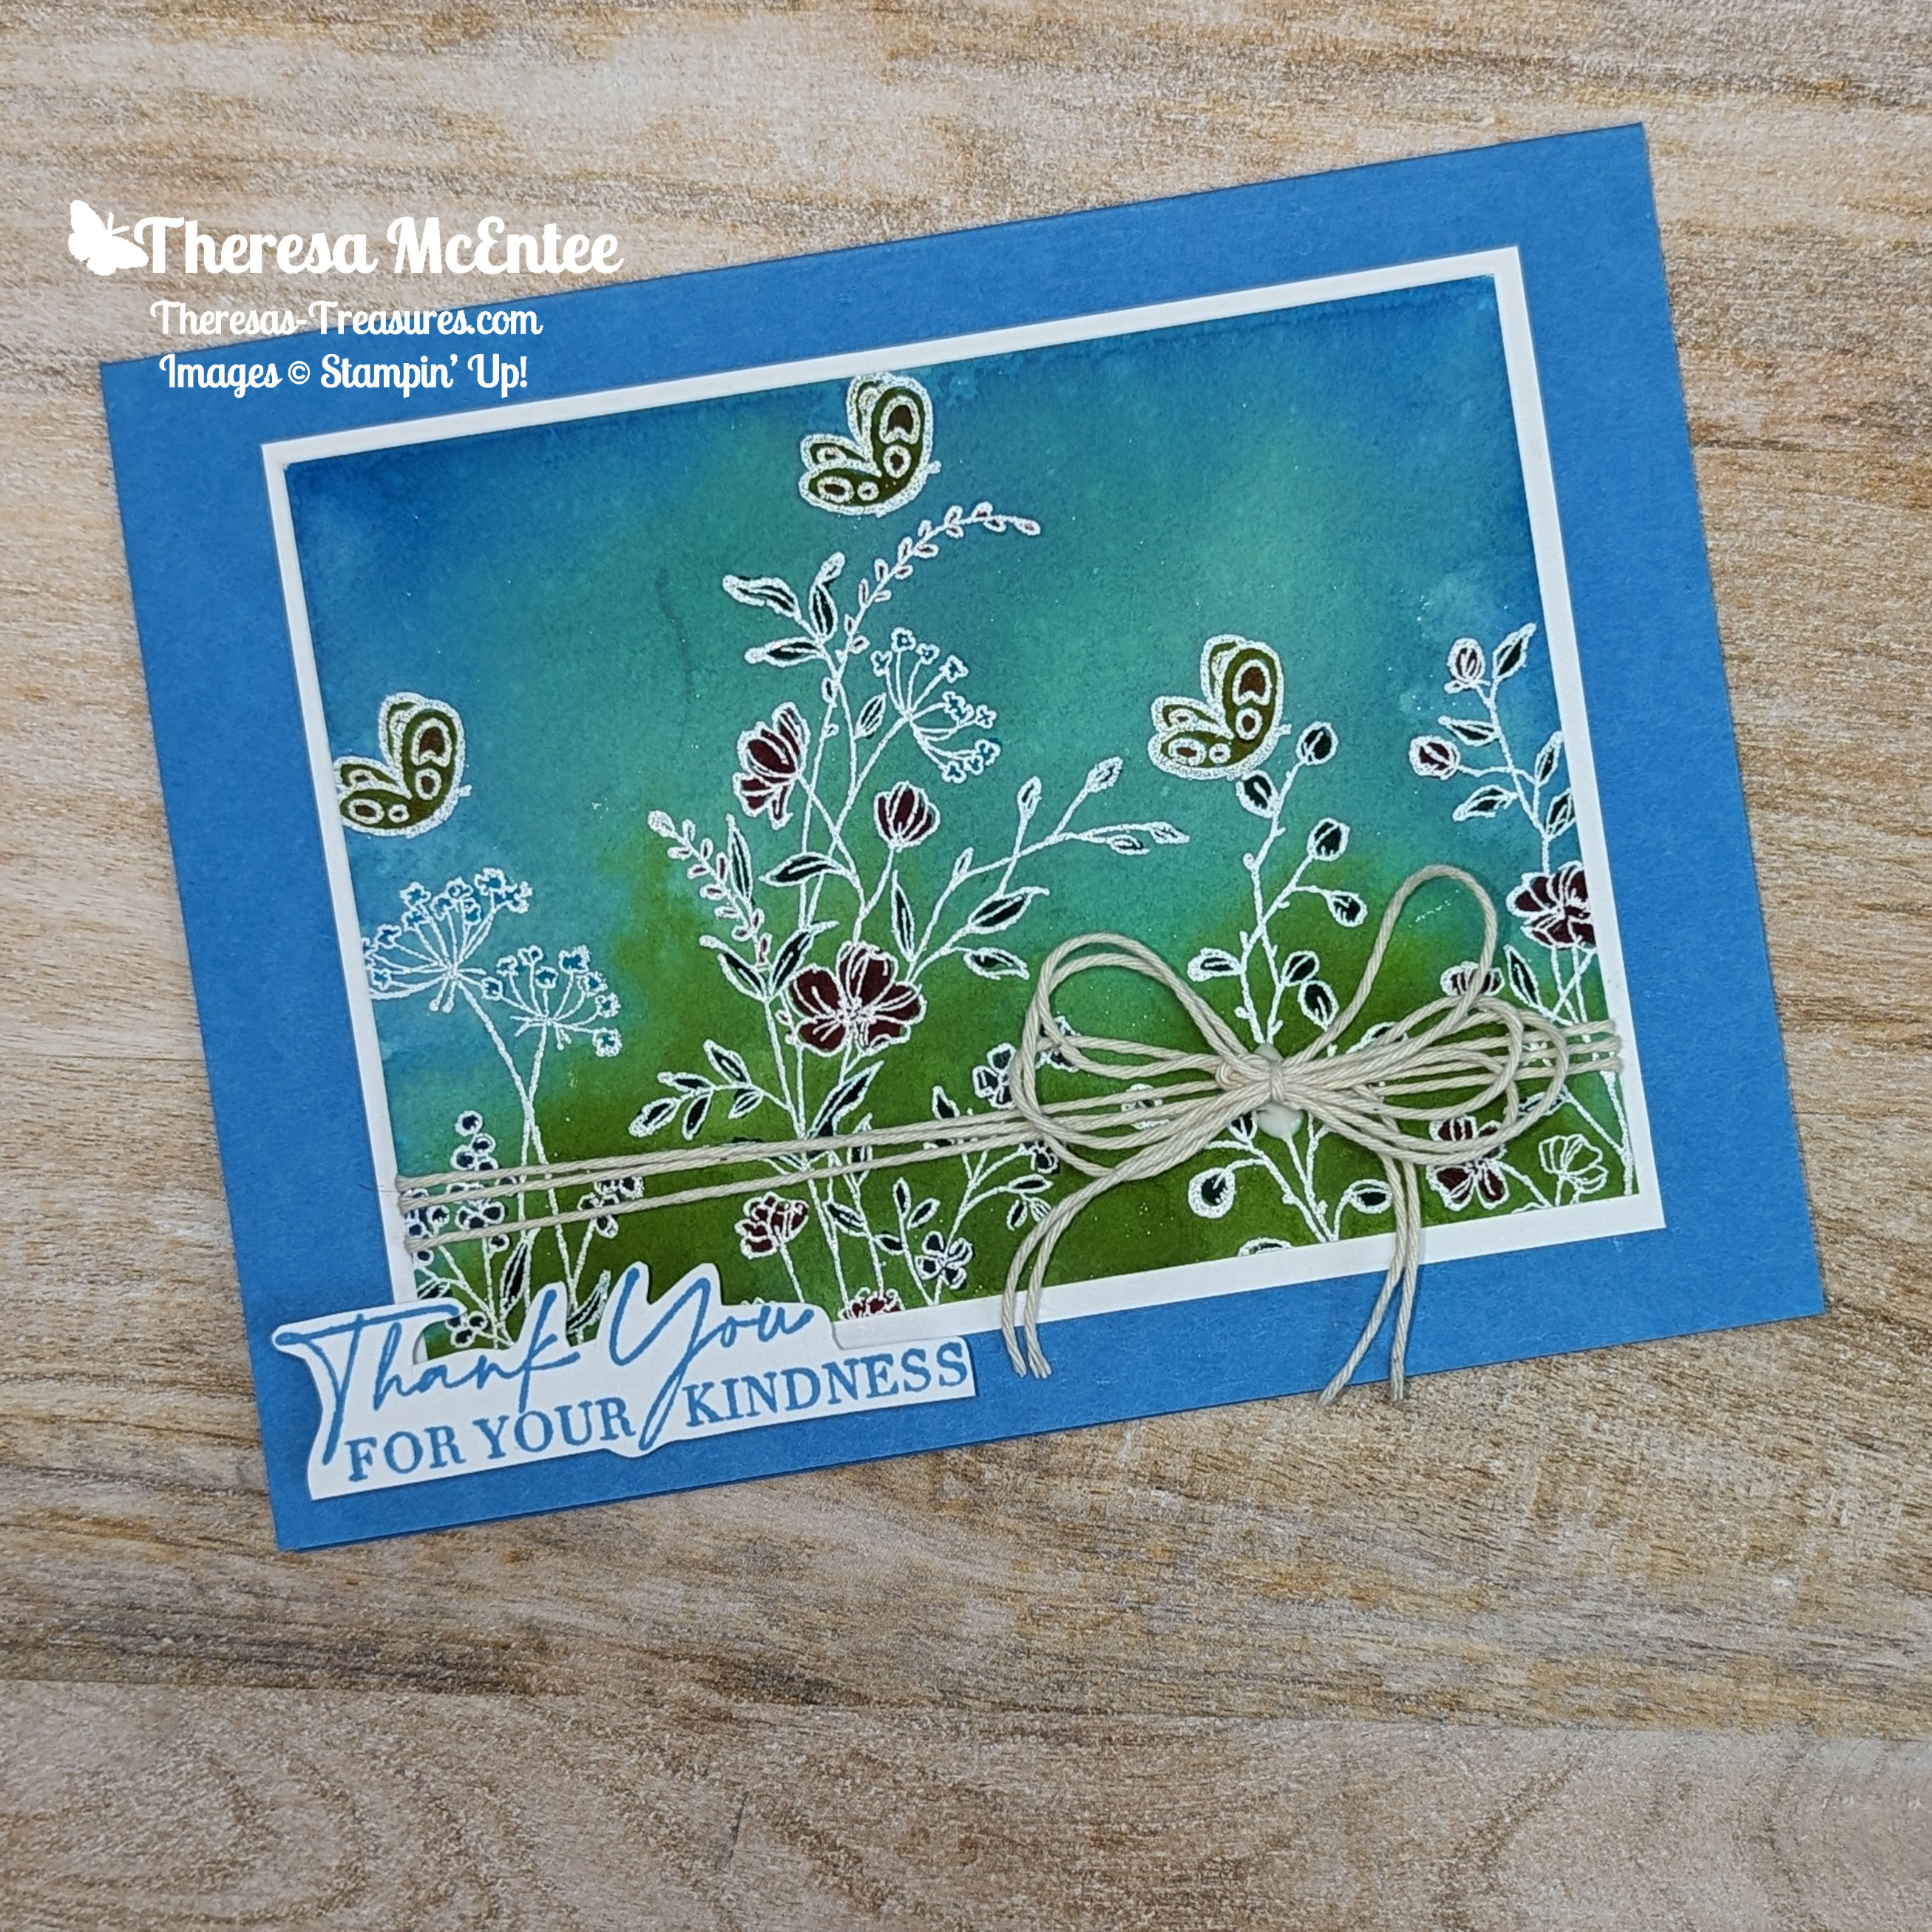
This card was made using several different stamp sets: Pretty Florals, Trusty Tools, Terrific Toadstools and Simply Said. The focus is really on the Florals in Bloom Designer Series Paper. I am so in love with this patterned paper! Each design is just wonderful!
When I saw Mikaela’s card with the torn paper, I knew that I wanted to make one too. I did mine a little bit differently. Instead of having a front panel, I have a split card front.
I made a second card as I was having so much fun tearing paper! Here is the other version.
The AWOW Team
I am so glad you have joined me today in this worldwide hug that stretches all the way from Australia to Alaska across twelve different time zones. Below is an image of the whole crew and where they are from around the globe. Such a talented and wonderful group of people! You will want to visit everyone to be sure to see all the fabulous projects!
We all love sharing the joy of creating with you through projects from our individual parts of the world. I hope that you will be filled with lots of inspiration!
Hello and welcome! I am Theresa McEntee, creator of Theresa’s Treasures Paper Crafts. Today I have the pleasure of participating in the Blog Hop with Around the World on Wednesday (AWOW) organized by Angie McKenzie.
On the second Wednesday of each month, the AWOW team put together a thematic hop to give you some inspiration for your own crafting. Sketch 108 is the theme for this month.
My Project for today
This card was made using the Terrific Toadstool Bundle (stamp set and punch) in the Stampin’ Up! 2025 January to April Mini Catalog. During Sale-a-bration you can choose FREE product when you purchase $60 of Stampin’ Up! products. Two of the producsts are the Toadstool Garden 6″x6″ Designer Series Paper and the Fresh Fresia 3/8″ Seam Binding Ribbon. The card is embellished with another Freebie- the Purple Adhesive-Backed Sequins.
Here is the inside of the card.
The die cut flowers and vines are from the Linked Together Dies on page 49 of the 2025 January to April Catalog. The central white circle of cardstock is die cut with one of the Spotlight on Nature Dies in the Stampin’ Up! 2024-2025 Annual Catalog.
The AWOW Team
I am so glad you have joined me today in this worldwide hug that stretches all the way from Australia to Alaska across twelve different time zones. Each month this group of creative friends prepare a project for a theme. Below is an image of the whole crew and where they are from around the globe. Such a talented and wonderful group of people! You will want to visit everyone to be sure to see all the amazing projects!
We all love sharing joy with you through projects from our individual parts of the world. I hope that you will be filled with lots of inspiration!
Thank you so much for visiting today. I hope you enjoyed learning more about our projects. Have a most wonderful day!
Theresa
Promotions
2025 Spring Mini Catalog and Sale-a-bration
What is Sale-a-bration? This an awesome time of the Stampin’ Up! year! As you purchase the goodies found in the 2025 Mini Catalog (and the 2024-25 Annual Catalog) you can get Freebies from the Sale-a-bration Brochure! Sale-a-bration is from January 7, 2025 until February 28, 2025.
If you do not have a catalog or Sale-a-bration Brochure, and you do not already have a Stampin’ Up! Demonstrator-let me know and I can send them to you!
Joining Special
Customers who sign up to be a Stampin’ Up! Demonstrator during Sale-a-bration will have 2 options.
Option 1
Customers who join our crafting community as a new demonstrator can get $125 USD | $165 CAD worth of products PLUS a choice of two Stampin’ Write Marker Assortments AND the Handmade Designs Cling Stamp Set, an exclusive stamp set designed to work with the markers. That’s a $216 USD | $294 CAD value all for just $99 USD | $135 CAD
Option 2
Customers who want to join Stampin’ Up! during Sale-A-Bration but are interested in a different join option can instead get $125 USD | $165 CAD worth of product PLUS an additional $30 USD | $41 CAD worth of product of their choice when they join for $99 USD | $135 CAD. That’s a $155 USD | $206 CAD value!
See how to use Embossing Techniques to make this card!
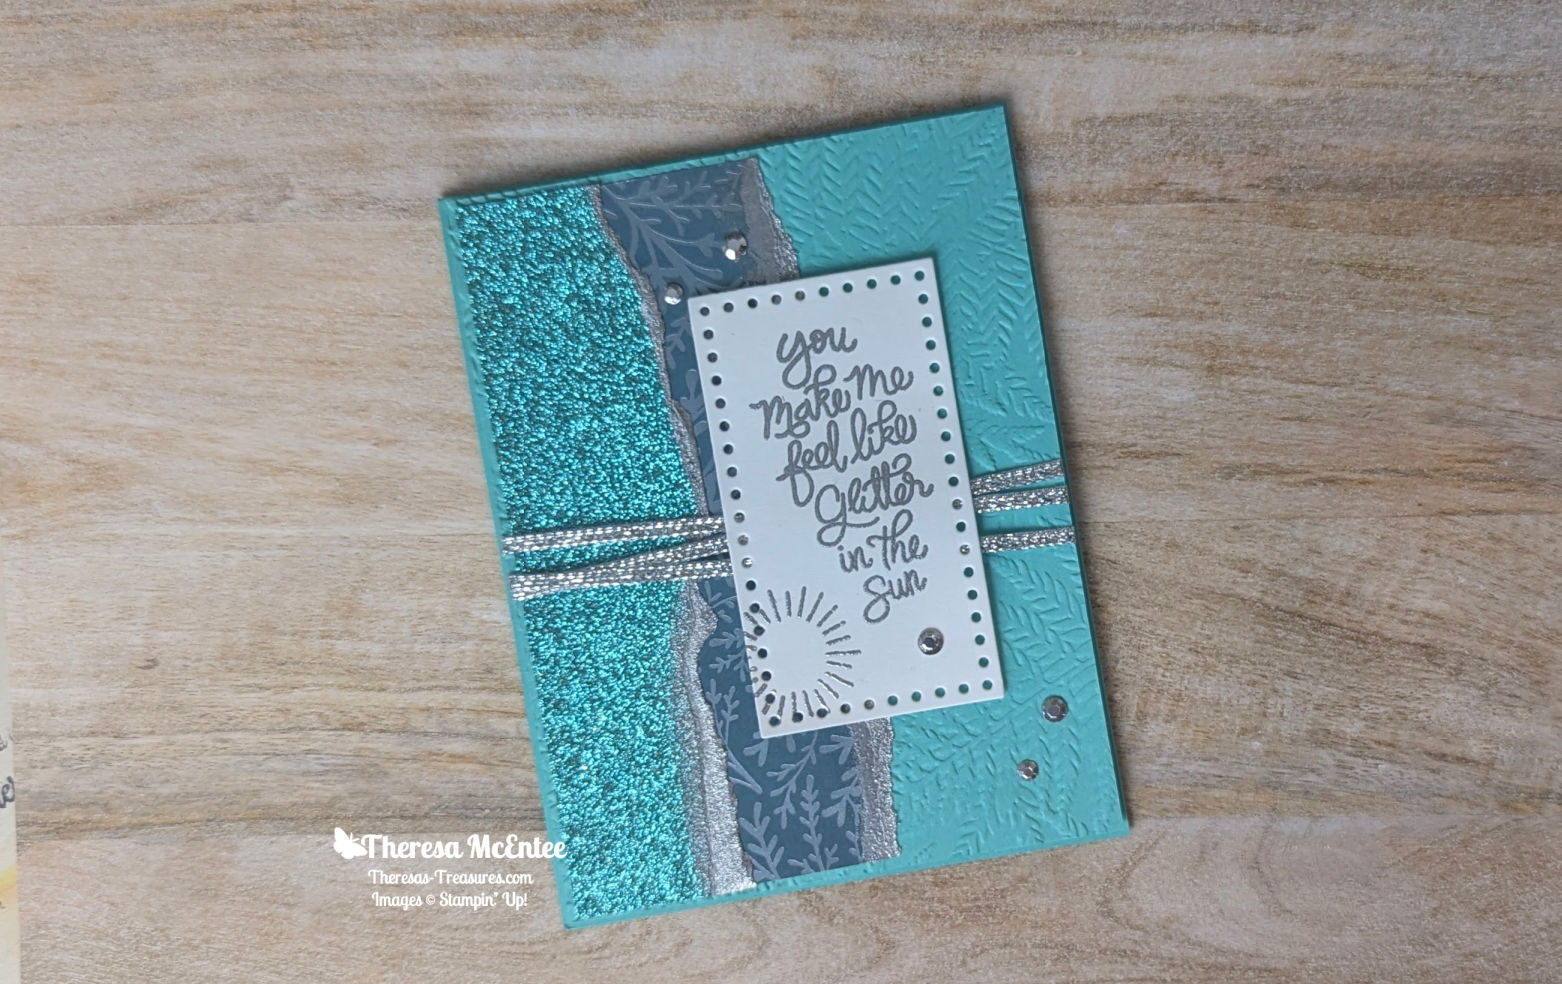
Welcome! Thank you for visiting Theresa’s Treasures Paper Crafts! I am Theresa, a Stampin’ Up! Demonstrator in Arizona, USA. Today is the monthly Inspirations in Ink Blog Hop! I am excited to be hopping with such talented demonstrators today. Be sure to check out everyone’s projects using different Embossing Techniques. The projects could be using embossing folders or projects using embossing powder or embossing paste. Lots of wonderful possibilities!
There are some Embossing Techniques that I used for this card today and I will include a few tips.
Measurements
Summer Splash cardstock card base: 4 1/4″ x 11″ scored at 5 1/2″ (10.5cm x 29.7cm scored at 14.85cm)
Summer Splash cardstock: 4 1/8″ x 5 3/8″ (10cm x 14.4cm)
Basic White cardstock: 3 3/4″ x 5″ (9.3cm x 13.7cm) inside and 2 1/4″ x 4″ (5.7cm x 10cm) sentiment
2024-2026 Glimmer Specialty Paper in Summer Splash: 1 1/2″ x 5 1/4″ (3.5cm x 14.4cm)
Thoughtful Designs Specialty Designer Series Paper in Summer Splash: 3″ x 5 1/4″ (9.6cm x 14.4cm)
If you are new to using Embossing Powders-Welcome! You will be amazed at how fun it is to see the embossing powder change-it’s magical! For basic embossing and most embossing techniques you will need:
Stampin’ Up! has two awesome embossing powder collections. You can click on the image above or order from my Online Store HERE.
Check out this fun Embossing Technique below!
Instructions
Using an Embossing Folder to Emboss Cardstock
First emboss the Summer Splash cardstock with the Fern 3D Embossing Folder. TIP: Spritz the cardstock so that the paper is slightly damp in order to get the best 3D look after you emboss it. Set aside.
Embossing the Sentiment
Die cut the 2 1/4″ x 4″ (5.7cm x 10cm) Basic White cardstock with the third from the smallest rectangle die in the Everyday Details Dies.
Very Important TIP: Use an anti-static tool on the cardstock prior to using embossing powder. This avoids having the embossing powder stick to anything except your stamped image/sentiment.
After using the anti-static tool, stamp the sentiment and the sun rays with Versamark Ink. Versamark is an ink that is also an adhesive so the embossing powder will stick to it.
Sprinkle the embossing powder over the Versamark. Shake off the excess into a plastic container or onto a coffee filter. TIP:The coffee filter will not have as much static as paper, so the powder can easily be returned to the container.
TIP: After embossing, use a small paintbrush to remove any extra embossing powder before using the Heat Tool.
Turn on the Heat Tool and wait about 10 seconds for it to warm up.
TIP: Hold the Heat Tool about 4-6 inches (10-15cm) away from the cardstock. Heat the back first for about 10 seconds. Then heat from the front, moving the heat around until the embossing powder melts (turns).
TIP: As soon as the embossing powder turns (here’s the magic!) remove the heat from that area. Overheating can cause the image/sentiment to not look as crisp.
TIP: After the entire image/sentiment has turned, allow it to cool. The embossing powder is basically melted plastic and will stick to your skin and burn you if you touch it before it has cooled. (Ask me how I know!)
Use a microfiber cloth to remove any excess powder.
Inside of the Card-Embossing
Now for the Basic White cardstock for the inside of the card. Stamp the “Thank You” sentiment from the Thoughout the Year stamp set in Versamark. Emboss with the Silver Embossing Powder same as above. Heat & cool.
Stamp the butterfly from the Happiest Day stamp set in Versamark Ink onto the right lower corner of the inside card piece. Heat. Cool.Adhere this piece to the inside panel of the Summer Splash cardstock card base.
Embossing Technique- Embossing the Edge of the Paper
Now for a fun Embossing Technique!
Tear the right side of the long edge of the Summer Splash Glimmer Paper and Thoughtful Design Specialty Paper.
Use the Versamark Ink pad to dab Versamark onto the torn edge.
Dip the edge in the Silver Embossing Powder that is in a plastic container or shake a bit out onto just the edge. Shake off the excess powder. Use the Heat Tool the same as above. Cool.
Repeat with the Thoughtful Designs Specialty Paper.
Assembling the Card
Adhere the torn and embossed Thoughtful Designs Specialty Paper to the Summer Splash cardstock embossed with the Fern 3D embossing folder.
Adhere the torn and embossed Summer Splash Glimmer Paper to the left of the Thoughtful Designs Specialty Paper.
Use a Mini Glue Dot to hold one end of the Silver Trim to the back of the card piece. Wrap around three times and secure to the back with another Mini Glue Dot.
Use Stampin’ Dimensionals to adhere the card piece to the front panel of the Summer Splash cardstock card base.
Use Stampin’ Dimensionals to adhere the sentiment to the card front.
Embellish the card front with the Metallic Gems as desired.
Voila!
Thank you so much for visiting today! I hope you enjoyed my project and my Embossing Technique. You will be inspired when you visit all the blogs in the Inspirations In Ink Blog Hop! There are some awesome projects!
You are currently visiting Theresa McEntee-USA creator of Theresa’s Treasures Paper Crafts.
Thinking of adding more creativity to your life? Start out by trying a monthly paper crafting kit! The Paper Pumpkin Monthly Subscription delivers a kit with everything you need to make a project-right to your door! Sign up for a Pre-paid Paper Pumpkin Subscription HERE.
Here is a sneak peak at the upcoming Paper Pumpkin Kit for August. You will need to subscribe before August 10, 2024.
Hello and welcome! I am Theresa McEntee, creator of Theresa’s Treasures Paper Crafts. Today I have the pleasure of participating in the Blog Hop with Around the World on Wednesday (AWOW) organized by Angie McKenzie.
On the second Wednesday of each month, the AWOW team put together a thematic hop to give you some inspiration for your own crafting. Sketch 106 is this month’s challenge.
I turned the sketch around to fit my idea.
My Project for today
This card was made using the Spotlight on Nature Bundle. The stamp set is just beautiful. The dies are a series of layering circles with different borders.
I wanted to showcase the 2024-2026 In Color Designer Series Paper. For this card, each of the five new In Colors were chosen in a different pattern of the Designer Series Paper. The 2024-26 In Colors are: Pretty in Pink, Peach Pie, Shy Shamrock, Summer Splash and Petunia Pop.
The AWOW Team
I am so glad you have joined me today in this worldwide hug that stretches all the way from Australia to Alaska across twelve different time zones. Each month this group of creative friends prepare a project for a theme. Below is an image of the whole crew and where they are from around the globe. Such a talented and wonderful group of people! You will want to visit everyone to be sure to see all the amazing projects!
We all love sharing joy with you through projects from our individual parts of the world. I hope that you will be filled with lots of inspiration!
I just love this Thank You card made with the Online Exclusives-Simply Zinnia Bundle!
Welcome! Thank you for visiting Theresa’s Treasures Paper Crafts! I am Theresa, a Stampin’ Up! Demonstrator in Arizona, USA. Today is the monthly Inspirations in Ink Blog Hop! I am excited to be hopping with talented demonstrators from around the world. Be sure to check out everyone’s projects using Stampin’ Up! Online Exclusives!
The Simply Zinnia Bundle is one of many Online Exclusives! It is only available in my Online Store. When you are ready, you may order from my Online Store HERE.
I enjoyed using the Stampin’ Blend Alcohol Markers to color the zinnia-which is one of my favorite flowers.
The Flowering Zinnias Designer Series Paper (DSP) is so vibrantly colorful! I wanted to be sure to use the DSP on my card! Too many choices!
Measurements
Melon Mambo cardstock card base: 5 1/2″ x 8 1/2″ scored at 4 1/4″
Flowering Zinnias DSP:
Large Floral with White background: 4 1/4″ x 5 1/4″ (die cut with the 2nd to largest Deckled Rectangle Die)
Melon Mambo floral design: 3 1/2″ x 4 3/4″ (die cut with the 3rd to the largest Deckled Rectangle Die)
Floral Design with Melon Mambo background: 1 1/4″ x 5 1/2″
Basic White cardstock: 2 1/2″ x 5″ (for stamping zinnia and leaf), 1 1/4″ x 4 1/4″ (for sentiment) and 4″ x 5 1/4″ for inside
Supplies
Stamp Set: Simply Zinnia
Dies: Simply Zinnia & Deckled Rectangle
Ink: Blackberry Bliss & Memento ink pads
Stampin’ Blends: Lemon Lolly, Daffodil Delight, Flirty Flamingo, Melon Mambo, Lemon Lime Twist, Old Olive and Mossy Meadow
Embellishments: Adhesive-backed Shiny Sequins
Instructions
Fold the Melon Mambo cardstock card base in half and burnish with a Bone Folder. Set aside.
Die cut the DSP and set aside.
Stamp the large zinnia image in Memento Ink onto the 2 1/2″ x 5″ Basic White cardstock. Stamp the leaves. TIP: Let dry or use your Heat Tool to dry the image more quickly so that the black ink doesn’t affect the Lemon Lolly Stampin’ Blend Ink.
Color images as desired. Die cut with the Simply Zinnia Dies.
Stamp the sentiment for the front of the card in Blackberry Bliss Ink onto the 1 1/4″ x 4 1/4″ Basic White cardstock. Use the largest Deckled Rectangle to die cut the edges of the sentiment.
For the inside of the card, stamp the sentiment in Blackberry Bliss Ink. Stamp the trio of zinnias in Memento Ink in the lower right-hand corner. Let dry or use the Heat Tool on the trio. Color with Stampin’ Blends as desired.
Adhere the inside card piece to the inside of the Melon Mambo cardstock card base.
Adhere the DSP with the white background onto the front of the card base. Follow with the Melon Mambo floral DSP. Finish with the Floral strip with the pink background across the middle.
Use Stampin’ Dimensionals to adhere the sentiment, zinnia and leaves.
Add Bling! with the Adhesive-Backed Shiny Sequins as desired.
Voila!
Thank you so much for visiting today! I hope you enjoyed my project. Please visit all the blogs in the Inspirations In Ink Blog Hop. You will be amazed and inspired by all the fun and creative projects made by the Inspirations In Ink demonstrators.
You are currently visiting Theresa McEntee-USA creator of Theresa’s Treasures Paper Crafts.
Do you want to learn to stamp? Or do you want to build up some supplies while making awesome projects?
Start out by trying a monthly paper crafting kit! The Paper Pumpkin Monthly Subscription delivers a kit with everything you need to make a project-right to your door! Everything you need is included! You even get a ink spot in a different color every month!
Sign up for a Pre-paid Paper Pumpkin Subscription HERE.
Special Add-On Die Set for the April Paper Pumpkin is available in my Online Store HERE!
Hello! Welcome to the Kylie & Bruno Bertucci Demonstrator Training Blog Hop for September 2023. I’m Theresa with Theresa’s Treasures Paper Crafts & I have an Abundant Beauty Thank You card today. Abundant Beauty is a set of Decorative Masks (stencils). For this card I used the leaf mask.
I am so glad you are joining me! We are a group of Stampin’ Up! Demonstrators from around the world. We are taking part in training to help us build a successful Stampin’ Up! business. My goal is to participate in the monthly Blog Hop to help me make my customer Thank You cards. When you place an order with me, I will send one of the cards to you!
This blog hop is full of ideas and creative inspiration! Be sure to visit everyone’s blog by clicking on the links at the end of my post.
Measurements
Colored card stock: Copper Clay, Pumpkin Pie and Cajun Craze: 4 1/4″ x 11″ scored at 5 1/2″
Daffodil Delight cardstock: 4″ x 5 1/4″
Very Vanilla cardstock: 3 3/4″ x 5″ (two)
Very Vanilla cardstock strip: 3/4″ x 5″ (for inside)
Very Vanilla cardstock for sentiment: 2 1/4″ x 3″
Supplies
Abundant Beauty Decorative Masks
Autumn Leaves Bundle (stamp & dies)
Ink: Daffodil Delight, Pumpkin Pie, Copper Clay and Cajun Craze
Blending Brushes
Baker’s Twine Essentials Pack: Crumb Cake
Rustic Metallic Adhesive-Backed Dots
Instructions
Secure one of the Very Vanilla cardstock 4″ x 5 1/4″ panels to a piece of scrap paper with a repositionable adhesive.
Secure the leaf mask over top with sticky note tape.
Gently blend the Daffodil Delight Ink first. Start in the middle with a small circular motion. Or start around the edge. You will then blend progressively darker ink away from the Daffodil Delight Ink.
Blend in the Pumpkin Pie Ink, then Copper Clay Ink and finally Cajun Craze Ink.
Carefully remove the mask and bring to the sink to rinse off with water before using it again.
Secure the 3/4″ x 5″ strip to the scrap paper. Secure the leaf mask over top. Blend with the Blending Brushes as you did before, but use a lighter touch.
Use the Copper Clay Ink to stamp the sentiment “I’m Thankful” on the 2 1/4″ x 3″ Very Vanilla cardstock.
Stamp the “For all you do” in Pumpkin Pie Ink on the very edge of the same Very Vanilla cardstock. Use your trimmer to cut a thin strip with the sentiment on it.
Die cut the “I’m Thankful” sentiment with the Autumn Leaves Dies.
Adhere the layers to the card front.
Use Stampin’ Dimensionals to adhere the sentiment.
Make a bow with the Crumb Cake Twine from the Baker’s Twine Essentials Pack.
Add some Rustic Metallic Adhesive-Backed Dots.
Voila!
Remember to visit everyone’s blog. You will see lots of creative inspiration from Demonstrators around the world! You are currently at Theresa McEntee-Theresa’s Treasures-USA. Enjoy!
I appreciate your visit to my blog today. Please subscribe to my blog and receive more ideas and inspiration for your own cards!
If you need any assistance with placing your order, let me know in the comments. Thanks!
Hello, thank you for visiting Theresa’s Treasures. I am Theresa, an Independent Stampin’ Up! Demonstrator in Arizona, USA. I am really excited to be participating in Kylie Bertucci’s International Blog Highlight Gallery with my Lighting the Way Glow in the Dark Thank You card. Today I am blogging along with very creative Stampin’ Up! demonstrators from around the world! Please be sure to see all of the inspirational projects by visiting everyone’s blog. You will need to click on the“Vote” button below to see the Gallery. Once in the Gallery you can vote for up to 5 projects.
The theme for the Gallery is “Thank You”.
We often forget those simple words “Thank you”. However, it is so very important to show appreciation to the people in your life who have helped you, supported you or inspired you. One way to express gratitude is to send a handmade thank you card. Discover the joy in making and sending a handmade card!
This Lighting the Way Glow in the Dark Thank You Card showcases the Lighting the Way Photopolymer Stamp Set and Lighting the Way Dies which are in the 2023-24 Stampin’ Up Annual Catalog. The All About Autumn Designer Series Paper & the Glow In the Dark 6″ x 6″ Specialty Paper are in the upcoming 2023 Stampin’ Up! Mini Holiday Catalog. The Mini Holiday Catalog goes live on September 6, 2023!
Current Host Code: SBVQNPYQ
Measurements
Copper Clay cardstock card base: 4 1/4″ x 11″ scored at 5 1/2″
Mossy Meadow cardstock: 3″ x 4″ to diecut the lantern, and 1/2″ x 2 3/4″
Basic Black cardstock: 1 1/4″ x 4″ to diecut the three fireflies
Glow in the Dark 6″ x 6″ Specialty Paper: 3 1/4″ x 3 1/4″ to diecut the Deckled Circles, 1 1/2″ x 1 3/4″ to diecut the middle of the lantern, 1/2″ x 2 3/4″ to diecut the three fireflies and 5/8″ x 3 1/2″ for the sentiment
All About Autumn Designer Series Paper: 4 1/8″ x 5 3/8″ and 3/8″ x 5 1/4″ in the Mossy Meadow and Copper Foil design and 3 3/4″ x 5″ in the autumn leaves design.
Diecut the Deckled Circle and lantern center from the Glow In The Dark Specialty Paper. Use Deckled Circle Die #1, #2, #4 and #5 counting from the smallest.
Fit the Glow In the Dark Specialty Paper pieces in the center of the lantern.
Lay the two diecut Deckled Circles on the back side of the lantern.
Adhere the 1/2″ x 2 3/4″ Mossy Meadow cardstock strip to secure all of the Glow In The Dark pieces in place.
Create the Sentiment & Fireflies
Diecut three fireflies from both the Basic Black cardstock and the Glow in the Dark Specialty Paper.
Cut the bottoms off of the Glow in the Dark fireflies and adhere them to the Basic Black fireflies.
Be sure to use the Embossing Buddy on the strip of Glow in the Dark Specialty Paper before stamping the sentiment in Versamark Ink.
Use caution with the Heat Tool so you do not overheat the paper.
Trim both ends into a banner.
Finishing Up
Adhere the Mossy Meadow/Copper Foil design to the front of the Copper Clay cardstock card base.
Adhere the autumn leaves design on top of that.
Use the Copper Clay Ink to stamp the sentiment “You are all kinds of wonderful” onto the Very Vanilla cardstock.
Adhere the strip of Mossy Meadow/Copper Foil onto the Very Vanilla cardstock on the right-hand side.
Now adhere the Very Vanilla stamped card piece to the inside of the Copper Clay card base.
Use Stampin’ Dimensionals to adhere the lantern to the card front.
The fireflies and sentiment strip are also adhered using the Stampin’ Dimensionals.
Add Bling! with the Adhesive-Backed Sparkle Gems!
Voila!
I hope you enjoyed my card today using the Lighting the Way Photopolymer Stamp Set and Dies.
Visit my Online Store to order what you need to make this card for yourself. A photographic supply list is at the end of this blog. Note: the All About Autumn & Glow In the Dark papers are not available until September 6, 2023.
Current Host Code: SBVQNPYQ
You are currently at Theresa McEntee-Theresa’s Treasures-USA. When you click on the Vote For Me button above you will see the Gallery of creative inspiration from Demonstrators around the world! Remember to visit everyone’s blog by clicking on the photo of their card in the Gallery.
To vote for your favorite cards, click on the small heart in the upper right-hand corner of each photo. You have 5 votes! Enjoy and come visit Theresa’s Treasures again soon!
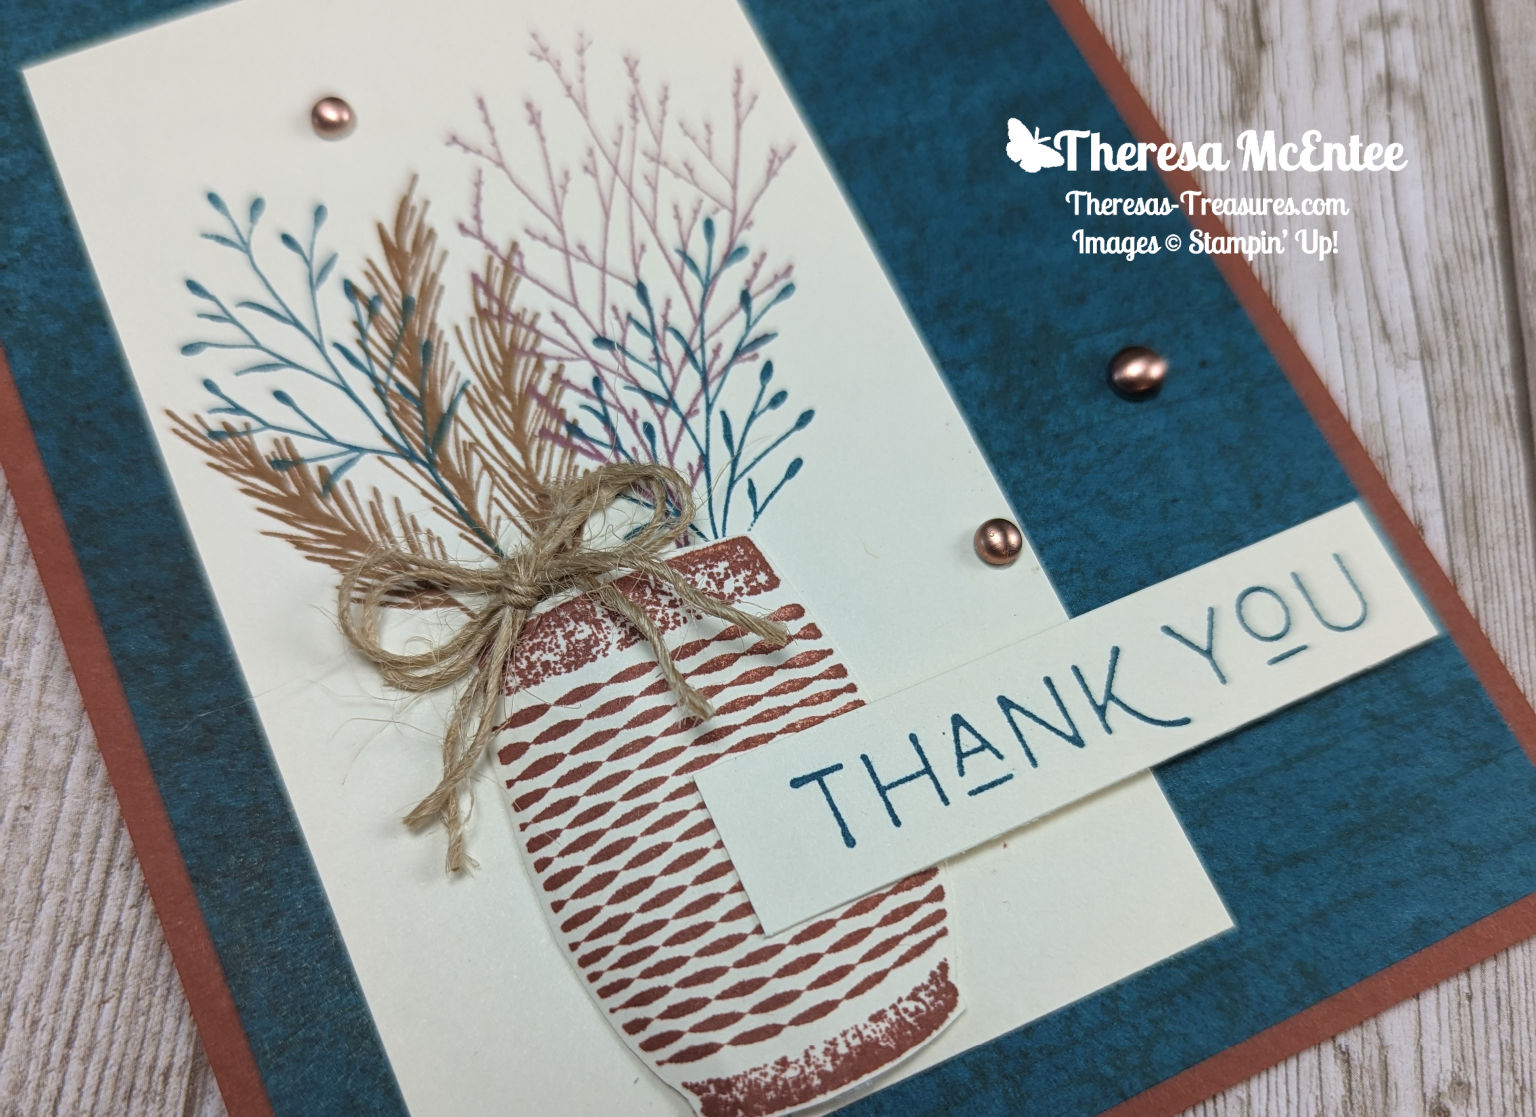
Hello! Welcome to Kylie & Bruno Bertucci’s Demonstrator Training Blog Hop for August 2023. I’m Theresa with Theresa’s Treasures Paper Crafts & I have an Earthen Textures Thank You card today.
I am so glad you are joining me! We are a group of Stampin’ Up! Demonstrators from around the world who are taking part in training to help us build a successful Stampin’ Up! business. My goal is to participate in the monthly Blog Hop. This blog hop is full of ideas and creative inspiration! Be sure to visit everyone’s blog by clicking on the links at the end of my blog.
Measurements
Copper Clay cardstock card base: 4 1/4″ x 11″ with a score line at 5 1/2″
Very Vanilla cardstock: 2 1/2″ x 4 1/2″, 2″ x 2 1/2″, 1/2″ x 2 1/2″ and 3 1/2″ x 4 3/4″ (inside)
Earthen Elegance Designer Series Paper (DSP): 4″ x 5 1/4″
Supplies
Earthen Textures stamp set
Ink: Pecan Pie, Copper Clay, Pretty Peacock and Moody Mauve
Brushed Metallic Dots
Natural 1/4″ Wavy Trim
Bone Folder
Foam Adhesive Strips
Stampin’ Dimensionals
Mini Glue Dots
Multipurpose Liquid Glue
Paper snips
Instructions
Stamp Off a clay pot onto the bottom of the 2 1/2″ x 4 1/2″ Very Vanilla cardstock.
Also stamp a clay pot in Copper Clay Ink onto the 2″ x 2 1/2″ Very Vanilla cardstock. Fussy cut this pot. Note: I did not use the Earthen Textures Dies to cut out the pot because the die cuts off the edges of the pot.
Place a sticky note over the bottom of the Stamped Off clay pot. This will prevent the stems from showing at the bottom.
Stamp the various branches and leaf fronds so that they appear to be in the Stamped Off clay pot. I used Pecan Pie Ink for the full leaf frond, Pretty Peacock Ink for the open leaf frond and Moody Mauve Ink for the branch with the small flowers on it.
Stamp the “Thank You” sentiment in Pretty Peacock Ink onto the 1/2″ x 2 1/2″ Very Vanilla cardstock strip.
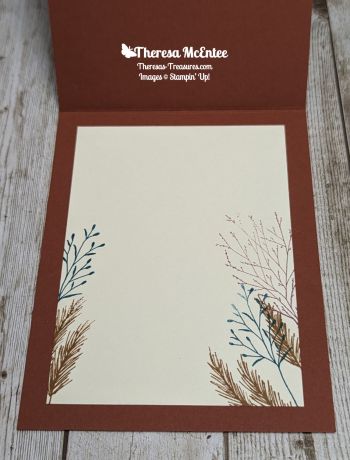
For the inside of the card, stamp the various branches in the same colors that you used on the front of the card.
Adhere the inside card piece to the inside of the Copper Clay cardstock card base.
Adhere the Earthen Elegance DSP to the front of the card base.
Adhere the Very Vanilla cardstock with the Stamped Off pot and branches to the card front.
Use your Bone Folder on the fussy cut clay pot to curl the cardstock. This will create a curved 3D pot.
Apply a Foam Adhesive Strip down the center of the curved pot.
Adhere the curved pot to the card front over the Stamped Off clay pot.
Apply Stampin’ Dimensionals to the back of the right side of the sentiment. Use a drop of Multipurpose Liquid Glue on the back of the left side. Adhere the sentiment to the card front.
Pull 2 strings off of the Wavy Ribbon and tie a bow. Adhere to the top of the clay pot with a mini Glue dot.
Embellish with the copper Metallic Dots.
Voila!
Now you can visit everyone’s blog to see creative inspiration from Demonstrators around the world! You are currently at Theresa McEntee-Theresa’s Treasures-USA. Enjoy!
I appreciate your visit to my blog today. Remember to subscribe to my blog and sign up for my Theresa’s Treasures Paper Crafts Newsletter. If you live in the United States and need a Stampin’ Up! demonstrator, contact me. Also, if you need any assistance with placing your order here in the USA, let me know in the comments. Thanks!
Have a most wonderful day! Happy crafting!
Theresa
2024 Stampin’ Up! Mini Holiday Catalog
The 2024 Mini Holiday Catalog will go live on September 6, 2024! Do you have your copy? If you live in the USA and need a catalog, please leave me a comment at theresastreasures.az@gmail.com.
Paper Pumpkin
Do you want to add a little creativity to your life but don’t want a bunch of craft supplies? A Paper Pumpkin Monthly Subscription is a perfect way to do just that! Each month a complete kit will be mailed to you. The kit will contain everything you need to make the project!
ABOUT THE KIT for SEPTEMBER
Kit Name: With Love & Gratitude.
This kit includes:
8 treat packages
8 note cards
8 coordinating envelopes
1 photopolymer stamp set
1 Lost Lagoon Ink S
pot
Specialty gold foil, precut embellishments
Adhesives
Finished treat packaging: 3-1/2″ x 5″ x 2″ (8.9 x 12.7 x 5.1 cm)
Thoughts of Thanks Journal Available starting: August 11, 2023, while supplies last
Price: $15.00 USD | $21.00 CAD
Item number: 163270 This add-on includes:
8″ x 10″ (20.3 x 25.4 cm) journal
2 specialty gold foil sticker sheets
Gold-clip page marker
My Next Zoom Class
I would love for you to join me on Zoom on September 16, 2023 at 2pm Mountain time for my Monthly Zoom Card Making Class. This month I am using the Pansy Patch stamp set.
The class is $20 USD for the kit. The kit includes the pre-cut cardstock and DSP needed for 4 projects, any embellishments or ribbon, an Instructional Photographic Tutorial PDF, and the 2-3 hour Zoom class.
You will need to have the Pansy Patch stamp set, ink in Lemon Lolly, Fresh Freesia and Gorgeous Grape, and Blending Brushes. You can purchase your supplies in my Online Store HERE.
To purchase the class send an email to theresastreasures.az@gmail.com.
Online Stamping Retreat
Along with Christy of Christysstampingspot and Jeanne the Jazzy Gypsy, I will be hosting an Online Stamp-Along on September 29 and 30, 2023.
Hello, thank you for visiting Theresa’s Treasures. I am Theresa, an Independent Stampin’ Up! Demonstrator in Arizona, USA. I am really excited to be participating in Kylie Bertucci’s International Blog Highlight Gallery with my Sweet &Precious Thank You card. Today I am blogging along with very creative Stampin’ Up! demonstrators from around the world! Please be sure to see all of the inspirational projects by visiting everyone’s blog. You will need to click on the “Vote” button below to see the Gallery.
The theme for this Gallery is “Thank You“.
We often forget those simple words “Thank you”. However, it is so important to show appreciation to the people in your life who have helped you, supported you or inspired you. One way to express gratitude is to send a handmade thank you card. Discover the joy in making and sending a handmade card!
This Sweet & Precious Thank You Card was created using the Sweet & Precious stamp set in the 2023-24 Stampin’ Up! Annual Catalog.
Current Host Code: QNJKQJNV
Measurements
Balmy blue cardstock card base: 4 1/4″x 11″ scored at 5 1/2″ (10.5cm x 29.7cm scored at 13.75cm)
Balmy Blue cardstock: 3 1/4″ x 4 1/2″ (7.5cm x 11cm)
Blueberry Bushel cardstock: 4 1/4″ x 5 1/2″ (11cm x 14.5cm)
Stamp the “Thank You” sentiment in Blueberry Bushel Ink onto the square of Basic White cardstock. Make a diecut with the small circular Radiating Stitches Die. Set aside.
Using Memento Ink, stamp the mamma & baby penguin onto the smaller rectangle of Basic White Cardstock. Also stamp onto a couple of full stick sticky notes. Fussy cut the image out of the sticky note and lay over the stamped image on the Basic White cardstock.
Use a large Blending Brush to very gently and slowly apply Balmy Blue Ink around the penguins. Remove the sticky note.
Use the Light Smoky Slate Stampin’ Blend to add shadows.
Use the Light Balmy Blue Stampin’ Blend Marker to make a slightly darker area under the penguins. Cover this with Wink of Stella.
Make a diecut from the Blueberry Bushel cardstock with the largest Radiating Stitches Die. Use this same die to make a diecut from the large Basic White cardstock to make the inside of the card.
Adhere the diecut Radiating Stitches rectangles-the Basic White one for the inside, and the Blueberry Bushel one for the card front.
Adhere the Holographic paper over the Blueberry Bushel Radiating Stitches rectangle.
Make a diecut with the second largest rectangular Radiating Stitches die on the Balmy Blue cardstock.
Adhere the penguin piece to the Balmy Blue rectangle. Use Stampin’ Dimensionals to adhere this piece to the Holographic piece on the card front.
Use Stampin’ Dimensionals to adhere the sentiment.
Tie a bow with the Azure Afternoon Sheer Ribbon. Use a Mini Glue Dot to apply the ribbon below the sentiment.
Finish up by applying the Balmy Blue Pastel Iridescent Gems.
Voila!
I hope you enjoyed my card today using the Sweet & Precious stamp set.
Visit my Online Store to order what you need to make this card for yourself. There is a photographic supply list is at the end of this blog.
Current Host Code: QNJKQJNV
You are currently at Theresa McEntee-Theresa’s Treasures-USA. When you click on the Vote For Me button above you will see the gallery of creative inspiration from Demonstrators around the world! Remember to visit everyone’s blog by clicking on the photo of their card in the Gallery.
To vote for your favorite cards, click on the small heart in the upper right-hand corner of each photo. You have 5 votes! Enjoy and come visit Theresa’s Treasures again soon!
Hello! Welcome to the Kylie & Bruno Bertucci Demonstrator Training Blog Hop for July 2023. I’m Theresa, creator of Theresa’s Treasures Paper Crafts. I have a Thank You card today with the Dainty Delight stamp set using the Emboss Resist Technique. I am so glad you are joining me!
We are a group of Stampin’ Up! Demonstrators from around the world. We are taking part in training to help us build a successful Stampin’ Up! business. My goal is to participate in the monthly Blog Hop in order to create a handmade Thank You card to send to my customers! This blog hop is full of ideas and creative inspiration! Be sure to visit everyone’s blog by clicking on the links at the end of my blog.
Measurements
Azure Afternoon card stock (cs): 5 1/2″ x 8 1/2″ with a score line at 4 1/4 “
Basic White card stock (cs): 3 1/2 x 4 1/2 inches, 1″ x 2 3/4″ (sentiment) and 4″ x 5 1/4″ (inside)
Fluid 100 Watercolor Paper: 3 1/2″ x 5″ initially, then trimmed to be 3 1/4″ x 4 1/2″
Supplies
Dainty Delight stamp set
Easter Bunny stamp set (for the butterfly)
Versamark Ink
White Emboss Powder
Heat Tool
Acrylic Block E
Stampin’ Spritzer
Ink: Memento, Azure Afternoon, Coastal Cabana and Granny Apple Green
Bakers Twine Essentials Pack– Very Vanilla
Blender Brushes
Stampin’ Write Markers: Daffodil Delight, Pumpkin Pie, Shaded Spruce, Sweet Sorbet, Tahitian Tide (I don’t yet have the Azure Afternoon) and Orchid Oasis.
Instructions
Emboss Resist Technique
Stamp the floral images as desired with the Versamark Ink onto the Fluid-100 Watercolor Paper. After each image, apply the White Emboss Powder. Use the Heat Tool to set. Stamp the butterfly image from the Easter Bunny stamp set. Cover with White Emboss Powder and heat set.
Moisten the paper with the Stampin’ Spritzer.
Use the Costal Cabana Ink Pad and apply color to the E Acrylic Block.
Then use the Azure Afternoon Ink Pad and apply ink to the outer upper border.
Finally, use the Granny Apple Green Ink Pad to apply color to the lower portion of the E Acrylic Block.
Spritz the block with the Stampin’ Spritzer until the colors begin to blend together. Quickly turn upside down onto the Watercolor Paper with the embossed images. Let sit for 15 minutes.
Remove the block, and Voila! You have a beautiful watercolor Emboss Resist panel.
Adding Color
Now for the fun part! Color the flowers and butterflies as desired with the Stampin’ Write Markers.
Trim this card piece to 3 1/4″ x 4 1/4″.
Putting it All Together
Adhere to the 3 1/2″ x 4 1/2″ Basic White cs.
Wrap the Very Vanilla Bakers Twine around the card piece three times.
Make a bow with several layers. Adhere the bow to the card front with the Tom Bow Liquid Glue.
Then adhere to the Azure Afternoon cs card base.
Inside Card Piece: use the Blending Brushes with the Coastal Cabana, Azure Afternoon and Granny Apple Green Inks to create a light color on the Basic White cs inside card piece.
Stamp the floral images in Memento Ink.
Color the flowers with the Stampin’ Write Markers.
Adhere to the inside of the Azure Afternoon cs card base.
Voila!
Remember to visit everyone’s blog. You will see creative inspiration from Demonstrators around the world! You are currently at Theresa McEntee-Theresa’s Treasures-USA. Enjoy!
I appreciate your visit to my blog today. Remember to sign up for my Theresa’s Treasures Paper Crafts Newsletter. You can click on the “Subscribe to my Newsletter” tab. Please subscribe to my blog as well. If you need any assistance with placing your order, let me know in the comments. Thanks!
Have a most wonderful day! Happy crafting!
Theresa
Promotions
New Online Exclusives!
Check out the Online Exclusives! These products will not be found in any Stampin’ Up! catalog. First click on my “shop” button. You will then select the “Menu” tab. Select “Shop Products” and scroll down to “Online Exclusives”. From here you can look at the currently available Online Exclusives!
Paper Pumpkin Monthly Kit
Last day to subscribe!!
Name: Fun in the Sun
This kit includes:
All the supplies you need to create 9 cards with fun accordion folds: 3 each of 3 designs; and coordinating envelopes.
An all-occasion stamp set to send friends and family words of encouragement, support and kindness.
Iridescent Sequin Embellishments.
1 Classic Stampin’ Spot: Daffodil Delight.
Summertime Ephemera pieces, labels, and paper pieces.
Adhesive Dots and Tear & Tape Adhesive.
Completed card size: 5-1/2″ x 4-1/4″ (14 x 10.8 cm)
Coordinating Stampin’ Up! colors: Azure Afternoon, Basic Gray, Crumb Cake, Daffodil Delight, Flirty Flamingo, Granny Apple Green, Melon Mambo, Pool Party
Bonus Days!!
BONUS DAYS ARE BACK!
Why? Because you know what is a great deal? Getting rewarded for all the crafting supplies you’re already going to buy!
When you shop between July 6-31 and spend $50 USD | $60 CAD you will earn a $5 USD | $6 CAD coupon! Make sure you save all your coupons because you can redeem them (and we mean ALL of them) between August 1–31 .
There’s no limit to how many coupons you can earn!


")
")


 Specialty Paper")
 Specialty Designer Series Paper")


")

 Trim Combo Pack")


")


 Designer Series Paper")


")


")


")


")


 Designer Series Paper")
 Wavy Trim")


")
")


 Specialty Paper")

 Sheer Ribbon Combo Pack")