Posted in 2021 Stampin' Up! July-December Mini Catalog, 3D Embossing Folder, Stampin" Blends Alcohol Markers, Stampin' Cut & Emboss Machine, Winter Holiday

Stampin’® Up! Great Tidings Religious Christmas Card

I am on Day 7 of the “12 Days of Christmas Card Making Challenge” with my stamping buddy Christy. Today’s card is a Stampin’ Up!® Great Tidings Religious Christmas Card. Each day of this challenge my blog will focus on a new holiday card. The challenge goes until December 10, 2021. I plan to showcase a different stamp set with each card. This will allow you plenty of time to see the great products that are available in the 2021 Stampin’ Up! July to December Mini Catalog, and to order in time to make your own Christmas cards! You can order HERE when you have your list ready!

Many of the products in the Stampin’ Up! July-December Mini Catalog will be retiring at the end of December. If you really want something, order now because products are “while supplies last”. Get more information on the “Last Chance” products HERE

I really like how colorful this Great Tidings Religious Christmas card turned out to be. The Wise Men Tidings Dies and the Gold Brushed Metallic Card Stock really make this card shine!

Measurements

Great Tidings Religious Christmas Card

  • Night of Navy Card Stock (CS) card base: 4 1/4 x 11 inches scored at 5 1/2 inches.
  • Basic White CS: 4 x 5 1/4 inches, 4 x 4 inches, and a 1/2 inch strip that is at least 3 inches long.
  • Gold Brushed Metallic CS: 5 3/8 x 4 1/8 inches.

Stamping

Use Memento Ink to stamp one each of the Three Kings onto the 4 x 4 inch Basic White CS.

Use Night of Navy Ink to stamp the sentiment “Wise men still seek Him” onto a 1/2 x 3 inch strip of Basic White CS. Also stamp, in Night of Navy Ink, the 4 x 5 1/4 inch Basic White CS with the sentiment “Sending Peace & Joy to you”, the 3 Gifts and the Star.

Use Stampin’ Blends Alcohol Markers to color the Three Kings. For skin color, I used the Light and Dark Cinnamon Cider, and Ivory. Additionally, I used the Light and Dark of: Bermuda Bay, Just Jade, Daffodil Delight, Blackberry Bliss and Night of Navy for the Kings’ dress. I shadowed the turban with Light Smoky Slate. Later I used Dark Poppy Parade for the gem in the turban and the jewel on the cloak of the middle King. Note: These are not the traditional colors for the Three Kings. Going left to right is Gaspar, Balthazar and Melchior.

Three Wise Men Dies and Hammered Metal Embossing Folder

The Three Wise Men Dies really help make the Great Tidings Religious Christmas Card shine. First die cut the Dome, placing the top of the die about 3/4 inch from the top edge and using the Stampin’ Cut & Emboss Machine. Use the dies for the Star and the Town of Bethlehem to diecut from the left over dome piece. Save the remainder of the dome cut out for future use. Tip: This is a great way to make the Gold Brushed Metallic CS last longer- use every scrap!

Use the Hammered Metal 3D Embossing Folder in the Stampin Cut & Emboss Machine for the texture on the 5 3/8 x 4 1/ 8 inch Gold Brushed Metallics CS card piece.

Assembling the Card

Adhere the inside card piece to the inside panel of the Night of Navy CS card base.

Start the front of the card by adhering the Hammered Metal Gold CS card piece to the front panel of the Night of Navy CS card base. Next adhere the Star with a Stampin’ Dimensional. Adhere the Little Town of Bethlehem flat to the background. Add the Three Kings using Stampin’ Dimensionals.

Finish the card by trimming the sentiment and adhering it to the card with Stampin’ Dimensionals. Add one large Gilded Gem to the center of the Star.

Voila! You have made a fabulous Great Tidings Religious Christmas Card!

For my family today is the second Sunday of Advent. Time is moving by so quickly! My son and husband are out to get the tree. I still need to wrap a bunch of packages to mail tomorrow. It is such a wonderful, busy time of year!

Supplies

Product List

I hope you have a Blessed Day!

Theresa

Posted in 2021 Stampin' Up! July-December Mini Catalog, 2021-2022 Stampin' Up! Annual Catalog, Blender Pen, Guys cards, Techniques, Winter Holiday

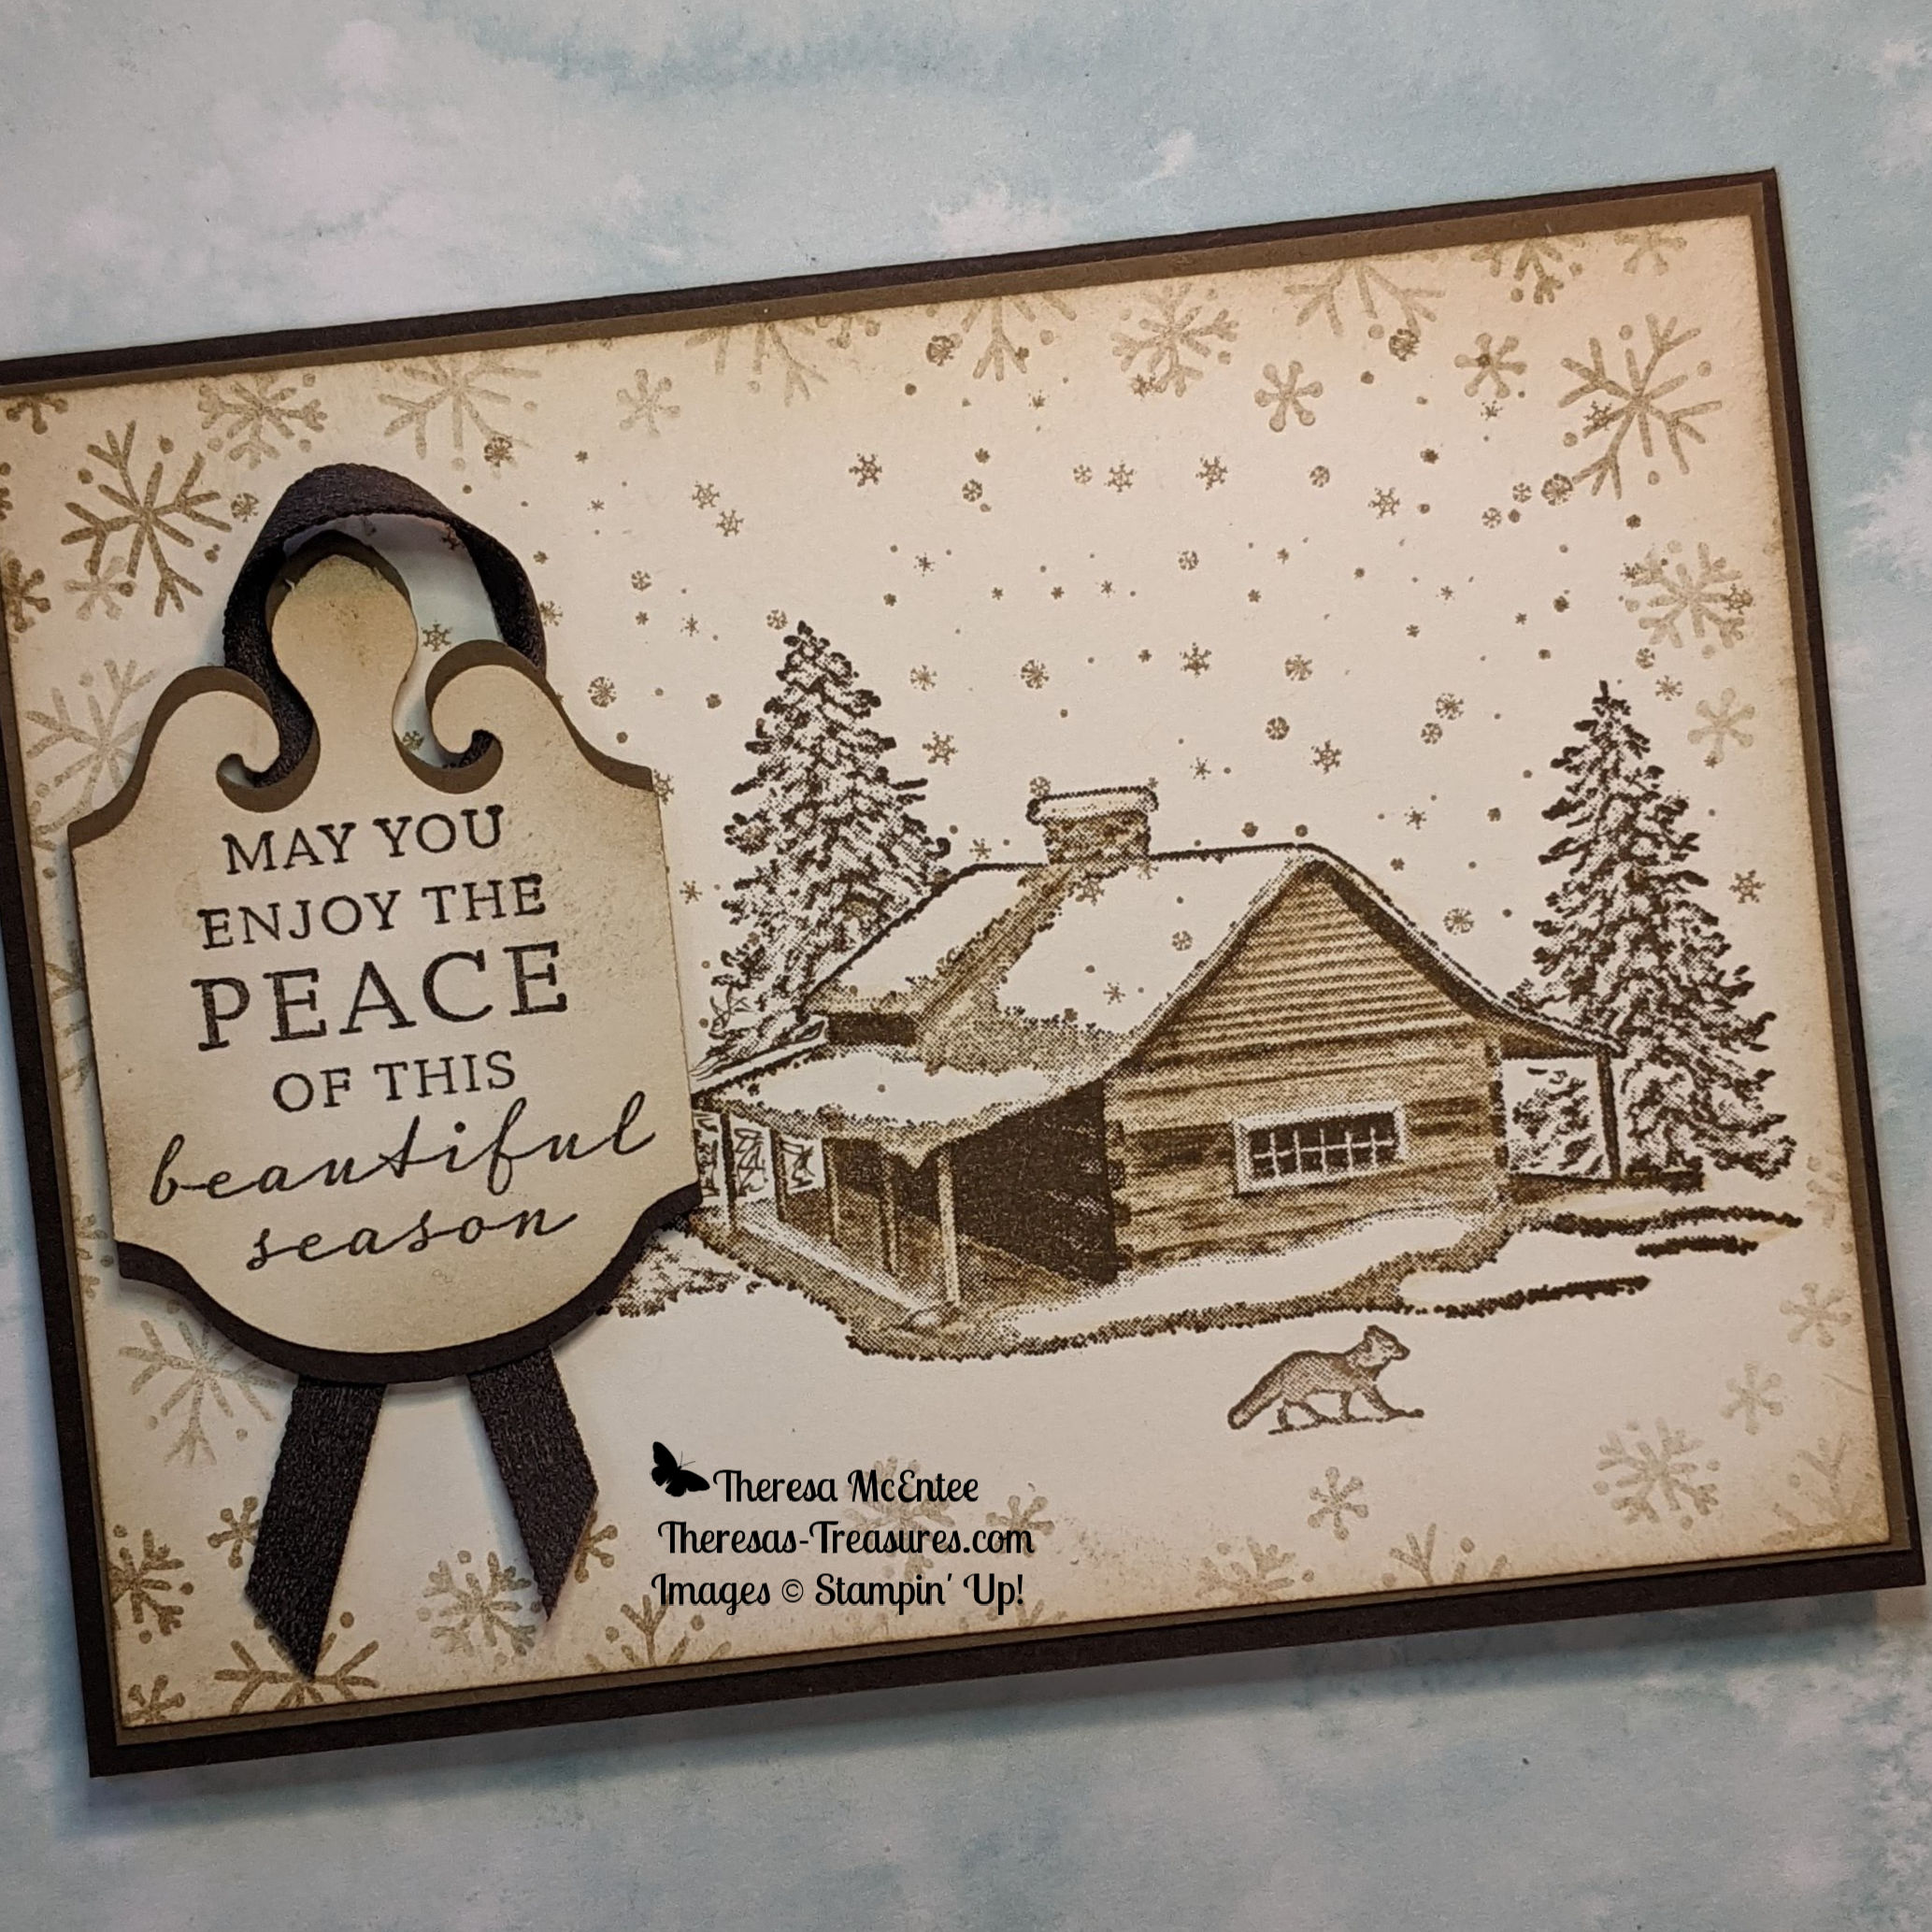
Stampin’ Up!® Peaceful Cabin Masculine Christmas Card

I am on Day 6 of the “12 Days of Christmas Card Making Challenge” with my stamping buddy Christy. Today’s card is a Stampin’® Up! Peaceful Cabin Masculine Christmas card. Each day my blog will focus on a new holiday card. The challenge goes until December 10, 2021. I plan to showcase a different stamp set with each card. This will allow you plenty of time to see the great products that are available in the 2021 Stampin’ Up! July to December Mini Catalog, and to order in time to make your own Christmas cards! You can order HERE when you have your list ready!

The Peaceful Cabin Masculine Christmas Card is being submitted to the Cardz4Guyz Card Challenge #285 Shades of Brown. Stop by the Cardz4Guyz blog to get more ideas on cards for guys.

Measurements

Peaceful Cabin Masculine Christmas Card

  • Early Espresso Card Stock (CS) card base: 5 1/2 x 8 1/2 inches with a score line at 4 1/4 inches.
  • Early Espresso CS: 2 1/4 x 3 1/4 inches
  • Soft Suede CS: 4 x 5 1/4 inches and 2 1/4 x 3 1/4 inches
  • Very Vanilla CS: 4 x 5 1/4 inches (inside), 3 7/8 x 5 1/8 inches (front) and 2 1/4 x 3 1/4 inches. Note: the front is slightly smaller than the inside.
  • Early Espresso 1/4 inch Faux Suede Trim: 8 inches

How to Use the Blending Brushes

First place your 3 7/8 x 5 1/8 inch Very Vanilla CS card piece on a scrap of paper. Apply slight pressure as you move the brush in a circular motion on the Crumb Cake ink pad. Tap onto the scrap paper. Then apply light pressure and move in a circular motion along the edge of the card piece. Start light and go slow. You can go over the area until it is as dark as you desire.

I wanted the very edge to be a little darker than the border of the card piece. You can hold the card piece up and scrape the Blending Brush on the very edge to accomplish this look.

To finish up with the Blending Brushes, stamp the sentiment “May You Enjoy The Peace of this beautiful season” in Early Espresso ink onto the 2 1/4 x 3 1/4 inch Very Vanilla CS. Punch the sentiment out with the Elegant Tag Punch. Use the Blending Brush with the Crumb Cake ink to blend the ink around the edges of the Elegant Punch.

Stamping

Stamp the cabin in Soft Suede ink onto the 4 x 51/4 inch Very Vanilla CS that has been shaded with the Blending Brush. Use the Blender Pen to smooth out the color on the cabin.

The tree stamp in the Peaceful Cabin stamp set is a group of 3 trees on one stamp. I cut my trees apart so that I would have more flexibility in using the trees.

Masking

Stamp the cabin onto some sticky paper and fussy cut. Lay it over the cabin on the Very Vanilla CS. Using the Soft Suede Ink, stamp some trees around the cabin.

I used the single stamp of the tree to stamp a tree on the right side of the cabin.

Sometimes when you stamp over another piece of paper, the image doesn’t take near the edge of the paper. Use the Soft Suede Stampin’ Write Marker to make the tree image complete.

More Stamping

Stamp the small snowflakes in Crumb Cake ink around the cabin. In the Snowman Season stamp set, there is a group of snowflakes. I stamped these in Crumb Cake ink, Stamping Off once, around the border of the card piece.

Fill in with the small snowflakes as you desire.

Stamp the little dog (or fox) in Crumb Cake. Use the Blender Pen to smooth out the color.

The 4 x 5 1/4 inch Very Vanilla CS is the inside of the card. Use the Blending Brush and the Crumb Cake Ink to blend some shadow in the upper left and lower right-hand corner. Stamp some trees in Soft Suede Ink in the lower right-hand corner. Use the small snowflakes and Crumb Cake Ink in both corners. Stamp the “Merry Christmas” sentiment from the Snowman Season in Early Espresso Ink.

Assembling the Card

Punch an Elegant Tag from both the 2 1/4 x 3 1/4 inch Early Espresso and 2 1/4 x 3 1/4 inch Soft Suede CS. Cut the Early Espresso tag and the Soft Suede tag in half. Use the Soft Suede CS on the top of the back of the Very Vanilla CS tag. Adhere the bottom half of the Early Espresso tag to the bottom of the Very Vanilla CS tag.

Make a loop with the 1/4 inch Early Espresso Faux Suede Trim and adhere to the back to the back of the Elegant Tag with Mini Glue Dots.

Adhere the Very Vanilla CS with the “Merry Christmas” to the inside of the Early Espresso CS card base. For the card front, first adhere the cabin Very Vanilla CS to the 4 x 5 1/4 inch Soft Suede CS. Then adhere the cabin piece to the front of the card base. Use Stampin’ Dimensionals to adhere the Elegant Tag sentiment to the left side of the card front.

Voila! You have a masculine Christmas card for your favorite guy! Stop by the Cardz4Guyz to see more masculine cards.

Supplies

Product List

Have a wonderful weekend! We will be getting ready for Christmas. I have packages to get ready to mail. My husband just put all the lights on the house. Now for the tree and getting the Christmas cards ready to mail!

Enjoy the season!

Theresa

Posted in 2021 Stampin' Up! July-December Mini Catalog, Animals, Cat, Designer Series Paper, Fun/Fancy fold card, Winter Holiday

Stampin’ Up!® Sweet Little Stockings Pet Christmas Tree card

I am on Day 5 of the “12 Days of Christmas Card Making Challenge” with my stamping buddy Christy. Today’s card is a Stampin’® Up! Sweet Little Stockings Pet Christmas Tree card. Each day my blog will focus on a new holiday card. The challenge is until December 10, 2021. I plan to showcase a different stamp set with each card. This will allow you plenty of time to see the great products that are available in the 2021 Stampin’ Up! July to December Mini Catalog and to order in time to make your own Christmas cards! You can order HERE when you have your list ready!

I wanted to showcase the totally cute Sweet Stockings Designer Series Paper (DSP). My thought was to make a Christmas tree out of all the adorable pets. Here is what I came up with using a Fun Fold for Fun Fold Friday!

Measurements

Stampin’® Up! Sweet Little Stockings Pet Christmas Tree card

  • Evening Evergreen Card Stock (CS) card base: 4 1/4 x 11 inches.
  • Basic White CS: 4 x 5 1/4 inches and a scrap that is at least 1 inch wide.
  • Old Olive CS: 2 1/8 x 5 3/8 inches, 1 7/8 x 4 3/8 inches and two at 7/8 x 1 7/8 inches.

Cutting out the Pet Images

Here are all the awesome Sweet Stockings DSP designs. (Buy some HERE).

These are the adorable pets for the Stampin’ Up! Sweet Stockings Pet Christmas Tree card that I fussy cut from the Sweet Stockings DSP. The puppies, the kitten and the mouse in the stocking come from the design with all the little stockings.

Making the Fun Fold Card Base

I actually struggled with this one. I believe I finally came up with easy-to-follow instructions. If not, please leave me a comment with any suggestions you may have. Here is the template.

Scoring the Evening Evergreen CS card base. (Score=Dashed lines/ Cut=Solid line)

  1. Score at 4 1/2 inches from 2 inches to the top.
  2. Next score at 5 1/2 inches from 2 inches down to the bottom.
  3. Finish scoring at 9 inches and then 10 inches from 2 inches to the top.

Turn the card base and cut from 1 inch to 6 1/2 inches at 2 inches from the left side.

Fold as shown in the left-hand photo. Use your Bone Folder to make the folds nice and crisp.

Stamping

Before you stamp onto the 4 x 5 1/4 inch Basic White CS, remove a 1 x 2 inch piece from the upper right-hand corner. Use this piece to stamp the larger present in Memento ink. On the remainder of the 4 x 5 1/4 Basic White CS use Memento ink to stamp a cascade of the small presents. Stamp the sentiment “Santa Paws is Coming to Town” in the center. On the scrap of Basic White CS stamp the sentiment “Peace Joy & Kisses”. I had to stamp it twice to get a dark stamp.

Color the presents with the Cherry Cobbler and Old Olive Stampin’ Blends Alcohol Markers. Adhere the piece with the “Santa Paws” sentiment to the inside of the Evening Evergreen CS card base.

Creating the Card Front

Adhere the Old Olive CS card pieces as shown.

Building the Pet Christmas Tree

Start on the right by placing the dog with the wreath about 1/4 inch from the bottom. Adhere the little dog in the sweater so he looks as though he is standing on the black dog’s back. Add a second dog in the sweater to the panel behind.

Adhere the rest of the cute pets stacking the next one on the lower pet’s back. When the card is open it will look like the photo on the left. The right-hand photo shows the card folded up.

Build the left side starting with the Golden Retriever wrapped in Christmas lights. Add the cats and mice. Top it off with the cute little puppy. Add the Christmas ornaments. Now adhere the large colored present with a Stampin’ Dimensional to the bottom left-hand corner. Finish by adhering the sentiment to the large present.

Add some Wonderful Gems and Voila! you have an adorable Sweet Little Stockings Pet Christmas Tree card for your favorite pet-lover!

I am so glad you stopped by for the 5th day of my 12 Days of Christmas Card Making Challenge! I hope you will come by for tomorrow’s card! Leave me a comment as to what you think about my first 5 days of Christmas cards. Which is your favorite card?

Supplies

Click on any photo to go directly to my Online Store and start shopping!

Product List

Cheerio!

Theresa

Posted in 2021 Stampin' Up! July-December Mini Catalog, 2021-2022 Stampin' Up! Annual Catalog, Birds, Nature, Shaker Card, Stamparatus, Winter Holiday

Stampin’ Up!® Classic Cloche Dome Christmas Shaker Card

I am on Day 4 of the “12 Days of Christmas Card Making Challenge” with my stamping buddy Christy. Each day my blog will focus on a new holiday card. The challenge is until December 10, 2021. I plan to showcase a different stamp set with each card. This will allow you plenty of time to see the great products that are available in the 2021 Stampin’ Up! July to December Mini Catalog and to order in time to make your own Christmas cards! You can order HERE when you have your list ready!

Today’s card is the Stampin’ Up!® Classic Cloche Dome Christmas Shaker Card. The card shaker is made with the Cloche Dome and the Subtle Shimmer Sequins.

Measurements

Classic Cloche Dome Christmas Shaker Card

  • Real Red Card Stock (CS) card base: 5 1/2 x 8 1/2 inches with a score line at 4 1/4 inches
  • Basic White CS: 4 x 5 1/4 inches and 3 1/2 x 3 3/4 inches
  • Heartwarming Hugs Designer Series Paper (DSP): 4 x 5 1/4 inches
  • One Cloche Shaker Dome #156387 (Order HERE)
  • A more complete supply list is at the end of the blog

The Cloche Dome can be used with two different stamp sets- the Classic Cloche and the Sweets & Treats! Click on either one to go directly to my Online Store and start shopping.

Stamping

First use the Cloche Dies to cut out the space for the dome. Then use Real Red Ink to stamp the sentiment under the dome.

This little image of the birds in the dome is actually a 3-Step Stamp. First- stamp the outline of the birds and branches in Memento ink. Second- use the stamp with just the branches with Garden Green Ink. Third- use the stamp with the body of the birds and stamp in Real Red Ink. (I really struggled to get these to line up. I ended up using the Stamparatus because I could place the 2nd and 3rd stamps more accurately.) Alternatively, you could always color in the image using the Garden Green and Real Red Stampin’ Write Markers.

Stamp the 3-Step Stamp of the bird image on the lower right-hand corner of the 4 x 5 1/4 inch Basic White CS. Add the sentiment in Real Red Ink.

Assembling the Card

Adhere the stamped card piece to the inside of the Real Red CS card base.

Adhere the Heartwarming Hugs DSP to the card front. Then lay but DO NOT ADHERE both of the pieces with the dome. Adhere the dome piece with the birds stamped on it ONLY. Pull the sentiment piece away.

Adding the Dome and Sequins

I like to place a few of the Rhinestone Basic Jewels on the bird card piece. The sequins will fall to the bottom of the plastic dome when the card is upright. Having a few rhinestones allows the sparkle to stay. Now add about a teaspoon of the Subtle Shimmer Sequins onto the center of the bird card piece. (In hindsight, I could have added about 2x the amount of sequins that I did).

Peel the protective cover off of the inside of the Cloche Dome. Carefully place it over the bird card piece and press firmly to adhere.

Now peel the protective cover off of the front of the Cloche Dome. Apply adhesive to the back of the sentiment card piece. Carefully position this piece over the Cloche Dome. Press firmly to adhere.

Add a bow made from the Real Red Double Stitched Satin Ribbon. Voila! The card is finished. Shake it to see how fabulous this shaker card is!

I also have a blog about a Thanksgiving Shaker Card made with the Sweets & Treats stamp set. Check it out HERE.

I really hope you give shaker cards a try. It is such a fun alternative to the standard card!

Specials

If you are unable to read the list, I recommend looking at the photos of the products available when you click on the Last Chance pop up on my Online Store website HERE.

Supplies

Product List

Thanks for stopping by for the 4th day of my 12 Days of Christmas Card Making Challenge! I hope you will come by for tomorrow’s card!

Theresa

Posted in 2021 Stampin' Up! July-December Mini Catalog, 2021-2022 Stampin' Up! Annual Catalog, Emboss Powder, Ornaments, Techniques, Winter Holiday

Stampin’ Up!® Bright Baubles Gold Emboss Christmas Card

I am on Day 2 of the “12 Days of Christmas Card Making Challenge” with my stamping buddy Christy. I will be blogging a new holiday card each day until December 10, 2021. I plan to showcase a different stamp set with each card. This will allow you plenty of time to see the great products that are available in the 2021 Stampin’ Up! July to December Mini Catalog and to order in time to make your own Christmas cards!

This Stampin’ Up! Bright Baubles Gold Emboss Christmas Card is rather simple to make with the instructions that follow. The Bright Baubles stamp set is just fabulous! The ornaments are very ornate and elegant.

To be able to heat emboss you will need: Stampin’ Emboss Powder-Metallic, Versamark Ink and the Heat Tool which are found in the 2021-2022 Stampin’ Up! Annual Catalog. These supplies are pictured below with links to my Online Store.

Measurements

  • Very Vanilla Card Stock (CS): 5 1/4 x 4 inches
  • Blackberry Bliss CS card base: 11 x 4 1/4 inches with a score line at 5 1/2 inches.
  • Blackberry Bliss CS card front: 5 1/4 x 4 inches.

Stamping

Stamp the sentiment first with Blackberry Bliss ink. Be sure to try it out on a scrap piece of paper to check the alignment. Follow by stamping one of each of the gorgeous ornaments. Finish with the sparkles on either side of the sentiment. Set aside.

Embossing

It takes practice to be able to get great images with the Gold Emboss Powder on a dark card stock. I strongly recommend purchasing an Anti-Static Powder bag or pouch. This helps prevent the emboss powder from sticking to other parts of the card piece, like to the oils from fingerprints. There are many anti-static pouches available from different suppliers. Also have a microfiber cloth on hand to get the powder off after embossing.

Start the embossing process by applying the anti-static powder to the 5 1/4 x 4 inch Blackberry Bliss CS. Next stamp the image of the larger ornament in Versamark. Tap out some of the Gold Emboss Powder and move it around so it sticks to the Versamark. Take care not to touch it. Use the Heat Tool until all of the powder has melted. Follow by stamping the second ornament, applying the Gold Emboss Powder and using the Heat Tool. Repeat the process for the “JOY” sentiment.

Again repeat the embossing process for the sparkles. See how hazy the card piece looks? After the Gold Emboss Powder has cooled, use a microfiber cloth to gently rub off the anti-static powder.

Adhere the Gold Embossed Blackberry Bliss CS to the front of the Blackberry Bliss card base. Adhere the stamped Very Vanilla CS card piece to the inside of the card base.

Add some Gilded Gems and Voila! you have a gorgeous elegant handmade Christmas card!

I hope you enjoy trying this card for yourself. I actually ended up making several. The other emboss powders in the Metallics set are silver and copper. Try them out on different colors of card stock to see how fabulous they are!

The complete list of supplies will be at the end of the blog.

Retiring Products from the July – December Mini Catalog

You may download the list to look over and make your shopping list.

Supplies

Product List

Thank you very much for stopping by to see my 2nd day of the 12 Day Christmas Card Challenge! See you tomorrow for day 3!

Theresa

Posted in 2021-2022 Stampin' Up! Annual Catalog, Clean and Simple, Gnomes, Winter Holiday

Stampin’ Up!® Punch Art Gnome Using the Ice Cream Cone Builder Punch and Stitched Triangle Dies

Greetings! I hope you are enjoying a wonderful day. I have a little Stampin’ Up! Punch Art Gnome to brighten your day if you need it! This card is for The Paper Players Challenge PP 568 CAS(Clean and Simple) Gnomes or Fairies.

My Gnome Punch Art Card

I did not have any stamps with gnomes or fairies. I decided to try to make a gnome with Punch Art. Punch Art used to be the art of making images using the Stampin’ Up! punches. However, right now there are not many punches in basic shapes like circles, squares and triangles. But there are many shapes in the Stampin’ Up! Dies that can be used!

The face and the boots are made from the Ice Cream Cone Builder Punch. The black lines are where I cut the punch. The little pompom for the gnome hat is from the Pierced Blooms Dies. The remaining pieces are different sizes of triangles from the Stitched Triangle Dies. The face is Blushing Bride Card Stock (CS). For the hat I used the Tidings of Christmas 6 x 6 Designer Series Paper (DSP). The boots are made with Early Espresso CS and the body is made with Soft Succulent CS. The beard and the pompom are in Basic White CS.

Assembly

First place the triangle for the body on the card front to be able to position the boots. After adhering the boots, use Stampin’ Dimensionals to adhere the body. Trim off the very tip of the triangle for the body.

Slide the white beard triangle under the “nose”. Then adhere the hat. Position the Stampin’ Dimensionals as shown.

Adhere the face with the beard and hat over the body. Stamp your greeting. I used the greeting from the Joyful Life stamp. The greeting is stamped in Soft Succulent ink.

Adhere the card front to a 5 1/4 x 4 inch piece of the Christmas Tidings DSP. Finish the card by adhering this piece to the front of an 11 x 4 1/4 inch Basic White CS card base.

Voila! A cute gnome is created for a whimsical holiday card! Stop by The Paper Players Challenge PP568 to see more cards made in the “Clean and Simple” style with gnomes or fairies.

I hope this card has brightened your day a little if you needed it. Stop by tomorrow for a 3D Thanksgiving shaker card made with the Stampin’ Up! Cloche Shaker Dome!

Remember that if you wish to subscribe to my newsletter, you can do so by scrolling down the side bar until you get to the “Subscribe to My Newsletter” form. I sent my very first Theresa’s Treasures Paper Crafts Newsletter out this past Monday. Constructive feedback on how to make my newsletter better for you is welcome.

Supplies to make this card

Click on any photo to go to my Online Store.

Product List

I hope you have a great day!

Theresa

Posted in 2021 Stampin' Up! July-December Mini Catalog, 2021-2022 Stampin' Up! Annual Catalog, Slim Line Cards, Snow, Snowflakes

Stampin’ Up!® Wonderful Snowflakes Season’s Greetings

Although I am not quite ready for Christmas cards, I couldn’t resist using the Wonderful Snowflakes as part of my card for The Paper Players Color Challenge PP567.

Here is my card:

This is a Slim Line card. The card base measures 8 1/2 x 7 inches with a score line at 3 1/2 inches. The scalloped rectangle in the background is not a Stampin’ Up! product, but I hear tell that there are some Slim Line Dies in the upcoming Stampin’ Up! 2022 Jan-June Mini Catalog!

The Wonderful Snowflakes are iridescent! The greeting from the Christmas To Remember stamp set is embossed with Silver Emboss Powder. The embossed snowflakes behind the sentiment are from the Time of Giving stamp set. The ribbon is the White 1/4 inch Crinkled Seam Binding in the Stampin’ Up! 2021-22 Annual Catalog.

I added a lot of Bling! using the Rhinestone Basic Jewels. There are 16 rhinestones on this card!

I love to enter The Paper Player Challenges because I need to push myself to imagine and think outside of my usual modus operandi. I find that I create cards in a new and exciting way.

Voila! That is it for today! Thanks for stopping by. Stop by The Paper Players and see the other entries to the Color Challenge PP567 HERE

Have a most wonderful day!

Theresa

Posted in 2021 Stampin' Up! July-December Mini Catalog, 3D Embossing Folder, Birds, Grunge style, Nature

The Paper Players Color Challenge PP553

Today’s blog is a card I created for The Paper Players Color Challenge PP553 using Real Red, Old Olive and Daffodil Delight. All very festive Holiday colors in my mind!

I choose to use the Happy Holly-Days stamp set from the 2021 Stampin’ Up! Mini Catalog which is currently available for you to order from. You may order from my Online Store here.

The background of the Very Vanilla Card Stock (CS) is embossed with the Timeworn 3D Embossing Folder. The background right behind the bird is stamped with the Gorgeous Leaves stamp set onto a Very Vanilla CS oval. The oval dies are from my stash. I distressed the edges of the Old Olive CS oval.

I used the Stampin’ Blends Alcohol Markers combined with the Stampin’ Write Watercolor Markers to color the images. The bird is colored in Real Red as are the berries for the holly. The yellow is Daffodil Delight and the green is Old Olive.

I hope you stop by The Paper Players to see all of the entries for this color challenge PP553. I really enjoyed the challenge!

Product List

Theresa

Posted in 2020 August-December Mini Catalog, Uncategorized, Winter Holiday

Stampin’ Up!® Merry Moose Christmas Cards

Wow! Christmas is almost here! It seems I have been making Christmas cards forever! Today’s Stampin’ Up!® Merry Moose Christmas Cards are very special because they are for my customers. I love my customers! They are the life of my business. With this in mind, the Stampin’ Up!® Statement of the Heart is really true for me “To love what we do and share what we love as we help others enjoy creativity and worthwhile accomplishments, in this we make a difference.”

The Merry Moose stamp set and Moose Punch are just so fun! And the “Merry Christmoose” sentiment adds a little humor. The background for the card is from the Feels Like Frost Designer Series Paper (DSP). So, let’s get started!

Supplies

Measurements: Whisper White Card Stock (CS) card base: 5 1/2 x 8 /12 inches with a score line at 4 1/4 inches; Pretty Peacock CS: 5 1/8 x 3 7/8 inches and 7/8 x 3 7/8 inches; Feels Like Frost DSP: 3 3/4 x 5 inches; Whisper White CS: 3/4 x 3 7/8 inches; Soft Suede CS: 3 x 4 inches and Cherry Cobbler CS: 1 1/2 x 2 inches. Alternatively, on some cards I used Balmy Blue, Night of Navy, Highland Heather and Shaded Spruce in place of the Pretty Peacock.

Stamping

Starting with the Soft Suede ink, stamp the inside of the Whisper White CS card base with the little racoon and then with the sentiment “enjoy the stillness of the season”. Similarly, stamp the moose onto the Soft Suede CS on one side. Note: Remember to use a catalog, magazine, or the Stampin’ Pierce Mat to get a great image with the Photopolymer Stamps.

Switching to the Cherry Cobbler ink, stamp the sentiment “Merry Chrismoose” onto the right hand side of the 3/4 x 3 7/8 inch Whisper White CS. Continuing with the Cherry Cobbler ink stamp the scarf onto the Cherry Cobbler CS.

Putting it all Together

Fussy cut the scarf and then use the Moose Punch to punch out the moose. Next use adhesive to adhere the scarf to the moose, and the sentiment strip to the 7/8 x 3 7/8 inch Pretty Peacock CS.

Apply adhesive to the Feels Like Frost DSP and then adhere it to the Pretty Peacock CS. Next adhere the card piece to the front of the Whisper White CS card base. To top it off add the sentiment strip.

Complete the card by using Stampin’ Dimensionals to adhere the moose to the card front on the sentiment strip.

Viola! You have made a fun Christmas card! I am trying to send one to every customer. If I perchance miss you, please leave me a comment or PM me on my Facebook page HERE.

Over the first 15 days of December I made 15 Christmas cards for you to see on my Home page HERE.

Thank you all for joining me today for this jolly Christmas card. I hope you all have a very safe and joyous Holiday Season!

Purchasing Supplies

Click on any photo below to go to my Online Store and start shopping for next year.

Product List

Happy Holidays and Happy Crafting!

Theresa

Posted in 2020 August-December Mini Catalog, Designer Series Paper, Fun/Fancy fold card, Mini Catalog 2020, Winter Holiday

Snowflake Wishes Fun Fold Christmas Card Stampin’ Up!®

Wow! I can’t believe how fast the time is going! 11 days until Christmas! I still need to get my cards out. I have them all made, the letter is written, I just need to put the letter and card in an envelope and address them. That is my goal for today.

This is an easy Fun Fold using the Snowflake Wishes stamp set and Snowflake Splendor Designer Series Paper. You can put this card together quickly and have a festive winter card ready to send out in no time.

This lovely wintery card is great for showcasing your Designer Series Paper. I know I have quite a stash. Pick out 3 different designs of the Snowflake Splendor DSP.

Measurements: Pool Party Card Stock (CS) card base: 5 1/2 x 11 inches with score lines at 1 3/8 inch, 4 1/8 inches and 6 7/8 inches; Pool Party CS belly band: 1 1/4 x 10 inches scored at 3 1/2 inches and 7 5/8 inches; Snowflake Splendor DSP: two at 1 1/8 x 5 1/4 inches, 2 1/2 x 5 1/4 inches and 3 7/8 x 5 1/4 inches; and Whisper White CS: 2 1/2 x 4 inches, 2 1/2 x 5 1/4 inches and 3/4 x 4 inches. You will also need 10 inches of the 1/4 inch Snowflake Splendor Ribbon to adhere to the belly band, and you will need a bow.

With Bermuda Bay ink stamp the sentiment “May Your Season Sparkle” onto the 2 1/2 x 5 1/4 inch Whisper White CS. Use Pool Party ink to stamp the group of small snowflakes on the corners. Note: Remember to use the Stampin’ Pierce Mat or a catalog to stamp on with the Photopolymer Stamps to be sure to get the best images.

Use the Bermuda Bay ink to stamp the sentiment “Snowflake Wishes For a Merry Christmas” onto the 3/4 x 4 inch strip of Whisper White CS. Use Pool Party ink to stamp a snowflake onto the 2 1/2 x 4 inch Whisper White CS. Use the 2 1/4 inch Circle Punch to punch out the snowflake. Set aside.

Fold the Pool Party CS card base as shown. Use your Bone Folder to make all of the folds nice and crisp. Lay the card flat on the table.

Adhere one of the 1 1/8 x 5 1/4 inch pieces of the Snowflake Splendor DSP on the front flap.

Open the card and lay flat on the table. Adhere the other 1 1/8 x 5 1/4 inch piece of Snowflake Splendor DSP to the other side of the front flap. Next adhere the 2 1/2 x 5 1/4 inch Snowflake Splendor DSP and then the 2 1/2 x 5 1/4 inch Whisper White CS with the sentiment stamped on it.

Finish with the 3 7/8 x 5 1/4 inch Snowflake Splendor DSP on the last panel.

Fold the card up again and wrap the 1 1/4 x 10 inch Pool Party CS around the card snuggly. This is the belly band. You want it to slide off easily but not fall off. Adhere the end in front.

Cut a banner end on both ends of the sentiment and adhere to the lower portion of the belly band.

Wrap the 10-inch piece of the Snowflake Splendor Ribbon around the belly band and glue in place with the ends meeting in front. Adhere the snowflake with Stampin’ Dimensionals. Adhere the Snowflake Splendor Ribbon bow with glue dots.

There are a lot of Bling! possibilities for this card to make it sparkle. I used both the Holiday Rhinestone Basic Jewels and the Snowflake Adhesive-Backed Embellishments.

I placed the light blue Holiday Rhinestone Basic Jewels in the center of and around the large snowflake, then added the Snowflake Embellishments to the background.

Viola! You have a beautiful Fun Fold for sending Christmas Wishes!

I really appreciate you stopping by today. I hope you try this fun card. Best of luck with all your Christmas cards if you haven’t gotten them out yet.

Product List

Have a wonderful week and stay crafty!

Theresa