Posted in 2024-2026 Stampin' Up! Annual Catalog, Animals, Birds, Guys cards, Inspiration in Ink Blog Hop, Nature, Online Exclusives, Stampin" Blends Alcohol Markers, Summer

Garden Meadow Bundle for the Inspirations in Ink August 2024 Blog Hop

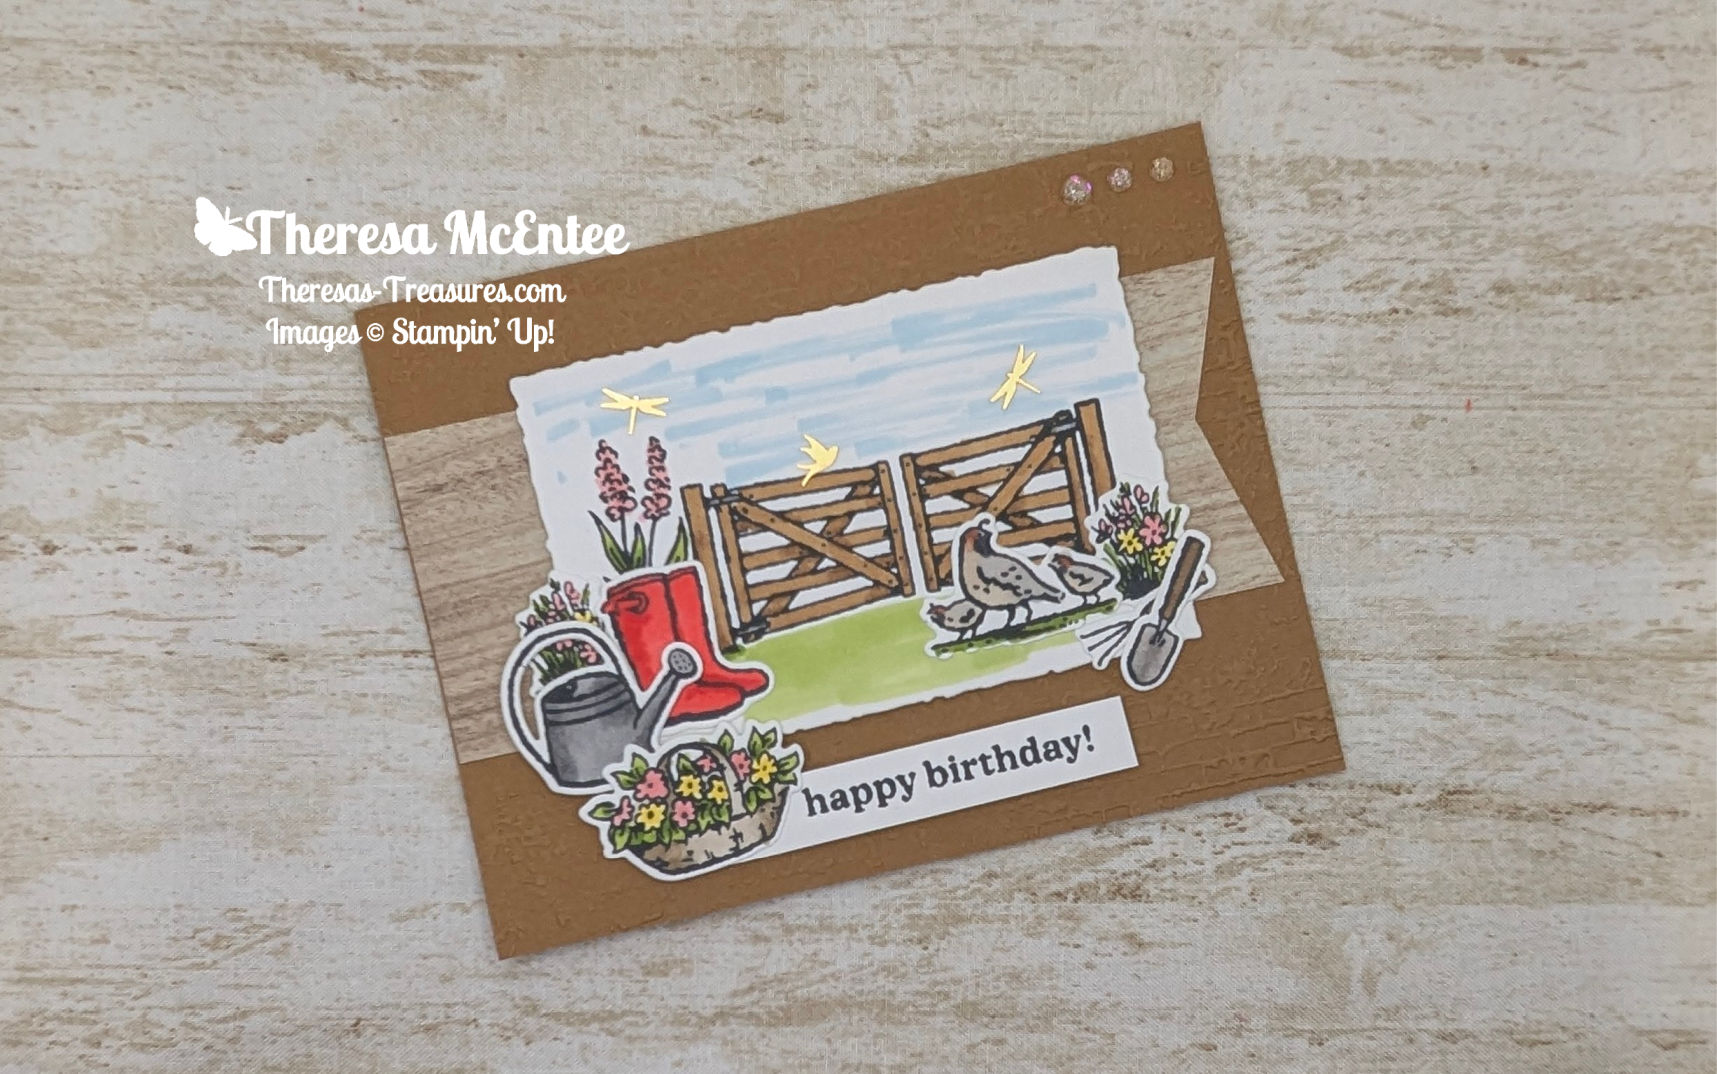
Welcome! Thank you for visiting Theresa’s Treasures Paper Crafts! I am Theresa, a Stampin’ Up! Demonstrator in Arizona, USA. Today is the monthly Inspirations in Ink Blog Hop! I am excited to be hopping with such talented demonstrators today. Today is a Sketch Challenge! Be sure to check out everyone’s projects. For my project, I used the Online Exclusive Garden Meadow Bundle. When you are ready, you may order from my Online Store HERE.

I chose the Garden Meadow Bundle because I love gardening! Flowers are my favorite! I love to play in the dirt! Somehow that is very grounding.

And living in the desert, I am able to see a lot of wildlife. There are two varieties of quail visiting my garden daily.

Measurements

  • Pecan Pie cardstock card base: 5 1/2″ x 8 1/2″ scored at 4 1/4″
  • Basic White cardstock: 3″ x 4 1/2″ to die cut the Deckled Rectangle and 1/2″ x 2 3/4″ for the sentiment. 3 3/4″ x 5″ for the inside. You will need scrap to stamp all of the images on.
  • Country Woods Designer Series Paper (DSP): light wood grain pattern: 2 1/4″ x 5 1/2″ and a 1/4″ x 5 1/4″ strip for the inside

Supplies

  • Stamp Set: Garden Meadow
  • Dies: Garden Meadow and Deckled Rectangle
  • Embossing Folder: Exposed Brick 3D
  • Ink: Memento Tuxedo Black Ink Pad; Stampin’ Blends Alcohol Markers: Lemon Lolly, Pretty in Pink, Granny Apple Green, Balmy Blue, Smoky Slate, Copper Clay, Pecan Pie, Poppy Parade and Crumb Cake.
  • Embellishments: Adhesive-Backed Dragonflies & Birds, and Iridescent Foil Gems

Instructions

  1. Die cut the Deckled Rectangle from the Basic White cardstock.
  2. Use Memento Ink to stamp the gate onto the Deckled Rectangle. Stamp the taller flowers on the left.
  3. Stamp the remaining images on your scrap Basic White cardstock.
  4. Color the images as desired with the Stampin’ Blends Alcohol Markers. Have some fun with shading using the darker shade.
  5. Use the Granny Apple Green Stampin’ Blend for the grass. The sky is done in the Balmy Blue Stampin’ Blend.
  6. Die cut all of the images.
  7. Emboss the front panel of the Pecan Pie cardstock card base.
  8. Cut a banner edge on one end of the light colored wood panel. Adhere this to the front of the card base.
  9. Use Stampin’ Dimensionals to adhere the Deckled Rectangle.
  10. Arrange the remaining images as desired and adhere to the card front.
  11. Stamp & then adhere the sentiment to the front of the card with Stampin’ Dimensionals. Add the basket of flowers.
  12. Adhere the Basic White cardstock inside panel to the inside of the Pecan Pie cardstock card base. Add the strip of the lightly colored wood.

Voila!

Thank you so much for visiting today! I hope you enjoyed my project. You will be inspired when you visit all the blogs in the Inspirations In Ink Blog Hop!

You are currently visiting Theresa McEntee-USA creator of Theresa’s Treasures Paper Crafts.

Blog Roll Call

Clickable Supply List

Product List
Garden Meadow Bundle (English)
$54.00
Deckled Rectangles Dies
$30.00
Exposed Brick 3 D Embossing Folder
$11.00
Tuxedo Black Memento Ink Pad
$8.00
Tuxedo Black Memento Ink Refill
$6.50
Lemon Lolly Stampin’ Blends Combo Pack
$11.00
Pretty In Pink Stampin’ Blends Combo Pack
$11.00
Granny Apple Green Stampin' Blends Combo Pack
$11.00
Balmy Blue Stampin' Blends Combo Pack
$11.00
Smoky Slate Stampin' Blends Combo Pack
$11.00
Copper Clay Stampin’ Blends Combo Pack
$11.00
Crumb Cake Stampin' Blends Combo Pack
$11.00
Poppy Parade Stampin' Blends Combo Pack
$11.00
Basic White 8 1/2" X 11" Cardstock
$13.00
Pecan Pie 8 1/2" X 11" Cardstock
$11.50
Country Woods 12" X 12" (30.5 X 30.5 Cm) Designer Series Paper
$12.50
Iridescent Foil Gems
$8.00
Adhesive Backed Dragonflies & Birds
$8.50

Monthly Paper Pumpkin Subscription

Thinking of adding creativity to your life this year? Start out by trying a monthly paper crafting kit! The Paper Pumpkin Monthly Subscription delivers a kit with everything you need to make a project-right to your door! Sign up for a Pre-paid Paper Pumpkin Subscription HERE.

Have a most wonderful and creative day!

Ciao!

Theresa

Posted in 2023-2024 Stampin' Up! Annual Catalog, 3D Embossing Folder, Gratitude/ Thanks, Nature, Outdoors, Stampin" Blends Alcohol Markers

Kylie’s International Blog Highlights Gallery-June 2023: Night of Flight Thank You Card

Hello, thank you for visiting Theresa’s Treasures! I am Theresa, an Independent Stampin’ Up! Demonstrator in Arizona, USA. I am extremely excited to be participating in Kylie Bertucci’s International Blog Highlight Gallery with my Night of Flight Thank You card! Today I am hopping along with Stampin’ Up! demonstrators from around the world! Please be sure to see all of the creative inspiration by visiting everyone’s blog. You can view the Gallery by clicking on the Vote Button below.

The theme for this Gallery is “Thank You“.

We often forget those simple words “Thank you”. However, it is so very important to show appreciation to the people in your life who have helped you, supported you or inspired you. One way to express gratitude is to send a handmade thank you card. Discover the joy in making and sending a handmade card!

This Night of Flight Thank You Card showcases the Host Set, Night of Flight, available for purchase at a discount when you have a qualifying order in my Online Store HERE.

Current Host Code: S7F7S9EK

Measurements

  • Mossy Meadow cardstock card base: 5 1/2″ x 8 1/2″
  • Mossy Meadow cardstock: 3″ x 4″ for diecutting the leaves
  • Copper Clay cardstock: 4″ x 5 1/4″
  • Very Vanilla cardstock: 4″x 5 1/4″
  • Basic White cardstock: 2 1/2″ x 5″ for stamping the moth
  • Crumb Cake cardstock: 1 3/4″ x 2″ for the sign

Supplies

  • Night of Flight stamp set
  • Timeless Arrangements stamp set (for the sentiment)
  • Exposed Brick 3D Embossing Folder
  • Timber 3D Embossing Folder
  • Cheerful Daisies Dies
  • Ink: Memento, Azure Afternoon and Copper Clay
  • Basic Black Stampin’ Write Marker
  • Stampin’ Blends Alcohol Markers: Copper Clay, Azure Afternoon, Basic Black and the lighter of the Medium Deep Natural Tones (SU800)
  • Paper Snips
  • Wink of Stella
  • Stampin’ Dimensionals
  • Stampin’ Cut & Emboss Machine

I was interested in a blue moth and found several awesome photos on Google. I combined elements of the 2 moths above to create the moth on the Night of Flight Thank You card.

Instructions

  • Stamp the large moth in Memento Ink onto the Basic White cardstock.
  • Stamp the inside of the wings in Azure Afternoon ink.
  • Use the Basic Black Stampin’ Write Marker to draw the “eyes” on the wings.
  • Use the Stampin’ Blends to color the wings.
  • Fussy cut the moth with the Paper Snips. Use the bone folder to slightly curve the wings and set aside.
  • Use the Exposed Brick 3D Embossing Folder to emboss the Copper Clay cardstock.
  • Lightly drag the Copper Clay Ink Pad over the embossed Copper Clay cardstock with the raised side up. This adds dimension to the brick wall.
  • Cut the Crumb Cake cardstock into 3/4″ x 2″ and 1″ x 2″ strips.
  • Use the Copper Clay Ink to stamp the sentiment “thanks” onto the 3/4″ x 2″ strip.
  • Place the 3 Crumb Cake cardstock strips in the Timber 3D Embossing Folder and run through the Stampin’ Cut & Emboss Machine.
  • Cut the 1″ x 2″ embossed Crumb Cake cardstock strip into a
    1″ x 1 1/2″ piece. Then cut in half so you get two 1/2″ x 1 1/2″ pieces to use for the posts of the sign.
  • Die cut 3 leaves with the Cheerful Daisies Dies from the 3″ x 4″ Mossy Meadow cardstock.
  • Adhere the Very Vanilla cardstock to the inside of the Mossy Meadow card base.
  • Now adhere the embossed Copper Clay cardstock to the front of the card base.
  • Use Stampin’ Dimensionals to adhere the moth.
  • Glue the sign posts to the Thanks sign and adhere to the card front.
  • Add the Mossy Meadow cardstock diecut leaves.

  • For some extra sparkle, brush on the Wink of Stella to the moth’s wings.

Voila!

I hope you enjoyed my card today using the Night of Flight Host Set.

Visit my Online Store to order what you need to make this card for yourself. Photographic supply list is at the end of this blog.

Current Host Code: S7F7S9EK

You are currently at Theresa McEntee-Theresa’s Treasures-USA. When you click on the Vote For Me button above you will see the gallery of creative inspiration from Demonstrators around the world! Remember to visit everyone’s blog by clicking on the photo of their card in the Gallery.

To vote for your favorite cards, click on the small heart in the upper right-hand corner of each photo. You have 5 votes! Enjoy and come visit Theresa’s Treasures again soon!

Clickable Supply List

Product List
Paper Snips
[103579]
$11.00

Thanks again for stopping by! Have a most wonderful and crafty day!

Theresa

Promotions

Designer Series Paper Sale June 1 to June 30, 2023!

Shop HERE now!

Joining Special to Join my Stamping Gems Team!!

It’s a fabulous time to join Stampin’ Up! New team members will get even more FREE products in their customizable Starter Kit. Between 1–30 June, those who sign up can get $125 USD | $165 CAD $155 USD | $206 CAD worth of products for only $99 USD | $135 CAD + free business supplies + free shipping + all the fun being a part of Stampin’ Up!

Join my Stamping Gems Team HERE!

New Online Exclusives!

Being a Stampin’ Up! demonstrator means enjoying fun perks like preordering products before they’re available to customers! For Online Exclusives, a demonstrator can preorder any product listed on the Online Exclusives flyer! A larger selection of new, exclusive products will be available to demonstrators and customers during the customer sales period.

Demonstrator Preorder: 1 June–5 July 2023

Customer Sales Period Begins: 6 July 2023

Subscribe to the most wonderful monthly paper craft kit HERE! You will receive a complete kit for the project each month. Each kit includes a mini ink pad! Collect all the Stampin’ Up! ink colors! Sign up before June 10, 2023 to receive the Welcome Inn kit!