Posted in 2024-2026 Stampin' Up! Annual Catalog, Animals, Inspiration in Ink Blog Hop, Nature, Stampin" Blends Alcohol Markers, Winter Holiday

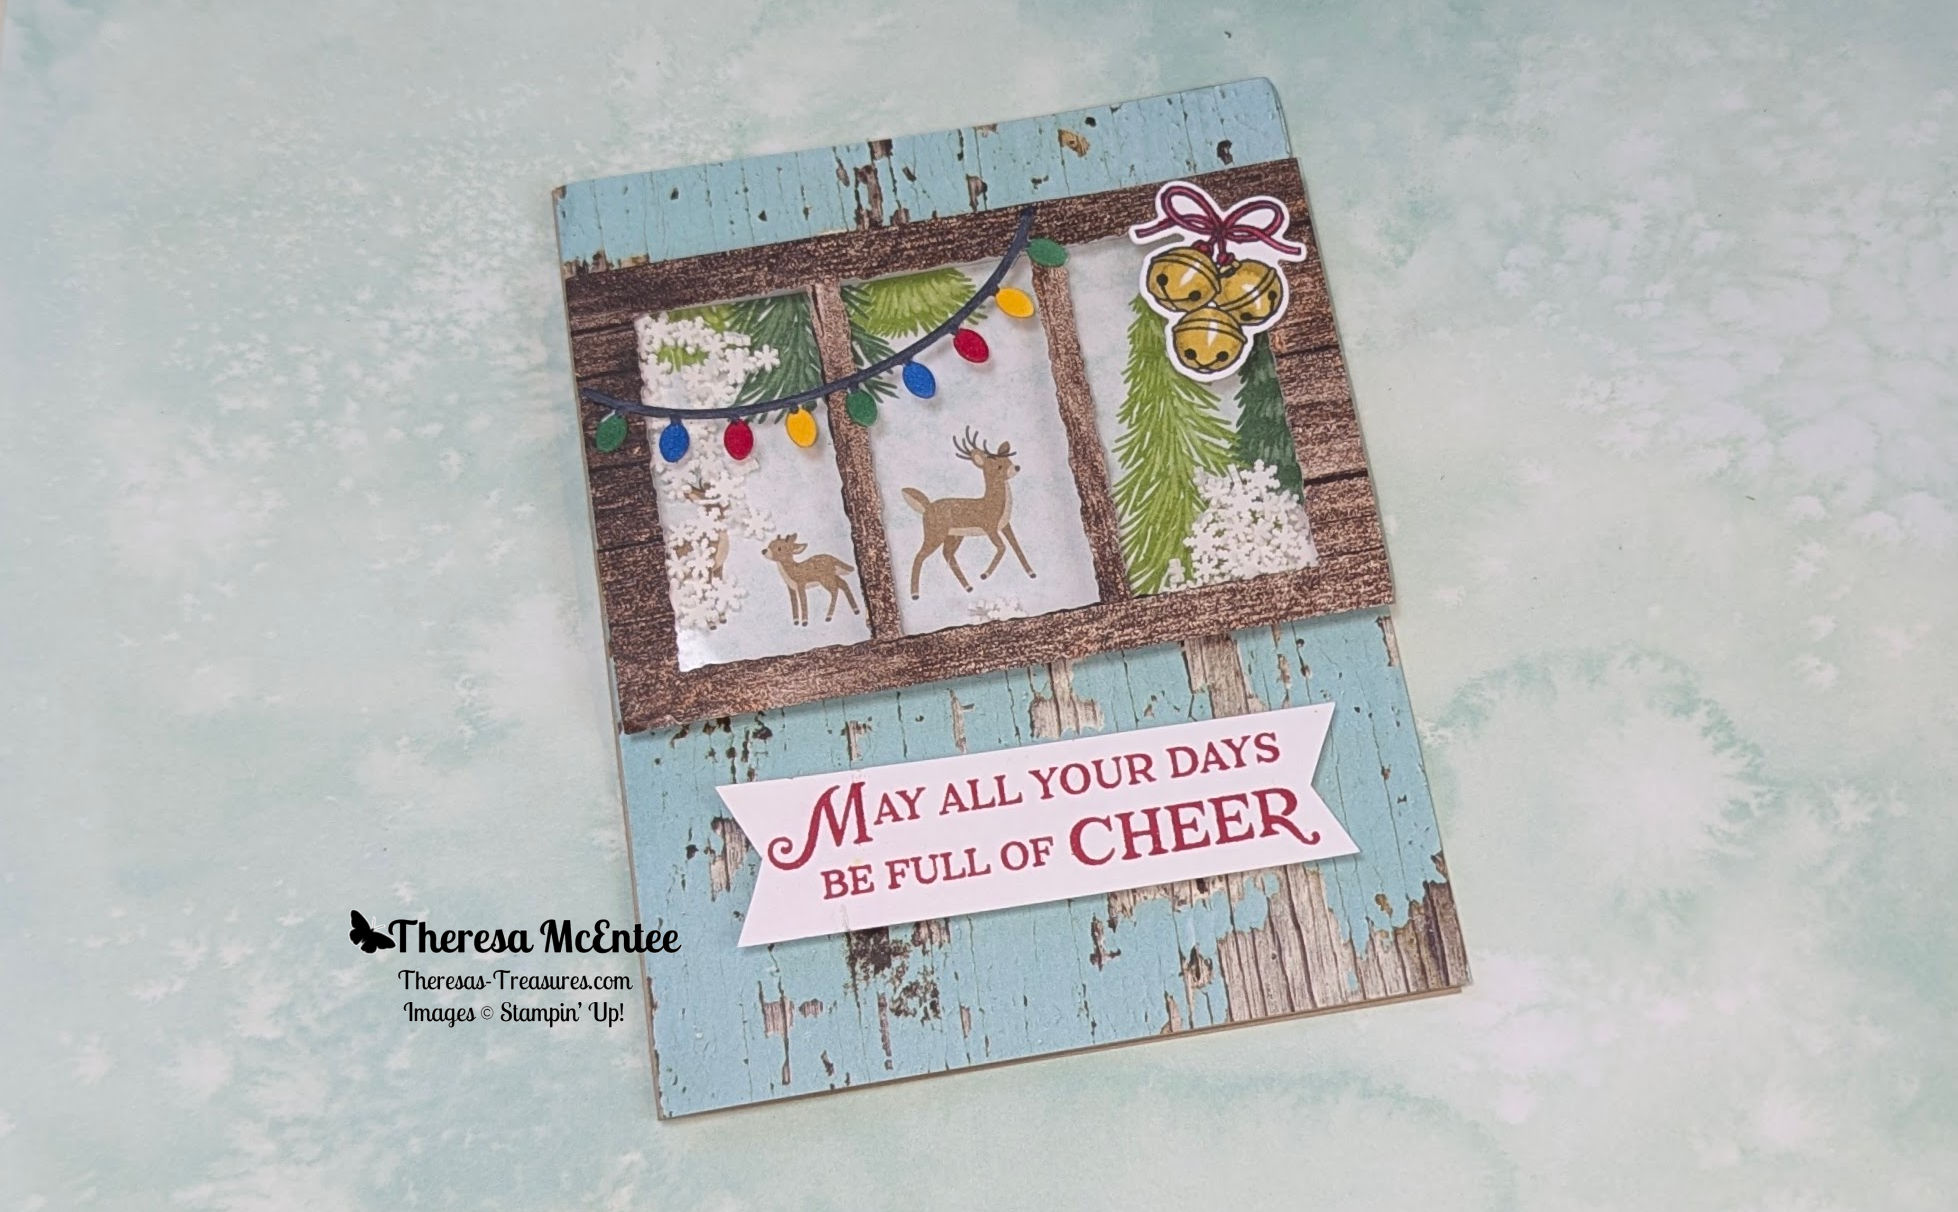
Reindeer Fun Bundle for the Inspirations in Ink October 2024 Blog Hop

replace with photo of card standing straight

Welcome! Thank you for visiting Theresa’s Treasures Paper Crafts! I am Theresa, a Stampin’ Up! Demonstrator in Arizona, USA. Today is the monthly Inspirations in Ink Blog Hop! I am excited to be hopping with such talented demonstrators today!

Today is a Sketch Challenge! Be sure to check out everyone’s projects. For my project, I used the Reindeer Fun Bundle from the 2024 Holiday Mini Catalog. When you are ready, you may order from my Online Store HERE.

I chose the Reindeer Fun Bundle. When I thought about the sketch I saw it as a window. Then, I was looking through the Reindeer Days Designer Series Paper and saw the scene with the deer! Perfect!

Measurements

  • Crumb Cake cardstock card base: 5 1/2″ x 8 1/2″ scored at 4 1/4″
  • Basic White cardstock: 3 3/4″ x 5″, 7/8″ x 3 1/2″ and scrap to die cut the string of lights and stamp the bells.
  • Reindeer Days Designer Series Paper (DSP): 2 5/8″ x 4 1/8″ (reindeer scene)
  • Window Sheet: 2 1/2″ x 4″
  • Country Woods DSP: 4 1/4″ x 5 1/2″ (turquoise wood) and 3 1/2″ x 4 3/4″ (brown wood)

Supplies

  • Stamp Set: Reindeer Fun
  • Dies: Reindeer Fun and Deckled Rectangle
  • Ink: Memento Tuxedo Black Ink Pad and Real Red Ink Pad
  • Stampin’ Blends Alcohol Markers: Wild Wheat, Blueberry Bushel, Shaded Spruce, Daffodil Delight, Basic Black and Real Red
  • Embellishment: White Loose Snowflakes
  • Adhesive Strips

Instructions

  1. Use the Memento Ink and stamp the jingle bells onto the scrap of Basic White cardstock. Color as desired witht the Stampin’ Blends Alcohol Markers.
  2. Die cut the string of lights from the scrap of Basic White cardstock. Color as desired.
  3. Stamp the sentiment for the card front in Real Red onto the 7/8″ x 3 1/2″ Basic White cardstock. Trim the ends to be banners.
  4. Use the Deckled Rectangle Die to cut the center from the brown wood design from then Country Woods DSP. Use the edge of the die to make the two planks for the inside of the window.
  5. Adhere the Window Sheet to the back of the brown wood window.
  6. Use the Real Red Ink to stamp the inside sentiment onto the 3 3/4″ x 5″ Basic White cardstock. Adhere this to the inside of the Crumb Cake cardstock card base.
  1. Adhere the turquoise wood to cover the front of the Crumb Cake cardstock card base.
  2. Adhere the reindeer scene.
  3. Apply the Adhesive Strips to surround the back of the window.
  4. Pour some of the Loose Snowflakes over the center of the reindeer scene. Carefully place the window over the reindeer scene and Loose Snowflakes. Press firmly.
  5. Use Stampin’ Dimensionals to adhere the sentiment.
  6. Use Multipurpose Liquid Glue to adhere the string of lights and jingle bells.

Voila!

Thank you so much for visiting today! I hope you enjoyed my project. You will be inspired when you visit all the blogs in the Inspirations In Ink Blog Hop!

You are currently visiting Theresa McEntee-USA creator of Theresa’s Treasures Paper Crafts.

Blog Roll Call

Clickable Supply List

Product List
Reindeer Fun Bundle (English)
$54.00
Deckled Rectangles Dies
$30.00
Tuxedo Black Memento Ink Pad
$8.00
Real Red Classic Stampin' Pad
$9.00
Real Red Stampin' Blends Combo Pack
$11.00
Wild Wheat Stampin’ Blends Combo Pack
$11.00
Basic Black Stampin' Blends Combo Pack
$11.00
Shaded Spruce Stampin' Blends Combo Pack
$11.00
Daffodil Delight Stampin' Blends Combo Pack
$11.00
Blueberry Bushel Stampin’ Blends Combo Pack
$11.00
Crumb Cake 8-1/2" X 11" Cardstock
$11.50
Basic White 8 1/2" X 11" Cardstock
$13.00
Reindeer Days 12" X 12" (30.5 X 30.5 Cm) Designer Series Paper
$12.50
Country Woods 12" X 12" (30.5 X 30.5 Cm) Designer Series Paper
$12.50
Foam Adhesive Strips
$8.25
Stampin' Dimensionals
$4.25
Multipurpose Liquid Glue
$6.00
White Loose Snowflakes
$8.00

Have a most wonderful and creative day!

Ciao!

Theresa

Posted in 2024-2026 Stampin' Up! Annual Catalog, Inspiration, Inspiration in Ink Blog Hop, Nature, Online Exclusives, Outdoors

Scenic Pumpkin Patch for the Inspirations in Ink September 2024 Blog Hop

Today’s card is created for the Inspirations in Ink September sketch Challenge. I just love autumn!

Welcome! Thank you for visiting Theresa’s Treasures Paper Crafts! I am Theresa, a Stampin’ Up! Demonstrator in Arizona, USA. Today is the monthly Inspirations in Ink Blog Hop! I am excited to be hopping with such talented demonstrators today. Today is another fun Sketch Challenge! Be sure to check out everyone’s projects. For my project, I used the Online Exclusive Scenic Pumpkin Patch stamp set. When you are ready, you may order from my Online Store HERE.

I chose the Scenic Pumpkin Patch because I love all of the lovely fall images! Creating an autumn scene is very easy and fun!

Scenic Pumpkin Patch stamp set #164364

I don’t get to see the same degree of fall colors here in the Southwestern United States. I have visited areas with a much more vivid color change and loved it!

Measurements

  • Crumb Cake cardstock card base: 4 1/4″ x 11″ scored at 5 1/2″
  • Crumb Cake cardstock: 2 1/2″ x 4″ to die cut the Deckled Rectangle (embossed with the Timber 3D Embossing Folder)
  • Peach Pie cardstock: 4 1/4″ x 5 1/2″ to die cut the Deckled Rectangle and 3″ x 3″ to die cut the Deckled Circle.
  • Very Vanilla cardstock: two at 3 3/4″ x 5 1/4″ to die cut the Deckled Rectangles for the front and the inside and 2 1/2″ x 2 1/2″ to die cut the Deckled Circle for the sentiment.

Supplies

  • Stamp Set: Scenic Pumpkin Patch and Autumn Leaves
  • Dies: Deckled Circle and Deckled Rectangle
  • Embossing Folder: Timber 3D
  • Ink: Old Olive, Calypso Coral, Peach Pie and Crumb Cake
  • Embellishments: 2023-2025 In Color Opaque Sparkle Dots and the Baker’s Twine Essentials Pack

Instructions

  1. Die cut the Deckled Rectangles from the Very Vanilla, Peach Pie and Crumb Cake cardstock.
  2. Die cut the Deckled Circles from the Very Vanilla and Peach Pie cardstock.
  3. Emboss the Crumb Cake cardstock Deckled Rectangle with the Timber 3D Embossing Folder.
  4. Use Crumb Cake Ink to stamp the tree trunks, house and fences onto the lower right-hand cornerof one of the Very Vanilla cardstock Deckled Rectangles. Stamp the roof of the house with Calypso Coral Ink. Use the Peach Pie and Calypso Coral Inks to stamp the leaves on the trees. Draw a door on the house with the Crumb Cake Stampin’ Write Marker. Use the Basic Black Stampin’ Write Marker to make a doorknob.
front of card
  1. Use the Peach Pie and the Calypso Coral Inks to stamp the single pumpkin in the lower left-hand corner.
  2. Stamp the vine and leaves in Old Olive Ink.
  3. Adhere the stamped Very Vanilla cardstock Deckled Rectangle to the Peach Pie cardstock Deckled Rectangle.
  4. Wrap Crumb Cake and Very Vanilla Baker’s Twine around the top of the Peach Pie/Very Vanilla cardstock Deckled Rectangle and tie a bow.
  5. Adhere this card piece to the front of the Crumb Cake cardstock card base with Stampin’ Dimensionals.
  6. Adhere the embossed Crumb Cake cardstock Deckled Rectangle to the stamped Very Vanilla cardstock Deckled Rectangle at an angle.
  7. On the Very Vanilla cardstock Deckled Circle stamp the sentiment “Autumn teaches us that change can be Beautiful” in Calypso Coral Ink. Use the Peach Pie and Calypso Coral Inks to stamp the row of pumpkins under the sentiment. Stamp the pumpkin stems in Old Olive Ink. Stamp the leaf and vine in Old Olive Ink over the sentiment.
  1. Adhere the stamped Very Vanilla cardstock Deckled Circle to the Peach Pie Deckled Circle.
  2. Adhere the sentiment card piece to the card front with Stampin’ Dimensionals.
  3. Embellish with the 2023-2025 In Color Opaque Sparkle Dots in Copper Clay.
  4. For the inside of the card, use the Peach Pie and Calypso Coral Inks to stamp the row of pumpkins on the bottom center of the second Very Vanilla cardstock Deckled Rectangle. Stamp the leaves and vines in Old Olive Ink. Stamp the stems for the pumpkins in Old Olive Ink.
Inside of card
  1. Adhere this inside card piece to the inside of the Crumb Cake cardstock card base.

Voila!

Thank you so much for visiting today! I hope you enjoyed my project. You will be inspired when you visit all the blogs in the Inspirations In Ink Blog Hop! Enjoy!

You are currently visiting Theresa McEntee-USA creator of Theresa’s Treasures Paper Crafts.

Blog Roll Call

Clickable Supply List

Product List
Scenic Pumpkin Patch Photopolymer Stamp Set (English)
$20.00
Autumn Leaves Photopolymer Stamp Set (English)
$24.00
Calypso Coral Classic Stampin' Pad
$9.00
Peach Pie Classic Stampin Pad
$9.00
Old Olive Classic Stampin' Pad
$9.00
Crumb Cake Classic Stampin' Pad
$9.00
Crumb Cake Classic Stampin' Pad
$9.00
Timber 3 D Embossing Folder
$11.00
Deckled Rectangles Dies
$30.00
Deckled Circles Dies
$37.00
Very Vanilla 8-1/2" X 11" Cardstock
$13.00
Peach Pie 8 1/2" X 11" Cardstock
$11.50
Crumb Cake 8-1/2" X 11" Cardstock
$11.50
Neutrals Stampin' Write Markers
$35.00
2023–2025 In Color™ Opaque Sparkle Dots
$8.00
Baker's Twine Essentials Pack
$11.00

Paper Pumpkin 40% Off First Month of New Subscription

Until October 10, 2024 you can get 40% off of the first month of a new Paper Pumpkin Subscription. Get 40% off of the October Nests of Christmas Paper Pumpkin Kit when you sign up as a new subscriber using the code HOLIDAY40. The following Paper Pumpkin Kits will be at the regular price. Sign up HERE

Upcoming Kits Collection Sale

Save up to 30% off on all your favorite kits from October 1, 2024 until October 30, 2024!!

All kits will qualify for the discount. Kits may also be added to a Starter Kit at the discounted price.

Kits are for all levels of crafters. It is easy to get together with your friends and family for an afternoon or evening of crafting! Consider making holiday kits together.

Purchase kits HERE

Have a most wonderful and creative day!

Ciao!

Theresa

Posted in 2024-2026 Stampin' Up! Annual Catalog, Animals, Birds, Guys cards, Inspiration in Ink Blog Hop, Nature, Online Exclusives, Stampin" Blends Alcohol Markers, Summer

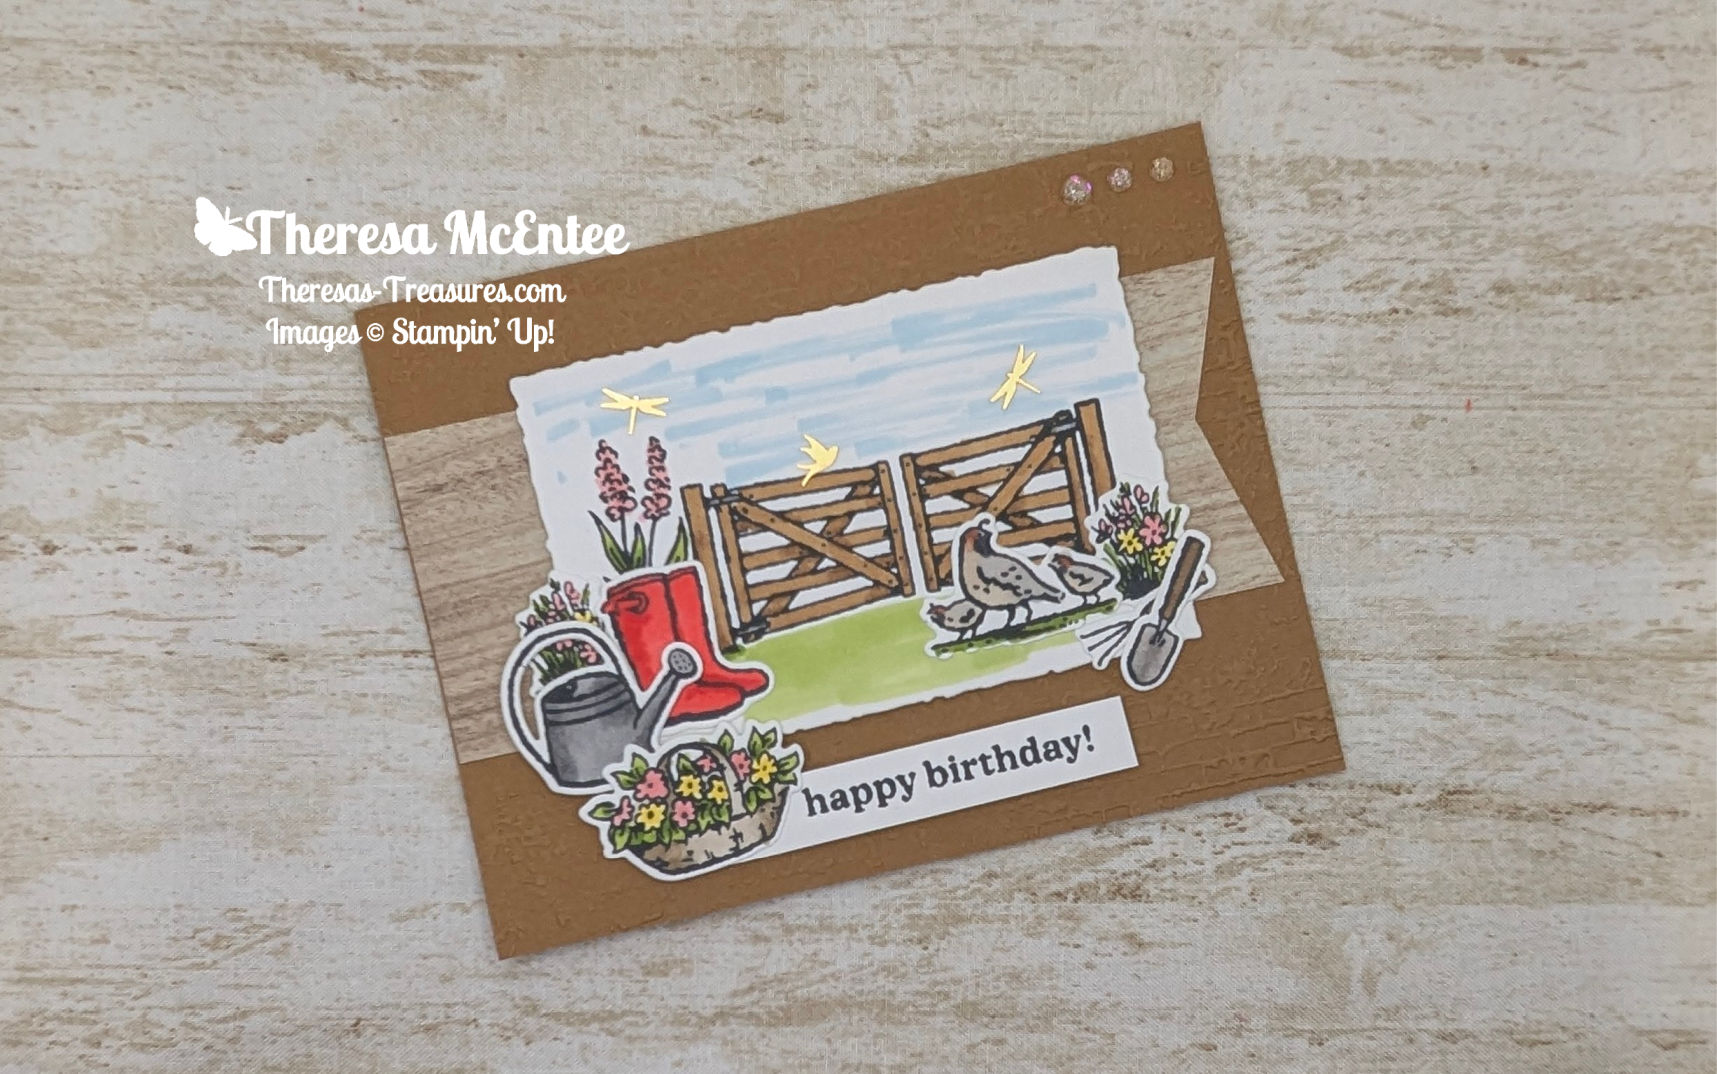
Garden Meadow Bundle for the Inspirations in Ink August 2024 Blog Hop

Welcome! Thank you for visiting Theresa’s Treasures Paper Crafts! I am Theresa, a Stampin’ Up! Demonstrator in Arizona, USA. Today is the monthly Inspirations in Ink Blog Hop! I am excited to be hopping with such talented demonstrators today. Today is a Sketch Challenge! Be sure to check out everyone’s projects. For my project, I used the Online Exclusive Garden Meadow Bundle. When you are ready, you may order from my Online Store HERE.

I chose the Garden Meadow Bundle because I love gardening! Flowers are my favorite! I love to play in the dirt! Somehow that is very grounding.

And living in the desert, I am able to see a lot of wildlife. There are two varieties of quail visiting my garden daily.

Measurements

  • Pecan Pie cardstock card base: 5 1/2″ x 8 1/2″ scored at 4 1/4″
  • Basic White cardstock: 3″ x 4 1/2″ to die cut the Deckled Rectangle and 1/2″ x 2 3/4″ for the sentiment. 3 3/4″ x 5″ for the inside. You will need scrap to stamp all of the images on.
  • Country Woods Designer Series Paper (DSP): light wood grain pattern: 2 1/4″ x 5 1/2″ and a 1/4″ x 5 1/4″ strip for the inside

Supplies

  • Stamp Set: Garden Meadow
  • Dies: Garden Meadow and Deckled Rectangle
  • Embossing Folder: Exposed Brick 3D
  • Ink: Memento Tuxedo Black Ink Pad; Stampin’ Blends Alcohol Markers: Lemon Lolly, Pretty in Pink, Granny Apple Green, Balmy Blue, Smoky Slate, Copper Clay, Pecan Pie, Poppy Parade and Crumb Cake.
  • Embellishments: Adhesive-Backed Dragonflies & Birds, and Iridescent Foil Gems

Instructions

  1. Die cut the Deckled Rectangle from the Basic White cardstock.
  2. Use Memento Ink to stamp the gate onto the Deckled Rectangle. Stamp the taller flowers on the left.
  3. Stamp the remaining images on your scrap Basic White cardstock.
  4. Color the images as desired with the Stampin’ Blends Alcohol Markers. Have some fun with shading using the darker shade.
  5. Use the Granny Apple Green Stampin’ Blend for the grass. The sky is done in the Balmy Blue Stampin’ Blend.
  6. Die cut all of the images.
  7. Emboss the front panel of the Pecan Pie cardstock card base.
  8. Cut a banner edge on one end of the light colored wood panel. Adhere this to the front of the card base.
  9. Use Stampin’ Dimensionals to adhere the Deckled Rectangle.
  10. Arrange the remaining images as desired and adhere to the card front.
  11. Stamp & then adhere the sentiment to the front of the card with Stampin’ Dimensionals. Add the basket of flowers.
  12. Adhere the Basic White cardstock inside panel to the inside of the Pecan Pie cardstock card base. Add the strip of the lightly colored wood.

Voila!

Thank you so much for visiting today! I hope you enjoyed my project. You will be inspired when you visit all the blogs in the Inspirations In Ink Blog Hop!

You are currently visiting Theresa McEntee-USA creator of Theresa’s Treasures Paper Crafts.

Blog Roll Call

Clickable Supply List

Product List
Garden Meadow Bundle (English)
$54.00
Deckled Rectangles Dies
$30.00
Exposed Brick 3 D Embossing Folder
$11.00
Tuxedo Black Memento Ink Pad
$8.00
Tuxedo Black Memento Ink Refill
$6.50
Lemon Lolly Stampin’ Blends Combo Pack
$11.00
Pretty In Pink Stampin’ Blends Combo Pack
$11.00
Granny Apple Green Stampin' Blends Combo Pack
$11.00
Balmy Blue Stampin' Blends Combo Pack
$11.00
Smoky Slate Stampin' Blends Combo Pack
$11.00
Copper Clay Stampin’ Blends Combo Pack
$11.00
Crumb Cake Stampin' Blends Combo Pack
$11.00
Poppy Parade Stampin' Blends Combo Pack
$11.00
Basic White 8 1/2" X 11" Cardstock
$13.00
Pecan Pie 8 1/2" X 11" Cardstock
$11.50
Country Woods 12" X 12" (30.5 X 30.5 Cm) Designer Series Paper
$12.50
Iridescent Foil Gems
$8.00
Adhesive Backed Dragonflies & Birds
$8.50

Monthly Paper Pumpkin Subscription

Thinking of adding creativity to your life this year? Start out by trying a monthly paper crafting kit! The Paper Pumpkin Monthly Subscription delivers a kit with everything you need to make a project-right to your door! Sign up for a Pre-paid Paper Pumpkin Subscription HERE.

Have a most wonderful and creative day!

Ciao!

Theresa

Posted in 2023-2024 Stampin' Up! Annual Catalog, Animals, Birds, Gratitude/ Thanks, International Project Highlights Gallery, Sale-a-Bration 2024, Watercolor Techniques

Kylie’s International Blog Highlights Gallery-January 2024: Seasonal Branches Thank You Card

Hello! Welcome to Theresa’s Treasures Paper Crafts. I am Theresa, an Independent Stampin’ Up! Demonstrator in Arizona, USA. I am really excited to be participating in Kylie Bertucci’s International Blog Highlight Gallery with my Seasonal Branches Thank You card.

Today I am blogging along with a very creative group of Stampin’ Up! demonstrators from around the world! You will be able to see all of the awesome blogs by clicking on the “Vote” button below to see the Gallery.

The theme for this Gallery is “Thank You”. We often forget those simple words. However, it is so important to show appreciation to others. One way to express gratitude is to send a handmade thank you card! I hope you will discover the joy in making and sending a handmade card for yourself!

This Seasonal Branches Thank You Card showcases the Seasonal Branches Bundle which coordinates with the FREE Sale-a-bration Flight & Airy Designer Series Paper (DSP). You can get the FREE Sale-a-bration products with a $50 USD purchase! Please use the Host Code if your purchase is less than $150 USD. Otherwise, you can use the Stampin’ Rewards yourself!

Current Host Code: 6B4FJPWS

Measurements

  • Pecan Pie cardstock (cs) card base: 5 1/2″ x 8 1/2″ scored at 4 1/4″
  • Flight & Airy DSP Pecan Pie mosaic pattern (1st layer): 4″ x 5 1/4″
  • Misty Moonlight cs: 4″ x 4″ to die cut the Deckled Circle
  • Flight & Airy DSP light blue with flowers pattern: 3 3/4″ x 3 3/4″ to die cut the Deckled Circle
  • Basic White cs: 2″ x 2 1/2″ to die cut the sentiment with the stitched rectangle from the Timeless Arrangements Dies
  • Basic White cs: 3 1/2″ x 4 3/4″ to die cut the inside panel with the Deckled Rectangle Dies
  • Calypso Coral, Pecan Pie and Garden Green cs to die cut the flowers, branches and leaves.
  • Fluid 100 5″ x 7″ Watercolor Paper: to stamp the bird on

Supplies

  • Seasonal Branches stamp set & Dies (Bundle #161365)
  • Deckled Circles Dies
  • Deckeld Rectangles Dies
  • Timeless Arrangements Dies
  • Ink: Misty Moonlight, Smoky Slate, Memento, Fresh Freesia, Calypso Corral & Garden Green
  • Embellishments: Adhesive-Backed Solid Gems

Instructions

  1. Die cut all of the pieces except the bird. You will need 5 Calypso Coral cs flowers, 1 small and 1 large Pecan Pie branch and 7 Garden Green cs leaves.
  2. Use the Deckled Circle Die #8 from center for the Misty Moonlight and the Deckled Circle Die #7 for the Flight & Airy blue floral pattern. Use the Deckeld Rectangle Die #6 from center for the larger Basic White cs and the Timeless Arrangements Die for the smaller Basic White cs.
  3. Use Smoky Slate Ink to stamp the bird onto the Fluid 100 Watercolor Paper. Then use a small paint brush with the Misty Moonlight, Fresh Freesia and Memento Inks to watercolor the bird. Die cut the bird with the Seasonal Branches Dies.
  4. Stamp the sentiment onto the Timeless Arrangements diecut in Misty Moonlight Ink.
  5. Use Calypso Coral Ink to stamp the individual flower onto the inside panel. Add the individual leaf in Garden Green Ink. Adhere to the inside of the Pecan Pie cs cardbase.
  1. Adhere the Flight & Airy Pecan Pie mosaic pattern to the front of the Pecan Pie cs card base.
  2. After you adhere the Flight & Airy DSP blue floral pattern Deckled Circle to the Misty Moonlight cs Deckled Circle- use Stampin’ Dimensionals to adhere it to the left side of the card front.
  3. Use Stampin’ Dimensionals to adhere the sentiment to the lower right-hand corner.
  4. Add the branches, flowers and leaves with Multipurpose Liquid Glue.
  5. Finish up by adhering the watercolored bird with Stampin’ Dimensionals.

Add Bling!

Don’t forget to add some Bling! to the centers of the flowers on the card front with the Adhesive-Backed Solid Gems!

Voila!

I hope you enjoyed my card today using the Seasonal Branches Bundle along with the FREE Sale-a-bration Flight & Airy Designer Series Paper.

Visit my Online Store to order what you need to make this card for yourself. Photographic supply list is at the end of this blog.

Current Host Code: 6B4FJPWS

You are currently at Theresa McEntee-Theresa’s Treasures-USA. When you click on the Vote For Me button above you will see the Gallery of creative inspiration from Demonstrators around the world! Remember to visit everyone’s blog by clicking on the photo of their card in the Gallery.

To vote for your favorite cards, click on the small heart in the upper right-hand corner of each photo. You have 5 votes! Enjoy and come visit Theresa’s Treasures again soon!

Clickable Supply List

Product List

Thanks again for stopping by! Have a most wonderful and crafty day!

Theresa

SALE-A- BRATION

What is Sale-a-bration? It is the best time of the Stampin’ Up!® year! When you make a qualifying purchase, you can choose from several products that are FREE! If you need to know more, shoot me an email at theresastreasures.az@gmail.com!

Posted in 2023 Stampin' Up! Holiday Mini Catalog, 2023-2024 Stampin' Up! Annual Catalog, Animals, Birds, Inspiration in Ink Blog Hop, Winter Holiday

Hey Chuck Bundle for the Inspirations in Ink November 2023 Blog Hop

Welcome and thanks for visiting Theresa’s Treasures Paper Crafts! I am Theresa, a Stampin’ Up! Demonstrator in Arizona, USA. Today is the monthly Inspirations in Ink Blog Hop! I am excited to be hopping with talented demonstrators from around the world. Be sure to check out everyone’s Hey Chuck Bundle projects. The Hey Chuck Bundle is in the Annual Catalog. When you are ready, you may order from my Online Store HERE.

I decided to make a Christmas card with the Hey Chuck chickens to spotlight the versatility of this set. I stamped the hat and scarf from the Beary Cute stamp set in the 2023 Mini Catalog. The lovely sentiment is also from the Beary Cute stamp set.

I used Wink of Stella to make the chicken very sparkly! Just right for the holidays!

Measurements

  • Poppy Parade cardstock: 4 1/4″ x 11″ scored at 5 1/2″
  • Basic White cardstock: 3 1/4″ x 4 3/4″ (for the diecut Deckled Rectangle inside), 3 1/4″ x 3 1/4″ (for the diecut Deckled Circle on front), 1/2″ x 3″ for the sentiment and enough to stamp the images.
  • Shaded Spruce cardstock: 2 1/4″ x 5 1/2″
  • Brights 6″x 6″ DSP in Poppy Parade, striped pattern: 2″ x 5 1/2″
  • Daffodil Delight cardstock: 2″ x 2 1/2″ (for the diecut sun)

Supplies

  • Hey Chuck Bundle
  • Beary Cute stamp set
  • Deckled Rectangles & Deckled Circles Dies
  • Ink: Memento, Poppy Parade and Shaded Spruce
  • Stampin’ Blends Alcohol Markers: Poppy Parade, Daffodil Delight and Shaded Spruce
  • Wink of Stella
  • Iridescent Rhinestone Basic Jewels

Instructions

  1. Die cut the Deckled Circle (#6 from center), the Deckled Rectangle (#6 from center) and the sun.
  2. Use Memento Ink to stamp the two chickens and the tree (from Beary Cute). Diecut the chickens after you color them with the Stampin’ Blends Alcohol Markers as desired.
  3. Use Shaded Spruce Ink to stamp the inside of the tree. Fussy cut the tree.
  4. Stamp two hats and one scarf in Shaded Spruce Ink. Fussy cut.
  5. Also use the Shaded Spruce Ink to stamp the “Merry Christmas” sentiment from Beary Cute onto the 1/2″ x 3″ Basic White cardstock strip. Cut the ends into a banner.
  6. Use Poppy Parade Ink to stamp “Rise and Shine” on the Deckled Rectangle (portrait orientation). I had to stamp a few stars around the inside sentiment because I was covering up a halo-oopsy!
  7. Adhere the Brights Designer Series Paper Poppy Parade, stripe pattern, onto the Shaded Spruce cardstock.
  8. Adhere this to the card front, slightly to the left.
  9. Use Stampin’ Dimensionals to adhere the Deckled Circle to the card front.
  10. Adhere the sun with Multipurpose Liquid Glue or Stampin’ Seal.
  11. Use Stampin’ Dimensionals to adhere the colored fat chicken to the card front. Add the scarf and hat.
  12. Use Stampin’ Dimensionals on each end of the sentiment, and glue in the center to adhere the sentiment banner.
  13. For the inside, adhere the Deckled Rectangle followed by the Christmas tree. Finish with the colored skinny chicken and the hat.
  14. Embellish the chickens with Wink of Stella.
  15. Add the Iridescent Rhinestone Basic Jewels.

Voila!

Thank you so much for visiting today! Please visit all the blogs in the Inspirations In Ink Blog Hop. You will be amazed and inspired by all the fun and creative projects made by the Inspirations In Ink demonstrators. 

You are currently visiting Theresa McEntee-USA creator of Theresa’s Treasures Paper Crafts.

Clickable Supply List

Product List

Have a most wonderful and creative day!

Ciao!

Theresa

Posted in 2023-2024 Stampin' Up! Annual Catalog, 3D Embossing Folder, Animals, Blending Brushes

Kylie’s International Blog Highlights Gallery-July 2023: Wildlife Wonder Thank You Card

Hello, thank you for visiting Theresa’s Treasures. I am Theresa, an Independent Stampin’ Up! Demonstrator in Arizona, USA. I am extremely excited to be participating in Kylie Bertucci’s International Blog Highlight Gallery with my Wildlife Wonder Thank You card. Today I am hopping along with Stampin’ Up! demonstrators from around the world! Please be sure to see all of the creative inspiration by visiting everyone’s blog.

The theme for this Gallery is “Thank You”.

We often forget those simple words “Thank you”. However, it is so very important to show appreciation to the people in your life who have helped you, supported you or inspired you. One way to express gratitude is to send a handmade thank you card. Discover the joy in making and sending a handmade card!

This Wildlife Wonder Thank You Card also showcases the Earthen Elegance and Fresh as a Daisy Designer Series Paper, and the Grassy Grove stamp set.

Current Host Code: DRT4WHEV

Measurements

  • Boho Blue cardstock card base: 5 1/2″ x 8 1/2″ scored at 4 1/4″
  • Fresh as a Daisy Designer Series Paper, blue “cloudy sky” design: 4 1/8″ x 5 3/8″
  • Earthen Elegance Designer Series Paper: 2 1/2″ x 4 1/8″
  • Pebbled Path cardstock: 1 1/4″ x 3″
  • Basic White cardstock: 1 1/4″ x 3″ and 4″ x 5 1/4″ (inside)

Supplies

  • Wildlife Wonder stamp
  • Grassy Grove stamp
  • Deckled Rectangle Dies
  • Ink: Pebbled Path, Copper Clay and Boho Blue
  • Watercolor Pencils Assortment 1
  • Blending Brush
  • Clear Emboss Powder
  • Heat Tool
  • 2023-2025 In Color Dots

Instructions

  1. Fold the Boho Blue card base and use the Bone Folder to make a crisp fold. Set aside.
  2. Take out the two pieces of Basic White cardstock. Start with the smaller piece. Use Pebbled Path Ink to stamp the wolf onto the paper.
  3. Color the rock under the wolf with the Pecan Pie Watercolor Pencil using a very light pressure. Then color the wolf with the Basic Gray Watercolor Pencil. Add some Blue Watercolor Pencil to the background. Finish up with a light layer of Early Espresso Watercolor Pencil under the rock.
  1. Use a Deckled Rectangle to diecut the edges. Set aside.
  2. For the inside card piece, use the Blending Brush and Boho Blue Ink to create a light blue background.
  3. Use the images from the Grassy Grove stamp and the Pebbled Path Ink to stamp a scene onto the inside card piece.

  1. Use a second Blending Brush and the Copper Clay Ink to add some color to the hill.
  2. Stamp the sentiment ” For All The Great Things You Do” just over the hill in Pebbled Path Ink.
  3. Adhere the inside card piece to the inside of the Boho Blue card base.
  4. Now stamp the sentiment “A Note Of Thanks” onto the Fresh as a Daisy Designer Series Paper. Immediately cover the ink with the Clear Emboss Powder. Tap off excess. Heat set.
  5. Adhere to the front of the Boho Blue card base.
  6. Use the Deckled Rectangle to cut the longest edges of the Earthen Elegance card piece. Adhere to the Fresh as a Daisy card piece.
  7. Adhere the wolf card piece to the Pebble Path cardstock. Then use Stampin’ Dimensionals to adhere it to the card front.
  8. Embellish with the 2023-2025 In Color Dots.

Voila!

I hope you enjoyed my card today using the Wildlife Wonder and Grassy Grove stamp set along with some awesome Designer Series Paper!

Visit my Online Store to order what you need to make this card for yourself. Photographic supply list is at the end of this blog.

Current Host Code: DRT4WHEV

You are currently at Theresa McEntee-Theresa’s Treasures-USA. When you click on the Vote For Me button above you will see the gallery of creative inspiration from Demonstrators around the world! Remember to visit everyone’s blog by clicking on the photo of their card in the Gallery.

To vote for your favorite cards, click on the small heart in the upper right-hand corner of each photo. You have 5 votes! Enjoy and come visit Theresa’s Treasures again soon!

Thanks again for stopping by! Have a most wonderful and crafty day!

Theresa
Clickable Supply List

Product List

Promotions

New Kit added to the Kit Collection!!

Boho Beach Kit

This kit includes: 

  • Supplies to create 8 cards—4 each of 2 designs
  • 8 coordinating envelopes
  • Boho Beach photopolymer stamp set
  • One Pecan Pie Ink Spot
  • Printed card bases, printed die cuts, adhesive, embellishments, and a clear block
  • Finished card size: 5-1/2″ x 4-1/4″ (14 x 10.8 cm)
  • Coordinating colors: Crumb Cake, Lost Lagoon, Pecan Pie, Pool Party, Wild Wheat

New Online Exclusives!

Being a Stampin’ Up! demonstrator means enjoying fun perks like preordering products before they’re available to customers! For Online Exclusives, a demonstrator can preorder any product listed on the Online Exclusives flyer! A larger selection of new, exclusive products will be available to demonstrators and customers during the customer sales period.

Demonstrator Preorder: 1 June–5 July 2023

Customer Sales Period Begins: 6 July 2023

Paper Pumpkin Monthly Kit

Bonus Days!!

BONUS DAYS ARE BACK!

Because do you know what’s a great deal? Getting rewarded for all the crafting supplies you’re already going to buy!

When you shop between July 6-31 and spend $50 USD | $60 CAD you will earn a $5 USD | $6 CAD coupon! Make sure you save all your coupons because you can redeem them (and we mean ALL of them) between August 1–31 .

There’s no limit to how many coupons you can earn!