

See how to use Embossing Techniques to make this card!

Welcome! Thank you for visiting Theresa’s Treasures Paper Crafts! I am Theresa, a Stampin’ Up! Demonstrator in Arizona, USA. Today is the monthly Inspirations in Ink Blog Hop! I am excited to be hopping with such talented demonstrators today. Be sure to check out everyone’s projects using different Embossing Techniques. The projects could be using embossing folders or projects using embossing powder or embossing paste. Lots of wonderful possibilities!

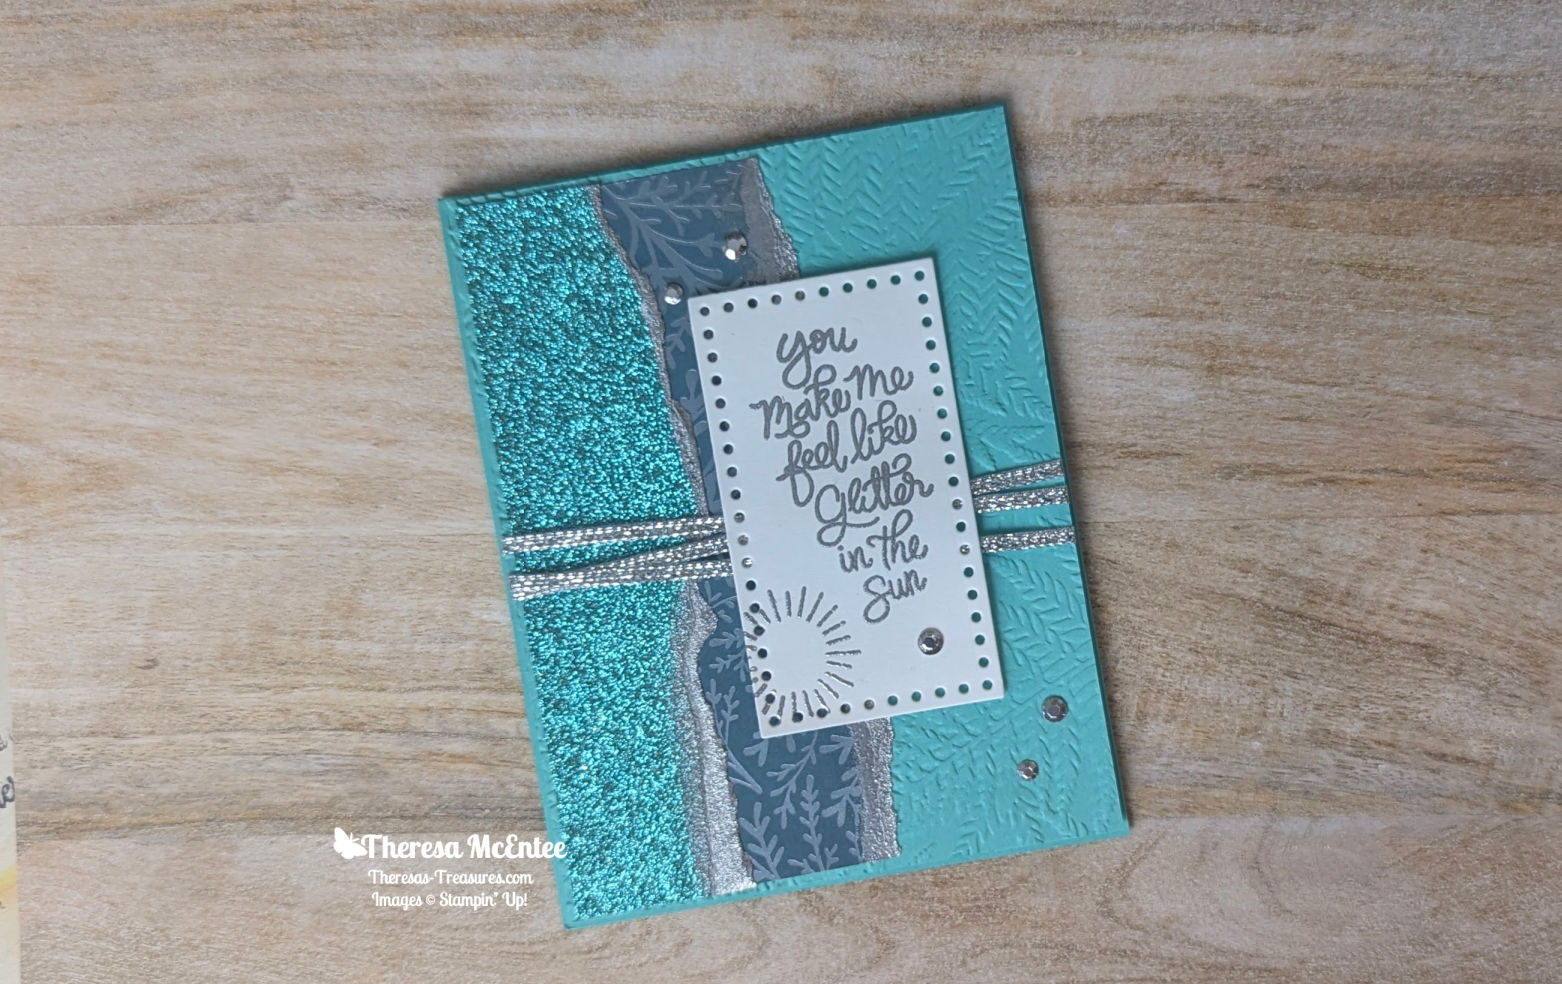
There are some Embossing Techniques that I used for this card today and I will include a few tips.

Measurements
- Summer Splash cardstock card base: 4 1/4″ x 11″ scored at 5 1/2″ (10.5cm x 29.7cm scored at 14.85cm)
- Summer Splash cardstock: 4 1/8″ x 5 3/8″ (10cm x 14.4cm)
- Basic White cardstock: 3 3/4″ x 5″ (9.3cm x 13.7cm) inside and
2 1/4″ x 4″ (5.7cm x 10cm) sentiment - 2024-2026 Glimmer Specialty Paper in Summer Splash:
1 1/2″ x 5 1/4″ (3.5cm x 14.4cm) - Thoughtful Designs Specialty Designer Series Paper in Summer Splash: 3″ x 5 1/4″ (9.6cm x 14.4cm)

Supplies
- Stamp Set: Happiest Day and Throughout the Year
- Dies: Everyday Details
- Embossing Folder: Fern 3D
- Ink:Versamark
- Embossing Powder: WOW! Metallics Embossing Powders-silver
- Embellishments: Metallic Gems-silver
- Ribbon:Gold & Silver Combo Trim
Basic Embossing Kit

If you are new to using Embossing Powders-Welcome! You will be amazed at how fun it is to see the embossing powder change-it’s magical! For basic embossing and most embossing techniques you will need:
- a Heat Tool
- Versamark Ink
- a small paint brush
- a spoon
- an anti-static tool (Embossing Buddy)
- a microfriber cloth
- an embossing powder container , plastic container with lid (or a coffee filter)
- and of course-Embossing Powder!


Stampin’ Up! has two awesome embossing powder collections. You can click on the image above or order from my Online Store HERE.

Check out this fun Embossing Technique below!
Instructions
Using an Embossing Folder to Emboss Cardstock
- First emboss the Summer Splash cardstock with the Fern 3D Embossing Folder. TIP: Spritz the cardstock so that the paper is slightly damp in order to get the best 3D look after you emboss it. Set aside.
Embossing the Sentiment
- Die cut the 2 1/4″ x 4″ (5.7cm x 10cm) Basic White cardstock with the third from the smallest rectangle die in the Everyday Details Dies.
- Very Important TIP: Use an anti-static tool on the cardstock prior to using embossing powder. This avoids having the embossing powder stick to anything except your stamped image/sentiment.
- After using the anti-static tool, stamp the sentiment and the sun rays with Versamark Ink. Versamark is an ink that is also an adhesive so the embossing powder will stick to it.
- Sprinkle the embossing powder over the Versamark. Shake off the excess into a plastic container or onto a coffee filter. TIP:The coffee filter will not have as much static as paper, so the powder can easily be returned to the container.
- TIP: After embossing, use a small paintbrush to remove any extra embossing powder before using the Heat Tool.
- Turn on the Heat Tool and wait about 10 seconds for it to warm up.
- TIP: Hold the Heat Tool about 4-6 inches (10-15cm) away from the cardstock. Heat the back first for about 10 seconds. Then heat from the front, moving the heat around until the embossing powder melts (turns).
- TIP: As soon as the embossing powder turns (here’s the magic!) remove the heat from that area. Overheating can cause the image/sentiment to not look as crisp.
- TIP: After the entire image/sentiment has turned, allow it to cool. The embossing powder is basically melted plastic and will stick to your skin and burn you if you touch it before it has cooled. (Ask me how I know!)
- Use a microfiber cloth to remove any excess powder.
Inside of the Card-Embossing
- Now for the Basic White cardstock for the inside of the card. Stamp the “Thank You” sentiment from the Thoughout the Year stamp set in Versamark. Emboss with the Silver Embossing Powder same as above. Heat & cool.
- Stamp the butterfly from the Happiest Day stamp set in Versamark Ink onto the right lower corner of the inside card piece. Heat. Cool. Adhere this piece to the inside panel of the Summer Splash cardstock card base.

Embossing Technique- Embossing the Edge of the Paper
- Now for a fun Embossing Technique!
- Tear the right side of the long edge of the Summer Splash Glimmer Paper and Thoughtful Design Specialty Paper.


- Use the Versamark Ink pad to dab Versamark onto the torn edge.
- Dip the edge in the Silver Embossing Powder that is in a plastic container or shake a bit out onto just the edge. Shake off the excess powder. Use the Heat Tool the same as above. Cool.
- Repeat with the Thoughtful Designs Specialty Paper.
Assembling the Card
- Adhere the torn and embossed Thoughtful Designs Specialty Paper to the Summer Splash cardstock embossed with the Fern 3D embossing folder.
- Adhere the torn and embossed Summer Splash Glimmer Paper to the left of the Thoughtful Designs Specialty Paper.
- Use a Mini Glue Dot to hold one end of the Silver Trim to the back of the card piece. Wrap around three times and secure to the back with another Mini Glue Dot.
- Use Stampin’ Dimensionals to adhere the card piece to the front panel of the Summer Splash cardstock card base.
- Use Stampin’ Dimensionals to adhere the sentiment to the card front.
- Embellish the card front with the Metallic Gems as desired.
Voila!

Thank you so much for visiting today! I hope you enjoyed my project and my Embossing Technique. You will be inspired when you visit all the blogs in the Inspirations In Ink Blog Hop! There are some awesome projects!
You are currently visiting Theresa McEntee-USA creator of Theresa’s Treasures Paper Crafts.
Blog Roll Call
Clickable Supply List
Product List ") $20.00 | ") $24.00 |  $34.00 |  $10.00 |  $11.50 |
 $13.00 |  Specialty Paper") $11.00 |  Specialty Designer Series Paper") $11.00 |  $21.00 |  $9.50 |
") $32.00 |  $27.00 |  Trim Combo Pack") $9.00 |  $9.00 |
Monthly Paper Pumpkin Subscription
Thinking of adding more creativity to your life? Start out by trying a monthly paper crafting kit! The Paper Pumpkin Monthly Subscription delivers a kit with everything you need to make a project-right to your door! Sign up for a Pre-paid Paper Pumpkin Subscription HERE.

Here is a sneak peak at the upcoming Paper Pumpkin Kit for August. You will need to subscribe before August 10, 2024.
Have a most wonderful and creative day!
Ciao!
Theresa


")
")


")


 Designer Series Paper")
 Striped Trim")


")


")


