I am starting to participate in a new challenge with The Paper Players which you can visit by clicking HERE to see all of the entries. The challenge for this week is “Clean and Simple”. This means there are minimal layers, little to no embellishments and lots of white space.
This cute little kitty is in the Stampin’ Up!® Pampered Pets stamp set. I used the Stampin’ Blends Alcohol Markers in Flirty Flamingo, Smoky Slate and Basic Black to color the image. The sentiment is from the Zoo Globe stamp set.
Measurements: Basic White Card Stock (CS) card base: 5 1/2 x 8 1/2 inches with a score line at 4 1/4 inches; Flirty Flamingo CS: 4 x 5 1/4 inches; Basic Gray CS: 1 x 5 inches; and Basic White CS: 3 5/8 x 5 inches.
I believe it is very important to let your children know that you are proud of them from time to time. Fortunately I have four beautiful children who I am very proud of. This card will be mailed to my lovely daughter, who is not only working full time and but is also taking four courses at the local community college. I am very proud of all of her accomplishments.
Be sure to visit The Paper Players at thepaperplayers.blogspot.com to see all the entries for the Clean and Simple PP529 Challenge.
Thanks for stopping by my blog today. Be sure to stop by tomorrow for my #simplestamping blog using the new Brilliant Butterflies stamp set.
I really love the Cardz4Guyz Challenges because they help me think creatively outside of my usual “box”. Clean and Simple (CAS) cards are not something that comes naturally for me, so this was a nice challenge.
This card is made using the Stampin’ Up!® Beautiful World stamp set and the World Map Dies. I love the sentiment “You make the world a better place”.
This is a very quick and easy card to make. Just die cut the globe and stand, stamp the sentiment in Night of Navy ink, glue the copper strip along the side of the 3 3/4 x 5 inch Very Vanilla Card Stock (CS), mount it on a Night Of Navy CS card base and….
Viola! You have yourself a very nice masculine card letting someone special know how much they mean to you.
Thanks for visiting today. Please check out all of the entries for the Cardz4Guyz Challenge #264- Clean and Simple HERE.
Recent events can sometimes make it hard to have hope for a good future. Nonetheless I am hopeful that Peace, Joy, and Love as stated on today’s card will prevail. This is a wonderful message to send out for the holidays. This card could also be sent for a Confirmation or First Communion, or just encouragement during these hard times.
Stampin’ Up!’s Dove of Hope stamp set also comes with Detailed Dove Dies in a Bundle saving you 10%. I made this card with the Beginner Stamper in mind, so I did not use the dies.
Measurements: Whisper White Card Stock (CS): 4 1/4 x 1 inches with a score line at 5 1/2 inches (this is the card base), 4 x 5 1/4 inches, 2 3/4 x 3 1/2 inches and a 1/2 x 4 1/8 inch strip; Night of Navy CS: 4 1/8 x 5 3/8 inches; Artistry Blooms Designer Series Paper (DSP).
Use Memento ink to stamp the dove in the upper left hand corner of the 2 3/4 x 3 1/2 inch Whisper White CS.
Stamp the berry branch under the dove with the Memento ink.
Use the Night of Navy ink to stamp the sentiment “Peace Joy Love” onto the 1/2 x 4 1/8 inch Whisper White CS strip. Tip: When stamping the sentiment, line up the capital letters to get the sentiment on straight.
Use Balmy Blue and Highland Heather ink to stamp a flurry of snowflakes on the 4 x 5 1/4 inch Whisper White CS. This will be the inside of the card.
Adhere the Whisper White CS with the flurry of snowflakes to the inside of the 4 1/4 x 11 inch Whisper White CS card base.
Adhere the 4 x 5 1/4 inch Artistry Blooms DSP to the 4 1/8 x 5 3/8 inch Night of Navy CS, then adhere the piece to the front of the Whisper White CS card Base.
To color the berry branch and dove I used the Stampin’ Write Markers in Real Red, Shaded Spruce and Smoky Slate.
Adhere the colored dove card piece and the sentiment strip to the card front.
And now for the Bling! I just love adding sparkle to a card! The Artistry Blooms Sequins have many different colors to add a little sparkle to just about any card!
I added a little bit of the sequins here and there until I felt satisfied with the overall look. Tip: Transferring the sequins is a breeze with the Take Your Pick tool.
Viola! You now have another fabulous Christmas or Holiday card ready to send out!
Thanks so much for visiting today. I really appreciate you! Please let me hear your thoughts by commenting. Thanks again!
One of the special ways I share my cards is by making religious cards and donating them to my church to sell in their gift shop.
The new stamp set called His Love by Stampin’ Up!® lends itself to several great card ideas.
This is a general note card which is very versatile. You could send someone encouragement to help them through a hard time, or send the card to celebrate a baptism, first communion or confirmation.
I created this card from one of my sketches. When I receive a card from someone, or see something on Pinterest or the Web, I copy down a sketch of the basic elements of the card onto a 5 1/2 x 4 1/4 inch white card stock. I keep these for times when I need a starting point to create a card.
Measurements: Whisper White Card Stock (CS) card base: 4 1/4 x 11 inches with a score line at 5 1/2 inches, 3 x 4 inches and 4 x 5 1/4 inches; Night of Navy CS: 4 1/8 x 5 3/8 inches and a 3/4 x 4 1/8 inch strip; Artistry Blooms Designer Series Paper (DSP): 4 x 5 1/4 inches. 1/4 inch Metallic ribbon in Seaside Spray: 5 1/2 inches.
Additional supplies: Memento ink; Stampin Blends Alcohol Markers in Ivory and Light and Dark Balmy Blue; super sticky note paper for a mask; Basic Pearl Jewels; Foam Adhesive Sheet; Glue Dots and Multipurpose Liquid Glue.
Stamp the inside of the card first. Stamp the sentiment “His Love Never Fails” and the image of the Bible in Memento ink on to the 4 x 5 1/4 inch Whisper White CS. Set aside.
Stamp the praying hands in Memento ink onto the lower left corner of the 3 x 4 inch Whisper White CS and onto the super sticky note paper.
Trim the super sticky note paper praying hands close to the outline with Paper Snips. This is your Mask. Place the mask over the stamped praying hands. Stamp the sentiment “Faith” in Memento ink on to the bottom right corner. Now using Night Of Navy ink, stamp the cross over the mask.
Let the ink dry for a minute or two, then remove the mask. Such a fun technique!
Color the cross as desired with the light and dark Balmy Blue Stampin’ Blends Alcohol Markers. I colored the hands with the Ivory Stampin’ Blend. You could also use Crumb Cake, Soft Suede or Petal Pink Stampin’ Blends for the skin color.
Add a little of the light and dark Balmy Blue to the ribbon in the Bible.
Adhere the 4 x 5 1/4 inch Artistry Blooms DSP to the 4 1/8 x 5 3/8 inch Night of Navy CS.
Use Glue Dots on the ends of the 1/4 inch Metallic ribbon to adhere it to the 3/4 x 4 1/8 inch strip of Night Of Navy CS. Adhere the ribbon and Night of Navy CS piece to the Artistry Blooms DSP on the Night Of Navy CS.
To give the card a little dimension, I used the new Foam Adhesive Sheet. First I cut the sheet into four 3 3/4 x 1/4 inch strips.
I adhered the four strips to the back of the praying hands piece, then adhered it to the card front. This is a lot easier than using 15+ of the Stampin’ Dimensionals!
Use the Bone Folder to fold the 4 1/4 x 11 inch Whisper White CS at the 5 1/2 inch score line. This is your card base. Adhere the praying hands and cross piece to the front of the card base. Adhere the inside piece to the inside of the card base.
Now for some Bling!
First I placed the large pearl in the center of the cross. I then placed the smallest pearls on each arm of the cross.
Next I placed 3 medium sized pearls on the background in a triangular orientation. Finally, I added some of the smaller pearls next to the medium sized pearls to make three clusters of pearls.
Now for the final touch, a bit of Wink of Stella on the arms of the cross.
And Viola! You now have a very versatile religious card! I just love how this turned out.
Here are two other versions using the same sketch as the starting point.
Thanks so much for stopping by. I hope you give this a try. Anytime you receive a card and you like the layout, try jotting it down as a sketch to use to start another card. It is a lot of fun to come up with designs using a sketch to start.
Don’t forget about Bonus Days! This promotion ends on August 3, 2020! Take advantage of this promotion: for a $50 order before August 3, 2020, you earn a $5 coupon to use starting August 4, 2020. That is the day the 2020 Holiday Catalog goes live! There are so many wonderful holiday products! I will be starting to show cards made with holiday product soon. I seriously cannot believe it is almost August! At this rate, Christmas will sneak up on me before I know it!
Hi! Welcome to Theresa’s Treasures. I’m Theresa and I’m an Independent Stampin’ Up! Demonstrator in Arizona, USA. I’m so excited to be taking part in Kylie’s Demonstrator Training Blog Hop today. This is a really fun way to share my creations, and have the opportunity to see projects from many other demonstrators from around the world! I especially love to hear your comments!
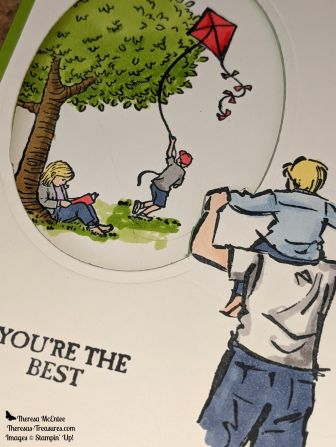
I had a lot of fun with this card. The images are from A Good Man and Summer Days stamp sets. I used to love to go kite flying when I was growing up. My Dad would make the kites and inevitably the kite string would break and the kite would never be seen again! We would be so sad, but he would just make another and we would try flying it again. This scene brings back those fond memories.
Here is a close up of the images. It really looks like the man with the child on his shoulders is watching the boy flying the kite!
I used the Layering Ovals Dies to cut out an oval except for around the man’s arm. This is a trick you can do by placing the cutting plate only on part of the card then running it through the Big Shot. It will only cut out what is under the plate. I ran it through a second time to get the other side of the arm. The arm was then fussy cut with paper snips.
I used the Stampin’ Blends Alcohol markers to color the scene. The cardstock is Granny Apple Green so I used the Granny Apple Green alcohol marker for the tree and the grass. The jeans are Misty Moonlight. The child’s shirt is Balmy Blue and the gray I used is Smokey Slate. To add some color I used Poppy Parade for the kite, ball cap and girl’s book. The blond hair is a light So Saffron. The girl’s shirt is Highland Heather and the tree trunk is Soft Suede. In every case I used the light shade of the color, then added shadow with the dark shade.
I hoped you enjoyed my card. You can purchase all the supplies needed to make your own card by visiting my online store HERE, or clicking on any of the product photos below.
Thank you so much for stopping by. Please visit all the blogs participating in this hop to see all the fun and inspiring projects by demonstrators from around the world. You are currently visiting Theresas Treasures.
There are many Stampin’ Up! stamp sets that are retiring by June 2, 2020. I will miss several, including Let It Ride. I just love the horses! I used to go horseback riding as a kid in Albuquerque, New Mexico with my siblings. My Mom would drop us off at the stables near the base of the Sandia Mountains. After our horseback ride we would ride our bikes home. Fond memories!
This is a beautiful watercolor fun fold card. Don’t worry, it is pretty simple! It only looks complicated. I am not an artist. The stamp just lends itself to a nice watercolor.
The card opens this way and there is plenty of space to write a little note inside.
Measurements: Early Espresso Card stock (CS): 6 1/4 x 5 1/2 inches with a score at 2 inches and 6 1/2 x 4 inches with a score at 3 1/4 inches; Soft Suede CS: 5 1/4 x 4 inches; Very Vanilla CS: 3 3/4 x 3 inches and 4 x 2 inches; Crumb Cake CS: 5 1/4 x 1 3/4 inches; and Fluid 100 Watercolor Paper: 3 3/4 x 3 inches.
First I stamped the background with the Gallery Grunge stamp set using Soft Suede ink on the 5 1/4 x 4 inch Soft Suede CS. (I put a green scrap paper behind my card piece so I would not get ink on the table).
Next I used a different stamp from the Gallery Grunge stamp set to stamp in Crumb Cake ink onto the 5 1/4 x 1 3/4 inch Crumb Cake CS.
Using Memento ink, stamp the horse from the Let It Ride stamp set onto the Fliud 100 Watercolor Paper. You will need to be sure you have plenty of ink on the stamp and hold the stamp down for 10 seconds to get a dark enough image. The watercolor paper absorbs the ink differently than the cardstock does.
Stamp the sentiment “Go for it!” in Memento ink onto the 4 x 2 inch Very Vanilla CS. Leave room around the sentiment so you can use a Scalloped Circle Punch.
Now for some water-coloring fun! Turn the Balmy Blue ink pad upside down on the table. Push your thumbs down in the center, up and down, several times. Flip it over and open the ink pad. You should have an ink spot on the top of the inside cover.
I like to watercolor with the Aqua Painter. To prep the Aqua Painter you will need to squeeze the barrel that is filled with water and get a few drops of water to come out on a paper towel.
Put a few drops of water next to the ink spot (less is better). Use the Aqua Painter to mix a little ink into the drops of water. Start to apply the ink and water to the background in long strokes horizontally. Start light and gradually add color until it pleases you.
Continue to add a drop of water, then mix in the ink and apply to the background until you have the background covered. Wash off the Balmy Blue ink by squeezing the barrel of the Aqua Painter and brush it onto the paper towel until the water is clear.
Repeat the procedure with the Granny Apple Green ink. Apply to the grass. Be sure to clean the Aqua Painter before using the next color.
Using the Crumb Cake ink, apply a thin wash to the entire horse.
To get a darker ink with the Aqua Painter, do not squeeze out any water. Pick up ink from the middle of the ink spot on the very tip of the brush. Apply to areas that you want darker or shadowed. Again, I am not an artist, but I follow the artist’s lines and apply a darker layer of ink in that area. I also apply darker color to the legs that are on the opposite side of the horse. In my mind, these legs would be shadowed by the horses body.
I used the Basic Black Stampin’ Write marker on the hooves.
We are going to adhere the watercolor horse to the 6 1/2 x 4 inch scored at 3 1/4 inches Early Espresso CS. We will adhere it to the “front” of this little card with it turned backward. If you lay the card open to the table, you would adhere the horse to the left side.
The 3 3/4 x 3 inch Very Vanilla CS will go on the inside of our backward card. If you lay the card face up (the horse will be on the back of the right side), adhere the Very Vanilla CS to the left side.
The backward little card should end up looking like this.
Adhere the 5 1/4 x 4 inch stamped Soft Suede CS to the inside of the 6 1/4 x 5 /1/2 inch scored at 2 inches Early Espresso CS “card”. This is an odd looking “card” right now, but I assure you it will look great when we are done!
Adhere the 5 1/4 x 1 3/4 inch stamped Crumb Cake CS to the front of the odd Early Espresso card. Now we will put the backward and the odd cards together.
Adhere the back of the backward horse card to the center of the inside of the odd Early Espresso card. Now open the horse card and fold the front of the Early Espresso CS card under it.
Here is a “bird’s eye” view.
Use the 1 3/8 inch Scalloped Circle Punch to punch out the sentiment “Go for it!”.
To make the sentiment stand out more, I sponged some Soft Suede ink around the edge of the scalloped circle. (If you need help preparing the sponge, look at my blog about sponging here.)
Apply some Mini Stampin’ Dimensionals to the side and bottom as shown. This is because you want the card front to have a space to slide under the scalloped circle.
Place the 1 3/8 inch Scalloped Circle on the bottom left corner and be sure the front piece will slice under it before you adhere it to the card.
Viola! You have a watercolor masterpiece! Well, maybe not, but it is a very special card! Any horse-lover would appreciate receiving this card!
Thanks for joining me. I hope you try this out. Don’t worry if it doesn’t look great the first time! Just stamp several horses on a piece of watercolor and have fun! Experiment!
The 2019-2020 Stampin’ Up! Annual Catalog will be good until June 2, 2020. If you would like to look at the “Last Chance Products” just go to my online store and click the tab in the left hand column. You can get to my store here.
If you need any assistance and/or want me to mail you a new 2020-2021 Stampin’ Up! Annual Catalog, leave me a comment on this blog or email me at: theresastreasures.az@gmail.com.
To purchase any of the products I used today, click on the photo below.
This is a great way to use most of the 6 x 6 inch piece of a Designer Series Paper (DSP). I know a lot of folks don’t really read a real live book anymore, but you can use the bookmark in your planner, recipe book, Bible, etc. Nonetheless, an inspirational card and bookmark is a wonderful handmade gift to give someone.
Measurements: Whisper White cardstock (CS): 8 1/2 x 5 1/2 inches with a score line at 4 1/4 inches, 6 1/4 x 2 inches, 5 x 2 inches and 5 x 2 1/2 inches; Best Dressed DSP: 6 x 6 inches (I will show you how to cut to 5 1/4 x 4 inches and 5 1/4 x 1 3/4 inches); and Melon Mambo CS: 5 x 2 inches. You will also need the following Punches: 1 3/4 inch Circle, Pretty Label, Butterfly Duet and Scalloped Tag Topper.
Using the new Stampin’ Up! Paper Trimmer, make the first cut on the Best Dressed DSP at 5 1/4 inches.
Turn the paper 90 degrees. The second cut is at 4 inches. The larger piece is 5 1/4 x 4 inches, which is what you will need for the card front. The smaller piece is 5 1/4 x 2 inches. Tip: I labeled the cutting blade “CUT” and the score blade “SCORE” so I would remember which was which. It is so sad when you accidentally CUT when you meant to SCORE!
The third cut will trim the 5 1/4 x 2 inches down to 5 1/4 x 1 1/4 inches. This will be the piece for the bookmark. You will end up with a little bit of left over DSP, but not much.
Now for some stamping! I love the Butterfly Wishes stamp set because there are several different types of butterflies. These two happen to coordinate with the Butterfly Duet Punch. Stamp the larger butterfly in Melon Mambo ink onto one end of the 5 x 2 1/2 inch Whisper White CS. Stamp the smaller butterfly in Melon Mambo ink on the other end.
There are two sentiments, one for the card and one for the bookmark. Stamp the sentiment “Love to celebrate you” in Melon Mambo ink in the center of one end of the 5 x 2 inch Whisper White CS. Stamp the other sentiment “It was a perfect day because of you” in the center of the other end. Be mindful about the placement so that the punches will be able to go around the sentiments.
The punches are the 1 3/4 inch Circle Punch and the Pretty Label Punch. Use the Circle Punch to punch out the sentiment “Love to celebrate you”. Tip: I find it easier to use the punches if I lay them upside down on the table and use the heel of my hand to push down firmly and quickly.
Use the Pretty Label Punch to punch out the sentiment “It was a perfect day because of you”.
Punch out a Pretty Label using the Melon Mambo CS.
Use the Butterfly Duet Punch to punch out the two butterflies.
Punch out the smaller butterfly first, then the larger butterfly.
Use the Scalloped Tag Topper Punch with the 6 1/4 x 2 inch Whisper White CS to make the bookmark. Tip: This punch is a little different. I do flip it upside down so I can see where the paper is, but you need to squeeze it firmly and quickly to make it punch the paper. It may be better to squeeze with both hands.
Gather all the pieces as shown above to make the bookmark.
Adhere the 5 1/4 x 1 3/4 inch DSP to the Whisper White CS bookmark.
Use Stampin’ Dimensionals on the back of the sentiment and the small butterfly. Adhere these to the bookmark.
For a finishing touch, I used 6 inches of the 5/8 inch Polka Dot Tulle Ribbon and then tied a bow around it with 10 inches of Whisper White Bakers Twine.
Use the Bone Folder on the 8 1/2 x 5 1/2 inch Whisper White CS to get a nice crisp fold at the 4 1/4 inch score line. This is the card base. Adhere the 5 1/4 x 4 inch Best Dressed DSP to the front of the card base.
Adhere the Melon Mambo CS Pretty Label to the back of the Pretty Label with the sentiment on it.
Apply Stampin’ Dimensionals to the back of the sentiment label and the large butterfly. Adhere the sentiment to the card front.
I had to remove one of the Stampin’ Dimensionals so that the butterfly would sit properly over the label with the sentiment.
Tie a bow with 10 inches of the 5/8 inch Polka Dot Tulle and one with 10 inches of the Whisper White Bakers Twine. Use Glue Dots to adhere the bows to the card front.
Viola!You have a beautiful card! But wait……
Viola! You have a beautiful card and a matching bookmark! What a great gift to give to someone to uplift their spirits!
Thanks for joining me. I hope you try this out. It is a lot of fun to make! Remember that the new Annual Catalog is just around the corner, and there are many stamp sets, punches, dies and embellishments which are retiring. Go to my online store by clicking SHOP HERE and look at the Last Chance Products. There are several on sale, some at 60% off! Let me know if I can be of assistance in placing your order. Contact me in a comment on this blog, private message me on my Theresa’s Treasures Facebook page by clicking HERE, or send me an email at: theresastreasures.az@gmail.com. Also notify me if you would like a 2020-2021 Stampin’ Up! Annual Catalog mailed to you. I would love to have you as my customer!
To purchase a product listed below, click on the photo and you will go to my Online store.


")

")


")


 Metallic Ribbon")


 Scallop Circle Punch")


 Circle Punch")


 Designer Series Paper")


 Polka Dot Tulle Ribbon")
