Posted in 2022 January-June Stampin' Up!® Mini Catalog, beginner stamper, Designer Series Paper, flowers, Nature, Vintage

Stampin’ Up!® Sneak Peak- Honeybee Home

I have an exciting new stamp set to give you a sneak peak of today- Honeybee Home. The 2022 January-June Stampin’ Up! Mini Catalog premieres on January 4, 2022! There are so many great stamp sets, Designer Series Papers, Dies and Embossing Folders in this catalog! If you would like me to be your Stampin’ Up! Demonstrator and are in need of a catalog, drop me an email with your name and address. I will send you a Catalog and a free gift! My email is theresastreasures.az@gmail.com.

Now for the card!

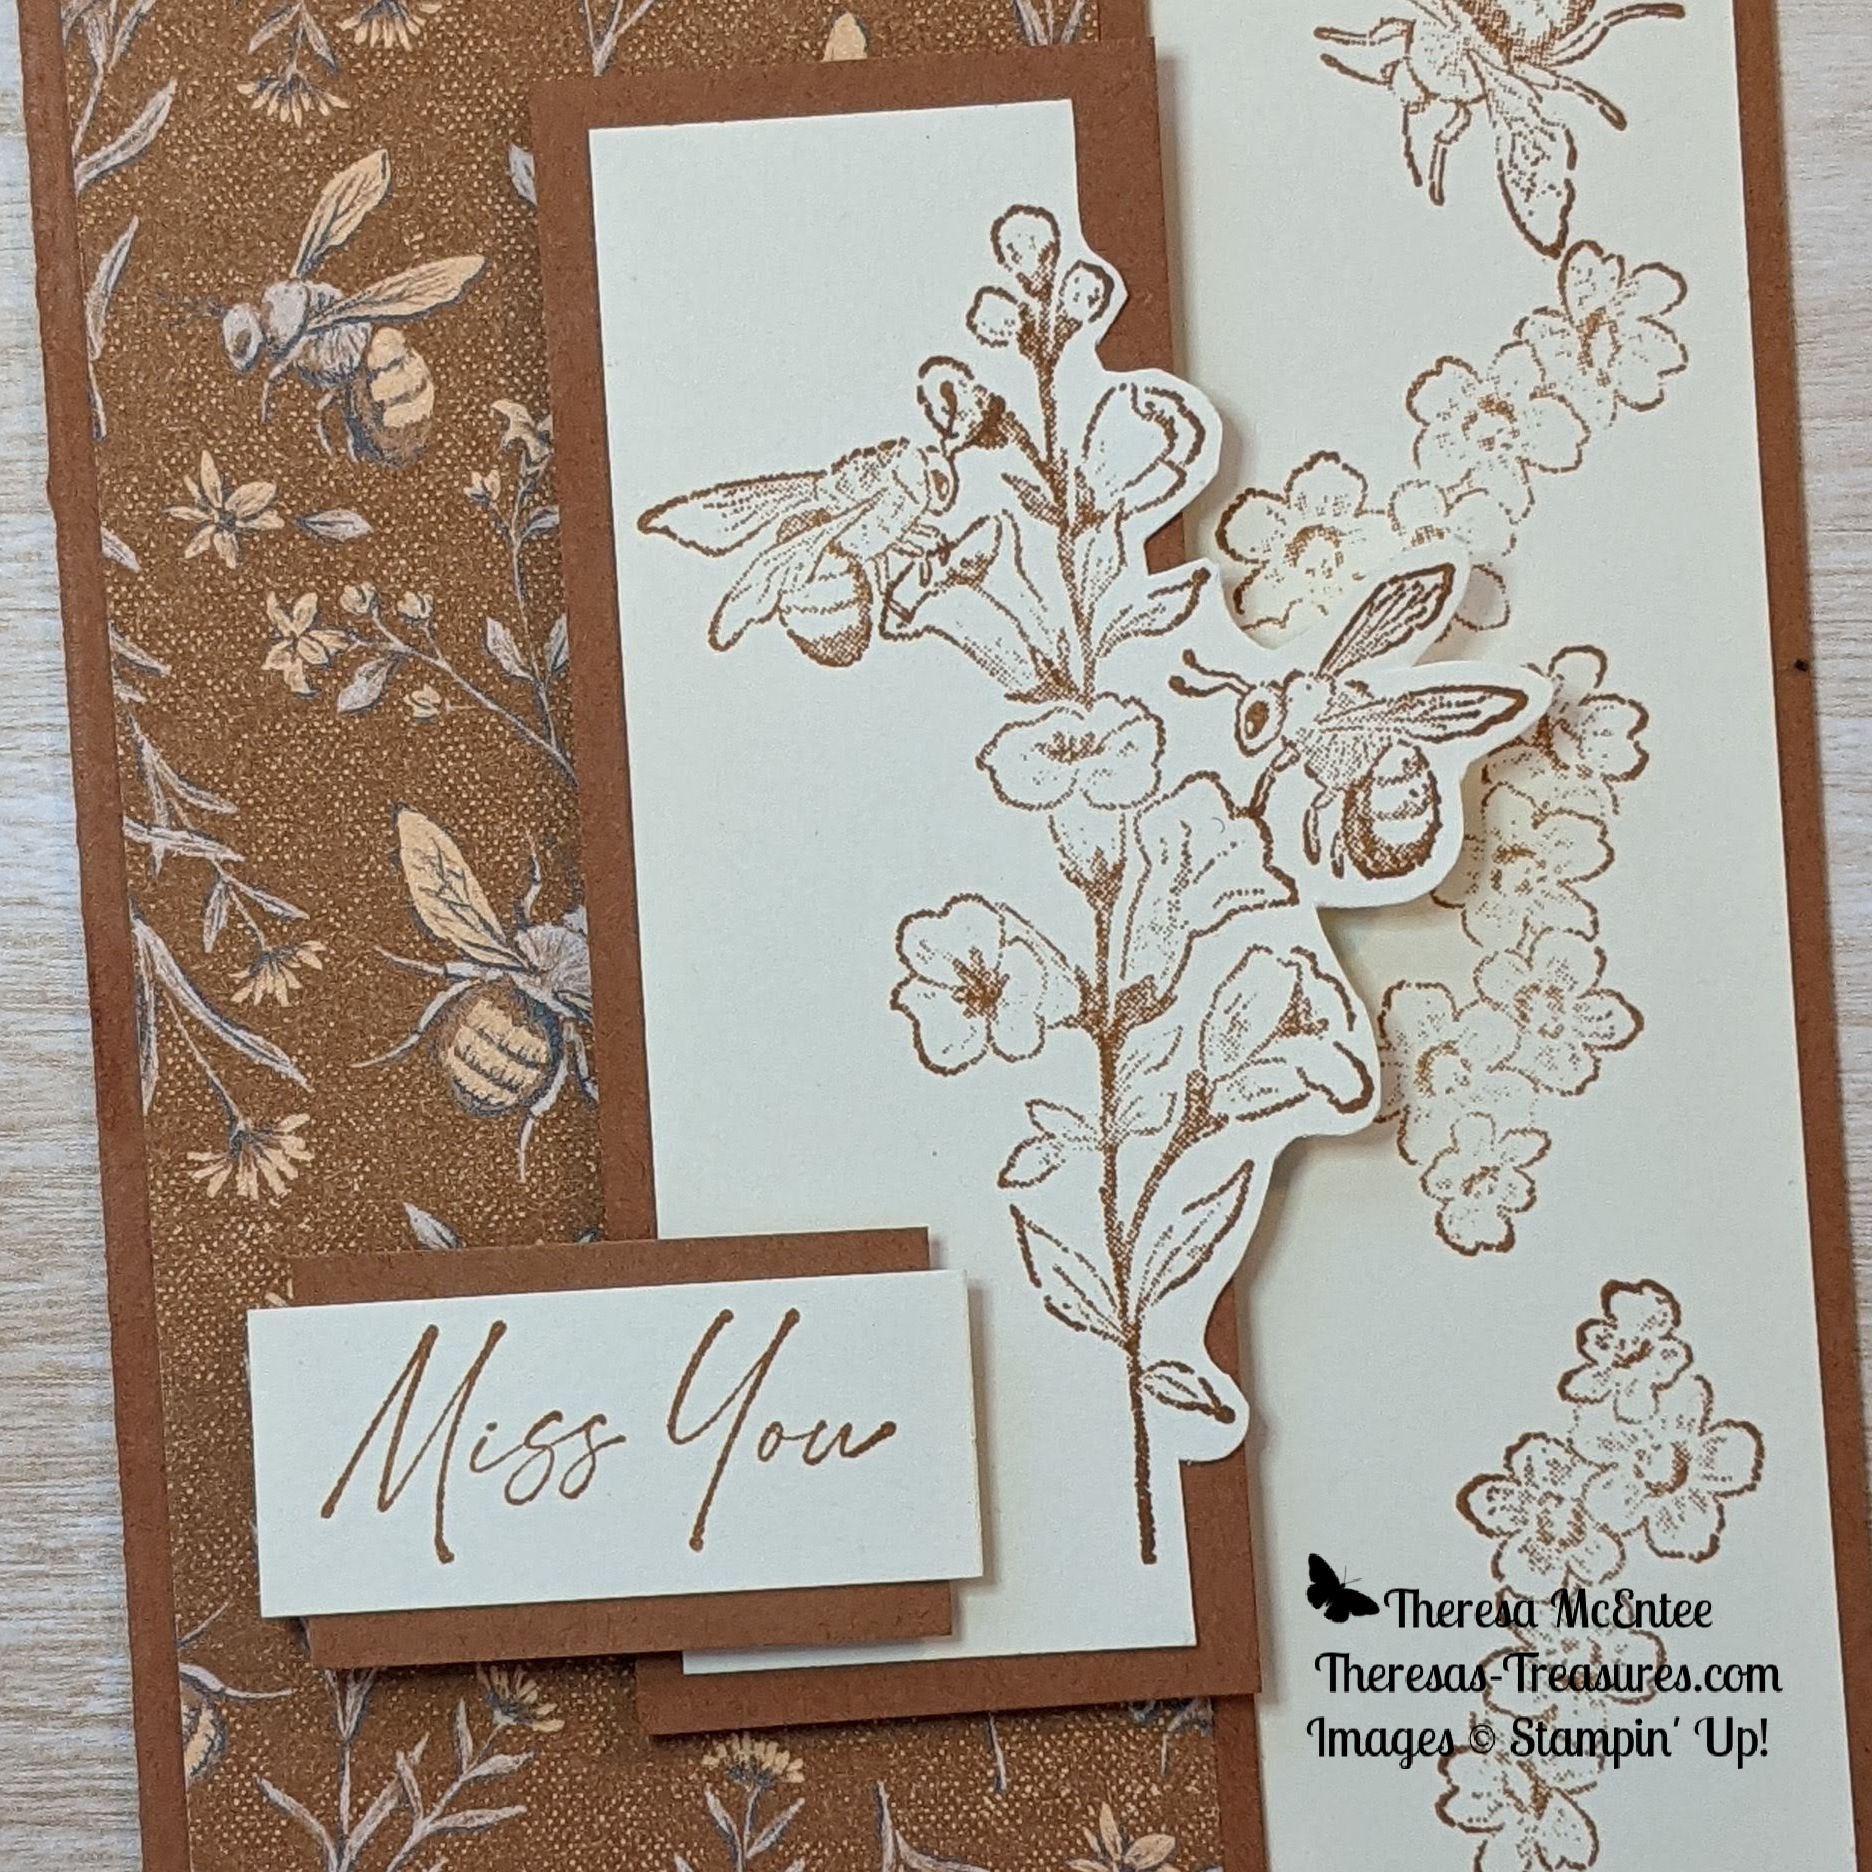
The elements that come together to make this “Miss You” Honeybee Home card are in the Heart & Home Suite. The Heart & Home Designer Series Paper (DSP) is just gorgeous!

Measurements

Honeybee Home Miss You Card

  • Cinnamon Cider Card Stock (CS) card base: 5 1/2 x 8 1/2 inches with a score line at 4 1/4 inches ( We will cut this to get the other Cinnamon Cider CS card pieces).
  • Very Vanilla CS: 4 x 5 1/4 inches, 2 1/2 x 3 3/4 inches and 3/4 x 1 3/4 inches (not pictured).
  • Heart & Home DSP: 2 1/2 x 5 1/4 inches.

Cutting the Card Base

Cut 1 1/2 inches off the left side of the Cinnamon Cider CS card base. This creates the card base and a 1 1/2 x 5 1/2 inch Cinnamon Cider CS piece. Cut 1 1/2 inches off the end of this piece. Now you have all of the card pieces needed.

Stamping

Start out by stamping the inside of the card. Use Cinnamon Cider Ink to stamp the largest Honeybee onto the top of the 4 x 5 1/4 inch Very Vanilla CS. Then stamp the group of flowers along the side.

Now stamp the flower with the stem onto the center of the 2 1/2 x 3 3/4 inch Very Vanilla CS. Next stamp the two bees in profile. Stamp close to the flowers so it looks like the bees are attending to the flowers.

To finish up the stamping, stamp the sentiment “Miss You” onto the 3/4 x 1 3/4 inch Very Vanilla CS.

Putting the Honeybee Home card together

Use the Paper Snips to cut the right side of the flower with the honeybees. Next adhere this piece to the 1 1/2 x 4 inch Cinnamon Cider CS. The cut portion of the flowers will hang over the edge of the Cinnamon Cider CS.

Adhere the stamped 4 x 5 1/4 inch Very Vanilla CS to the inside of the Cinnamon Cider CS card base.

Fold the left-hand flap forward and adhere the Heart & Home DSP to the front panel. (Sorry-forgot to make a photo!)

Adhere the “Miss You” sentiment to the left over Cinnamon Cider CS piece. Trim to about 1/4 inch on either side.

Stampin’ Dimensionals

Apply Stampin’ Dimensionals to the back of the flower and honeybee piece. Also apply a Stampin’ Dimensional on the back of the sentiment on the right. Apply two Dimensionals to the back of the sentiment on the left. You’ll see why you need two in a minute.

Remove the protective covering for the Stampin’ Dimensionals and adhere the flower and honeybee piece first. The edge of the Cinnamon Cider CS should line up with the right-sided edge of the front flap. Follow by adhering the sentiment. As you will see, you need two Dimensionals on the left because the right side is elevated by two.

Voila! You have lovely Honeybee Home “Miss You” card!

I loved making this card. I initially did not have any idea how it would turn out. Sometimes I just start out by cutting the card base and stamping some images. Then I start to see how I want them to come together.

It is very subtle, but you can add Bling!. I added the Champagne Rhinestone Jewels to the center of some of the flowers on the card to the right. In person, the rhinestones really sparkle!

Supply List

The Honeybee Home stamp set and the Heart & Home DSP will be available to order starting January 4, 2022.

Product List

Have a wonderful day! I hope you take some time to craft. This is the best time of year to make cards and papercrafts because you can give them away as Holiday gifts!

Ciao!

Theresa

Posted in 2021 Stampin' Up! July-December Mini Catalog, beginner stamper, Ornaments, Winter Holiday

Stampin’ Up!® Stars Are Shining Christmas Card

I am on Day 11 of the “12 Days of Christmas Card Making Challenge” with my stamping buddy Christy. Today’s card is the Stampin’ Up!® Stars Are Shining Christmas Card. For the last 10 days my blog has focused on a new holiday card showcasing a new stamp set each day. The challenge ends with tomorrow’s card. If you would like to see the whole Gallery of the 12 Days of Christmas Card Making Challenge you can see it on my Welcome page HERE. Check out all the fabulous products I used that are available in the 2021 Stampin’ Up! July to December Mini Catalog. Be sure to order in time to make your own Christmas cards! You can order HERE when you have your list ready!

Be sure to order as soon as you know what you would like. Many of the products in the 2021 July-Dec Mini Catalog are retiring. Click on the image above to see the list. Many are already SOLD OUT. There is also a delay the shipping process. Order today so you will have time to make your cards!

Joy to the World! Today’s card is a simple one. After creating the Layering Diorama with the Peaceful Deer yesterday, I needed an easier card!

Measurements

Stars Are Shining Christmas Card

  • Real Red Card Stock (CS) card base: 4 1/4 x 11 inches with a score line at 5 1/2 inches.
  • Basic White CS: two at 4 x 5 1/4 inches.
  • Tidings of Christmas 6 x 6 inch Designer Series Paper (DSP): 3 1/2 x 4 inches.
  • Real Red 3/8 inch Double-Stitched Satin Ribbon: 6 1/2 inches.

Cut the Tidings of Christmas DSP into 2 triangles. Place one triangle over the top of one of the 4 x 5 1/2 inch Basic White CS. Use a pencil to draw a line at the border of the DSP. Remove the DSP and set aside for later.

Before you start stamping, figure out where you would like the ornaments to be. Place the stamps on the paper. Include the sentiment “Joy to the World” in the lower right-hand corner. Use a pencil to mark the center of the top of each ornament.

You will have three dots where the string for the ornament needs to end. Stamp the sentiment in Memento Ink. Then stamp each of the three strings for the ornaments.

Start by stamping the middle ornament. Add the other two ornaments.

On the other 4 x 5 1/4 inch Basic White CS stamp the sentiment “The Stars are Shining Brightly”. Stamp some of the stars on the side. I stamped once, then turned the stamp 180 degrees, applied more Memento Ink, and stamped a second time.

Coloring the Ornaments

I absolutely love the Stampin’ Blend Alcohol Markers but the Stampin’ Write Markers have a finer tip. Color in some of the design with the Garden Green Stampin’ Write Marker. Finish up by using the Real Red marker.

Adhere the Tidings of Christmas DSP triangle to the top left corner.

Adhere the Real Red Double-Stitched Satin Ribbon to the front panel with Mini Glue Dots. Take care on the upper right-hand corner to have the ribbon to the left of the corner. Wrap the ribbon around to the back and adhere with a Mini Glue Dot. Trim the excess off of the top corner ribbon.

Adhere the ornament card piece to the front of the Real Red CS card base. Now adhere the inside panel to the inside of the card base.

Now for some Bling! Add some Red Rhinestone Basic Jewels. Add as many as you want! The more, the more sparkle!

Voila! A nice and simple but totally Bling! Stars are Shining Christmas Card! You could really have some fun with this one. Try different colors and patterns of DSP.

Supply List

Product List

Please remember to subscribe to my Theresa’s Treasures Paper Crafts Newsletter. I am just getting started with the Newsletter. I plan to have Up-to-date Stampin’ Up! information on promotions and goings on as well as announcements about my upcoming Zoom Classes. Once I get that going I plan to add a special PDF download for a card with each Newsletter. Subscribe by scrolling down the side bar until you get past the announcement for the Zoom Class. There is a “Subscribe to My Newsletter” form there. Or you can find the form at the end of this blog if you are on your phone.

Thanks so much for visiting today! Have a most wonderful day! The weekend is almost here!

Theresa

Posted in 2021 Stampin' Up! July-December Mini Catalog, beginner stamper, Clean and Simple, Winter Holiday

Stampin’ Up!® Frosted Gingerbread #SimpleStamping Christmas card

I am on Day 8 of the “12 Days of Christmas Card Making Challenge” with my stamping buddy Christy. Today’s card is a Stampin’ Up!® Frosted Gingerbread #SimpleStamping Christmas Card. Each day of this challenge my blog will focus on a new holiday card. The challenge goes until December 10, 2021. I plan to showcase a different stamp set with each card. This will allow you plenty of time to see the great products that are available in the 2021 Stampin’ Up! July to December Mini Catalog, and to order in time to make your own Christmas cards! You can order HERE when you have your list ready!

Many of the products in the Stampin’ Up! July-December Mini Catalog will be retiring at the end of December. If you really want something, order now because products are “while supplies last”. Get more information on the “Last Chance” products HERE

#SimpleStamping Stampin' Up! Frosted Gingerbread Christmas card

This is a perfect card for the beginner stamper to try out. I use only one stamp set, one ink and one type of paper to create this Frosted Gingerbread #SimpleStamping Christmas card.

Measurements

Frosted Gingerbread #SimpleStamping Christmas Card

  • Basic White Card Stock (CS) card base: 5 1/2 x 8 1/2 inches with a score line at 4 1/4 inches.
  • Basic White CS: 4 x 5 1/2 inches

Stamping

The first step is to use Real Red Ink to stamp the sentiment “Wishing You A Merry Christmas” on the inside panel of the Basic White CS card base. Tip: Be sure to use either the Stampin’ Pierce Mat or your catalog to stamp on. Photopolymer stamps work best with a softer surface under the card stock.

For the next step you will need either a Clear Block I or your stamp case. I will be using my stamp case. First remove the paper insert from the stamp case. Lay the border stamp on the top of the 4 x 5 1/4 inch Basic White CS to be sure it is straight. Pick the stamp up with the front of the stamp case.

Close the stamp case. Apply Real Red Ink and stamp along the upper border of the 4 x 5 1/4 inch Basic White CS.

Turn the Basic White CS so the stamped border is on the bottom. Ink the border stamp again and stamp along the top edge.

Stamp the sentiment “Sending You Peppermint Kisses” on the lower right-hand side. Now stamp the trio of peppermints to the left and slightly above the sentiment.

Assembling the Card

To finish the card, adhere the stamped panel to the front of the Basic White CS card base.

completed Stampin' Up! Frosted Gingerbread #SimpleStamping Christmas card

And Voila! That is all there is to this Frosted Gingerbread #SimpleStamping Christmas card!

Supply List

Click on any photo to go to my Online Store and start shopping!

Product List

Thank you for stopping by for Day 8 of the 12 Days of Christmas Card Making Challenge. Later today there will be a non-Christmas blog coming out. I am participating in Kylie Bertucci’s International Blog Highlights Gallery. But I will be back tomorrow with another Christmas card!

Theresa

Posted in 2021 Stampin' Up! July-December Mini Catalog, 2021-2022 Stampin' Up! Annual Catalog, beginner stamper, Emboss Powder, Ornaments, Techniques, Winter Holiday

Stampin’ Up!® Bright Baubles Gold Emboss Christmas Card

I am on Day 2 of the “12 Days of Christmas Card Making Challenge” with my stamping buddy Christy. I will be blogging a new holiday card each day until December 10, 2021. I plan to showcase a different stamp set with each card. This will allow you plenty of time to see the great products that are available in the 2021 Stampin’ Up! July to December Mini Catalog and to order in time to make your own Christmas cards!

This Stampin’ Up! Bright Baubles Gold Emboss Christmas Card is rather simple to make with the instructions that follow. The Bright Baubles stamp set is just fabulous! The ornaments are very ornate and elegant.

To be able to heat emboss you will need: Stampin’ Emboss Powder-Metallic, Versamark Ink and the Heat Tool which are found in the 2021-2022 Stampin’ Up! Annual Catalog. These supplies are pictured below with links to my Online Store.

Measurements

  • Very Vanilla Card Stock (CS): 5 1/4 x 4 inches
  • Blackberry Bliss CS card base: 11 x 4 1/4 inches with a score line at 5 1/2 inches.
  • Blackberry Bliss CS card front: 5 1/4 x 4 inches.

Stamping

Stamp the sentiment first with Blackberry Bliss ink. Be sure to try it out on a scrap piece of paper to check the alignment. Follow by stamping one of each of the gorgeous ornaments. Finish with the sparkles on either side of the sentiment. Set aside.

Embossing

It takes practice to be able to get great images with the Gold Emboss Powder on a dark card stock. I strongly recommend purchasing an Anti-Static Powder bag or pouch. This helps prevent the emboss powder from sticking to other parts of the card piece, like to the oils from fingerprints. There are many anti-static pouches available from different suppliers. Also have a microfiber cloth on hand to get the powder off after embossing.

Start the embossing process by applying the anti-static powder to the 5 1/4 x 4 inch Blackberry Bliss CS. Next stamp the image of the larger ornament in Versamark. Tap out some of the Gold Emboss Powder and move it around so it sticks to the Versamark. Take care not to touch it. Use the Heat Tool until all of the powder has melted. Follow by stamping the second ornament, applying the Gold Emboss Powder and using the Heat Tool. Repeat the process for the “JOY” sentiment.

Again repeat the embossing process for the sparkles. See how hazy the card piece looks? After the Gold Emboss Powder has cooled, use a microfiber cloth to gently rub off the anti-static powder.

Adhere the Gold Embossed Blackberry Bliss CS to the front of the Blackberry Bliss card base. Adhere the stamped Very Vanilla CS card piece to the inside of the card base.

Add some Gilded Gems and Voila! you have a gorgeous elegant handmade Christmas card!

I hope you enjoy trying this card for yourself. I actually ended up making several. The other emboss powders in the Metallics set are silver and copper. Try them out on different colors of card stock to see how fabulous they are!

The complete list of supplies will be at the end of the blog.

Retiring Products from the July – December Mini Catalog

You may download the list to look over and make your shopping list.

Supplies

Product List

Thank you very much for stopping by to see my 2nd day of the 12 Day Christmas Card Challenge! See you tomorrow for day 3!

Theresa

Posted in 2021 Stampin' Up! July-December Mini Catalog, beginner stamper

Stampin’ Up!® #SimpleStamping Christmas Season Christmas Card

Season’s Greetings! I am embarking on the “12 Days of Christmas Card Making Challenge” with my stamping buddy Christy. Our plan is to create and blog about a new holiday card each day from November 29, 2021 until December 10, 2021. Each day I plan to showcase a different stamp set. This will allow you plenty of time to see what is available in the 2021 Stampin’ Up! July to December Catalog and order it in time to make your own Christmas cards! You can Shop Here when you are ready to place your order.

This lovely #SimpleStamping Christmas card is made from two stamp sets. The images are in the Christmas Season stamp set. The sentiment is from the Christmas to Remember stamp set.

You can get both sets along with 2 sets of dies, Cherry Cobbler & Gold ribbon, Gold Holly Leaves and gorgeous Painted Christmas Designer Series Paper (DSP) when you order the Painted Christmas Suite Collection. You will find the Painted Christmas Collection on pages 16- 17 in the Mini Catalog.

Measurements

  • Basic White Card Stock (CS) card base: 5 1/2 x 8 1/2 inches with a score line at
    4 1/4 inches.
  • Basic White CS: 5 x 3 3/4 inches
  • Real Red CS: 5 1/4 x 4 inches

Stamping

The first step in creating this card is to stamp the sentiment in Real Red ink onto the 5 x 3 3/4 inch Basic White CS. The next step involves using a Two Step Stamp. To start, lay down the large and the small of the less detailed of the 2 pinecone stamps for positioning. Then use the Clear Acrylic block E to pick up the stamps. Stamp this layer in Crumb Cake ink.

Now lay the more detailed stamps on the stamped images for positioning. Pick up the stamps with an acrylic block as you did in the previous step. Use Early Espresso ink to stamp the images.

See how the pinecones now have a more 3D quality! Next use Shaded Spruce ink and the dual small pine needle stamp to stamp twice around the smaller pinecone. Stamp the second time without adding any ink to your stamp. This is called Stamping Off.

Continue to use the Shaded Spruce ink and stamp the larger pine needle image around the pinecones. Use the Stamping Off Technique here too. This helps to add a 3D quality to the pine needles.

Assembly

Adhere the stamped card piece onto the 5 1/4 x 4 inch Real Red CS. Adhere this piece onto the front of the 8 1/2 x 5 1/2 inch Basic White CS card base.

Add a bow and Voila! you have finished a #simplestamping Christmas card!

Join me again tomorrow for another Holiday Card complete with instructions and a supply list!

Supplies for today’s card

Click on any photo to get to my Online Store and start shopping!

Product List

I hope you have a great start to your week! Happy stamping!

Theresa

Posted in 2021 Stampin' Up! July-December Mini Catalog, beginner stamper, Nature, Simple stamping, Thanksgiving

Stampin’ Up!® #SimpleStamping Fall Friendship Card

Howdy! Fall is slowly giving way to the Holiday Season. Next week I will begin to show you some Holiday cards. For today I have a lovely fall friendship card made using only stamps, ink and paper. Otherwise known as #SimpleStamping.

I am actually using the Christmas Season stamp set. But I chose fall colors so I could create a nice fall friendship card. The sentiment is part of the Christmas to Remember stamp set. Stay tuned because I will soon be using the same two stamp sets to create a Christmas card.

Measurements

  • Cajun Craze Card Stock (CS) card base: 8 1/2 x 5 1/2 inches with a score line at 4 1/4 inches.
  • Very Vanilla CS: two 5 1/4 x 4 inches
  • Note: Ink colors: Cajun Craze, Pumpkin Pie and Old Olive.

Stamping

Start out by stamping the sentiment “Friends Like You Make This Season Special” in Cajun Craze ink onto one of the 5 1/4 x 4 inch Very Vanilla CS. Stamp some leaves in Old Olive ink. Then stamp another style of leaf in Pumpkin Pie ink. I started out with 3 of each color in a triangular orientation.

Add a third style of leaf in Cajun Craze ink. Fill in the spaces as desired using any of the 3 styles of leaves and their coordinating color. On the second 5 1/4 x 4 inch Very Vanilla CS stamp in the same manner just along the right-hand side. This will be the inside of the card so you need to leave space for writing.

Assembly

Adhere the first stamped Very Vanilla CS panel to the front of the Cajun Craze CS card base. Adhere the second panel to the inside of the card base.

Voila! You have a gorgeous #SimpleStamping fall friendship card!

Bling! Alert! I added a few of the Champagne Rhinestone Basic Jewels for some extra sparkle around the sentiment! This is a step up from #SimpleStamping.

Thanks so much for stopping by today. Be sure to sign up for my newsletter by scrolling to the bottom of the side bar. I will be sending my first Theresa’s Treasures Paper Crafts Newsletter out soon!

Supplies

To purchase the Stampin’ Up! products needed to make this card yourself, click on any of the photos below and you will go to my Online Store.

Product List

Have a most wonderful day!

Theresa

Posted in 2021-2022 Stampin' Up! Annual Catalog, beginner stamper, Designer Series Paper, flowers, Fun/Fancy fold card, Gratitude/ Thanks, Mystery Stamping

Fun Fold Friday- Stampin’ Up!® Artistically Inked Thank You Card

Join me today to make this gorgeous Artistically Inked Thank You card!

It is gradually getting cooler here in Arizona, but I am not quite ready to show Christmas cards yet. Today I have a Fun Fold that I had my Stamping Gems Team members make as a Mystery Stamping activity.

Fun Fold Friday is on!

Mystery Stamping is a fun way to make cards together. You give the clues one by one. Each person picks the paper and stamp set they want to use. All of the cards are uniquely different. Usually you do not show the finished card until the end.

Clue #1 Supplies

  1. Color Card Stock (CS) Color A: 8 1/2 x 5 1/2 inches with score lines at 2 1/8 and 6 3/8 inches. (This is the card base and it is in portrait orientation.) You also need a 3 x 2 inch piece.
  2. Color CS Color B: choose a color to coordinate with Color A. Two 4 x 2 5/8 inches.
  3. Designer Series Paper (DSP) to coordinate with the Color A and Color B CS. Two 3 3/4 x 2 3/8 inches.
  4. Basic White CS: 2 3/4 x 1 3/4 inches and 5 1/4 x 4 inches.
  5. A sentiment stamp to fit inside the 2 3/4 x 1 3/4 inch Basic White CS card piece.
  6. Images to make a border around the sentiment and the inside of the card.
  7. Coordinating ink, embellishments, adhesive and Stampin’ Dimensionals.

Clue #2

Stamp your sentiment onto the 2 3/4 x 1 3/4 inch Basic White CS. Stamp images around the sentiment.

Clue #3

Stamp the images around the outside edge of the 5 1/4 x 4 inch Basic White CS. Leave the center blank so one could write a note.

Clue #4

Adhere the sentiment to the 3 x 2 inch Color A CS. Adhere the 5 1/4 x 4 inch Basic White CS to the center panel of the 8 1/2 x 5 1/2 inch Color A CS.

Clue #5

Adhere the DSP to the Color B CS. Repeat for the other pieces. You should have two identical card pieces.

Clue #6

Bring the 2 side panels together so they meet in the center of the card. Apply adhesive to the back of the left half of one of the card pieces with the DSP on it. Adhere this to the top of the left-hand panel. Now apply adhesive to the back of the right side of the second DSP card piece. Adhere it to the bottom of the right-hand panel.

Clue # 7

Use Stampin’ Dimensionals to adhere the sentiment to the center of the upper DSP card piece.

Clue #8

Use embellishments as desired.

Voila! That is the Mystery Stamping Fun Fold using the Artistically Inked stamp set and Expressions in Ink DSP! The Mystery Stamping is a really fun way for my Stamping Gems Team and me to stamp together as part of our monthly team meeting.

Product List

I hope you have some time to do some crafting this weekend! I find stamping and card making is so peaceful and relaxing.

Bye for now!

Theresa

Posted in beginner stamper, Designer Series Paper, Gratitude/ Thanks

Bruno and Kylie Bertucci’s Stampin’ Up!® Demonstrator Training Program Blog Hop- November 2021 Eden’s Garden Thank You Card

Welcome to my Eden’s Garden Thank You Card today. Thank you for joining me today for Bruno and Kylie’s Demonstrator Training Program Monthly Blog Hop! This Demonstrator Training Program is for Stampin’ Up! Demonstrators all over the world who are working towards bettering their business. The program has been so awesome so far! One thing I learned is how to participate in this Blog Hop!

Be sure to visit all the blogs and see all the unique Thank You cards from around the world! There are so many ideas and creative inspiration! If you wish to become a Stampin’ up! Demonstrator please see “The Start With Savings Starter Kit” information of the end of this blog.

I am so amazed with how beautiful the Eden’s Garden Collection is! The Ever Eden Designer Series Paper (DSP) has so many fabulous designs! I decided to use the DSP as the focus of my customer Thank You cards.

Measurements: Ever Eden DSP– 5 x 1 inch and 3 1/2 x 1 3/4 inches; Evening Evergreen Card Stock (CS) card base and 3 3/4 x 2 3/4 inches; Basic White CS 3 1/4 x 2 1/2 inches and 5 1/4 x 4 inches.

Add a few of the Garden Gems and Voila! A fast and simple Thank You Card to show off the fabulous Ever Eden DSP to my customers!

Be sure to click on the next person in line to see more amazing cards. You are at Theresa McEntee-Theresa’s Treasures-USA

Supplies- Shop Here
November Host Code: BAKE6KM6*

*Use the host code when you order $50 or greater and receive a free gift from me!  If your order is over $150, please do not use this code because you can use the Stampin’ Rewards yourself. Any questions-shoot me an email at theresastreasures.az@gmail.com

You may also click on any photo below to go to my Online Store

Product List

Start With Savings Starter Kit Promotion – November 4-30!

The Start with Savings Starter Kit promotion allows you an excellent opportunity to purchase your Starter Kit at a great deal! The Starter Kit is usually $99 which is already an awesome deal! For a limited time you may choose a custom Starter Kit for only $75!!!  This is an unbeatable bargain for Stampin’ Up! product with a value of $125! And you will become part of my Stamping Gems Team!

Have a most wonderful day!

Theresa

Posted in beginner stamper, Simple stamping, Stampin' Up! Eden's Garden Collection

Stampin’ Up!® Eden’s Garden #SimpleStamping Friendship Card

Hello! I hope all is going well with you today. We got close to a freeze the other night, but are now back up in the 70’s during the day here in Arizona. I love fall but I don’t like it too cold!

Today I have created a fun #SimpleStamping card for you to try. This card looks more complicated than it is.

I am using Stampin’ Up! product from the Eden’s Garden Collection which is being released today! I will have the item numbers and shopping information at the end of this blog.

Measurements

Basic White Card Stock (CS): card base at 8 1/2 x 5 1/2 inches with a score line at 4 1/4 inches; One 4 1/2 x 3 3/4 inch piece; and one 2 3/4 x 1 inch piece.

Evening Evergreen CS: 5 1/4 x 4 inches, and two 1 x 7/8 inch squares.

Stamping

On the 4 1/2 x 3 3/4 inch Basic White CS, start out with one type of leaf. Stamp with the Evening Evergreen ink. Add a second type of leaf in the same color of ink. (Note: the 4 1/2 inch edge is on the top and bottom; the 3 3/4 inch edge is on either side)

Switch to the Soft Succulent ink and stamp a third type of leaf. Finish stamping this card piece with a fourth type of leaf in the Soft Succulent ink.

Return to the Evening Evergreen ink and stamp the sentiment “Dear Friend How are you?” onto the 2 3/4 x 1 inch Basic White CS. Next stamp the sentiment “My heart is tied to yours…” on the inside panel of the 8 1/2 x 5 1/2 inch Basic White CS card base. Use the Soft Succulent ink to stamp the leaf sprigs on either side of the sentiment.

How To Assemble the Card

Use your Stampin’ Up! Paper Trimmer to cut the stamped card piece into 1 1/2 inch strips. (Note: the 4 1/2 inch edge is still on the top and bottom; the 3 3/4 inch edge on either side). Adhere the strips to the 5 1/4 x 4 inch Evening Evergreen CS. Adhere this card piece to the front panel of the Basic White CS card base.

To create the sentiment, adhere the two 1 x 7/8 inch Evening Evergreen CS pieces to the ends of the sentiment strip. (Note: the 7/8 inch edge is on either side).

Voila! You have finished a great friendship card using only stamps, ink and paper! That is what #SimpleStamping is all about!

Dress It Up

If you want to “Dress It Up” a bit, add a few of the Garden Gems. I added three to make the card sparkle!

Supplies

To shop my Online Store click on any photo below.

Product List
Product List

I really appreciate you stopping by today! I just love to share my creations! My hope is that you will give this a try yourself and experience how enjoyable it is to make your own cards.

Ciao!

Theresa

Posted in beginner stamper, flowers, Stampin' Up! Eden's Garden Collection, Sympathy

Stampin’ Up! Eden’s Garden Sympathy Card-how to make a card from a sketch

Hello! Hope your day is going well. I am playing with the new Eden’s Garden Collection which will be available on November 3, 2021.

Often I have a hard time coming up with an idea for a card. Quite a while ago, I started to make sketches of the cards I received on a 5 1/2 x 4 1/4 inch Basic White cardstock. When I am stumped, I look through the sketch cards. Today I am going to share the sketch and the card I created from it.

This is the sympathy card I created with the Eden’s Garden Collection using the sketch. I especially love the Ever Eden Designer Series Paper (DSP) with the gold foil accents. Fabulous!

The Sketch

Here are the sketch and the finished card side by side.

Supplies

Card base: Evening Evergreen Card Stock (CS) 8 1/2 x 5 1/2 inches with a score line at 4 1/4 inches

1st Layer: Gold Foil 5 1/4 x 4 inches

Ever Eden DSP: two at 5 x 1 3/4 inches

Top Layer: Basic White CS 3 1/2 x 2 3/4 inches and Evening Evergreen CS 3 5/8 x 2 7/8 inches.

Stamping

I stamped the floral image several times, first in Evening Evergreen ink and then in Soft Succulent ink. I liked the Soft Succulent flower with the Evening Evergreen sentiment on the bottom (bottom right).

Putting It All Together

The first step is to adhere the 5 1/4 x 4 inch Gold Foil to the Evening Evergreen CS card base. (Tip: A little trick I learned to save my Gold Foil is to use dies to cut out shapes before covering it up. The sprigs are for another card.) Next adhere the two pieces of the Ever Eden DSP.

Finish the card front by adhering the stamped Basic White CS to the Evening Evergreen CS. Use Stampin’ Dimensionals to adhere this to the card front. I added some of the Garden Gems around the flowers. Next, I stamped a 5 1/4 x 4 inch Basic White CS with the sentiment on the right and framed it with the little sprig for the inside of the card.

Voila! You have a beautiful sympathy card.

Supplies

Product List

Thanks so much for checking out my blog today. I hope you have a wonderful day!

Theresa