Posted in 2020-2021 Stampin' Up! Catalog, Lake/Sea/Ocean, Sea, Sealife, Stampin" Blends Alcohol Markers

Seaside Notions for End of Summer Seaside Birthday Card

This wonderful summer Birthday card was inspired by a swap I received. A swap is a card that you make multiple copies of and take to a stamping event with you. There you will meet others who have made swap and you swap cards with them. Unfortunately I have lost the name of who made the swap I was inspired by.

Measurements: Very Vanilla Card Stock (CS): 4 1/4 x 11 inch card base with a score line at 5 1/2 inches, two 4 x 5 1/4 inch, 2 x 4 1/2 inches and 1 x 3 3/4 inches.

I used Memento ink for the stamping and I colored with Stampin’ Blends Alcohol Markers. I used the light and dark Blend of each of the following colors: Pool Party, Purple Posy, Petal Pink, Crumb Cake and Soft Suede.

Using the Memento ink, stamp the sea horse onto the 2 x 4 1/2 inch Very Vanilla CS and the “Happy Birthday” sentiment onto the 1 x 3 3/4 inch strip of Very Vanilla CS.

On one of the 4 x 5 1/4 inch Very Vanilla CS pieces I stamped a row of the conch shell, then added the sand dollars.

Next I stamped the snail shell. I filled in the spaces with the clam shell. I added another conch shell on the very bottom left and top right. This is a slightly organized random pattern in my book! Ha, ha! 🙂 

Don’t do this step because it turned out to be a mistake later on but i wanted to share this with you so you won’t make the same mistake. On the inside of the card base I stamped another sea horse and two sand dollars. I recommend that you stamp the sea horse and sand dollars onto the other 4 x 5 1/4 inch Very Vanilla CS piece.

Again do not do this step. Once I used the Stampin’ Blends to color the sea horse and sand dollars, I realized that the markers bled through to the back. Whoa! 😲 The way I fixed it is that I cut the inside panel to be 4 x 5 1/4 inches and made another 4 1/4 x 11 inch Very Vanilla CS card base.

On with the fun. Color the sea horse with the light and dark Soft Suede Blends.

For each of the shells, I decided to add a shadow to the lower right hand side. I did this by first coloring in the shell with the Light Crumb Cake Blend. I then went over the lower right with the Dark Crumb Cake Blend. Lastly I went over the area I wanted shadowed again with the Light Crumb Cake Blend to blend the light and dark together.

I repeated the process with all the shells. The conch shells are colored in Petal Pink. The snail shell is colored in Pool Party and the clam shell in Purple Posy.

Fussy cut the sea horse that is stamped on the 2 x 4 1/2 inch Very Vanilla CS. Place cut up Stampin’ Dimensionals and Mini Stampin’ Dimensionals on the tail and head, leaving the body without Dimensionals.

Adhere the body of the sea horse to the left side of the Happy Birthday sentiment. Cut a banner end on the right end of the sentiment strip.

Adhere the 4 x 5 1/4 inch Very Vanilla CS stamped with the sea horse to the inside of the 4 1/4 x 11 inch Very Vanilla CS card base. Use the Bone Folder on the 5 1/2 inch score line to make a crisp fold.

Adhere the other 4 1/4 x 5 inch Very Vanilla CS stamped with the shells to the card front. Use Stampin’ Dimensionals on the back of the sentiment strip and adhere in place.

Now for some Bling! The Wink of Stella Glitter Brush is perfect for adding a little sparkle to the sea horse.

Viola! You have a fun end of summer Birthday card to send off to someone special. I just love the sparkle!

Thank you for visiting theresas-treasures.com today. I hope you enjoyed this end of summer card. I am looking forward to some cooler temperatures, but here in Arizona it may be quite awhile. Good thing I can craft inside!

Product List

Have a wonderful day full of creative ideas!

Theresa

Posted in 2020-2021 Stampin' Up! Catalog, Sympathy

Touched My Heart Sympathy Card

Touched My Heart is a Host stamp set that you can earn when you host a Stampin’ Up!® Party. I still remember the Stampin’ Up! Party I went to many years ago. I have the first card I made displayed in my craft room. I just fell in love with the idea of making my own handmade cards!

This card is a SIP card- stamps, ink and paper. And there is only one color of ink- Basic Grey. Let’s get stamping!

Measurements: Smoky slate Card Stock (CS): 5 1/2 x 8 1/2 inch card base with a score line at 4 1/4 inches and 2 3/4 x 4 1/4 inches; Whisper White CS: two 5 3/8 x 4 1/8 inches and one 2 5/8 x 4 1/8 inches.

First thing to do is stamping! Use the Basic Grey ink with the leaf design in the Touched My Heart stamp set to stamp on each corner of one 4 1/8 x 5 3/8 inch Whisper White CS as shown.

Switch to the straight leaves and stamp them in the Basic Grey ink on either side of the first stamp.

Using the single leaf and the Basic Grey ink, stamp 3 times in the corner.

Repeat the stamping identically on the other 4 1/8 x 5 3/8 inch Whisper White. One piece with be the inside of the card, and one will go on the outside of the card.

Stamp the sentiment “With Sympathy” in Basic Grey ink onto the 2 5/8 x 4 1/8 inch Whisper White CS. Stamp in the lower right hand corner.

This stamping uses a Masking Technique. Use a piece of sticky note paper to cover the sentiment. Stamp the heart image in Basic Grey ink over the top of the masked sentiment as shown. Let dry then remove the sticky note mask. Cool Trick!

Add the butterfly if desired.

Adhere one of the stamped 4 1/8 x 5 3/8 inch Whisper White CS to the inside and one on the card front.

Adhere the sentiment piece to the 2 3/4 x 4 1/4 inch Basic Grey CS.

Adhere the sentiment piece to the front of the card with Stampin’ Dimensionals.

Viola! You have made a heartfelt sympathy card. Hopefully it will be a long time before you will have to send one off to someone.

Alternatively, you could add a hint of color. I used the Stampin’ Blends Alcohol Markers in light Petal Pink, light Mint Macaron, and light and dark Purple Posy.

Thanks so much for stopping by. I hope all is going well with you and your family. For us, school at home just started and it is not going well. Very stressful. I am glad I can craft and keep myself sane!

If you would like to learn more about Stampin’ Up!® parties, please send me an email at theresastreasures.az@gmail.com. You can also learn more on my Stampin’ Up! Website HERE and clicking on the HOST tab.

Products used today:

Product List

Happy crafting!!

Theresa

Posted in 2020-2021 Stampin' Up! Catalog, Animals, Fish, Guys cards, Lake/Sea/Ocean, Sea, Sealife

Cardz 4 Guyz Challenge # 251- Gone Fishing with Whale Done

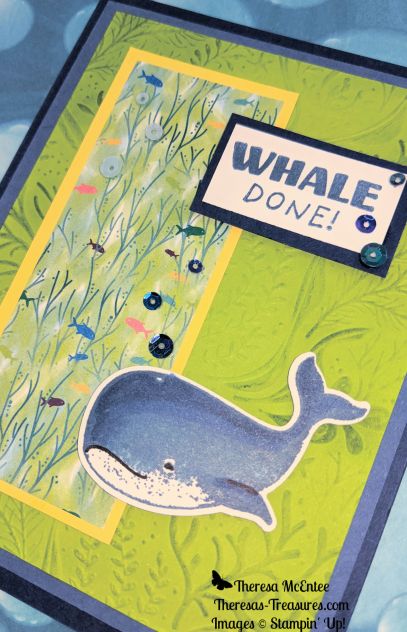
The Cardz4Guyz Challenge #251 is Gone Fishing. I didn’t have any fishing stamp sets, but I do have a big fish in the fun Whale Done stamp set and some great Whale of a Time Designer Series Paper (DSP).

The card base is Night Of Navy cardstock. The next layer is Misty Moonlight. For the Granny Apple Green panel I embossed it with the Seabed 3D Embossing Folder. Next I used a Sponge Dauber to sponge on some Granny Apple Green ink and highlight the fabulous design made by the embossing. Inside the card, I used a panel of Whisper White card stock, then adhered a 1 inch strip of the little fish pattern of the DSP with an edge of Night Of Navy card stock.

I first stamped the whale in Misty Moonlight ink. I used the Stampin’ Blends Alcohol Markers in Light and Dark Balmy Blue, and Light and Dark Misty Moonlight to enhance the whales features. I used the Basic Black Stampin’ Write marker to bring out the whales smile and eye, and add shadow to the fin. I punched the whale out with the Whale Builders Punch. I used the Whale of a Time Sequins to add “bubbles” above the whale and the little fish.

The fun and colorful little fish pattern of the Whale of a Time DSP on the card front is bordered by Daffodil Delight card stock.

I hope you like my card. Please leave a comment and share what you think. I appreciate you stopping by today. Go to the Cardz4Guyz blog and see everyone else’s cards! Lots of great inspiration!

If you would like to purchase the Stampin’ Up! products I used for this card, please visit my Online Store HERE.

Colors for this card included:

Products included: (click on photo to go to my Online Store)

Product List

Have a great day!

Theresa

Posted in 2020-2021 Stampin' Up! Catalog, Animals, Sealife

Fun Fold Friday Whale Done

Happy Friday! You made it through the week- Whale Done! Now for some fun!

The Whale Done stamp set has these sweet sea creatures so you can make a splash with any card! This fun fold is called a Fold Back Card.

The colors used in this fun fold card are:

Measurements: 12 x 12 inch Pretty Peacock Card Stock(CS) card base: cut to 4 1/4 x 11 inches and scored at 2 3/4 and 5 1/2 inches; 8 1/2 x 11 inch Pretty Peacock CS: 3 1/4 x 4 1/4 inches; Whisper White CS: 3 1/4 x 4 1/4 inches, 2 1/2 x 4 inches and 1 1/4 x 2 inches; Whale of a Time Designer Series Paper (DSP): small fish design: 4 x 5 1/4 inches, sea horse design: 2 1/2 x 4 inches and the underwater scene design: 3 1/8 x 4 1/8 inches.

Stamp the sentiment “it’s your DAY!” from the Itty Bitty Birthday set in Pretty Peacock ink onto the 1 1/4 x 2 inch Whisper White CS. Trim this down to 3/4 x 1 1/4 inches to fit on the front of the card.

Stamp the sentiment “Hoping all your birthday fishes come true” from the Whale Done set in Pretty Peacock ink onto the center of the 2 1/2 x 4 inch Whisper White CS. Add the little school of fish in several places in Pretty Peacock ink.

Stamp the sea turtle and whale in Pretty Peacock ink onto the 3 1/4 x 4 1/4 inch Whisper White CS. Position the whale at the bottom as shown so you can use the Whale Builder Punch.

Use the Stampin’ Blends Alcohol Marker in Light Just Jade to color the sea turtle. Use the Dark Just Jade marker to color the outer edge of the shell and to enhance the shadowed areas.

Use the Light and Dark Balmy Blue Stampin’ Blend Alcohol Marker to color in the middle portion of the whale.

Punch out the whale with the Whale Builder Punch. Fussy cut the sea turtle leaving the same amount of white outline as is on the whale.

Fold the 4 1/4 x 11 inch Pretty Peacock CS card base in half at the 5 1/2 inch score line. Use the Bone Folder to get a crisp fold.

Now fold back the top of the card base. Separate it from the underlying layer to use the Bone Folder. The end result is a “Z” fold.

Adhere the corresponding panels to the Pretty Peacock CS card base as shown.

Apply Stampin’ Dimensionals to the back of the sea turtle, whale, and the trimmed down sentiment.

Adhere under the sea scene design of the Whale of a Time DSP to the 3 1/4 x 4 1/4 inch Pretty Peacock CS. Add the sentiment, turtle, and whale.

To apply the top of the card position it then flip it over and make a light pencil mark. This will help you get the Stampin’ Dimensionals in the right place.

Adhere the front of the card to the top panel of the card base. The Stampin’ Dimensionals will not be showing on the under side.

This is the completed card lying flat on the table.

Viola! You have a splashy card to send off to someone and wish them a Happy Birthday!

Thank you so much for stopping by. I hope you try this card. It is not too difficult once you have made it once or twice.

Product List

Have a great and crafty weekend!

Theresa

Posted in 2020-2021 Stampin' Up! Catalog, Animals, Sympathy

Sympathy card after the loss of a beloved pet

Whichever type of stay-at-home, lock-down or quarantine you are experiencing, it can be difficult enough to keep yourself in a positive frame of mind. Sadly, I have had several people in my life who have lost their dog or cat, their best buddy, during this time. I can’t imagine what they are feeling. I made this card to hopefully help ease the pain a bit. This is a quick card to make.

The Peaceful Moments stamp set is a great set for a beginner because there are sentiments for many occasions. The sympathy stamp is a nice one to use and fits within several punches. There are also the Painted Label Dies if you have a cutting machine.

Measurements: Whisper White Card Stock (CS): 5 1/2 x 8 1/2 inches with a score line at 4 1/4 inches for the card base and 2 1/2 x 4 inches; Basic Black CS: 3 1/2 x 4 3/4 inches and 2 1/2 x 4 inches; Real Red CS: 1/2 x 4 inches; and the Playful Pets Designer Series Paper (DSP): 3 x 4 1/4 inches.

Using Memento black ink stamp the sentiment “With Deepest Sympathy” slightly to the left of the 2 1/2 x 4 inch Whisper White CS. Punch the sentiment out with the Label Me Lovely Punch.

Punch out another label from the 2 1/2 x 4 inch Basic Black CS with the Label Me Lovely Punch. Cut it in half as shown. Adhere one half to the bottom of the Whisper White CS sentiment label. Adhere the other half to the top of the sentiment label. This will make the sentiment stand out better from the paw and heart background.

In the center punch out the silhouette of the dog with the Dog Builder Punch from the 3 1/2 x 4 3/4 inch Basic Black CS. You will be using this card stock behind the DSP in another step, so you want to punch from the center leaving the borders uncut.

Punch a heart from the 1/2 x 4 inch Real Red CS. now you have the silhouette of the dog and a heart.

Fold the 5 1/2 x 8 1/2 inch Whisper White CS at the 4 1/4 inch score line and use the Bone Folder to make a crisp fold. Adhere the 3 1/2 x 4 3/4 inch Basic Black CS to the center of the front of the Whisper White card base. Adhere the 3 x 4 1/4 inch Playful Pets DSP to the Basic Black CS. Be mindful of the direction of the heart so you adhere it in the proper direction.

Adhere the sentiment, the dog and finally the heart.

Viola! You have a very heartfelt sympathy card to send to someone who has just lost a best buddy. (Alternatively, you could use the cat punch if that is more appropriate.)

I hope you all are staying safe and healthy. I also hope your furry friends are doing well. If you have suffered the loss of a pet, my heart goes out to you.

Wishing you a very crafty day!

Theresa

Posted in 2020-2021 Stampin' Up! Catalog, Fun/Fancy fold card, Nature

Fun Fold Friday with Timeless Tropical

I love fun fold cards because they are a little bit of a challenge to figure out. Once I have them figured out, I make a lot of cards with that fold. I learned this fun fold from my stamping friend Karen.

The Timeless Tropical stamp set is great for this card with the big bright hibiscus and the smaller flower as a compliment. The Timeless Tropical stamp set is versatile because it has sentiments for birthday, thank you and hello. I have just celebrated a birthday, so I chose to make a birthday card.

Measurements: Mango Melody Card Stock (CS) card base: 5 1/2 x 8 1/2 inches with a score line at 4 1/4 inches; Whisper White CS: 3 1/2 x 5 1/2 inches, 3 1/2 x 4 inches, 2 1/4 x 3 1/2 inches; Rainbow Glimmer Paper: 2 x 2 3/8 inches; Artistry Blooms Designer Series Paper (DSP): two at 1 1/4 x 4 inches.

The first thing to do is to make the fun fold. Here is what it will look like when complete.

With the 5 1/2 inch side of the Mango Melody card base along the top, make a cut at 1 1/2 inches down to the 4 1/4 inch scoreline.

Just a little side note. This is the new Stampin’ Up! Paper Trimmer. I could not for the life of me remember which was the cutting blade and switch was the scoring blade. I used my label maker to make labels.

Slide the Mango Melody card base down to 4 inches and make another cut down to the 4 1/4 inch scoreline.

Turn the Mango Melody card base so that the 8 1/2 inch side is on top and the side with the cuts is on your left. Slide the card base down to 2 1/8 inches and make a score line on the middle section only, down to the next cut.

When complete, the score line will look like this.

Here is a birds eye view of the Mango Melody card base with the two cut lines and the score line.

Use your Bone Folder to make crisp folds at the score lines.

Here is what the card base will look like now. Let’s get stamping!

On the 3 1/2 x 5 1/2 inch Whisper White CS, stamp the hibiscus in Magenta Madness ink, the small flower in Mango Melody and the leaf in Granny Apple Green.

You may fussy cut the stamped images, or if you have a cutting machine the Timeless Tropical stamps coordinates with the Tropic Dies.

Stamp the sentiment “May Your Birthday Be Memorable” in the center of the 2 1/4 x 3 1/2 inch Whisper White CS. Use the Timeless Label punch to punch the sentiment out.

Adhere the 3 1/2 x 4 inch Whisper White CS to the center of the inside of the Mango Melody card base. Apply adhesive to the two side panels as shown.

Adhere the two side panels to the inside of the card base. Now adhere the two 1 1/4 x 4 inch Artistry Blooms DSP pieces to the side panels.

Adhere the Rainbow Glimmer Paper to the front of the middle panel.

Use Stampin’ Dimensionals to adhere the sentiment “May Your Birthday Be Memorable” to the bottom of the inside of the card. Stamp the sentiment “Rest and Relax You Deserve It” in Magenta Madness ink on the inside of the card above the other sentiment.

Use Stampin’ Dimensionals to adhere the two flowers and the leaf to the Rainbow Glimmer Paper. Be sure the edge of the flowers on the bottom does not go past the edge of the card stock underneath so you can fold the middle up and behind the birthday sentiment.

Viola! You have a very colorful, summery fun fold Birthday Card! However, if you like, you may add some Bling!

The Artistry Blooms self adhesive sequins come in a variety of colors including Mango Melody and Rich Razzleberry which complements the Magenta Madness nicely.

I added three of each color to the side panels. You could also add some to the flowers if you wish. The Take Your Pick tool really makes transferring the self adhesive sequins easy.

Viola! Now you have a colorful, summery fun fold Birthday card with Bling!

Thank you so much for your interest in my blog. Please leave a comment letting me know what you think.

Stampin’ Up! Products used are shown below. Click of any photo to go to my online store and start shopping!

Product List

Have a most wonderful and crafty day!

Theresa

Posted in 2020-2021 Stampin' Up! Catalog, Gratitude/ Thanks, Stamping-off technique

Inspiring Iris for Appreciating Somebody Who Makes Everybody Feel Like Somebody #simplestamping

I believe you can always add some sunshine to your day by thanking somebody. Gratitude has a way of not only making the recipient feel good, but also the well-wisher. Today’s card is a super simple and beautiful card to send out a word of thanks.

The Inspiring Iris is a Two Step Stamp. I love the beautiful script font the sentiments are written in. This card is a Simple Stamping card because it uses primarily ink, stamps and paper.

Measurements: Whisper White Card Stock (CS): 5 1/2 x 8 1/2 inch card base with a score line at 4 1/4 inches, two 4 x 5 1/4 inches and 2 1/4 x 3 1/2 inches; Gorgeous Grape CS: 2 3/4 x 4 1/2 inches; and 6 x 6 inch Designer Series Paper Assortments-Brights-Gorgeous Grape: 2 x 4 inches.

Use Memento Black ink to stamp the outline of the irises onto the 2 1/4 x 3 1/2 inch Whisper White CS. Be sure to use the Stampin’ Pierce Mat or a catalog. Stamp the leaves in Granny Apple Green ink. Do not worry that the leaves do not exactly line up. Being offset a little is part of the design. i think this looked best when I tried lining up the top of the stems.

Stamp the body of the irises in Gorgeous Grape ink.

Stamp the sentiment “Thanks” in Gorgeous Grape ink onto the card piece with the irises. Then stamp the sentiment “You are somebody who makes everybody feel like somebody” in Gorgeous Grape ink onto one of the 4 x 5 1/4 inch Whisper White CS.

To fancy up the inside of the card, stamp the little flowers in Gorgeous Grape ink. The two darker flowers are stamped at full strength and the lighter one is Stamped Off. The center of the flower is Stamped Off for the darker flowers, and at full strength for the lighter Stamped Off flower. The body of the leaves is stamped in Granny Apple Green without using an outline.

Adhere the 2 3/4 x 4 1/2 inch Gorgeous Grape CS to the left side of the second 4 x 5 1/4 inch Whisper White CS, keeping the distance from the edge of the Whisper White equal on 3 sides, about 1/4 inch. Adhere the 2 x 4 inch Gorgeous Grape Designer Series Paper to the right side, about 1/4 inch from the right edge.

Apply Stampin’ Dimensionals to the back of the irises. Alternatively, the iris piece can be adhered flat to the card front.

Fold the 5 1/2 x 8 1/2 inch Whisper White CS card base at the 4 1/4 inch score line and use the Bone Folder to get a crisp fold. Adhere the iris card piece to the front of the card, then adhere the whole piece to the front of the card base.

Adhere the card piece with the sentiment to the inside of the card base.

Viola! That is all there is to making this wonderful card! You can stop here or….

You can add a little Bling! The Pearl Basic Jewels are great for this card.

I used the Take Your Pick tool to transfer 3 Pearl Basic Jewels in decreasing size to the lower left corner of the Gorgeous Grape CS.

Viola! Same wonderful card now with a little Bling! Either way, this is a nice card to send to someone to thank them for being a great person!

Thank you so much for coming by today and learning how to put together this beautiful card. Please leave a comment below letting me know what you think.

Click on any photo below to go to my Online Store.

Product List

Happy #simplestamping!

Theresa

Posted in 2020-2021 Stampin' Up! Catalog, Grunge style, Guys cards, Sponge Dauber

Cardz 4 Guys Challenge #50- Get Well Wishes

It is hard to design a card for a guy when you do want to use a flower. However, the Cardz 4 Guys Challenge #50 for a card with a Good Well Wish made it the perfect time to give it a try. I hope you like what I came up with.

One of the styles I really like is grunge. This grungy background was created with Stampin’ Up! inks in Night of Navy, Balmy Blue, Crumb Cake and Soft Suede. I used some retired sets which are my favs: Gorgeous Grunge and Timeless Textures. There are similar stamps in the current catalog, but I just love these.

These particular rose and leaves are in the current Stampin’ Up! Annual Catalog and the stamp set is called Healing Hugs. This is a Distinktive stamp which to me looks more photographic. I enhanced the rose with the Pacific Point Watercolor Pencil, and the leaves with the Old Olive Watercolor Pencil to make them even more realistic.

Thanks for stopping by and viewing my Cards 4 Guys Challenge #50- Get Well Wishes. You can find out more about this challenge at cardz4guys.com. I have a lot of fun with it!

Product List

Happy stamping!

Theresa

Posted in 2020-2021 Stampin' Up! Catalog, Avid Stamper, Father's Day, Guys cards, Love/Affection, Sponging technique, Summer

Cardz 4 Guyz Challenge # 249-No Patterned Paper

Hello and Welcome to the Cardsz 4 Guyz Challenge #249- No Patterned Paper.

This card was the #1 Winner in the Top # for the Cardz 4 Guyz Challenge!

A Good Man and Summer Days stamp sets by Stampin’ Up® make for a great pair for this Cardz 4 Guyz Challenge. This turned out to be an avid stamper type card.

I just love this quiet and peaceful moment between the man and the girl.

I decided to try something a little different and make a scene inside the card that could be seen outside the card through an oval die cut.

In order to do a Partial Die Cut to leave the little girl uncut, I came up with a novel idea. I made a smaller plate to use in my Big Shot. I took an old cracked plate and had my son cut it at 3 1/2 inches. He then filed the rough surface and rounded the corners. I am calling this “Theresa’s Small Cutting Plate”.

I adhered the front panel with the stamped man and girl to the Poppy Parade Card Stock (CS) card base with repositional tape, then placed the oval die cut on the front panel. I used sticky note tape to hold the oval in place and a Sharpie to mark the area I did not want to cut (from the top of the man’s head to his pant leg). The Big Shot sandwich from bottom to top is: Magnetic Plate, Cutting Plate, Card Stock, Oval Die cutting surface side down and finally Theresa’s Small Cutting Plate. I placed Theresa’s Small Cutting Plate as shown before running it through the Big Shot. It will only get cut where the plate covers the CS.

Here is what it looks like after running the sandwich through the Big Shot. The rest of the girl was fussy cut.

I cut an oval out of the middle of a 5 1/2 x 4 1/4 inch sheet of Gina K. Masking Magic paper to mask the inside of the card. I sponged the sunset with the following Stampin’ Up! inks: Daffodil Delight, Calypso Coral, Terracotta Tile and Poppy Parade. I used the Stampin’ Blend Alcohol Markers to color the images. The Stampin’ Blend colors used are: Granny Apple Green, Old Olive, Soft Suede, Crumb Cake, Daffodil Delight, Misty Moonlight, Purple Posy. Petal Pink and Flirty Flamingo. I used the light and the dark Stampin’ Blend for each color except the Flirty Flamingo. I only used the light Stampin’ Blend for that one.

Thank you so much for visiting today for my Cardz 4 Guyz Challenge #249- No Patterned Paper. If you want to give this card a try, the supplies are all listed below. The supplies can be purchased from my Online Store by clicking on any of the photos below.

Product List

You have a most wonderful and creative day!

Theresa

Posted in 2020-2021 Stampin' Up! Catalog, Hello, Sponging technique, Stamping-off technique

Little Lambs Eat Ivy- Hippo Happiness

“Mairzy doats and dozy doats and liddle lamzy divey, a kiddle divey too, wouldn’t you?” I am really showing my age here. My Grandma used to sing that little ditty to us. For some reason, this little lamb reminded me of it. Have you any songs that your Grandma or Mom sang to you? It is fun to make a card as a reminder.

Measurements: Whisper White Card Stock (CS): 8 1/2 x 5 1/2 inch card base with a score line at 4 1/4 inches, 5 1/4 x 4 inches and 4 x 2 inches; Gorgeous Grape CS: 5 3/8 x 4 1/8 inches.

Ink Colors: Memento, Gorgeous Grape, Calypso Coral, Balmy Blue, Flirty Flamingo, Daffodil Delight and Granny Apple Green.

On the 4 x 2 inch Whisper White CS, stamp the sentiment “fluttering by just to say hi!” in Gorgeous Grape ink on to the right side. Allow space around the sentiment to be able to use the Label Me Fancy Punch. Use Calypso Coral ink to stamp the outline of the butterfly on the left side.

The main images on this card require Two Step Stamping. (Hover over underlined words for definition). I also used the Stamping Off Technique for this butterfly. Ink up your stamp and stamp it lightly but evenly onto a scrap paper, then stamp it onto your card piece without adding any ink. This way you get a lighter shade of the same ink color.

I added the little face for the butterfly in Memento ink. Punch the sentiment out with the Label Me Fancy Punch.

Lay the sentiment and butterfly pieces onto the 5 1/4 x 4 inch Whisper White CS. Use the Memento ink and the dotted swirl stamp to stamp the path of the butterfly just over the sentiment.

Now for the fun part! I found it easier to line up the second stamp if I stamped the full strength part of the image first. For the second stamp of the Two Step Stamping I first Stamped Off onto a scrap paper, then lined up the scallops on the head and body, and stamped over the full strength image. The first lambs are in Balmy Blue ink.

I added one color at a time, always starting with the full strength part of the image. The next colors I used are Flirty Flamingo ink and Daffodil Delight ink.

After you have all the lambs in place, add the face with Memento ink. (Confession: I had to do this card 3 times in order to get it all looking good. The first card, I had it all good, then dropped the block with the inked stamp on top of it! After that, I had a hard time lining the two images up. I waited a day and tried again. If you can’t get it lined up, take a break and try again later.)

Use the tiny flower stamp to stamp flowers in the spaces with Gorgeous Grape ink.

I wanted the sentiment to stand out a little more. I used the Sponging Technique to add a little Gorgeous Grape to the edge.

I used Stampin’ Dimensionals to adhere the sentiment and the butterfly, then Multipurpose liquid glue to adhere the stamped card piece to the 5 3/8 x 4 1/8 inch Gorgeous Grape CS. The entire piece is then adhered to the front of the 8 1/2 x 5 1/2 inch Whisper White CS card base.

And of course, now some Bling! I used the Champagne Rhinestone Basic Jewels and transferred them to the card with the Take Your Pick tool.

Viola! Plenty of colorful little lambs and a little fluttering butterfly to say “Hi!” and spread some joy!

I hope you found this card to be fun. I sure did! Thanks so much for stopping by and visiting my blog. Please leave a comment and let me know whether you like it or not.

Almost Over!!!

The chance to earn a $5 coupon towards your order in August for a $50 order now is almost gone! There is only 1 week left to take advantage of this promotion! Click HERE to get to my Online Store or click on any of the products below to get to the store before August 4, 2020.

Announcement: Stampin’ Up! is updating the Online Stampin’ Up! store on August 4, 2020. The links for the product photos below may not work after August 4, 2020.

Product List

Have a Happy Crafty Day!!

Theresa