Posted in 2021 Stampin' Up! July-December Mini Catalog, 3D Embossing Folder, Animals, Birds, Fun/Fancy fold card, Stampin" Blends Alcohol Markers, Winter Holiday

Stampin’ Up!® Happy Holly Days Happy Christmas card

I am on Day 9 of the “12 Days of Christmas Card Making Challenge” with my stamping buddy Christy. Today’s card is a Stampin’ Up!® Happy Holly Days Happy Christmas Card. Each day of this challenge my blog will focus on a new holiday card. The challenge goes until December 10, 2021. I plan to showcase a different stamp set with each card. This will allow you plenty of time to see the fabulous products that are available in the 2021 Stampin’ Up! July to December Mini Catalog, and to order in time to make your own Christmas cards! You can order HERE when you have your list ready! Tomorrow there is FREE shipping!

I was inspired to make this particular card by a Color Challenge that Stampin’ Up! puts out every month. This months colors are Mossy Meadow, Real Red, Crumb Cake and Gold. This Happy Holly Days Happy Christmas card shows all of these colors.

Measurements

Happy Holly Days Happy Christmas card

  • Mossy Meadow Card Stock (CS) card base: 5 1/2 x 8 1/2 inches scored at 4 1/4 inches. One end has been cut 1/2 inch shorter with the scalloped pattern in the Basic Borders Dies.
  • Basic White CS: 2 1/4 x 5 1/2 inches, 2 3/4 x 5 1/4 inches, 3 x 3 1/2 inches and 3/4 x 3 1/2 inches(not shown).
  • Real Red CS: 2 x 5 1/2 inches
  • Gold Brushed Metallic CS: 3 x 4 1/4 inches. Cut with the 3rd smallest Scalloped Contours Die.
  • Crumb Cake CS: 1 1/4 x 5 1/2 inches. Embossed with the Tasteful Textile 3D Embossing Folder

Stamping

Stamp the bird image in Sahara Sand Ink onto the 3 x 3 1/2 inch Basic White CS. Then stamp the holly image 3 times onto the 2 3/4 x 5 1/2 inch Basic White CS.

Next stamp the holly image 2 times onto the corners of the 2 3/4 x 5 1/4 inch Basic White CS. Then stamp the sentiment in Mossy Meadow Ink. Also in Mossy Meadow Ink, stamp the sentiment “Happy Christmas” onto the 3/4 x 3 1/2 inch Basic White CS (not shown).

Coloring With Stampin’ Blends Alcohol Markers

I love the Stampin’ Blends Alcohol Markers because you can blend the colors and create beautiful images. My bird doesn’t look as realistic as some, but I am satisfied with the results. I learned to use the Dark Blend first for small areas to create shadows. Then blend in the Light color. The colors here are: Dark Daffodil Delight, Dark Basic Black, and the Light and Dark Crumb Cake, Real Red and Mossy Meadow.

The same procedure, Dark Blend first followed by the Light, is followed for the holly images.

Fussy cut the bird and holly. Also fussy cut the “Happy Christmas” sentiment (not shown).

Tip: Sometimes it is very difficult to cut exactly and not have any white edge. I just use the Light Blend along the outer edge to hide the white.

Assembling the Card

Adhere the inside sentiment and the embossed Crumb Cake CS strip to the inside of the Mossy Meadow CS card base. Adhere the 2 x 5 1/2 inch Real Red CS to the front of the card base.

Now with Stampin’ Dimensionals adhere the Gold Brushed Metallic CS scalloped rectangle to the card front. Follow by adhering the bird with Stampin’ Dimensionals.

Use Mini Stampin’ Dimensionals on the center of the back of the holly leaves. Adhere as desired under the bird. To finish, adhere the sentiment “Happy Christmas” under the Gold scalloped rectangle.

Add some Wonderful Gems to make the card front sparkle a little more.

Voila! You have a very festive Happy Christmas card!

I am submitting this card to the #sucolorchallenge and to my Glimmer Gals Team page for our color challenge as well. I hope you enjoyed Day 9 of the 12 Days of Christmas Card Making Challenge. See you tomorrow with card #10!

Supply List

Click on any photo to go to my Online Store and start shopping!

Product List

Thanks for stopping by. Have a most wonderful day!

Theresa

Posted in 2021-2022 Stampin' Up! Annual Catalog, Gratitude/ Thanks, Snowflakes

Kylie’s International Blog Highlights Gallery- December 2021- Stampin’ Up!® Snowflake Wishes Thank You card

Today I am taking part in Kylie Bertucci’s Monthly International Blog Highlights Gallery. The theme is- Thank You. It is so important to thank those who inspire us. Those who help us out. Those who have our back.

On this gallery, you can see thank you cards made by people from all over the world! I hope you enjoy my Snowflake Wishes Thank You card and take the time to see everyone else’s inspiring creations by visiting the gallery. You can get to the gallery by selecting the “Vote For Me” button at the end of this blog.

The Thank You sentiment if from the Sweet Ice Cream stamp set. All of the stamped snowflakes are from the Snowflake Wishes stamp set. The Stampin’ Up! color is Pacific Point. I ended up with several packages of the Wonderful Snowflakes, so I really wanted to make a card with them.

Using the Blending Brushes

To create the background I used the Blending Brush with Pacific Point Ink on Basic White Card Stock (CS). A few tips:

  1. Gently swirl the Blending Brush on the ink pad in a circular motion.
  2. Touch your scrap paper before blending the color onto your Basic White CS.
  3. Move the Blending Brush in a circular motion with light pressure, then medium pressure as the color leaves the brush.
  4. Go slow to keep the color blending on smoothly. You will need many layers.
  5. The Blending Brushes do take some practice. My goal is to eventually have a very smooth transition of color.

The Wonderful Snowflakes are super fun! When the light hits just right you see a rainbow!

I added lots of the Rhinestone Basic Jewels for sparkle! Voila! Such a pleasant Thank You card to send off!

Please vote for my card when you visit the Gallery by selecting the “Vote For Me” button below. Thank you!

Ciao!

Theresa

Posted in 2021 Stampin' Up! July-December Mini Catalog, Clean and Simple, Winter Holiday

Stampin’ Up!® Frosted Gingerbread #SimpleStamping Christmas card

I am on Day 8 of the “12 Days of Christmas Card Making Challenge” with my stamping buddy Christy. Today’s card is a Stampin’ Up!® Frosted Gingerbread #SimpleStamping Christmas Card. Each day of this challenge my blog will focus on a new holiday card. The challenge goes until December 10, 2021. I plan to showcase a different stamp set with each card. This will allow you plenty of time to see the great products that are available in the 2021 Stampin’ Up! July to December Mini Catalog, and to order in time to make your own Christmas cards! You can order HERE when you have your list ready!

Many of the products in the Stampin’ Up! July-December Mini Catalog will be retiring at the end of December. If you really want something, order now because products are “while supplies last”. Get more information on the “Last Chance” products HERE

#SimpleStamping Stampin' Up! Frosted Gingerbread Christmas card

This is a perfect card for the beginner stamper to try out. I use only one stamp set, one ink and one type of paper to create this Frosted Gingerbread #SimpleStamping Christmas card.

Measurements

Frosted Gingerbread #SimpleStamping Christmas Card

  • Basic White Card Stock (CS) card base: 5 1/2 x 8 1/2 inches with a score line at 4 1/4 inches.
  • Basic White CS: 4 x 5 1/2 inches

Stamping

The first step is to use Real Red Ink to stamp the sentiment “Wishing You A Merry Christmas” on the inside panel of the Basic White CS card base. Tip: Be sure to use either the Stampin’ Pierce Mat or your catalog to stamp on. Photopolymer stamps work best with a softer surface under the card stock.

For the next step you will need either a Clear Block I or your stamp case. I will be using my stamp case. First remove the paper insert from the stamp case. Lay the border stamp on the top of the 4 x 5 1/4 inch Basic White CS to be sure it is straight. Pick the stamp up with the front of the stamp case.

Close the stamp case. Apply Real Red Ink and stamp along the upper border of the 4 x 5 1/4 inch Basic White CS.

Turn the Basic White CS so the stamped border is on the bottom. Ink the border stamp again and stamp along the top edge.

Stamp the sentiment “Sending You Peppermint Kisses” on the lower right-hand side. Now stamp the trio of peppermints to the left and slightly above the sentiment.

Assembling the Card

To finish the card, adhere the stamped panel to the front of the Basic White CS card base.

completed Stampin' Up! Frosted Gingerbread #SimpleStamping Christmas card

And Voila! That is all there is to this Frosted Gingerbread #SimpleStamping Christmas card!

Supply List

Click on any photo to go to my Online Store and start shopping!

Product List

Thank you for stopping by for Day 8 of the 12 Days of Christmas Card Making Challenge. Later today there will be a non-Christmas blog coming out. I am participating in Kylie Bertucci’s International Blog Highlights Gallery. But I will be back tomorrow with another Christmas card!

Theresa

Posted in 2021 Stampin' Up! July-December Mini Catalog, 3D Embossing Folder, Stampin" Blends Alcohol Markers, Stampin' Cut & Emboss Machine, Winter Holiday

Stampin’® Up! Great Tidings Religious Christmas Card

I am on Day 7 of the “12 Days of Christmas Card Making Challenge” with my stamping buddy Christy. Today’s card is a Stampin’ Up!® Great Tidings Religious Christmas Card. Each day of this challenge my blog will focus on a new holiday card. The challenge goes until December 10, 2021. I plan to showcase a different stamp set with each card. This will allow you plenty of time to see the great products that are available in the 2021 Stampin’ Up! July to December Mini Catalog, and to order in time to make your own Christmas cards! You can order HERE when you have your list ready!

Many of the products in the Stampin’ Up! July-December Mini Catalog will be retiring at the end of December. If you really want something, order now because products are “while supplies last”. Get more information on the “Last Chance” products HERE

I really like how colorful this Great Tidings Religious Christmas card turned out to be. The Wise Men Tidings Dies and the Gold Brushed Metallic Card Stock really make this card shine!

Measurements

Great Tidings Religious Christmas Card

  • Night of Navy Card Stock (CS) card base: 4 1/4 x 11 inches scored at 5 1/2 inches.
  • Basic White CS: 4 x 5 1/4 inches, 4 x 4 inches, and a 1/2 inch strip that is at least 3 inches long.
  • Gold Brushed Metallic CS: 5 3/8 x 4 1/8 inches.

Stamping

Use Memento Ink to stamp one each of the Three Kings onto the 4 x 4 inch Basic White CS.

Use Night of Navy Ink to stamp the sentiment “Wise men still seek Him” onto a 1/2 x 3 inch strip of Basic White CS. Also stamp, in Night of Navy Ink, the 4 x 5 1/4 inch Basic White CS with the sentiment “Sending Peace & Joy to you”, the 3 Gifts and the Star.

Use Stampin’ Blends Alcohol Markers to color the Three Kings. For skin color, I used the Light and Dark Cinnamon Cider, and Ivory. Additionally, I used the Light and Dark of: Bermuda Bay, Just Jade, Daffodil Delight, Blackberry Bliss and Night of Navy for the Kings’ dress. I shadowed the turban with Light Smoky Slate. Later I used Dark Poppy Parade for the gem in the turban and the jewel on the cloak of the middle King. Note: These are not the traditional colors for the Three Kings. Going left to right is Gaspar, Balthazar and Melchior.

Three Wise Men Dies and Hammered Metal Embossing Folder

The Three Wise Men Dies really help make the Great Tidings Religious Christmas Card shine. First die cut the Dome, placing the top of the die about 3/4 inch from the top edge and using the Stampin’ Cut & Emboss Machine. Use the dies for the Star and the Town of Bethlehem to diecut from the left over dome piece. Save the remainder of the dome cut out for future use. Tip: This is a great way to make the Gold Brushed Metallic CS last longer- use every scrap!

Use the Hammered Metal 3D Embossing Folder in the Stampin Cut & Emboss Machine for the texture on the 5 3/8 x 4 1/ 8 inch Gold Brushed Metallics CS card piece.

Assembling the Card

Adhere the inside card piece to the inside panel of the Night of Navy CS card base.

Start the front of the card by adhering the Hammered Metal Gold CS card piece to the front panel of the Night of Navy CS card base. Next adhere the Star with a Stampin’ Dimensional. Adhere the Little Town of Bethlehem flat to the background. Add the Three Kings using Stampin’ Dimensionals.

Finish the card by trimming the sentiment and adhering it to the card with Stampin’ Dimensionals. Add one large Gilded Gem to the center of the Star.

Voila! You have made a fabulous Great Tidings Religious Christmas Card!

For my family today is the second Sunday of Advent. Time is moving by so quickly! My son and husband are out to get the tree. I still need to wrap a bunch of packages to mail tomorrow. It is such a wonderful, busy time of year!

Supplies

Product List

I hope you have a Blessed Day!

Theresa

Posted in 2021 Stampin' Up! July-December Mini Catalog, 2021-2022 Stampin' Up! Annual Catalog, Blender Pen, Guys cards, Techniques, Winter Holiday

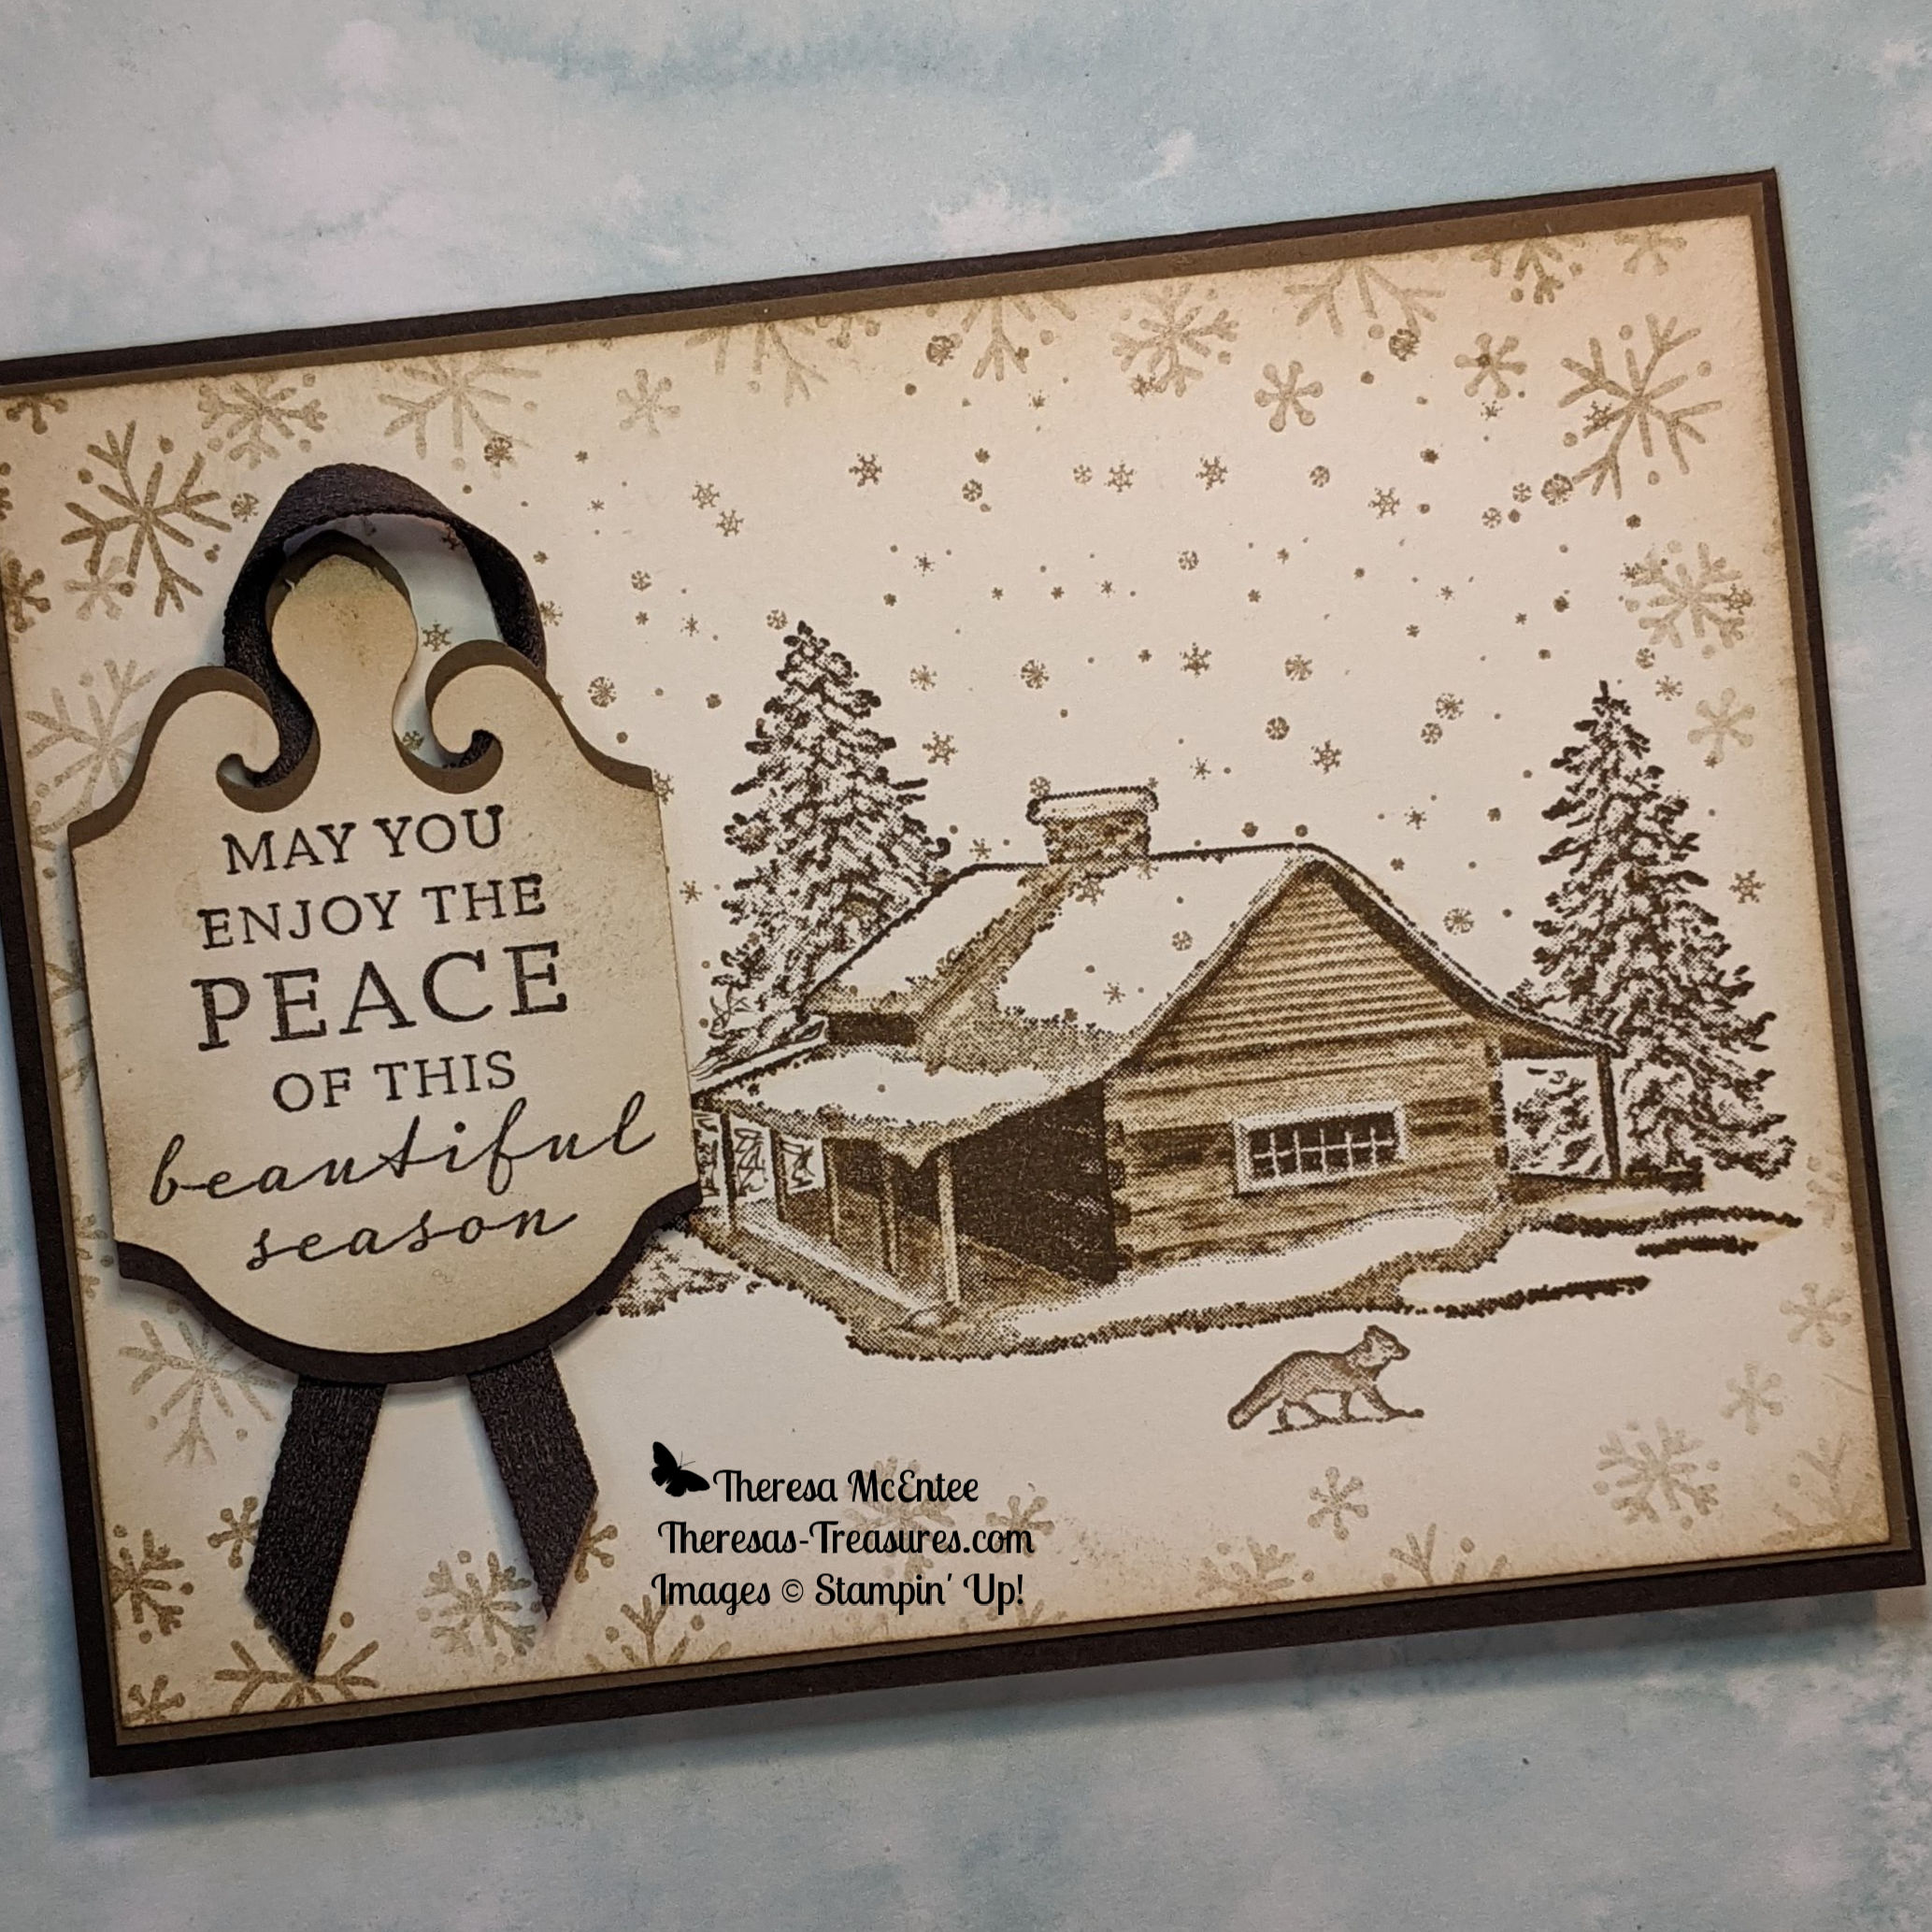
Stampin’ Up!® Peaceful Cabin Masculine Christmas Card

I am on Day 6 of the “12 Days of Christmas Card Making Challenge” with my stamping buddy Christy. Today’s card is a Stampin’® Up! Peaceful Cabin Masculine Christmas card. Each day my blog will focus on a new holiday card. The challenge goes until December 10, 2021. I plan to showcase a different stamp set with each card. This will allow you plenty of time to see the great products that are available in the 2021 Stampin’ Up! July to December Mini Catalog, and to order in time to make your own Christmas cards! You can order HERE when you have your list ready!

The Peaceful Cabin Masculine Christmas Card is being submitted to the Cardz4Guyz Card Challenge #285 Shades of Brown. Stop by the Cardz4Guyz blog to get more ideas on cards for guys.

Measurements

Peaceful Cabin Masculine Christmas Card

  • Early Espresso Card Stock (CS) card base: 5 1/2 x 8 1/2 inches with a score line at 4 1/4 inches.
  • Early Espresso CS: 2 1/4 x 3 1/4 inches
  • Soft Suede CS: 4 x 5 1/4 inches and 2 1/4 x 3 1/4 inches
  • Very Vanilla CS: 4 x 5 1/4 inches (inside), 3 7/8 x 5 1/8 inches (front) and 2 1/4 x 3 1/4 inches. Note: the front is slightly smaller than the inside.
  • Early Espresso 1/4 inch Faux Suede Trim: 8 inches

How to Use the Blending Brushes

First place your 3 7/8 x 5 1/8 inch Very Vanilla CS card piece on a scrap of paper. Apply slight pressure as you move the brush in a circular motion on the Crumb Cake ink pad. Tap onto the scrap paper. Then apply light pressure and move in a circular motion along the edge of the card piece. Start light and go slow. You can go over the area until it is as dark as you desire.

I wanted the very edge to be a little darker than the border of the card piece. You can hold the card piece up and scrape the Blending Brush on the very edge to accomplish this look.

To finish up with the Blending Brushes, stamp the sentiment “May You Enjoy The Peace of this beautiful season” in Early Espresso ink onto the 2 1/4 x 3 1/4 inch Very Vanilla CS. Punch the sentiment out with the Elegant Tag Punch. Use the Blending Brush with the Crumb Cake ink to blend the ink around the edges of the Elegant Punch.

Stamping

Stamp the cabin in Soft Suede ink onto the 4 x 51/4 inch Very Vanilla CS that has been shaded with the Blending Brush. Use the Blender Pen to smooth out the color on the cabin.

The tree stamp in the Peaceful Cabin stamp set is a group of 3 trees on one stamp. I cut my trees apart so that I would have more flexibility in using the trees.

Masking

Stamp the cabin onto some sticky paper and fussy cut. Lay it over the cabin on the Very Vanilla CS. Using the Soft Suede Ink, stamp some trees around the cabin.

I used the single stamp of the tree to stamp a tree on the right side of the cabin.

Sometimes when you stamp over another piece of paper, the image doesn’t take near the edge of the paper. Use the Soft Suede Stampin’ Write Marker to make the tree image complete.

More Stamping

Stamp the small snowflakes in Crumb Cake ink around the cabin. In the Snowman Season stamp set, there is a group of snowflakes. I stamped these in Crumb Cake ink, Stamping Off once, around the border of the card piece.

Fill in with the small snowflakes as you desire.

Stamp the little dog (or fox) in Crumb Cake. Use the Blender Pen to smooth out the color.

The 4 x 5 1/4 inch Very Vanilla CS is the inside of the card. Use the Blending Brush and the Crumb Cake Ink to blend some shadow in the upper left and lower right-hand corner. Stamp some trees in Soft Suede Ink in the lower right-hand corner. Use the small snowflakes and Crumb Cake Ink in both corners. Stamp the “Merry Christmas” sentiment from the Snowman Season in Early Espresso Ink.

Assembling the Card

Punch an Elegant Tag from both the 2 1/4 x 3 1/4 inch Early Espresso and 2 1/4 x 3 1/4 inch Soft Suede CS. Cut the Early Espresso tag and the Soft Suede tag in half. Use the Soft Suede CS on the top of the back of the Very Vanilla CS tag. Adhere the bottom half of the Early Espresso tag to the bottom of the Very Vanilla CS tag.

Make a loop with the 1/4 inch Early Espresso Faux Suede Trim and adhere to the back to the back of the Elegant Tag with Mini Glue Dots.

Adhere the Very Vanilla CS with the “Merry Christmas” to the inside of the Early Espresso CS card base. For the card front, first adhere the cabin Very Vanilla CS to the 4 x 5 1/4 inch Soft Suede CS. Then adhere the cabin piece to the front of the card base. Use Stampin’ Dimensionals to adhere the Elegant Tag sentiment to the left side of the card front.

Voila! You have a masculine Christmas card for your favorite guy! Stop by the Cardz4Guyz to see more masculine cards.

Supplies

Product List

Have a wonderful weekend! We will be getting ready for Christmas. I have packages to get ready to mail. My husband just put all the lights on the house. Now for the tree and getting the Christmas cards ready to mail!

Enjoy the season!

Theresa

Posted in 2021 Stampin' Up! July-December Mini Catalog, Animals, Cat, Designer Series Paper, Fun/Fancy fold card, Winter Holiday

Stampin’ Up!® Sweet Little Stockings Pet Christmas Tree card

I am on Day 5 of the “12 Days of Christmas Card Making Challenge” with my stamping buddy Christy. Today’s card is a Stampin’® Up! Sweet Little Stockings Pet Christmas Tree card. Each day my blog will focus on a new holiday card. The challenge is until December 10, 2021. I plan to showcase a different stamp set with each card. This will allow you plenty of time to see the great products that are available in the 2021 Stampin’ Up! July to December Mini Catalog and to order in time to make your own Christmas cards! You can order HERE when you have your list ready!

I wanted to showcase the totally cute Sweet Stockings Designer Series Paper (DSP). My thought was to make a Christmas tree out of all the adorable pets. Here is what I came up with using a Fun Fold for Fun Fold Friday!

Measurements

Stampin’® Up! Sweet Little Stockings Pet Christmas Tree card

  • Evening Evergreen Card Stock (CS) card base: 4 1/4 x 11 inches.
  • Basic White CS: 4 x 5 1/4 inches and a scrap that is at least 1 inch wide.
  • Old Olive CS: 2 1/8 x 5 3/8 inches, 1 7/8 x 4 3/8 inches and two at 7/8 x 1 7/8 inches.

Cutting out the Pet Images

Here are all the awesome Sweet Stockings DSP designs. (Buy some HERE).

These are the adorable pets for the Stampin’ Up! Sweet Stockings Pet Christmas Tree card that I fussy cut from the Sweet Stockings DSP. The puppies, the kitten and the mouse in the stocking come from the design with all the little stockings.

Making the Fun Fold Card Base

I actually struggled with this one. I believe I finally came up with easy-to-follow instructions. If not, please leave me a comment with any suggestions you may have. Here is the template.

Scoring the Evening Evergreen CS card base. (Score=Dashed lines/ Cut=Solid line)

  1. Score at 4 1/2 inches from 2 inches to the top.
  2. Next score at 5 1/2 inches from 2 inches down to the bottom.
  3. Finish scoring at 9 inches and then 10 inches from 2 inches to the top.

Turn the card base and cut from 1 inch to 6 1/2 inches at 2 inches from the left side.

Fold as shown in the left-hand photo. Use your Bone Folder to make the folds nice and crisp.

Stamping

Before you stamp onto the 4 x 5 1/4 inch Basic White CS, remove a 1 x 2 inch piece from the upper right-hand corner. Use this piece to stamp the larger present in Memento ink. On the remainder of the 4 x 5 1/4 Basic White CS use Memento ink to stamp a cascade of the small presents. Stamp the sentiment “Santa Paws is Coming to Town” in the center. On the scrap of Basic White CS stamp the sentiment “Peace Joy & Kisses”. I had to stamp it twice to get a dark stamp.

Color the presents with the Cherry Cobbler and Old Olive Stampin’ Blends Alcohol Markers. Adhere the piece with the “Santa Paws” sentiment to the inside of the Evening Evergreen CS card base.

Creating the Card Front

Adhere the Old Olive CS card pieces as shown.

Building the Pet Christmas Tree

Start on the right by placing the dog with the wreath about 1/4 inch from the bottom. Adhere the little dog in the sweater so he looks as though he is standing on the black dog’s back. Add a second dog in the sweater to the panel behind.

Adhere the rest of the cute pets stacking the next one on the lower pet’s back. When the card is open it will look like the photo on the left. The right-hand photo shows the card folded up.

Build the left side starting with the Golden Retriever wrapped in Christmas lights. Add the cats and mice. Top it off with the cute little puppy. Add the Christmas ornaments. Now adhere the large colored present with a Stampin’ Dimensional to the bottom left-hand corner. Finish by adhering the sentiment to the large present.

Add some Wonderful Gems and Voila! you have an adorable Sweet Little Stockings Pet Christmas Tree card for your favorite pet-lover!

I am so glad you stopped by for the 5th day of my 12 Days of Christmas Card Making Challenge! I hope you will come by for tomorrow’s card! Leave me a comment as to what you think about my first 5 days of Christmas cards. Which is your favorite card?

Supplies

Click on any photo to go directly to my Online Store and start shopping!

Product List

Cheerio!

Theresa

Posted in 2021 Stampin' Up! July-December Mini Catalog, 2021-2022 Stampin' Up! Annual Catalog, Birds, Nature, Shaker Card, Stamparatus, Winter Holiday

Stampin’ Up!® Classic Cloche Dome Christmas Shaker Card

I am on Day 4 of the “12 Days of Christmas Card Making Challenge” with my stamping buddy Christy. Each day my blog will focus on a new holiday card. The challenge is until December 10, 2021. I plan to showcase a different stamp set with each card. This will allow you plenty of time to see the great products that are available in the 2021 Stampin’ Up! July to December Mini Catalog and to order in time to make your own Christmas cards! You can order HERE when you have your list ready!

Today’s card is the Stampin’ Up!® Classic Cloche Dome Christmas Shaker Card. The card shaker is made with the Cloche Dome and the Subtle Shimmer Sequins.

Measurements

Classic Cloche Dome Christmas Shaker Card

  • Real Red Card Stock (CS) card base: 5 1/2 x 8 1/2 inches with a score line at 4 1/4 inches
  • Basic White CS: 4 x 5 1/4 inches and 3 1/2 x 3 3/4 inches
  • Heartwarming Hugs Designer Series Paper (DSP): 4 x 5 1/4 inches
  • One Cloche Shaker Dome #156387 (Order HERE)
  • A more complete supply list is at the end of the blog

The Cloche Dome can be used with two different stamp sets- the Classic Cloche and the Sweets & Treats! Click on either one to go directly to my Online Store and start shopping.

Stamping

First use the Cloche Dies to cut out the space for the dome. Then use Real Red Ink to stamp the sentiment under the dome.

This little image of the birds in the dome is actually a 3-Step Stamp. First- stamp the outline of the birds and branches in Memento ink. Second- use the stamp with just the branches with Garden Green Ink. Third- use the stamp with the body of the birds and stamp in Real Red Ink. (I really struggled to get these to line up. I ended up using the Stamparatus because I could place the 2nd and 3rd stamps more accurately.) Alternatively, you could always color in the image using the Garden Green and Real Red Stampin’ Write Markers.

Stamp the 3-Step Stamp of the bird image on the lower right-hand corner of the 4 x 5 1/4 inch Basic White CS. Add the sentiment in Real Red Ink.

Assembling the Card

Adhere the stamped card piece to the inside of the Real Red CS card base.

Adhere the Heartwarming Hugs DSP to the card front. Then lay but DO NOT ADHERE both of the pieces with the dome. Adhere the dome piece with the birds stamped on it ONLY. Pull the sentiment piece away.

Adding the Dome and Sequins

I like to place a few of the Rhinestone Basic Jewels on the bird card piece. The sequins will fall to the bottom of the plastic dome when the card is upright. Having a few rhinestones allows the sparkle to stay. Now add about a teaspoon of the Subtle Shimmer Sequins onto the center of the bird card piece. (In hindsight, I could have added about 2x the amount of sequins that I did).

Peel the protective cover off of the inside of the Cloche Dome. Carefully place it over the bird card piece and press firmly to adhere.

Now peel the protective cover off of the front of the Cloche Dome. Apply adhesive to the back of the sentiment card piece. Carefully position this piece over the Cloche Dome. Press firmly to adhere.

Add a bow made from the Real Red Double Stitched Satin Ribbon. Voila! The card is finished. Shake it to see how fabulous this shaker card is!

I also have a blog about a Thanksgiving Shaker Card made with the Sweets & Treats stamp set. Check it out HERE.

I really hope you give shaker cards a try. It is such a fun alternative to the standard card!

Specials

If you are unable to read the list, I recommend looking at the photos of the products available when you click on the Last Chance pop up on my Online Store website HERE.

Supplies

Product List

Thanks for stopping by for the 4th day of my 12 Days of Christmas Card Making Challenge! I hope you will come by for tomorrow’s card!

Theresa

Posted in 2021 Stampin' Up! July-December Mini Catalog, Avid Stamper, Emboss Powder, Religious, Winter Holiday

Stampin’ Up!® Angels of Peace Christmas Card

Today’s card is the Stampin’ Up!® Angels of Peace Christmas Card for Day 3 of the “12 Days of Christmas Card Making Challenge”!

Peace on Earth! I would really like to see more of that. As I said above, I am on Day 3 of the “12 Days of Christmas Card Making Challenge” with my stamping buddy Christy. I will be blogging a new holiday card each day until December 10, 2021. I plan to showcase a different stamp set with each card. This will allow you plenty of time to see the great products that are available in the 2021 Stampin’ Up! July to December Catalog and order it in time to make your own Christmas cards! You can order HERE when you have your list ready!

Disclaimer: This is a somewhat advanced card as there are several steps before you can put the card together. I used the Silver Emboss Powder, the Blending Brushes, Watercolor Pencils, the Wink of Stella, and the Metallic Mesh Ribbon in creating this fabulous card! I went through many different versions of this card before deciding on the final one.

This card will be submitted to The Paper Players PP569 Sketch Challenge.

Here is what you need to emboss: Silver Emboss Powder-Metallics, Versamark and the Heat Tool.

Measurements

  • Basic White Card Stock (CS) card base: 4 1/4 x 11 inches with a score line at 5 1/2 inches.
  • Basic White CS: 3 x 5 inches and a 3/8 x 3 7/8 inch strip.
  • Peaceful Place Designer Series Paper (DSP): one 1 7/8 x 12 inch piece of the trees and night sky design. First cut a 5 1/8 inch piece with the tree on it. Then cut the remaining DSP into a 5 inch piece. Cut that piece at 2 1/2 inches to make two small rectangles. Trim 1/8 inch off the length on each piece. You will also need a 1/2 x 4 1/2 inch piece of the night sky.
  • Disregard the white and silver design as I ended up not using it in the final version.
  • Silver Foil: 4 x 5 1/4 inches.

Stamping

Start out by making the sentiment. Use the Basic Black Stampin’ Write Marker to ink up the “Peace on Earth” only. Stamp onto the 3/8 x 3 7/8 inch Basic White CS. Set aside.

Blending with the Blending Brushes

Use medium pressure as you put the Blending Brush to the Pacific Point Ink Pad. Move in small circles until you have some ink on the Blending Brush. Practice on a scrap piece of paper, moving the Blending Brush in circles. Try different amounts of pressure. Learn which pressure is needed to lightly apply the color to the paper. Blend the Pacific Point Ink onto the top and right side of one of the night sky pieces. Next, blend the ink onto the bottom and right side of the other night sky piece.

Apply the Pacific Point Ink to the top and left side of the tree piece. Blend ink onto the ends of the 1/2 x 3 7/8 inch night sky piece.

Here is how the Peaceful Place DSP pieces will fit together when they are adhered to the Silver Foil. The strip will be used on the inside of the card.

More Stamping

Create the inside of the card by stamping in Memento ink the sentiment “Blessings to you and yours this season and in the coming year” onto the inside of the 4 1/4 x 11 inch Basic White CS card base. Stamp the snowflakes in Pacific Point ink. Adhere the 3/8 x 3 7/8 inch night sky piece to the bottom of the inside panel.

Heat Embossing the Angel

Steps for Heat Embossing:

  1. Apply an Anti-Static powder to the 3 x 5 inch Basic White CS.
  2. Use Versamark to stamp the angel onto the CS.
  3. Sprinkle the Silver Emboss Powder over the Versamark until it sticks to it evenly.
  4. Tap the paper to remove the Emboss Powder that is not stuck to the Versamark TIP: If you see some Silver Emboss Powder stuck in a place where it should not be, you can use the tip of a fine tip paint brush to remove the powder before heating.
  5. Heat the Heat Tool for about 10 seconds, then wave the heat over the Silver Emboss Powder until it is all melted. Let it cool.

Coloring the Angel

To create the angel the same way I did, you will need the Pacific Point Watercolor Pencil. First apply an even but light layer on the dress. Then darken certain areas to make shadows. I am not great at the shadows. Just do what seems right for you. The hair is a light layer of the Daffodil Delight Watercolor Pencil. The face and hand are done in a very light layer of Calypso Coral. I did color the wings and the dove, but later wished I had left it alone. To finish the angel, use the Wink of Stella on the dress and wings.

Assembling the Card

Begin by adhering the Peaceful Place DSP pieces to the 4 x 5 1/4 inch Silver Foil as shown. Next tie a bow with the 1 1/2 inch metallic Mesh Ribbon leaving long tails. Use glue dots to adhere to the card front. Then use Stampin’ Dimensionals to adhere the angel. Wrap the tails of the bow around her. Finish by adhering the sentiment.

Complete the card by adhering the Silver Foil panel to the front of the Basic White CS card base. Take care to know which panel has the inside sentiment on it so you adhere the Silver Foil to the correct side.

Add some Rhinestone Basic Jewels to the sky. Voila! You have made a beautiful, shining angel Christmas card.

Thanks for joining me for Day 3 of the “12 Days of Christmas Card Making Challenge”. I have a great 3D card for tomorrow!

Happy crafting!

Theresa