

Hello! Well, it is almost Friday. Yay! We made it through another week! I have an extra fun card for you today!
One of the perks of being a Stampin’ Up! Demonstrator is that you are able to attend the Onstage Stampin’ Up! Convention in November of each year. This last Onstage there was a presentation by Rosemarrie Gonzalez on how to make this faux shaker card that I am going to share today.

Snowman Season is an adorable stamp set with this happy snowman. He reminds me of young children putting their faces up in the snowfall to catch snowflakes on their tongue. This is a very simple shaker card to make.

Measurements: Thick Whisper White Card Stock (CS) card base: 4 1/4 x 5 1/2 inches; Green Foil Sheet: 4 1/8 x 5 3/8 inches (I used a rectangle die to cut the center of the green foil so I can save it to use on another card); Whisper White CS: 3 7/8 x 5 1/8 inches and a Stitched Nested Label die cut (the 3rd up from the smallest): and Red Foil Sheet Stitched Nested Label die cut (4th up from the smallest). I also die cut some snowflakes from Silver Foil Sheets with the So Many Snowflakes Dies.

On the back of the Thick Whisper White CS card base, stamp the sentiment “Merry Christmas” in Shaded Spruce ink. Next stamp the sentiment “Hoping this season builds heartwarming memories” in Real Red ink. Add a few snowflakes in Smoky Slate ink. I Stamped Off some of the snowflakes.

Stamp the happy snowman in Memento Black ink. Add some snowflakes in Smoky Slate ink, some full strength and some Stamped Off.


I used the Stampin’ Blends Alcohol Markers to color the happy snowman. The colors are the Light and Dark: Smoky Slate, Pumpkin Pie, Real Red and Shaded Spruce.

Slide the happy snowman card piece into one of the Stampin’ Up! Clear Envelopes (p. 153 in the Annual Catalog, item #102619).

Add a spoon or two of the Snowflake Sequins.


Push the card piece into the lower left corner, flip over and seal the top to be snug on the right hand border.


Fold the excess envelope down and seal with Scotch Tape. Viola! A shaker card!


Using the 1/4 inch Crinkled Seam Binding, wrap it around the shaker card and tie in a bow. Tip: When no one is around to hold the tie, I use tweezers. This bow is made extra special by tying in an extra piece. It is hard to see but the bow has 2 tails on each side.


Adhere the Green Foil rectangle to the Thick Whisper White piece. Be sure you have the sentiment on the back facing the right way. Adhere the shaker card piece to the Green Foil and Thick Whisper White CS with 1/4 inch strips of the Foam Adhesive Sheets. So cute!


Use the Shaded Spruce ink to stamp the sentiment “Let It Snow” onto the Whisper White die cut Stitched Nested Label. Stamp some snowflakes around the border in Smoky Slate ink. Adhere to the Red Foil Stitched Nested Label die cut.

Adhere the Red Foil to the front of the shaker card piece. Add the Silver Foil snowflake die cuts as desired.

Viola! You have a really fun and happy snowman shaker card for Christmas!
I am so glad you stopped by to see this fun and easy Faux Shaker card technique! I was so “Wow’d” when Rosemarrie demonstrated this technique.
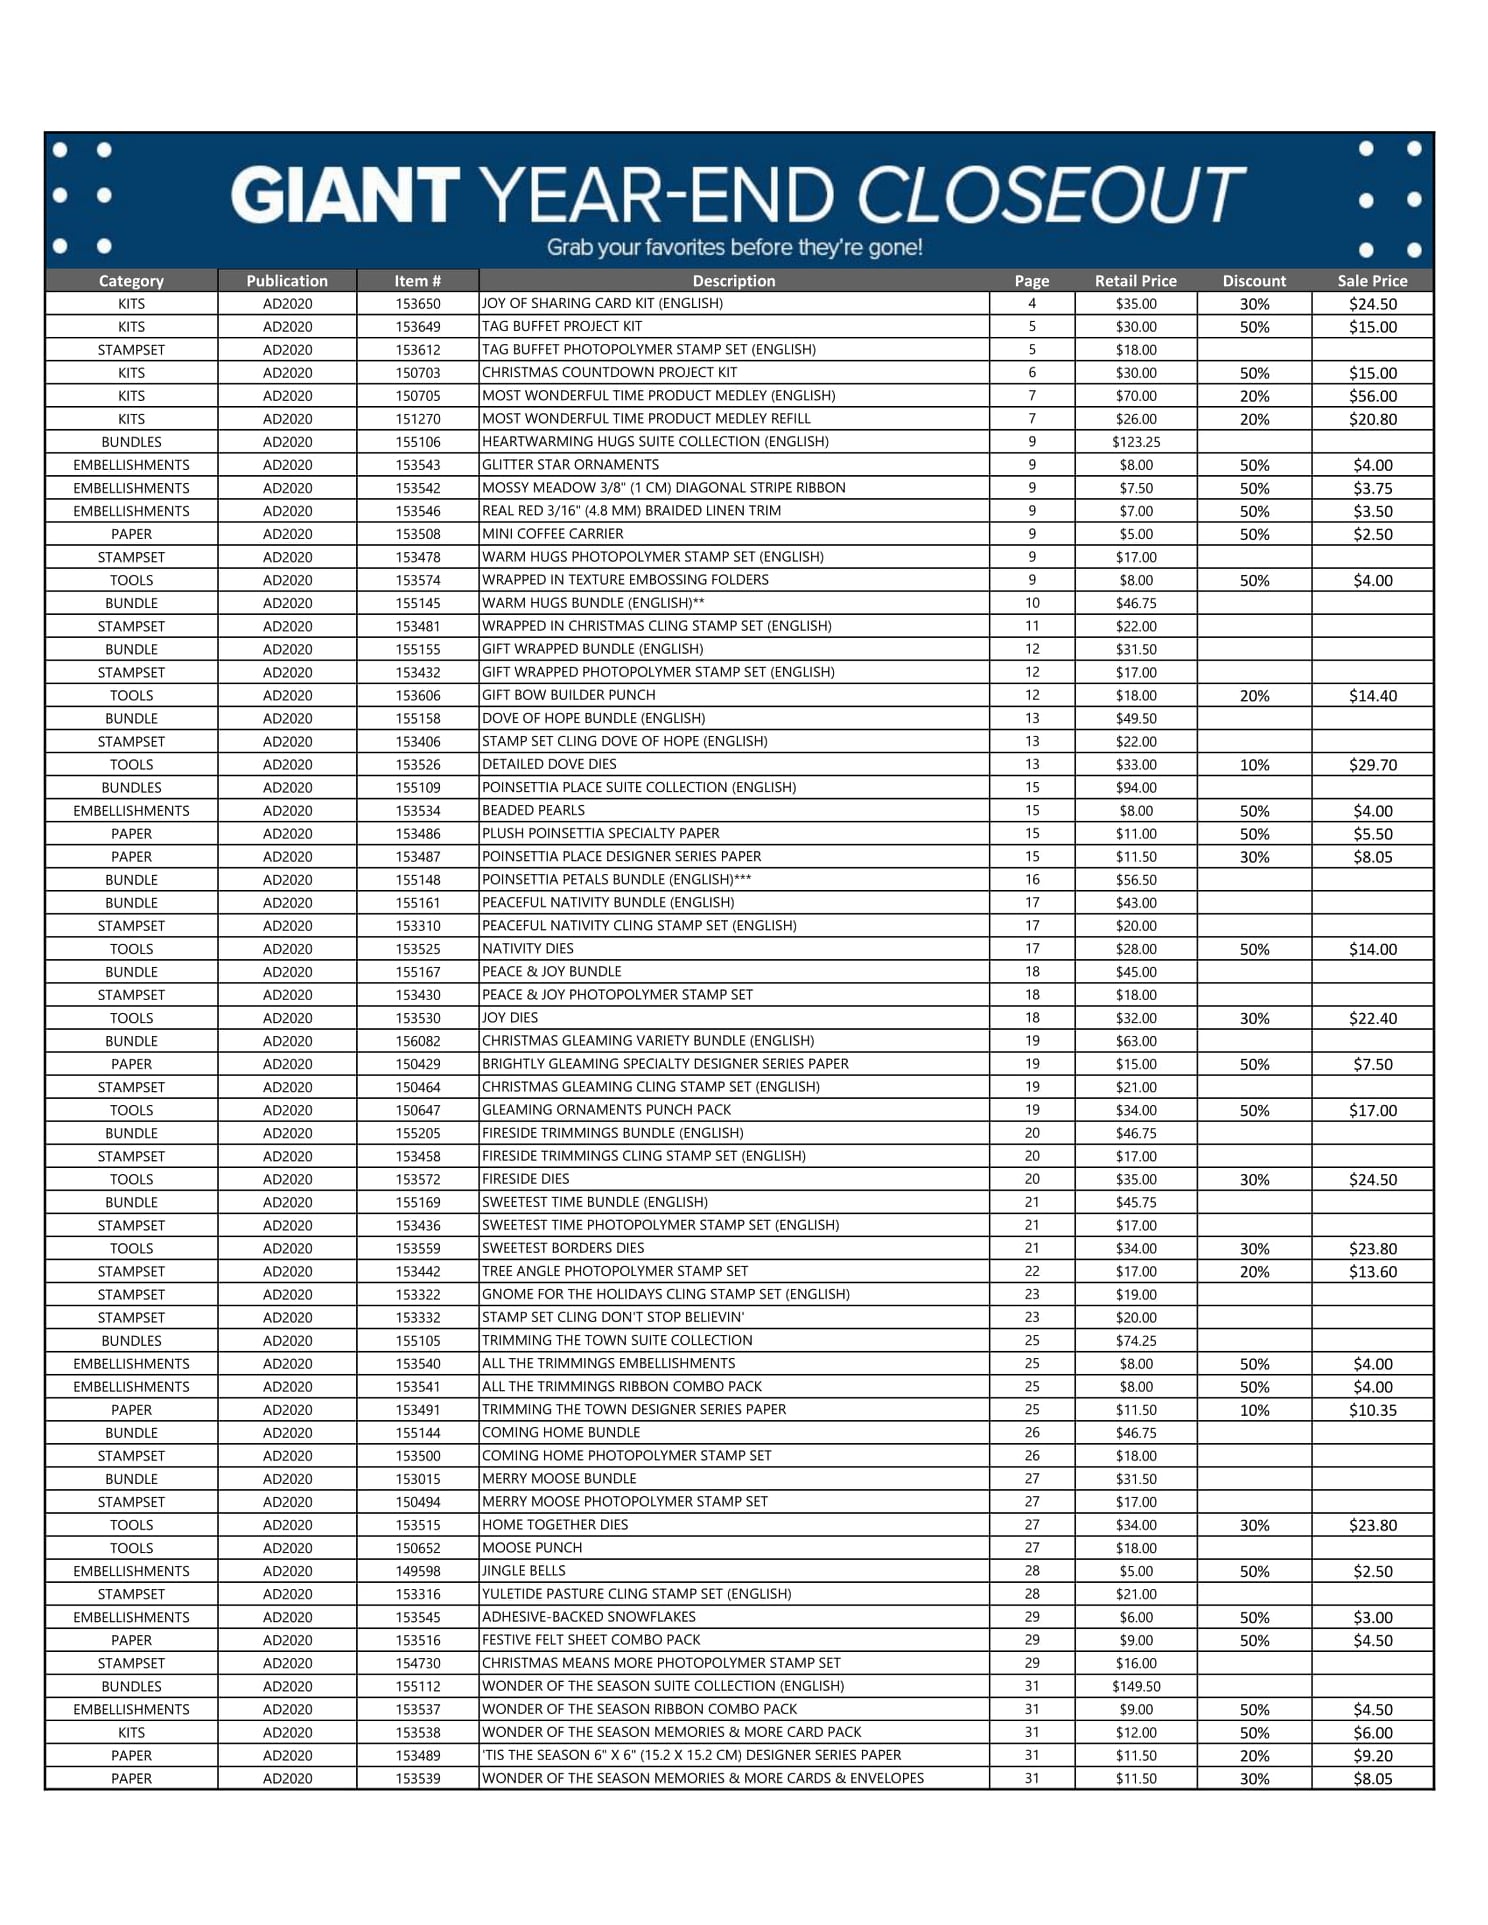
The Giant Year-End Closeout is still going on. If you haven’t had a chance to check out the discounts, please download the list below. The closeout will end on January 4, 2021 but as products run out-that is it!
To go directly to my Online Store, select any photo below:
Product List")
")


 Crinkled Seam Binding Ribbon")


I hope this happy snowman faux shaker card has brightened your day! Happy crafting!
Theresa